

Help my sanity, removing heads on 88 LB9


Thread Starter
Member

Joined: Apr 2008
Posts: 111
Likes: 2
From: hinckley, oh
Car: 1988 iroc-z (original owner)
Engine: 305
Transmission: 5-speed manual
Help my sanity, removing heads on 88 LB9
Last weekend I began my process of removing the heads on my 1988 IROC LB9/manual with power steering and AC. I thought that 8hrs (maybe 12) would be sufficient to take the heads off, and that I would begin the process of mildly porting the intake manifold/heads and then getting a valve job and upping to 1.94� intakes. The initiative for all this is leaky valve stem seals and a pretty significant head gasket oil leak.
Well plans are foiled by stripped torx heads (damned be the engineers) with seized bolts. After grinding off the passenger side front fuel rail bolt and then breaking the alternator bracket. (To get the fuel rail off, the fuel line bracket had to have its bolt removed; however, the fuel lines could not be manipulated enough with the alternator on. So I attempted to remove the alternator and the upper left bolt, which has the brace running to the intake manifold on the backside, was seized. Gentle tapping on the backside nut caused the bracket to sheer off.) Now, I�m at the point where only one last stubborn bolt on the intake has resulted in my breaking three torx bits. (Flog the engineers that decided torx are good idea.) I have used Kroil, PB blaster, CRC Freeze/Lube, hammer impact, impact guns, and nothing has helped...Even after I get that off it seems that there are two bolts on the alternator/PS pump bracket that have to be removed, and similarly on the AC bracket.
Using a mirror, one of the torx (damned be the engineers) on the alternator bracket looks like it will be a real PIA to get at, because a rib protrudes in front of it. And on the AC side it�s looks worse: does the compressor have to be removed to get at one of the two bolts holding the bracket to the heads, because one is inaccessible behind the compressor? I'll post pics later.
My frustration level is to the point that I regret starting this, but �in for a penny, in for a pound.� Besides my wife said �no,� when in my frustration I asked if I should just get rid of my IROC and buy a loaded Z06.
Back to the last intake manifold bolt, and hoping that I get to drive the car this year.
thanks,
greg


Joined: May 2013
Posts: 1,494
Likes: 99
From: CT
Car: 86 Trans Am WS6
Engine: 383 stroker
Transmission: 700r4
Axle/Gears: 9 Bolt Torsen 3.70
Re: Help my sanity, reoving heads on 88 LB9
I would also love to know the logic behind why they decided to use torx heads instead of socket cap bolts or even normal hex heads. especially on the TPI runners where they're so tucked deep down under and between the runner and manifold where it would be impossible to retrieve a stripped torx head without drilling. Everytime I take a torx head out of my car, a socket cap replaces it.
Re: Help my sanity, reoving heads on 88 LB9
When you use the right tools, and approach the project the right way, the Torx bolts have advantages to the alternatives. Unfortunately, most people don't have the right tools, but rather a no-name knock off. Worse yet, people don't take basic precautions... For example not cleaning the socket of Torx bolts so the bit will seat fully. Or not tapping the bit with a hammer for the same reason. The teeth on Torx are a bit curved, so the further from fully seated, the less grip the tool has. If the tool is fully inserted, the tool or the bolt will break before the socket strips.
Another mistake people make is trying to sneak up on the breaking torque slowly. It's almost always better to make sure the tool is properly engaged with the fastener and crack it with a firm slap from the palm of your hand, or a swift whack of a rubber mallet. The impact will frequently shock the bolt loose without the tool slipping.
All of the above aside, sometimes bolts just strip and break, and make your life hell.
Joined: May 2013
Posts: 1,494
Likes: 99
From: CT
Car: 86 Trans Am WS6
Engine: 383 stroker
Transmission: 700r4
Axle/Gears: 9 Bolt Torsen 3.70
Re: Help my sanity, reoving heads on 88 LB9
When you use the right tools, and approach the project the right way, the Torx bolts have advantages to the alternatives. Unfortunately, most people don't have the right tools, but rather a no-name knock off. Worse yet, people don't take basic precautions... For example not cleaning the socket of Torx bolts so the bit will seat fully. Or not tapping the bit with a hammer for the same reason. The teeth on Torx are a bit curved, so the further from fully seated, the less grip the tool has. If the tool is fully inserted, the tool or the bolt will break before the socket strips.
Another mistake people make is trying to sneak up on the breaking torque slowly. It's almost always better to make sure the tool is properly engaged with the fastener and crack it with a firm slap from the palm of your hand, or a swift whack of a rubber mallet. The impact will frequently shock the bolt loose without the tool slipping.
All of the above aside, sometimes bolts just strip and break, and make your life hell.
Another mistake people make is trying to sneak up on the breaking torque slowly. It's almost always better to make sure the tool is properly engaged with the fastener and crack it with a firm slap from the palm of your hand, or a swift whack of a rubber mallet. The impact will frequently shock the bolt loose without the tool slipping.
All of the above aside, sometimes bolts just strip and break, and make your life hell.
Thread Starter
Member
Joined: Apr 2008
Posts: 111
Likes: 2
From: hinckley, oh
Car: 1988 iroc-z (original owner)
Engine: 305
Transmission: 5-speed manual
Re: Help my sanity, reoving heads on 88 LB9
yes, i use craftsman bits and the bits were fully seated and when a bit was stubborn I hit it with the hammer/impact or with a 24" breaker bar+hammer. I've tried it all. It's incredible how gunked up some of the more difficult threads were. Other than the one fuel rail bolt, which i caused an initial rounding because I grabbed an SAE wrench instead of metric, these bolts are seized just due to crud and/or galvanic reaction. Keep in mind that this car has never seen a winter & salt, but it seems that some of the bolts in the manifold are in through (not blind) holes and therefore see either oil or coolant, correct?
Now any insight into whether or not those brackets and compressor have to come off?
here's a link to the manual impact tool: https://www.craftsman.com/products/c...-impact-driver.
Now any insight into whether or not those brackets and compressor have to come off?
here's a link to the manual impact tool: https://www.craftsman.com/products/c...-impact-driver.


Joined: Mar 2017
Posts: 4,255
Likes: 427
From: Portland, OR
Car: 86 Imponte Ruiner 450GT, 91 Formula
Engine: 350 Vortec, FIRST TPI, 325 RWHP
Transmission: 700R4 3000 stall.
Axle/Gears: 9 Bolt Torsen 3.70
Re: Help my sanity, reoving heads on 88 LB9
The compressor does not have to be removed from the bracket to get the bolts out of the head. At least not on mine it doesn't. I'm running the serpentine system.
I had similar issues with my eBay serpentine brackets and accessories. They came pretty nasty. Getting the alternator bolt out was seriously ugly on the bench with the bracket off the car. I ended up going pretty medieval on it with vice grips and a torch. Got it out and saved the threads but I didn't think it was going to come out and I deal with broken and stuck fasteners just about every day. That one was just about the worst I have seen that actually ended up coming out in the end. Thought for sure I was going to heli-coil it. I sheared the tip of a torx bit clean off in that bolt early on and had to just clamp some fat vice grips to it and work it out with a hammer. Spent about an hour on that one.
Rick
Trending Topics
Thread Starter
Member
Joined: Apr 2008
Posts: 111
Likes: 2
From: hinckley, oh
Car: 1988 iroc-z (original owner)
Engine: 305
Transmission: 5-speed manual
Re: Help my sanity, reoving heads on 88 LB9
Well removing the heads was time consuming to say the least. I had to grind off two of the intake manifold bolts, and the front driver’s side bolt came out of the head only after heating the head on the bench. Even after 10-minutes of the trusty bensomatic, it took an incredible amount of torque to convince that 29-year old bolt to let go with the vice grip. Also, removing the rear two exhaust manifold bolts required that I remove the heater/AC box. Not sure how anyone could access those. The AC will not be going back in this year. (This project has been “nickel and diming” me to the point that I decided that I cannot justify the expense of Dyno Don headers this year.)
I’ve been in the process of porting and polishing the heads and am ready to order the 1.94” and 1.60” valves and 1.6:1 rockers (CCA-1418-16) for my 081 castings. Concerning the valves I have a few questions.
I measured the stems and got diameter readings from 0.390” to 0.394” anywhere and all along the stem. I attribute the range to the quality and accuracy of my dial caliper; however, the readings beg the first question. While I will no doubt have to get new valve guides (there seemed to be some lateral play/slop in a couple of valves), I noticed that Summit Racing lists very similar valve stem sizes: 0.341, 0.342, and 0.344. Is that correct, there are stems that close in size? Do guides just get bored/honed out to accommodate slightly larger stems? Or is the insert route the way to go? Looking at Summit tonight, I have decided tentatively upon these two: SUM-V8000-8 and SUM-V8010-8. These are 0.341”stem x 4.911”long. As for the larger valves: when I get the valve job done, the “cylindrical” area under the valve, which I’ve blended and polished into a relatively smooth transition, will be bored out to a larger diameter, correct? Or is that something I have to specify when I talk to the machinist?
Now, the important question is: should I replace the valve springs? I’ve looked through the forums and googled and typical spring questions are for upgraded cams. I am keeping the (better) cam (0.415/0.430 lifts) that is original to my 1988 LB9 5sp manual. I placed the springs (coil + inner damper) in a line on my recently-poured epoxy table top in my wood shop. The table is darn near flat. With a rule across them, there seemed not be any difference in height. But they are 130,000miles old. If I do replace them, would the CCA-981-16 springs that are a common recommendation for the aftermarket cam be a good choice? If not, what? The MAN-22410-16?
As always, thanks in advance for the responses.
Moderator


Joined: Jul 1999
Posts: 17,273
Likes: 171
From: 51�N 114�W, 3500'
Car: 87 IROC L98
Engine: 588 Alcohol BBC
Transmission: Powerglide
Axle/Gears: Ford 9"/31 spline spool/4.86
Re: Help my sanity, reoving heads on 88 LB9
The valve springs are probably 29 years old and don't have anywhere near the OEM spring tension. Stock replacement springs will do just fine.
If you're changing the camshaft, use a spring with similar specs to the one that's recommended or just use the ones that are recommended.
If you're changing the camshaft, use a spring with similar specs to the one that's recommended or just use the ones that are recommended.
Joined: Mar 2017
Posts: 4,255
Likes: 427
From: Portland, OR
Car: 86 Imponte Ruiner 450GT, 91 Formula
Engine: 350 Vortec, FIRST TPI, 325 RWHP
Transmission: 700R4 3000 stall.
Axle/Gears: 9 Bolt Torsen 3.70
Re: Help my sanity, reoving heads on 88 LB9
The 981-16 springs should do the job I would think. With the lift increase due to the 1.6 rockers and you already having a .415/.430 cam, those should work nicely.
GD
GD
Thread Starter
Member
Joined: Apr 2008
Posts: 111
Likes: 2
From: hinckley, oh
Car: 1988 iroc-z (original owner)
Engine: 305
Transmission: 5-speed manual
Re: Help my sanity, reoving heads on 88 LB9
Now I have a question about porting, and general questions about the intake manifold.
I have already ported & polished the heads, and dropped them off yesterday at a machine shop with new 1.60" & 1.94" valves. So I have now moved on to porting the intake, which I have nearly finished with the rough material removal. I only have to match the head gasket intake side, and this is my question: how far back should I taper? To the front of the injector hole, to the backside of it, or somewhat further (how much)? I watched Darin Docterman's video and it's not clear.
General questions about the intake. What is the baffle (?) and its function on the underside of the intake?
as always, mukus grakus.
Last edited by kimnach; May 6, 2017 at 10:59 AM.
Supreme Member
Joined: Sep 2011
Posts: 2,080
Likes: 34
From: Spring Hill, Fl.
Car: 87 iroc-z
Engine: 454
Transmission: th350
Axle/Gears: 3.73
Re: Help my sanity, reoving heads on 88 LB9
when port matching the intake, i would'nt take much material from the intake. concentrate more on the head. you don't want to leave a "step".
Joined: Mar 2017
Posts: 4,255
Likes: 427
From: Portland, OR
Car: 86 Imponte Ruiner 450GT, 91 Formula
Engine: 350 Vortec, FIRST TPI, 325 RWHP
Transmission: 700R4 3000 stall.
Axle/Gears: 9 Bolt Torsen 3.70
Re: Help my sanity, reoving heads on 88 LB9
I am no expert but wouldn't you want to port them both to the gasket since that is an accurate die-cut piece with very little variation due to production.... unlike castings?
GD
Thread Starter
Member
Joined: Apr 2008
Posts: 111
Likes: 2
From: hinckley, oh
Car: 1988 iroc-z (original owner)
Engine: 305
Transmission: 5-speed manual
Re: Help my sanity, reoving heads on 88 LB9
When it rains it shines. After my earlier post today, I went to do some polishing of the intake passages, and the needle bearing broke on the Dotco extended grinder. Took it apart and a couple were bent! Now I have to find a replacement bearing for this classic grinder (10L1101B) which my late father probably used since the early 70s as a die maker at MTD.
(I have a small fortune in tools, reference blocks, etc. that I inherited from him. I don't know what they're worth, but I know that the $700 offered by someone, just after my dad passed in '03, was a significant lowball.)
Time to riffle through the tools to see if there's another grinder, or if I have to head off to HF to get an asian POS.
Joined: Mar 2017
Posts: 4,255
Likes: 427
From: Portland, OR
Car: 86 Imponte Ruiner 450GT, 91 Formula
Engine: 350 Vortec, FIRST TPI, 325 RWHP
Transmission: 700R4 3000 stall.
Axle/Gears: 9 Bolt Torsen 3.70
Re: Help my sanity, reoving heads on 88 LB9
Bearings are usually Lego parts. Call an industrial bearing supply and give them the numbers or the dimensions.
GD
GD
Supreme Member
Joined: Sep 2011
Posts: 2,080
Likes: 34
From: Spring Hill, Fl.
Car: 87 iroc-z
Engine: 454
Transmission: th350
Axle/Gears: 3.73
Re: Help my sanity, removing heads on 88 LB9
watch the beginning of this video with the guy using a Brzenzinski plate. notice how it has 2 slightly different sizes? one is for the intake side, and one for the head side. it's designed so you dont create a "step" on the head. it also helps prevent reversion, kind of like the purpose of d-port heads.
http://theamcpages.com/engine-design...s/image020.jpg
http://theamcpages.com/engine-design...s/image020.jpg
Last edited by redneckjoe; May 6, 2017 at 03:44 PM.
Thread Starter
Member
Joined: Apr 2008
Posts: 111
Likes: 2
From: hinckley, oh
Car: 1988 iroc-z (original owner)
Engine: 305
Transmission: 5-speed manual
Re: Help my sanity, removing heads on 88 LB9
great video--i've seen a number of his but not that one. (is it the camera angle or are the inner plate holes off center from the manifold holes? has to be parallax.)
i finished porting the area around the injectors. happy enough with the outcome.
tonight i was going to drop the pan and remove the timing cover, but then i figured before i get into that project that i had better take a look at the block. it's been covered since i took off the heads. wow, i forgot just how badly the original metallic gaskets were stuck to the block. i tried a plastic scraper, that just will not work. also, not how a few of the water passages are partially covered by the factory gaskets!
at this point i will get a super scraper and probably hit the material with heat to soften it up. ; however, before i get all sorts of material into the engine while scraping, i'm looking at a way to cap it off. guinness always provides an answer.
that wont be 'till next week.....story of our lives. will i make my june 1 deadline to get the car out?
Thread Starter
Member
Joined: Apr 2008
Posts: 111
Likes: 2
From: hinckley, oh
Car: 1988 iroc-z (original owner)
Engine: 305
Transmission: 5-speed manual
Re: Help my sanity, removing heads on 88 LB9
Thankfully the my freshman son's regatta season is over, much of the yard work is done, etc. Now I may finally be able to steal a bit more IROC time--maybe. I had started to scrape the block almost three weeks ago but, in spite of plugging the oil and water passages, some debris got down in the engine, so I have now decided that the only course of action is to pull the engine and tear it down. (A cotton ball slipped down one of the oil passages as I all too slowly grabbed for a pair of needle nose pliers...) June 1 is officially off the table.
Question: does the removal of the fluid line just below the shifter require a line disconnect tool? I am assuming that is the case since it does not have a hex head to loosen.
thanks.
Question: does the removal of the fluid line just below the shifter require a line disconnect tool? I am assuming that is the case since it does not have a hex head to loosen.
thanks.


Joined: Sep 2005
Posts: 654
Likes: 10
From: Windsor, Ontario
Car: 1987 Trans Am
Re: Help my sanity, removing heads on 88 LB9
watch the beginning of this video with the guy using a Brzenzinski plate. notice how it has 2 slightly different sizes? one is for the intake side, and one for the head side. it's designed so you dont create a "step" on the head. it also helps prevent reversion, kind of like the purpose of d-port heads.
https://www.youtube.com/watch?v=SO9mWASjt1U
http://theamcpages.com/engine-design...s/image020.jpg
https://www.youtube.com/watch?v=SO9mWASjt1U
http://theamcpages.com/engine-design...s/image020.jpg
Joined: Aug 2009
Posts: 1,972
Likes: 127
From: Los Angeles
Car: 1989 IROC Convertible
Engine: 350 TPI L98
Transmission: WC T5
Axle/Gears: 3.42
Re: Help my sanity, removing heads on 88 LB9
Drop the pan. Looks easy from your setup there. Then you can get the crap outta there. A cotton ball could become a problem. You shouldn't need to yank the motor. And while you are in there might as well replace the oil pump.
Last edited by Tootie Pang; May 26, 2017 at 10:33 AM.
Thread Starter
Member
Joined: Apr 2008
Posts: 111
Likes: 2
From: hinckley, oh
Car: 1988 iroc-z (original owner)
Engine: 305
Transmission: 5-speed manual
Re: Help my sanity, removing heads on 88 LB9
Wow, this job is taking so long....will i drive it this season? Today I have "me" time to work on the engine.
I have a question about checking valve clearances. I converted a couple of hydraulic lifters to solid and, because the IROC uses hydraulic lifters and therefore it doesn't have a spec for solid lifter adjustment, I used a 0.020" feeler to set the lash. (This is from a Summit Racing video.) I placed playdough about 1/8" proud of the flat piston surface and rotated the engine a couple of revolutions. To my amazement there was barely an indentation on the top of the valve relief arc area. I thought that with the 1.6:1 roller rockers the valve would come closer to the surface of the piston surface or into the valve relief. What am I missing? I have now set up to repeat the test.
Again this is a 1988 LB9. I had the block machine 0.020 over, the valves are now 1.94" & 1.6", and am using the original lifter rods with the Comp Cams 1.6 roller rockers.
As always, thanks in advance.
Last edited by kimnach; Jul 16, 2017 at 10:20 AM.


Joined: Sep 2005
Posts: 28,004
Likes: 2,486
Car: Yes
Engine: Usually
Transmission: Sometimes
Axle/Gears: Behind me somewhere
Re: Help my sanity, removing heads on 88 LB9
There is almost never a problem in a SBC with piston/valve clearance. Certainly not with a stock cam, or really even, anything you could realistically drive on the street. Not something you need to be bothered with testing.
In any case, the point at which full valve lift occurs, both valves, is when the piston is about halfway down. The valves are either on or near the seat when the pistons are at TDC.
In any case, the point at which full valve lift occurs, both valves, is when the piston is about halfway down. The valves are either on or near the seat when the pistons are at TDC.
Thread Starter
Member
Joined: Apr 2008
Posts: 111
Likes: 2
From: hinckley, oh
Car: 1988 iroc-z (original owner)
Engine: 305
Transmission: 5-speed manual
Re: Help my sanity, removing heads on 88 LB9
good to hear--i dhecked because i was worried that the larger valves might cause issues.
it just seemed odd that through a full revolution of the crank, the valves barely come close to the top of the flat-top piston--let alone protrude into the valve relief. (this is from the observation that the playdough is 1/8" over the surface of the piston and barely made a mark at the apex of the valve relief area.)
thanks.
Joined: Sep 2005
Posts: 28,004
Likes: 2,486
Car: Yes
Engine: Usually
Transmission: Sometimes
Axle/Gears: Behind me somewhere
Re: Help my sanity, removing heads on 88 LB9
With a stock cam in a SBC, the pistons won't even hit the valves if the timing chain breaks. There's THAT MUCH clearance.
The thing that the larger valves come closest to in a 305, is the block deck.
If you put a set of heads so equipped onto a 305 block without crank & pistons and look at them from underneath, you'd see what I mean.
In fact enlarging the valves in a 305 often leads to a decrease in performance for this reason: the valve ends up so close to the bore wall that no flow can occur there. A net reduction in total flow through the valve and into the cyl is the result, even though the heads might flow just fine on a flow bench unless a 3.736" pipe is used.
I hope for your sake that this isn't the case in yours, but I guess there's only one way to find out.
There's also a problem with the shape of the chamber wall in 305 heads such as 081, of a very similar nature. Here's a photo that shows it.
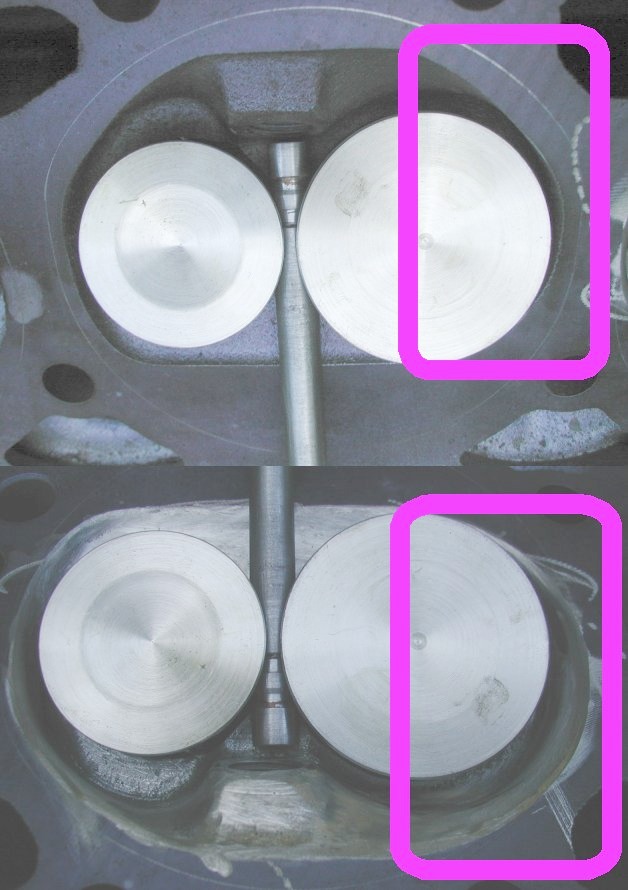
The mark scribed around the chamber is a 350 head gasket. A 305 one would be about 1/8" smaller all the way around (radius) since the bore is about �" smaller diameter.
Observe how close the 1.94" valve comes to the "vertical" wall of the chamber on that side. Part of prepping those heads for the larger valves involves laying back the chamber over there to gain some clearance between the margin of the valve and the casting. Of course this really only does very much good when setting them up for going onto a 350; the 305 bore would still shroud the valve. Although I suppose it might be possible to cut a relief into the block deck like the factory did in 396 blocks, but I've never tried that.
The thing that the larger valves come closest to in a 305, is the block deck.
If you put a set of heads so equipped onto a 305 block without crank & pistons and look at them from underneath, you'd see what I mean.
In fact enlarging the valves in a 305 often leads to a decrease in performance for this reason: the valve ends up so close to the bore wall that no flow can occur there. A net reduction in total flow through the valve and into the cyl is the result, even though the heads might flow just fine on a flow bench unless a 3.736" pipe is used.
I hope for your sake that this isn't the case in yours, but I guess there's only one way to find out.
There's also a problem with the shape of the chamber wall in 305 heads such as 081, of a very similar nature. Here's a photo that shows it.
The mark scribed around the chamber is a 350 head gasket. A 305 one would be about 1/8" smaller all the way around (radius) since the bore is about �" smaller diameter.
Observe how close the 1.94" valve comes to the "vertical" wall of the chamber on that side. Part of prepping those heads for the larger valves involves laying back the chamber over there to gain some clearance between the margin of the valve and the casting. Of course this really only does very much good when setting them up for going onto a 350; the 305 bore would still shroud the valve. Although I suppose it might be possible to cut a relief into the block deck like the factory did in 396 blocks, but I've never tried that.
Last edited by sofakingdom; Jul 16, 2017 at 01:20 PM.
Thread Starter
Member
Joined: Apr 2008
Posts: 111
Likes: 2
From: hinckley, oh
Car: 1988 iroc-z (original owner)
Engine: 305
Transmission: 5-speed manual
Re: Help my sanity, removing heads on 88 LB9
An observation and question about plugs.
Everyone mentions the plug on the front of the block adjacent to the mechanical fuel pump as a culprit for oil leaks--the upper one on my '88 305 is a blind hole.
There is a 3/8-24 hole in the block just above the timing cover. I shone a light into it and could not see any light in the oil or water passages. I then placed the flashlight on the water pump openings and the oil passages behind the timing cover area and could not see any light in the 3/8 hole. I will plug it, but am curious if that is a coolant or oil plug? I've googled it and have not seen mention made of it.
Joined: Aug 2008
Posts: 410
Likes: 38
From: Lansing, Mi
Car: One owner '88 IROC 50k
Engine: L98 with bolt ons.
Transmission: T56
Axle/Gears: 3:42 again
Re: Help my sanity, removing heads on 88 LB9
An observation and question about plugs.
Everyone mentions the plug on the front of the block adjacent to the mechanical fuel pump as a culprit for oil leaks--the upper one on my '88 305 is a blind hole.
There is a 3/8-24 hole in the block just above the timing cover. I shone a light into it and could not see any light in the oil or water passages. I then placed the flashlight on the water pump openings and the oil passages behind the timing cover area and could not see any light in the 3/8 hole. I will plug it, but am curious if that is a coolant or oil plug? I've googled it and have not seen mention made of it.
Everyone mentions the plug on the front of the block adjacent to the mechanical fuel pump as a culprit for oil leaks--the upper one on my '88 305 is a blind hole.
There is a 3/8-24 hole in the block just above the timing cover. I shone a light into it and could not see any light in the oil or water passages. I then placed the flashlight on the water pump openings and the oil passages behind the timing cover area and could not see any light in the 3/8 hole. I will plug it, but am curious if that is a coolant or oil plug? I've googled it and have not seen mention made of it.

Member
Joined: Aug 2010
Posts: 478
Likes: 4
From: Las Vegas
Car: Fourth Gen '94 camaro
Engine: 350 Gen II
Transmission: A4
Axle/Gears: 3.23
Re: Help my sanity, removing heads on 88 LB9
Wow, this job is taking so long....will i drive it this season? Today I have "me" time to work on the engine.
I have a question about checking valve clearances. I converted a couple of hydraulic lifters to solid and, because the IROC uses hydraulic lifters and therefore it doesn't have a spec for solid lifter adjustment, I used a 0.020" feeler to set the lash. (This is from a Summit Racing video.) I placed playdough about 1/8" proud of the flat piston surface and rotated the engine a couple of revolutions. To my amazement there was barely an indentation on the top of the valve relief arc area. I thought that with the 1.6:1 roller rockers the valve would come closer to the surface of the piston surface or into the valve relief. What am I missing? I have now set up to repeat the test.
Again this is a 1988 LB9. I had the block machine 0.020 over, the valves are now 1.94" & 1.6", and am using the original lifter rods with the Comp Cams 1.6 roller rockers.
As always, thanks in advance.
I have a question about checking valve clearances. I converted a couple of hydraulic lifters to solid and, because the IROC uses hydraulic lifters and therefore it doesn't have a spec for solid lifter adjustment, I used a 0.020" feeler to set the lash. (This is from a Summit Racing video.) I placed playdough about 1/8" proud of the flat piston surface and rotated the engine a couple of revolutions. To my amazement there was barely an indentation on the top of the valve relief arc area. I thought that with the 1.6:1 roller rockers the valve would come closer to the surface of the piston surface or into the valve relief. What am I missing? I have now set up to repeat the test.
Again this is a 1988 LB9. I had the block machine 0.020 over, the valves are now 1.94" & 1.6", and am using the original lifter rods with the Comp Cams 1.6 roller rockers.
As always, thanks in advance.
Anyways regarding your p-rods to check for correct length you can use a cheap p-rod checking tool. But you also need to elongated the p-rod slots in the head for 1.6 rockers - unless you have opened the slots up and are using self-aligning rockers or guide plates. There is tool called the "Lewis" tool that just acts as a guide for a large drill bit - but you if your careful enough you could grind them to size your self.
BTW haven't heard of many 0.020" oversized pistons. Usually 0.010", 0.030", 0.060" and sometimes 0.080". Well regardless now is the time to measure your above piston volume with liquid so you can nail your compression ratio. Measuring this and your head chamber volumes with liquid well make choosing a cam much, much easier.
Good luck and hope this helps.

Thread Starter
Member
Joined: Apr 2008
Posts: 111
Likes: 2
From: hinckley, oh
Car: 1988 iroc-z (original owner)
Engine: 305
Transmission: 5-speed manual
Re: Help my sanity, removing heads on 88 LB9
thanks for the input.....the pistons are Kieth Black 0.020-over flat tops--unlike the original mildly-dished pistons. i hadn't elongated the openings: the rods are original length and the rockers are self-aligning 1.6:1 rollers. after all of the porting and polishing of the chambers and the intake manifold, i forgot to measure the volume. (wow, i thought the car would be out by june 1....looks like sept 1, if i'm lucky. waiting for the dyno don headers, and my younger one's crew season starts in a couple of weeks. life.)
Thread Starter
Member
Joined: Apr 2008
Posts: 111
Likes: 2
From: hinckley, oh
Car: 1988 iroc-z (original owner)
Engine: 305
Transmission: 5-speed manual
Re: Help my sanity, removing heads on 88 LB9
After going on vacation in Tennessee (Dale Hollow Lake) the week of 25 July, I have gotten a bit more done on the car. I installed the UMI adjustable torque arm and did a bit more work on the engine. I am now waiting for the Dyno Don headers (shipped 9 August) and will be ordering a few more items (new distributor, exhaust clamps, etc.) I also tried, in vain, to remove the pilot bushing with the slide hammer: I just received a new pilot bearing removal tool. (Grease wont work now because the slide tool mangled the bushing.)
I now have a few simple questions due, in part, to the fact that this whole process began in March and I "had to" remove the engine in June. The pictures I took do not detail everything because I originally intended to have a valve job done only and thought the process would be quick and that I'd remeber everything.
1) there is a small threaded hole on the intake manifold next to the #4 injector. I don't recall removing anything from it and do not have anything in my organization baggies. What, if anything goes there?
2) this will probably be answered when I install the engine and the picture I have during the removal process shows thes two bolt holes as empty: What mounts to the two holes on the front of the intake manifold above the thermo-switch?
As always, thanks in advance.
Thread Starter
Member
Joined: Apr 2008
Posts: 111
Likes: 2
From: hinckley, oh
Car: 1988 iroc-z (original owner)
Engine: 305
Transmission: 5-speed manual
Re: Help my sanity, removing heads on 88 LB9
Ah, September 17 and here I am with a question.
Why is my crank pulley set back by 3" from the water pump pulley? I don't see a spacer of any ind (nor do I remember one nor find one mentioned in the shop manual).
The solution is probably simple, but it doesn't jump out at me.
Never mind, put the pulley on backwards
Why is my crank pulley set back by 3" from the water pump pulley? I don't see a spacer of any ind (nor do I remember one nor find one mentioned in the shop manual).
The solution is probably simple, but it doesn't jump out at me.
Never mind, put the pulley on backwards
Last edited by kimnach; Sep 17, 2017 at 01:08 PM.
Thread Starter
Member
Joined: Apr 2008
Posts: 111
Likes: 2
From: hinckley, oh
Car: 1988 iroc-z (original owner)
Engine: 305
Transmission: 5-speed manual
Re: Help my sanity, removing heads on 88 LB9
Joined: Feb 2017
Posts: 4,185
Likes: 576
From: Meriden, CT 06451
Car: 84 TA orig. 305 LG4 "H" E4ME
Engine: 334 SBC - stroked 305 M4ME Q-Jet
Transmission: upgraded 700R4 3200 stall
Axle/Gears: 10bolt 4.10 Posi w Lakewood TA Bars
Re: Help my sanity, removing heads on 88 LB9
With a stock cam in a SBC, the pistons won't even hit the valves if the timing chain breaks. There's THAT MUCH clearance.
The thing that the larger valves come closest to in a 305, is the block deck.
If you put a set of heads so equipped onto a 305 block without crank & pistons and look at them from underneath, you'd see what I mean.
In fact enlarging the valves in a 305 often leads to a decrease in performance for this reason: the valve ends up so close to the bore wall that no flow can occur there. A net reduction in total flow through the valve and into the cyl is the result, even though the heads might flow just fine on a flow bench unless a 3.736" pipe is used.
I hope for your sake that this isn't the case in yours, but I guess there's only one way to find out.
There's also a problem with the shape of the chamber wall in 305 heads such as 081, of a very similar nature. Here's a photo that shows it.
The mark scribed around the chamber is a 350 head gasket. A 305 one would be about 1/8" smaller all the way around (radius) since the bore is about �" smaller diameter.
Observe how close the 1.94" valve comes to the "vertical" wall of the chamber on that side. Part of prepping those heads for the larger valves involves laying back the chamber over there to gain some clearance between the margin of the valve and the casting. Of course this really only does very much good when setting them up for going onto a 350; the 305 bore would still shroud the valve. Although I suppose it might be possible to cut a relief into the block deck like the factory did in 396 blocks, but I've never tried that.
Joined: Feb 2017
Posts: 4,185
Likes: 576
From: Meriden, CT 06451
Car: 84 TA orig. 305 LG4 "H" E4ME
Engine: 334 SBC - stroked 305 M4ME Q-Jet
Transmission: upgraded 700R4 3200 stall
Axle/Gears: 10bolt 4.10 Posi w Lakewood TA Bars
Re: Help my sanity, removing heads on 88 LB9
Here are the pictures of how far the valves must be opened to touch the cylinder wall. In my case, it was something like .800" without a head gasket.
Joined: Sep 2005
Posts: 28,004
Likes: 2,486
Car: Yes
Engine: Usually
Transmission: Sometimes
Axle/Gears: Behind me somewhere
Re: Help my sanity, removing heads on 88 LB9
The problem is how close the edge of the valves comes to the bore.
You can clearly see in your pics, there is NO space between the valve and the bore; therefore no flow can occur there. For this reason it is actually possible to DECREASE the overall flow in a smallbore motor, after final assembly, by putting larger valves in the heads.
It would show up on a flow bench if a 3.75" tube was used instead of 4" or 4.125".
Joined: Feb 2017
Posts: 4,185
Likes: 576
From: Meriden, CT 06451
Car: 84 TA orig. 305 LG4 "H" E4ME
Engine: 334 SBC - stroked 305 M4ME Q-Jet
Transmission: upgraded 700R4 3200 stall
Axle/Gears: 10bolt 4.10 Posi w Lakewood TA Bars
Re: Help my sanity, removing heads on 88 LB9
I agree. I posted the pics to back up what you wrote Sofa. You know what they say, "A picture is worth 1000 words." The bore notches I made should help - certainly can't hurt. I never knew these heads had 2.02/1.6 valves in them until 15 years later when I removed them. I had already ordered new 1.94/1.5 valves. These heads are not what I ordered when I originally built the engine. I ended up getting heads destined for a 305 class racer.
Joined: Sep 2005
Posts: 28,004
Likes: 2,486
Car: Yes
Engine: Usually
Transmission: Sometimes
Axle/Gears: Behind me somewhere
Re: Help my sanity, removing heads on 88 LB9
The photo does show the issue, definitely. That's exactly what I was talking about. Thanks for the example: I don't have one readily available to me. Thanks for the confirmation.
The 396 blocks that are relieved, might have extra metal underneath that part of the deck... there's a YUUUUUUJJJJJJE notch lopped out of the spot in question. Not sure if they're all like that, but several that I've dealt with over the years had that feature. Also not sure if there's enough meat under there in a small block, to carve out enough to make it REALLY worthwhile, since it would take most of �" to get rid of the problem.
The 396 blocks that are relieved, might have extra metal underneath that part of the deck... there's a YUUUUUUJJJJJJE notch lopped out of the spot in question. Not sure if they're all like that, but several that I've dealt with over the years had that feature. Also not sure if there's enough meat under there in a small block, to carve out enough to make it REALLY worthwhile, since it would take most of �" to get rid of the problem.
Joined: Feb 2017
Posts: 4,185
Likes: 576
From: Meriden, CT 06451
Car: 84 TA orig. 305 LG4 "H" E4ME
Engine: 334 SBC - stroked 305 M4ME Q-Jet
Transmission: upgraded 700R4 3200 stall
Axle/Gears: 10bolt 4.10 Posi w Lakewood TA Bars
Re: Help my sanity, removing heads on 88 LB9
My bore notches went to the edge of the head gasket I used and I left a .050" safety margin above the top piston ring.
Thread Starter
Member
Joined: Apr 2008
Posts: 111
Likes: 2
From: hinckley, oh
Car: 1988 iroc-z (original owner)
Engine: 305
Transmission: 5-speed manual
Re: Help my sanity, removing heads on 88 LB9
Well, just completed the probably most frustrating portion of the build. Maybe.
Getting the power steering pulley was a pain mostly because the installation screw, the jack screw, and the jack nut are all RH threads. The moment there was any friction between the thrust washer and the pulley (yes even the bearing didn't minimize the friction), the pulley began to rotate clockwise and thereby loosened the installation screw from the pulley shaft. After numerous attempts last night--torquing down the installation screw in the shaft before each attempt--the screw always came loose and the pulley did not even begin to press on.
I then tried to bake the pulley at 400F for 20 minutes, thinking it would slide on. Not only did it not, my wife woke up from a deep sleep and was less than happy about the stench.
When I got home from work today, i had my 16-year old son hold the pulley to keep it from spinning, and got the pulley on about 2/3 of the way. He could not hold it any more--then i tried and it spun. (Yes, he's probably stronger at this point than my 56-year old body;-( ) Talk about an inordinate amount of toque required--those youtube videos make it look to easy--it's not.
So I ran out to sears, got a set of band wrenches, set it up on the pulley, and finished the job.
Next up is getting the clutch installed, putting the tranny on, tossing it (wishful thinking) all in the engine bay, and hooking everything back up.
Joined: Feb 2017
Posts: 4,185
Likes: 576
From: Meriden, CT 06451
Car: 84 TA orig. 305 LG4 "H" E4ME
Engine: 334 SBC - stroked 305 M4ME Q-Jet
Transmission: upgraded 700R4 3200 stall
Axle/Gears: 10bolt 4.10 Posi w Lakewood TA Bars
Re: Help my sanity, removing heads on 88 LB9
A v-belt and a pair of vise grips would have worked. Glad you got it on.
Thread Starter
Member
Joined: Apr 2008
Posts: 111
Likes: 2
From: hinckley, oh
Car: 1988 iroc-z (original owner)
Engine: 305
Transmission: 5-speed manual
Re: Help my sanity, removing heads on 88 LB9
yep, also tried the belt--though not with vice grips since i didn't want to risk tearing the new one.
this morning I have been looking through various parts on the bench and at photos of the tear down, and I have no idea where this retainer belongs.
also test fit the original dip stick.
once I discover where the aforementioned harness retainer belongs (if on the block), I will mount the tranny.
thanks
Joined: Sep 2005
Posts: 28,004
Likes: 2,486
Car: Yes
Engine: Usually
Transmission: Sometimes
Axle/Gears: Behind me somewhere
Re: Help my sanity, removing heads on 88 LB9
That retainer, if that's the right screw for it, doesn't go on the block. That's a sheet metal screw.
Probably for trans fluid cooler lines or something more along those lines.
Probably for trans fluid cooler lines or something more along those lines.
Thread Starter
Member
Joined: Apr 2008
Posts: 111
Likes: 2
From: hinckley, oh
Car: 1988 iroc-z (original owner)
Engine: 305
Transmission: 5-speed manual
Re: Help my sanity, removing heads on 88 LB9
Yes, i found where that retainer goes: the flat area just to the inside of the passenger side wheel well. Hhen i shone a light on it, i could make out a vague impression.
Now, the exercise in frustration--probably due to a new clutch & pressure plate. it is all aligned--the tool slides in and out freely, and the new pilot bearing did fit the stem of the shaft. Try as a might, i could not get the bell housing (with 5-speed tranny connected) any closer than about 1/8" from the alignment dowels.
After much frustration, I did put a bit of bearing grease on the shaft's end this latest attempt, and found that it did leave indicator lines that it had fully seated in the pilot bearing. This is a bit different than the general questions that i had seen and the recommendation that the bolts not be used to pull in the bell housing for fear of damaging the pilot bearing/bushing or shaft if things are not aligned. If the shaft is fully seated and there is a gap between the bell and the dowel, then is it safe to pull it all in with the bolts? (I assume yes contrary to all the other posts I've seen that do not mention that the shaft seated in the pilot, and I assume that the fingers of the new pressure plate are what are keeping the bell from reaching the dowels.)
Joined: Feb 2017
Posts: 4,185
Likes: 576
From: Meriden, CT 06451
Car: 84 TA orig. 305 LG4 "H" E4ME
Engine: 334 SBC - stroked 305 M4ME Q-Jet
Transmission: upgraded 700R4 3200 stall
Axle/Gears: 10bolt 4.10 Posi w Lakewood TA Bars
Re: Help my sanity, removing heads on 88 LB9
So you are saying that the shaft is bottoming out in the pilot bearing, and you still have 1/8" to go. That sounds like your pilot bearing needs to be driven deeper into the crankshaft. Can you drive it in 3/16" deeper? Binding is never a good thing.
Thread Starter
Member
Joined: Apr 2008
Posts: 111
Likes: 2
From: hinckley, oh
Car: 1988 iroc-z (original owner)
Engine: 305
Transmission: 5-speed manual
Re: Help my sanity, removing heads on 88 LB9
sorry for the late follow-up, I got sick and was down and out for over a week, and had little opportunity to work on the car.
as for the 1/8 gap: that was between bell housing and dowel. the bell was more like 5/8" away from block. after being frustrated and measuring the 5/8" gap, i realized that that is the length of the shaft that goes into the pilot. i measured the plastic alignment tool and its spline out diameter was 0.020" smaller than that of the shaft splines. so it seems that the tool slipped in and out ok, but the actual shaft was hitting the pilot (of center by up to 0.010"). purchased a new tool from summit, aligned the clutch, and in the tranny slipped.
i still cannot explain how the shaft showed those streaks of grease consistent with the pilot bearing!
so I managed to get the engine in with but a few hick-ups. first, a fully dressed engine wont clear (at least easily with a 2-ton lift) the front radiator cross member. i had to remove the pulley from the harmonic balancer. no biggie.
no, there is an issue with the passenger side mount. it is barely seated on the bars that protruded from the rubber. the driver's side is more fully seated. is this an issue? the bolt that runs through the rubber is actually carrying the load, right? oh, and what is the torque spec for that bolt/nut pair? the shop manual just state "torque to spec" and i cannot find anything elsewhere in the manual.
now on to the UMI torque arm. I loosely installed it this summer while the engine & tranny were out. but now with the tranny there is barely any clearance between the torque arm pivot arm and the tranny. as a matter of fact, while initially lifting the back end of the tranny with a jack, i had to physically push the two apart else the tranny would catch the pivot arm bolt and push the entire tranny mount/torque-arm upward. pics included. should i have put the tranny mount bolt on the passenger side slot of the UMI tranny bracket? but then the tranny+ drive shaft wouldn't, i assume, line up as nicely with the differential input. but that's one of the reasons for u-joints.
as always, mukus grakus in advance.
Joined: Sep 2005
Posts: 28,004
Likes: 2,486
Car: Yes
Engine: Usually
Transmission: Sometimes
Axle/Gears: Behind me somewhere
Re: Help my sanity, removing heads on 88 LB9
it is barely seated on the bars that protruded from the rubber
the bolt that runs through the rubber is actually carrying the load, right?
what is the torque spec for that bolt/nut pair?
For the torque arm situation I'd suggest contacting UMI directly and see what they have to say.
Joined: Feb 2017
Posts: 4,185
Likes: 576
From: Meriden, CT 06451
Car: 84 TA orig. 305 LG4 "H" E4ME
Engine: 334 SBC - stroked 305 M4ME Q-Jet
Transmission: upgraded 700R4 3200 stall
Axle/Gears: 10bolt 4.10 Posi w Lakewood TA Bars
Re: Help my sanity, removing heads on 88 LB9
Glad you got it figured out.
Thread Starter
Member
Joined: Apr 2008
Posts: 111
Likes: 2
From: hinckley, oh
Car: 1988 iroc-z (original owner)
Engine: 305
Transmission: 5-speed manual
Re: Help my sanity, removing heads on 88 LB9
Got the headers on, but need to get a little extra length hose or coupler to mate the AIR to the passenger side AIR tubes on the header.
Well, I can see that my desire to learn to weld is something that will be done over the course of this winter. So I will be buying a multi-process welder to install the exhaust system. The outer sub-frame connectors are up against the Dyno Don connecting pipe. Time to slightly modify and add hangers. It will not make it out on the road this yea
Now, because I removed the ac, heater core, the vacuum controller for the heater, and am doing the "coolant bypass" on the plenum (just leave two coolant ports open) how do I route the coolant return? Coming out of the intake manifold on the front of it there are really only two options:
1) a hard right (toward passenger side) and then bend forward to the small return input at the top of the radiator.
2) come forward of the belt tensioner, turn right, and then turn forward into the return.
With option 1 there isn't a lot of room behind the ac-bracket, and option 2 seems prone to possibly hitting the belt without some sort of support. What do others do?
Or did that intake output port route somewhere that I just don't remember--perhaps up into the plenum on the front?