

HELP unexplainable oil leak


Thread Starter
Member
Joined: Dec 2002
Posts: 244
Likes: 0
From: Chicago, IL
Car: 1992 Camaro RS
Engine: 350 TPI
Transmission: T5- manual five speed
HELP unexplainable oil leak
I havea 350tpi with a oil leak at the rear of the intake mani. It is definetly there because i put engine dye to make sure. I have redone the intake three times and the last time i actually put a good used intake on. still leaks out of the same place. PCV and breather are all working fine, good vacuum although a little low as i have to adjust the valves. There is no excessive crankcase pressure. the engine has only 20,000 miles on it since the rebuild. oil pressure is good. it is not the distributor or the aftermarket guage i have hooked up at that sender port back there. What the hell is going on, excess oil pressure shooting right at that spot back there? I dont know. any help would be greatly appreciated. thanks

Member
Joined: Mar 2004
Posts: 420
Likes: 0
what have you used as a gasket on the china wall? a thick bead of RTV? cork gasket? people will give you all kinds of opinions about how they have made it seal perfectly. personally, i use the cork gaskets with a fair amount of RTV at the corners and mine doesnt leak. since it has happened multiple times, have you checked to make sure the china wall itself is smooth? and the intake? it could be warped. make sure everything is straight, clean off all old gasket material/RTV, and give it another shot. if youre using a gasket, its pretty easy to push the gasket over the end of the wall while dropping the intake down. you cant really see back there, so that could be what has been happening. good luck.

Senior Member
Joined: Apr 2004
Posts: 584
Likes: 0
From: TEXAS
Car: 88GTAnotchbac/91 -Z/66 Chevelle
Engine: All strokers
Transmission: Pro built 700r4's
Personally I dont think that your oil leak is coming from the intake gasket I beleive that its coming from your oil pressure sensor that plugs behind your intake on top of the back of your motor.
If you changed the gaskets and pulled your intake and did see the oil trail out of the gasket mating surface once the intake was lifted than follow the following instructions.
If you are sure its the gasket in the middle between the two heads.
First off dont use the cork or rubber gaskets that come with the intake gaskets sets. In the front and back side of the block use the "GREY" automotive silicone. Make sure that bothe surfaces are clean (block and intake )dont use anything that might have any residual oils in them as a cleaner like gasoline.
When you think the mating surfaces are clean use paint thinnner or acetone last. Place a fat bead of silicone on the front and back of the block where the intake will rest. Imediately lay the intake on top and tighten to recomended torque specs in the correct tightening bolt pattern. (start from the center of the intake and cross over from side to sidethen out wards.
Do not over tighten the bolts hoping to keep the oil from leaking!
Get a torque wrench and tighten to spec I believe its 25 to 30 lbs of torque .
Rob

Senior Member
Joined: Nov 2001
Posts: 692
Likes: 1
From: Orlando,Fl. USA
Car: 1990 GTA
Engine: 5.7 T.P.I.
Transmission: 700r4
Axle/Gears: 3:23
" Imediately lay the intake on top and tighten to recomended torque specs in the correct tightening bolt pattern. (start from the center of the intake and cross over from side to sidethen out wards."
I have read that you are supposed to wait a couple of minutes for the gasket sealer to 'cure' a little. Also, here is a diagram of the bolt tightening sequence. I am not saying that you are wrong, but I am redoing my intake manifold gasket right now because it was leaking oil at the back like crazy. I did use the cork gaskets which I will not do this time. I dont really remember if I let the gasket sealer sit or not, I just want to get it right this time because I dont want to do this again!
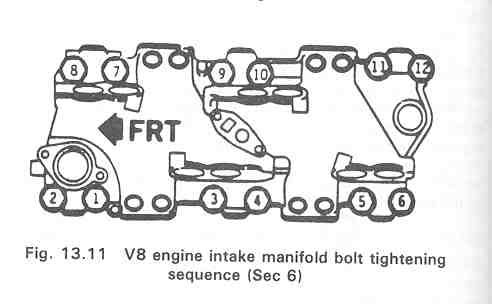
I have read that you are supposed to wait a couple of minutes for the gasket sealer to 'cure' a little. Also, here is a diagram of the bolt tightening sequence. I am not saying that you are wrong, but I am redoing my intake manifold gasket right now because it was leaking oil at the back like crazy. I did use the cork gaskets which I will not do this time. I dont really remember if I let the gasket sealer sit or not, I just want to get it right this time because I dont want to do this again!
Last edited by 1990GTA; May 2, 2005 at 05:31 AM.
Senior Member
Joined: Apr 2004
Posts: 584
Likes: 0
From: TEXAS
Car: 88GTAnotchbac/91 -Z/66 Chevelle
Engine: All strokers
Transmission: Pro built 700r4's
Well if you want an awesome SEAL use the silicone I advised about the GREY automotive silicone.
NOt any cork or rubber material. You will be amazed at how strong of a seal that silicone holds possibly to strong of a hold.Over the black silicone.
One of the motors I built a couple years back had me fooled that I might have left a bolt bolted in somewhere on the intake because I couldnt get the intake pried off after using the GREY silicone. I ended up placing a shovel in the neck of the intake to pry the intake up off the block and I split the wooden shovel.
Well I ended up prying the intake off with a screw driver but the seal was the best seal I have seen and used for years on several motors and never had a leak there since.
Trending Topics

Supreme Member

Joined: Jul 1999
Posts: 1,556
Likes: 28
From: Adrian, Mi, USA
Car: 1988 Pontiac Firebird Formula
Engine: 5.7 TPI
Transmission: 700R4
I used the black RTV, works pretty good, not had a problem with it. I also used a punch to dimple the block surface some, to give the RTV something else to hang on to. I allowed it to set for about five minutes, just enough to develope a "skin" and then set the manifold on. I use this method on (numerous) chevy trucks when the develope the inevitable manifold leak, and have not had one come back yet.
Senior Member
Joined: Apr 2004
Posts: 584
Likes: 0
From: TEXAS
Car: 88GTAnotchbac/91 -Z/66 Chevelle
Engine: All strokers
Transmission: Pro built 700r4's
On a scale from 1 to 10 in strength and strong sealing characteristics I would give the black silicone a 5 the red a 6 copper a 7 grey a 9 or 10 there really isnt a comparison try it and you will be using it from then on with out having to make any extra provisions like dimpling your block for it to stick better other than two dry clean mating surfaces.
Senior Member
Joined: Apr 2004
Posts: 584
Likes: 0
From: TEXAS
Car: 88GTAnotchbac/91 -Z/66 Chevelle
Engine: All strokers
Transmission: Pro built 700r4's
Well sorry to hear that but they are not all equal at all.
I have used the copper color silicone between headers on big block heads with no gasket material and guess what it works excellent seals good and doesnt burn off at all like most of the others will. I dont think any of the others will with stand that temp or stress in that application. They all have properties that make them excellent choices for that specific application.
Dang I sound like a silicone sales Rep.
Senior Member
Joined: Nov 2001
Posts: 692
Likes: 1
From: Orlando,Fl. USA
Car: 1990 GTA
Engine: 5.7 T.P.I.
Transmission: 700r4
Axle/Gears: 3:23
Can you get the grey at Autozone or Advanced(Discount) ?
Also do you put the gasket sealer all over the gaskets or just around the coolant ports?, and how much should you use ?
Also do you put the gasket sealer all over the gaskets or just around the coolant ports?, and how much should you use ?
Last edited by 1990GTA; May 3, 2005 at 08:57 PM.

TGO Supporter
Joined: Oct 2000
Posts: 1,231
Likes: 0
From: Wilmington NC
Car: C1500
Engine: 350
Transmission: 700r4
Axle/Gears: 2.73
I've put a few intakes on so far (different cars). When I used black silicone it did seep, not a steady leak, but a seep. On my car I used ugly orange silicone because that's what I had, and it has held perfectly (no leaks whatsoever).


Joined: Jul 2003
Posts: 10,539
Likes: 206
From: NYC / Jersey
Car: 1990 Trans Am GTA
Engine: Turbo 305 w/MS2
Transmission: 700R4
Originally posted by robsgta.They all have properties that make them excellent choices for that specific application.
After boring out an old project, to get a nice seal... we applied the light blue RTV on the heads/intake, then lied the intake down on the heads. We then placed a couple of bricks on top of the intake manifold (for some light pressure, as opposed to torquing the bolts down right away), then waited for the silicone to cure.
Let me tell you, like everyone here... no matter how many projects one builds, it always get's exciting. In fact, it got so exciting, that we even forgot to bolt down the intake after we lifted the bricks up off from it (we had them on their for about 30 minutes).
Despite that, the car ran perfect! We didn't even realize that the bolt's were off for days... and even when we did notice, she still ran fine. No vacuum loss, no leaks, nothing. Of course, we eventually did torque down the bolts eventually, but regardless, that is some tough silicone let me tell you.
Even when we tried removing it once, with all the bolts removed.... you'd sware that the intake was somehow welded to the heads!
Quality stuff!

Last edited by Street Lethal; May 3, 2005 at 09:25 PM.

Senior Member
Joined: Apr 2004
Posts: 584
Likes: 0
From: TEXAS
Car: 88GTAnotchbac/91 -Z/66 Chevelle
Engine: All strokers
Transmission: Pro built 700r4's
Originally posted by 1990GTA
Can you get the grey at Autozone or Advanced(Discount) ?
Also do you put the gasket sealer all over the gaskets or just around the coolant ports?, and how much should you use ?
Can you get the grey at Autozone or Advanced(Discount) ?
Also do you put the gasket sealer all over the gaskets or just around the coolant ports?, and how much should you use ?
You should be able to get it at any auto parts place that has a decent selection. Auto zone ,Napa, O reileys etc etc
When you replace the intake you should peal off and scrape the intake gasket material from bothe sides of each head. I plug all of the intake ports and oil valley with tape and paper towels to keep debris out( I also use a wire wheel with an air grinder then use acetone or thinner to lift any residual oils that might reside in the pours of the metal that might contribute to a leak later on.
There will always be erosion around the 4 water ports of the intake and on the heads, (filling your motor & radiator with distilled water 50% anti freeze 50% instead of tap water will prevent erosion) Use a razor and the grey silicone as a filler and scrape the silicone across and into the eroded pits to form a smooth gasket mating surface around the water ports.
Scrape off and clean the material between each intake gasket this is the area that people have been referring to as the china wall <<<< Do not replace the rubber or cork gasket material here use only a thick bead of silicone !!! As if you were laying down a fat weld.
Place the intake on top of the silicone while it is still wet for an air tight seal thats it. Torque to specs Game Over
Rob
Member
Joined: Sep 2002
Posts: 158
Likes: 0
From: Elizabethtown, KY
Car: 89 Formula 350
Engine: L98 w/ Stealthram
Transmission: 700R4
Axle/Gears: 9 bolt 3.27
I'd avoid blue RTV for aluminum applications. If it's not the newer blue, it can oxidize and destroy the aluminum. I personally like the "Right Stuff" black gasket maker. It's great.
Thread Starter
Member
Joined: Dec 2002
Posts: 244
Likes: 0
From: Chicago, IL
Car: 1992 Camaro RS
Engine: 350 TPI
Transmission: T5- manual five speed
I was thinking about putting one of those rubber rails in the rear with dabs ob silicone in the corner where block meets head. I really dont want to have to do this again so i will keep everything you guys have said in mind. I just dont understand i had it perfectly clean and dry and i put a bead on and let it sit for a couple of minutes before applying the manifold.
Senior Member
Joined: Apr 2004
Posts: 584
Likes: 0
From: TEXAS
Car: 88GTAnotchbac/91 -Z/66 Chevelle
Engine: All strokers
Transmission: Pro built 700r4's
Jc33 if you let it sit that was the cause of your leak the silicone started to dry on the out side and began to form a harder outer layer that will not stick like it would have if it was wet.
Take my advice. The last thing you want to do before you drop the intake on is lay a fat bead then imediately and carefully lower the intake into position and start getting all of your bolts into place. After that has been done then you can wait a minute or two but not the other way around.
Take my advice. The last thing you want to do before you drop the intake on is lay a fat bead then imediately and carefully lower the intake into position and start getting all of your bolts into place. After that has been done then you can wait a minute or two but not the other way around.
Thread Starter
Member
Joined: Dec 2002
Posts: 244
Likes: 0
From: Chicago, IL
Car: 1992 Camaro RS
Engine: 350 TPI
Transmission: T5- manual five speed
well fellas i think i may have found the problem. i had to take my trans and clutch apart because the bellhousing vibrated loose and destroyed my clutch and the input shaft of my trans. This involved taking the flywheel off to have it resurfaced. well guess what i found. the rear main is seperate from the block as you guys probably know and there is a gasket there, well this gasket is completely blown out. my theory is that the crank was slinging oil all over in the bell housing and it was seeping thru the not oil tight bell housing to block junction and making it appear to be a intake leak. which makes sense because of th way the oil leaked which i thought was weird for an intake leak and the fact that after i would work on the manifold it wouldnt appear to leak for a few days. 
Supreme Member
iTrader: (2)
Joined: Jul 2003
Posts: 3,205
Likes: 0
From: Dallas, TX area
Car: 91 Formula WS6 (Black, T-Tops)
Engine: 383 MiniRam (529 HP, 519 TQ - DD2K)
Transmission: Built '97 T56, Pro 5.0, CF-DF
Axle/Gears: 4.11 posi Ford 9"
Rob --- ypu aren't recommending using the grey sealer without the intake gaskets are you? I know not to use the china wall pieces, but it almost sounds like you're saying you don't need any of the gaskets....
Originally posted by robsgta
You should be able to get it at any auto parts place that has a decent selection. Auto zone ,Napa, O reileys etc etc
When you replace the intake you should peal off and scrape the intake gasket material from bothe sides of each head. I plug all of the intake ports and oil valley with tape and paper towels to keep debris out( I also use a wire wheel with an air grinder then use acetone or thinner to lift any residual oils that might reside in the pours of the metal that might contribute to a leak later on.
There will always be erosion around the 4 water ports of the intake and on the heads, (filling your motor & radiator with distilled water 50% anti freeze 50% instead of tap water will prevent erosion) Use a razor and the grey silicone as a filler and scrape the silicone across and into the eroded pits to form a smooth gasket mating surface around the water ports.
Scrape off and clean the material between each intake gasket this is the area that people have been referring to as the china wall <<<< Do not replace the rubber or cork gasket material here use only a thick bead of silicone !!! As if you were laying down a fat weld.
Place the intake on top of the silicone while it is still wet for an air tight seal thats it. Torque to specs Game Over
Rob
Senior Member
Joined: Apr 2004
Posts: 584
Likes: 0
From: TEXAS
Car: 88GTAnotchbac/91 -Z/66 Chevelle
Engine: All strokers
Transmission: Pro built 700r4's
Originally posted by vernw
Rob --- ypu aren't recommending using the grey sealer without the intake gaskets are you? I know not to use the china wall pieces, but it almost sounds like you're saying you don't need any of the gaskets....
Rob --- ypu aren't recommending using the grey sealer without the intake gaskets are you? I know not to use the china wall pieces, but it almost sounds like you're saying you don't need any of the gaskets....
VERNW That is exactly what I am saying to do You dont have to use any gasket material on the CHINA wall The cork or rubber pieces allow and or absorb oil after time and shift out of place using only the grey silicone with a good clean < (use acetone or thinner ) dry surface is all you need. I have built or help buddies build or rebuild around 20 hi per - motors and this works extremely extremely well...Give it a try and thank me later...
Jc33 good to see you found it.. The best way to find a squirrely leak like that is to take your to the car wash and have it power washed with a decent engine degreaser drive it around the block to get the water out of the way hurry up get it on jack stands and track the leak while its dripping fresh, after the wind and your fans have their way with it you will never be sure..
Rob
Thread Starter
Member
Joined: Dec 2002
Posts: 244
Likes: 0
From: Chicago, IL
Car: 1992 Camaro RS
Engine: 350 TPI
Transmission: T5- manual five speed
yeah that was a tricky leak. well now im really depressed i took off the rear main seal retainer and discovered what looks to be like a piece of thrust washer in the rear main seal. looks like im screwed.
Senior Member
Joined: Apr 2004
Posts: 584
Likes: 0
From: TEXAS
Car: 88GTAnotchbac/91 -Z/66 Chevelle
Engine: All strokers
Transmission: Pro built 700r4's
Can you post a pick of what it looks like...
Yous should be able to knock that old worn rear main seal out of its holder and replace it with a new one and be back on track to reassembly ??
Yous should be able to knock that old worn rear main seal out of its holder and replace it with a new one and be back on track to reassembly ??
Thread Starter
Member
Joined: Dec 2002
Posts: 244
Likes: 0
From: Chicago, IL
Car: 1992 Camaro RS
Engine: 350 TPI
Transmission: T5- manual five speed
man i wish that is all i had to do. the bearing is part of the middle main bearing, hopefully all i'll have to do is replace that bearing and slap it back together. im really hoping i dont have to get a new crank and/or main bearing cap. ill take a pic of the bearing and post it next time Im working on the car.
Thread Starter
Member
Joined: Dec 2002
Posts: 244
Likes: 0
From: Chicago, IL
Car: 1992 Camaro RS
Engine: 350 TPI
Transmission: T5- manual five speed
I should take a pic so you can see what a loose bell housing does to a clutch disc and flywheel. all i can say is make sure all drivetrain mounts are good and tight.
Senior Member
Joined: Apr 2004
Posts: 584
Likes: 0
From: TEXAS
Car: 88GTAnotchbac/91 -Z/66 Chevelle
Engine: All strokers
Transmission: Pro built 700r4's
where was it leaking jc33 its hard to tell.. from the pic whats the black gasket looking material above the crank seal ?
Thread Starter
Member
Joined: Dec 2002
Posts: 244
Likes: 0
From: Chicago, IL
Car: 1992 Camaro RS
Engine: 350 TPI
Transmission: T5- manual five speed
the leak was coming from that gasket thats all cracked and blown out. the rear main is a one piece seal that is in a separate housing from the block. The housing attaches to the block right where that cracked gasket is. so the rear seal was actually good still it was the housing to block gasket that was ****ed up.

Junior Member
Joined: Dec 2015
Posts: 15
Likes: 0
Re: HELP unexplainable oil leak
I was thinking about putting one of those rubber rails in the rear with dabs ob silicone in the corner where block meets head. I really dont want to have to do this again so i will keep everything you guys have said in mind. I just dont understand i had it perfectly clean and dry and i put a bead on and let it sit for a couple of minutes before applying the manifold.


Joined: Mar 2017
Posts: 4,255
Likes: 427
From: Portland, OR
Car: 86 Imponte Ruiner 450GT, 91 Formula
Engine: 350 Vortec, FIRST TPI, 325 RWHP
Transmission: 700R4 3000 stall.
Axle/Gears: 9 Bolt Torsen 3.70
Re: HELP unexplainable oil leak
GD

Supreme Member

Joined: Oct 2003
Posts: 1,085
Likes: 4
From: DFW
Car: 1992 Z28
Engine: 5.7 TPI
Transmission: 700R4
Axle/Gears: G80 3.23
Re: HELP unexplainable oil leak
I immediately thought of idiocracy
https://getyarn.io/yarn-clip/b8018cf...1-3dbdb7aee114
https://getyarn.io/yarn-clip/b8018cf...1-3dbdb7aee114

Thread
Thread Starter
Forum
Replies
Last Post
Hotrodboba400
Firebirds for Sale
3
Dec 10, 2019 07:07 PM
Hotrodboba400
Firebirds for Sale
0
Sep 2, 2015 07:28 PM