When you click on links to various merchants on this site and make a purchase, this can result in this site earning a commission. Affiliate programs and affiliations include, but are not limited to, the eBay Partner Network.
Today I was finally brave enough to take the oil pan off amd check oht the bearings. I loosened all the caps and gave the crank a spin, and it was smooth as butter again. I looked at the caps and the bearings and some looked scratches but they mostly looked fine.. til i tried to put them back. Three of the six pairs had somehow shrunk, or warped or something. Trying to put them back would anap them onto the crabkshaft as if they were too small. So i got them back out and took s measurement of the inside, end to end. They had basically been squished, for lack of another way of saying it. The ends were too close together, and with the diameter lost it was enough to lock up the crankshaft. I checked the crankshaft surface, and i lucked out immensely there, still very smooth. Looks like it was a connecting rod bearing problem, possibly defective bearings or improper installation im not 100% sure. All i know is I am going to order another set and give it another go. I have to replace the head gasket it blew out too, so in the meantime while I wait for my bearings, I can tear down to that and get started. Looks like I can save her after all!
Geez, that sucks. I wish I saw this post a month ago.
If there are still usable (but damaged) threads left in the end of your crankshaft, you should replace that bolt with a stud that is an equivalent strength to that grade 8 bolt. And red Loctite it in there. Then use a big thick washer and a grade 8 nut to hold the balancer on. That way you will no longer be working those threads in the crankshaft.
Engine parts need to be operating room clean during assembly. That includes every oil passage in the block. Right now would be a good time to flush the oiling system with the oil you removed. Leave the caps off the rods (keep them in order - you did number them, right?) and put the pan back in place. If there is any crap in your oil, strain it out.
Pour the oil back in the engine, remove the distributor and run the oil pump with a preluber shaft and drill motor. DO NOT push down hard on the drill motor while doing this because you will drive the oil pump's gears into the cover. OMG, you did put a new oil pump and pickup in the engine, right? The more I think about this, I think you might have overlooked more than a few things. BTW, 1 speck of dirt behind a single rod bearing is enough to lock up the crankshaft.
A few other questions: did you use cam lube on the camshaft & lifters?
Did you use break-in oil with proper levels of ZDDP for flat tappet lifters?
Is there any way that you got any of the main or rod caps mixed up? The MUST go back to where they originally came from.
Were your new piston rings "file fit"? Since you will be removing a cylinder head, you can remove 1 piston and re-check the rings in the empty cylinder.
What you did was pound out the rod bearings. Detonation is the usual cause for this on an otherwise properly running engine. Because your engine was "new", if you didn't get everything adjusted at least close enough, then this could have contributed to your failure. Detonation is when the air/fuel mixture is ignited too soon while the piston is still coming up during the compression stroke. The pressure from combustion tries to push the piston back down, instead of helping to push it down after TDC to continue the rotation of the crankshaft. The result is that the connecting rod bearings get hammered. I'm not saying that this is what happened in your case, but it could be a possibility.
Keep us posted. We can save this engine!
Last edited by NoEmissions84TA; Oct 2, 2017 at 01:30 AM.
Geez, that sucks. I wish I saw this post a month ago.
If there are still usable (but damaged) threads left in the end of your crankshaft, you should replace that bolt with a stud that is an equivalent strength to that grade 8 bolt. And red Loctite it in there. Then use a big thick washer and a grade 8 nut to hold the balancer on. That way you will no longer be working those threads in the crankshaft.
Engine parts need to be operating room clean during assembly. That includes every oil passage in the block. Right now would be a good time to flush the oiling system with the oil you removed. Leave the caps off the rods (keep them in order - you did number them, right?) and put the pan back in place. If there is any crap in your oil, strain it out.
Pour the oil back in the engine, remove the distributor and run the oil pump with a preluber shaft and drill motor. DO NOT push down hard on the drill motor while doing this because you will drive the oil pump's gears into the cover. OMG, you did put a new oil pump and pickup in the engine, right? The more I think about this, I think you might have overlooked more than a few things. BTW, 1 speck of dirt behind a single rod bearing is enough to lock up the crankshaft.
A few other questions: did you use cam lube on the camshaft & lifters?
Did you use break-in oil with proper levels of ZDDP for flat tappet lifters?
Is there any way that you got any of the main or rod caps mixed up? The MUST go back to where they originally came from.
Were your new piston rings "file fit"? Since you will be removing a cylinder head, you can remove 1 piston and re-check the rings in the empty cylinder.
What you did was pound out the rod bearings. Detonation is the usual cause for this on an otherwise properly running engine. Because your engine was "new", if you didn't get everything adjusted at least close enough, then this could have contributed to your failure. Detonation is when the air/fuel mixture is ignited too soon while the piston is still coming up during the compression stroke. The pressure from combustion tries to push the piston back down, instead of helping to push it down after TDC to continue the rotation of the crankshaft. The result is that the connecting rod bearings get hammered. I'm not saying that this is what happened in your case, but it could be a possibility.
Keep us posted. We can save this engine!
That stud idea is brilliant. I never even considered that. I still have a large washer from the original crankshaft bolt so all I really need is a stud and a nut. That will be lifesaving for time consumption when disassembling.
I did some digging on the parts I ordered in and called around to figure out if I had the wrong bearings since that occured several times already. Turns out, the part number I used is 64020a50x2.. 6 of 4020A bearings oversized by 0.50MM, BUT the X2 is what is important. they are modified for oversized bores on the connecting rods. I needed just a plain 64020A50. So that is mistake one.
Mistake two. You're right, I didn't put a new oil pump in it. The old one was operating just fine, so I figured I would leave it as is. I did pre-oil it, but this was AFTER assembly, not before, so whatever was in the passages stayed in the passages. Is there a quick way to blast that out of there? Say like with an air compressor, or do I have to run the oil through it?
As for the ZDDP I did check that part, and the oil I was using was already "High Zinc" So i still used a ZDDP additive reccomended for flat tappet engines. I didnt want to screw that part up.
Finally, no I actually dfidn't use cam lube specifically. I used the engine lubricant they sent with it, a red sticky stuff. I've opted for a higher grade engine lubricant, and more of it for this second time around, this stuff is moly lube or something that its called. Black sticky stuff. I was told it was better than the red. Did some research and everyone who buys it loves it so I'll try it.
A couple of questions, just to put my mind at ease, when I take the pistons back out, because they are still in with the caps on, do I have to replace the rings again?
Is there any way to avoid taking the timing cover and water pump off? the seal was very weak between the two and I had to replace it more than once. I assume no because I can't take the camshaft back out to clean my oil passages if they are on there..
If the old pump is working, why is it necessary to replace it with a new one?
Finally, I want to note that when I did the pre-oiling process, I expected oil to come out somewhere up top around the rocker arms or something. I did not see any. Is a passage clogged?
Thanks again for sticking behind me. I feel the cold weather coming and I know my time is growing shorter, so instead of working on my other cars and putting my poor girl aside, i've opted to devote my time to her and save her before the snows come.
You have to pull the timing cover since the crank goes through it. The way I always sealed up a timing cover was to use a very thin coating of RTV gasket sealer on both side of the gasket itself when I reassembled it, never had a leak.
The old oil pump may be working, just not as efficient as it should. With that high of mileage, it's just a good insurance measure to do. Also, with all other parts being new, it will force the old pump to work harder, since clearances are tighter with new parts. Might as well replace it while everything is apart now, rather than having to try to do it again later, trust me, doing a pump in car is NOT fun. Getting that oil pan out is a major PITA.
they are modified for oversized bores on the connecting rods. I needed just a plain 64020A50. So that is mistake one.
Yep. That'll do it. Those .002" oversize OD bearings are for cracked cap type of rods where you cannot do conventional resizing of the big ends.
Mistake two. You're right, I didn't put a new oil pump in it. The old one was operating just fine, so I figured I would leave it as is. I did pre-oil it, but this was AFTER assembly, not before, so whatever was in the passages stayed in the passages. Is there a quick way to blast that out of there? Say like with an air compressor, or do I have to run the oil through it?
Oil pumps are inexpensive - and get the new screen. Autozone might even have the installation tool. Once set in the proper position, you should tack weld it, but it is not absolutely necessary.
At this point, get the new pump installed and use the preluber tool to flush your oiling system as I described above. You can also make the tool from an old distributor. The oil filter should trap any contaminants, and you can then strain the oil through something like paper towels to re-use it. I know money is a concern. If you didn't already, add some ZDDP additive to help your cam & lifters live.
As for the ZDDP I did check that part, and the oil I was using was already "High Zinc" So i still used a ZDDP additive reccomended for flat tappet engines. I didnt want to screw that part up.
Finally, no I actually dfidn't use cam lube specifically. I used the engine lubricant they sent with it, a red sticky stuff. I've opted for a higher grade engine lubricant, and more of it for this second time around, this stuff is moly lube or something that its called. Black sticky stuff. I was told it was better than the red. Did some research and everyone who buys it loves it so I'll try it.
The black moly is the stuff you want to use with a flat tappet cam & lifters - but not for the bearings.
A couple of questions, just to put my mind at ease, when I take the pistons back out, because they are still in with the caps on, do I have to replace the rings again?
CAREFULLY take the rings off 1 piston. One at a time you set them square in the bore and measure the end gap with a feeler gauge. They should measure about .025". If the gaps were too small, they could butt together when things heated up and bind in the bore, which would destroy the ring lands on the piston. I would bet that the rings you got were already pre-gapped. BTW, there are markings on the rings as to which way the go. Be sure to get it right.
Is there any way to avoid taking the timing cover and water pump off? the seal was very weak between the two and I had to replace it more than once. I assume no because I can't take the camshaft back out to clean my oil passages if they are on there..
You can do this entire job from underneath the car. You have to be EXTREMELY CAREFUL not to put any nicks in the rod journals from the sharp threads on the connecting rod bolts. Protector boots are made for doing this.
Thin-wall rubber tubing can also be used. Just slide pieces over those threads. If you do see any nicks, you use a fine stone to remove them.
CLEANLINESS IS ESSENTIAL! Get the crank in a position where you can remove a rod cap. Either push the piston up a little bit, or rotate the crank out of the rod slightly - just enough to get to the upper bearing and rotate it out of the connecting rod. If you use a tool here, DO NOT USE ANYTHING METAL. A popsicle stick is a good choice. I would then wash the rod and journal with WD-40. Now you can put your correct rod bearing in by reversing the procedure. The tang will go in last. Paint some bearing lube on the journal and move the journal back into the rod bearing. Now you can put the other half of the bearing in the cap, a little more bearing lube, and put it back on. Torque the cap to specs. Repeat for the other 5 cylinders. IF AT ANY TIME THE CRANK CANNOT ROTATE - STOP AND FIGURE OUT WHAT IS WRONG. It will not "wear in".
If the old pump is working, why is it necessary to replace it with a new one?
drdave88 already answered. But with the pan bolted in place, the pickup should be 3/8" from the bottom. Check with clay or play-doh.
Finally, I want to note that when I did the pre-oiling process, I expected oil to come out somewhere up top around the rocker arms or something. I did not see any. Is a passage clogged?
The correct preluber shaft will not be just a straight shaft, it will also have what replicates the bottom shaft of your distributor, which seals the oil gallery that it passes through. Without it, you are just priming the oil pump and probably not get the oil to show at the rockers - at least not on the bank that the distributor shaft is on.
Or, you did not run the oil pump long enough. With both valve covers off, prelube, rotate the crank some (1/4 turn), prelube, rotate crank, continue until you see oil at ALL of the rockers. Then you can start the engine.
Thanks again for sticking behind me. I feel the cold weather coming and I know my time is growing shorter, so instead of working on my other cars and putting my poor girl aside, i've opted to devote my time to her and save her before the snows come.
GOOD LUCK.
Last edited by NoEmissions84TA; Oct 2, 2017 at 08:48 PM.
Cant thank you enough NoEmissions84TA, that explanation of the procedures is exactly what I need.
I have some additional information that is pertinent to a question I have... I am running 20w50 weight high zinc valvoline. I was wondering if I should consider a different weight seeing that I am rebuilding the engine. Also, I was looking at the replacement oil pump and was wondering if i should go for a high volume one or just a standard replacement. With oil being one of the most important fluids for the engine, i want to make sure i am giving it the right stuff
I wouldn't use oil that thick, especially for initial fire up of a new engine. You want oil to be able to get where it needs to go quickly to coat all your friction surfaces, the thicker the oil, the longer it will take on cold start up to get there. I've always been a believer of using what the manufacturer recommends, unless you've modded what it was initially built with. In this case, I'd stick with the original 10w30? I think that's what the pre fuel injection engines called for.
See drdave when i looked it up in my system here at advance auto it was calling for 20-50 from manufacturer which was mind boggling for me. But i do feel a thinner oil would be much better for it, problem is my store doesnt stock high zinc in low weights (thanks advance) i am probably going to use 5-30 or 10-30 just not sure which yet. Also, what are your thoughts on synthetic vs conventional?
You can get ZDDP additives to add to the oil. I was running valvoline VR-1 conventional 5w30 in my 3.4 because it had the higher ZDDP level. NAPA usually has some kind of sale on it every now and then (just don't tell your co-workers).
Thats excellent! The VR-1 is exactly what i had but 20w50 weight. Ill see if we can get the 5w30 if not ill have to visit Napa down the road. I am trying to dig up the part number right now but so far have only found vr-1 at 10w30...
EDIT: not to jump off site but check out the conversation at https://www.corvetteforum.com/forums/c3-tech-performance/1646912-vr1-racing-oil-isn-t-the-oil-we-thought-it-was.html about the vr1 by valvoline.. it may really not be what we thought..
Last edited by Aerizanthar; Oct 3, 2017 at 01:38 PM.
Reason: New info
Cant thank you enough NoEmissions84TA, that explanation of the procedures is exactly what I need.
I have some additional information that is pertinent to a question I have... I am running 20w50 weight high zinc valvoline. I was wondering if I should consider a different weight seeing that I am rebuilding the engine. Also, I was looking at the replacement oil pump and was wondering if i should go for a high volume one or just a standard replacement. With oil being one of the most important fluids for the engine, i want to make sure i am giving it the right stuff
Glad to help. Now you got it. The oil is just like your blood and the oil pump is like your heart. You don't want to cheap out in these 2 areas. Besides, they are not expensive.
There are so many reports on motor oils that you could go crazy trying to make sense of all that data. For you - use 10W30 CONVENTIONAL (DINOSAUR) oil for break-in. Since you never really know what is in the oil you are pouring in (they change the formulations all the time), buy a decent quality brand of oil and use the additive. That way, YOU KNOW it's in there and how much because YOU put it in there. You can switch to synthetic after 3000 miles.
I don't know if you are old enough to remember the old Mobil 1 commercial where they poured oil in 2 frying pans on the stove - Mobil 1 in one pan, conventional oil in the other. Then they turned up the heat. Conventional turned black and started smoking. Mobil 1 stayed golden brown and did not burn. For me, if that was the ONLY benefit to synthetic, that's enough reason for me to use it. But there are also many other benefits. You can also blend CONV and synthetic. For my daily-drivers, I do 50%/50% and use the additive in any engines that have flat tappets.
A standard volume OP will be sufficient for your engine.
And drdave88 did a fine job covering the rest. Thanks.
You are doing fine and almost at the finish line. Take your time, ask questions, and do the job right.
Edit: if you do use a stud to replace the crank balancer bolt, DO NOT use cheap hardware store threaded rod. You must use grade 8 or better. You already know the thread, so check to see if ARP has a stud for doing this. That is IF the threads are not buggered too badly.
Last edited by NoEmissions84TA; Oct 4, 2017 at 12:10 AM.
Ok, at the point where it is time to start putting things back together. I need to know this one thing before I dive into it. Do the bearings and the connecting rods/caps match up the notches OPPOSITE each other, Like Picture 1, or SAME SIDE like picture 2?
Picture One, notches opposite each other
Picture two, notches on the same side as each other
See when I looked into this previously I ended up with the same images you linked. Problem with those is that it shows applications where the crank journal holds two rods, and there is contact between the two rods so they have special matching surfaces for that.. In the 84's 2.8l v6, each rod has its own journal, none of the rods are touching against each other, so I have no way of identifying that.
On the other side of this coin, I have kept them numbered and paired to their pistons, and the pistons have marks showing which direction they go, and the rods were never removed from the pistons themselves so all the rods and caps and such are still matched to the correct cylinder. Now that I know what way to orient the cap when bolted to the rod however, its time to finish this project! Thank you again. I will be sure to check both sides for any differences in surface first though.
One thing that may help you is to get some plastigauge. It's a small stick of soft plastic material. You put it on the crank, put the rod/main cap (with bearing) on, torque it and then remove it. It will show you what your clearance is between the surfaces.
Yeah its not technically available to the public, like timing tape. But my manager and I keep some around the shop for the engine builders so we had some
Winter was hell as usual here in West Virginia, but it didn't stop me. I finally got the courage up to open the engine back up and fix what I had done. The bearings were the wrong size, and the new ones have been installed. Engine was bolted all back together, and turned over after a great deal of messing with the spark timing. It runs! Been driving it daily for the last 3 months! Fouled spark plugs on a daily basis til I went back in and changed out the valve stem seals. Remember when I freaked out and threw battery acid on the cylinder heads because of flash rust? Killed the seals. All fixed now, and I'm fairly satisfied, there's just a few problems left...
I think my timing chain skipped a notch. The engine won't run unless spark is timed at 10-20 degrees before my supposed top dead center mark, so either my mark is wrong, or my chain skipped a tooth.
Starter fried itself, now it won't engage half the time. Just need a new one and that's fixed.
Alternator is about to die, making a hell of a racket.
Oil and temp sensors were switched out, and now my readings are perfect! Everything is going very well internally on that end..
Only real problem I have that I can't wrap my head around is this. When it is cold, and I depress the accelerator from idle cruising on the road, the engine will actually drop in rpm before increasing. I think it is either a vacuum leak or possibly too much fuel being dumped in, but the latter makes no sense because it did not start this until I changed out the rods and jets for a leaner configuration. Once I find the old ones I will change it back to test that.
My concern is the weird timing and the studder on acceleration. The engine lacks power but I feel it is related to one or both of these issues. Any ideas? I just expected more from it. A simple hill requires pedal to the floor to maintain even 40mph...
The factory timing is 10BTDC on these engines. Are you setting timing with a warm engine, no advance or anything hooked up to the distributor? Setting the timing correctly may fix all of your issues, start with that.
Gonna check on that tomorrow night, gonna make sure my mark is in the right place then try to time it properly again. It didn't like going lower than 12, but ran well at 15 so i think my mark is off.
hey don't let a blown motor discourage you. Once you done it you will have a nice bit of knowledge of do and don'ts built up for any future rebuilds or engine swaps.
hey don't let a blown motor discourage you. Once you done it you will have a nice bit of knowledge of do and don'ts built up for any future rebuilds or engine swaps.
I honestly don't think I will ever swap this one out, unless it is for another 2.8, 3.1, or 3.4. Everyone tells me I'm crazy for saying so, but this girl is unique. I don't see anyone else around with a 4-barrel carb attached to a 2.8l engine, so I plan to do my best to always take care of her!
Hopefully my list of do's and don'ts will help me do so!
Redid the jets on the carb and brought it a step back towards rich, fires and runs well in park. Gonna road test it tomorrow, hopefully that fixed some of the problems I've had, and I can move on to fixing the timing next.... More to come.
Redid the jets on the carb and brought it a step back towards rich, fires and runs well in park. Gonna road test it tomorrow, hopefully that fixed some of the problems I've had, and I can move on to fixing the timing next.... More to come.
take it a little low for that initial testing make sure you get everything dialed in than drive it like you stole it because whats the fun of an engine rebuild if you cant enjoy it from
time to time
Driving to work one day... Engine stops and locks up completely. Turns out, there's no oil in it AT ALL.
...
Dumped 4 quarts of oil in, let it cool, fired right back up. She's a fighter, if nothing else. Problem though, valves are making very loud clicking sound, and oil pump holds no consistent pressure at all anymore.
Old post, I know... but figured I'd share some back-up advice on this for those who pop in here with the same symptoms. I had this happen in a 1987 Pontiac Fiero w/ V6. Car overheated when I bought the aftermarket Coltec / Holley waterpump, and the plastic pump gear broke free from the impeller. Sigh.
Anyway, this colossal loss of oil pressure, which is causing the upper-end rattle of the valves, is because of the considerable wear that occurred when the engine overheated / seized. Specifically, it's the main bearings. When they get below a certain spec, the oil just gushes out. It makes it impossible to build any oil pressure. Knocking typically wouldn't be too far off either.
You're absolutely right, that was exactly what had happened.
So I talked to an expert of sorts at work today and learned a valuble piece of information that I was able to back up with data from our own message boards... I cannot time the engine when the electronic spark control is plugged in. That is exactly why it would not run where I was expecting. So tonight I will be unplugging that and trying one more time to time the engine properly. I hope it works out, I just got some new rims for it too..
The computers are pretty simple in these cars maybe you can look into a hei or just a standard non computer controlled distributor. There should be two wires that feed it one white and they are easily adaptable its what I did with mine.
You're absolutely right, that was exactly what had happened.
So I talked to an expert of sorts at work today and learned a valuble piece of information that I was able to back up with data from our own message boards... I cannot time the engine when the electronic spark control is plugged in. That is exactly why it would not run where I was expecting. So tonight I will be unplugging that and trying one more time to time the engine properly. I hope it works out, I just got some new rims for it too..
Shoot, it's been at least a decade since I looked at this. But if I'm not mistaken, I think you have to jump two wires on the ALDL to "disable" timing advance, so that you can then set the base timing. I don't think you need to actually disconnect something.
Let me look it up...
YES!!! That's correct.
You need to jumper ground and the diagnostic terminal. This puts your car into "Closed Loop" mode.
Here it is for the Fiero, but basically the exact same engine / configuration:
So to repeat, you do NOT need to disconnect anything.
I can jumper it in that code reader spot? well I'll be damned, I never expected that!! Thanks a ton! I'll give it a try tomorrow afternoon when I work on it.
EDIT: That post is absolutely right about that spark leakage. I had one shoot through my body once and I use welding gloves now.
My experience is with Fieros and I've never actually owned a 3rd gen, but from what I've read on this forum in the past, I'm not sure shorting those pins on the ALDL connector is valid for the F-Bodies. I'm not even sure if the pinout is the same, so shorting those pins might carry a risk of damaging something.
Everything I've seen on this forum has always said that in order to disable ECM timing advance, you're supposed to disconnect a wire. I'm sure that's at least what people have said for the MPFI models, not totally sure about the carbed cars like you have.
The Fiero uses a different ECM than any of the thirdgens, and for whatever reason they seem to have used different methods of disabling ECM timing advance.
@82-T/A: Did you use the Fiero method on your 82 T/A?
BTW, after you have this car back out on the road and have it dialed in, I would be interested in your impressions of this cam. I've been thinking about getting one for a Fiero, but don't want to lose low/mid RPM torque or have an obvious lope. I'm trying to be fairly conservative with it, but I figure the old original should probably be retired when the opportunity presents itself.
Alright, so I tried to time the spark again yesterday, much to my aggravation as it would not time properly, got irritated and ordered new gaskets for the carb and intake. Meanwhile, I started testing the area with starting fluid, and immediately found the culprit of much of my problems. The carb spacer bottom gasket (Between the spacer and the intake) was ripped in half on one side, enough to where if i touched it or pressed on it, the engine would suck straight air and stall out. Good thing I ordered those gaskets eh??
Today I took it apart and installed the new gaskets, and immediately my idle speed dropped to 400 when it would idle, otherwise stalled out unable to idle. screwed the screw in and brought it up to 800, brought engine heat to proper, and tuned the carb, dialed back to 800rpm, and much to my surprise, it wouldnt run hardly at all. Checked timing, and yeah. 30 degrees out is probly not good!
Bring in timing light, disconnected the electronic spark controller in the distributor, and brought the engine into time at 10 degrees BTC. Engine starts running like a roadrunner in the old cartoons. Instant start up. No rough idle. Everything near perfect. Reconnected the Electronic Spark controller in the distributor, and tested a pedal push while watching the time. Time at idle sat at 12, pedal push simulation retarded the timing to approx 20. Road test!!
Low end power is amazing. No obvious lope in my case. Can accelerate up hills, but takes some effort. Detent cable needs some fine tuning. Brought it back home, and on the street I tested what would happen if i mashed it wide open from a dead stop, and surprisingly, it backfired. I could see the light from the backfire in the carb air cleaner (there's a hole in my hood because clearance and reasons.)
Now this brings me to my next question. To eliminate the backfire, I intend to re-time the engine to 8 BTC. What do you think? Needs a paintjob badly before I post embarrasing pics of her again.... but wow. What a journey it has been.
Post 122 says you are using a 4 bbl carb on your 2.8L engine.
What carb are you using again? I'm sure it will need some tuning to work well with your combo.
Was your original 2 bbl carb computer controlled? Are you still using a computer controlled distributor?
You have come a long way! Congratulations. Summer is almost here. Time to enjoy your car.
Remember you said this in post #1: I hope to complete it in two days or less, if possible.
That was 11 months ago!
Last edited by NoEmissions84TA; Apr 28, 2018 at 09:14 PM.
Vehicle parked and jacked, ready to begin procedure
If you have the room, add another air filter element on top of the one you are using now. Make a double cheeseburger. The cheese between the patties will be a bead of Permatex. I think that small filter might be restrictive, even for your 2.8L.
If you have the room, add another air filter element on top of the one you are using now. Make a double cheeseburger. The cheese between the patties will be a bead of Permatex. I think that small filter might be restrictive, even for your 2.8L.
I went with a high flow air filter from spectre but you may still be right. Maybe bigger? I've already chopped the hood so I can expand for size if need be. They have a REALLY nice one that the top of the air cleaner is also filter material too... where was that picture..
Post 122 says you are using a 4 bbl carb on your 2.8L engine.
What carb are you using again? I'm sure it will need some tuning to work well with your combo.
Was your original 2 bbl carb computer controlled? Are you still using a computer controlled distributor?
You have come a long way! Congratulations. Summer is almost here. Time to enjoy your car.
Remember you said this in post #1: I hope to complete it in two days or less, if possible.
That was 11 months ago!
I learned that day that this would be a project all my life, something I grow with and learn from every day. I swapped in 15 inch tires today too. made it look classy for once. The paint still is terrible. Next pay maybe? Not sure yet... Needs rotors still and I put it off repeatedly simply because I've never done rotors where the rotor is also part of the bearing..
As for the carb, its the Edelbrock part number 1404. 500cfm. A bit much for it, would pair nicely with a holley that does 390cfm for a 4bbl, but the old carb was the 2bbl E2SE varajet, so it was nearly all computer/vacuum controlled. I eliminated most of it but kept the old distributor so it is still computer controlled. It's the only reason the computer is still in it. Everything else is aftermarket or manual control.
Last edited by Aerizanthar; Apr 28, 2018 at 09:46 PM.
Wanted to mention I did lean down the metering rods, I have leaner jets if need be as well, but this is the first time it's been vacuum leak free with the carb on after rebuild, so I wasn't sure if I needed to lean it out that much or not yet. If need be I have em, if not, I still have em just in case!
Okay, here is some bad news. You can't partially disable the computer control like you did.
It's either all ........ or nothing. All of those sensors that were there monitor many different conditions of your engine (input) and then the ECM makes adjustments to your timing and electronically controlled carb (output). Also the transmission for torque converter lockup. Your torque converter may never lock, which might damage your transmission. Which transmission do you have? Because if it uses a TV cable and you don't have it hooked up (properly), you will almost certainly damage the transmission.
By replacing your electronic carb with a manual, all of the other functions that the ECM controls are now not correct. Your distributor is most likely not providing the proper spark advance at the proper time.
Before you crap your pants, this situation is not hopeless. You just need to go completely manual - NO computer control at all. You need to get a pre-computer distributor with centrifugal weights and vacuum advance. And you will have to wire up a circuit for TCC lockup. There are also kits for doing this.
One thing I noticed was your carb spacer. I assume you had to get your carb up that high for clearance issues. You should be using a 4 hole spacer to maintain the divided plenum of the intake manifold (keep each side separate). For cheap, you could add a divider to your open phenolic spacer to create nearly the same thing. Obtain a 1/4" thick piece of aluminum. Use your dremel to mill vertical grooves in the middle of the front and rear walls of the spacer, so that you can snugly slide the aluminum piece in to divide the spacer in half. Then JB Weld it in there to make it permanent. If you have a technical school nearby with a machine shop, this would be a simple job for them. Buy a box of Dunkin Donuts for the class as payment.
If your spacer were a little shorter, then you would have more room to do the double-stack with the air filters.
Here are a couple of pics to give you the idea. This is a spacer of mine that also incorporates a turtle that is used in a single plane intake manifold to help direct the fuel mixture into the ports more efficiently. You do the same to your spacer, without those "wings".
I was wondering about that divider, thanks for that necessary input. Looks like vacuum distributor got moved up the list then. I'll also be looking into that torque converter lock up circuit as well. I wanted to go full manual anyway, so I'm glad this is the direction I am heading. I'll be honest though - I've been under there a few times and never saw any wires heading to the transmission. Only cooler lines, shifter cable and detent cable. Is it possible mine does not have that circuit?
Do you know what transmission you have?
Does it have overdrive?
From your description, it sounds like a Turbo 350.
Take a picture of the pan and post it here.
Last edited by NoEmissions84TA; Apr 29, 2018 at 08:32 PM.
Do you know what transmission you have?
Does it have overdrive?
From your description, it sounds like a Turbo 350.
Take a picture of the pan and post it here.
Definitely the 700-R4. I did a transmission filter/gasket change when I got it, and took a lil searching back then to figure it out. I memorised it once I knew.
If it is a 700R4, then there will be a 4 pin connector for the torque converter lockup and that "detent cable" is your TV cable which must be hooked up correctly. It is not a kickdown cable like on a TH350. Your Edelbrock carb needs to have a TV correction bracket to hook it up correctly. https://www.summitracing.com/parts/s...SABEgJen_D_BwE
I'll need to crawl under again and look around for that connector. I've called the TV cable the detent cable and the kickdown cable often, using them interchangeably, didn't know there was a major difference. As for the bracket I do have that already set up on the carb, so that much is done.
Bring in timing light, disconnected the electronic spark controller in the distributor, and brought the engine into time at 10 degrees BTC. Engine starts running like a roadrunner in the old cartoons. Instant start up. No rough idle. Everything near perfect. Reconnected the Electronic Spark controller in the distributor, and tested a pedal push while watching the time. Time at idle sat at 12, pedal push simulation retarded the timing to approx 20. Road test!!
Low end power is amazing. No obvious lope in my case. Can accelerate up hills, but takes some effort. Detent cable needs some fine tuning. Brought it back home, and on the street I tested what would happen if i mashed it wide open from a dead stop, and surprisingly, it backfired. I could see the light from the backfire in the carb air cleaner (there's a hole in my hood because clearance and reasons.)
Now this brings me to my next question. To eliminate the backfire, I intend to re-time the engine to 8 BTC. What do you think? Needs a paintjob badly before I post embarrasing pics of her again.... but wow. What a journey it has been.
PS. I reccomend the camshaft. I love it.
Thanks for the feedback on the cam. It's been hard to find much commentary about it. I've noticed that all the specs seem to be the same as the Melling MTC-5 except for the *advertised* duration, which is lower on the Edelbrock. But the duration @0.050 is the same.
The backfire is surely a bigger issue than a 2 degree base timing adjustment. Maybe it's fueling/pump shot, or a major timing issue due to the way the ECM is being handled/bypassed.
I don't know much about the carbed 2.8s or carburetors in general, so I can't offer much useful suggestions, but I look forward to seeing things progress.
Alright, had to wait a month to get the funds together for a distributor, and this is the one I have picked out right now. Let me know what you all think, it's matched to my year make and model engine so it shouldn't have any bolt up issues, and comes with a wiring harness shown in the picture that will work for the factory coil.. Hopefully this is the one! Let me know
Problem. The picture shows the distributor you want (not computer controlled) but the description says W/O VACUUM OR CENTRIFUGAL ADVANCE MECHANISM; Reman.
Since you are no longer computer controlled, you want centrifugal and vacuum advance on your distributor. You can't look up one up for your year - computer controlled. You have to find a pre-computer distributor from an earlier year 2.8L.
I was worried about that, exactly why I asked. I'll have to do a search here on the forums; I should find the information I need easily, thank you for the input and confirming my fear concerning that one. Stand by for my next possible solution.


 The oil is just like your blood and the oil pump is like your heart. You don't want to cheap out in these 2 areas. Besides, they are not expensive.
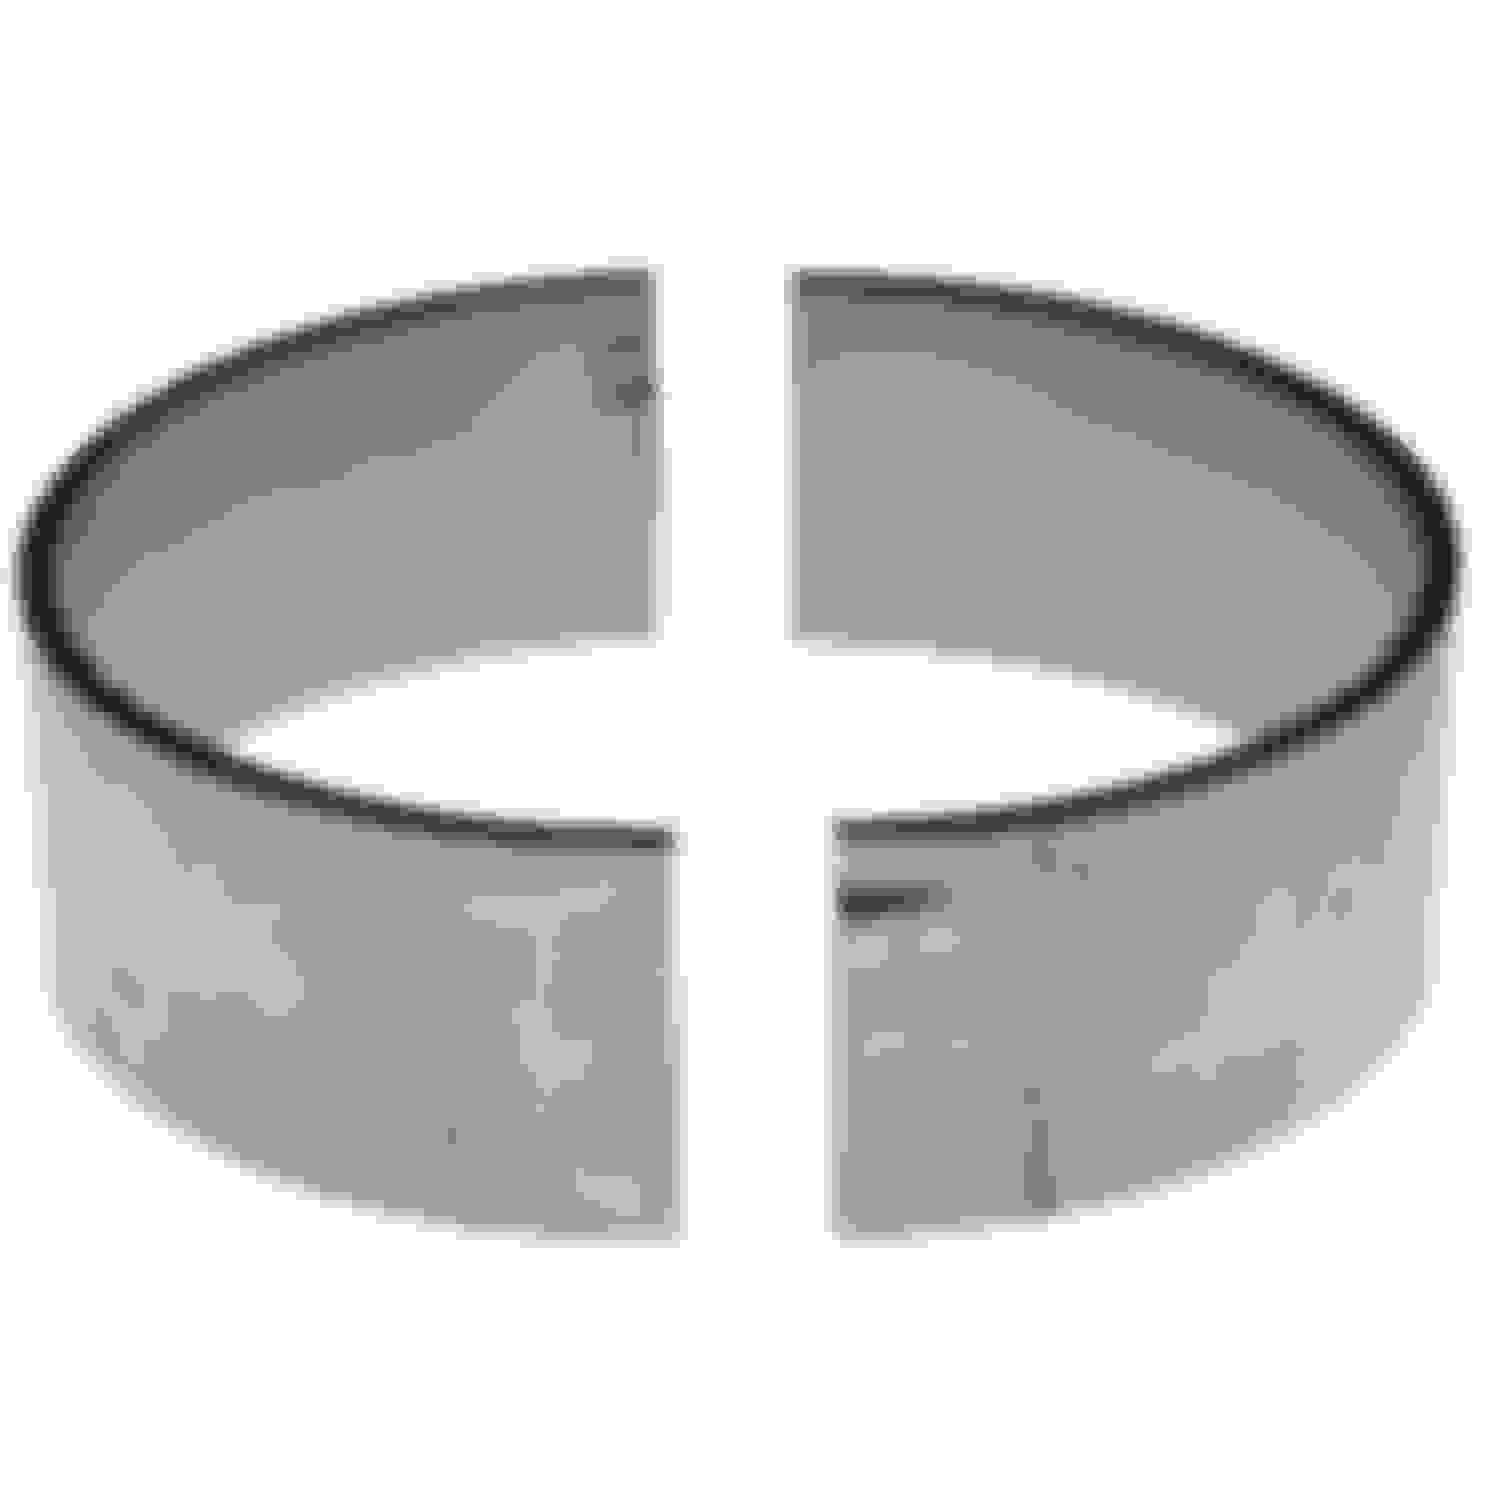


![82-T/A [Work]'s Avatar](data:image/svg+xml;utf8,<svg xmlns='http://www.w3.org/2000/svg' viewBox='0 0 50 50'><circle class='avatar-circle-default' fill='%2383b3b1' cx='25px' cy='25px' r='20px'></circle><text class='avatar-text-default' x='49%' y='53%' fill='white' text-anchor='middle' alignment-baseline='middle'>8</text></svg>)