Standing Water in Trunk
 08-12-2010, 02:15 AM
#1
Junior Member
Thread Starter
iTrader: (1)

Join Date: May 2010
Location: Waterloo, IA
Posts: 48
Likes: 0
Received 2 Likes
on
1 Post
Car: 1988 Chevy Camaro
Engine: 305 TBI
Transmission: T-5
Axle/Gears: Posi
Standing Water in Trunk
I think this is the right section.
Here's the story: I was replacing the liftgate support struts today in my 1988 Camaro hardtop coupe and accidentally dropped one of the bolts down into the trunk area. As I reached down, I noticed that my jumper cable bag was damp on top. I pulled it out and sure enough there was about a quarter inch of water just sitting there in the recessed trunk area.
Any ideas where this water is getting in from? I going to assume that the weatherstripping is bad and hopefully get it changed out soon. Is there any good places online that sell it that you would recommend? Is there any other place that water could be getting in besides through the weatherstripping? I've also had small amounts of water in the glovebox previously too.
Thanks in advance.
 08-12-2010, 03:33 AM
#2
Re: Standing Water in Trunk
The glovebox I'm not too sure about, but I would definitely have the weatherstripping checked out. Try Ebay or Hawks Third gen for parts if you buy online. I'm pretty sure Hawks even has a complete kit for the whole car, which is what I'd do personally w/a 20+year old car. Good luck!
08-12-2010, 07:51 AM
#3
Re: Standing Water in Trunk
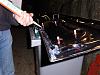
Tape newspaper (or some other material) around the inside of the rear section of the car, shut the deck lid and gently run water on one section at a time. You should find the leak, though new weather stripping will probably cure your ills.
JamesC
JamesC
08-13-2010, 12:00 AM
#4
TGO Supporter

Join Date: Sep 2000
Location: So.west IN
Posts: 6,775
Likes: 0
Received 26 Likes
on
23 Posts
Car: 87 Formula/ 00 Xtreme
Engine: TPI 305/ v6
Transmission: struggling t-5/ 4l60E
Axle/Gears: 3.08/ 3.23
Re: Standing Water in Trunk
As a guess, the leak is possibly from the glass to hatch (decklid) asphalt sealer used has dried up, cracked and caused a leak. A solution I used on my old pos 84 was to run a bead of X-color silicone between the hatch (decklid) and glass on the outside of the car. Never had a leak after until the pile went to the junkkyard to get crushed.
Even if the hatch weatherseal is gone (as in missing), the lip the weatherseal attaches to (the body sheetmetal), prevents water from casually dripping into the hatch area. Pull the seal off and look for yourself if you don't believe, it's not glued down.
Even if the hatch weatherseal is gone (as in missing), the lip the weatherseal attaches to (the body sheetmetal), prevents water from casually dripping into the hatch area. Pull the seal off and look for yourself if you don't believe, it's not glued down.
08-13-2010, 12:12 AM
#5
Supreme Member
iTrader: (1)
Join Date: Mar 2010
Location: Goose Creek, SC
Posts: 1,088
Likes: 0
Received 0 Likes
on
0 Posts
Car: 1987 IROC-Z and 1988 Iroc-Z
Engine: 5.7 350 V8 and 5.0 305 V8
Transmission: 700R4 Automatic Transmission
Axle/Gears: 3.27 Posi
Re: Standing Water in Trunk
Same thing happened to me. What I ended up doing was finding a few rolls of peel and stick weather stripping in the garage. It took a few tries to get the leak to stop cuz some areas needed about 3-4 layers. Tell me if you need me to post some pics because I can try to show a liitle of what I did.
08-13-2010, 02:45 AM
#6
Junior Member
Thread Starter
iTrader: (1)
Join Date: May 2010
Location: Waterloo, IA
Posts: 48
Likes: 0
Received 2 Likes
on
1 Post
Car: 1988 Chevy Camaro
Engine: 305 TBI
Transmission: T-5
Axle/Gears: Posi
Re: Standing Water in Trunk
Thanks for all the input! I think I'm just going to run a bead of silicone and probably get new weatherstripping as well since it doesn't seem to be too terribly expensive. Then if it still leaks... Well, I guess I have bigger problems then.
12-23-2010, 08:08 AM
#7
Junior Member

Join Date: Oct 2010
Posts: 89
Likes: 0
Received 0 Likes
on
0 Posts
Re: Standing Water in Trunk
James - I just put in new trunk weatherstripping. After our last rain, I noticed a lot of water in the bottom of the trunck well. Do you have any ideas what it might be or where it could be coming from?
Thank you,
Mark
Thank you,
Mark
Trending Topics
12-23-2010, 08:22 AM
#10
12-28-2010, 11:05 AM
#11
Former Sponsor

Re: Standing Water in Trunk
12-29-2010, 10:27 AM
#13
Member
Join Date: Dec 2009
Location: Granite Falls, NC
Posts: 338
Likes: 0
Received 0 Likes
on
0 Posts
Car: 1992 Camaro RS
Engine: 305 TBI
Transmission: T5
Re: Standing Water in Trunk
Your problem is the same problem mine has. Where the glass and deck lid meet the seal is shot.
12-29-2010, 11:31 PM
#14
Senior Member
Join Date: Dec 2009
Location: Chilliwack BC
Posts: 850
Likes: 0
Received 8 Likes
on
6 Posts
Car: White 1987 IROC-Z
Engine: 305 TPI LB9, 215 HP
Transmission: Borg-Warner T5 NWC
Axle/Gears: Borg-Warner 7.75 with 3.27 ratio
Re: Standing Water in Trunk
Hello All!!
This seems to be a common problem as of late, as I also have the dreaded "Water in the Camaro Problem""!!
It really is a PITA problem, as the water flows to the lowest point being in the deep well area!!
Just a word of advice, once you fix the seal between the glass and the deck lid, there are also on each side, a plastic transition piece between the rear glass window frame, and the deck lid. Make sure to get sealant in that area, or you will still have a leak problem!!
Same area, three leaks on three different Camaros!!
Last edited by 87IROC-DAN61; 12-29-2010 at 11:37 PM.
01-02-2011, 11:45 AM
#16
Senior Member
Join Date: Dec 2009
Location: Chilliwack BC
Posts: 850
Likes: 0
Received 8 Likes
on
6 Posts
Car: White 1987 IROC-Z
Engine: 305 TPI LB9, 215 HP
Transmission: Borg-Warner T5 NWC
Axle/Gears: Borg-Warner 7.75 with 3.27 ratio
Re: Standing Water in Trunk
It's on the underside of the decklid, at the window edge, where it transitions from the window to the decklid!!
You should have two, one on each side, approx 1-2 inches in length, this is where my first leak came from!!
Cost $16.00 at the stealership in 1988 to fix it!!
 01-03-2011, 07:15 AM
#18
Junior Member
Join Date: Oct 2010
Posts: 89
Likes: 0
Received 0 Likes
on
0 Posts
Re: Standing Water in Trunk
87IROC-DAN81 -
THE CHEVY DEALERSHIP SEALED THE SIDES FOR YOU?
ALSO, ON THE SEAL BETWEEN THE GLASS AND THE DECK LID - COULDN'T I JUST RUN A BEAD OF SEALANT ON THE EXTERIOR? IF NOT, WOULD I TAKE IT TO THE DEALERSHIP OR AN AUTO GLASS SHOP?
THANKS FOR THE HELP.
MBH
THE CHEVY DEALERSHIP SEALED THE SIDES FOR YOU?
ALSO, ON THE SEAL BETWEEN THE GLASS AND THE DECK LID - COULDN'T I JUST RUN A BEAD OF SEALANT ON THE EXTERIOR? IF NOT, WOULD I TAKE IT TO THE DEALERSHIP OR AN AUTO GLASS SHOP?
THANKS FOR THE HELP.
MBH
01-05-2011, 06:43 AM
#19
Junior Member
Join Date: Oct 2010
Posts: 89
Likes: 0
Received 0 Likes
on
0 Posts
Re: Standing Water in Trunk
do i have to take the plastic interior deck cover off to get to the triangle piece or is it visible without taking it off? sorry to bother you again, i am just trying to seal this up
thank you
thank you
01-07-2011, 12:37 AM
#20
Senior Member
Join Date: Dec 2009
Location: Chilliwack BC
Posts: 850
Likes: 0
Received 8 Likes
on
6 Posts
Car: White 1987 IROC-Z
Engine: 305 TPI LB9, 215 HP
Transmission: Borg-Warner T5 NWC
Axle/Gears: Borg-Warner 7.75 with 3.27 ratio
Re: Standing Water in Trunk
Yes, back in 1988 I had water in the deep well area, and I thought that it was the hatch seal, however the "stealership" told me that I didn't need the hatch seal replaced, as the water was leaking into the hatch from the seal between the glass, and the steel trunk lid, right at the transition piece, cost me about $16.95. This piece is visible when you open the hatch, and look at either side, you will see a black plastic piece about 1 -2 inches in length, and about 1 inch wide, it transitions the gap between the glass, and the steel trunk lid on the side, it may be hard to see it, as it might be covered up with black window sealant!!
As for the seal on the exterior between the glass and the deck lid, yes, you should be able to run a bead of sealant from edge to edge along the exterior leading edge!! Cut your sealant tube nozzle to the right size, and run a bead into the gap that you see!!
A word of advice, if you take your car to the stealership or an auto glass shop, make sure you get an estimate first...........I was quoted yesterday, $320.00 CDN to R & R the rear glass seal!!

Same guy suggested to me, $14.99 for a tube of urethane auto glass sealant, it should do the trick, and last for about 2 - 3 years!!
I'm going to do this also myself, maybe this weekend, as I have a bit of water (read as approx 1 gallon) in the hatch well area on my 1989 Red Iroc-Z!!


Last edited by 87IROC-DAN61; 01-07-2011 at 12:51 AM.
01-07-2011, 12:59 AM
#21
Senior Member
Join Date: Dec 2009
Location: Chilliwack BC
Posts: 850
Likes: 0
Received 8 Likes
on
6 Posts
Car: White 1987 IROC-Z
Engine: 305 TPI LB9, 215 HP
Transmission: Borg-Warner T5 NWC
Axle/Gears: Borg-Warner 7.75 with 3.27 ratio
Re: Standing Water in Trunk
No, you don't have to take anything off, the piece is at the far right and left of the plastic interior deck cover!!
I'd show you a picture, but I don't have my digital camera with me, at this time!!
P.S. Don't worry about bothering me with all types of questions, that's why I'm on these boards, to spead knowledge, and to learn from others!!!
The hard part is "weeding" all the
 out of the knowledge!!
 01-07-2011, 11:42 AM
#22
Senior Member
Join Date: May 2009
Location: Conway SC
Posts: 744
Likes: 0
Received 0 Likes
on
0 Posts
Car: 1988 Camaro
Engine: 385
Transmission: 700r4
Axle/Gears: 9 bolt
Re: Standing Water in Trunk
Wow, 320 to remove the hatch and reseal. I'm in the wrong line of work. But that shop probably isn't very busy.
Sounds like dealership got you. That triangle piece is not sealing anything but hatch weatherstrip. Their seal job probably diverted water enough to keep it away from seal. Water should not get between glass and hatch.
Sounds like dealership got you. That triangle piece is not sealing anything but hatch weatherstrip. Their seal job probably diverted water enough to keep it away from seal. Water should not get between glass and hatch.
01-08-2011, 06:44 AM
#23
Junior Member
Join Date: Oct 2010
Posts: 89
Likes: 0
Received 0 Likes
on
0 Posts
Re: Standing Water in Trunk
87IROC-DAN61
thanks for helping me, i really appreciate it. if you get your digital camera back, please send me a picture, that would be great to take to the dealer or whomever will check it for me.
have a great weekend.
mbh
thanks for helping me, i really appreciate it. if you get your digital camera back, please send me a picture, that would be great to take to the dealer or whomever will check it for me.
have a great weekend.
mbh
01-09-2011, 12:46 AM
#24
Senior Member
Join Date: Dec 2009
Location: Chilliwack BC
Posts: 850
Likes: 0
Received 8 Likes
on
6 Posts
Car: White 1987 IROC-Z
Engine: 305 TPI LB9, 215 HP
Transmission: Borg-Warner T5 NWC
Axle/Gears: Borg-Warner 7.75 with 3.27 ratio
Re: Standing Water in Trunk
Wow, 320 to remove the hatch and reseal. I'm in the wrong line of work. But that shop probably isn't very busy.
Sounds like dealership got you. That triangle piece is not sealing anything but hatch weatherstrip. Their seal job probably diverted water enough to keep it away from seal. Water should not get between glass and hatch.
Sounds like dealership got you. That triangle piece is not sealing anything but hatch weatherstrip. Their seal job probably diverted water enough to keep it away from seal. Water should not get between glass and hatch.
The shop is an auto glass shop, that was his price, and I'm not paying that price ever, the rear glass can leak till the cows come home, and I'll just drill a drain hole in the hatch well area before I pay that price!!
I can also buy a lot of urethane glass sealer for that price too!!
As for the "triangle piece", it's actually "rectanglular" in shape, and the explanation that was given to me at the time in 1988 was that it prevented water from coming into the hatch at the window transition between the deck lid and the glass!!
Remember, that was their explanation, I was just repeating it, here!!

I was at the same shop again today to buy some urethane glass sealer, and I was talking to one of the other guys who worked there, and he was saying that water can get in via the tail lights!!

I can't see that in my situation, as my car is usually parked facing uphill in the drive way, and should actually drain away from the car's rear end!!
I'll know more tomorrow when I start tearing things apart to find the water's entry point(s)!!
Wish me luck!!!
01-09-2011, 06:19 AM
#25
Senior Member
Join Date: May 2009
Location: Conway SC
Posts: 744
Likes: 0
Received 0 Likes
on
0 Posts
Car: 1988 Camaro
Engine: 385
Transmission: 700r4
Axle/Gears: 9 bolt
Re: Standing Water in Trunk
Dan, wow that glass shop is high or things cost a lot more in your area. I can buy two windshields installed and go to Mcd's after for that price. Maybe that's why I had a Viper in the shop last month that was from Canada. We fixed the car and he loaded it up on a trailer and carried it back up there. Either that or he was embarrassed to bring it home wrecked!
I probably worded that wrong about the dealership. In the 90's, at the dealership I worked at I remember we would seal some of those cars like you described but to keep the owners from fussing about the different appearance we'd steer them in the direction of that rectangle plastic piece. Actually had owner complain about the sealer, didn't look right to him. Is different but it seals the glass.
I probably worded that wrong about the dealership. In the 90's, at the dealership I worked at I remember we would seal some of those cars like you described but to keep the owners from fussing about the different appearance we'd steer them in the direction of that rectangle plastic piece. Actually had owner complain about the sealer, didn't look right to him. Is different but it seals the glass.
01-10-2011, 05:15 PM
#27
Senior Member
Join Date: May 2009
Location: Conway SC
Posts: 744
Likes: 0
Received 0 Likes
on
0 Posts
Car: 1988 Camaro
Engine: 385
Transmission: 700r4
Axle/Gears: 9 bolt
Re: Standing Water in Trunk
Doesn't matter if it does get in there. Rear body panel only has small holes for taillights and lock cylinder. Gaskets on taillights and thumbnuts should seal those up pretty well. Quick removal of rear body trim should show if they are leaking or not. Should be "tracks", stain from water running in.
01-10-2011, 05:22 PM
#28
Junior Member
Join Date: Oct 2010
Posts: 89
Likes: 0
Received 0 Likes
on
0 Posts
Re: Standing Water in Trunk
WHITE GOLD 88 -
i think you just gave me a good place to look for my leak, my taillight gaskets are shot and they need replacing. they pop out and don't seal anymore. that could be a problem. thank you.
mbh
i think you just gave me a good place to look for my leak, my taillight gaskets are shot and they need replacing. they pop out and don't seal anymore. that could be a problem. thank you.
mbh
01-10-2011, 06:04 PM
#29
Member

Join Date: Jul 2010
Location: NJ
Posts: 305
Likes: 0
Received 0 Likes
on
0 Posts
Car: 87 GTA flame red
Engine: 5.7 l98 cranes 2032 and chip
Transmission: stage 10 700r4
Axle/Gears: 3.27 axle
Re: Standing Water in Trunk
water gets in by the seal where the hatch and the glass conect and over time if your drain is cloged water fills up
01-10-2011, 06:56 PM
#30
Senior Member
Join Date: May 2009
Location: Conway SC
Posts: 744
Likes: 0
Received 0 Likes
on
0 Posts
Car: 1988 Camaro
Engine: 385
Transmission: 700r4
Axle/Gears: 9 bolt
Re: Standing Water in Trunk
The only other place in rear body panel I can think of is where the taillight wires go through, but that's on the drivers side. The pad on the back of your rear body trim should be wet if it's getting in around taillight mounts. The mod's post about using newspaper sounds like a good idea for finding leaks. Good luck with it.
01-18-2011, 11:11 PM
#32
Senior Member
Join Date: Dec 2009
Location: Chilliwack BC
Posts: 850
Likes: 0
Received 8 Likes
on
6 Posts
Car: White 1987 IROC-Z
Engine: 305 TPI LB9, 215 HP
Transmission: Borg-Warner T5 NWC
Axle/Gears: Borg-Warner 7.75 with 3.27 ratio
Re: Standing Water in Trunk
Did you find the source of your water leak???
Sorry that I haven't posted about my findings, work kind of got in the way of my "water fun"!!
I pulled my rear compartment carpet out of the hole, and found water, lots of water, but only in the hole!!
I do believe that I have it all dried up at least, and will be searching for the source of the water leak this weekend!! Barring any work interuptions, I should have the water leak sourced!!
I'm leaning towards the tail lights/spoiler bolts, as the water is leaving no trails on the interior plastic, nor the carpet, and the carpet is only wet in the bottom of the hole!!

I have taken a quick look at the tail light/spoiler bolts, and I have seen no water trails, but this leak of mine is relatively new so, maybe it just hasn't left any yet!!
Last edited by 87IROC-DAN61; 01-18-2011 at 11:18 PM.
01-18-2011, 11:25 PM
#33
Supreme Member
iTrader: (1)
Join Date: Mar 2010
Location: Goose Creek, SC
Posts: 1,088
Likes: 0
Received 0 Likes
on
0 Posts
Car: 1987 IROC-Z and 1988 Iroc-Z
Engine: 5.7 350 V8 and 5.0 305 V8
Transmission: 700R4 Automatic Transmission
Axle/Gears: 3.27 Posi
Re: Standing Water in Trunk
Hello MBH!!
Did you find the source of your water leak???
Sorry that I haven't posted about my findings, work kind of got in the way of my "water fun"!!
I pulled my rear compartment carpet out of the hole, and found water, lots of water, but only in the hole!!
I do believe that I have it all dried up at least, and will be searching for the source of the water leak this weekend!! Barring any work interuptions, I should have the water leak sourced!!
I'm leaning towards the tail lights/spoiler bolts, as the water is leaving no trails on the interior plastic, nor the carpet, and the carpet is only wet in the bottom of the hole!!
I have taken a quick look at the tail light/spoiler bolts, and I have seen no water trails, but this leak of mine is relatively new so, maybe it just hasn't left any yet!!
01-19-2011, 09:03 AM
#34
Junior Member
Join Date: Oct 2010
Posts: 89
Likes: 0
Received 0 Likes
on
0 Posts
Re: Standing Water in Trunk
87IROC-DAN61
Good to hear from you, I know my work was busy also. I finally found the leak. It was coming in from the seal where the glass meets the deck lid. It was getting underneath the carpet in the well. I traced it from the storage compartment to the left of the well with paper towels. Water was finding it's way there and into the well. I will get some sealant and seal up the deck lid. I might go to a glass shop and get estimate to seal it up correctly.
Off to work, take care.
MBH
01-19-2011, 08:02 PM
#35
Senior Member
Join Date: May 2009
Location: Conway SC
Posts: 744
Likes: 0
Received 0 Likes
on
0 Posts
Car: 1988 Camaro
Engine: 385
Transmission: 700r4
Axle/Gears: 9 bolt
Re: Standing Water in Trunk
MBH, if your hatch is like most and doesn't fit good, I'd take it apart. If it lines up good then just seal it up. No need in taking unnecessary risks with your back glass. Stuff happens!
01-20-2011, 12:23 AM
#36
Supreme Member
Join Date: Apr 2006
Location: Northern, CA
Posts: 4,482
Likes: 0
Received 8 Likes
on
8 Posts
Car: 1989 Iroc-Z Camaro
Engine: TBI,5.0
Transmission: Automatic 700R4
Axle/Gears: Eaton Posi,3.42,LPW Ultimate Cover
Re: Standing Water in Trunk
I'm glad to here that you found the leak. I was going to offer you a different idea on were the water could be coming from (I also had a leak but it was not coming from the hatch.) but if you found it , that's great.
Last edited by Ron U.S.M.C.; 01-20-2011 at 12:38 AM. Reason: add info.
01-20-2011, 12:44 AM
#37
Junior Member
Join Date: Jan 2011
Location: Tacoma, WA
Posts: 3
Likes: 0
Received 0 Likes
on
0 Posts
Car: Iroc
Engine: 350TPI
Transmission: 700r4
Axle/Gears: 3.42
Re: Standing Water in Trunk
Uggggh.... What's with f-bodies and leaking lol. I just found standing water in my trunk the other day too after a good rain.. I think it's just my weatherstripping.. but after reading all this it could be from more than one thing... looks like I got some work to do this weekend... 
01-20-2011, 01:18 AM
#38
Supreme Member
Join Date: Apr 2006
Location: Northern, CA
Posts: 4,482
Likes: 0
Received 8 Likes
on
8 Posts
Car: 1989 Iroc-Z Camaro
Engine: TBI,5.0
Transmission: Automatic 700R4
Axle/Gears: Eaton Posi,3.42,LPW Ultimate Cover
Re: Standing Water in Trunk
OK, this may sound way out there but my leak was coming from missing and loose rubber wing nuts that hold the rear lights on. The back side of the bottom inside part of the plastic covering the hatch motor was very wet and I found water also in the bottom of the trunk bay under the carpet mainly. There was also water in the bottom of the glove glove box next to the trunk. Two of the nuts were missing and the rest were loose. They need to be tight to make a seal or they will leak.You would not think something so small could cause a problem but water seems to have a mind of its own.I replaced and tighten the rest and the problem stopped. Thats just bin my experience. Maybe this will help. Just a thought.(be careful when tightening the nuts because there's a lot of tension between the nut and the bolt on the light. You don't want to crack anything.)
Last edited by Ron U.S.M.C.; 01-20-2011 at 01:24 AM. Reason: add info.
03-01-2011, 11:50 PM
#41
Senior Member
Join Date: Dec 2009
Location: Chilliwack BC
Posts: 850
Likes: 0
Received 8 Likes
on
6 Posts
Car: White 1987 IROC-Z
Engine: 305 TPI LB9, 215 HP
Transmission: Borg-Warner T5 NWC
Axle/Gears: Borg-Warner 7.75 with 3.27 ratio
Re: Standing Water in Trunk
Hello MBH!!
Sorry to have left this thread hanging with no reply, work, and a death in the family have taken up a lot of my time!!
Anyways enough of that, my leak has been traced to the two plastic patches on the side of the hatch that I mentioned before!!
What happens is the water gets to the side of the glass at the deck lid, and then runs between the black moulding, and the glass, to the two plastic patches, and then it runs down the top of the weatherstrip until it rolls over the edge at two places along the weatherstrip at the back edge, then it leaks down into the deep well area, from behind the rear cargo area plastic panel!!
My solution was to buy a new factory weatherstrip seal, and replace that, and then to apply some urethane to the two plastic patches to seal them up!!
My only problem with this is that it's been kind of cold here, and I don't have a heated garage, so I've been waiting for a relatively warm day, but it's not happening, so I'm playing the waiting game!!
Found another water entry source also, but it's not causing the water in the deep well area!!
The right rear spoiler extention is leaking at the top bolt, but the water leaks straight down into the spare tire well, and since there is a drain hole in there, it just drains away!!
I will seal that up with some strip caulk!!
03-02-2011, 05:36 AM
#42
Member
Join Date: May 2009
Location: Bergen, Norway
Posts: 225
Likes: 0
Received 0 Likes
on
0 Posts
Car: '87 Camaro SC
Engine: 305 LG4
Transmission: TH-700R4
Axle/Gears: 3.42
Re: Standing Water in Trunk
I too had that problem with water in my trunk. As mentioned here it was coming in from the deck where it meets the glass. Me and my dad took the entire thing apart, cleaned out all the old sealant (which was shot to heck) and laid new lines of something called Trans7. I was told that it is important that the new sealant is not silicone based, as silicone will deteriorate a lot quicker than newer types of sealer. Anyways, what I really wanted to say in this post is that I took some good pictures of it (...at least I think I did). I'll post them up here when I get home from work so that people can see how it looks like inside the rear hatch. Also, it wasn't really that difficult to take it all apart. Just follow the tech article about rear hatch reallignment, and be careful when supporting the glass so it doesn't break.
03-02-2011, 09:15 AM
#43
Junior Member

Join Date: Oct 2010
Location: Oakland, California
Posts: 25
Likes: 0
Received 1 Like
on
1 Post
Car: 1991 Camaro Z28
Engine: 5.7 TPI, Dyno Don Headers
Transmission: 700R4
Axle/Gears: Eaton Posi - 3.42
Re: Standing Water in Trunk
Great, the pictures will help a good deal!
03-02-2011, 10:59 AM
#44
Member
Join Date: May 2009
Location: Bergen, Norway
Posts: 225
Likes: 0
Received 0 Likes
on
0 Posts
Car: '87 Camaro SC
Engine: 305 LG4
Transmission: TH-700R4
Axle/Gears: 3.42
Taking your trunk lid apart (with pictures)
OK, so maybe I didn't take as many pictures as I remembered, but her goes:
Note: everything I write here is based on what I can remember and what you see in the pictures. I repaired my trunk in November of 09, so my memory might not be 100 % correct.
In order to unbolt the lid from the glass you need to remove the struts that support the rear hatch, which means you need to find an alternative way to support the hatch glass. I used two pieces of 2x4"and placed them like pillars on each side of the car. This might not be the best of ideas, but it worked for me. Before you start unbolting anything, note the position of the trunk lid on the glass using masking tape or similar. The holes in the glass are about an inch and a half in diameter, so there is plenty room for misalignment when time comes to reassemble. To reach the bolts you first have to remove the plastic inner liner of the trunk lid. This is held in place by a few small screws and has a lip facing the front of the car that is slid over the metal backing plate that sits underneath. After you've removed the screws. simply slide the plastic piece forward and it should come right off. I'd recommend taking pictures of it all to remember where it all goes back. Anything that comes off, take a picture of it BEFORE you take it off. If your car is anything like mine was there will be plenty of dust to outline where everything was, but it is still a good idea to take pictures.
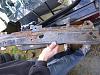
Here you can clearly see the effects of water coming in over an extended period of time. Not cool. This is the backing plate that sits underneath the glass and bolts to the top lid through three or four holes in the glass. As I recall there were plastic shims between the glass and the inner metal plate. They are there to create enough room for the lip of the plastic piece to be able to slide in between. If you put the shims on the other side of the glass you wont get the plastic inner trim back on. Also, be careful to note the position, direction and placement of the transitional plastic trim pieces that sit on either side of the trunk lid. They are two little rectangular pieces of black plastic that slides in place on the outer edges of the hatch glass to prevent water from running down into your trunk where the inner metal backing plate does not cover it. These fit both facing up and down, and I cannot remember which way is correct, only that I discovered that mine were facing the wrong way after everything had been put back together, so I had to redo them. The last thing I can recall that sit on the glass are two long rubber separators that keeps the glass and the metal from rubbing on one another.
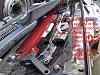
Note the old rotten silicone. All of it has to go, and wipe of any old remains with appropriate solvent before you put on the new stuff.
Also, on a side note, notice how my trunk lid is red underneath the black paint, even though the sticker on it matches my vin number. Strange.
Here we are getting ready to reassemble. As mentioned, I cannot guarantee that the position of the outer plastic trim pieces on these pictures are correct.
Note: everything I write here is based on what I can remember and what you see in the pictures. I repaired my trunk in November of 09, so my memory might not be 100 % correct.
In order to unbolt the lid from the glass you need to remove the struts that support the rear hatch, which means you need to find an alternative way to support the hatch glass. I used two pieces of 2x4"and placed them like pillars on each side of the car. This might not be the best of ideas, but it worked for me. Before you start unbolting anything, note the position of the trunk lid on the glass using masking tape or similar. The holes in the glass are about an inch and a half in diameter, so there is plenty room for misalignment when time comes to reassemble. To reach the bolts you first have to remove the plastic inner liner of the trunk lid. This is held in place by a few small screws and has a lip facing the front of the car that is slid over the metal backing plate that sits underneath. After you've removed the screws. simply slide the plastic piece forward and it should come right off. I'd recommend taking pictures of it all to remember where it all goes back. Anything that comes off, take a picture of it BEFORE you take it off. If your car is anything like mine was there will be plenty of dust to outline where everything was, but it is still a good idea to take pictures.

Here you can clearly see the effects of water coming in over an extended period of time. Not cool. This is the backing plate that sits underneath the glass and bolts to the top lid through three or four holes in the glass. As I recall there were plastic shims between the glass and the inner metal plate. They are there to create enough room for the lip of the plastic piece to be able to slide in between. If you put the shims on the other side of the glass you wont get the plastic inner trim back on. Also, be careful to note the position, direction and placement of the transitional plastic trim pieces that sit on either side of the trunk lid. They are two little rectangular pieces of black plastic that slides in place on the outer edges of the hatch glass to prevent water from running down into your trunk where the inner metal backing plate does not cover it. These fit both facing up and down, and I cannot remember which way is correct, only that I discovered that mine were facing the wrong way after everything had been put back together, so I had to redo them. The last thing I can recall that sit on the glass are two long rubber separators that keeps the glass and the metal from rubbing on one another.

Note the old rotten silicone. All of it has to go, and wipe of any old remains with appropriate solvent before you put on the new stuff.
Also, on a side note, notice how my trunk lid is red underneath the black paint, even though the sticker on it matches my vin number. Strange.

Here we are getting ready to reassemble. As mentioned, I cannot guarantee that the position of the outer plastic trim pieces on these pictures are correct.
03-02-2011, 11:17 AM
#45
Member
Join Date: May 2009
Location: Bergen, Norway
Posts: 225
Likes: 0
Received 0 Likes
on
0 Posts
Car: '87 Camaro SC
Engine: 305 LG4
Transmission: TH-700R4
Axle/Gears: 3.42
Taking your trunk lid apart (with pictures)
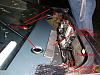
First rule of waterproofing: Apply liberally! 
It's hard to see in these pictures, but you'll clearly see where you need to apply your chosen silicone replacer to make a waterproof trunk. It forms the shape of an oval that leads water outside the trunk weatherstripping.

Everything sandblasted, repainted, filled to the brim with sealer and bolted back together.
Trans7 sealer: $10.99
Can of anti rust primer: $5.49
Can of black glossy paint: $4.99
Peace of mind: Priceless!
Disclaimer: All prices are entirely fictional, results may vary, performed at own risk, each set sold separatly, batteries not included.
Hope that helps.
Last edited by 87_LG4; 03-02-2011 at 11:33 AM.
03-06-2011, 12:54 AM
#46
Senior Member
Join Date: Dec 2009
Location: Chilliwack BC
Posts: 850
Likes: 0
Received 8 Likes
on
6 Posts
Car: White 1987 IROC-Z
Engine: 305 TPI LB9, 215 HP
Transmission: Borg-Warner T5 NWC
Axle/Gears: Borg-Warner 7.75 with 3.27 ratio
Re: Standing Water in Trunk
Hello 87_LG4!!
Thanks for the pictures!!

It always pays to see what your getting into, before you get into it!!

Thanks for the pictures!!
It always pays to see what your getting into, before you get into it!!
03-12-2011, 08:32 AM
#47
Junior Member
Join Date: Oct 2010
Posts: 89
Likes: 0
Received 0 Likes
on
0 Posts
Re: Standing Water in Trunk
87IROC-DAN61
Thank you for the update. i think i am going to use silicone and just seal the glass outside where it meets the hatch cover. that should prevent the water from coming in. that is my leak area.
just out of curiosity, where did you get the factory weatherstrip seal from?
hope all is well with you.
regards,
mbh
03-12-2011, 10:50 AM
#48
Senior Member
Join Date: Dec 2009
Location: Chilliwack BC
Posts: 850
Likes: 0
Received 8 Likes
on
6 Posts
Car: White 1987 IROC-Z
Engine: 305 TPI LB9, 215 HP
Transmission: Borg-Warner T5 NWC
Axle/Gears: Borg-Warner 7.75 with 3.27 ratio
Re: Standing Water in Trunk
87IROC-DAN61
Thank you for the update. i think i am going to use silicone and just seal the glass outside where it meets the hatch cover. that should prevent the water from coming in. that is my leak area.
just out of curiosity, where did you get the factory weatherstrip seal from?
hope all is well with you.
regards,
mbh
Thank you for the update. i think i am going to use silicone and just seal the glass outside where it meets the hatch cover. that should prevent the water from coming in. that is my leak area.
just out of curiosity, where did you get the factory weatherstrip seal from?
hope all is well with you.
regards,
mbh
I got the factory weatherstrip from my local GM dealer, I gave him a GM part # 10212939 and he found a few of them in the GM parts plant in Michigan!!
$99.00 from my local dealer!!
Nothing beats the feel of original "over priced" GM parts!!
03-13-2011, 01:00 PM
#49
Supreme Member
iTrader: (25)

Join Date: Feb 2006
Location: Manteca,California. Nor Cal.
Posts: 7,260
Likes: 0
Received 5 Likes
on
5 Posts
Car: SOLD IT. Mopar guy only now.
Engine: gone
Transmission: gone
Axle/Gears: gone
Re: Standing Water in Trunk
yup this is my car. I drilled holes in my bottom hatch area to help drain. I am going to pull out the glass and decklid have the glass tinted and reseal the deck lid.

Thread
Thread Starter
Forum
Replies
Last Post