When you click on links to various merchants on this site and make a purchase, this can result in this site earning a commission. Affiliate programs and affiliations include, but are not limited to, the eBay Partner Network.
Hey guys, my 91 TA has a rotted battery tray and it's the driver's side one that doesn't have any replicas for sale just yet (at least none that I was able to find). There's a few thirdgen Camaros at the JY near me but their batteries are on the passenger side. Can I use the driver's side tray from those? I think they hold the fuel evap canisters or something. Are the bolt holes for the brackets/battery holder gonna be the same? And if somebody can find some brand new driver's side trays, please let me know!
Hey guys, my 91 TA has a rotted battery tray and it's the driver's side one that doesn't have any replicas for sale just yet (at least none that I was able to find). There's a few thirdgen Camaros at the JY near me but their batteries are on the passenger side. Can I use the driver's side tray from those? I think they hold the fuel evap canisters or something. Are the bolt holes for the brackets/battery holder gonna be the same? And if somebody can find some brand new driver's side trays, please let me know!
Thanks!
Hey dont mean to hijack the thread but ii saw ur issue was solved. In my car i got some rust on the battery tray but it seems solid can i just sand it a bit and prime / paint over it and be fine? what should i do?
Hey dont mean to hijack the thread but ii saw ur issue was solved. In my car i got some rust on the battery tray but it seems solid can i just sand it a bit and prime / paint over it and be fine? what should i do?
Sure no problem.
If it's solid with no holes then I'd just slap on some Chassis Saver or POR-15. Should withstand any battery acid MUCH better than the factory paint.
sweet wanna take care of it while i can have seen what its ends up like when left alone lol not pretty
Yeah no problem... obviously you wanna scrap off most of the rust first but the labels have instructions. And you definitely wanna get to that because the PO of my car left a leaking battery in it as it was parked for a year and now I have no battery tray.
Hey guys, my 91 TA has a rotted battery tray and it's the driver's side one that doesn't have any replicas for sale just yet (at least none that I was able to find). There's a few thirdgen Camaros at the JY near me but their batteries are on the passenger side. Can I use the driver's side tray from those? I think they hold the fuel evap canisters or something. Are the bolt holes for the brackets/battery holder gonna be the same? And if somebody can find some brand new driver's side trays, please let me know!
Thanks!
Hello musclecar70sfan!!
The GM parts numbers for these two trays are 10092052 RH, and 10092053 LH, have you tried the stealership for new?
Also check your local body shop, they may have a line on the side that you need.
I saw a replacement part number of EL2669R for the left hand side, and EL2670R for the right hand side at a place called www.thepartsplaceinc.com
The left hand side one was a call for price, and the right hand side one was $39.00
This is of course if you want new!!
However if you want used, just rip one out of an old Camaro/Firebird, the one from the Camaro, has the mounting holes for the battery hold down, and the tab for the front of the battery.
Could you not use the more commonly available right hand side, but modified to fit???
I think you could, depending on how much you are trying to replace!!
If it's just the tray part, you should be able to cut out the old tray, and weld in the new tray, and if it's done good, you wouldn't even be able to tell!!
Last edited by 87IROC-DAN61; 12-30-2010 at 12:51 AM.
Did I try the stealership? The answer lies within the question itself my friend haha. And I don't think I can use the passenger side one because I noticed a metal tab that sticks out weird and my fabrication skills are terrible. I'll definitely look up the info you gave me, thank you very much!
Did I try the stealership? The answer lies within the question itself my friend haha. And I don't think I can use the passenger side one because I noticed a metal tab that sticks out weird and my fabrication skills are terrible. I'll definitely look up the info you gave me, thank you very much!
Hello musclecar70sfan!!
Maybe if your "fab" skills are a little questionable, you could get someone to do it for you!!
Yeah it's the piece that points out; I believe it sits flush with the unibody "frame rail" or whatever you'd call it. There's a picture right here: http://www.classicindustries.com/cam.../10092052.html
And there's also the vertical piece which looks questionable and it'll probably need a good amount of work to fit into the driver's side. No big deal though, I'll either find a new driver's side one or cut one out of the camaros at the junkyard. Thanks!
not to hijack a thread but to save yourself some future headaches on rusted out battery trays.
1) use an optima dry cell red top battery(expensive but stops from having a leaky battery)
2) get a trickle charger if the car is stored a lot as a red top doesn't like to go below 9 volts for a long period of time. or upgrade to from the red top to the optima yellow top(even more expensive) which is a deep cell and can drop to low volts and re-charge several times with no problems.
3) every few months or at least once a year. pull the battery out of the car and clean any dirt or trash that may be sitting down there. give it a quick scuff with steel wool or a scotch-brite pad. blow it out if you have an air compressor. lastly a quick coat of rustoleum black paint.
takes very little time and low cost (once you get the battery and trickle charger)
Yeah it's the piece that points out; I believe it sits flush with the unibody "frame rail" or whatever you'd call it. There's a picture right here: http://www.classicindustries.com/cam.../10092052.html
And there's also the vertical piece which looks questionable and it'll probably need a good amount of work to fit into the driver's side. No big deal though, I'll either find a new driver's side one or cut one out of the camaros at the junkyard. Thanks!
New to this place in posting, but not in researching. Figured i'd chip in on the battery tray issue, since my car was thoroughly rusted through, an '85 trans am with a pass. side battery. my answer was an easy find, Ebay. There are two sellers with passenger side battery trays, aftermarket, brand new....Just type in firebird battery tray and you should see two in the list for third gens. Price is about $40 plus shipping. I just ordered mine a few weeks ago and i havr yet to install it but it looks to be a perfect match, with all of the odd holes for hold-downs and etc.. My remaining problem is how to install the battery properly once i can finally remove the piece of tipsy plywood that the previous owner thought looked fantastic. Basically i'm unsure of what all of the holes are for and what i should do to prevent the new tray from ever giving me this grief. I'm guessing a battery tray mat will absorb any acid in the future.
Oh, and the seller i bought my battery tray from was Hawks Third Gen, so you can order from their site if you don't care for ebay. Good luck!
Well, it looks like it's going to either cost you $40.00 bucks, plus shipping and handling costs, and the time it takes to get to you. Or you could try to remedy the problem yourself. Even with minimum fabrication skills you still may surprise yourself if you want to give this a try.
Start off with some cardboard to make a templatre out of. ( it's easy to cut out and you can get an exacte shape and fit ), some sheet metal, a pair of tin snips, a hammer, an electric drill with drill bits, some nuts, bolts and washers, a can of spray paint in your choice of color, and some old newspaper. These are all the tols youn need for this fabrication. ( you could also add a tape measure to the list as well ).
The first thing you want to do is to measure out the battery tray area and then trace it out onto the cardboard. ( you can do this strictly by the measuring tape, or bending the cardboard in place and cutting it out to fit ). Whichever method you use, I would add a perimiter of 2 inches all the way around the template pattern.
Next trace this pattern onto your sheet metal, and cut this out with your tin snips, making sure you have your two inch perimiter, and the actual size pattern drawn so you can see it. Use the tin snips to cut from each corner edge down to the 2 inch margin of the template. Now, take the hammer and use a table edge and beat the edges down so that you form a cupped area all the way around template, ( which is the 2 inches and the reason you added them, as well as for securing them to the vehicle ).
Now, test fit the battery tray to see how well you did on it. If it fits right into place great, you;re almost done. If it still needs a little reshaping or conturing, with it in pl;ace gently tap it so that it conforms to the shape of the battery tray and it's flush there. Now take the electric drill and decide where to put a few holes to attach it into the engine bay. Once you have the placement set and the holes drilled, take it back out and prime it and paint it with it on the newspaper. Let it dry completely.
Once it's completely dry, put it in place take the nuts, bolts and washers and screw it into place, and place your battery in the tray. Volia, you're done, and you have a battery tray that cost you very little and it'll do the job.
Note: you Do have to option of drilling a hole in the center of the front of your battery tray to accept a battery hold down attachment that goes on top of your battery and hooks into the hole at the bottom of the tray to keep your battery from shifting or moving around. The reason this is important is that you can Kill a battery if it is allowed to bounce around not being secure. I know because I've done it.
I hope this helps you and it's one option that you do have. It's up to you. *S*
Camaro-454
I would GLADLY pay $40 bux. Just tell me who has it. Nobody has the drivers side box. I am sure I could fab a box. But I want factory look. I work at a chevy dealership and we can't get them anymore an no dealer has it. I also called classic industries and parts placeinc. They all say there is no inventory. So unless someone knows a supplier that has it. I guess I will be cutting one out of a junk car. Thanks.
OK here I am resurrecting a dead thread, but for a good reason! Even though this was posted almost 2 years ago, I'm finally tearing into my car and handling this battery tray issue.
Unfortunately, I never managed to find the driver's side battery tray like I need. However, after making a few measurements on the car, I decided to pull the trigger on a passenger side one and making it fit. Hopefully it'll arrive in time for the weekend, and my friend (who's great with welding/fab work) agreed that we could probably make the passenger side tray work where I need it to be.
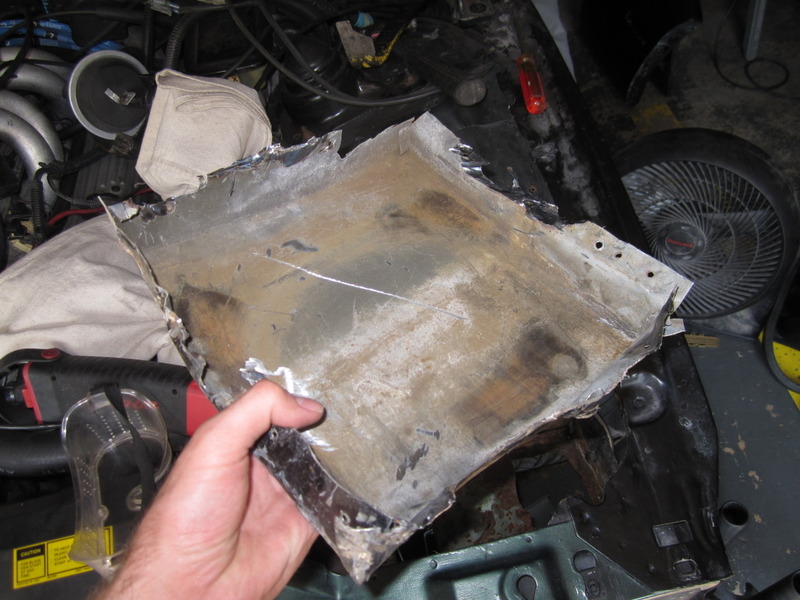
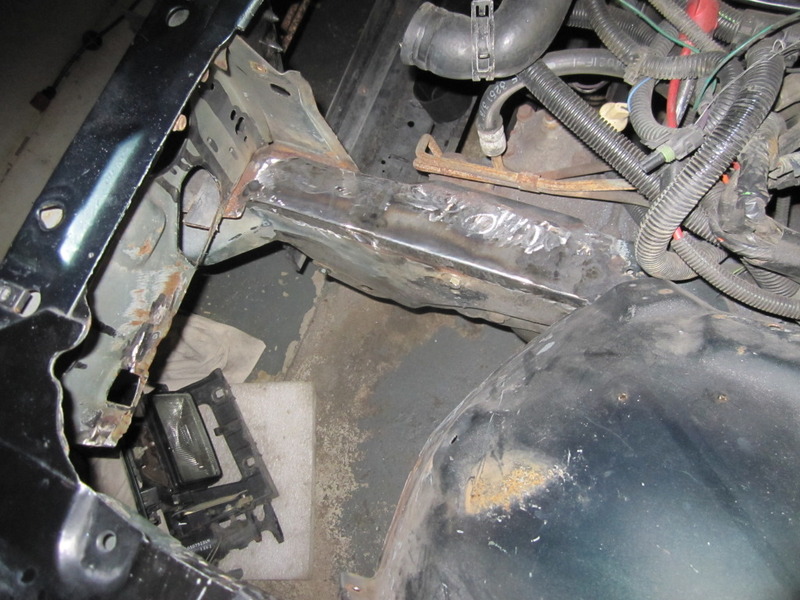
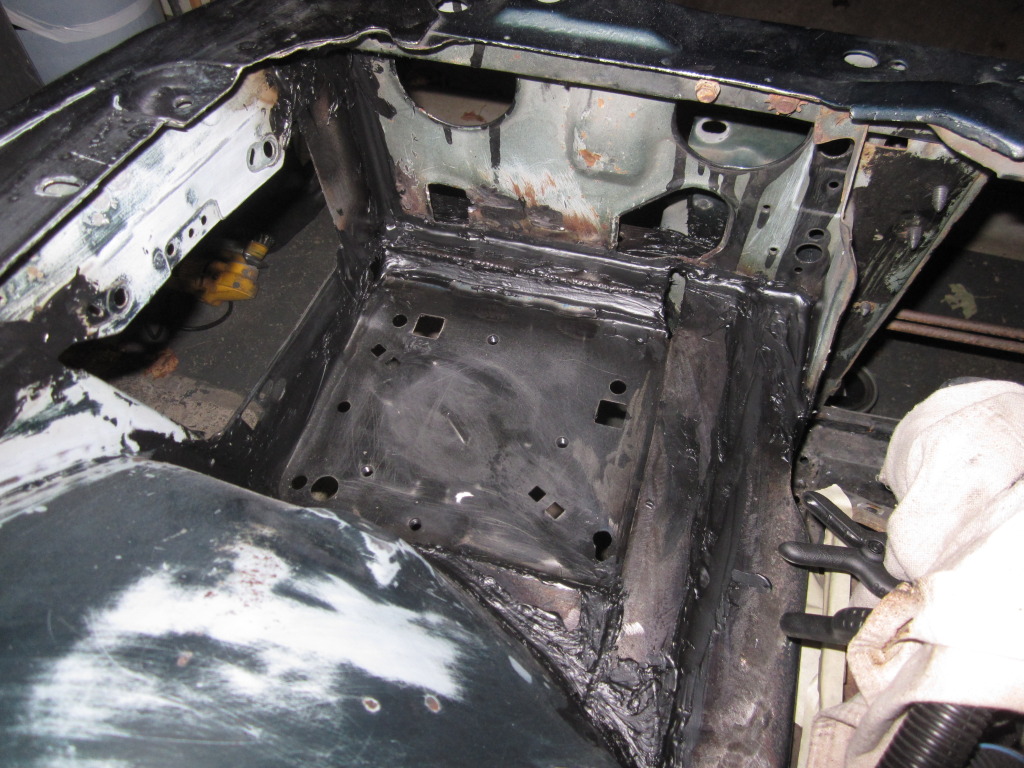
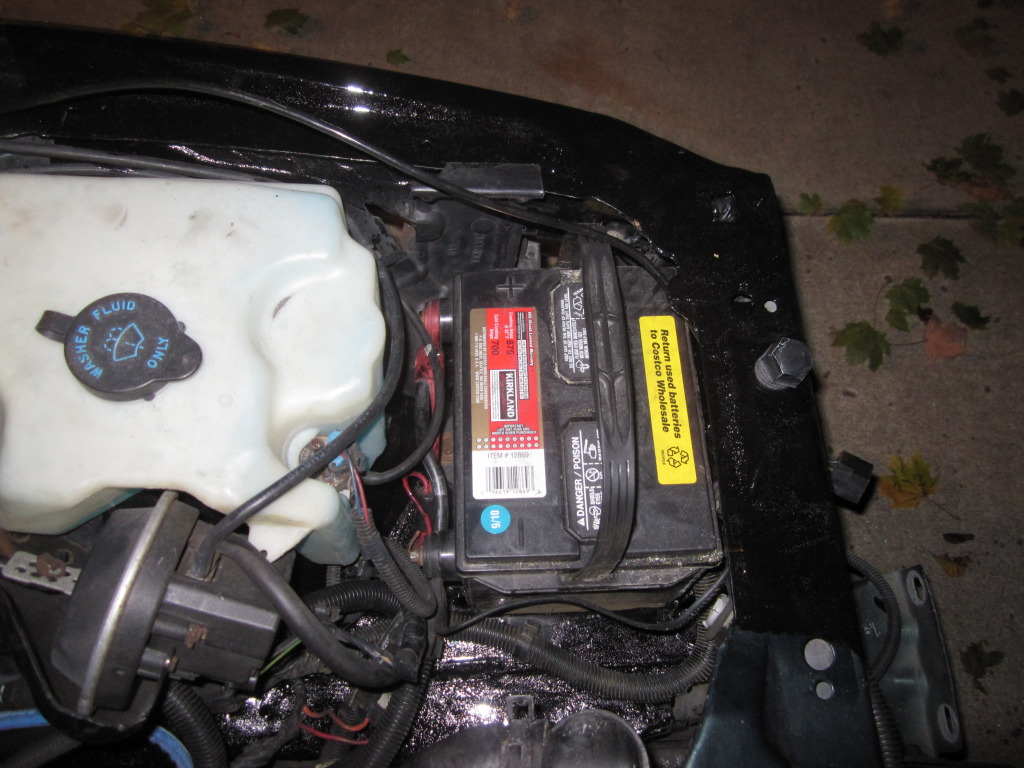
In the mean time, here's a picture of the carnage we'll be dealing with. As you can see, over time the original one rotted to almost nothing, and somebody decided to do me a "favor" and weld a slab of metal on top of this crap with NO prep work whatsoever.
I'll keep you all posted. Hopefully this will be done this weekend.
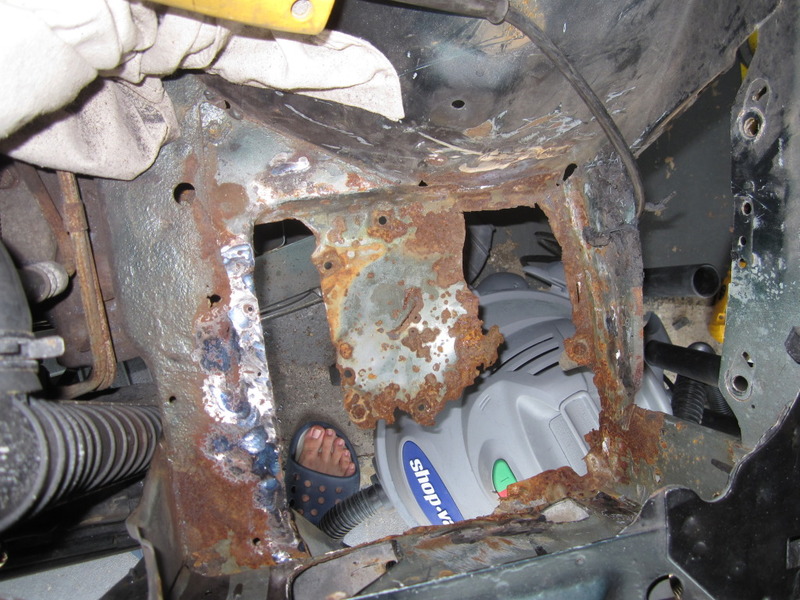
I'm gonna spend the day cleaning this out the best I can to get the metal ready for when it's time to weld the new tray in. Fedex is saying the battery tray should arrive tomorrow.
Wow, that's even worse than mine was before I cut it out . I still fail to see why the aftermarket doesn't produce the trays for the driver's side as they're pretty much a mirror image of what's on the other side. Not to mention the fact that a majority of Birds have the battery on the driver's side due to the air box. Seriously, who do we have to get a hold of to get these things made ?
I wish you luck in your retrofit of the passenger's side tray. Hopefully it can be done without too much fuss, and some instructions can be made for the rest of us. When you're done, get a hold of some stuff called "Battery Mat" and put it under the battery... It's supposed to neutralize the battery acid that leaks out and prevent it from eating the metal underneath. I'd also coat the tray with bedliner to act as an additional barrier against what may or may not seep through (actually, I already have on the 88).
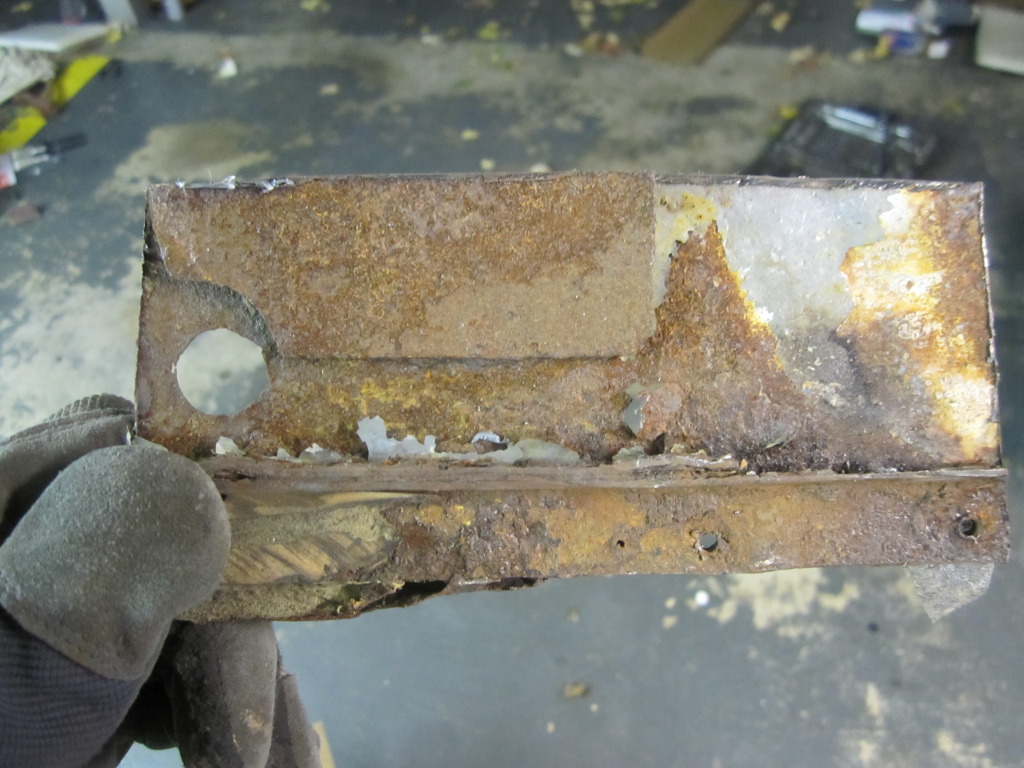
Yeah it's not pretty, and I'm disappointed to see that I'll probably have to cut as far as the actual frame rail because the rust spread to there and ate up the metal badly. Fortunately it's just the top of it that's bad, so cutting that piece out and welding in a new plate shouldn't be too bad. And trust me, when this is done, I think the rest of the car will rot away before this battery tray will.
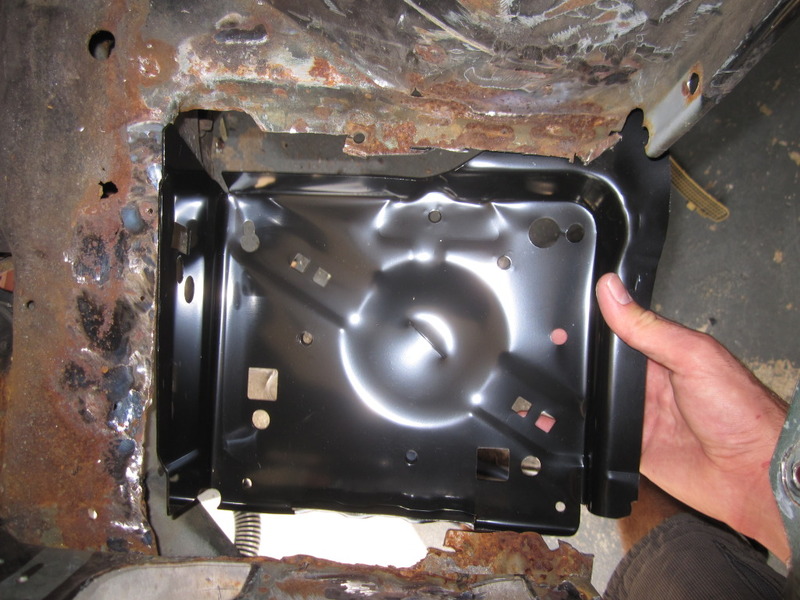
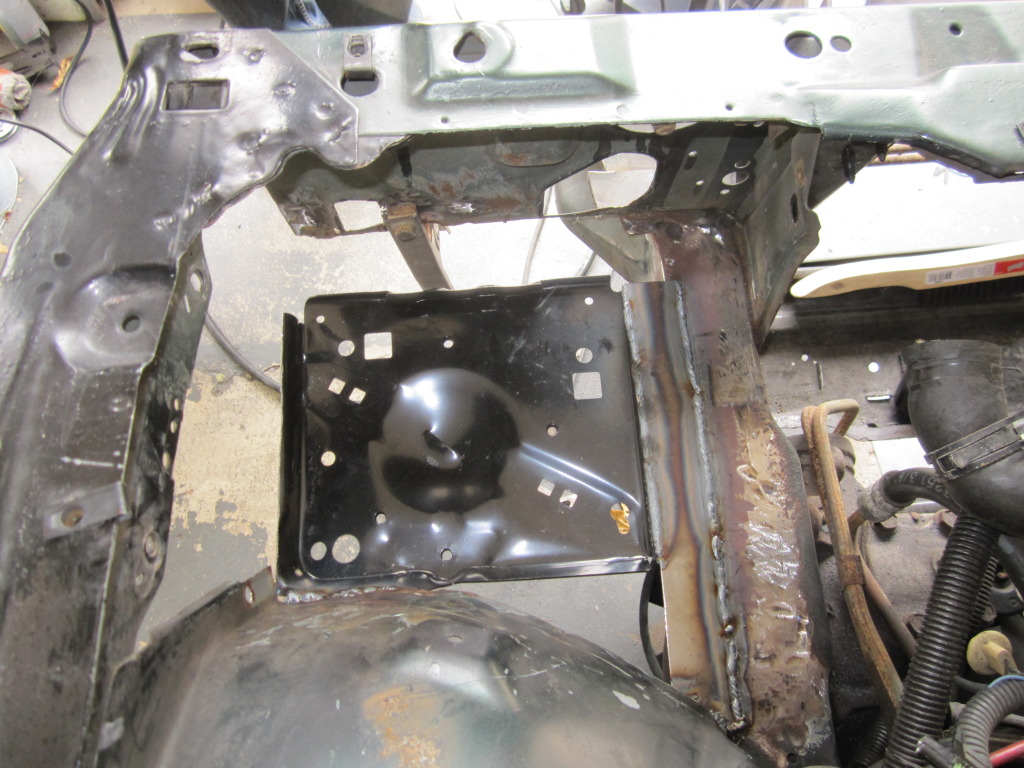
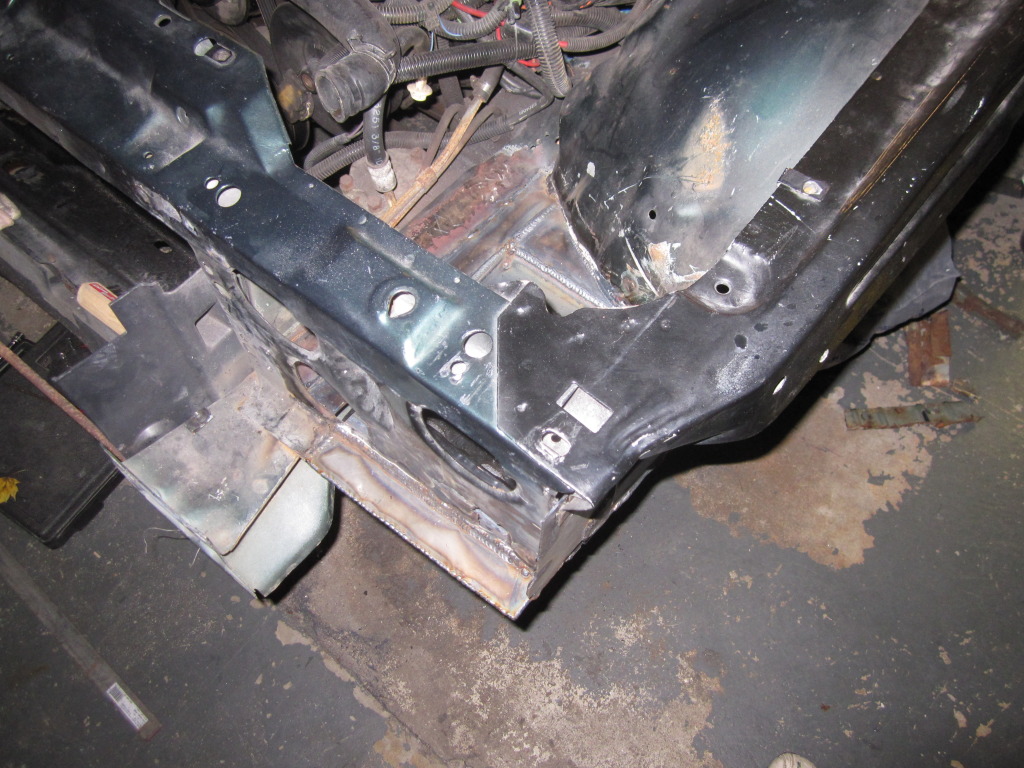
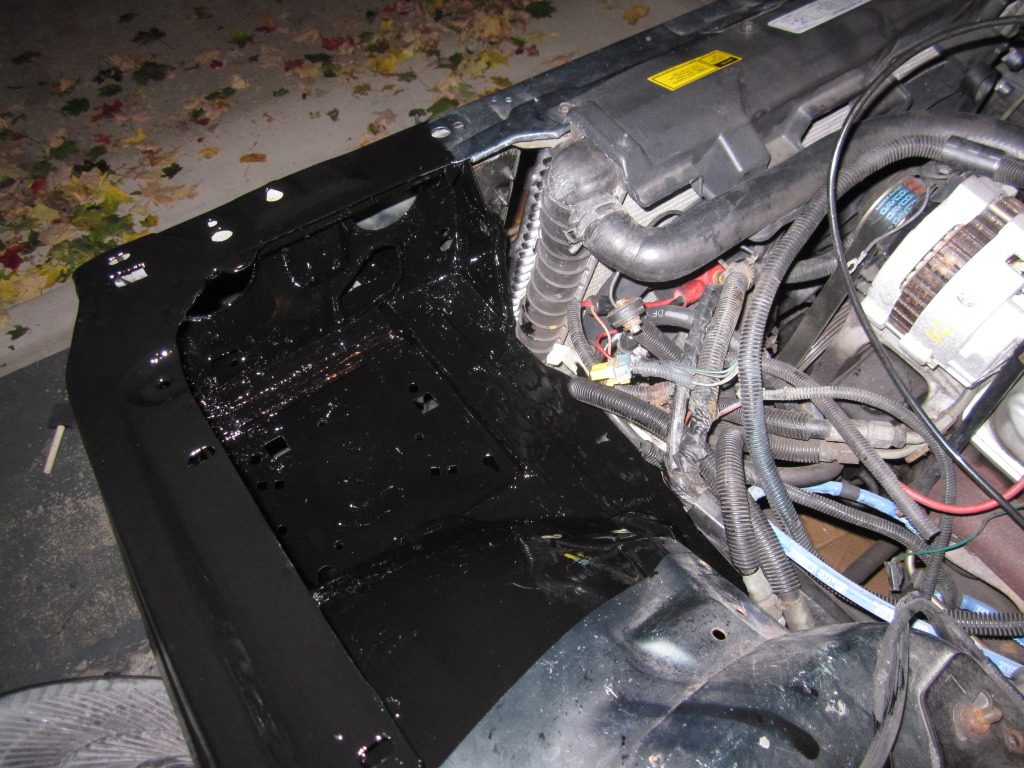
My battery tray came in today (in a timely fashion, as is usually the norm with Summit Racing ). After checking it out, it shouldn't be difficult at all making it fit, just a matter of trimming the excess metal around the tray itself used to mount it to the subframe on the passenger side and then welding in some of your own stuff to hold it in place. Here's a little picture of about where it'll sit... as you can see I still have a considerable amount of cancer left to cut out and after a decent amount of metal will need to be welded in to hold this in.
It'll take some work but I don't think it should be too difficult! Then again, my friend's the one doing the welding so I'll let him do the talking.
Last edited by musclecar70sfan; 08-18-2012 at 10:21 AM.
I had my battery on the passenger side originally. Same problem as most of you PO left in an old battery and it leaked getting acid over the tray and rotting it out to nothing. My solution was to take out the charcoal canister and the vacuum actuated cruise control module from the driver side and move a new non leaking battery over to there. about 5 feet of 4 awg cable some terminals and a hold down kit solved my problem. I was even able to use the same negative cable. Just attached it to the bolt holding the power steering on instead of the one holding the alternator. Really easy job too. Much easier then cutting and welding or drilling and riveting.
I had my battery on the passenger side originally. Same problem as most of you PO left in an old battery and it leaked getting acid over the tray and rotting it out to nothing. My solution was to take out the charcoal canister and the vacuum actuated cruise control module from the driver side and move a new non leaking battery over to there. about 5 feet of 4 awg cable some terminals and a hold down kit solved my problem. I was even able to use the same negative cable. Just attached it to the bolt holding the power steering on instead of the one holding the alternator. Really easy job too. Much easier then cutting and welding or drilling and riveting.
So from my understanding you left the rotted tray alone?
For now yes. I will go back and solve the rusting problem as soon as I get the tools to do so. Kinda hard to cut that thick of steel with a dremel.
Alright so your advice was pretty much telling me to just move the battery and leave it alone for now... further delaying this project. No offense but that wasn't helpful at all. But feel free to come back here looking for advice once you come around to fixing your car the right way.
what I did solved the problem. It was a lot easier and cheaper then welding in a whole new battery tray. How much did that tray cost you? How about the rest of the parts your going to need? What about all that welding your going to have to do? How much is that going to cost? Sorry but if I can do something to fix a problem immediately for 25 dollars I'll do it. The rust that is on the passenger side hasn't gone anywhere in the past 4 years I've owned the car. Did I fix the problem of the battery potentially falling through the car as I'm driving? Yes I did. Did I fix the problem of not being able to properly strap down the battery? Yes I did. Therefore It's a valid and cheaper fix. Thank you. When YOU need to know how to fix something without spending more money then you need to cause you have a budget you can let me know and maybe I will help you. Have a nice day and Try not to rip on someone else solution to a problem. It's very rude
what I did solved the problem. It was a lot easier and cheaper then welding in a whole new battery tray. How much did that tray cost you? How about the rest of the parts your going to need? What about all that welding your going to have to do? How much is that going to cost? Sorry but if I can do something to fix a problem immediately for 25 dollars I'll do it. The rust that is on the passenger side hasn't gone anywhere in the past 4 years I've owned the car. Did I fix the problem of the battery potentially falling through the car as I'm driving? Yes I did. Did I fix the problem of not being able to properly strap down the battery? Yes I did. Therefore It's a valid and cheaper fix. Thank you. When YOU need to know how to fix something without spending more money then you need to cause you have a budget you can let me know and maybe I will help you. Have a nice day and Try not to rip on someone else solution to a problem. It's very rude
A simple "band-aid" alternative wasn't the point of this thread and your pointers were nice but irrelevant; it might run me 80-100 dollars to fix but at least I know that this will get fixed correctly and last a long time. I actually got rather annoyed when you suggested your repair and then ended with "it's much easier then cutting and welding or drilling and riveting." Well no kidding it is! But is that the right way of doing it? Not if you ask me. My Trans Am (while not perfect) is a valued possession of mine and I want it being repaired the proper way if my time, money, and resources allow for it. With this project, that criteria is finally met so I'm giving myself the green light to take this on. Now lets stop bickering and get back to getting our hands greasy.
A band-aid fix would have been what I did before I moved the battery. When me and my buddy dropped the new engine in we simply found a slightly larger piece of steel put it over the hole and held the battery down with a bungie cord. That my unbudget minded friend is a band-aid fix. Moving the entire battery to solid metal from the car installing a new battery hold down kit and rerouting the positive battery cable and alternator wire is not a band-aid fix. I would call that more of a budget fix cause apparently unlike you I am not made out of money and don't have the cash flow to spend 80 to 100 on my car. believe me if I did have money top throw at my car it would be painted with a new 6 speed saginaw trans a moser posi rear end and an aluminum balanced drive shaft driven by a world products small block 454 (they do exist look it up). I also would have a fully tuneable suspension. The fixes I do would be more minded to those of us that have families with tight budgets that still love our cars but have higher priorities then that at this point in our lives. Oh but my apologies for trying to give you a cheaper easier way to actually fix something. Will the passenger side hole get fixed. Yes it will. Is the battery in danger of ever falling out. No it isn't. Thank you good night I have a family to go to work for.
I would call that more of a budget fix cause apparently unlike you I am not made out of money and don't have the cash flow to spend 80 to 100 on my car.
I go to school; when's the last time you last met a college student made of money? But you wouldn't know that because I don't spend time digressing on other people's project threads with my life story.
RETURNING TO THE ORIGINAL TOPIC, this should be getting welded tomorrow or Wednesday.
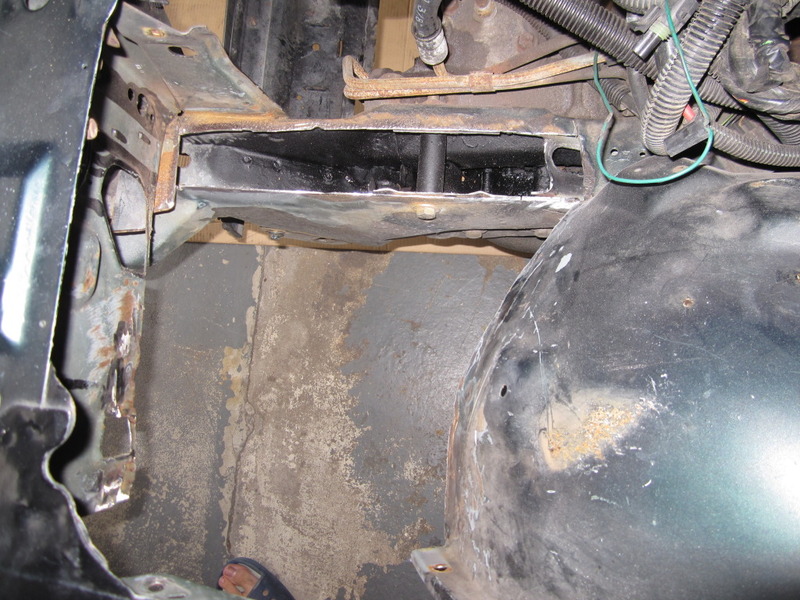
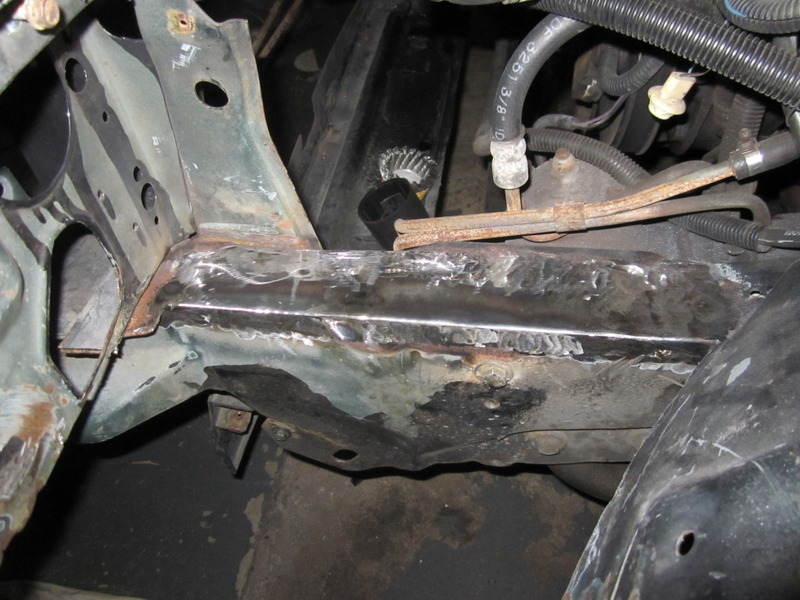
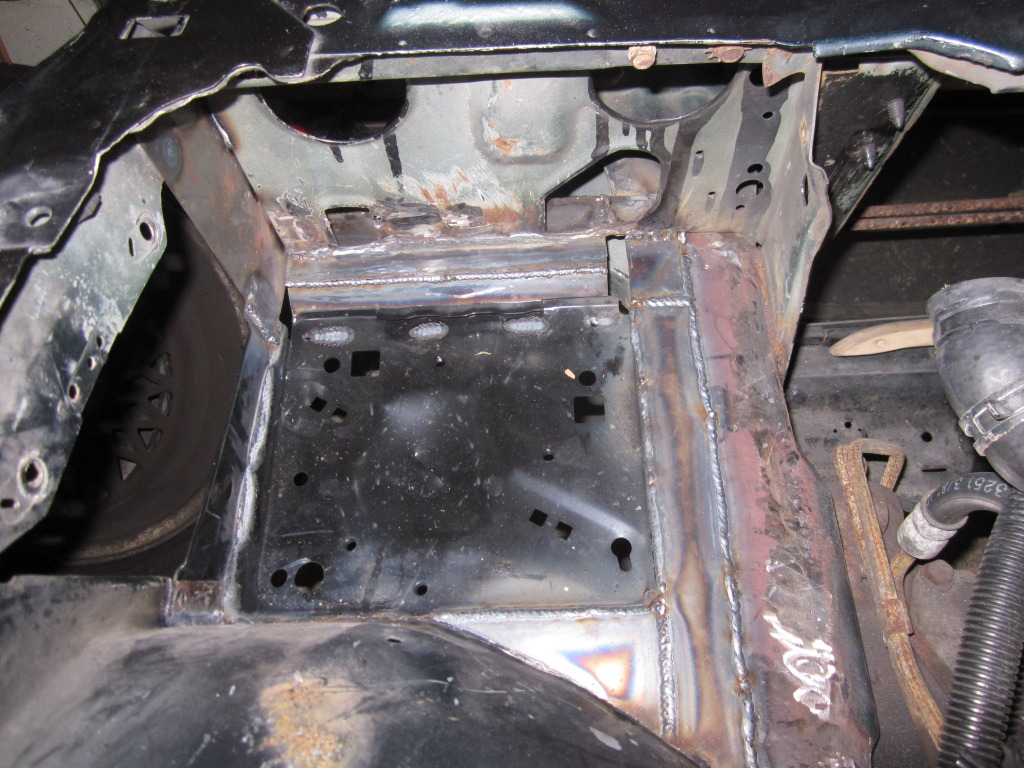
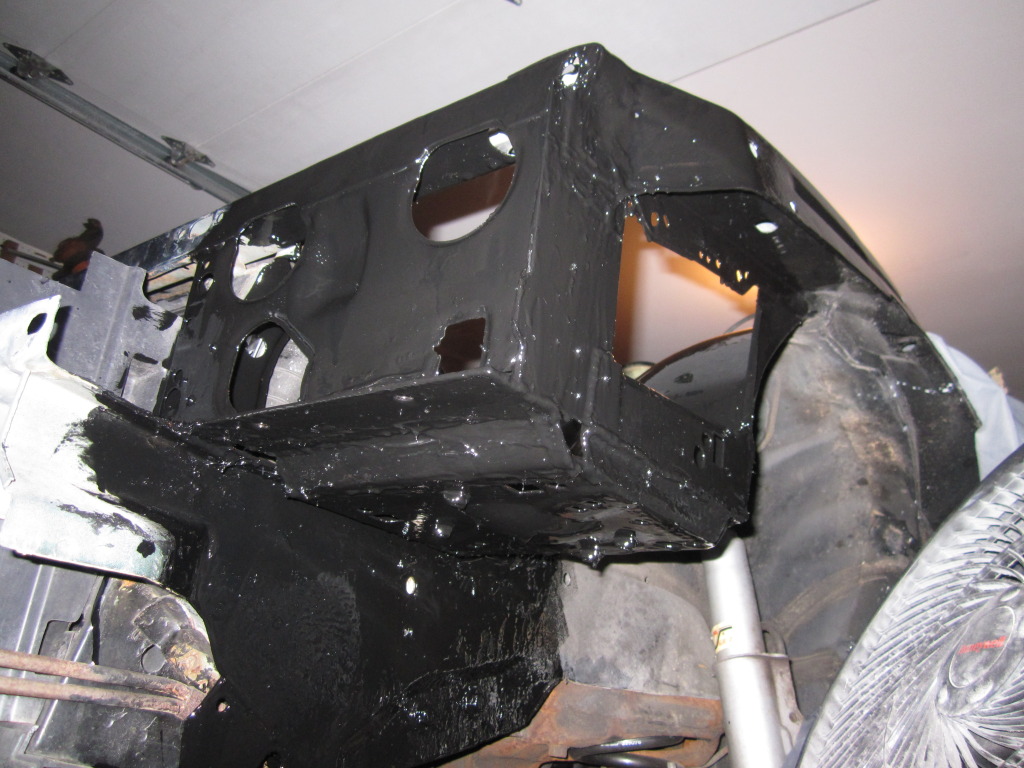
Little bit of a delay but my buddy came over today and welded up the frame rail for me. We still have a bit more sheet metal to throw in there, but at least the frame is now boxed up and solid as a rock.
Here's the before... I liberally sprayed a lot of rust reformer into the frame rail before it got welded up:
And the after:
He did a really awesome job so far!
The pictures honestly don't do the work much justice; the new metal (including the welds) have been ground down nicely and are smooth as glass now. It'll probably look very close to factory when it's done and painted.
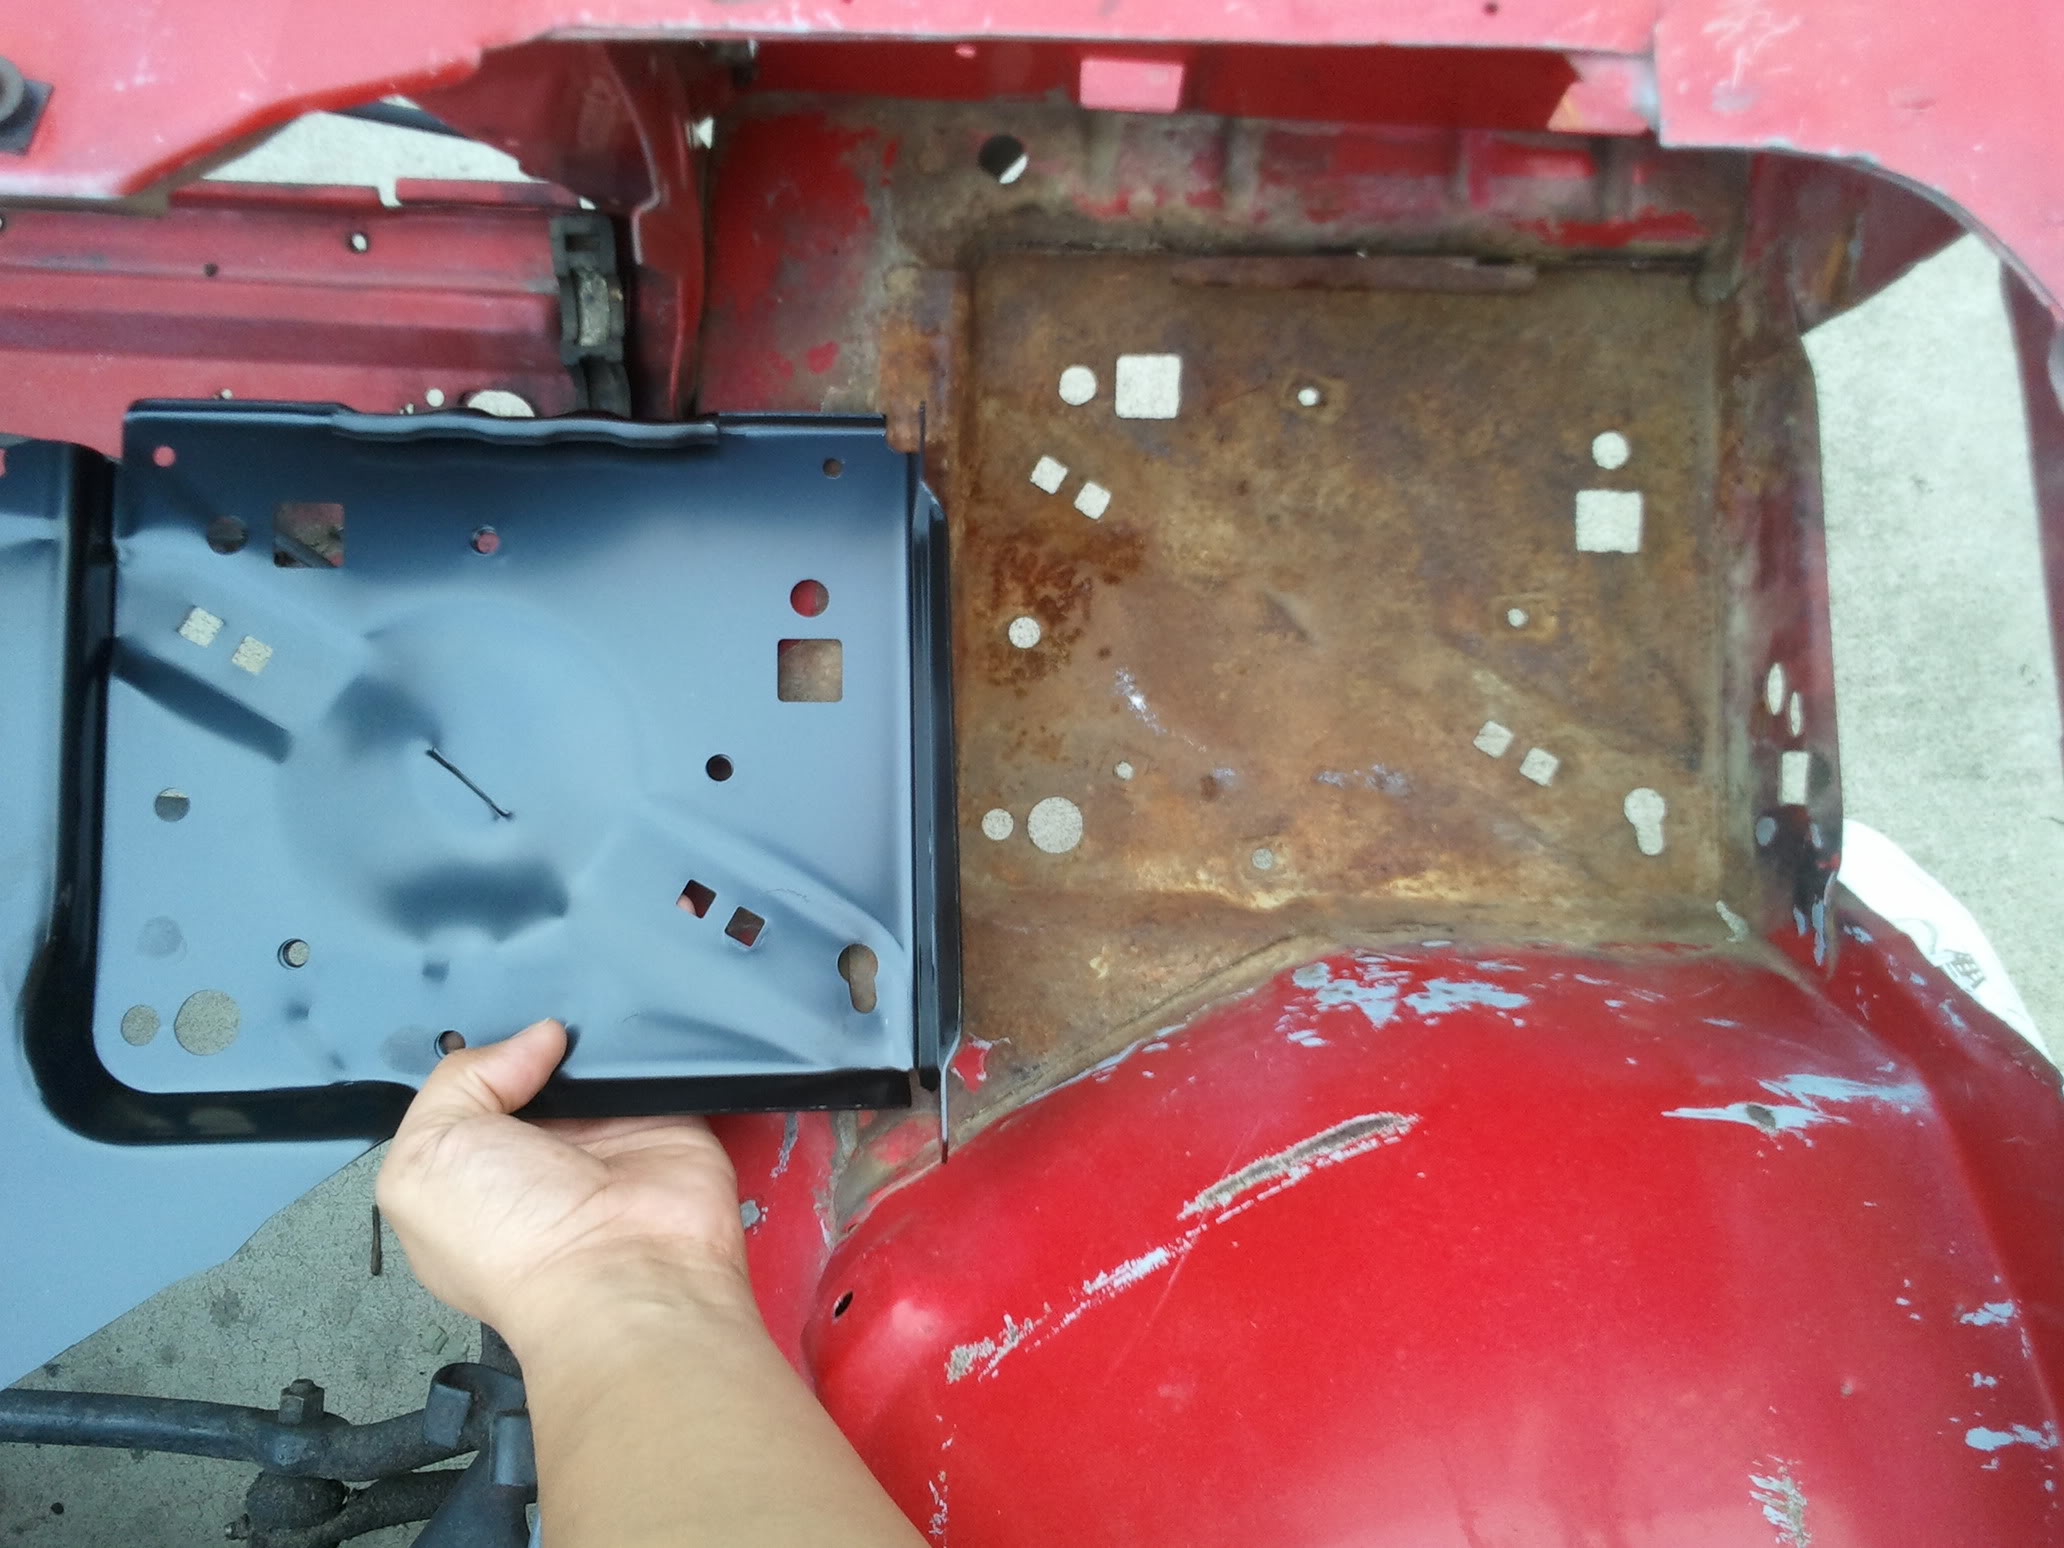
I was able to find the pass tray, but never found the driver side. this one is from hawks. looks to be sheet metal, with a little effort, it can be made to fit the other side.
I was able to find the pass tray, but never found the driver side. this one is from hawks. looks to be sheet metal, with a little effort, it can be made to fit the other side.
Yeah that's the idea... I already have a passenger side tray and it looks identical to yours; Hawks and Summit probably sell the same units. Shouldn't be too bad, and seeing that mine needed a pretty hefty tear down and rebuild, modifying this tray to fit will probably be the easiest bit of the equation.
Last edited by musclecar70sfan; 09-04-2012 at 01:35 PM.
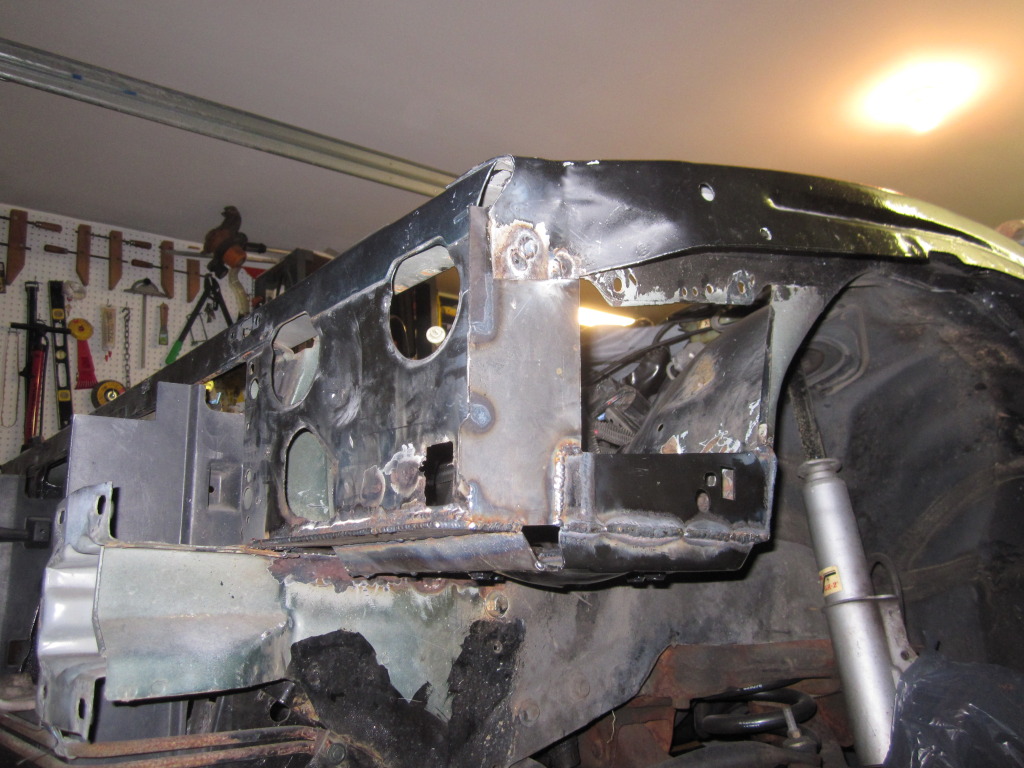
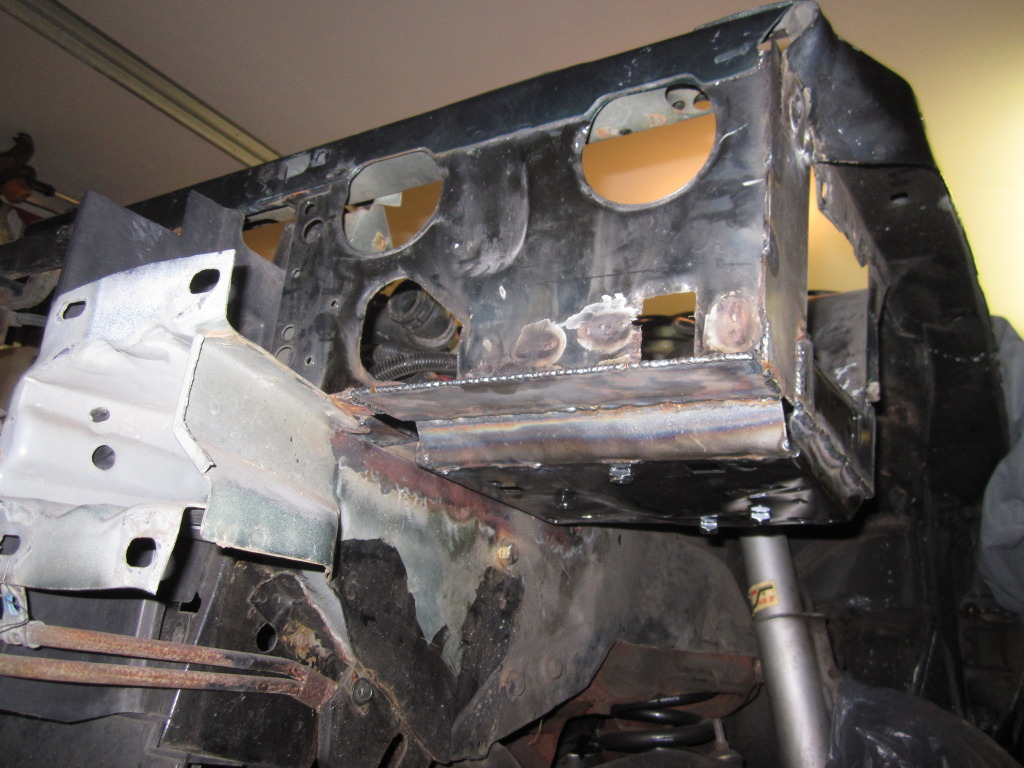
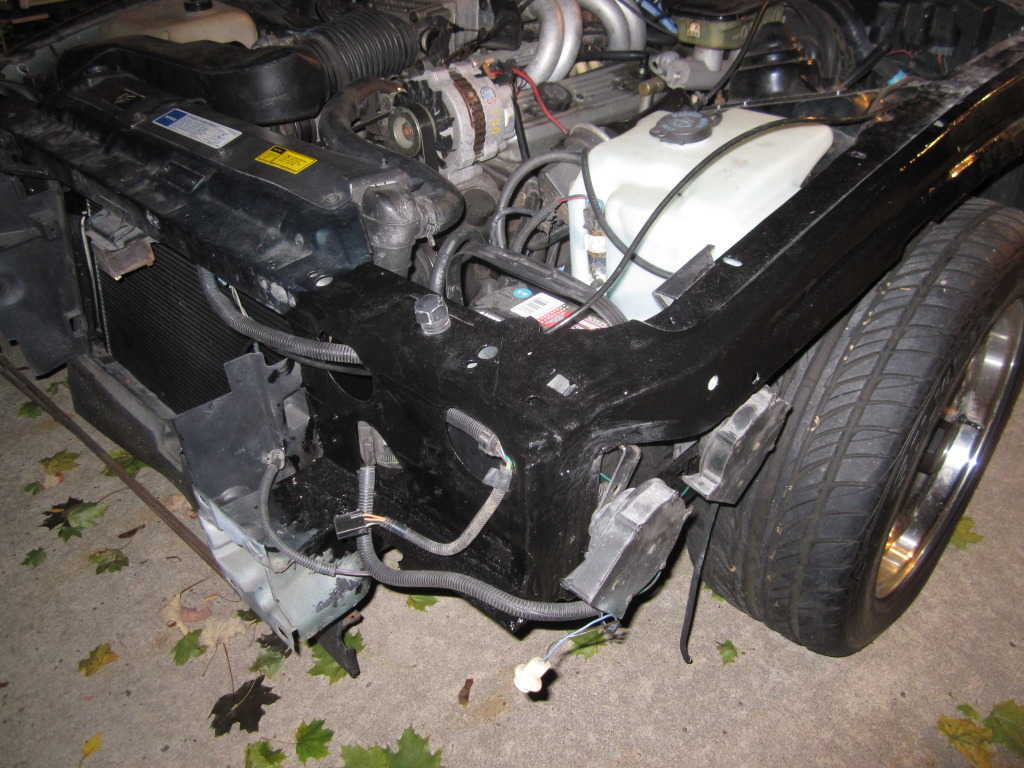
My buddy did a great job, the thing looks good and is solid as a rock! I'm just going to grind the welds down and throw some seam sealer as well as VERY good and VERY rust-resistant paint.
So YES, a passenger side battery tray CAN be fitted to the driver's side on a thirdgen with some ingenuity. Granted, mine was a bit of an unusual case seeing just how awful the rust was and how it even spread to the frame of the car. As a result, a good chunk had to be replaced. But the metal is healthy now and just waiting for the final touches. Hope this helps anybody who's in a similar situation to mine.
i must say the proper repair comes out so much nicer doesn't it. i always wondered about grafting a chevy 3500 battery tray in. i originally had my battery on the passenger side but when i switched to tpi i had to move it to the driver side. of course i had a slightly rusted under battery till i wire wheeled the hell out of it and rustproofed it.
i must say the proper repair comes out so much nicer doesn't it. i always wondered about grafting a chevy 3500 battery tray in. i originally had my battery on the passenger side but when i switched to tpi i had to move it to the driver side. of course i had a slightly rusted under battery till i wire wheeled the hell out of it and rustproofed it.
Thanks! You're telling me! Haha, I love seeing it put together the right way . And I have no idea about the 3500 battery tray; never even saw one. And you're from Wallingford huh? What does your car look like? I could've sworn I've seen a blue Formula down there back in the summer. By the way, I live in Plainville about 20 minutes or so away.
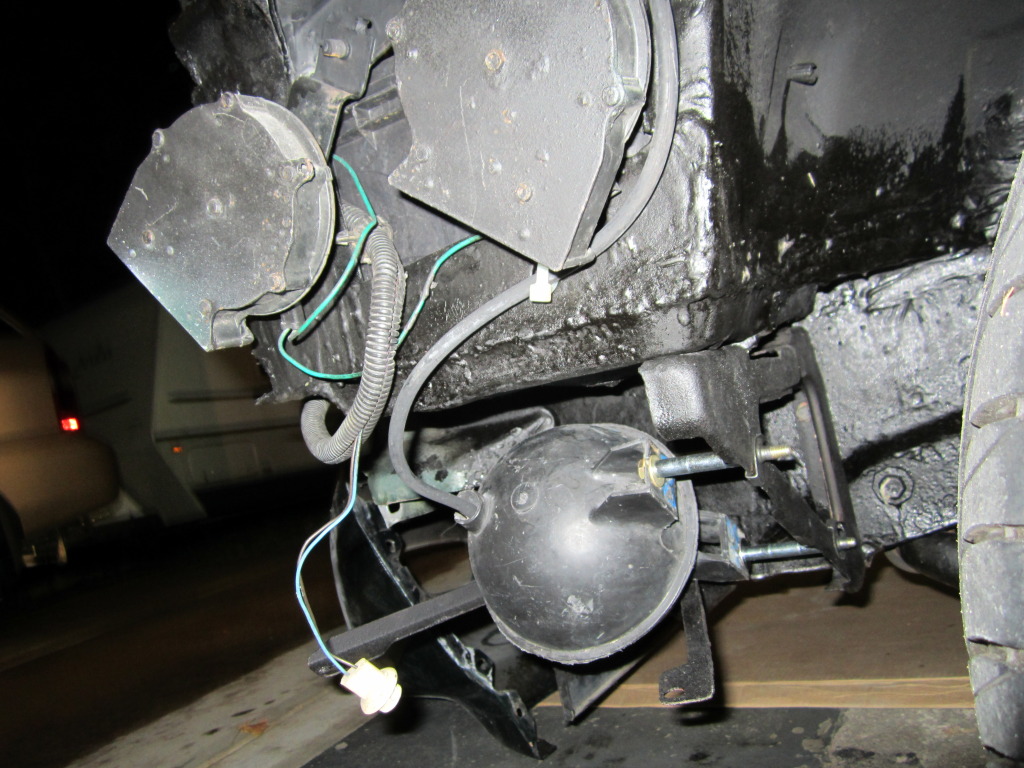
Oh and I figured I'd let you guys know how I mounted the vacuum reservoir. I thought it would've just bolted straight to the bottom of the battery tray like factory, but it turns out the screws would have been poking the battery. I could've made some mount or stand for the battery to give it clearance, but I was afraid it would be easier for it to move under heavy cornering and I didn't want to change the fact that it's clamped in there TIGHT right now. So I modified that triangular brace underneath it, got some 2 1/2 or 3 inch bolts (to clear the v-shaped fender mount) and mounted the reservoir to that. Looks funny, but it's functional, holding good and won't be visible once the car's back together.
I have the same issue on my "new-to-me" '98 IROC-Z... Just thinking out loud, shoot my idea down is it is not plausible. I have not welded before, but after the reviews of the 120v Harbor Freight welder... I am thinking of securing some 18ga or equivalent sheet metal, cleaning up the area where the try is now (i.e. removing the original tray by drilling it out and grinding where applicable). Using some angle iron, creating some mounting points and rest flanges for the battery to sit in and tack welding some angle iron underneath the flat piece of sheet metal that will be welded in where the original tray resided....
this way I have made a solid and secure battery tray. Even installing an OE or one cut out from a parts car at the salvage yard, I would still need to weld....
I've been in denial about the condition of my battery tray.
I was lying under the car today, and I noticed the underside of the tray - or what was left of it. Very bad. Very, very bad.
So, I ordered up a tray from Hawks. I haven't welded since 1979, so this should be interesting. I'm thinking about giving the $100 Harbor Freight flux-core welder a try.
I've read using this welder using Lincoln wire works well.
A good, "cheap" 110/120V welder is the Lincoln 140. I did a bunch of welding with it with a 15 amp breaker, just had to be careful to not go too hot or too long, but now that I put in a dedicated 20amp circuit, I can weld anything I'll ever need to do (I think it can handle 3/8" metal, which is thicker than anything you'll ever need on a car or a trailer).
With an available spool gun attachment you can also weld aluminum. It's either flux or gas shielded as well.
There are tools I go bargain basement on, and some I spend a bit of money on. Chances are, I will never need another, stronger welder, and in all respects, it isn't that much money, I got mine here for $450 Canadian on sale, not sure what they would be in the states, but considering we get screwed when stuff comes across the border and the exchange rate, I bet they are much cheaper in the states.
 12-25-2010, 05:50 PM