Another firebird Autometer gauge panel
 08-28-2009, 12:57 PM
#1
Senior Member

Thread Starter
iTrader: (3)
Join Date: Oct 2004
Location: Charleston, SC
Posts: 805
Likes: 0
Received 3 Likes
on
3 Posts
Car: '85 TA
Engine: 350 turbo
Transmission: T56
Axle/Gears: 3.70 posi 9bolt
Another firebird Autometer gauge panel
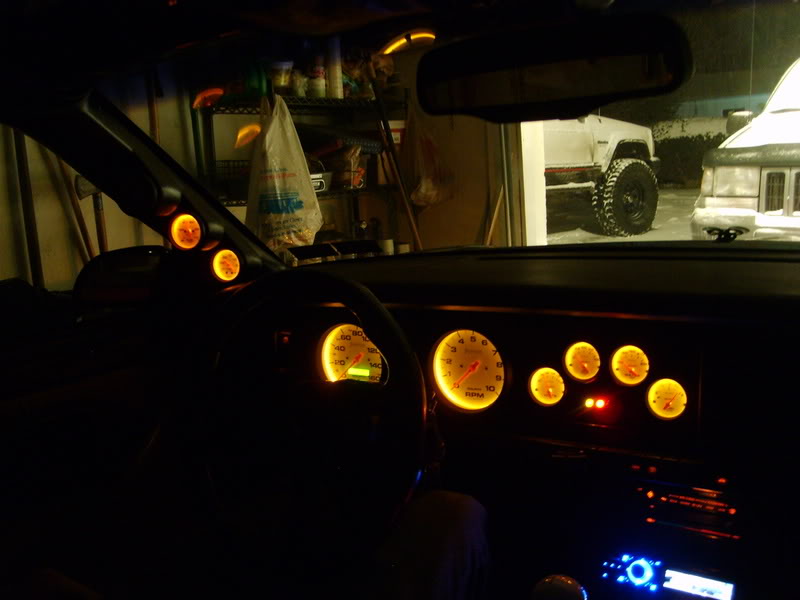
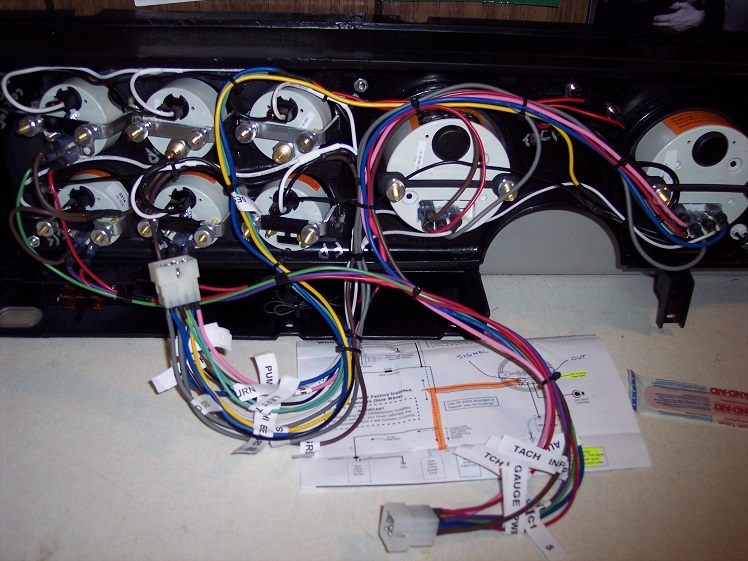
After collecting a full set of Autometer carbon fiber gauges, I was ready to start modifying the original plastic piece. I used a 5" speedo and tach, so I had to enlarge those holes using a 4-1/2" hole saw. The other five gauges are 2-1/16" and I cut holes in the panel to make an oval (like ghettocruiser did). Then, I used 1/8" abs plastic and a 2" hole saw to make the insert. Next, I glued it in and here's the result:


Next, came the wiring and I used 8 row terminal strips to organize sets of wires easily (power, ground, light).

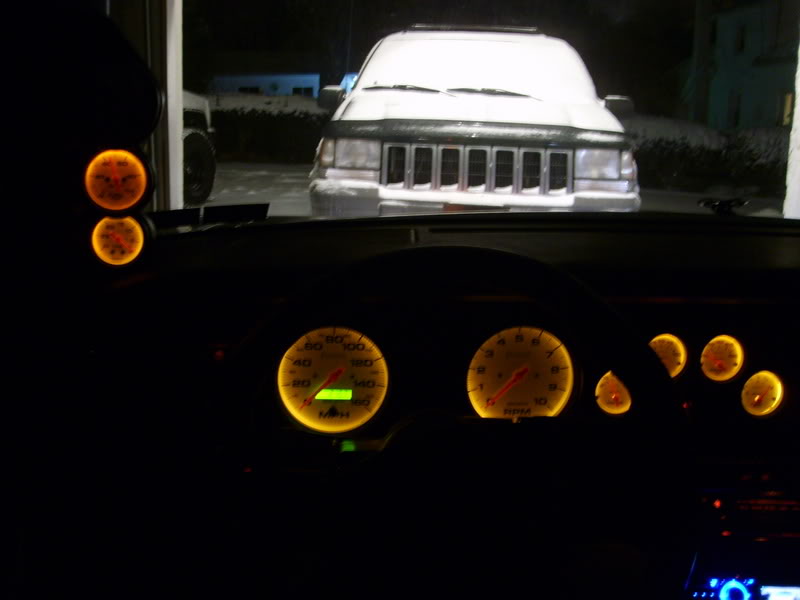
Finally, the only thing left was to run the power/ground from the factory wiring harness and the sending unit wires to the gauges. I used about 2ft. of wire for each, which made connecting everything up before mounting the panel a breeze. Here is what it looks like:


Next, came the wiring and I used 8 row terminal strips to organize sets of wires easily (power, ground, light).
Finally, the only thing left was to run the power/ground from the factory wiring harness and the sending unit wires to the gauges. I used about 2ft. of wire for each, which made connecting everything up before mounting the panel a breeze. Here is what it looks like:
 08-28-2009, 01:19 PM
#2
Member
iTrader: (1)
Join Date: Oct 2007
Location: Dumfries, Va
Posts: 150
Likes: 0
Received 0 Likes
on
0 Posts
Car: '89 Formula Firebird
Engine: LSX-451 / 705HP
Transmission: T-56
Axle/Gears: Moser Ford 9" with 4.30
Re: Another firebird Autometer gauge panel
Looks great. What color is the back lighting?
Eric
Eric
08-28-2009, 02:43 PM
#3
Senior Member
Thread Starter
iTrader: (3)
Join Date: Oct 2004
Location: Charleston, SC
Posts: 805
Likes: 0
Received 3 Likes
on
3 Posts
Car: '85 TA
Engine: 350 turbo
Transmission: T56
Axle/Gears: 3.70 posi 9bolt
Re: Another firebird Autometer gauge panel
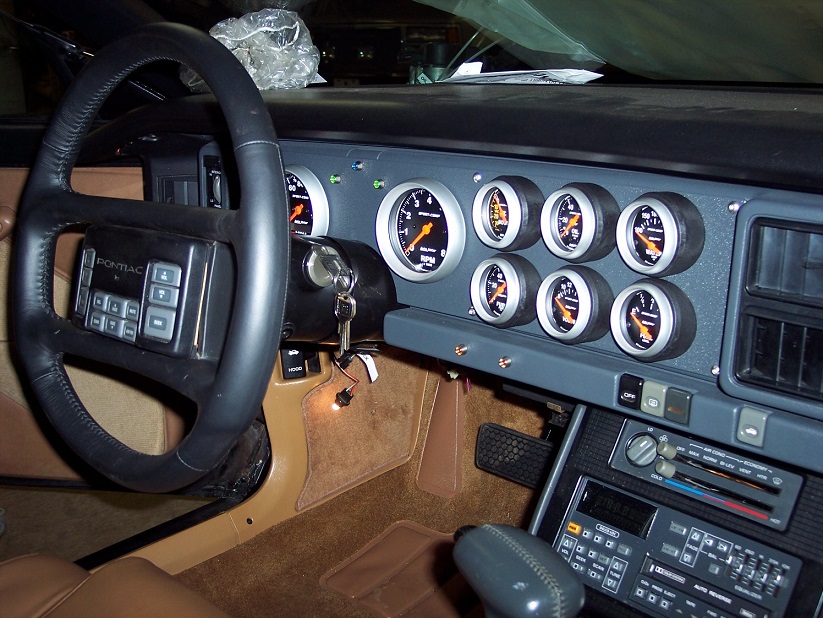
I have the red backlights, but I might change them to white. I figured I'd give it some time to see how I like them. I'll post a pic whenever I get one. I also haven't done anything with the turn signal/high beam indicators, so I'll have to figure out what to do there.
10-07-2009, 09:15 AM
#4
Senior Member
Thread Starter
iTrader: (3)
Join Date: Oct 2004
Location: Charleston, SC
Posts: 805
Likes: 0
Received 3 Likes
on
3 Posts
Car: '85 TA
Engine: 350 turbo
Transmission: T56
Axle/Gears: 3.70 posi 9bolt
Re: Another firebird Autometer gauge panel
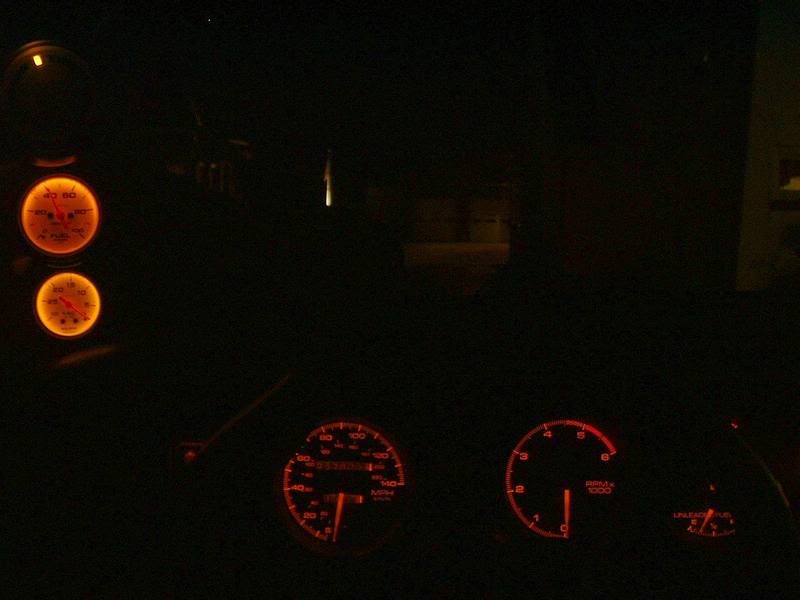
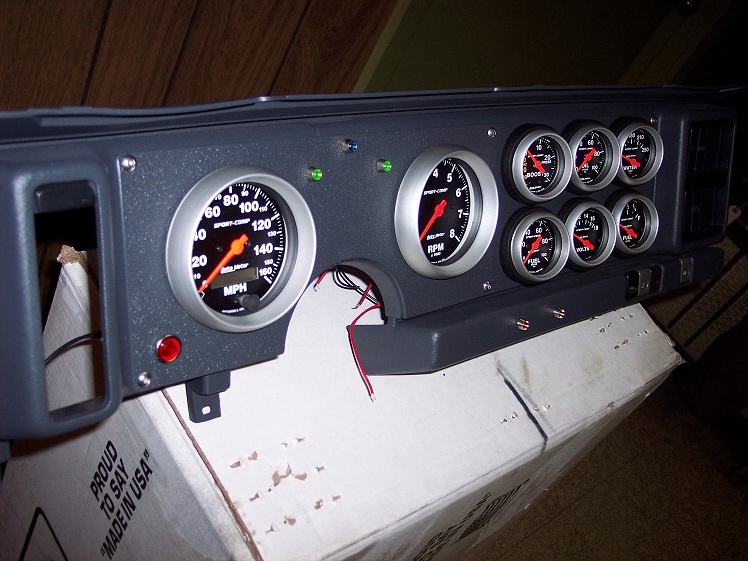
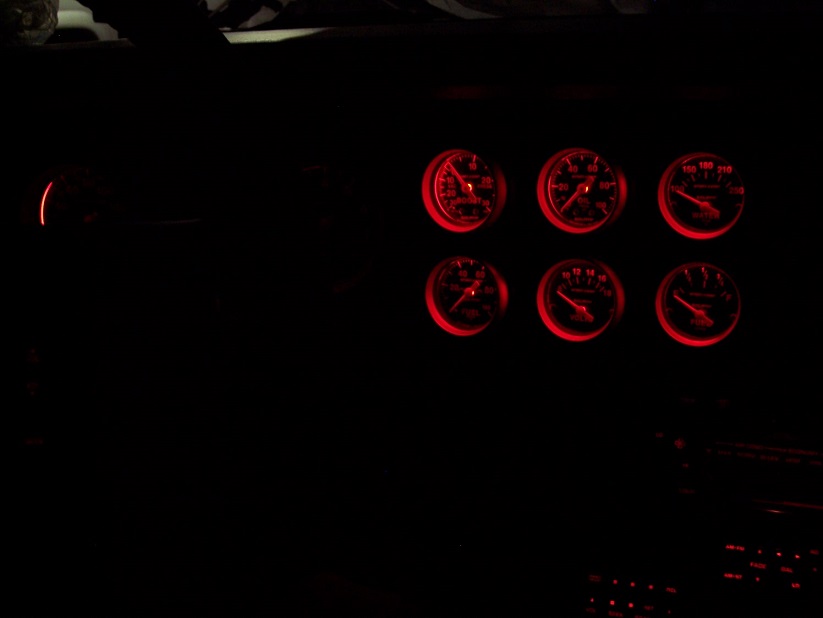
I finally got a decent pic of the gauges showing the red backlights. I'm loving the programmable speedo, since I've already changed rear end gearing once.

 10-07-2009, 10:26 AM
#6
Supreme Member
iTrader: (4)
Join Date: Sep 2004
Location: MN
Posts: 2,069
Likes: 0
Received 3 Likes
on
3 Posts
Car: 85 SC, 86 Berlinetta
Engine: V6, V8
Transmission: 700r4, 700r4
Re: Another firebird Autometer gauge panel
I've never owned one, but I really like the Firebird dashes with the aftermarket gauges. It looks fantastic! 
10-07-2009, 10:33 AM
#7
Banned
iTrader: (12)
Join Date: Jul 1999
Location: Bertram (outside Austin), TX
Posts: 12,212
Likes: 0
Received 10 Likes
on
10 Posts
Car: 87 GTA
Engine: L98
Transmission: 700R4
Axle/Gears: Dana M78 3.27 posi
Re: Another firebird Autometer gauge panel
Just great....Now I have ANOTHER mod to add to my "want" list! 
Looks great!
Looks great!
Trending Topics
10-07-2009, 04:32 PM
#9
Senior Member
Join Date: Apr 2007
Location: Huntington, NY
Posts: 394
Likes: 0
Received 1 Like
on
1 Post
Car: 1983 Pontiac Firebird
Engine: LG4 305ci 4bbl
Transmission: 700r4
Axle/Gears: 10-bolt open diff.
Re: Another firebird Autometer gauge panel
looks AWESOME! how hard was it to run the wiring? could you have used the stock harness and sender? i've been wanting to do something like this for a while.
10-08-2009, 08:57 AM
#10
Senior Member
Thread Starter
iTrader: (3)
Join Date: Oct 2004
Location: Charleston, SC
Posts: 805
Likes: 0
Received 3 Likes
on
3 Posts
Car: '85 TA
Engine: 350 turbo
Transmission: T56
Axle/Gears: 3.70 posi 9bolt
Re: Another firebird Autometer gauge panel
Thanks all for the compliments. The wiring ended up being easier than I thought it would be. Using the terminal strips to group wires made it clean and simple. I don't think you can use a stock sender with an aftermarket gauge, and even if you could it would be a good idea to have new senders anyways.
I did use many wires from the factory harness including the power, ground, light, rpm, and fuel level. For the speedo I just had to run the sender wire down to the transmission, and wired the oil pressure and water temp. to the Autometer senders I already had in place (since those gauges in the factory panel didn't work).
This has been one of the coolest mods I've done and it's nice to have finally finished.
 04-28-2010, 11:52 AM
#12
Senior Member
Thread Starter
iTrader: (3)
Join Date: Oct 2004
Location: Charleston, SC
Posts: 805
Likes: 0
Received 3 Likes
on
3 Posts
Car: '85 TA
Engine: 350 turbo
Transmission: T56
Axle/Gears: 3.70 posi 9bolt
Re: Another firebird Autometer gauge panel
No wiring diagram, I just used a test light to find what wires I needed. The hardest part was fabricating the plastic oval insert to fit within the cutout from the factory panel. You camaro guys have it easier since there is an aftermarket panel available.
 09-24-2011, 03:08 AM
#14
Junior Member

Join Date: Sep 2011
Location: ocala,fl
Posts: 19
Likes: 0
Received 0 Likes
on
0 Posts
Car: 92 Pontiac Firebird
Engine: 350 small block
Transmission: 700r4
Axle/Gears: stock
Re: Another firebird Autometer gauge panel
how much was this to do and what sizes are the tach and the little guges???
09-25-2011, 08:56 AM
#15
Senior Member
Thread Starter
iTrader: (3)
Join Date: Oct 2004
Location: Charleston, SC
Posts: 805
Likes: 0
Received 3 Likes
on
3 Posts
Car: '85 TA
Engine: 350 turbo
Transmission: T56
Axle/Gears: 3.70 posi 9bolt
Re: Another firebird Autometer gauge panel
My first post has the gauge sizes that I used. The total cost was about $600. I bought most gauges used or new from Craigslist. Also, most people wouldn't need an electronic fuel pressure gauge, so it would be $450 without it.
09-26-2011, 10:21 PM
#16
Senior Member
Join Date: Feb 2011
Location: Long Island, NY
Posts: 653
Likes: 0
Received 4 Likes
on
3 Posts
Car: 87 Trans Am, 99 WS6, 16 Mustang GT
Engine: LB9, LS1
Transmission: 700R4, T56
Axle/Gears: 3.42 Posi, 4.10 Posi
Re: Another firebird Autometer gauge panel
Wow, that looks fantastic. The best I've seen so far for the birds.
I really like how you used gauges with a black face too, similar to original.
I really like how you used gauges with a black face too, similar to original.
11-23-2011, 11:11 AM
#17
Senior Member
Join Date: Mar 2011
Location: dothan, al
Posts: 668
Likes: 0
Received 0 Likes
on
0 Posts
Car: 1988 pontiac trans am
Engine: None
Transmission: None
Axle/Gears: 10 Bolt
Re: Another firebird Autometer gauge panel
what is mounted in the defroster switch area?
11-23-2011, 11:50 AM
#18
Re: Another firebird Autometer gauge panel
Clever spot for a radar detector 
Dash looks good! When I re-do mine eventually, Im going to keep the same configuration, but Im going to make the 2-1/16" gauge panel part of the main assembly like you did. The way I have it now is nice...because things kind of unbolt and come out like factory. But I have that separation between the big gauges and the small gauges which makes it kind of a pain. I plan to re-wire and re-work things a little.
Good job!
For the lighting... I used orange 194 bulbs in all of mine. I like the orange light better than straight up red. I think it matches the original backlighting better.
J.
11-23-2011, 12:22 PM
#19
Senior Member
Thread Starter
iTrader: (3)
Join Date: Oct 2004
Location: Charleston, SC
Posts: 805
Likes: 0
Received 3 Likes
on
3 Posts
Car: '85 TA
Engine: 350 turbo
Transmission: T56
Axle/Gears: 3.70 posi 9bolt
Re: Another firebird Autometer gauge panel
Yep, I have the concealed display for the Valentine 1 radar detector mounted there.
The red ends up being slightly orange-red, but what I don't like is that it is too dim with the colored bulb covers. I have lots of those 194 bulbs around, so I give your idea a shot next time I have the panel off.
The red ends up being slightly orange-red, but what I don't like is that it is too dim with the colored bulb covers. I have lots of those 194 bulbs around, so I give your idea a shot next time I have the panel off.
11-23-2011, 08:36 PM
#22
Senior Member
Thread Starter
iTrader: (3)
Join Date: Oct 2004
Location: Charleston, SC
Posts: 805
Likes: 0
Received 3 Likes
on
3 Posts
Car: '85 TA
Engine: 350 turbo
Transmission: T56
Axle/Gears: 3.70 posi 9bolt
Re: Another firebird Autometer gauge panel
The main unit is mounted above the rear view mirror and is hardwired to the concealed display. It makes the controls easier to reach.

11-23-2011, 11:10 PM
#23
Senior Member
Join Date: Mar 2011
Location: dothan, al
Posts: 668
Likes: 0
Received 0 Likes
on
0 Posts
Car: 1988 pontiac trans am
Engine: None
Transmission: None
Axle/Gears: 10 Bolt
Re: Another firebird Autometer gauge panel
that is sick. definitely gonna have to do that eventually. how much modding was there to do to get it to fit. Love the gauges also
11-27-2011, 09:30 AM
#25
Senior Member
Thread Starter
iTrader: (3)
Join Date: Oct 2004
Location: Charleston, SC
Posts: 805
Likes: 0
Received 3 Likes
on
3 Posts
Car: '85 TA
Engine: 350 turbo
Transmission: T56
Axle/Gears: 3.70 posi 9bolt
Re: Another firebird Autometer gauge panel
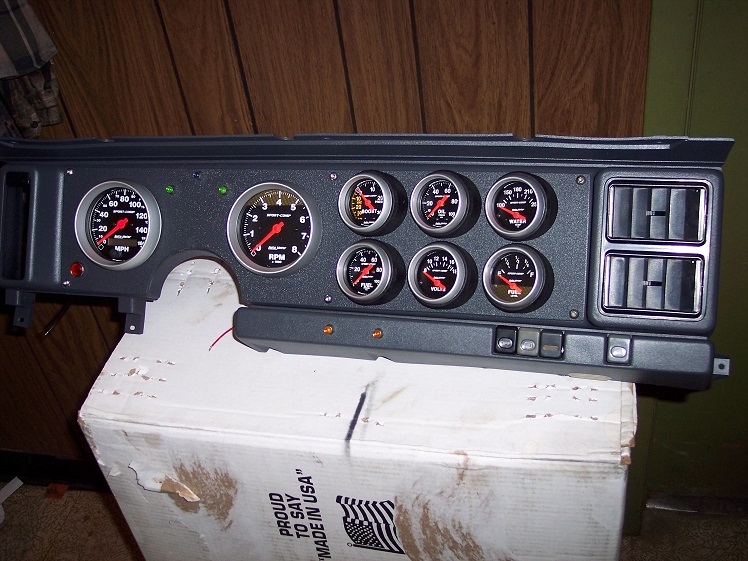
All but the a/f ratio gauge are Autometer carbon fiber gauges:
(left to right)
- boost/vac
- Innovative XD16 a/f ratio
- programmable speedometer
- tachometer
- volts
- oil pressure
- electric fuel pressure
- water temp
- fuel level
Since I'm out of room in the dash, if I wanted to add another gauge, I'd have to replace the 2 gauge pod with a 3 gauge pod. I was thinking an exhaust temp gauge or air intake temp gauge would be neat to have with the turbo.
11-27-2011, 10:42 AM
#26
Re: Another firebird Autometer gauge panel
Thats one of the cleanest setups I've seen. One thing that's deterring me from putting an aftermarket panel in my GTA is that I haven't found a simple way to angle the gauges up to the eye like they were from the factory.
Looks like it would be easy enough with the way you cut the panel like that, I could cut some styrene tubes to fit in the insert panel and angle the gauges that way, and then coat the entire thing with plasti-dip! The only other thing I don't like are the huge ugly autometer bezels on all their gauges!
Looks like it would be easy enough with the way you cut the panel like that, I could cut some styrene tubes to fit in the insert panel and angle the gauges that way, and then coat the entire thing with plasti-dip! The only other thing I don't like are the huge ugly autometer bezels on all their gauges!
11-28-2011, 10:57 AM
#27
Re: Another firebird Autometer gauge panel
Here is an OLLLLLDDDD pic of my pillar gauges along with my stock dash cluster.
And a newer pic. Not my current set up 100%... but an earlier version. In this pic, the lights are cranked. They are PLENTY bright. I usually run the car with the dimmer set at 50%. Its perfect for me.
Turned down a bit. The only things left that are stock illumination are my HVAC and headlight switch. So it all blends pretty well.
J.
12-01-2011, 11:44 AM
#28
Senior Member
Thread Starter
iTrader: (3)
Join Date: Oct 2004
Location: Charleston, SC
Posts: 805
Likes: 0
Received 3 Likes
on
3 Posts
Car: '85 TA
Engine: 350 turbo
Transmission: T56
Axle/Gears: 3.70 posi 9bolt
Re: Another firebird Autometer gauge panel
Thanks for the pictures, I think your gauge setup looks really nice. I'm not sure if my gauges will be able to get as bright as yours even with the bulb swap since mine have a black background instead of white. I think it's still worth a shot to try it out though.
12-22-2011, 09:42 PM
#30
Senior Member
Join Date: Mar 2011
Location: dothan, al
Posts: 668
Likes: 0
Received 0 Likes
on
0 Posts
Car: 1988 pontiac trans am
Engine: None
Transmission: None
Axle/Gears: 10 Bolt
Re: Another firebird Autometer gauge panel
Wait my bad read it wrong, do you still have the same color or have you changed it yet
12-23-2011, 06:44 AM
#31
Senior Member
Thread Starter
iTrader: (3)
Join Date: Oct 2004
Location: Charleston, SC
Posts: 805
Likes: 0
Received 3 Likes
on
3 Posts
Car: '85 TA
Engine: 350 turbo
Transmission: T56
Axle/Gears: 3.70 posi 9bolt
Re: Another firebird Autometer gauge panel
Not yet. I'm currently swapping to a First tpi intake, and afterwards, some of the smaller projects like this will get done.
03-05-2012, 02:25 AM
#34
Member
iTrader: (2)

Join Date: Nov 2009
Location: Zanesville, Ohio
Posts: 471
Likes: 0
Received 0 Likes
on
0 Posts
Car: 1984 Formula ws6
Engine: 370 LSX
Transmission: 4L80E with a brake and 4500 Stall
Axle/Gears: Moser 9" 4.30 gear
Re: Another firebird Autometer gauge panel
Im planning on doing this to my t/a. I have a question, Im running a carbed lsx and a full manual 4l80e. Do I basically run all new wires, or Do I reuse the factory stuff. Do you having a wiring printout you can send me? I horrible at reading schematics.
03-07-2012, 10:15 AM
#35
Senior Member
Thread Starter
iTrader: (3)
Join Date: Oct 2004
Location: Charleston, SC
Posts: 805
Likes: 0
Received 3 Likes
on
3 Posts
Car: '85 TA
Engine: 350 turbo
Transmission: T56
Axle/Gears: 3.70 posi 9bolt
Re: Another firebird Autometer gauge panel
You can reuse some of the factory wiring including the power, ground, and dimmer light (use a test light to find these). Also the tach (white) and fuel level (pink). Then run a wire from the speedometer to the speed sensor on the 4l80e. Everything else I would run new since you should install new senders anyways.
08-09-2015, 02:31 PM
#36
Supreme Member
Join Date: Jun 2012
Location: Canada
Posts: 1,241
Received 152 Likes
on
125 Posts
Car: '91 Firebird Formula
Engine: SP383 Deluxe FIRST� TPI Intake
Transmission: Tremec T56
Axle/Gears: Moser 9" Eaton Truetrac Motive 3.89
Re: Another firebird Autometer gauge panel


2015 Autometer Dash Restomod
Firebird Formula 1991 Custom Autometer Dash
calebzman, your setup is awesome! It blends with the original interior. It has inspired me and I came up with this after lots of headaches! I went with the 194 covered bulbs and it is quite dimmed and color inconsistent between gauges. It’s not perfect but it retains the OEM look and specially the OEM warning lights. I custom ordered from Autometer to match with the added phantom style. I used the OEM dash cluster and original back connectors. I added prosport clock and dual IAT gauges http://www.fastwrx.com/products/pros...ake-temp-gauge Would be nice for your turbo!
Cheers
Last edited by SbFormula; 08-26-2015 at 05:57 PM.
08-09-2015, 10:18 PM
#37
Re: Another firebird Autometer gauge panel
I had a need for 6 smaller gauges without using a pillar pod, so here's what I came up with.
I used L.E.D.s for the turn/Hi-beam indicators and a bigger LED for the CEI.
the 2 lower amber LEDs are to indicate which of the 2 fuel pumps is running.
.....
I used L.E.D.s for the turn/Hi-beam indicators and a bigger LED for the CEI.
the 2 lower amber LEDs are to indicate which of the 2 fuel pumps is running.
.....
08-10-2015, 04:35 PM
#38
Supreme Member
Join Date: Jun 2012
Location: Canada
Posts: 1,241
Received 152 Likes
on
125 Posts
Car: '91 Firebird Formula
Engine: SP383 Deluxe FIRST� TPI Intake
Transmission: Tremec T56
Axle/Gears: Moser 9" Eaton Truetrac Motive 3.89
Re: Another firebird Autometer gauge panel
Looks incredible W72! I like it, especially the angle with the plastic pods. I have a small green led for the fuel pump but it's between the defrost and trunk switches. At the time, if I would have known, I would have put the green led with the warning lights.
Keep on customizing!
08-31-2015, 07:49 AM
#39
Senior Member
Thread Starter
iTrader: (3)
Join Date: Oct 2004
Location: Charleston, SC
Posts: 805
Likes: 0
Received 3 Likes
on
3 Posts
Car: '85 TA
Engine: 350 turbo
Transmission: T56
Axle/Gears: 3.70 posi 9bolt
Re: Another firebird Autometer gauge panel
You both did a great job. Definitely clean installs. W72, you must be an electrical engineer with those wiring skills. LED's would make a great addition to my panel.
09-01-2015, 06:44 AM
#40
Re: Another firebird Autometer gauge panel
Thanks, but not an EE for sure, just patient. Everything is soldered and shrink wrapped and you can see I used Molex connectors to make it removable/ serviceable .
I bet I have 20 hours bent over the workbench just doing the wiring. The LEDs were cheap on Amazon and solved the problem of trying to integrate the factory turn/Hi beam into the cover panel I made.
Odd thing is, when the horn is honked the Hi-beam LED glows dimly so I'll have to look into that, maybe a diode inline will solve any back feed that is occurring.

Thread
Thread Starter
Forum
Replies
Last Post
Ghettobird52
Tech / General Engine
15
12-29-2023 08:23 AM
IROCZDAVE (88-L98)
Interior Parts for Sale
4
10-06-2016 09:08 AM
ambainb
Camaros for Sale
11
04-25-2016 09:21 PM