When you click on links to various merchants on this site and make a purchase, this can result in this site earning a commission. Affiliate programs and affiliations include, but are not limited to, the eBay Partner Network.
Tech / General EngineIs your car making a strange sound or won't start? Thinking of adding power with a new combination? Need other technical information or engine specific advice? Don't see another board for your problem? Post it here!
So I came across a 400 short block for cheap last fall that had no apparent cracks. I looked around the area near the steam holes because I was told that's where it commonly occurs.
I got it on the cheap because the starter tab was broken and welded back on with a stud welded in place of the threaded hole. Would I be able to just use the other two holes and get rid of the stud? Are all of the starter holes threaded? I feel like it'll cause clearance problems.
With that out of the way at first I planned on using the stock pistons and rods until I realized how low the compression would be and then was quick to see that the stock 5.565 length isn't easy to come by brand new and bushed. So I leaned towards 5.7 rods but am unsure of what will clear easiest. I was told the combination of stroker clearanced pistons and a small base cam together will eliminate having to do any grinding. Anyway I knocked the stockers out and honed the cylinders since the ridge seems to barely be there at all. Don't worry I'm going to thoroughly clean it before I start assembling anything. I didn't have fight the pistons getting them out and I'd rather avoid any machining unless it's absolutely necessary and I'm talkin dire. I'm tight man. Pretty much ordering 1-2 parts at a time.
heart of the build is:
NKB 200cc 64cc aluminum heads: NKB-274-SH
What head gaskets should I run with these? I can put the steam holes in them. Thicker gaskets would be better to help with lowering the compression a bit right? I'd like to stay in the 10s. From what I understand I can manage on 93-94 if my setup is done right? -5cc lightweight 4032 forged Flat Top DSS Pistons: 8120-4125
This engine will probably see a lot of highway pulls as well as 40-50-mph roll ins around town so I figured I'd go with these and I read that the 4032 forging has better lifespan for street use due to not expanding as much on top of being able to take a beating.
Unsure of what 5.7 rods to choose for the stock 3.75 crank I was looking at the Scat 2-ICR5700-7/16
but they've been on back order and I'm ready to order the pistons and rods ASAP soon as I figure out exactly what I need so I'm open to other options long as it'll work.
In consideration of having the rods clearing the cam I've been eyeballing the Howards retrofit hydraulic roller small base HRC110275-12S
This cam is the best thing I can find for the range I want the power to be in along with having a 112 LS. Seems like options are pretty limited when it comes to small base stuff unless I have something custom done.
Basic RPM Range: 2600-6500 Intake Duration @ .050": 241 Exhaust Duration @ .050": 247 Intake Valve Lift with OE Rocker Ratio (1.50): .545" Exhaust Valve Lift with OE Rocker Ratio (1.50): .565" Intake Lobe Lift: .363" Exhaust Lobe Lift: .376" Lobe Separation Angle: 112 Degrees Intake Centerline: 108 Degrees
Howards max effort hydraulic roller lifters: 91160 Intake is going to be an rpm air gap.
Is this a good combo with the NKB heads? The heads come with comp cams 987-16 springs. I probably won't be pushing this over 6k super often but it will see a lot of driving in general. Trans was rebuilt last year and the highest I shift it at right now is about 5200-500. 2700-3000 stall? Car has a locker with 3.73 gears in it right now but I don't plan on keeping the 10 bolt I have out back if I finish this engine with what I have laid out and I don't plan on launching it from until I do. Roll ins only.
With what I have planned out so far could I maybe see the 500s on hp and torque or am I aiming too high with what I have? If I'm delusional feel free to school me I'm here to learn.
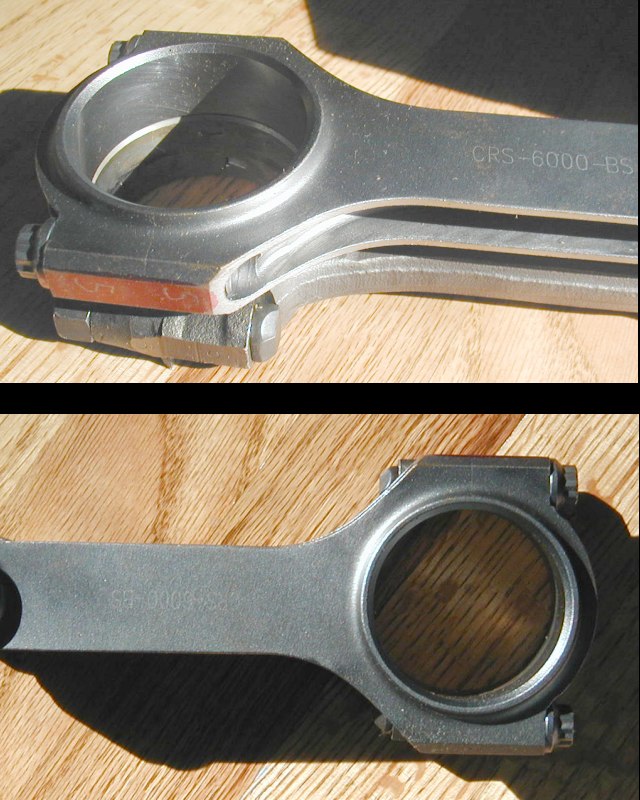
Pistons are irrelevant to the cam/rod clearance. What matters is the rod bolt.
Here's how much difference it makes. This is an Eagle rod w/ cap screws as opposed to bolt & nut; vs a X rod out of a L69.
THIS is what matters when considering if you need a small base circle. Capisce?
I don't agree with the cam selection at all. You'll need ALOT LOT LOT LOT of stall with that much .050" duration. IMO that's too much for anything remotely streetable. That looks to me like a cam made for a lightweight dirt short track car on a slick track with long straights and real tight flat corners, like Martinsville except dirt, with that wide LSA; NOT a street cam at all. My 400 ran GREAT with a Comp XE274, and later with a XR282 (both with 1.6 steel roller rockers, and 987 springs), but that was with a 5-speed. With good heads you simply don't need that much cam. I'd keep the cam in the 233� intake range, and whatever corresponding exhaust duration the heads demand, and about the lift you posted. You'll need to go to 1.55" springs to get much more lift than that reliably. Or, maybe beehives, or LS springs. Not sure what's available in retainers for that possibility though.
With aluminum heads and a low-mid 230s intake duration cam, you'll want the static compression to be mid-high 10s, to run any kind of pump gas. You'll want the quench to be in the .040" range of course. Easiest thing to do would be to use a FelPro 1044 gasket, 6" rods somewhat like those ones in my photo, and custom pistons to be about .010" proud of the block, with a "reverse dome" to match the chamber in the heads. With your .030" over 400 in the photo and that setup, you'd need between 12 & 15cc of dish to make that; that'll put you between about 10.4 and 10.8 CR. Use 6" rods and custom pistons, it's the cheeeeper betttter way to your goal, than trying to find something off the shelf. JE / SRP / Wiseco can help you out there.
Never heard of "NKB" heads. Sounds kinda chinese to me. ?? What valves will you put in them?
I can't see how you could avoid making 500/500 if those heads flow anything decent; let's say 275/200 or something like that.
Your stock crank will break at the front; either at the 1st rod journal or the front-most counterweight. Won't take long. That would be a GIGANTIC mistake, especially with the cam you posted. My 400 broke across the front CW when it had the XE274, still ran but of course made an UNBELIEVABLE racket. If there's ONE PART of a stock 400 that doesn't scale up well, it's the crank.
Have made over 1300 hp on nos on a stock cast GM 400 crank.. On any 400 build rod to cam clearance .must
t be checked..
thats hard to believe lol
240 deg cam isnt super huge for a healthy 400. But with only 200 cc heads with ok port profile and a rpm airgap dual plane you can go 10 deg shorter and be a better match. Lunati had a nice 231/239 deal i believe, forget the specs. Comp xr282 is good too.
i’ve run 246-252 cam on my 400 turbo car but i had bigger heads and a single plane to rev it out to 6500. Drives fine with good tune. If you run a flat top it will be closer to 11:1 comp and it will need the bigger cam to keep it pump gas friendly
Not a huge fan of 987 springs. There are better double springs for that. You want a smaller diameter type spring but i would probably do something closer to 140-150 lb seat pressure and 375-400 open. Valvetrain is important so you will want to check those heads out well. China castings can be ok but make sure the components used are good too
Everybody is quick to say how much better 5.7 or 6 inch rods are. On a budget build i wouldnt be afraid to run 5.56" rods. They have more clearance to the cam. It was the old school way of making 383s before stroker kits came along. Sure would keep it cheaper when buying pistons. I have a set of re-conditioned 5.56 rods, weight matched, and fitted with ARP bolts. If you cant find a decent set, i might sell them.
I know you mentioned not wanting to spend money at the machine shop, but it might be worth having them check it over for a clean bill of health first?
Pistons are irrelevant to the cam/rod clearance. What matters is the rod bolt.
Here's how much difference it makes. This is an Eagle rod w/ cap screws as opposed to bolt & nut; vs a X rod out of a L69.
THIS is what matters when considering if you need a small base circle. Capisce?
I don't agree with the cam selection at all. You'll need ALOT LOT LOT LOT of stall with that much .050" duration. IMO that's too much for anything remotely streetable. That looks to me like a cam made for a lightweight dirt short track car on a slick track with long straights and real tight flat corners, like Martinsville except dirt, with that wide LSA; NOT a street cam at all. My 400 ran GREAT with a Comp XE274, and later with a XR282 (both with 1.6 steel roller rockers, and 987 springs), but that was with a 5-speed. With good heads you simply don't need that much cam. I'd keep the cam in the 233� intake range, and whatever corresponding exhaust duration the heads demand, and about the lift you posted. You'll need to go to 1.55" springs to get much more lift than that reliably. Or, maybe beehives, or LS springs. Not sure what's available in retainers for that possibility though.
With aluminum heads and a low-mid 230s intake duration cam, you'll want the static compression to be mid-high 10s, to run any kind of pump gas. You'll want the quench to be in the .040" range of course. Easiest thing to do would be to use a FelPro 1044 gasket, 6" rods somewhat like those ones in my photo, and custom pistons to be about .010" proud of the block, with a "reverse dome" to match the chamber in the heads. With your .030" over 400 in the photo and that setup, you'd need between 12 & 15cc of dish to make that; that'll put you between about 10.4 and 10.8 CR. Use 6" rods and custom pistons, it's the cheeeeper betttter way to your goal, than trying to find something off the shelf. JE / SRP / Wiseco can help you out there.
Never heard of "NKB" heads. Sounds kinda chinese to me. ?? What valves will you put in them?
I can't see how you could avoid making 500/500 if those heads flow anything decent; let's say 275/200 or something like that.
Your stock crank will break at the front; either at the 1st rod journal or the front-most counterweight. Won't take long. That would be a GIGANTIC mistake, especially with the cam you posted. My 400 broke across the front CW when it had the XE274, still ran but of course made an UNBELIEVABLE racket. If there's ONE PART of a stock 400 that doesn't scale up well, it's the crank.
OH woops damn typo I know the piston doesn't matter for the clearance I meant stroker clearance rods like scat sells. My bad.
That's real bad news about the crank I'll have to shop around for something affordable and at least somewhat strong any suggestions? I'd even be willing to maybe go with a full rotating assembly for something under 900 if I could.
Was really hoping I could get away with using the stock crank but you're pretty much saying no way in hell so roger that.
Cylinders aren't .030 over I just honed them a lil bit I know they look bigger in the pics but I don't think I honed them THAT much. They're still tight enough on 4.125 I'd say.
That cam looks decent aside from being a flat tappet. I'd really prefer to run a hydraulic roller though so what about this? I wouldn't plan on running any higher lift so if I could find some good 1.5s that'd be great for this I think.
Side note is that I do plan on getting EFI for this far later in the build after everything under it is done. HRC110265-12S
Intake Duration @ .050": 233 Exhaust Duration @ .050": 241 Intake Valve Lift with OE Rocker Ratio (1.50): .530" Exhaust Valve Lift with OE Rocker Ratio (1.50): .545" Intake Lobe Lift: .353" Exhaust Lobe Lift: .363" Lobe Separation Angle: 112 Degrees Intake Centerline: 108 Degrees These are the rest of the retrofit rollers from howards the ones that end in an S are the small base ones.
As far as the NKB heads go they're skip white performance heads I've seen people talk about them in forums/youtube and so far nothing really bad. I've had my eye on them for a while as far as 400 options go. What caught my eye at first was they also come with the steam holes drilled already so that's a bonus. They do list just about every detail for their heads for what goes into them on the page so I've been going off that. The valves the heads come with are "Erson PBM" valves 2.02/1.60. Along with the springs I mentioned above.
These are the flow numbers they show on the page. Here
Originally Posted by sofakingdom
Post a pic of the mess at the starter and I'll see if I dare to guess how much of a future it has.
Alright heres the carnage lmao it's ugly. Why I asked if theres anyway I can just cut and grind away this stud and use the other two starter bolt holes? Supposedly the starter was fine like this in previous owners 60 something Camaro. they even had it mounted up but I don't how reliable this is lol. This was the same pic they sent me before I bought it. I just figured it wouldn't be the end of the world to fix something like this but you tell me. I've been reading up on it some other guys were saying to just cut the stud then grind it down, drill, and tap it.
Last edited by Emeraldsun; 03-09-2021 at 10:02 PM.
240 deg cam isnt super huge for a healthy 400. But with only 200 cc heads with ok port profile and a rpm airgap dual plane you can go 10 deg shorter and be a better match. Lunati had a nice 231/239 deal i believe, forget the specs. Comp xr282 is good too.
i�ve run 246-252 cam on my 400 turbo car but i had bigger heads and a single plane to rev it out to 6500. Drives fine with good tune. If you run a flat top it will be closer to 11:1 comp and it will need the bigger cam to keep it pump gas friendly
Not a huge fan of 987 springs. There are better double springs for that. You want a smaller diameter type spring but i would probably do something closer to 140-150 lb seat pressure and 375-400 open. Valvetrain is important so you will want to check those heads out well. China castings can be ok but make sure the components used are good too
Only using the comp springs since they come with the heads and yeah running over 11:1 is what I'm afraid of I'm trying to keep it in the mid to high 10s. I'm probably going to do what sofakingdom suggested and get custom pistons if theres no affordable kit.
Originally Posted by redneckjoe
Everybody is quick to say how much better 5.7 or 6 inch rods are. On a budget build i wouldnt be afraid to run 5.56" rods. They have more clearance to the cam. It was the old school way of making 383s before stroker kits came along. Sure would keep it cheaper when buying pistons. I have a set of re-conditioned 5.56 rods, weight matched, and fitted with ARP bolts. If you cant find a decent set, i might sell them.
I know you mentioned not wanting to spend money at the machine shop, but it might be worth having them check it over for a clean bill of health first?
I gave myself a huge *** headache trying to find 4.125 pistons that were for a 5.565 rods and trying to find 5.565 rods that were floating and not pressed fit because I'm honestly afraid to mess with press fit rods myself after seeing how tedious they are. Although if I need to I could just get the guys down the street from me to put them together. I'll def keep you in mind my man appreciate it.
The cheap scat rods are good with the bigger rod bolt. 5.7-6” if you cant find pistons for oem length. Couple hundred bucks.
Second cam is better imo. 233/241 will play nice with mid low 10’s compression.
if you stick with 1.5 rocker only, .530 lift intake .545 lift exhaust, i would set the install height of intake at 1.76”. That will get you more like .080” to bind and 150-154 lb seat pressure and 350 lb open. I think thats a better spec to control that cam. Exhaust i would go about the same 1.76”. You will want to see where the springs come set at and adjust from there with proper shims.
This block is basically trash unless you can find a better way of "fixing" it. Proper starter bolts are NOT generic threaded rod.
You mentioned just using the other 2 bolt holes. That's a problem because both configurations (straight and diagonal starter mtg) have that outer bolt in common --- both use the outer bolt.
Stock 400 cranks don't have a problem with "horsepucker", as such. Their issue is sustained RPMs. The torsional vibrations that develop in them are damped by the crank damper of course, like any other crank; but they're so severe, that eventually the metal fails. Most often at the front.
Sure you made 1300 HP with one. ONCE maybe. Perhaps even TWICE. Ya know, I personally knew a guy who went skydiving, and his parachute failed; and he survived in spite of it. Should I get on all the skydiving forums and tell everybody they don't need a parachute, look, this guy didn't? That makes about as much sense. Just because you got lucky ONCE, doesn't mean that it's A Good Idea for everybody else to do deliberately as a matter of policy and choice.
This one is a Lunati crank. Same block casting as yours (509).
The reason STOCK 5.565" rods work better in 400 or stroker applications than STOCK 5.7" rods, is the shape of the rod bolt. NOT anything "better" about the rods themselves. Since there are no STOCK 6" rods, it's not possible to make that comparison. Yes I well remember making 383s out of a stock 350 block, stock 350 pistons, stock 400 rods, and a stock 400 crank with the journals turned down. Aftermarket stuff is SO MUCH BETTER than that though, nobody does that anymore.
The "corner" of the STOCK rod bolt is the part of a STOCK 5.7" rod, or some aftermarket bolt/nut 5.7" and 6" rods, that interferes with the cam. The photo of those Eagle cap-screw rods (Scat has similar products as well) shows pretty clearly why that problem goes away when using rods with that style of hardware. The rod length, in and of itself, is irrelevant. Look at a STOCK 400 rod bolt and compare to a STOCK 5.7" and the difference will be obvious.
Putting ARP bolts in STOCK 400 rods is IMO a waste of effort. There's too many other ways for things to go wrong with the STOCK 400 setup for the bolt to make much difference; particularly the crank breaking. It's misdirected money.
That block is GARBAGE as far as I can see. That starter hack job is not likely to be satisfactory in any manner way shape form or fashion. In fact I'd bet that's why you got such an otherwise desirable block for such a good price: it's trashed, and wouldn't start dependably, and d00d got sick of it. Not sure if that can be properly repaired or not, but I'd recommend doing that FIRST before spending ANY money on any internal parts, lest you end up with a whole pile of REAL EXPENSIVE garbage that you can't actually drive.
You can take ANY rod and hone the big end out, and change it from press to floater. "Real" ones usually have a bushing installed also, but not all. With an oil hole added, just honing will often work fine.
I'd really like to try and find a way to fix the starter bolt problem. I'd hate to trash this project because of that alone.
I'll do some reading and see if theres anything I can do about it. You're both right I'd hate to put this thing together just for the starter mess to be the biggest PITA later on.
I don't know if any of you frequent the Hotrodders forums but this topic has come up a few times over there and a few guys have just tapped the block while using the extra holes and it's worked fine for them?
This seems like it would work thoughts?
If the hole can be drilled deeper and threaded, then no need for a helicoil. Just get a longer bolt that reaches into the deeper threaded hole. Blocks are actually very soft, and easily drilled and tapped. I was helping my buddy swap a T56 into his Nova with a 350 SBC and it didn't have all three holes. I bolted the starter off the '95 Camaro on the block with one bolt and checked it for clearance to the flywheel ring. Then made up a sleeve that fit closely in the other starter hole, and used a smaller bit to drill a hole through the sleeve. Then removed the starter and drilled the hole out, and tapped for 3/8 NC thread. Worked perfect and easy to do.
Problem is, there's no "extra hole" that can work for this. If it was one of the inner holes that was buggered, then yes, that might be available as a solution. But that one is critical and irreplaceable.
All the same, solve that problem FIRST, before spending A DIME on anything to go in it that can't be used for something else. Be ready and willing to scrap it if it can't be made whole again. There are few things worse than a motor that can't be reliably started; maybe cheeeeep headers, but I can't think of much else.
Blocks are indeed easy to drill & tap; but a block with a weld blibbet mess including a piece of threaded rod down in it, is gonna be pretty damn repair hostile. Imagine trying to drill out a piece of wood embedded in butter: that's about what you're facing. If Cletus and Billy Bob hadn't already got hold of it, that kind of damage isn't all that hard to repair. But that's REALLY botched.
This is one of those times when a post about "should I buy this" instead of "I just bought this" would have been wise.
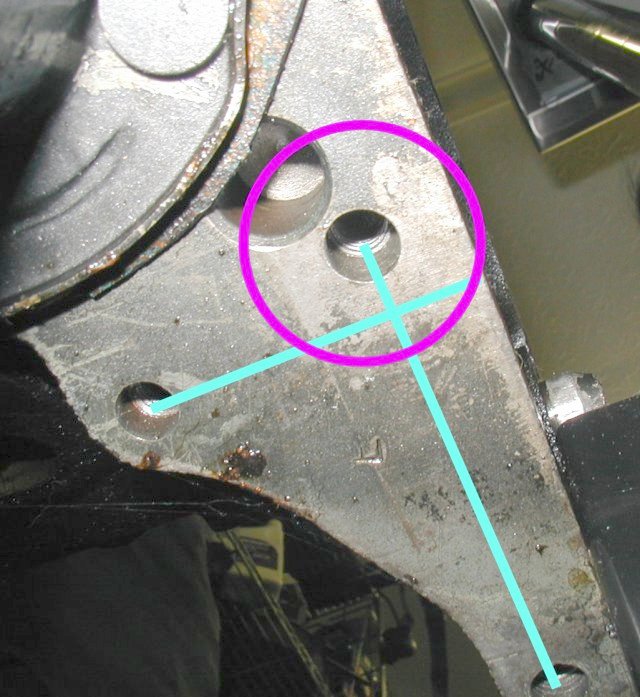
Speaking of adding the holes, here's the same 400 block as the above photo. I drilled & tapped the circled hole myself much as your quote above.
Be aware of course, starter bolts are SPECIAL. They have a kind of "shoulder" right behind the threads, larger than the main shank, that goes into a recess in the block, and acts like a dowel pin to affix the starter positively in the right place. This feature of a starter bolt hole is clearly visible in the photo. Regular bolts won't work; they'll let the starter move away from the crank, and then all hell breaks loose.
In case you can't tell, I've been down this road before, and know the pitfalls.
I would not in any case worry about using a Heli-Coil. They are MUCH harder and altogether better in every way than a thread tapped into a casting. But you're not ready for that yet: first thing you gotta do is make that part of the block FLAT, then drill the hole in the correct place with the feature to support the actual starter bolt, and THEN worry about threads. Threads are the easy part.
Last edited by sofakingdom; 03-10-2021 at 02:17 PM.
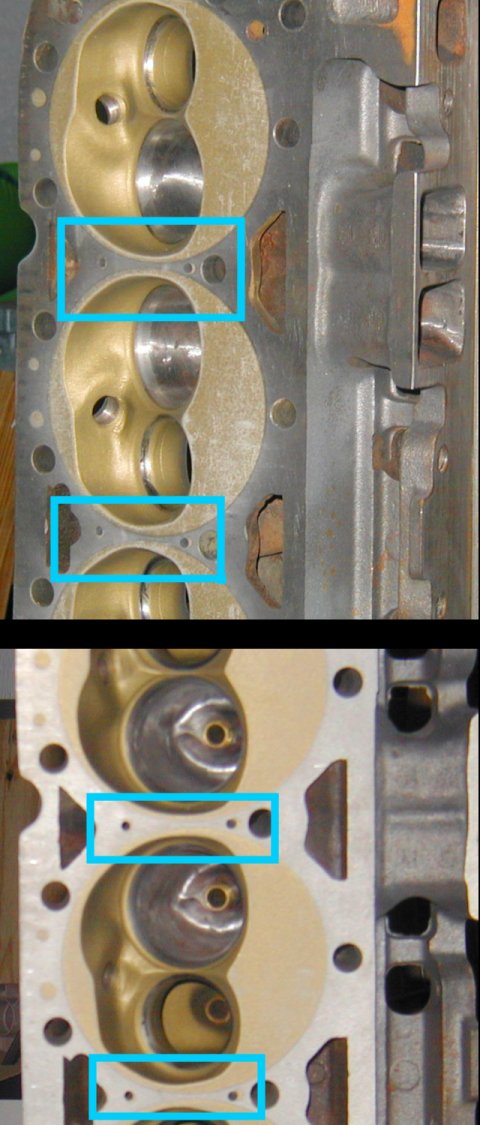
I would also mention, ANY yutz can drill steam holes in a set of heads. Even me. Here's a set I drilled (these are Dart but that's immaterial).
All ya gotta do is, lay a 400 head gasket on the heads, taking care of course to align it by way of the dowel pin holes, and center-punch those. Use a 3/16" drill bit; the ones on the exhaust side are straight, the ones on the intake side are angled away from the bolt about 30�. You can use ANY and ALL SBC heads on a 400 that way.
You'll also note that I reamed out the holes in the deck right under the center exh ports, so that they allow full passage of water right there. The head gasket has metering holes, but the block and head castings both often are restricted there. That's the hottest area of a SBC head BY FAR, and inadequate cooling of the head casting right there leads to all manner of "mystery" overheating problems.
Yellow is bolt holes; red is dowel pins; grey is oil drainback; cyan is steam holes. All others are coolant metering: they are carefully placed and sized to deliver the correct amount of coolant flow to the places that need it, and should not be altered unless you REALLY know what you're doing. (very few people do) Magenta is the ones I was referring to above that MUST NOT be blocked. It pays off in a high-perf build to do what you can see that I did to those heads, where I ground the deck surface out to unobstruct those holes. The block sometimes has a single large round hole there, but often it's slightly off-center as well, and needs the same treatment. Your block has 3 holes but it would be wise to lay the gasket on there and verify that they match totally up, and open them out if they don't.
Personally, I wouldn't give a pile of rat turds for ANYTHING that says Skip White on it. The cheeeeepest of the cheeeeeeeeeeeeep, and 100% of all donations go to support the Red Army. I'll gladly pay twice as much just to avoid that crap.
Problem is, there's no "extra hole" that can work for this. If it was one of the inner holes that was buggered, then yes, that might be available as a solution. But that one is critical and irreplaceable.
All the same, solve that problem FIRST, before spending A DIME on anything to go in it that can't be used for something else. Be ready and willing to scrap it if it can't be made whole again. There are few things worse than a motor that can't be reliably started; maybe cheeeeep headers, but I can't think of much else.
Blocks are indeed easy to drill & tap; but a block with a weld blibbet mess including a piece of threaded rod down in it, is gonna be pretty damn repair hostile. Imagine trying to drill out a piece of wood embedded in butter: that's about what you're facing. If Cletus and Billy Bob hadn't already got hold of it, that kind of damage isn't all that hard to repair. But that's REALLY botched.
This is one of those times when a post about "should I buy this" instead of "I just bought this" would have been wise.
Speaking of adding the holes, here's the same 400 block as the above photo. I drilled & tapped the circled hole myself much as your quote above.
Be aware of course, starter bolts are SPECIAL. They have a kind of "shoulder" right behind the threads, larger than the main shank, that goes into a recess in the block, and acts like a dowel pin to affix the starter positively in the right place. This feature of a starter bolt hole is clearly visible in the photo. Regular bolts won't work; they'll let the starter move away from the crank, and then all hell breaks loose.
In case you can't tell, I've been down this road before, and know the pitfalls.
I would not in any case worry about using a Heli-Coil. They are MUCH harder and altogether better in every way than a thread tapped into a casting. But you're not ready for that yet: first thing you gotta do is make that part of the block FLAT, then drill the hole in the correct place with the feature to support the actual starter bolt, and THEN worry about threads. Threads are the easy part.
Yeah it is botched hella bad not gonna act like it hasn't been on the back of my mind since I bought it but I guess I was na�ve in thinking it wouldn't be the end of the block im so used to just finding ways to make something work so I saw it as not impossible.
Gotcha so leaving the crank and different heads aside for now I'll focus this weekend on the starter issue. I can tell this is gonna take some time to do it right I don't wanna make it worse than it is lol.
Gonna get it flat and then get the hole properly located and try to drill it. I'll check back in with you guys in a few days, appreciate the help.
So doing something similar to how you guys did it would I at first start with a slightly bigger bit and drill in a bit to accommodate the larger shank area snug and then use a sleeve that fits up in there and use a smaller bit through that to drill and tap for the threads further in? This is along the lines of what was explained only as you said I'm dealing with a weld mess and a big *** rod shoved up in it. lol
The main reason small chevy's break the starter bolt hole is people using the wrong bolts. In the early 80's they switched to a metric thread. Check out part numbers on starters and you'll see some end with a "M" for metric.
small block chevy starter issues...
The BLOCK MOUNTING SCREW threads..
up thru 1981 .. they are threaded 3/8-16
from 1982 up.. they are threaded 10MM x 1.5 pitch.
performance GM blocks even thou they are newer are usually 3/8-16..
please check the fit of your bolts.. you cannot interchange the bolts.. disaster will result.. there is 0.020" difference.. the metric bolts are slightly larger... put them in with an impact or with big hands.. you will either snap them off in the block.. or split the ear off the block...
I know it sounds defeatist, but I'd suggest not attempting to repair that at home.
The surfaces of the block, both the starter pad and the BH flange, need to be absolutely flat and in the correct plane. The starter bolt hole needs to be in the exact right place. You get exactly one try on the bolt hole: if it's not right, it'll near impossible to repair again. You'd have to fill it with something, grind it flat again, and start over. Decking that surface flat is best left to someone with the right machinery for ... decking a block flat.
The way to drill a precise hole is, first mark it; then center punch it; then make a drill bushing for a very small bit like 1/16" or so out of something sturdy like a piece of bar stock, and clamping or bolting it to the block, such that it CANNOT move; then drilling. Then enlarge the hole in your bushing piece to maybe 1/8" or so, and repeat. Keep increasing the drill bit size until you're at the one for either a 3/8"-16 tap or for the Heli-Coil of that size. Then drill the entry portion of the hole. Then tap, and if it's your plan, install the Heli-Coil. Keeping in mind of course that the Heli-Coil uses a larger bit than the threads, and if it's too large, then the entry portion of the hole will be too large as well, which would be a serious flaw. I can't recall what the diameter of the starter bolt shank is but you can go to the parts store and just buy one and measure it. The Heli-Coil drill size for 3/8"-16 thread is 25/64" if memory serves.
Drilling is going to be a challenge no matter what. You've got a piece of threaded rod in there, which is MUCH harder than cast iron; as you drill, if the bit slips off of it, it's going to go off to the side and start making a new hole in the wrong place. That's the reason for drill bushings, is to unconditionally locate the bit in the right spot. You have the possibility that wherever the hole belongs, the crap that's there now is off to the side of where it needs to be; you might get it all the way drilled, and discover you've got a little "fingernail" of leftover material of some kind, that then falls out and leaves an oval instead of a circular hole. You might break that ear off of the block again. (if it's even the "ear", and not just a blob of some kind of metallic spooge) There's ALOT of ways it can go wrong. Best to leave it to a pro.
The BH bolt right next to it there needs to be made right as well, although that's not near as critical.
I've fixed a few broken/cracked starter bolt ears, but have always had the broken piece. I TIG weld it back together using stainless, (high nickel), rod.
Take it to a good engine shop and see what they say.
ofcourse you could try mock crank up with flexplate and starter, wire it to a battery and see if it engages lol
damn lol this is getting depressing really fast
I think I'll do this first I'll take a few pictures of it to the guys down the street from me and see what they have to say before I do anything.
Also I've seen those adapter plates around but wouldn't I have to use an older style starter with those? Like a 50/60s starter. I don't even think I could find one or would want to be restricted to that when it comes to needing replacements in the future. Correct me if I'm wrong.
Been doing some more looking and I think I'll give the bellhousing plate mount route a try. like mentioned above. There are plenty of new 57 style starters off the shelf more than I originally thought plus minis.
It looks like the nose mounts to the plate and then I use a mounting tab coming off the back of the starter motor.
The plate could work, but if you try the repair, see if you can find an old-school 3 bolt cast iron starter nose to use for a template / hole guide. It has all 3 holes. https://www.ebay.com/itm/CHEVY-BIG-B...AAAOSwhixgJcUw
I actually have one, so if you need measurements and such, just LMK.
The old cast-iron nosepiece has 3 holes, but they are not those same 3 that are in that block.
See the photo up in post #13. The 3560 nosepiece has the inboard in-line hole at the intersection of the 2 cyan lines, appropriate to a 14" flywheel. Here's a fairly good photo of one. https://myautovaluestore.com/genco/p...arter-gnc-3560
The 3rd hole in that block is an incompletely finished backyard-added late-model hole, missing the critical feature that makes it a starter bolt hole, in the place where the hole in the magenta circle in my photo is, for the 77-up 12.8" wheel. AFAIK no nosepiece exists that uses both that hole AND the one that's not in-line, because those 2 holes are for 2 different size flywheels.
As far as I can tell, the offset hole in that block is OK. Can't really see down into it though.
That "repair" looks worse from this new angle than it did from the others. It's completely unusable as it is. There's not enough material built up around the little chip that's all that's left of what broke off, to properly drill. That needs professional help. IMO that's the best solution to the whole situation. The cast iron Powerglide adapter is a considerably inferior solution and probably will end up costing just as much in the long run, if not more, and will cause other constraints (like requiring a 14" wheel) that may be unacceptable. Unfortunately that turns a "good" price for that block, into an above market price. I.e., the seller washed his hands of a problem, and the buyer (emeraldsun) gets screwed. A tough introduction to motor building for sure.
Before i spent any money or time on that block, i think it would be wise to have it checked over at a machine shop to see if its a usable core. Then get an estimate to have the block machined, cleaned, repaired, etc. The block is the foundation of your build.
Might be wise to consider, that the 3rd hole that the block's PO added, might or might not be in the right place. That one should be checked, and might have to be redone as well, if a 12.8" wheel is in this motor's future; which minor details like header fitment might require. The 50s starter will be farther out and lower than a correct 12.8" one (part # 6316 for example). That's easier though: it can be drilled larger, filled with a steel pipe plug, ground flat, and re-drilled, with little or no added risk. Just expense.
Last edited by sofakingdom; 03-11-2021 at 12:25 PM.
Here's a view of the 2 starters. Sorry, didn't quite get em perfectly lined up.
Top is the old style for 14" flywheel (part # 3510 for SBC & BBC w/ PG, Turbo 350 & 400, 4-speeds, etc. - I could get a better pic of the aluminum version, but the cast-iron 3560 has all the same bolt spacings).
Bottom is 6316 (for 83 T-5, 12.8")
The right-hand bolt in each is the outer one. Think of that as the "fixed" point of reference for comparing the pics; the hole that emeraldsun's block is fornicated. Note how the inner bolt, to the left, is much farther over to the left, on the 6316. Different spacing. Has to be. That's because the motor shaft and the drive are about .600" over to the left, to mate to the 1.2" smaller wheel.
It's not obvious from the photo, but the 6316 also has a smaller body than the 3510 or 3560 as well. Overall it's near an inch tighter to the side of the block (header fitment, anyone?) than the 35xx.
In fact on emeraldsun's last 2 photos you can see a witness mark where the old starters were; they left a straight line mark where the nosepiece met the block; the other in-line hole for the 3560 is at the same relation to that line mark as the offset hole. That other in-line hole in his block is at or near the location for the 12.8" starter requirement. Looks too close to the BH flange to my eye but I don't claim that my eyeball is that well calibrated.
It's also EXTREMELY obvious from that 6316 photo why there's NO WAY to use the offset bolt hole with that starter, or any other starter with the shaft in that location: you can clearly see that the inboard bolt would then have to go RIGHT DIRECTLY THROUGH THE MIDDLE of the starter drive. I cannot begin to count how many times I've told people that, and had idiots try to tell me all about how you could use this or that "dual pattern" starter and it would work. NO. There is NO WAY that ANY starter can possibly mate to the 12.8" wheel and have a bolt in the early location, because it's not something that the starter determines. It's a result of the FLYWHEEL (which forces the location of the starter motor shaft & drive) and the BOLT HOLE. The ONLY way a starter will work with the 12.8" wheel, is if it has the late-model bolt hole. No matter how many patterns it will work with, if the block doesn't have THAT pattern, the starter cannot work.
Actually there is one way, but it's too complicated to explain. Somebody has actually made it though. But it's a $200 solution to a $2 problem, and thus suitable only for Vette owners who don't actually DO anything to their cars but instead just whup out the credit card to pay "shop" to indulge in their hobby for them.
Starters are quite the situation.
Last edited by sofakingdom; 03-11-2021 at 04:36 PM.
Well I've been thinking about it the past two days and you guys have pretty much convinced me that I either take this block to the machine shop and have the works done as well as fix the bolt hole problems or just use it as an anchor.
I hadn't even considered that the the hole itself isn't positioned properly but now that it's brought up...considering how the stud was put in like that then it would makes sense. Ugh...this is a huge let buzz kill but I guess it's good I don't have a bunch of brand new useless speed parts sitting in boxes in the garage lmao. I'm so ticked. Thanks for your help guys.
One thing I'm confused on though is the starters you guys have shown and the ones I've been looking at don't appear to be the same? The 3 bolt bellhousing mount style doesn't have the three side bolt mounts shown on the ones you guys have posted. It uses the 3 bolts for the bellhousing mount plus a mounting tab. Would this one still not fit properly in place?
Last edited by Emeraldsun; 03-12-2021 at 03:43 PM.
That's the old cast iron Powerglide (and older) starter.
Only works with 14" flywheel, and sits lower and farther outboard than the block mounted type. Much farther in all directions from the engine, than a 12.8" starter, maybe as much as a full inch. All bets are off as to exhaust compatibility in our chassis.
You still face the same kind of risk: a big pile of $$$$ parts you can't drive. I would not go that route until all other options are exhausted.
Do yourself a big favor and give up on this block. You haven't had a machine shop determine if the block is any good, aside from the starter issue. Cut your losses now!
And listen to Sofa about the 14" flywheel / flexplate. Believe me, you WANT to run the 12.8" version.
Taking this route is going to have you chasing one problem after another, and another. Been there, done that. Please take our good advice.
Well...taking everyone's advice into consideration and how depressed I am about it I've decided to scrap this project...so mods can close this thread now or something. I'll check in if I get the motivation to find another block later on.
I appreciate all you guys giving me good advice you've all been a good look out because I'd definitely be worse off if I had ran into all of this headache a bunch of dollar bills down the road so thanks all!
Sofa is correct that the old cast-iron nosepiece with the 3 holes won't line up with the 3 holes in your block, but PowerMaster makes a few starters that can use all three bolts holes. 4 or 5 years ago, a buddy cracked the outside ear on his 400 block and used the one below - all the outside bolt on his was doing was helping to locate the starter. As long as that stud is secure, I don't know why this one wouldn't work for you either. - header fitment aside and assuming the rest of the block was worth salvaging. You would need a 168-tooth flex plate though. https://www.summitracing.com/parts/pwm-9112
I'd check starter to header fitment while the engine was on the stand. However, the main issue I see with the stud is you would probably have to install the starter before stabbing the engine and depending on the headers, it might be a pain doing that. Then, if something happened to the starter, you probably wouldn't be able to get the header out of the way enough - you might not even be able to pull the header to get it out. That is, unless you were lucky enough the starter could drop straight down.
I've tossed out so many 509 400 blocks for various reasons it's not funny. The last one I used I had a ton of money in it with the splayed mains and fixing the cam tunnel it wasn't funny. Stock flat tappet cam was fine in it but when I used a solid roller with high spring psi it started spitting out cam bearings. Machine shop said it was the worst they had ever seen. Had it fixed and ran it for awhile then went aftermarket.
Emeraldsun, there is now a very easy recipe for putting the power into these cars that GM could not do at the time.
Get yourself a known good 1996-2000 L31 SBC engine from a Chevy/GMC truck. That would be the 5.7L 350 cid version.
The block has a 1 piece rear main seal, decent Vortec heads, and most importantly it is set up for a roller camshaft.
You could add a stroker kit to turn it into a 383 if you wanted to. Or you could buy an already remanufactured short or long block.
The factory machining done to these blocks is light years ahead of the 70s and 80s versions, so you do not have to deal with those problems.
Starting out with a good foundations will let you spend your money where you will actually get the most bang for your buck.
I'm sure other members will add more details - all you have to do is ask.
Last edited by NoEmissions84TA; 03-13-2021 at 06:03 PM.
 03-09-2021, 04:33 PM