
T-TOP AJUSTERS


Supreme Member
Joined: Feb 2004
Posts: 1,581
Likes: 3
From: So Cal
Car: 89 IROC Z28
Engine: 357 TPI
Transmission: 700R4
Axle/Gears: 3.42 Posi


Supreme Member
iTrader: (5)
Joined: Oct 2005
Posts: 1,775
Likes: 1
From: MA
Car: 1995 Formula; 1976 Trans Am
Engine: LT1; None
Transmission: T56; None
Remove the t-top. Where each t-top pin goes when you latch them in place,that is where the adjuster is located. You have to remove tha plastic trim pieces over these two areas to see the screws that hold the adjuster in place, and which you have to loosen to adjust the latching of the t-top. There are four of these adjusters, two per t-top.

Junior Member
Joined: May 2005
Posts: 91
Likes: 1
From: France
Car: Camaro RS 1992
Engine: 305 TBI
Transmission: TH700R4
Hi,
There's a french article dedicated of the ttop adjustement.
There are several photos to help you.
If you want, I can translate the article.
TTOP adjustement
There's a french article dedicated of the ttop adjustement.
There are several photos to help you.
If you want, I can translate the article.
TTOP adjustement

Trending Topics
Junior Member
Joined: May 2005
Posts: 91
Likes: 1
From: France
Car: Camaro RS 1992
Engine: 305 TBI
Transmission: TH700R4
Ok this is the job
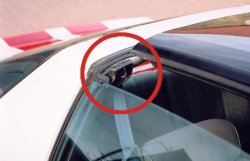
1 - This t-top has been unlocked and simply put away,
we can see his rear attach point (passenger side).
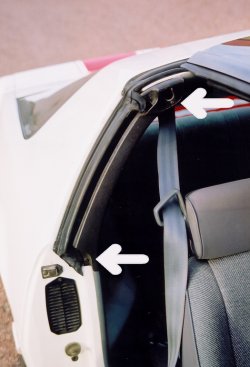
2 - A rubber moulding is hold in place by two screws
(see white arrows).
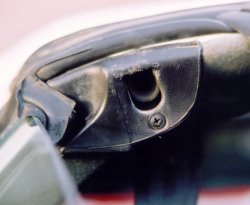
3 - Here's a "zoom in" view of the t-top's attach point
(upper section of the moulding). This part of the moulding hide
the hole where fits the t-top's lock system.
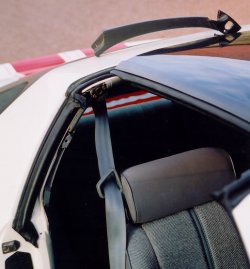
4 - The moulding is now removed ( it's on the top).

5 - We can see here the attach point hold in place by
two screws.
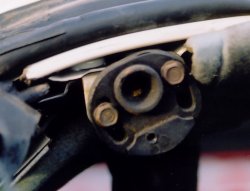
6 - This attach point is ajustable. By loosing the screws,
you ill be able to ajust-it. When it's done correctly, tight the
screws (not too much) and do the same on the other side.
I would thank JM350 who has done the translation, cause my english is very too bad
1 - This t-top has been unlocked and simply put away,
we can see his rear attach point (passenger side).
2 - A rubber moulding is hold in place by two screws
(see white arrows).
3 - Here's a "zoom in" view of the t-top's attach point
(upper section of the moulding). This part of the moulding hide
the hole where fits the t-top's lock system.
4 - The moulding is now removed ( it's on the top).
5 - We can see here the attach point hold in place by
two screws.
6 - This attach point is ajustable. By loosing the screws,
you ill be able to ajust-it. When it's done correctly, tight the
screws (not too much) and do the same on the other side.
I would thank JM350 who has done the translation, cause my english is very too bad
Last edited by wahoo; Jan 10, 2007 at 02:44 PM.


Thread
Thread Starter
Forum
Replies
Last Post
1Aauto
Sponsored Vendors
1
Jan 15, 2016 06:26 AM
Thirdgen89GTA
NW Indiana and South Chicago Suburb
4
Nov 26, 2015 11:04 PM