smoothin car out

Thread Starter
Member
Joined: May 2007
Posts: 161
Likes: 1
smoothin car out
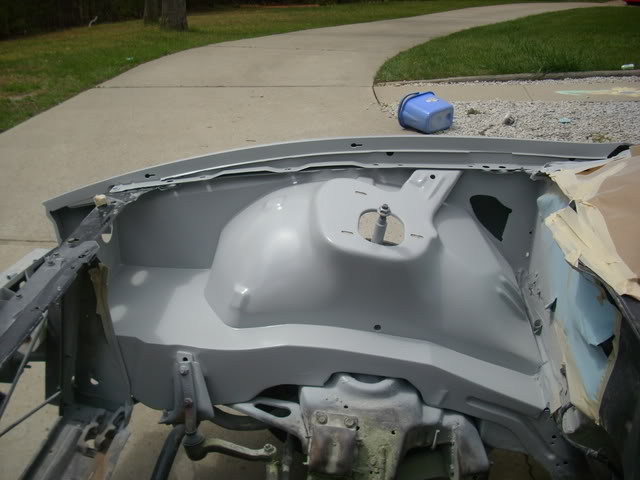
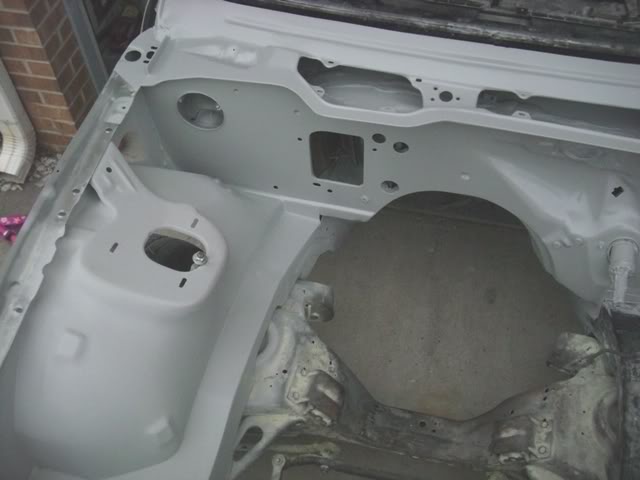
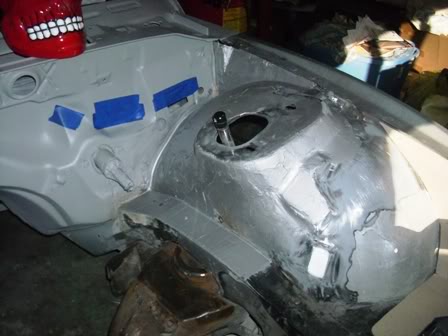
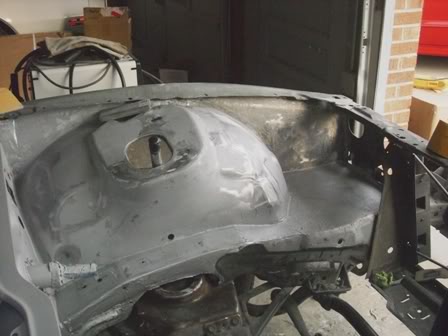
Hey guys... I think I'm in the right threads now...Body... anyway.. I've been an on looker for awhile and I figured I'd show so pics of what I've been doing to the body of my car... It is going to be a KITT... so anyway... I first started with my passenger side engine bay:
then I got stuck molding a bumper for my car:
That picture was during the process of the bumper... This is how it looks now
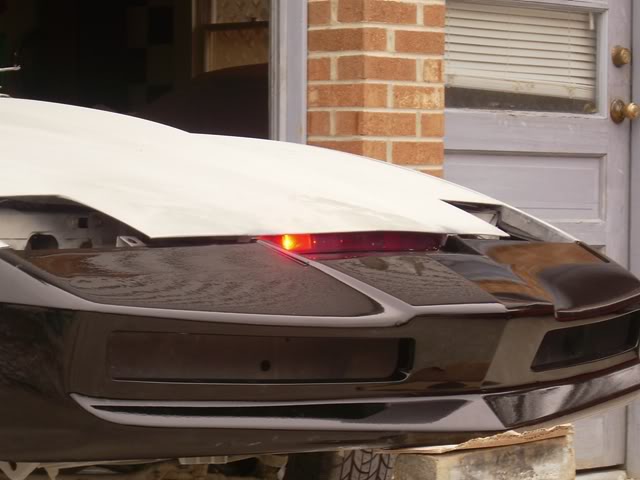
Check out the block holding it up... that's because after molding , it weighed in at over 100lbs.... not very good on the ol fenders... so anyway... So after a year of making a bumper.... I can finally start back on what I like doing... This is modding and bodywork that I love doing... The only reason I'm posting this is because I've been doing that bumper for a year straight, and I finally got back onto my engine bay again. YES ... so , to the guys that know me, sorry I'm posting these pics up again, but I love doing this stuff.. anyway...Here is where I'm at now....
I'm welding, then putting all metal in, then bondo... so NO, the bondo is not thick... I just use it for general blocking , NO big fills of bondo.... so anyway... I'm just happy about being back doing regular bodywork... Sorry again to the guys who have seen this alot( my Knight Rider guys) ... Just happy to be back doing this kind of stuff ....Thanks to all for listening, now back to your normally scheduled program
Marc
then I got stuck molding a bumper for my car:
That picture was during the process of the bumper... This is how it looks now
Check out the block holding it up... that's because after molding , it weighed in at over 100lbs.... not very good on the ol fenders... so anyway... So after a year of making a bumper.... I can finally start back on what I like doing... This is modding and bodywork that I love doing... The only reason I'm posting this is because I've been doing that bumper for a year straight, and I finally got back onto my engine bay again. YES ... so , to the guys that know me, sorry I'm posting these pics up again, but I love doing this stuff.. anyway...Here is where I'm at now....
I'm welding, then putting all metal in, then bondo... so NO, the bondo is not thick... I just use it for general blocking , NO big fills of bondo.... so anyway... I'm just happy about being back doing regular bodywork... Sorry again to the guys who have seen this alot( my Knight Rider guys) ... Just happy to be back doing this kind of stuff ....Thanks to all for listening, now back to your normally scheduled program
Marc
Supreme Member
iTrader: (7)
Joined: Jun 2008
Posts: 1,468
Likes: 0
From: Minnesota
Car: 89 IROC-Z
Engine: 370 LSX, LS3 Top End
Transmission: Built T-56
Axle/Gears: 9" Aluminum Center 3.89's
Re: smoothin car out
WOW that engine bay looks AMAZINGLY smooth! Good work 

Joined: Dec 2007
Posts: 1,924
Likes: 12
From: Minnesota
Car: 84 camaro, 88 trans am, 98 camaro
Engine: Modded , stock, LSX modded
Transmission: 700r4, 700r4, t-56
Axle/Gears: 327, 308, 373
Re: smoothin car out
Thats going to look amazingly great! and this is coming from some one thats been there, all that hard work will diffidently going pay off in the end keep us posted!
is that bondo on the bumper? id be very leary to slap even thin coats on urethane bumper - in less that nose is fiberglass
is that bondo on the bumper? id be very leary to slap even thin coats on urethane bumper - in less that nose is fiberglass
Thread Starter
Member
Joined: May 2007
Posts: 161
Likes: 1
Re: smoothin car out
hey guys,
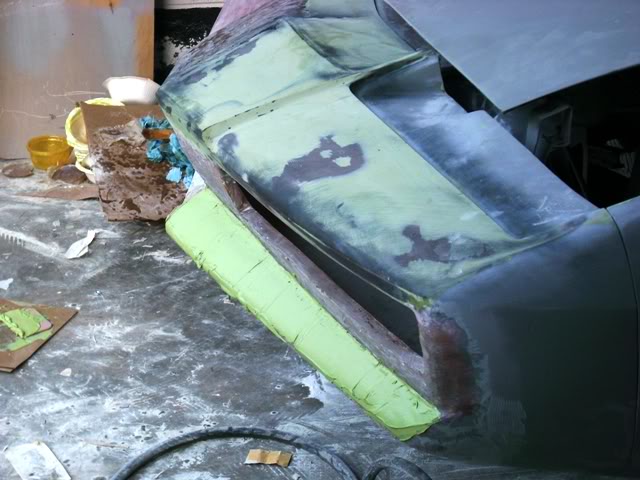
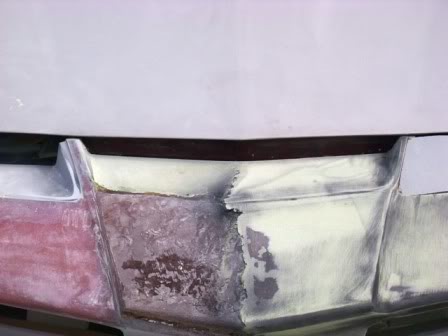
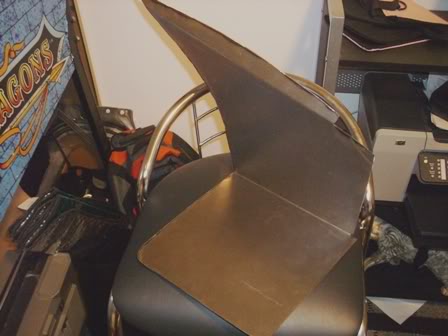
Yes , If you look at the pic, the bumper is being held up by a block... that bumper weighs more than 100lbs... My fenders love me.. just joking.. No I used bondo alot on the bumper, mainly because of making my own lines on it , and I wanted something easy to work with. The bumper has since those pictures , went to molding process. I used original measurements from one of the original KITT cars to get my nose done... This is how much I cut off of it and started over... I fiberglassed the back side , then went to cutting.....
So yey, I did some major bodywork on this nose....speakin of bondo, you can use bondo to shape when making a mold, so check the bottom of the bumper out... I used my gargage floor to straighten it out... I put saran wrap and duct tape on the floor, then put 3/4 gallon of bondo on.... alot, but remember, its going to be a plug for a mold... so it doesn't matter how thick. It's going to molded and copied...
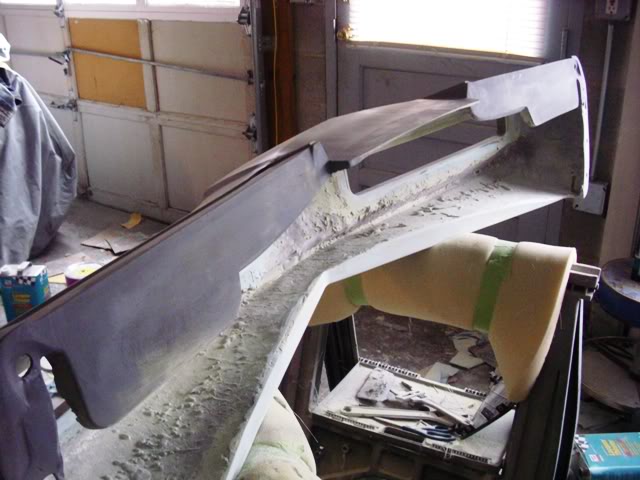
So , yey, bondo is a molders have to have....Here's a couple of build pics of the bumper
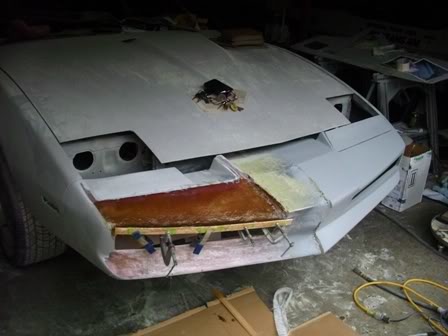
That last one is still before I cut the nose...AAAAaaaaahhhh
Thanks for lookin
marc
Yes , If you look at the pic, the bumper is being held up by a block... that bumper weighs more than 100lbs... My fenders love me.. just joking.. No I used bondo alot on the bumper, mainly because of making my own lines on it , and I wanted something easy to work with. The bumper has since those pictures , went to molding process. I used original measurements from one of the original KITT cars to get my nose done... This is how much I cut off of it and started over... I fiberglassed the back side , then went to cutting.....
So yey, I did some major bodywork on this nose....speakin of bondo, you can use bondo to shape when making a mold, so check the bottom of the bumper out... I used my gargage floor to straighten it out... I put saran wrap and duct tape on the floor, then put 3/4 gallon of bondo on.... alot, but remember, its going to be a plug for a mold... so it doesn't matter how thick. It's going to molded and copied...
So , yey, bondo is a molders have to have....Here's a couple of build pics of the bumper
That last one is still before I cut the nose...AAAAaaaaahhhh
Thanks for lookin
marc
Thread Starter
Member
Joined: May 2007
Posts: 161
Likes: 1
Re: smoothin car out
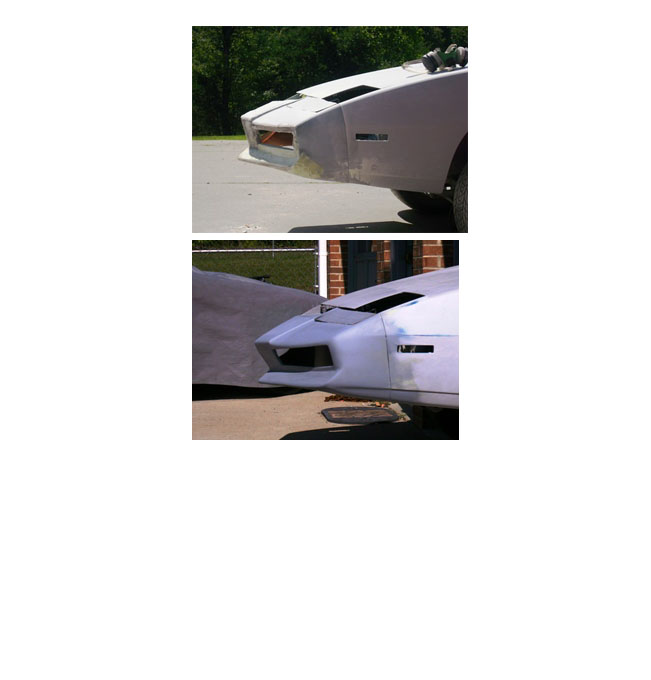
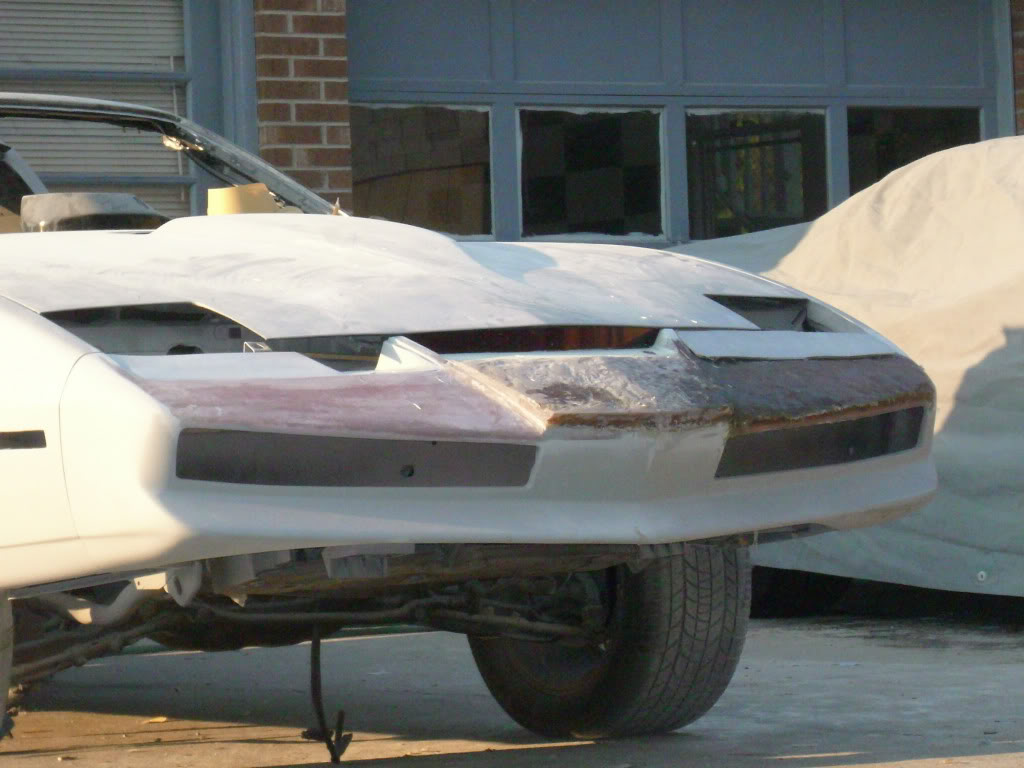
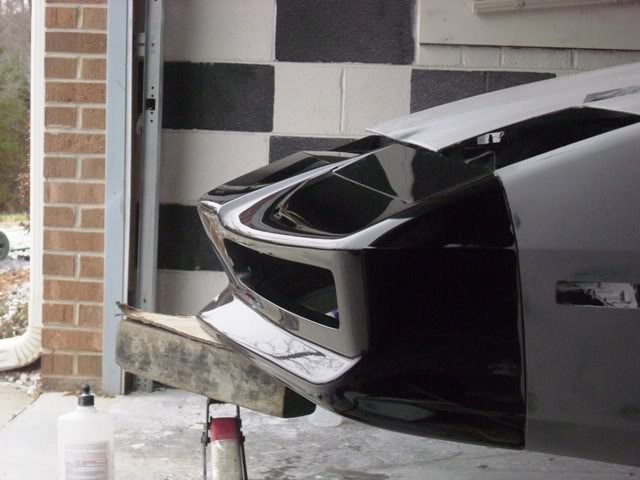
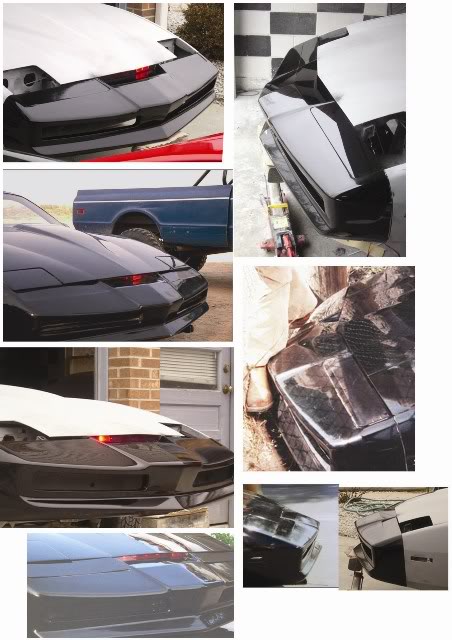
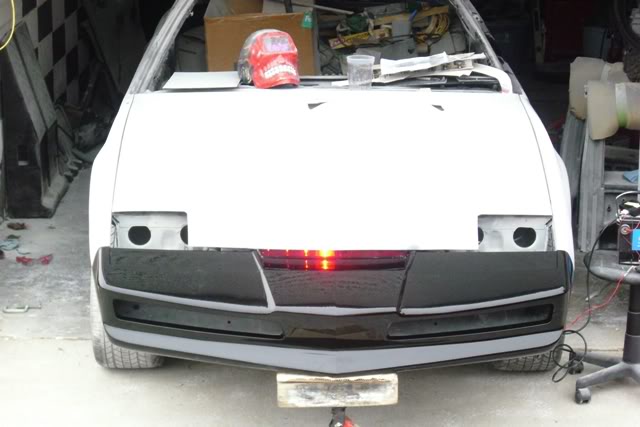
Anyway, I then basically cut the nose after I had done all that work, because I got to get the measurements off of one of the originals... So anyway...So after all is said and done ,after a years worth of work... I got my measurements on and got it primed , then painted... The next pic is one of my favorites...It is with the plexi covers over the turn signal covers...
then , while I made the bumper, to see differences in the bumper, I made alot of comparison pictures... Here's what I had at the end ....These are of the original versus mine.... kind of cool ...
Anyway... sorry about showing you all this, but I just wanted to show you all why it took a year to do....Thanks for lookin ....just call me Bondo Boy...BB
By the way, I did all of this just for an inch scanner area... just thought I'd tell ya that...pretty funny eh?
thanks for lookin... sorry so long
Marc
Last edited by Marc Brown; Dec 30, 2008 at 04:36 AM.

Trending Topics


Member
Joined: Dec 2008
Posts: 308
Likes: 0
From: Mebane, NC
Car: 88 GTA
Engine: 305 V8 LB9
Transmission: 4 sp. Auto-4L60
Axle/Gears: 3.27
Re: smoothin car out
After all that work, you need a Lectric Enterprises scanner to go with it. WAY brighter than what you've got on there. That's got a good trail, tho... Is that a Lectric and just dimmer because it's daytime?
WAY brighter than what you've got on there. That's got a good trail, tho... Is that a Lectric and just dimmer because it's daytime? Re: smoothin car out
I'm a huuuuuuge Knight Rider fan.... the original one anyway, and I can certainly appreciate that work that you put into your project. It looks really good! I initially wondered why you went through so much time and hassle to build one when there are a few shops out there that already does. Whatever I guess. Perhaps you're starting your own business with your own molds. Either way, I think it looks great! Do you plan on doing a full K.I.T.T. interior? If so, which version? I'm partial to the 3rd season dash with the single larger monitor.
Thread Starter
Member
Joined: May 2007
Posts: 161
Likes: 1
Re: smoothin car out
Hey guys,
thanks for the post... Yes , that is a Lectric Enterprises scanner... but not a bulb one...It's Brenon's LED one... Also...yes , there is some shops close by... One of them is Lectric Enterprises, who does scanners and the dash electrics...Lectric Enterprises is only 2 miles from my house.. So , yes, I'm going with him on the scanner and interior pieces.. One of the other vendors is , Knight Designs.org...His name is Billy , and he does excellent fiberglass work , if not the best I've personally ever seen... There is also Don Collie up in Virginia who does full turnkeys... His business name is Advance Designs.. very, very top notch thru all vendors I mentioned. There are others, but it all depends on how accurate do you want it to the show. if you want an accurate bumper to first and second season, I would go with mine... (I promise I'm not trying to sound anyway) but I personally had help from alot of the top vendors in the Knight Rider community to make this... and had measurements from an original bumper to go by.. Us Knight Rider people are Crazy, Craaaaazy people... We like accurate, and that's what I'm going for... So I'm going with Knight Designs for the interior pieces and Lectric for the electroinics... The bumper is in the molding process and when done, WILL be available for purchase. Please P.M. me if interested in one. My site is being made now , I'll have it up soon.. Thanks soooo much for the comments.. I'm still working on that firewall ... what a B!^Ch...... anyway... Thanks again for the responces...I'll have pics soon...Thanks again for looking and your comments are greatly appreciated....Thanks
marc
Thread Starter
Member
Joined: May 2007
Posts: 161
Likes: 1
Re: smoothin car out
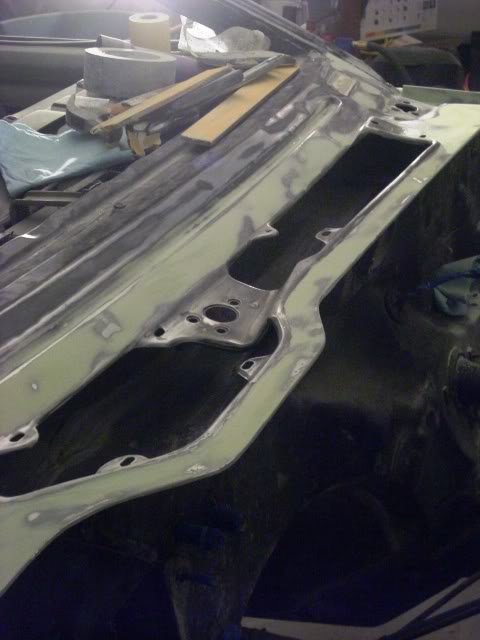
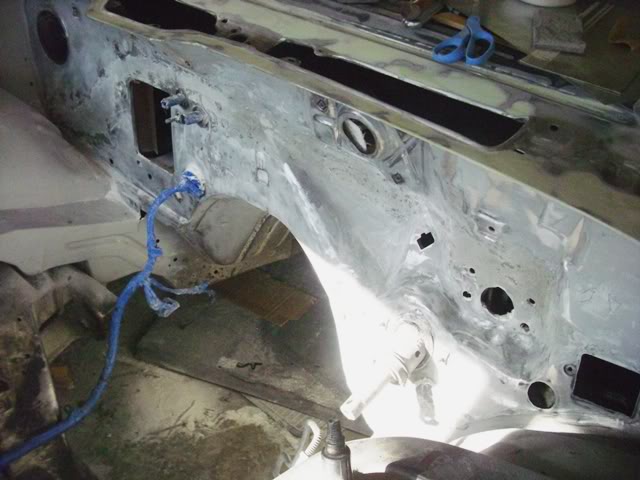
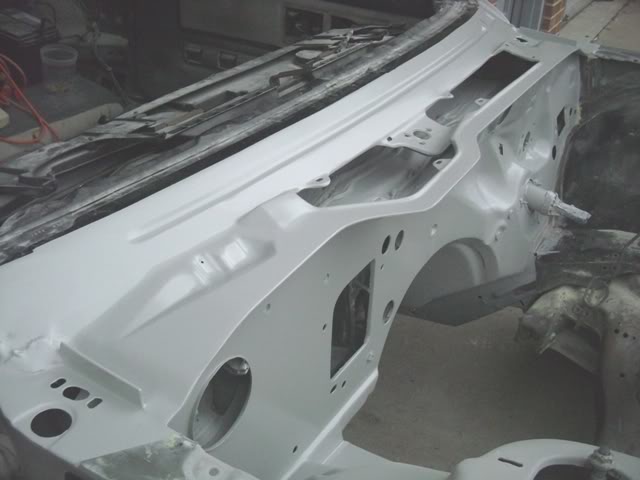
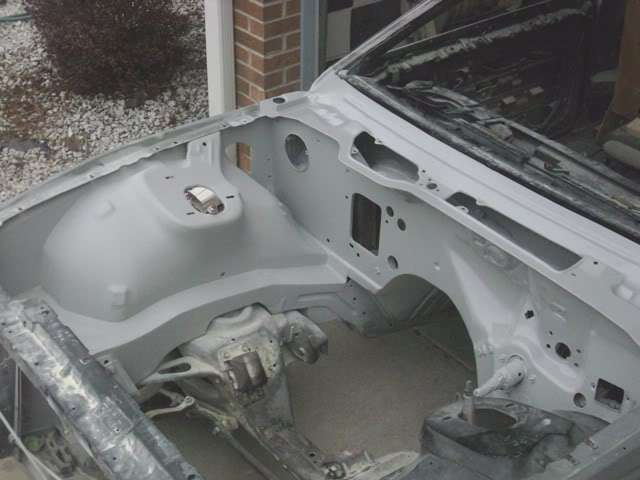
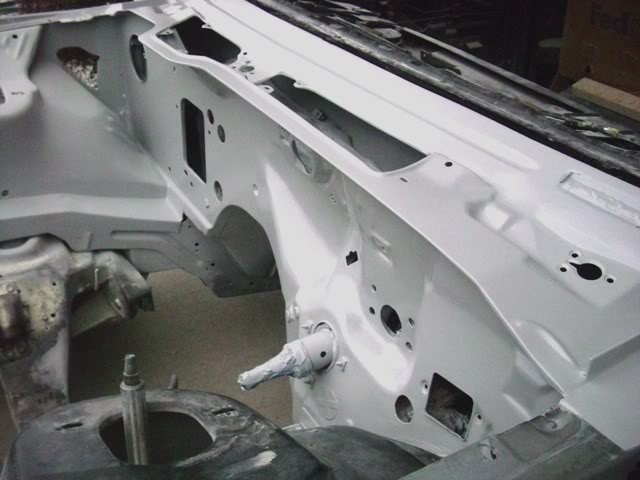
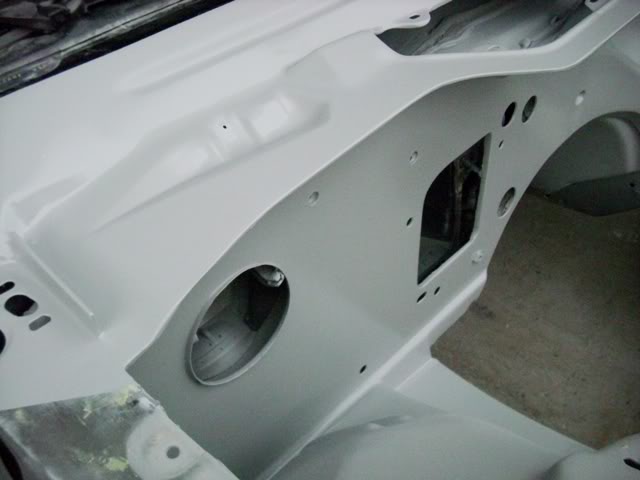
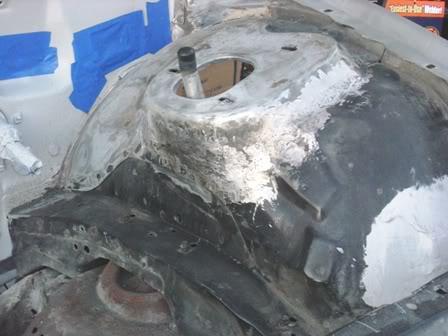
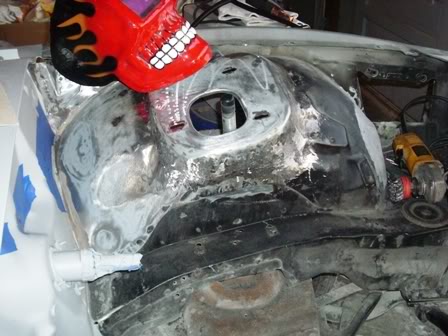
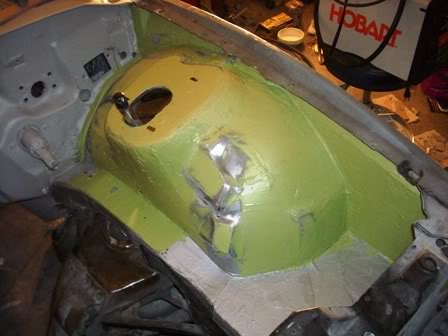
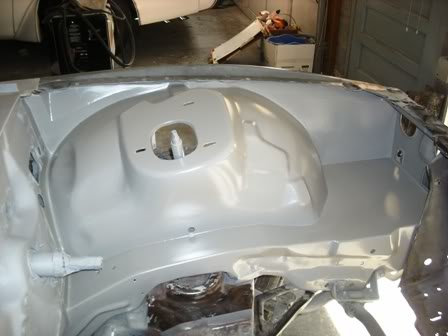
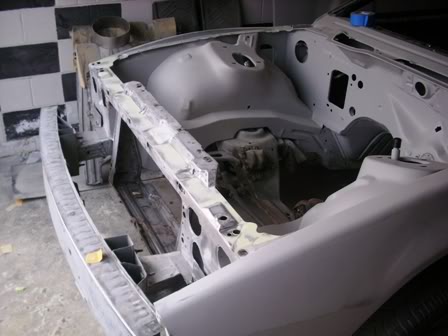
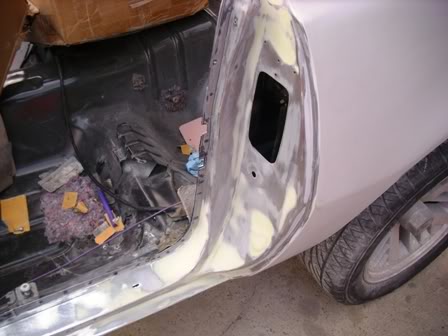
Just thought I'd show you all what I've done so far on the firewall .... speaking of, what a freakin b!%@h....... Anyway...after a couple of hours just slappin bondo on here and there, I managed to get it... here is just a few pics of what I did to smooth it out..... Thanks for lookin... and again..sorry for so many pics... thanks
Sanding of firewall
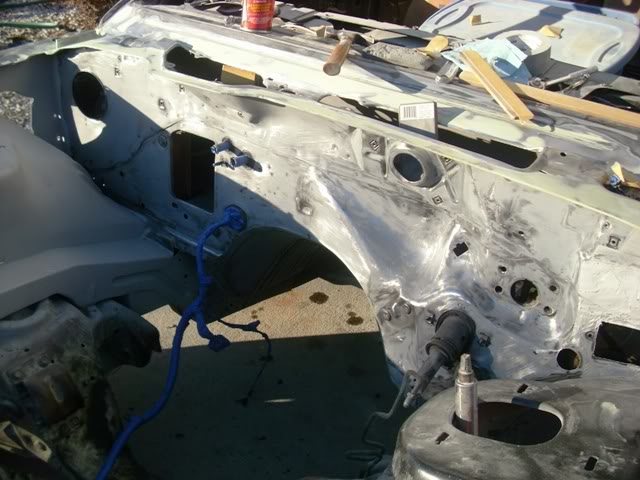
Welding of holes and the big seam that goes all the way across ...
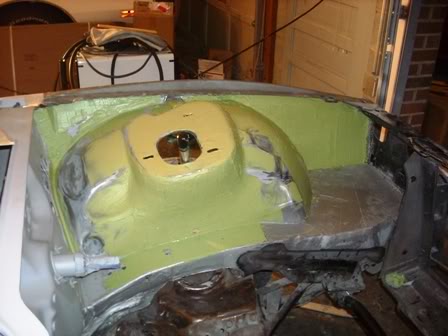
This is how I bondo... I just fill the whole thing up , then just sand it...different strokes for different folks.... but here it is AAAAAaaaaahhhhhh
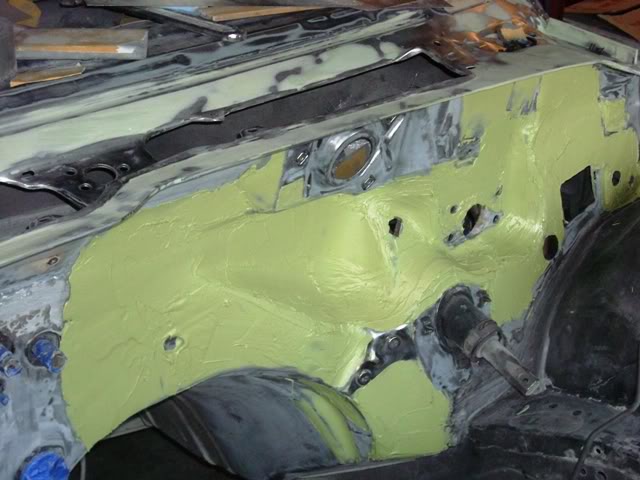
I'm installing a A/C delete cover but I still wanted to seal the seam so no moisture could get under the seam and haunt me later ....
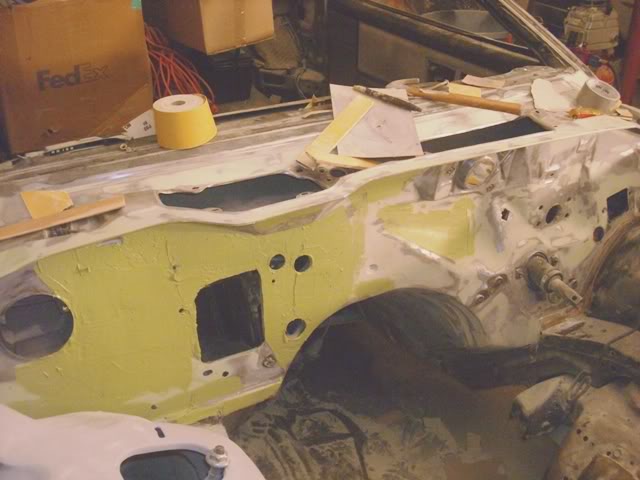
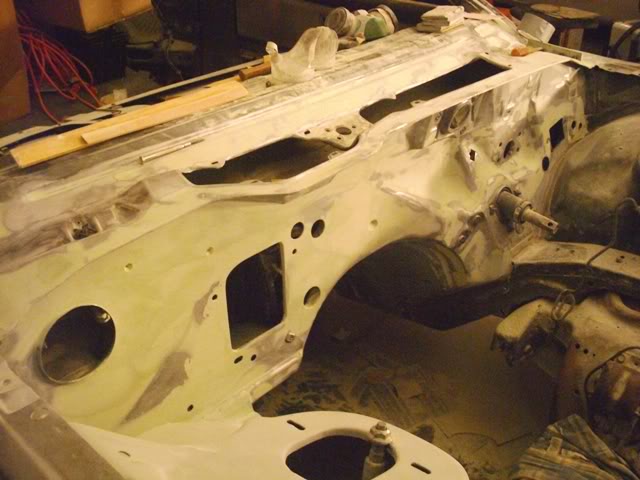
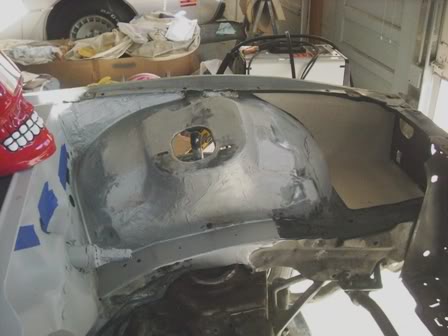
After finishing , After a month and half (spending time on it when I can)!!
Sanding of firewall
Welding of holes and the big seam that goes all the way across ...
This is how I bondo... I just fill the whole thing up , then just sand it...different strokes for different folks.... but here it is AAAAAaaaaahhhhhh
I'm installing a A/C delete cover but I still wanted to seal the seam so no moisture could get under the seam and haunt me later ....
After finishing , After a month and half (spending time on it when I can)!!
Member
Joined: Sep 2008
Posts: 164
Likes: 0
From: Concord, NC
Car: 89 Camaro, 94 z-71,98 Camaro
Engine: none, 350 tbi.sixxer
Transmission: none, 4l60e,auto
Axle/Gears: none, 3.73
Re: smoothin car out
That is sweet looking ..... now I have another venture to do with the Camaro. Am so looking forward to your finished product!
Thread Starter
Member
Joined: May 2007
Posts: 161
Likes: 1
Re: smoothin car out
Well, I haven't got much done on this car this month...but this is the January report card...I started the driver side tower braces....aAAAAAhhhhhhhhhahhh.... MAN , is that alot of welding..anyway.... just wanted to post January progress
thanks for lookin
Thanks guys....
Marc
thanks for lookin
Thanks guys....
Marc
Re: smoothin car out
not so much of a knight rider fan, but i love the work. you really have a great skill. i wish i was able to fab stuff up like that and be as meticulous about it as you are. your maaking me jealous. nice job.

Thread Starter
Member
Joined: May 2007
Posts: 161
Likes: 1
Re: smoothin car out
Thought I'd show you all this before I get started on the battery tray area. I went ahead and made me a template for the pans out of cardboard.. just will have to go to the shop and make one at work. Can't wait to get a pan in and start welding that in. That's when I'll know that I'm almost there. anyway, I went ahead and put the All Metal on to protect the metal, now it's time to make the pan YES!!! Can't wait...talk with you all when that 's in... see ya!
Marc

Marc

Junior Member
Joined: Dec 2006
Posts: 44
Likes: 0
From: near St Louis
Re: smoothin car out
Why are you doing an A/C delete? or is that part of the Knight Rider theme? Excuse my ignorance, I'm not a big KR fan. But I can sure appreciate fine craftsmanship, and your's seems to be a fine example.
Thread Starter
Member
Joined: May 2007
Posts: 161
Likes: 1
Re: smoothin car out
Hey , I'm doing an A/C delete but still going to have A/C.... I'm going to use the compressor like normal, but I'm going to try to customize the interior for one of those old school 68 mustand designed A/C units...sounds weird but I think I have a spot for it. It won't be like the original , blowing alot of air , but enough to cool the inside . I've done talked to a couple a vendors about the A/C deal , and they say people do it all the time...Sorry , maybe in the old ones, but not in a 3rd gen...I know... but I really want that weird looking turbo setup. I have something to do with making it look KR looking at the end of the project. Hope this helps.. and the other thing is that , I want to be able to get to my plugs easy... Just jokin but true
Marc
Marc
Member
Joined: Aug 2007
Posts: 239
Likes: 0
From: ANDERSON SC
Car: 92 RS
Engine: 305
Transmission: T-5
Axle/Gears: 3.08
Re: smoothin car out
Wow you have just gave me so many ideas for 92 RS that im about to start on. Stop apologizing for so many pics whats that about, the more the better looks awesome man.
Thread Starter
Member
Joined: May 2007
Posts: 161
Likes: 1
Re: smoothin car out
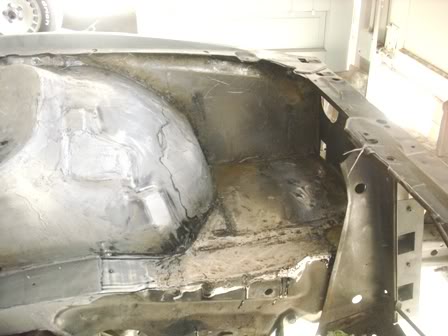
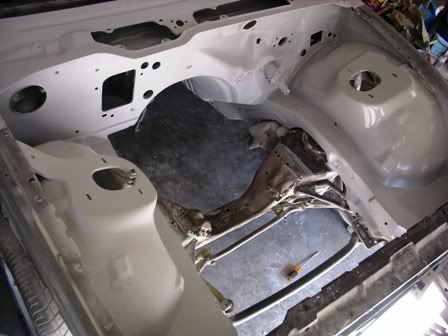
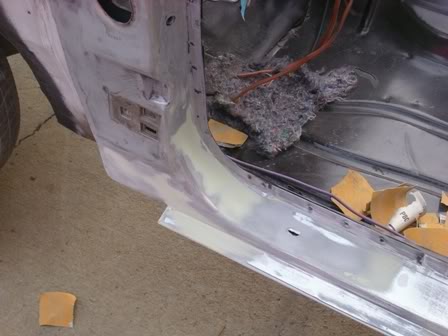
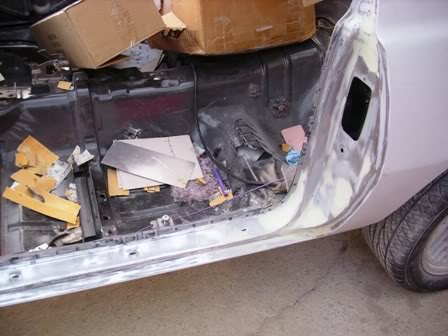
Hey , I thought I'd just post some pics of what I've been doing this month. First of all, I had to cut my battery pan out. My shop at work has this real ancient big @ss metal bender from like the 30's or 40's... just pickin, but it is probably from the 70's . It's wider than a bus. No problem bending this little metal.
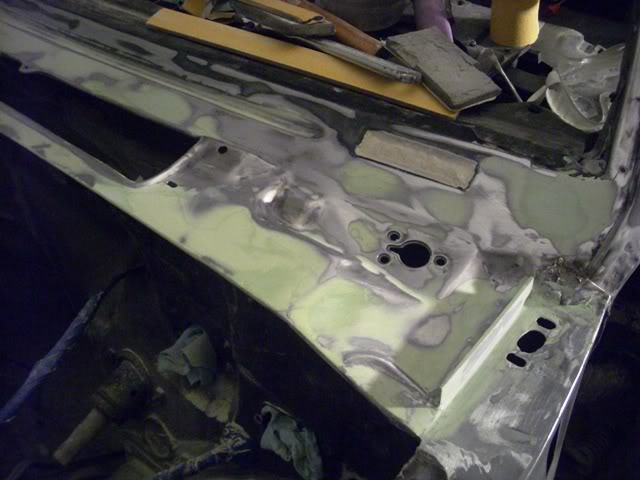
Well, of course you have to weld it in, so if you look at your battery tray, it has alot of holes in the bottom...Well, I used some of the block steel you can get at Lowe's or any hardware store, and measured where the holes were and made a view of my own. I wanted support for the tray so I can put stuff on it if needed. So , I measured and welded the pieces to the pan, then, welded the pan in.
well, after the pan was in , there is a problem , which was the same as the other side, The battery tray is flat and the frame goes down. BIG problem in blocking. WILL NOT LOOK GOOD! So, I measured the difference of the pan and the frame , and it was about 1/4 inch, at the highest point. So , I welded a piece of 1/4 inch steel on the frame, then grinded it down, and acted like I was blocking but with steel and a grinder. So basically, the piece I welded in (which was straight before ) was now tilted and level with the battery tray. Anyway. I checked it with a block and made sure it was straight, I DO NOT like alot of bondo in my rides. Well , here is how it looks, it probably looks like , " WHAT THE #ELL HAVE YOU DONE" but remember this is before the ALL METAL goes on.
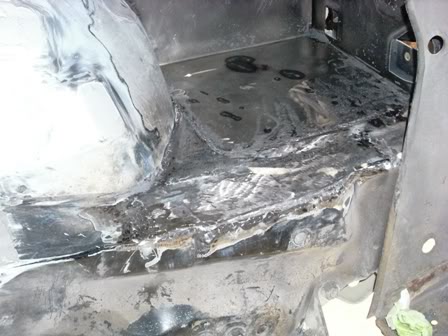
Now the next thing I do, which alot of people will say, HUH, but this is just from my experiences with metalwork. I glass the seams just to make sure that no air gets trapped. I used a little more resin than normal so the resin goes in the holes. Usually bondo or all metal go in the pores of the welded area but resin seems to drip in them more, less chances of air release later. Anyway...here it is with the glass done....the next pic of it will be in all metal and bondo... so until then , thanks for listening to this long @ss letter....Here's how it is with the glass (very little glasswork)
Thanks
Marc
Well, of course you have to weld it in, so if you look at your battery tray, it has alot of holes in the bottom...Well, I used some of the block steel you can get at Lowe's or any hardware store, and measured where the holes were and made a view of my own. I wanted support for the tray so I can put stuff on it if needed. So , I measured and welded the pieces to the pan, then, welded the pan in.
well, after the pan was in , there is a problem , which was the same as the other side, The battery tray is flat and the frame goes down. BIG problem in blocking. WILL NOT LOOK GOOD! So, I measured the difference of the pan and the frame , and it was about 1/4 inch, at the highest point. So , I welded a piece of 1/4 inch steel on the frame, then grinded it down, and acted like I was blocking but with steel and a grinder. So basically, the piece I welded in (which was straight before ) was now tilted and level with the battery tray. Anyway. I checked it with a block and made sure it was straight, I DO NOT like alot of bondo in my rides. Well , here is how it looks, it probably looks like , " WHAT THE #ELL HAVE YOU DONE" but remember this is before the ALL METAL goes on.
Now the next thing I do, which alot of people will say, HUH, but this is just from my experiences with metalwork. I glass the seams just to make sure that no air gets trapped. I used a little more resin than normal so the resin goes in the holes. Usually bondo or all metal go in the pores of the welded area but resin seems to drip in them more, less chances of air release later. Anyway...here it is with the glass done....the next pic of it will be in all metal and bondo... so until then , thanks for listening to this long @ss letter....Here's how it is with the glass (very little glasswork)
Thanks
Marc
Member
Joined: Jan 2008
Posts: 150
Likes: 0
From: Susanville Ca
Car: 89 Firebird Formula
Engine: chevy 5.7 V8 TBI but carbed soon
Transmission: T-5
Axle/Gears: no freakin clue lol
Re: smoothin car out
Nice i am doing a tear down and rebuild and i am starting with the engine bay. thanks for the ideas and AWESOME WORK my friend.
Senior Member
Joined: Oct 2008
Posts: 629
Likes: 0
From: The Sticks, Ca.
Car: '79 Camaro; '84 Z28
Engine: 350; none
Transmission: TH-350, 2500 stall; none
Axle/Gears: posi, 3.08; disc, 3.23
Re: smoothin car out
Very impressive work man! Two thumbs way up! Can't wait to see it finished.
Thread Starter
Member
Joined: May 2007
Posts: 161
Likes: 1
Re: smoothin car out
Thanks guys.... It means alot, especially after induring this torture for this long. Just jokin, it (I think) will be worth it ,in the end. but until then....I guess I'll be sanding some more...aAAAAAAaaaaahhhhhh! I just got the ALL METAL on the tower brace sanded down and I'll put the All METAL on the Battery tray area next. Can't wait to get that sanded also, then the good ol bondo(RAGE GOLD) will be used. That's when the real patience comes in. Anyway. All I have after this side of the engine bay is my rear passenger quarter....YES!!!!! Can't say that enough. I'll be a very happy man after that is done...To the paint shop is the words I'm waiting to say!
Thanks again
marc
Thanks again
marc
Member
Joined: Dec 2008
Posts: 308
Likes: 0
From: Mebane, NC
Car: 88 GTA
Engine: 305 V8 LB9
Transmission: 4 sp. Auto-4L60
Axle/Gears: 3.27
Re: smoothin car out
Thanks guys.... It means alot, especially after induring this torture for this long. Just jokin, it (I think) will be worth it ,in the end. but until then....I guess I'll be sanding some more...aAAAAAAaaaaahhhhhh! I just got the ALL METAL on the tower brace sanded down and I'll put the All METAL on the Battery tray area next. Can't wait to get that sanded also, then the good ol bondo(RAGE GOLD) will be used. That's when the real patience comes in. Anyway. All I have after this side of the engine bay is my rear passenger quarter....YES!!!!! Can't say that enough. I'll be a very happy man after that is done...To the paint shop is the words I'm waiting to say!
Thanks again
marc
Thanks again
marc
Me... I consider it a good drive if my battery doesn't fall out and my motor mounts don't break.

Member
Joined: Dec 2008
Posts: 308
Likes: 0
From: Mebane, NC
Car: 88 GTA
Engine: 305 V8 LB9
Transmission: 4 sp. Auto-4L60
Axle/Gears: 3.27
Re: smoothin car out
I'm not going to laugh. It takes a lot of time, money, and skill to build a TRUE KITT replica, and I've seen your bodywork.
Just don't forget that KITT didn't have the front deflector panels under the nose.
Just don't forget that KITT didn't have the front deflector panels under the nose.
Member
Joined: Sep 2008
Posts: 164
Likes: 0
From: Concord, NC
Car: 89 Camaro, 94 z-71,98 Camaro
Engine: none, 350 tbi.sixxer
Transmission: none, 4l60e,auto
Axle/Gears: none, 3.73
Re: smoothin car out
Man ....I didn't realize that you were that close....... I'd love to see this in person...
Senior Member
Joined: Oct 2008
Posts: 629
Likes: 0
From: The Sticks, Ca.
Car: '79 Camaro; '84 Z28
Engine: 350; none
Transmission: TH-350, 2500 stall; none
Axle/Gears: posi, 3.08; disc, 3.23
Re: smoothin car out
Having always been a Knight Rider fan, it really is cool to see someone taking this level of care to make a quality replica. Having a good amount of experience with fiberglass myself I can really appreciate the ammount of time and patience that goes into the work you are doing. I didn't catch though in this thread if you were planning on installing the interior/dash kit. I know it is pretty spendy, but I was just curious if it was in your plans.
Thread Starter
Member
Joined: May 2007
Posts: 161
Likes: 1
Re: smoothin car out
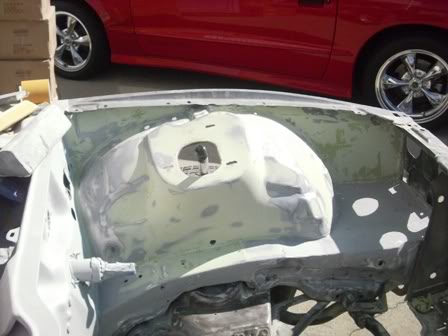
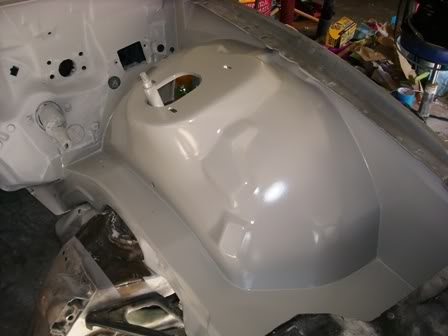
Hey guys, more pics! YES.... Just jokin...but these pics , you can see it finally coming together...
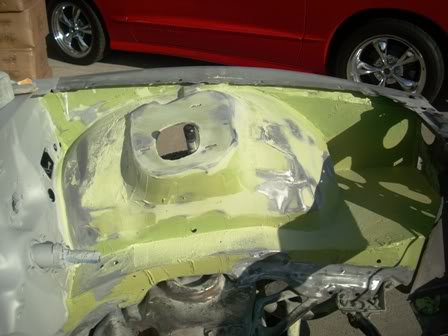
This is after the ALL METAL was sanded and ready for bondo
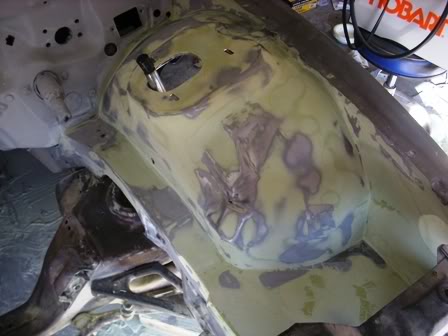
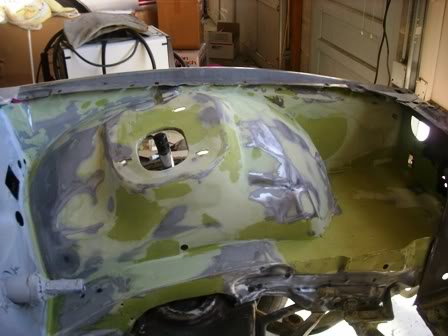
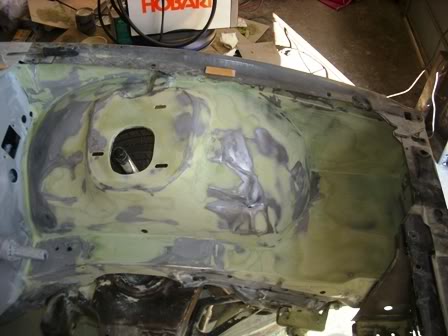
Here are the rest with just bondo added...This should be the last big sanding. The rest should be just hole fills...
And yes, brother, I'm doing the interior also. Billy from Knight Designs is doing a very low,very low, number of all original dashes. Original Dash , original TV bezels, original Steering wheel , ETC. I am getting the whole interior kit from him.. Freakin killer glass man, probably the best in the hobby, him and a guy name Ken Glenn from a company called Wraith Innovations, do the best glass work. The electronics are coming from Lectric Enterprises and are totally accurate to the show. Many, upon many hours have went to making the most accurate replica parts. My bumper is also in this little accuracy issue. I think it's pretty close (I'm more critical to my own work) Just go to this website and this should help ya out
www.knightneutralzone.proboards.com
Thanks for looking and hope that board helps you out. There are more boards out there by far, so do some researching
thanks for looking
marc
This is after the ALL METAL was sanded and ready for bondo
Here are the rest with just bondo added...This should be the last big sanding. The rest should be just hole fills...
And yes, brother, I'm doing the interior also. Billy from Knight Designs is doing a very low,very low, number of all original dashes. Original Dash , original TV bezels, original Steering wheel , ETC. I am getting the whole interior kit from him.. Freakin killer glass man, probably the best in the hobby, him and a guy name Ken Glenn from a company called Wraith Innovations, do the best glass work. The electronics are coming from Lectric Enterprises and are totally accurate to the show. Many, upon many hours have went to making the most accurate replica parts. My bumper is also in this little accuracy issue. I think it's pretty close (I'm more critical to my own work) Just go to this website and this should help ya out
www.knightneutralzone.proboards.com
Thanks for looking and hope that board helps you out. There are more boards out there by far, so do some researching
thanks for looking
marc
Member
Joined: Dec 2008
Posts: 308
Likes: 0
From: Mebane, NC
Car: 88 GTA
Engine: 305 V8 LB9
Transmission: 4 sp. Auto-4L60
Axle/Gears: 3.27
Re: smoothin car out
You can see mine once I get it back from the shop! I'll be doing the dash and seats while it's gone, so once it comes back, it'll be ready to RIDE!
Senior Member
Joined: Oct 2008
Posts: 629
Likes: 0
From: The Sticks, Ca.
Car: '79 Camaro; '84 Z28
Engine: 350; none
Transmission: TH-350, 2500 stall; none
Axle/Gears: posi, 3.08; disc, 3.23
Re: smoothin car out
Awesome bro, I will be looking for your other threads as well. It really is a thrill to see, and as I'm sure you are, I am anxious for the finished product.


Thread Starter
Member
Joined: May 2007
Posts: 161
Likes: 1
Re: smoothin car out
Well, I finally got this side done.....YES!!!!! anyway... Here's a couple of pics of what I went through....Ok, ......
Round 1 Sanding
After that....more bondo
Bondo 2
put that on, well
Round 2 Sanding
Well, after that....ok , little spots here and there(finally getting somewhere!
bondo 3
ALLRIGHTY THEN
Round 3 sanding YES!!!!!
It's done... Now I just need to prime it sometime and take a few overhead shots of the whole thing.... anyway... I'll have pics of the bay in primer shortly (I hope) thanks for letting me share
Marc (2-20-09)
Thread Starter
Member
Joined: May 2007
Posts: 161
Likes: 1
Re: smoothin car out
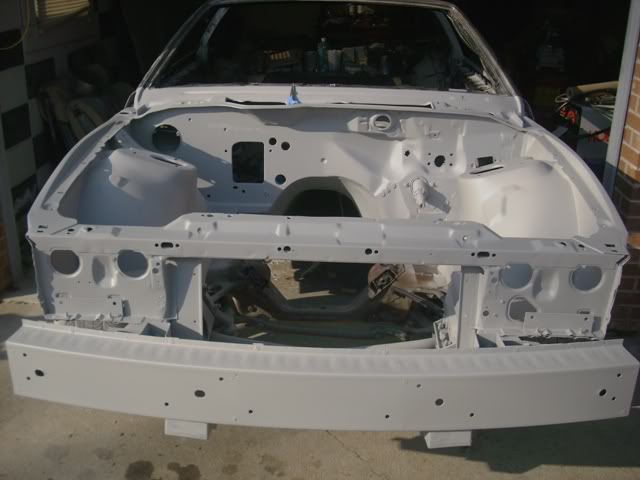
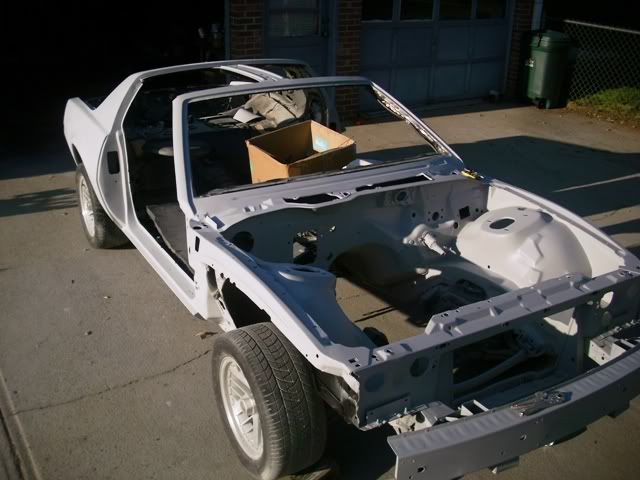
Thanks ! I couldn't wait any longer.... I had to put it in primer...I was going to wait till Monday...UHHH, nope.... Here it is all finished (the whole thing finally)
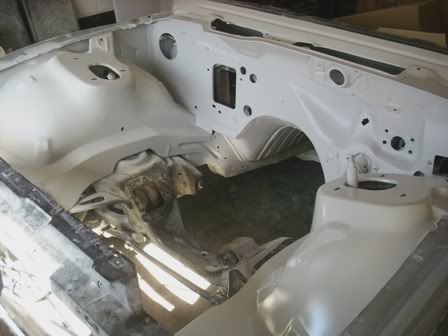
thanks , now all I have on the front is the Radiator support and the front fender clips... YES! ..... Then all I have left is the passenger side quarter....Man , I can't wait till this thing is ready to spray.... anyway...Thanks for lookin
Marc
thanks , now all I have on the front is the Radiator support and the front fender clips... YES! ..... Then all I have left is the passenger side quarter....Man , I can't wait till this thing is ready to spray.... anyway...Thanks for lookin
Marc
Senior Member
iTrader: (2)
Joined: Dec 2008
Posts: 990
Likes: 1
From: Peoria, IL
Car: 1988 Camaro Sport Coupe
Engine: 5.0 305 Carb'd
Transmission: 700R4
Axle/Gears: 3.23
Re: smoothin car out
im subscribing to this. amazing job. id love to do this to my car. well my next car, this car isnt really worth it.. (i want an IROC!!!)
Thread Starter
Member
Joined: May 2007
Posts: 161
Likes: 1
Re: smoothin car out
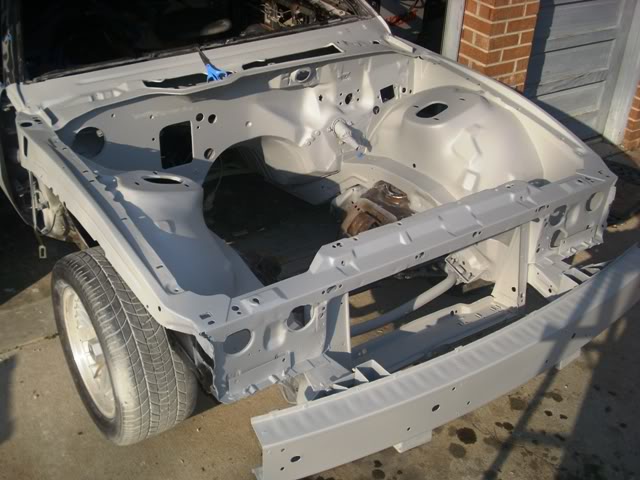
Just thought I'd show you guys my progress on the little odds and ends now... I welded the holes I wouldn't need on the radiator support and blasted the paint and roughed up the primer and metal to get ready for priming. Oh , and bondo of course. JJ.... I thought this was going to be easy....NOT.... anyway... This is it , then the k-member. I'm going to eventually take the k-member out to rebuild but for now, I'll just rough it up so paint will stick... Anyway...Long story short (yey right) nothing Knight Rider is short, here's a couple of pics....

Now for some primer.....after the k-member, This is my February update...thanks for lookin
Marc
Now for some primer.....after the k-member, This is my February update...thanks for lookin
Marc
Last edited by Marc Brown; Mar 4, 2009 at 04:30 PM.
Thread Starter
Member
Joined: May 2007
Posts: 161
Likes: 1
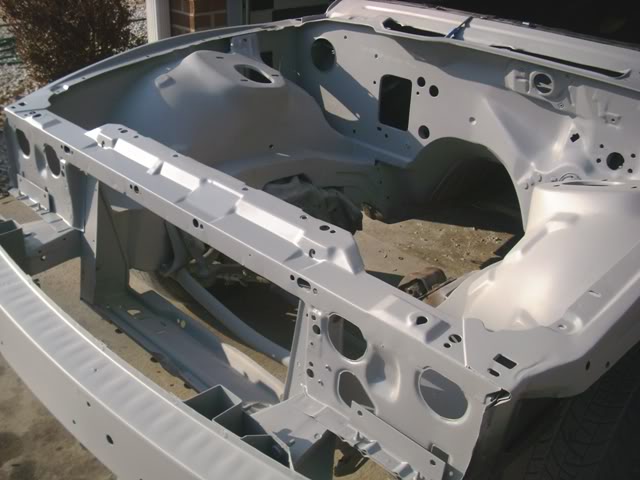
Re: smoothin car out
Just thought I'd post my last pic for awhile... I finished my engine bay and man am I glad about that....YES!....Anyway...here's some shots...Thanks for looking , now I can rest for a little....AAAAaaaahhhh! Drink me a cold one (pepsi)
Marc
Marc
Thread Starter
Member
Joined: May 2007
Posts: 161
Likes: 1
Re: smoothin car out
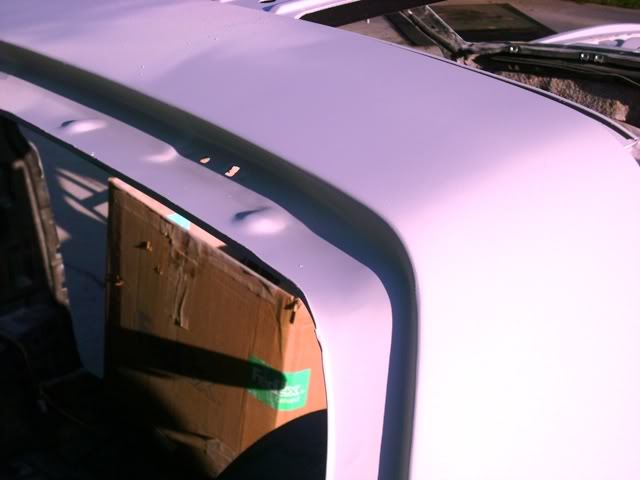
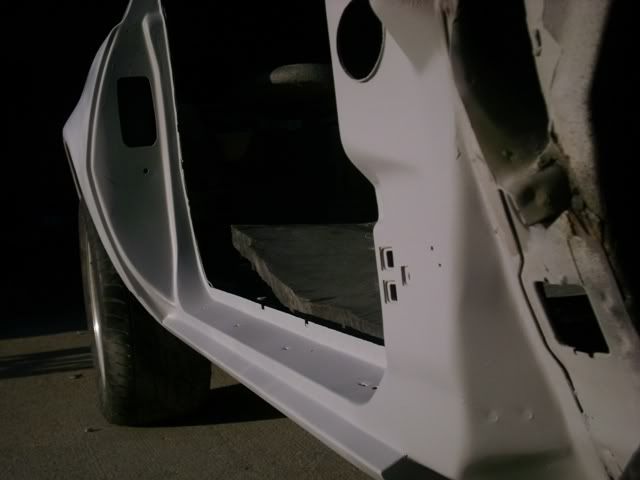
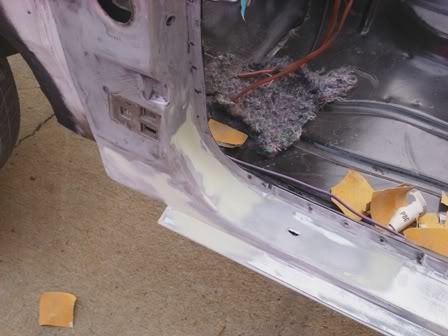
Hey guys, I'm just going to make this my March update... WOW , what a freakin month it's been...Vegas took alot of my time away from the ride, but I was able to get alot still done.(Just so you all know, It was for a Knight Rider festival) ( It was a blast) My first thing when I got back was to get the driver side door jam all smoothed out....Not in prime but ready....
Then , I went ahead and started the T-tops also..... The weather strip was a B.... man oh man, was it?
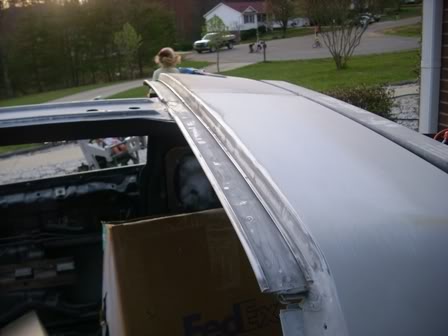
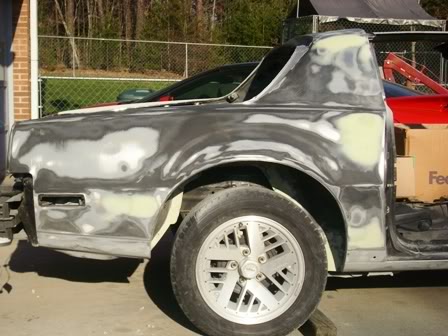
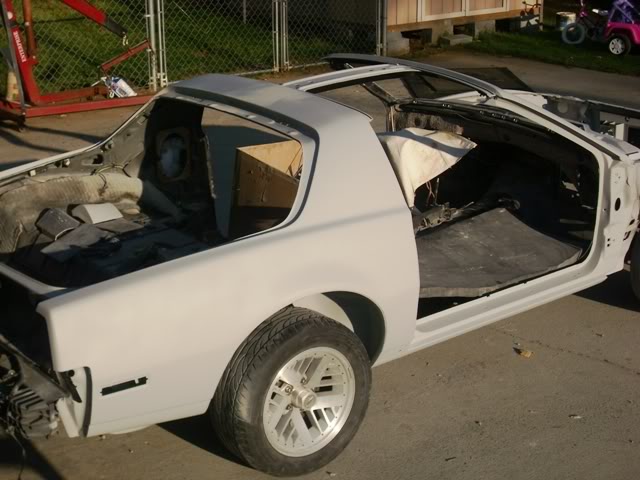
Then, my last piece is the passenger quarter... Well, I thought it was in good shape... everything was good until the wheel well...I had a little rust to take off.... But, I got it , did some welding ,grinding, etc, etc, oh and bondo of course.....
Well, that's it for March...Hopefully , I'll get the rest of the quarter done this month... That was my March update...going back to work!
Oh and check out this video from the stunt team out in Vegas....doing the Ski mode...That's right... How cool is that?
http://s25.photobucket.com/albums/c5...t=DSCN2526.flv
Marc
Then , I went ahead and started the T-tops also..... The weather strip was a B.... man oh man, was it?
Then, my last piece is the passenger quarter... Well, I thought it was in good shape... everything was good until the wheel well...I had a little rust to take off.... But, I got it , did some welding ,grinding, etc, etc, oh and bondo of course.....
Well, that's it for March...Hopefully , I'll get the rest of the quarter done this month... That was my March update...going back to work!
Oh and check out this video from the stunt team out in Vegas....doing the Ski mode...That's right... How cool is that?
http://s25.photobucket.com/albums/c5...t=DSCN2526.flv
Marc
Supreme Member
Joined: Jan 2005
Posts: 1,699
Likes: 3
From: Amsterdam , NY
Car: 1985 Trans Am
Engine: vee eight
Transmission: auto
Axle/Gears: 4.10 gears
Re: smoothin car out
wow this is a great thread and great pics. I love the work your doing , its looking freakinf awesome .
Thread Starter
Member
Joined: May 2007
Posts: 161
Likes: 1
Re: smoothin car out
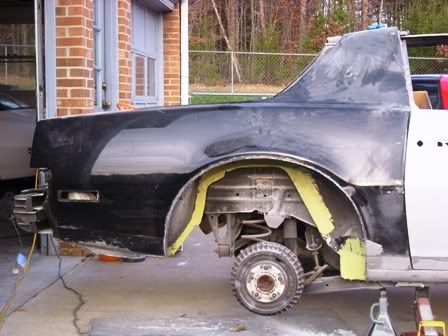
Hey guys , It's been awhile since I posted about my ride, but I've been busy as (insert here) ... Anyway. I've got my usual bunches of pics for you all and here goes.... I will say that I'm finally done with ALL bodywork and now all I have to do is do my guidecoats.. ... Man , am I stoked! This has been a long time coming for me. Finally done with this monster...Ok, I'll start this thing up...
Here's a pic of Before....well , let's just say, YEY, it's a bondo machine. Just jokin. A straight 57 or 55 chevy has more though... Here's some bondo before pics...
That was the bondo , and plenty of hours sanding.... I do know alot of body people take down to the metal , but I personally don't all the time, but I have done that before. My 68 cougar was done that way, but nothing this new.... anyway. Here's the primer put on...Ahh , finally , all of it done....AAAAAAAAAAAAAAAAAAAAAAaaaaaaaaaaaaaaaaaHHHHHHHHHHhhhhhhhhhh