When you click on links to various merchants on this site and make a purchase, this can result in this site earning a commission. Affiliate programs and affiliations include, but are not limited to, the eBay Partner Network.
I bought this car a little over a year ago for $1000 since it seemed like I could get it running and driving fairly easily. When I checked it out before buying, it ran decently with the old intake/carb setup and the body seemed to be in pretty good condition from what I could tell.
It got delivered to my house the day after I bought it and I started working on the whole drivetrain/wiring since it was messed up a bit. Three or so months passed while I got it rewired (got a "new" harness, redid all power distribution, etc), got the engine running really well with a new manifold and intake, new megashifter, and all new fluids. I got it to the point where I was able to drive it and it felt really great, along with everything working properly.
When I would have to work underneath the car I noticed something seemed off on the drivers side floorboard and the floor where the rear seats are. Didn't think much of it, thought it was just some heat shield that rusted away since the floor was solid all around and didn't look rusty from underneath.
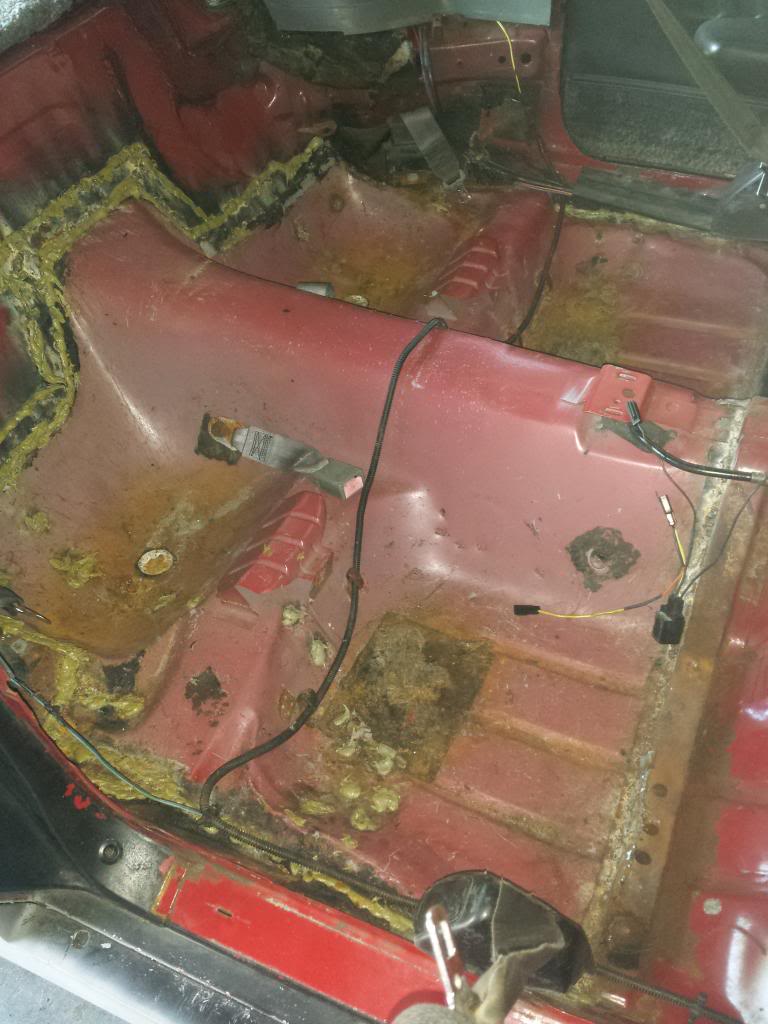
A month passed where I didn't work on the car because of school so it sat in it's current state of having all the systems working, but the interior was old and cruddy so when I got back to working on the car, that's what I started with. I saw some surface rust on the transmission tunnel near the shifter and finally pulled the carpet up to find a ton of rust and really, really, really, bad repair jobs.
It looks like some previous owner replaced the whole rear floorpan section with another car's pan because it must have been so rusted out. Too bad they did such a horrible job at it that every weld had rusted back out.
I decided to just cut out that rear section completely and buy a cutout of the piece from a junkyard car since I couldn't find a rear section anywhere online.
Last edited by 84LsxZ28; Feb 22, 2015 at 06:17 PM.
Now for all the work and progress stuff that I have been making recently. I put the project on hold over the summer because I ran out of money for the project at the time which meant I couldn't buy the front floor pans.
I wish I had more pictures to post from the past few months, but my phone got messed up and I lost all the pictures I had on that.
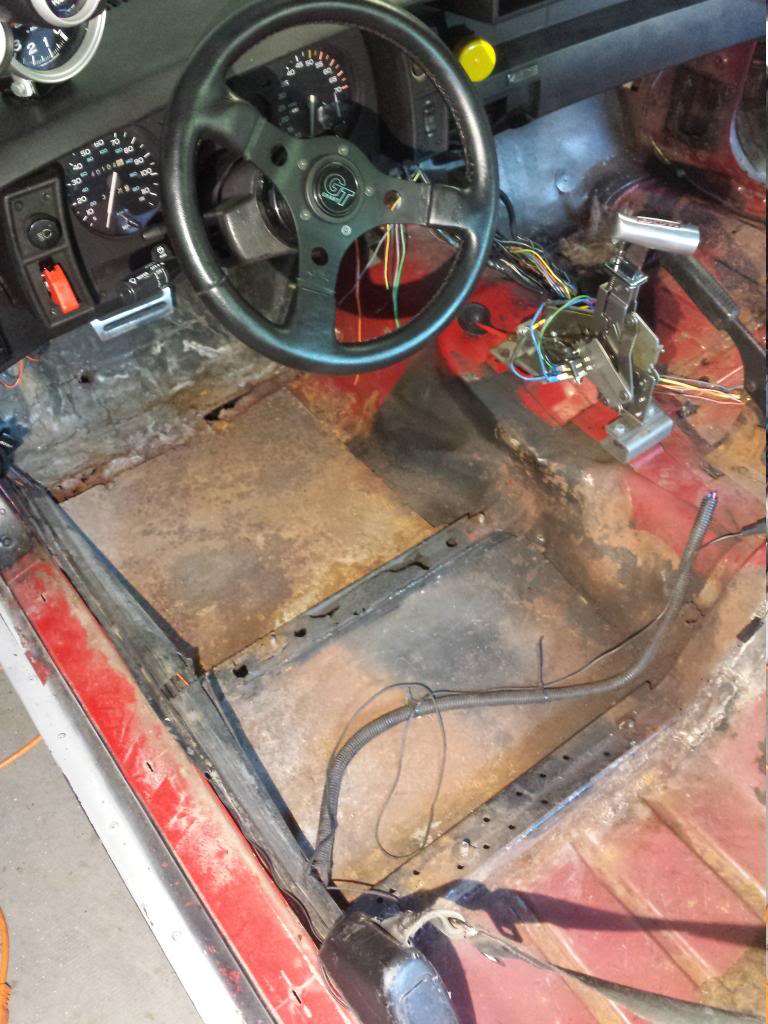
I finally got back into the project two weeks ago and started cutting out all the old front floor pans. I wanted the install of the new floorpans to be pretty discreet, so I went around to every spotweld and drilled it out with Eastwood spotweld cutters. They are a great tool if you're thinking of doing floorpan work and want to remove the old metal very cleanly.
Here is the my progress as of tonight. I have that one spot at the front of the drivers side to get out and then I will be ready to clean up all the frame rails/rockers and paint them with primer.
No other part of the car was really rusty at all. The frame rails have pretty much zero rust on them, despite being underneath all the rusted out floorpans for who-knows how long.
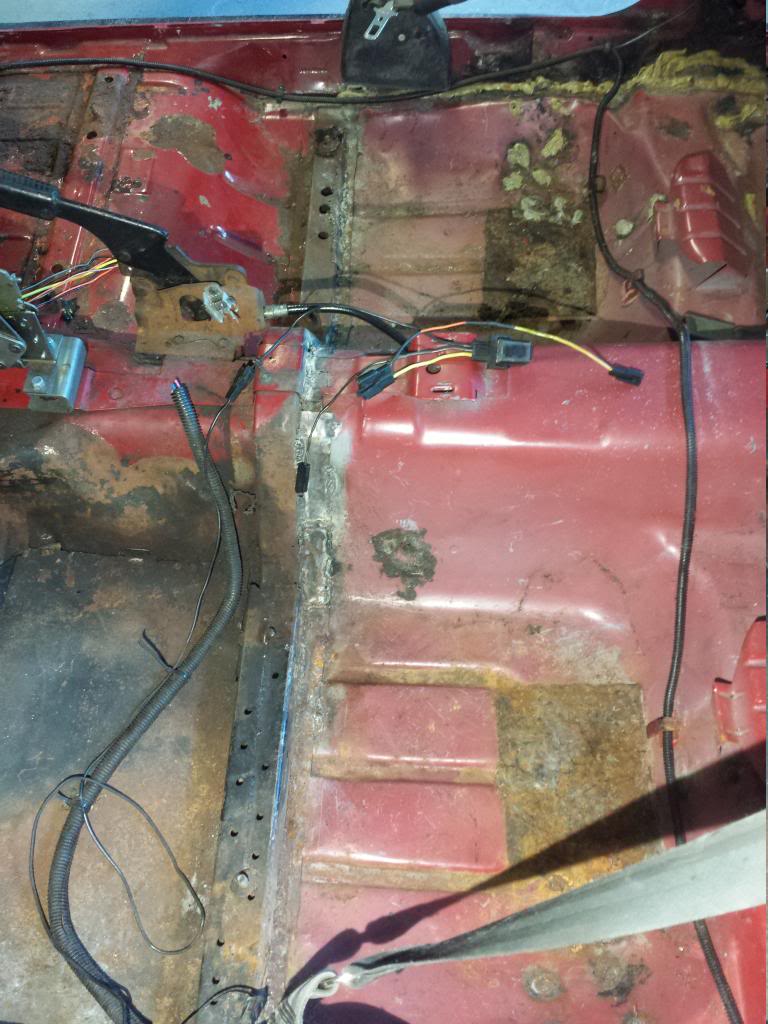
Where the seam of the floorpan is pretty much the extent of the rust. I'm really surprised it didn't go past that black seam sealer stuff and rot out the rocker.
I need to cut out the seam on the hump here because whoever did the previous "repair" messed it up and it rusted out to where it won't meet with my donor floorpan. Good thing I have the piece that matches up with my donor pan
I was able to place my new passenger side floorpan in the car and it fits really well even though I haven't prepped too much. I'm quite pleased with these. I got them on Summit and paid $650 for the pair.
This whole thing is pretty rough right now because it's just at the removal/test/clean up stage. Once I get the car prepped to accept the floor pans, I will cut the rear donor piece with a special jig to make sure it is perfectly straight with the new front pans and I will do the same with the rear seam that's above the differential.
I expect to get the driver side floor pan test fitted tomorrow, so progress pics will be up of that too. I'm also aware that this is quite a lot of work for such a common car that can be had without rust, but I wanted to stay commited to this car and overcome a big challenge instead of just scraping it.
Last edited by 84LsxZ28; Mar 24, 2015 at 10:35 PM.
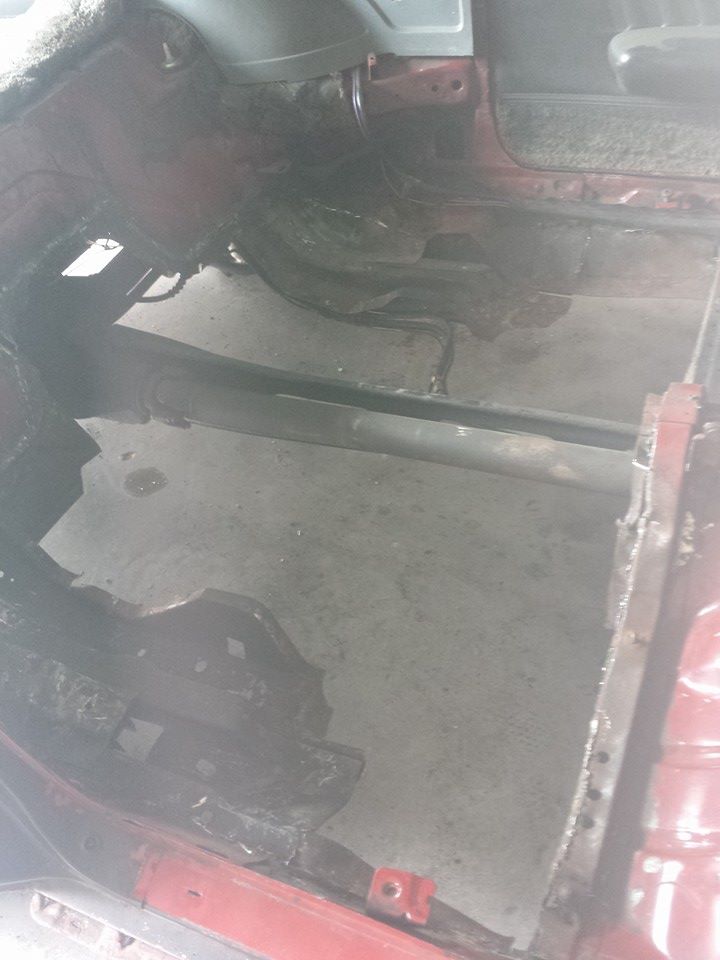
Got the front piece on the drivers side out this evening. It took way longer than it should have. I thought that it would be much easier getting this side's piece out because of the weakened rusted metal, but it made it much harder because I was unsure if I got every spot weld or not.
The rocker area up front may look pretty rusty, but most of the rust seen there is on the piece of floorpan that is still connected to the rocker panel. I was too worn out to get that after I got the front piece out.
All of the rust that is not on the floorpan piece that is left is just light surface rust I can get with my die grinder.
Tomorrow my goal is to get the drivers side pan test fitted and cut the rear pan to meet up with the new front pans. Hopefully I will get all three pieces in the car at once to seen the car with a full floor again after 8 months
Albeit this time it will look much better!
Last edited by 84LsxZ28; Mar 24, 2015 at 10:35 PM.
Great job so far! You're pretty ambitious to replace the entire pan. What are you going to do about the seat mount brackets? Do they reproduce those?
Thank you! The seat mount brackets have been what I've been kind of worried about throughout this whole thing because no place does reproduce them. I think Bruce at Hawks Thirdgen can cut specific parts out of cars though if you call him up, which is what I'll probably have to end up doing.
awesome job great to see this! I will be doing the same on my car and i wanted to ask if your car is a t-top and did you have any concern about the body moving when you had the floor out.
When i do mine i will be using a complete floor from a clean car that i parted out.
and leaving the seat rails and rear torque boxes attached to it.
the torque boxes are rusted enough for me to want to use the ones on the new floor
but it concerns me even more with having to cut out such a key part of the cars structure while keeping anything from moving
any advice about that is appreciated, thank you
The car is a T-top car and I did have some concerns about the body moving while the floors are out, but I'm not using any bracing and it seems fine for now. I did fix the sagging that the car had though before pulling the engine and floors out. I jacked it from the cross member and put stands underneath the front frame rails, then took it off the jack and let the weight of the engine pull the sagging out.
If you're going to replace the torque boxes, I'd really really suggest welding some tubing in as braces before you pull the old floor out. Two from the hump above the axle to the firewall, and a diagonal bar somewhere. Being that the toque boxes in the rear pretty much keep the front half of the car connected to the rear, you'll want quite a bit of extra bracing.
If you still need seat mount brackets I got the passage side. I need the drives side for my project. I can cut them out of my parts car for you 10$+ shipping if interested pm me.
Very ambitious! make sure the pans are as close to the original "elevation" as you can get them...I know a guy who put new floor pans in a 1980 corvette...they weren't pushed down all the way....by about an inch...everything looked fine till he put the seats back in...the drivers seat was so high he couldn't put the set track back in!
Got time to work this week/weekend in which I was able to cut the new rear piece to the correct size as well as fit the new front pans in very snug.
Originally Posted by 84LsxZ28
That space was caused by the lip underneath where the main seam of the pan that gets welded to the rocker. It was bent up from previous people jacking the car up from there, or from the car scraping on the road. This caused the rocker to protrude into the car which pushed the new pan up and made the huge gap.
I bought a propane torch to heat up the metal and a 2LB hammer to hit it back into place so the edge of the pan would fit flush with the rocker. Worked really well and once I do some fine corrections, it should be ready to weld in.
Sorry there are no pictures, too busy to get my camera stuff to set up since I had to stop for the day to eat dinner/do chores. Hopefully will get some tomorrow of the current state of the car's floors.
Last edited by 84LsxZ28; Feb 23, 2015 at 10:19 PM.
So, I haven't had a ton of time or progress on this except that all of the pieces are fitted now.
I got the back part in and started welding it tonight, but my welder kept jamming and I couldn't get it to cooperate, so I'm not too happy with my welds. I started at the left where it's clean and my tack welds kept burning through. I got them how I wanted them more towards the right, but still ground them down and will probably redo them all to how I would like instead of half-assing it.
Any more updates!? I'm going to have to do this! And this is helping me out a lot!
Yup! I got the whole inside of the car primered and fully prepped for the welding in of the floor pans as well as more welds on the back piece in my last update. I am currently waiting on subframe connectors and an 8 point roll bar to arrive later this week. Once I have those two things, I will be towing it over to my shop and using that facility to weld the floors in as well as the roll bar and SFC's.
I am moving at the end of June, so I need to complete this car in a little under three months and I am stressing out, but I will get it done.
Lots of progress last week and this week. Brought my car into my shop and got it up on our alignment lift so that it's sitting even on the tires. Made sure that all the tire pressures were exactly the same so that the frame rails were exactly the same distance away from the lift on each side.
Once I did that, I got them bolted in and perfectly placed in the car so that I could just run beads along the edges. I left the primer on the frame rails so that there was no chance of rust starting in between the frame and pan. When welding, the primer helps seal around the weld to keep contaminants out as well. Before welding I also didn't realize that there was oil coating the floor pans to keep them from rusting, so that made welding a bit harder, but still got really good penetration all around. Some of the welds are ugly, but I will grind them down a bit before painitng the whole underside.
Using a bead all around the frame rail to the floor pan increased the strength a whole lot. I'm expecting this car to be really stiff considering the new welds on the floor, beefy subframe connectors, and the 8 point bar I will weld in next.
Forgive the bad picture quality, didn't have my camera on me at the time.
Using a nice big Miller Welder is very helpful with this considering it's just point and shoot to get a decent weld.
Pretty much finished up welding in the floorpans today. Will need to go over some places and add in a couple more welds, but it is for the most part done. Will need to clean up a lot of the stuff to paint and spray in the undercoating. Tomorrow I start on welding in my cage. Will post lots of pics once I bring my camera over to my shop.
The main welds on the floors are done, I just have to get some small parts done. Also, the welds on the cage/bar are just to hold it in place at the moment. I will finish welding them all the way around once I get every piece fitted and in. I may grind some of the welds down to redo them so that I can make them pretty.
Anyways, pics I took today:
Disregard the rust, it's just flash rust which easily comes off with a die grinder.
I'm loving how well these bars are fitting. Could barely see the main hoop in there when I didn't have the rear bars in. Also not putting in a headliner, so it's really tight up against the center bar for the t-tops.
Last edited by 84LsxZ28; Apr 17, 2015 at 08:22 PM.
Got a lot done today! Went to a pick your part place and found a camaro that was in great condition (Body wise). I got the seat rails and center console bracket from it. Took the seats out and drilled all of the spot welds out. Took about three hours of constant drilling, prying, and hammering. Not very fun when you didn't think to bring any liquid and are working under the sun in Florida. I'm very thankful that my drill batteries were able to last to get every spotweld drilled out.
Will be welding these in on monday when I get to my shop. Car will almost be ready to reassemble after these are put in.
Great thing is that I only paid $30 for everything.
Last edited by 84LsxZ28; Apr 19, 2015 at 10:37 AM.
Almost done with the car's body. Need to get some small stuff welded up and get the X in the rear bars. Progress has been slower than I would like because I've been helping a friend on his car while at the shop. Will be brining it home on wednesday hopefully though.
Any chance of a few pics taken from inside the car showing the where the floorpan meets the rocker area/section?
Just finished rebuilding half my cowl area and doing driver floor pan next.
Yeah, I can get some pics of that area when I bring the car home on Friday. If you have any questions before I take the pictures, I can probably answer them since that area was one of a lot of focus and work to get right.
Yeah, I can get some pics of that area when I bring the car home on Friday. If you have any questions before I take the pictures, I can probably answer them since that area was one of a lot of focus and work to get right.
Cool, thanks, I'm most interested in the frivers front area to about the midway point going to the rear.
Got the cowl rebuilt and next time we can get together the floor surgery starts.
Cool, thanks, I'm most interested in the frivers front area to about the midway point going to the rear.
Got the cowl rebuilt and next time we can get together the floor surgery starts.
Putting the new floor in is actually pretty easy, the hard work is all the prep making sure everything is in good condition to mate the new pan to. Replacing the whole floor for me may have been easier than making patches.
I found this picture in a folder of mine if it helps any.
Putting the new floor in is actually pretty easy, the hard work is all the prep making sure everything is in good condition to mate the new pan to. Replacing the whole floor for me may have been easier than making patches.
I found this picture in a folder of mine if it helps any.
Not the best for what I need, but gives me enough to go with from what I/we were thinking when we do it.
Thanks man. I'm just happy I can get by correctly repairing it and not having to do a whole floor pan.
Either way it sucks, but at least we are both putting some thirdgens back on the road done the right way.
I'm really happy when I see people repairing these cars and giving them the care they deserve. When I bought mine it was being parted out and kind of trashed.
Here's another a picture that may show you a better view of what you need.
I'm really happy when I see people repairing these cars and giving them the care they deserve. When I bought mine it was being parted out and kind of trashed.
Here's another a picture that may show you a better view of what you need.
Cool, thanks again I appreciate it.
Took the 5 yr old with me last nite to the cruise spot. When I came home and put the boys to bed I went out to the garage until 1am working on the engine
Probably be 2 weeks before we can get together to knock the floor board out.
Keep the the good work and we can keep comparing our stupidity about rebuilding thirdgens
Its all good as long as we both make it here
I wish I could work on mine for very long. Ever since I brought it home from my shop, it's been way too hot out to do anything. Having a crowded garage because of moving doesn't help either.
Man that's pretty impressive. I'd be scared shi**less to do that
Thanks man. I was when I first realized that I had to replace every piece of floor pan. Just took a lot of time and patience to get over it, as well as realizing what my finished product would be.
It's not as bad as you think and actually doesn't take as long as you think if you get left alone or have a capable friend or two to help.
I'm sure 84Lsx would say the same.
No doubt about it, it is a lot of work, but after tearing into mine it was nowhere near as bad as I thought it was going to be.
The tedious part if figuring out where to cut from the car and where to cut replacements at and measuring a million times so you don't screw it up.
Drilling spot welds blows however No nice way other than one after the other.
I really hope I won't have to cut anymore spotwelds ever again. I've probably done over 1000 spotwelds since starting this project and I've had enough!
I really hope I won't have to cut anymore spotwelds ever again. I've probably done over 1000 spotwelds since starting this project and I've had enough!
It's been 5 years for me since I last did that. There is light at the end of the tunnel.
Got the carpet cut around the bars today and got it held down. Industrial velcro has worked pretty well for the seams I had to cut to get to the farther inward bar.
Hey I'm a newbie looking to hit a junk yard and grab a pair of seat mounts for my project. Can you tell me exactly how you removed them from the donor car in your situation? I have a angle grinder w/ various attachments, will this get er done?
I'd just drill the spotwelds out. I tried bringing an angle grinder to the junkyard once and the battery died pretty quickly. The drill lasted a long time when I brought a couple batteries. It's not an easy process, but it is very doable if you conserve your energy and are systematic about drilling the spotwelds out
A lithium drill is needed. 18V minimum too. There are a lot of spotwelds to get out, and they require some special drill bits, or drilling 1/8th inch holes first then using a bigger bit.
Also, I see that it says you're in Ohio. What part?
I'm in Columbus. Will one of those el cheap-o's work, what kind of bits? I found a 18v at Harbor Freight for like $18. I'm going to upload a pic of my Floor Pan project soon as the weather breaks and maybe you can lend a digital hand lol!