
removing eprom from memcal


Supreme Member
Joined: Jul 1999
Posts: 2,844
Likes: 4
From: Maryland
Car: 2005 Subaru STI
Engine: 153ci of Turbo Power!
Transmission: 6-Speed
I didn't use this method but in retrospect it appears to be a better method. Use a pair of small cutters or a utility knife and cut each leg on the EPROM. After cutting all the legs the EPROM will fall off. Throw that EPROM in the garbage. Use your solder iron and desolder each little leg.
Tim
------------------
TRAXION's 1990 IROC-Z
Best Time = 12.244 @ 112.51mph (1.778 60' / 7.819@88.32mph in the 1/8)
All Natural. No Force. No Drugs. Stock Bottom End. Stock Body Panels.
Gunning for NA 11's with bigger cam, bigger stall, and bigger exhaust.
-=ICON Motorsports=-
Moderator: PROM board at thirdgen.org
Moderator


Joined: Mar 2001
Posts: 14,293
Likes: 195
From: Doghouse �������������������������������������� Car: 1989 Formula 350 Vert Engine: 350 L98 Transmission: 700R4 Axle/Gears: B&W 3.27
Car: 87 Formula T-Top, 87 Formula HT
Engine: 5.1L TPI, 5.0L TPI
Transmission: 700R4, M5
Axle/Gears: Sag 3.73, B&W 3.45
I found this interesting, since I had 2 86 ECM's and one 87 ECM I have 3 CALPACKS. The 2 86 calpacks all I had to do was stuff a needle down into the hole next to the EPROM to break the solder joint, place a screwdriver under it and pry it off. worked like a charm.
the 87 CALPACK was a different story, it was soldered MUCH better, and this method could not be used to break the solder joints. I had to first grind a custom tip on my soldering iron to fit in the holes. At first I was trying to de solder the whole calpack and remove the chip. SINCE this is impossible, I thought I might get lucky.
--------------
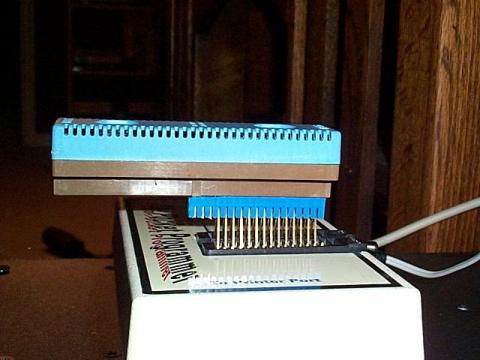
EPROM REMOVAL:
I placed a small screwdriver under the end of the chip, twist (the screwdriver) so the chip is about 1/32" to 1/16" (of an inch) from the cal pack on both ends. This will start to pull the prongs out of the cal pack, DO NOT go too far too fast you will ruin the calpack which would be baaaddd.
WITH the HOT soldering iron push each of the prongs in the cal pack back down into their holes. It should be easy since you are liquifying the solder, do this to each of the 28 prongs. You now have a chip 1/32" to 1/16" of an inch from the cal pack. do this several times, each time getting the chip further from the plastic cal pack. Eventually it will be free and you can use the chip if you like.
------------
Soldering the socket to the CALPACK:
IF you get really lucky you will notice that you can remove and install the chip without any problems, and it will work. FORGET THIS IDEA. look closely at the calpack, you should see where here is metal contacts (prongs) and on the opposite side there is only plastic. Using the calapck as a means of holding the chips without a socket adapter will work for a while, but when you wear out the plastic, you will have a useless piece and you will have to solder in an adapter anyway. Get it out of the way while you can. I went to Radio Shack and bought the low profile sockets for only $.99 each.
To solder the socket in I took my solder and cut 30 small pieces of solder about 1/16" long each. I stuffed the socket into the calpack and placed a piece of cut solder into each of the holes, I did it in groups of seven.
----------------
Test your connections:
AFTER you have soldered all the prongs to your socket, check to see if you have a good connection with a tester.
You should be done. It sounds difficult, but its not, If I would charge to do it I would only get about $30.00 to do it, just because it takes time to do a nice job. AND it hurts my back to slouch over my project.
John
the 87 CALPACK was a different story, it was soldered MUCH better, and this method could not be used to break the solder joints. I had to first grind a custom tip on my soldering iron to fit in the holes. At first I was trying to de solder the whole calpack and remove the chip. SINCE this is impossible, I thought I might get lucky.
--------------
EPROM REMOVAL:
I placed a small screwdriver under the end of the chip, twist (the screwdriver) so the chip is about 1/32" to 1/16" (of an inch) from the cal pack on both ends. This will start to pull the prongs out of the cal pack, DO NOT go too far too fast you will ruin the calpack which would be baaaddd.
WITH the HOT soldering iron push each of the prongs in the cal pack back down into their holes. It should be easy since you are liquifying the solder, do this to each of the 28 prongs. You now have a chip 1/32" to 1/16" of an inch from the cal pack. do this several times, each time getting the chip further from the plastic cal pack. Eventually it will be free and you can use the chip if you like.
------------
Soldering the socket to the CALPACK:
IF you get really lucky you will notice that you can remove and install the chip without any problems, and it will work. FORGET THIS IDEA. look closely at the calpack, you should see where here is metal contacts (prongs) and on the opposite side there is only plastic. Using the calapck as a means of holding the chips without a socket adapter will work for a while, but when you wear out the plastic, you will have a useless piece and you will have to solder in an adapter anyway. Get it out of the way while you can. I went to Radio Shack and bought the low profile sockets for only $.99 each.
To solder the socket in I took my solder and cut 30 small pieces of solder about 1/16" long each. I stuffed the socket into the calpack and placed a piece of cut solder into each of the holes, I did it in groups of seven.
----------------
Test your connections:
AFTER you have soldered all the prongs to your socket, check to see if you have a good connection with a tester.
You should be done. It sounds difficult, but its not, If I would charge to do it I would only get about $30.00 to do it, just because it takes time to do a nice job. AND it hurts my back to slouch over my project.
John

Junior Member
Joined: May 2001
Posts: 50
Likes: 0
From: Aliso Viejo, CA USA
I'm lazy. I cut all the legs on the chip as close to the top as possible, removed the chip, and soldered the legs of the zif to the old chip legs.
------------------
88 Z51 4+3 Corvette
94 Trans Am GT
------------------
88 Z51 4+3 Corvette
94 Trans Am GT

Thread Starter
Member
Joined: Sep 2000
Posts: 216
Likes: 0
From: richmond, ca
i found a way to do it. since i have plenty of chips i just broke the legs off in the memcal by putting a screwdriver under the chip and prying it off. all the legs were broke off inside the memcal. i went and got a telescoping pointer magnet, and held it 1/8 inch underneath each leg as i place the solder gun on the top of the solder joints, and the legs shot out onto the magnet as soon as the solder got hot

Member
Joined: Jun 2001
Posts: 391
Likes: 0
From: Eh?
Car: 1988 Monte Carlo SS
Engine: 5.7L TPI
Transmission: T5
Axle/Gears: 3.73
If you have access to a surface mount hot-air rework tool, it can be done in 30 seconds flat... 
1) secure memcal in product vise
2) use low-medium temp, slow air speed (too much heat and you'll melt the plastic)
3) heat one side of chip, while carefully prying up with small flat head screw driver
4) work side to side using step 3 until the chip is free from the memcal
1) secure memcal in product vise
2) use low-medium temp, slow air speed (too much heat and you'll melt the plastic)
3) heat one side of chip, while carefully prying up with small flat head screw driver
4) work side to side using step 3 until the chip is free from the memcal

Junior Member
Joined: Oct 2001
Posts: 89
Likes: 0
From: Lake Ronkonkoma, N.Y.
Bringing this post back from the dead. If you were to just cut the old chip out like Trax posted how will you be able to read the prom. I'm jusy starting diy and i would think that i'd need a referance to go from when buring my new chip correct?
Trending Topics
Joined: Jul 1999
Posts: 12,089
Likes: 125
From: SALEM, NH
Car: '88 Formula
Engine: LC9
Transmission: 4L60E
Axle/Gears: 3.89 9"
Pretend your old prom never existed, and download the newest production bin image from diy-efi...
-- Joe
-- Joe

Member
Joined: Jan 2003
Posts: 363
Likes: 0
From: Sydney
Originally posted by dantheihatemustangsguy79
...If you were to just cut the old chip out like Trax posted how will you be able to read the prom...
...If you were to just cut the old chip out like Trax posted how will you be able to read the prom...
John

Thread
Thread Starter
Forum
Replies
Last Post