
Exhaust fabrication tricks

Thread Starter
Supreme Member
iTrader: (1)
Joined: Jul 2004
Posts: 10,763
Likes: 4
From: Calgary, AB, Canada
Car: 1982 Trans-Am
Engine: 355 w/ ported 416s
Transmission: T10, hurst shifter
Axle/Gears: 10 bolt, true-trac, 3.73
Exhaust fabrication tricks
Hey guys;
I was pondering building an exhaust system, and couldn't wrap my head around a certain "how".
So lets say i'm buying headers, some header flanges, some pipe lengths, and some mandrel bends (J bends or whatnot), mufflers, etc
Now, I can wrap my head around most of this, as it seems fairly obvious, however I can't seem to grasp how you'd cut the J bends. I've seen pictures of the results (instead of a smooth bend which was obviously done at the shop, it's a handful of bends welded together). I'm just wondering how you would jig up the J-bend to be able to cut it to the correct angle. What jig/fixture/tools would you use to know how to get the right angle?
Thanks
Last edited by Sonix; Aug 3, 2011 at 12:09 PM.

Re: Exhaust fabrication tricks
Steel chop saw if you have one, saw-zall if you dont. Hacksaw will work if you have all weekend to devote. Cut it slightly larger than needed and grind it to fit perfectly. Just a tip, make your cuts perpendicular to the tangent of the bend or the round pipe will be an oval and you'll have to bridge a small gap when welding it up. Some areas are just too tight and you have to do this, but for most areas, try to keep it perp for a good clean joint
Also, use lots of tach welds to get a long string mocked up prior to the finishing pass
Also, use lots of tach welds to get a long string mocked up prior to the finishing pass
Thread Starter
Supreme Member
iTrader: (1)
Joined: Jul 2004
Posts: 10,763
Likes: 4
From: Calgary, AB, Canada
Car: 1982 Trans-Am
Engine: 355 w/ ported 416s
Transmission: T10, hurst shifter
Axle/Gears: 10 bolt, true-trac, 3.73
Re: Exhaust fabrication tricks
Ok, I do have a chop saw, so i'm good there. I guess i'm asking more about measuring the layout.
Basically, do you just put your straight pieces on jackstands (or hang from hangers/u-joints), then hold a j-bend in place, and use a tape measure and sharpie to mark where you want it cut, then cut it slightly large, and grind it to fit? All butt joints for example?
I guess you'd get 1 or maybe 2 bends per J bend. So you'd generally need a schwack of them?
Re: Exhaust fabrication tricks
I buy bends in bulk from ebay. Theres a seller that has 10 pc kits for very cheap. One kit is enough to do a very complicated Y-pipe
I like getting a few 45's and 90's to hold up where the tubing will go. Makes it easier to visualize what the route and approx bend will be. Dont ever throw scraps away no matter how small until the job is done. Never know when a 1/4" ring or small sliver will be needed. Strait sections are easiest so i save them for last. I prefer to use junk wire hanging from the chassis over jacks because space is already cramped
Sharpies are your friend and yes butt joints are fine. You'll be welding them solid in the end. Slip joints are handy when you want a section removable such as collectors and over the axle section
Also, be very careful with cutoff wheels, esp the larger diameter ones. 10 stitches later I have a new found respect for them. They'll tear you up in a heatbeat
Thread Starter
Supreme Member
iTrader: (1)
Joined: Jul 2004
Posts: 10,763
Likes: 4
From: Calgary, AB, Canada
Car: 1982 Trans-Am
Engine: 355 w/ ported 416s
Transmission: T10, hurst shifter
Axle/Gears: 10 bolt, true-trac, 3.73
Re: Exhaust fabrication tricks
Unfortunately my garage isn't quite well stocked enough yet for a bandsaw  I have a hand belt sander, but usually a flap wheel on my angle grinder is what i'd use.
Do you clamp the bends in place (with what?) in order to check the layout, or tack it up as you go, and perhaps do a fair bit of cutting it back off?
Ebay for bends - i'll check that out.
I have a hand belt sander, but usually a flap wheel on my angle grinder is what i'd use.Do you clamp the bends in place (with what?) in order to check the layout, or tack it up as you go, and perhaps do a fair bit of cutting it back off?
Ebay for bends - i'll check that out.
Re: Exhaust fabrication tricks
No bandsaw here or chop saw
I do a single tach on the bottom of the joint for a first fit. If its good, I do 3 tachs, space permitting 120* apart then move on. A single tach is strong enough to hold a small bend up, but soft enough to break with your hand and grind flat off the car
I do a single tach on the bottom of the joint for a first fit. If its good, I do 3 tachs, space permitting 120* apart then move on. A single tach is strong enough to hold a small bend up, but soft enough to break with your hand and grind flat off the car
Trending Topics

Senior Member
Joined: Apr 2006
Posts: 510
Likes: 0
From: Murphy, TX
Car: 1990 formula
Engine: 433 sbf + turbos
Transmission: powerglide
Axle/Gears: fab9, 3.50
Re: Exhaust fabrication tricks
Unfortunately my garage isn't quite well stocked enough yet for a bandsaw I have a hand belt sander, but usually a flap wheel on my angle grinder is what i'd use.
Do you clamp the bends in place (with what?) in order to check the layout, or tack it up as you go, and perhaps do a fair bit of cutting it back off?
Ebay for bends - i'll check that out.
I have a hand belt sander, but usually a flap wheel on my angle grinder is what i'd use.Do you clamp the bends in place (with what?) in order to check the layout, or tack it up as you go, and perhaps do a fair bit of cutting it back off?
Ebay for bends - i'll check that out.
If you are going to MIG weld you can be more tolerant of gaps. If you are going to tack with MIG and take it somewhere to be TIG welded the welder is going to HATE you if any of your gaps are more than 1/16".
You can buy special pliers that can clamp exhaust tubing, but only up to 2.5" IIRC.
What I do is to get the tube into position, use a sharpie to scribe lines across the gap, then go set the tubes in the vice, clamp them into position, and tack weld them (with the TIG) at 3 equally spaced intervals. If you have a MIG you can probably tack weld them on the car easily as you can hold with one hand and weld with the other.


Joined: May 2009
Posts: 410
Likes: 0
From: Petal Ms.
Car: 1990 Iroc
Engine: 6.0
Transmission: 4l65E
Axle/Gears: 373 zexel torsen
Re: Exhaust fabrication tricks
I also used a sharpie to mark the pipe before tacking. I tried several things to line it up and tack it in my shop. But I ended up tying the pipe under the car marking the alignment with sharpie and tacking pipe while under the car. Then take the section out to weld.

Joined: Jun 2000
Posts: 5,364
Likes: 52
From: Enschede, Netherlands
Car: 82 TA 87 IZ L98 88 IZ LB9 88 IZ L98
Engine: 5.7TBI 5,7TPI 5.0TPI, 5,7TPI
Transmission: T5, 700R4, T5, 700R4
Axle/Gears: 3.08, 3.27, 3.45, 3.27
Re: Exhaust fabrication tricks
I have a chop saw and a belt sander and hardly ever use them.
i prefer a normal angle grinder, actually 2. One with a thin cut off disc and the other with a flapper disc for sanding. With practice you will be able to make super precise cuts quickly and grind them smooth for a perfect fit. I TIG weld all my exhausts and do it by eye and feel, I hardly ever measure. A neat trick to quickly get clean cuts is to use a large pipe cutter to score the pipe so you can see where you have to cut to make it perpendicular.
Also, welding on a table with a stainless shet on top makes it much easier to weld while manipulating the pipe. Just ground the table and get cracking.
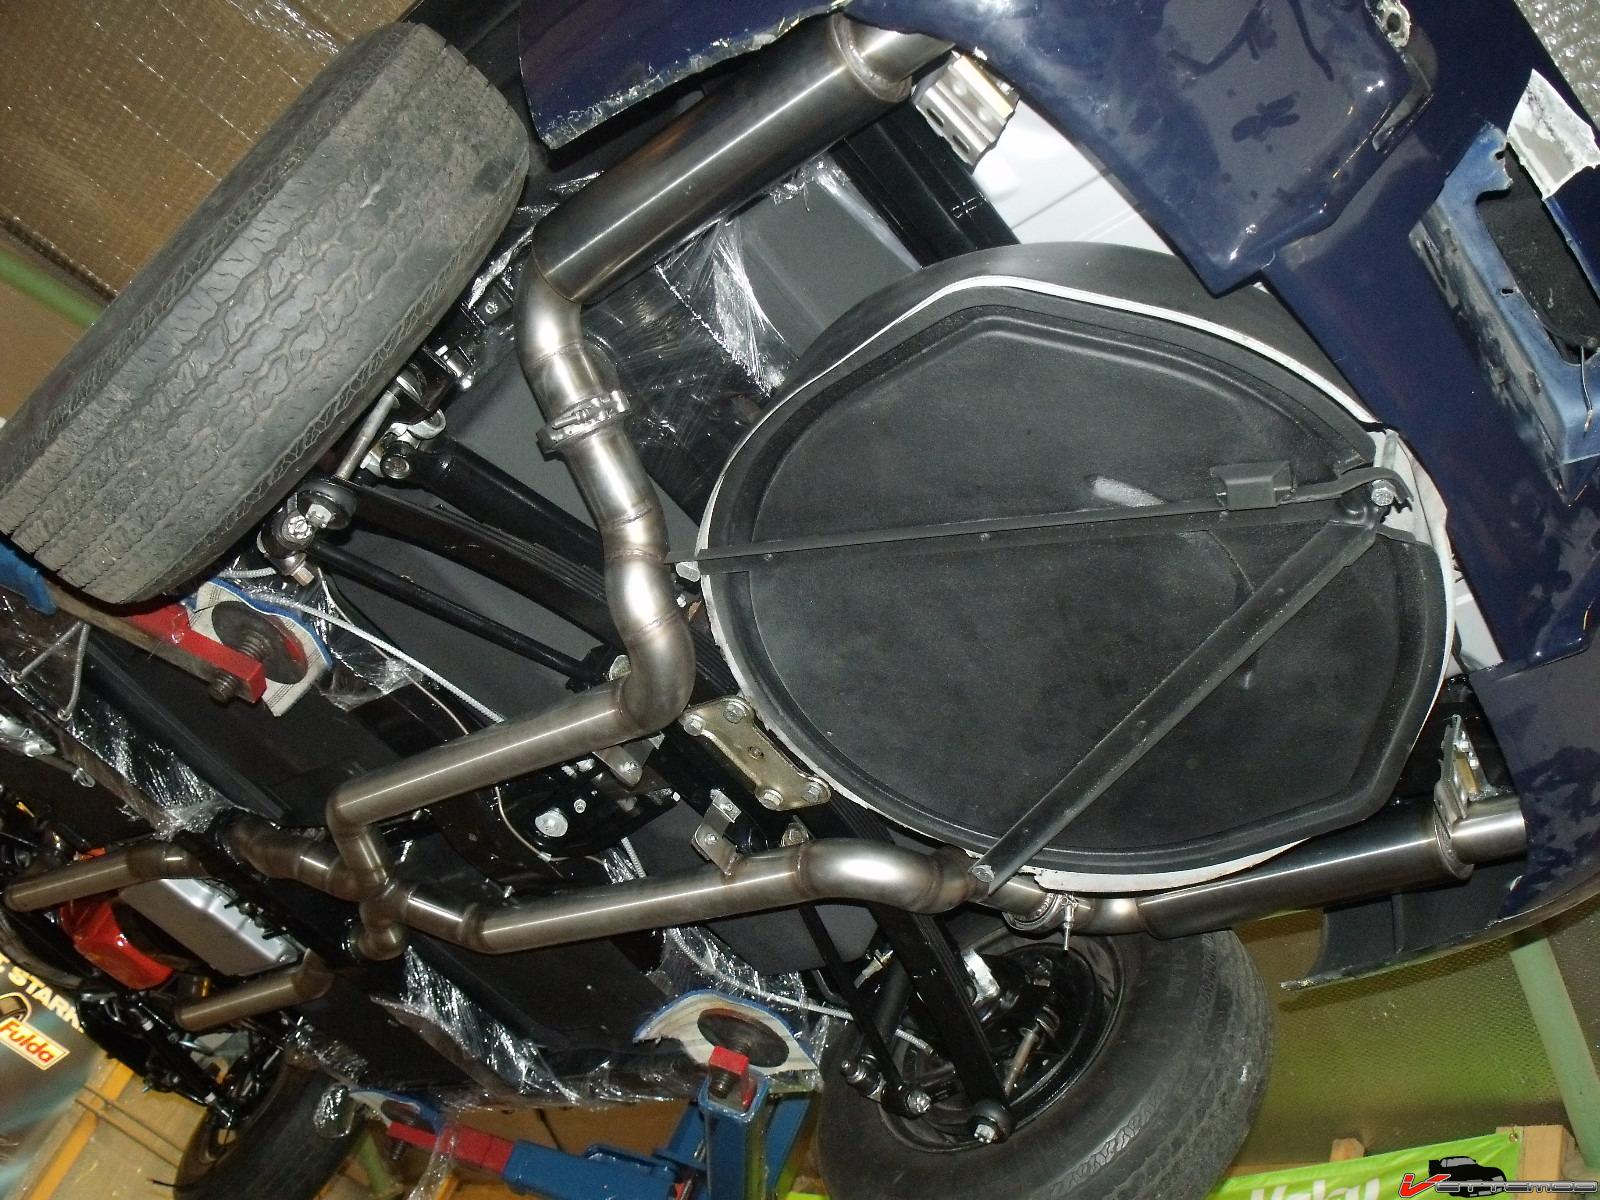
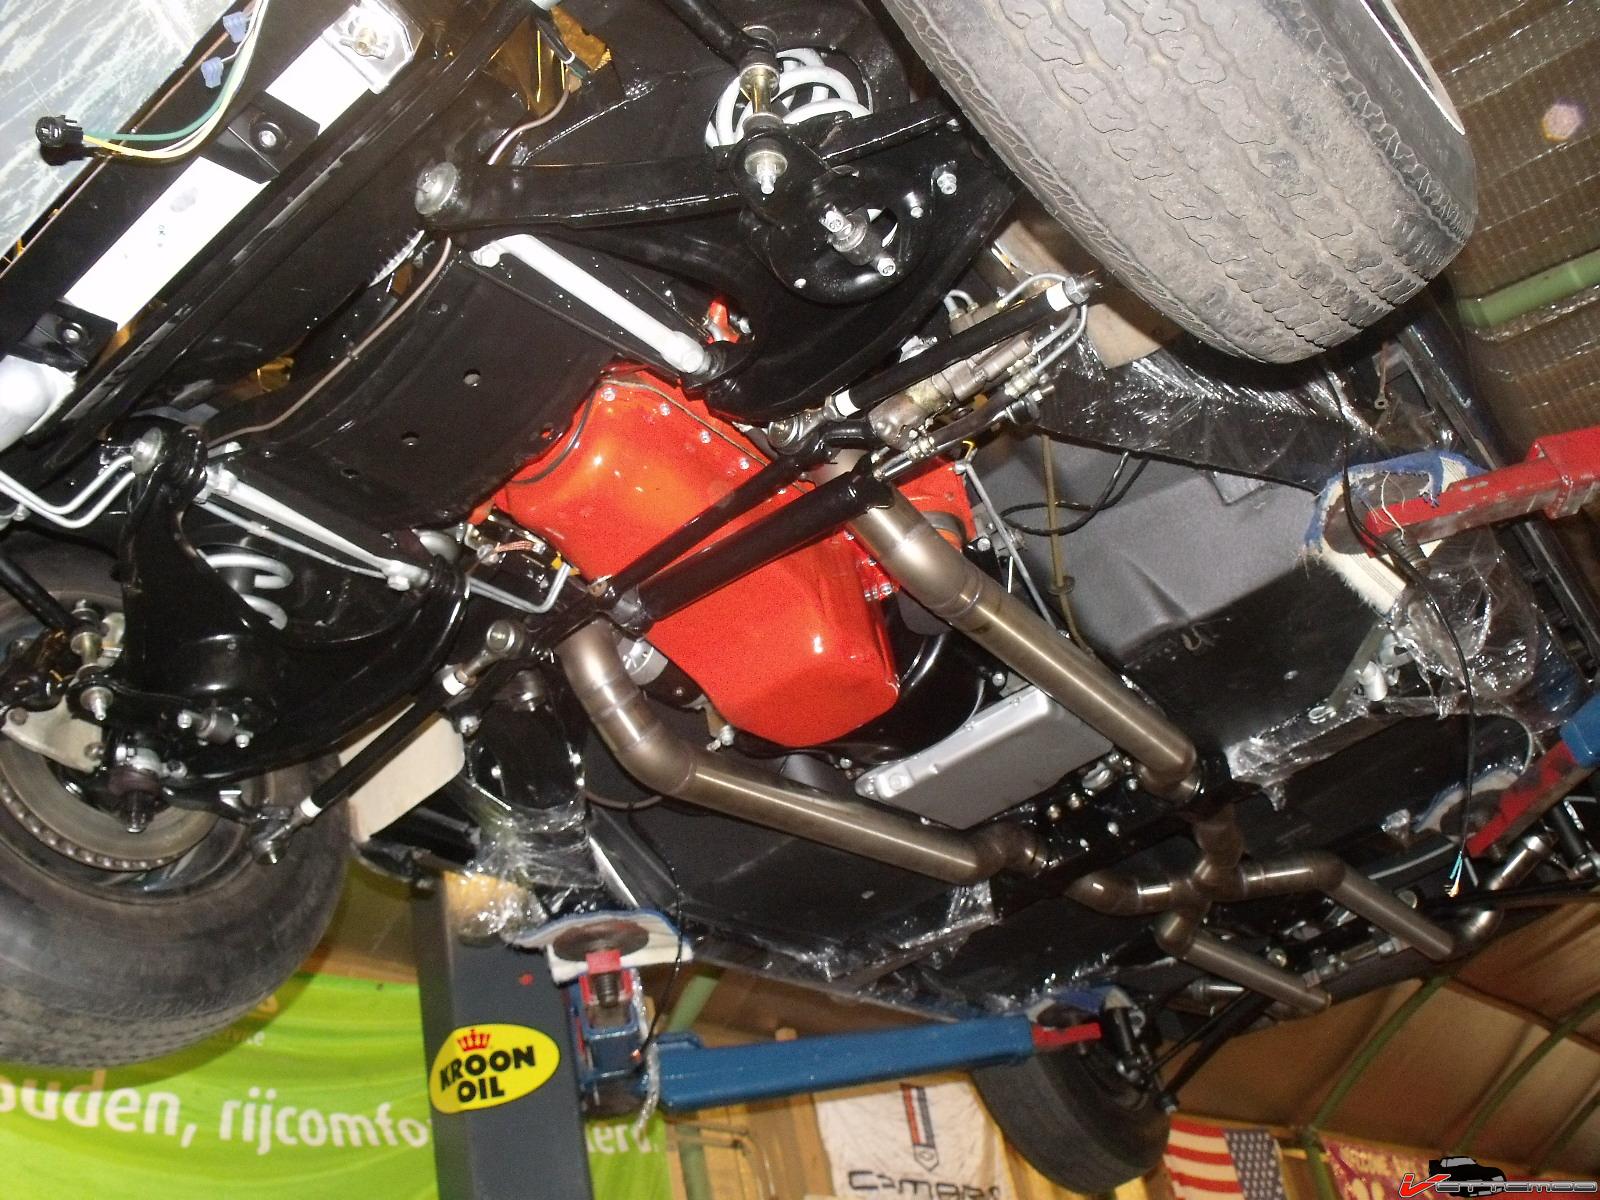
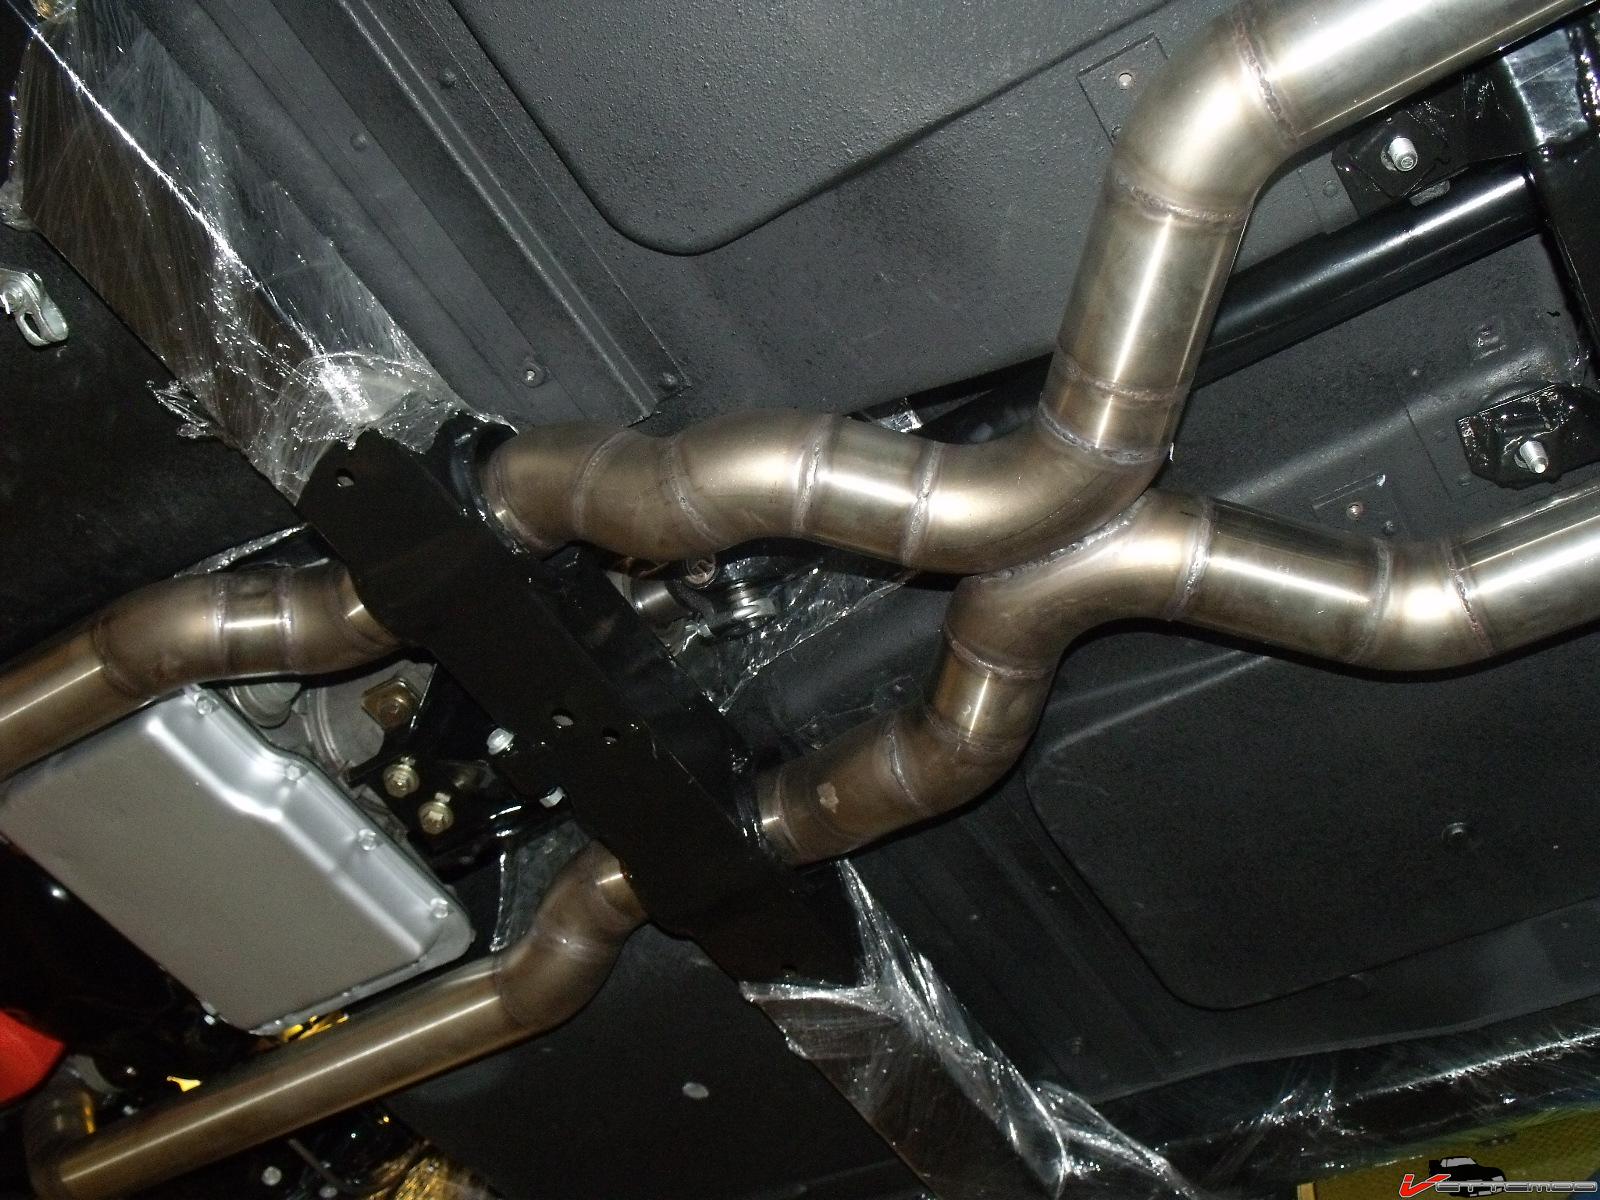
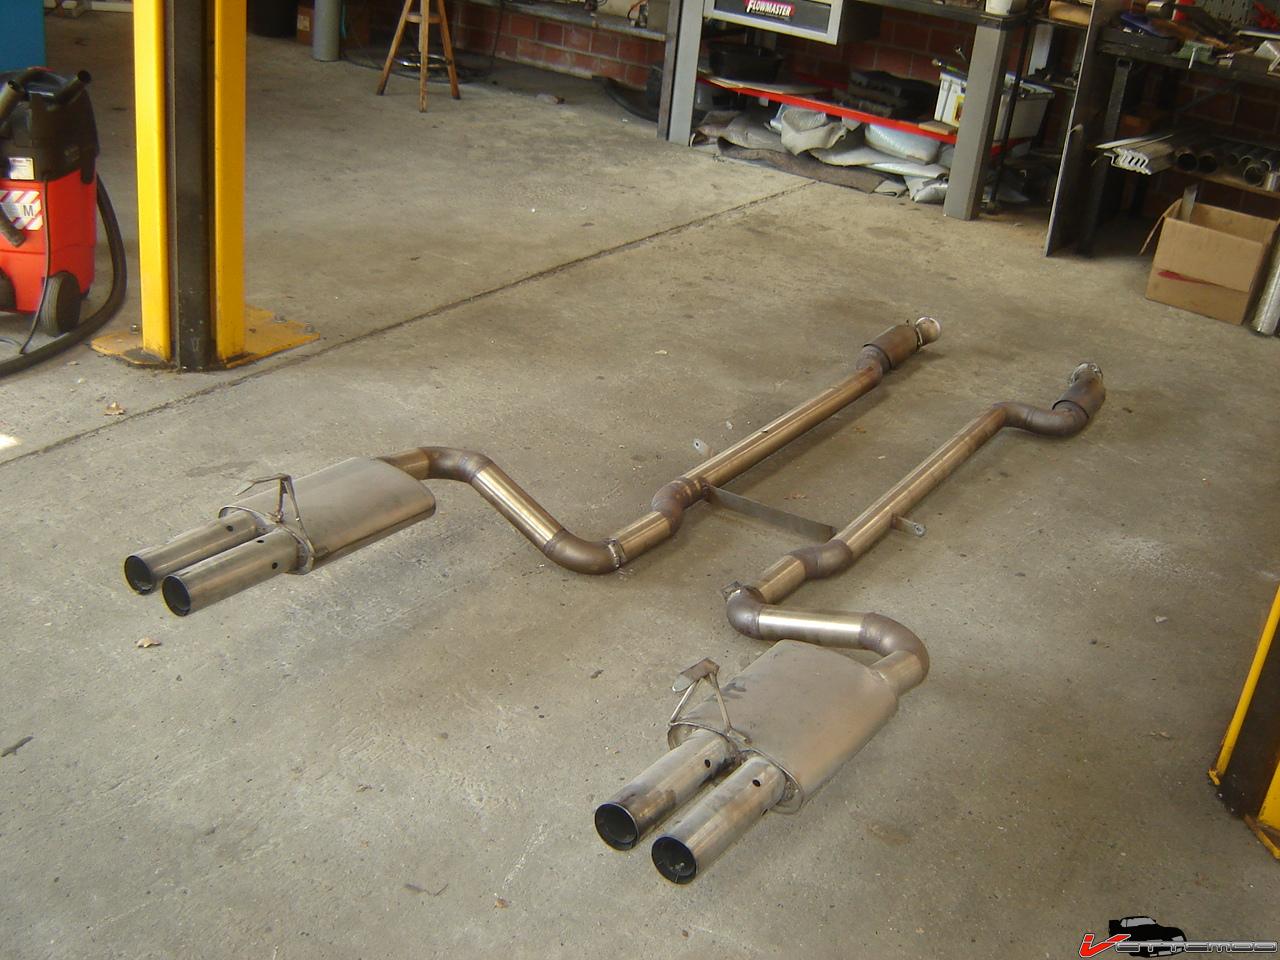
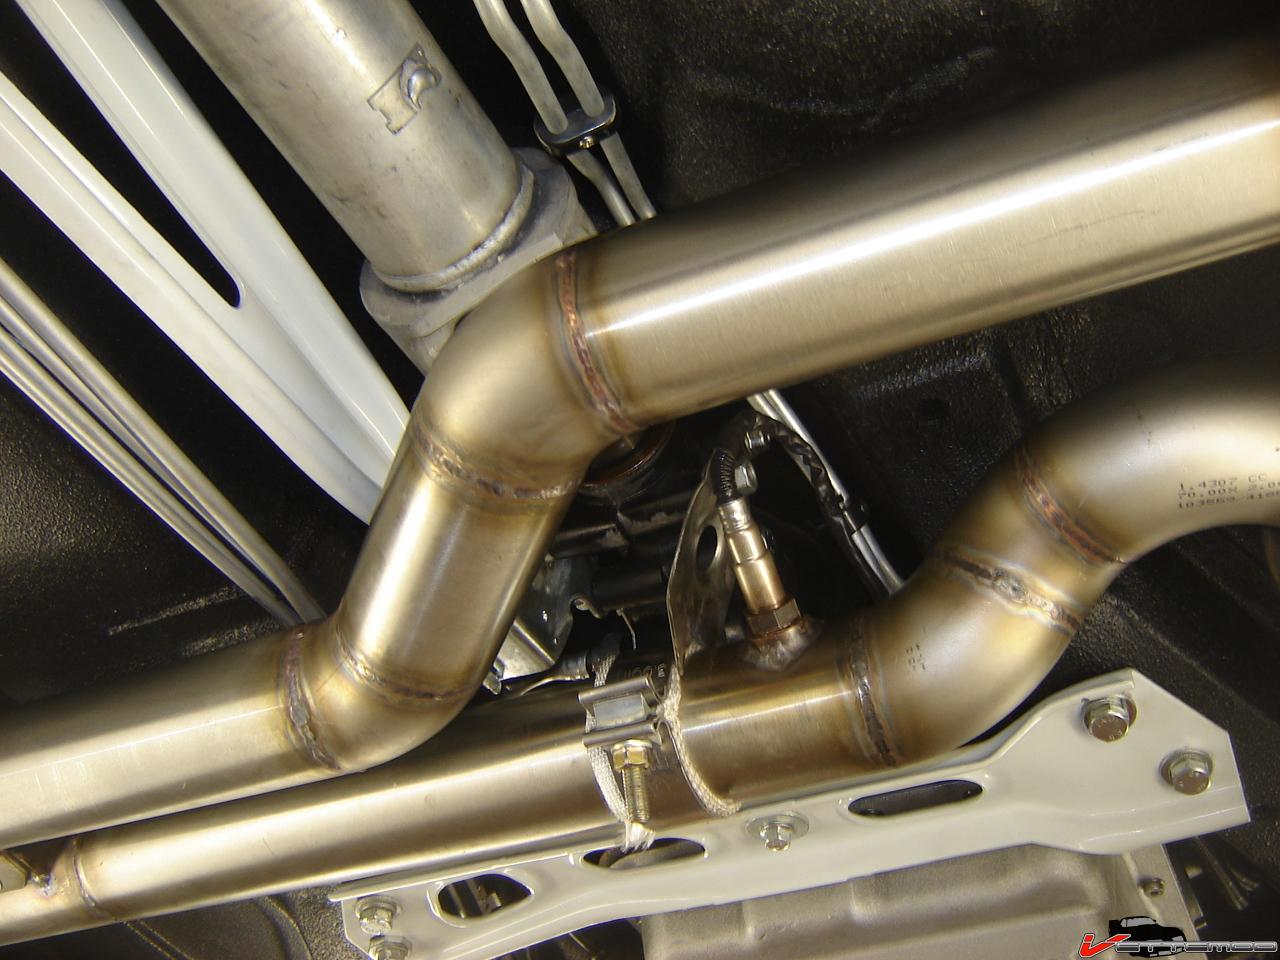
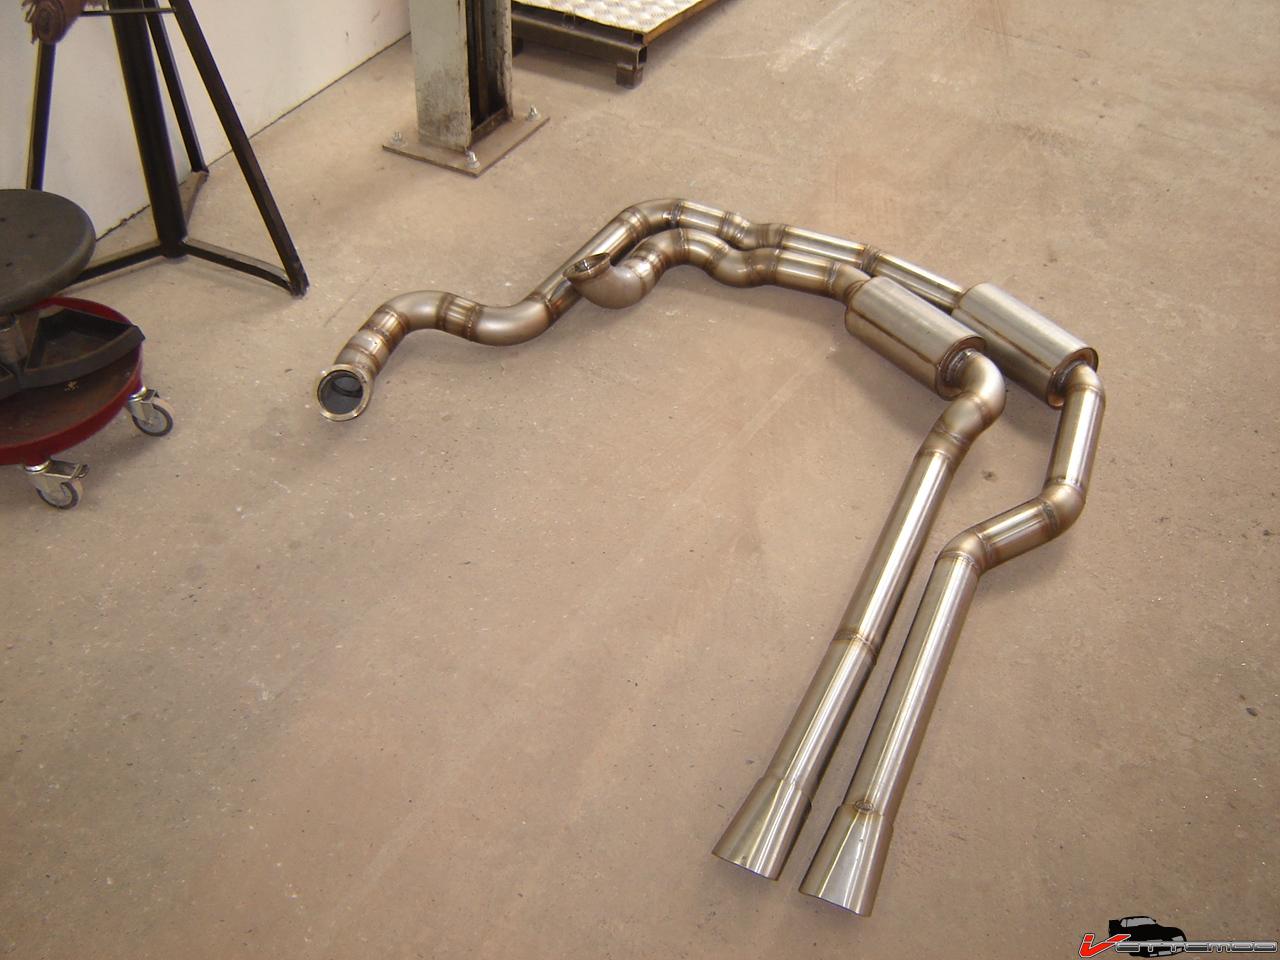
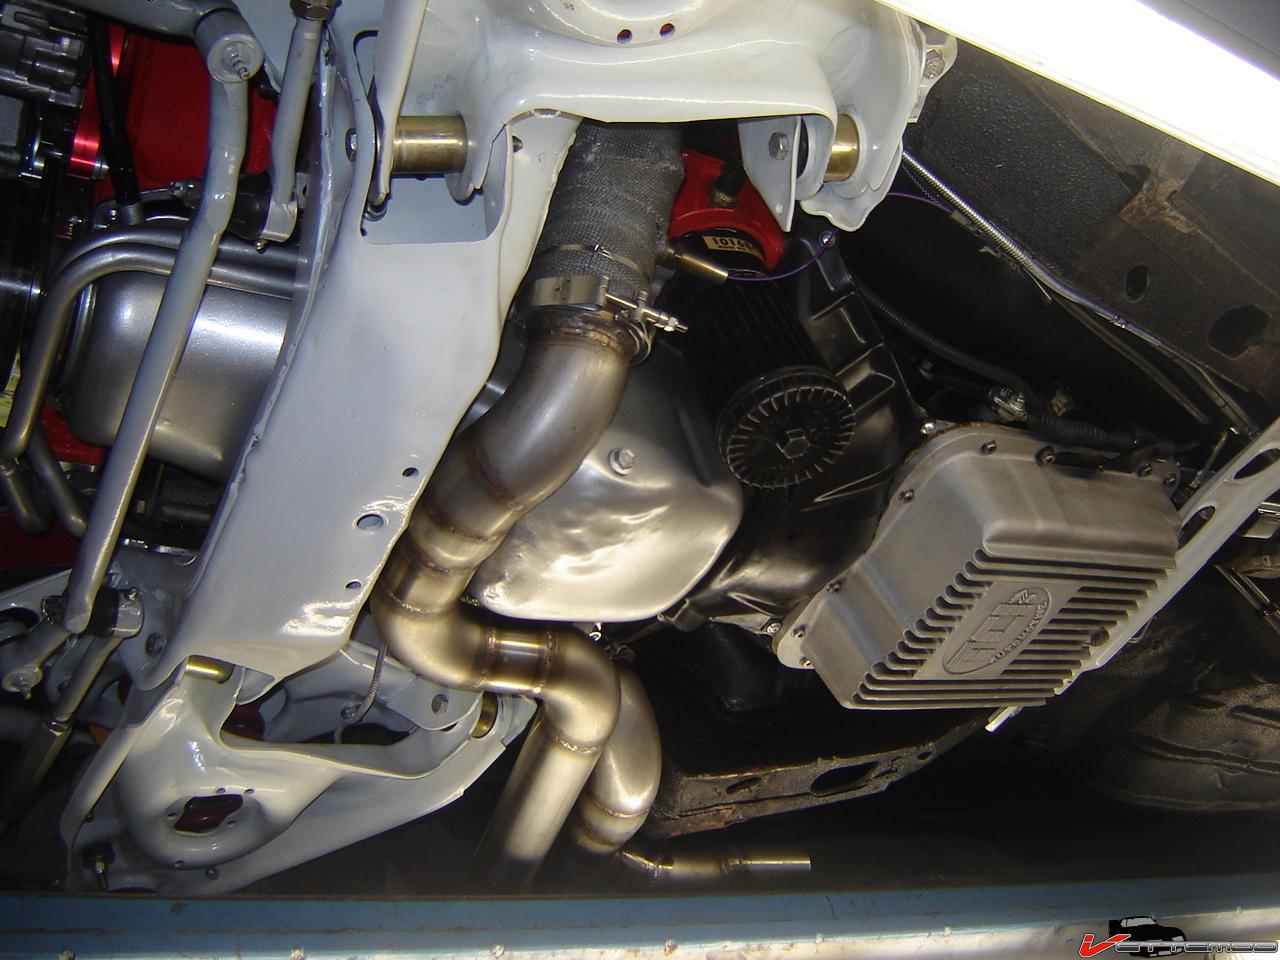
This is some of the stuff I made, didn't use a chop saw on any of these because I feel it takes way too much time to set it all up, I can make a cut with the angle grinder much quicker.
i prefer a normal angle grinder, actually 2. One with a thin cut off disc and the other with a flapper disc for sanding. With practice you will be able to make super precise cuts quickly and grind them smooth for a perfect fit. I TIG weld all my exhausts and do it by eye and feel, I hardly ever measure. A neat trick to quickly get clean cuts is to use a large pipe cutter to score the pipe so you can see where you have to cut to make it perpendicular.
Also, welding on a table with a stainless shet on top makes it much easier to weld while manipulating the pipe. Just ground the table and get cracking.
This is some of the stuff I made, didn't use a chop saw on any of these because I feel it takes way too much time to set it all up, I can make a cut with the angle grinder much quicker.
Thread Starter
Supreme Member
iTrader: (1)
Joined: Jul 2004
Posts: 10,763
Likes: 4
From: Calgary, AB, Canada
Car: 1982 Trans-Am
Engine: 355 w/ ported 416s
Transmission: T10, hurst shifter
Axle/Gears: 10 bolt, true-trac, 3.73
Re: Exhaust fabrication tricks
Great pics, thanks twin_turbo.
Yea, I have a home made TIG setup, so i'd be TIG'ing it. I suppose I can use my belt sander to make sure a cut is flat/concentric.
Holding it in place with one hand to tack it with a TIG is... difficult I suppose I can use magnet clamps?
Thanks guys, i'll have to buy some materials and give it a shot from here.
Yea, I have a home made TIG setup, so i'd be TIG'ing it. I suppose I can use my belt sander to make sure a cut is flat/concentric.
Holding it in place with one hand to tack it with a TIG is... difficult
I suppose I can use magnet clamps?Thanks guys, i'll have to buy some materials and give it a shot from here.
Senior Member
Joined: Apr 2006
Posts: 510
Likes: 0
From: Murphy, TX
Car: 1990 formula
Engine: 433 sbf + turbos
Transmission: powerglide
Axle/Gears: fab9, 3.50
Re: Exhaust fabrication tricks
Great pics, thanks twin_turbo.
Yea, I have a home made TIG setup, so i'd be TIG'ing it. I suppose I can use my belt sander to make sure a cut is flat/concentric.
Holding it in place with one hand to tack it with a TIG is... difficult I suppose I can use magnet clamps?
Thanks guys, i'll have to buy some materials and give it a shot from here.
Yea, I have a home made TIG setup, so i'd be TIG'ing it. I suppose I can use my belt sander to make sure a cut is flat/concentric.
Holding it in place with one hand to tack it with a TIG is... difficult
I suppose I can use magnet clamps?Thanks guys, i'll have to buy some materials and give it a shot from here.
Joined: Jun 2000
Posts: 5,364
Likes: 52
From: Enschede, Netherlands
Car: 82 TA 87 IZ L98 88 IZ LB9 88 IZ L98
Engine: 5.7TBI 5,7TPI 5.0TPI, 5,7TPI
Transmission: T5, 700R4, T5, 700R4
Axle/Gears: 3.08, 3.27, 3.45, 3.27
Re: Exhaust fabrication tricks
Yes, that's what I doo, a couple of quick stripes over the 2 halves with a sharpie to align then weld on the bench.


Joined: Sep 2003
Posts: 25,896
Likes: 430
From: Pittsburgh PA
Car: 89 Iroc-z
Engine: 555 BBC Turbo
Transmission: TH400
Axle/Gears: MWC 9� 3.00
Re: Exhaust fabrication tricks
I built alot my systems with just a sawzall and a cutoff wheel on a die grinder. Works very well. Just have to have a stable hand and good eye for visualizing cut angles.
sharpie marker to help draw the lines and cut to spec. Mock up and tack weld up sections as necessary to see how the system flows. Make adjustments as necessary.
Chop saw works well for most cuts. I have that and use it alot too.
The more you do exhausts the better you become. My second system was alot better than the first and I am considering redoing some sections to get more clearance.
Joined: Dec 2007
Posts: 1,924
Likes: 12
From: Minnesota
Car: 84 camaro, 88 trans am, 98 camaro
Engine: Modded , stock, LSX modded
Transmission: 700r4, 700r4, t-56
Axle/Gears: 327, 308, 373
Re: Exhaust fabrication tricks
The tool i use makes really nice cuts, no tapper or grinding required after cutting takes about less then 1min for each cut ...
https://www.thirdgen.org/forums/exha...-fab-long.html
https://www.thirdgen.org/forums/exha...-fab-long.html
Joined: May 2009
Posts: 410
Likes: 0
From: Petal Ms.
Car: 1990 Iroc
Engine: 6.0
Transmission: 4l65E
Axle/Gears: 373 zexel torsen
Re: Exhaust fabrication tricks
One trick to hold the pipe so you can tack it is, get a wide hose clamp like plumbers use for soil pipe cut the only the center out of the clamp. Then use the clamp to hold the pipe together you can tack in the spot you cut out of the clamp.

Thread
Thread Starter
Forum
Replies
Last Post