When you click on links to various merchants on this site and make a purchase, this can result in this site earning a commission. Affiliate programs and affiliations include, but are not limited to, the eBay Partner Network.
A low-priority part of your project at this point and ( IMO ) better to do that work when the body is ready for them. ( Right now, it's clearly not ready ! ) Installing SFC isn't super difficult and doesn't NEED to be done now; kinda' like installing headers on a fresh motor before dropping the motor in; it's easy when the block is on the stand and looks cool,... but your not really doing yourself any favors.
Back at the old chassis shop we built everything on a jig. Plumb and square were guaranteed and SFCs were installed then.
You could replicate that somewhat if you really want to get them installed now. Either way, fully assembled or otherwise you still have to ensure that everything is straight. Check out this link for an idea of what another member has done. https://www.thirdgen.org/forums/body...l#&gid=1&pid=3
I really want to get them installed when the car is completely naked like it is now.
Once it has more stuff in it, LS3/T56/Moser 12 bolt, I don't think making adjustments by myself will be easier.
I will finish epoxy priming the underside, spin it back to horizontal and then start taking measurements against what was shown in the link.
May be able to jack, pull, and flex the body into matching the dims in the link. It is a hardtop so hope there is not too much flex. We will see.
I will post up in a couple months when I get around to it. Adding a second bathroom to may basement first.
My was stripped of the entire drivetrain, doors, hatch, fuel tank and suspension prior to going down the street to the shop. Spohn SFCs were welded in there.
For me, there was no better opportunity to do it. And admittedly, there was a little rust repair to address as well.
Did they ensure it was all straight somehow before welding in the spohn SFC?
Mine is in a similar state, I don't have fenders, hood, interior of any kind, nose, bumpers, lights, etc...
Basically if it can be removed, it has been on mine so I have amazing access to everything.
I would like to weld as much "stuff" that I need to now. I am epoxy priming the entire exterior and interior after all the welding is done.
All on a two post lift. The Spohns run parallel to the pinch weld along the rocker and are hard up against the floor. At one point the SFCs were supporting the weight of the body as things were stitched into place. I can't comment on what others have encountered but there was no drama.
No issues whatsoever. The car was freshly assembled with everything new including Del-A-Lum, polyurethane and steering (including a new box). No surprises. First alignment and subsequent yielded nothing unusual. Car tracks straight, is noticeably tighter and nothing weird with fitting the doors, hood or hatch.
FWIW, if I place a floor jack under the LCA front support, the entire side of the car will lift off the ground.
I would highly recommend sub frame connectors on uni-bodies this old. I became a believer after striping the interior, pulling the motor and sitting in the engine bay looking directly down the underside of the car. I was feeding some wiring into the passenger compartment and asked my son to climb inside to pull the wires through. I visibly experienced the center of the car dip down as he climbed in. I had him repeat the entry 3 times because I thought I was seeing an illusion. Without sub frames, the car would flex like a clown car around corners.
Find a way confirm its straight and true.
I also had mine done on a race car jig, like Skinny talks about.
The main thing you have to be ABSOLUTELY POSITIVELY 100% TAKE IT TO THE BANK IRONCLAD CERTAIN of, is that the car is STRAIGHT. All the crap you hear about "chassis loaded" is just that, CRAP. the operative concept is STRAIGHT. If the chassis is tweeeeeeeeeked in any way when you weld em in, the tweeeeeeeeek will be retained FOREVER and will be IMPOSSIBLE to remove except by cutting them off... which is a low probability of success activity, since you'll be cutting tubing off of sheet metal.
I would NOT recommend installing them on a rotisserie. Too much chance of the body NOT being straight, if for no other reason than, it's sideways instead of laying flat.
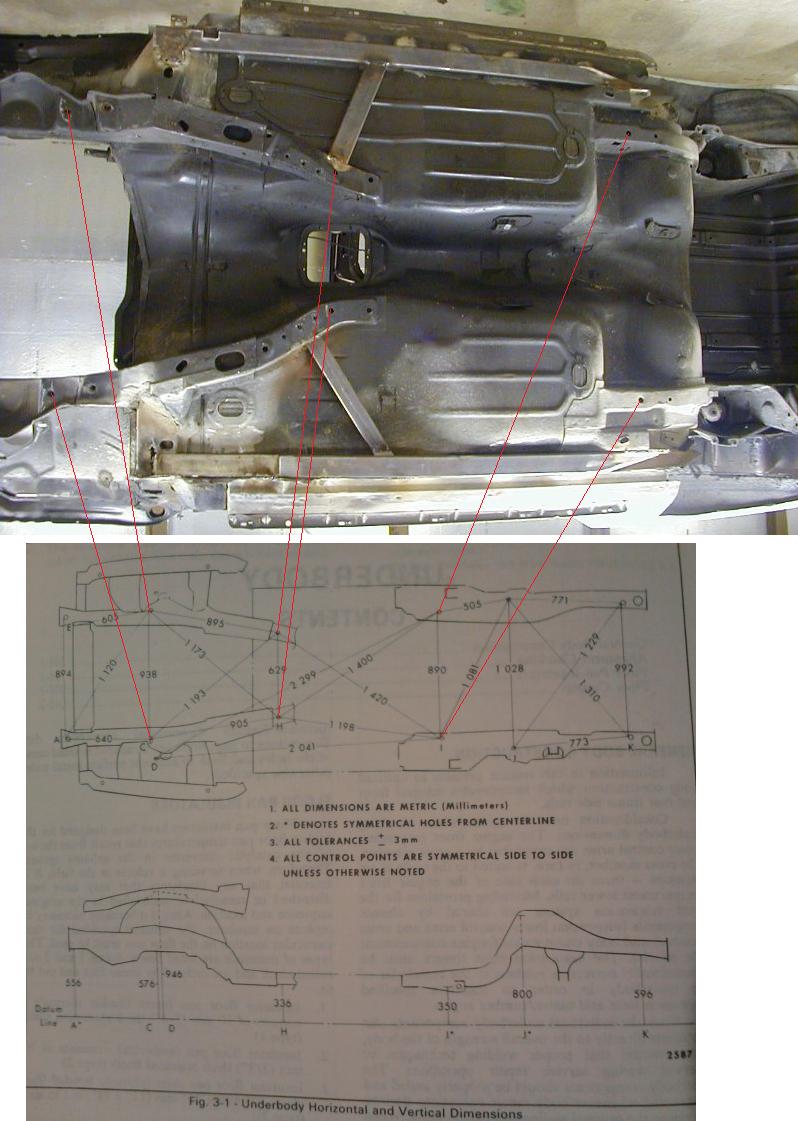
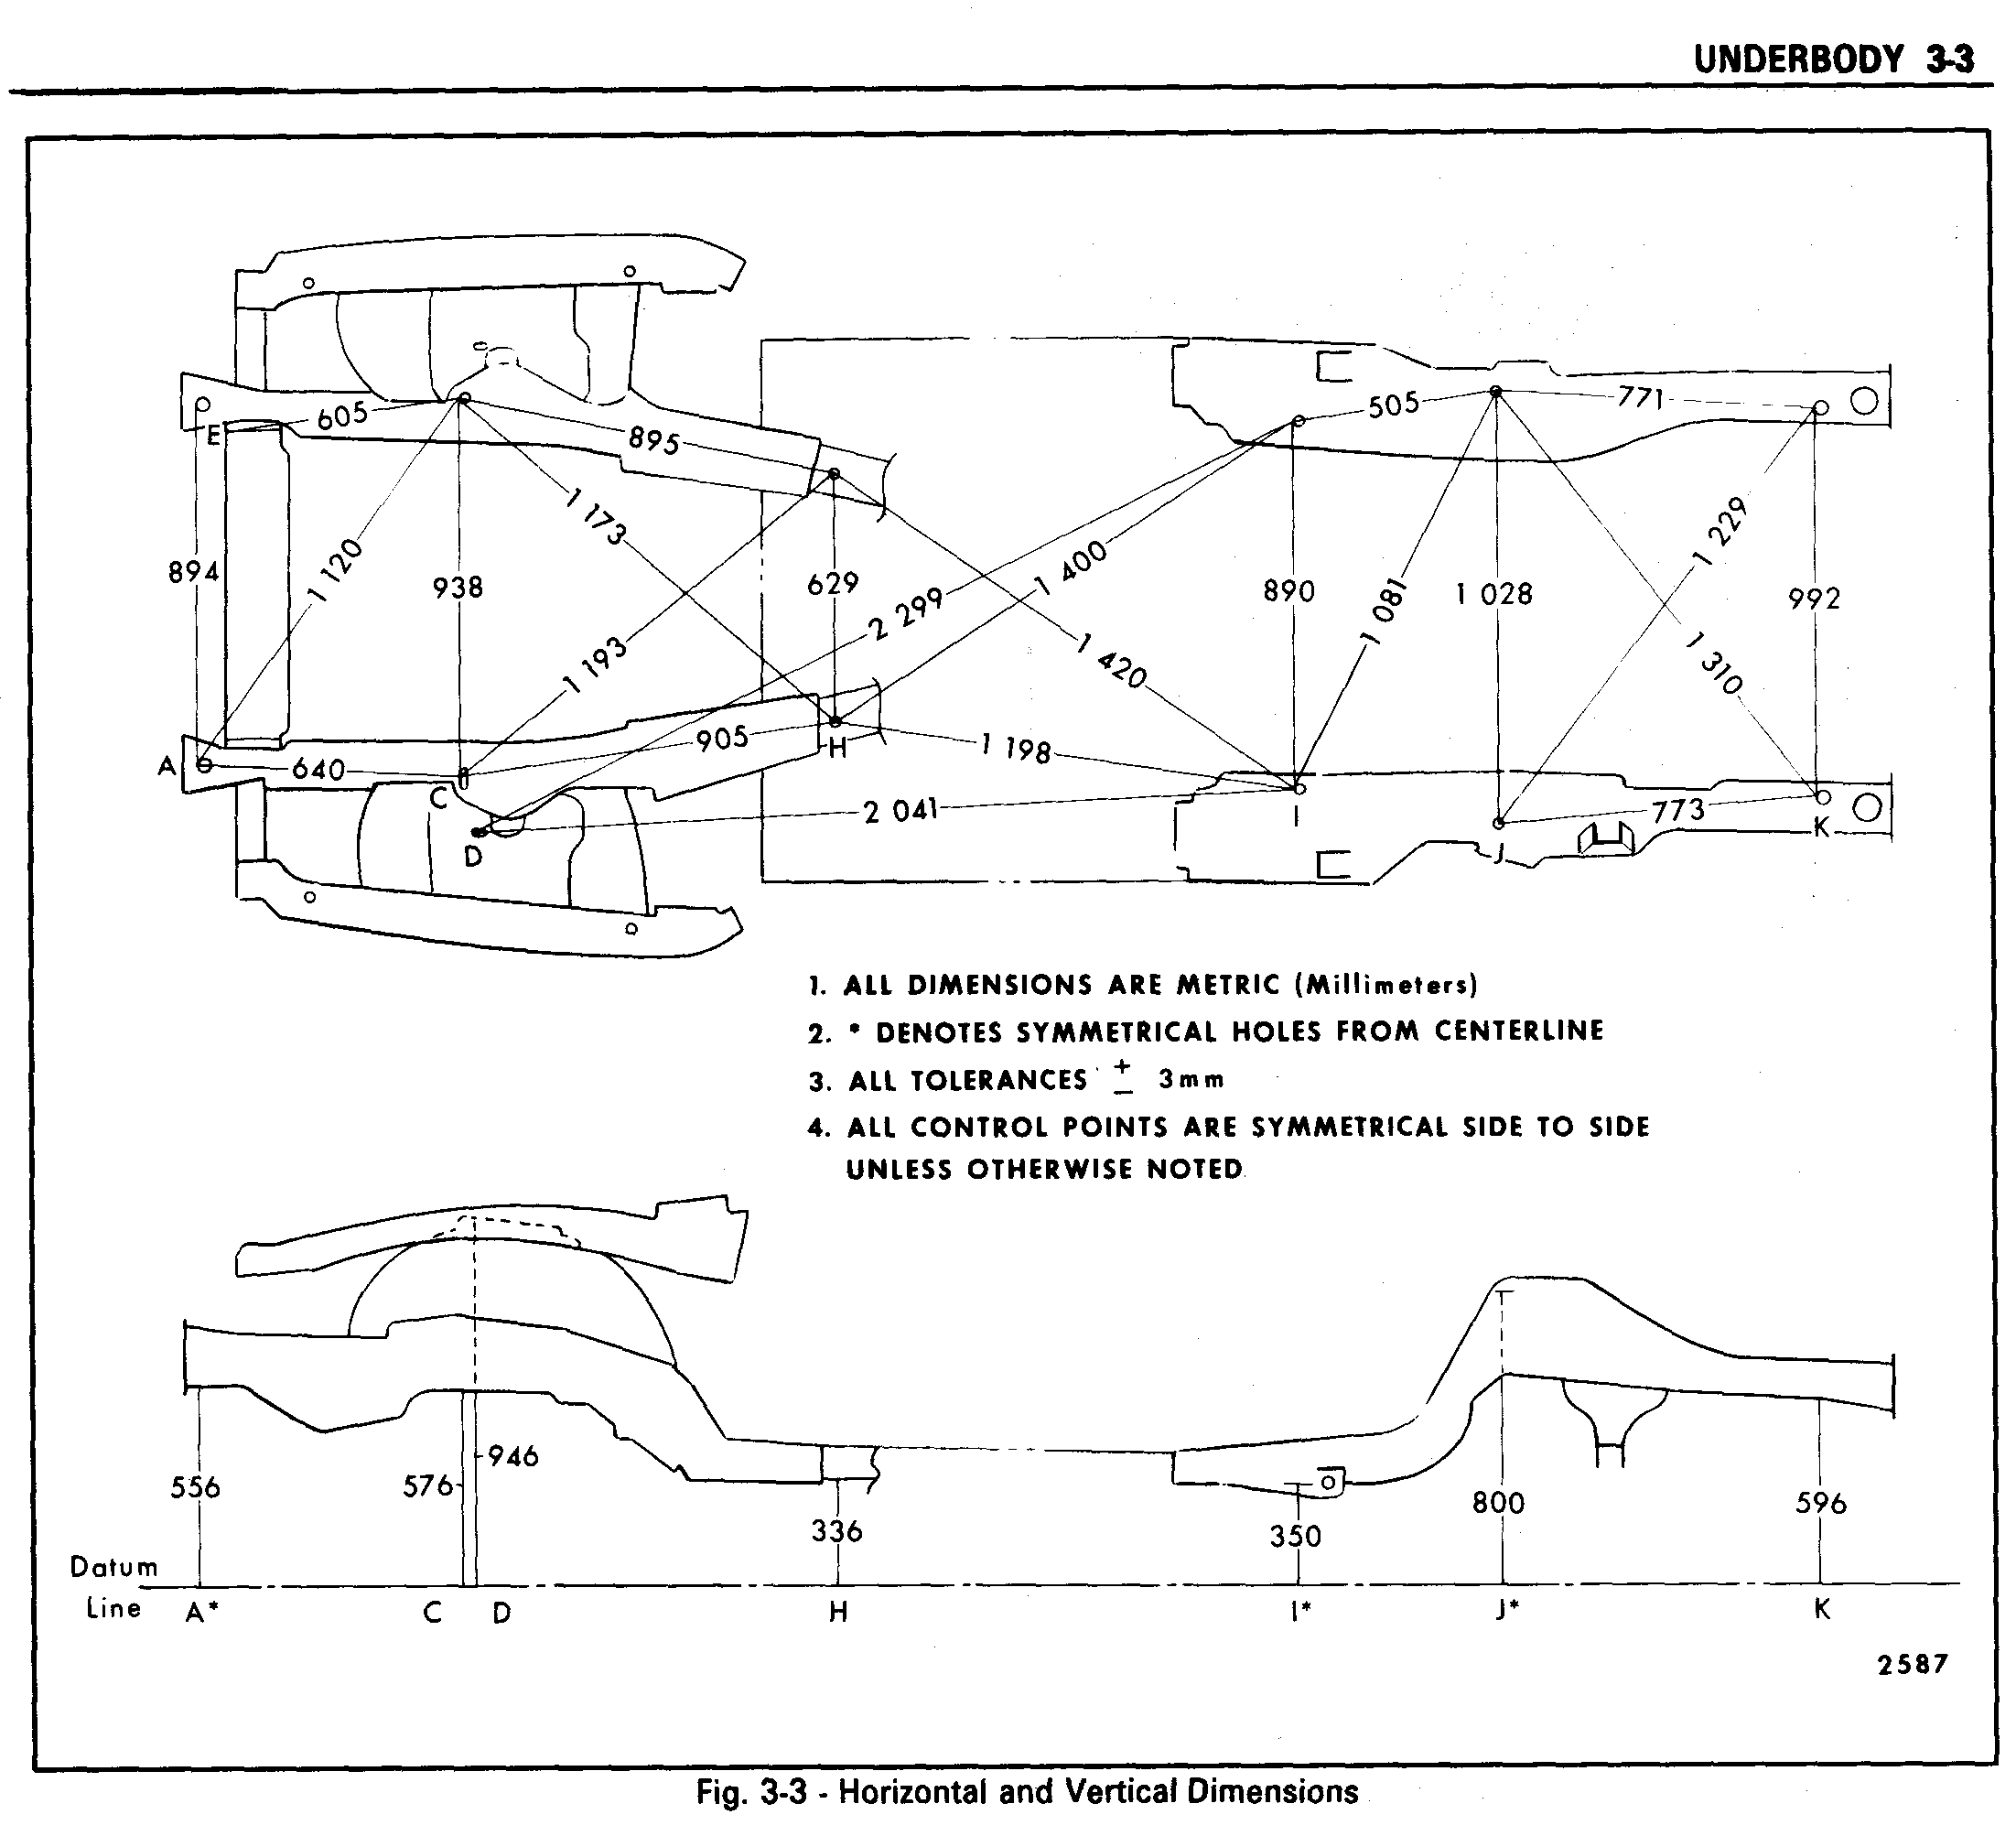
I've also posted all the pages out of the FSM with chassis dimensions. Anybody with frame shop knowledge experience and equipment can execute all this.
Last edited by sofakingdom; Oct 24, 2020 at 07:06 PM.
Looks like great solid info and thanks for posting all the images and dims.
I will be laying down the last of the epoxy primer in the next few weeks (underside).
At that time I will be able to rotate the car back around so it is level and "normal", while still on the rotisserie.
From there I will grab dims. The car was not driven hard and had never been in an accident. Also a hard top, on top of that I used to have SFC on it back in high school, and a 6 point in there in college.
This build up is supposed to be more sleek, so no cage.
I will post pics here of when I am checking stuff. For sure want this to be straight. But also for sure am not having this thing loaded onto a flat bed and brought someplace.
Part of the pride of this build is to do it all on my own, here at home. I plan to paint it right here too. Lots more to come. Gonna be getting a nice new LS3/T-56 straight from Blueprint. Should be sweet when its done.
50% done measuring every dim the best I can. I am certain the image pointing to hole locations is incorrect. (The first image). Following the diagrams and hole descriptions, it is impossible for them to be right (on a 91 z28 at least). Thought you guys should know. Following the pages out of the manual works perfect. So far all my dims are spot on. I have the front of the car held up by the bumper horns, and the back on jack stands. If the remaining dims all check out tomorrow I will tack in the SFC tomorrow and start planning pinch weld tie ins.
I am certain the image pointing to hole locations is incorrect. .
Funny that. I don't recall seeing the red lined drawing. It's the factory data that I was intending to post. That lined drawing is obviously someone's interpretation (not mine).
Hope it wasn't too confusing!
So I measured and measured and measured. A few hours of work.
Everything I could check is laser spot on. Went ahead and welded in the PS SFC. Pics on my build thread.
I made my own frame connectors. My car was complete or fully assembled at that time. I had read a number of times to have the car supported in a fashion to mimic it being on the ground. I believe the installation instructions from my Alston inner connectors also recommend this. I had jack stands under the rear axle and cinder blocks under the front wheels. I mocked up my pieces with the car like this, tacked them together, removed them, then completed welding them together off of the car. After completing them I installed the connectors onto the car still on the stands and blocks. The doors open and close perfectly when the car is on the ground and when I have it jacked up and on jack stands under the rear axle and placed at the front of my connectors. Just recently I had to swap out the clutch slave cylinder. So when I put the jack stands under the car I put them under the frame horns just behind the front bumper. I didn't want them in the way of the creeper, trans jack and the rest of the process. When I opened and closed the door I did notice that it was misaligned and not operating as smoothly as before. After a brief WTF moment I realized it was the jack stand placement. The car didn't bend in half but it did flex a little bit, enough to effect the door operation. I also have one on a rotisserie, it is not completely bare. It still retains the rear axle, k member, front suspension, and bare doors. EVERYTHING else is gone. The body seems quite rigid in this state, but it is mounted to the bumper brackets/ frame horns. I can't help but wonder if it still flexes enough to make a difference just by rotating the the body on the rotisserie.
I really want to get them installed when the car is completely naked like it is now.
Once it has more stuff in it, LS3/T56/Moser 12 bolt, I don't think making adjustments by myself will be easier.
I will finish epoxy priming the underside, spin it back to horizontal and then start taking measurements against what was shown in the link.
May be able to jack, pull, and flex the body into matching the dims in the link. It is a hardtop so hope there is not too much flex. We will see.
I will post up in a couple months when I get around to it. Adding a second bathroom to may basement first.
Hello, how did you make out with the frame connectors on the IROC? I used to live in West Warwick on Wakefield Ave. Live in Warwick now.
Hello, how did you make out with the frame connectors on the IROC? I used to live in West Warwick on Wakefield Ave. Live in Warwick now.
I know it has been a long time, but I am still here in West Warwick working on my '91 Z28 restomod project.
Car isn't an IROC, but yeah it is going great. I am working on restoring and modding my doors right now. Shaved everything and rebuilding all the internals. Prime, paint and all that.
SFC went well and car is still on the rotisserie. Doors are a muti month project in themselves, especially since just about nothing stock is going back in and I am replacing a lot of hinge components.
Always happy to give advice or insight, let me know if you have any questions!


 !
!