
Gauge Layout Options for Trans AM

Thread Starter
Joined: Sep 2002
Posts: 3,685
Likes: 10
From: PA
Car: 86 Trans AM
Engine: LS1 (not stock...)
Transmission: Built T56
Axle/Gears: Strange 12-bolt w/ 3.73
Gauge Layout Options for Trans AM
Hey all. Im doing an LS1/T56 swap in my 87 TA, and Im going with a full set of Autometer Gauges. They are all Phantom gauges to match my pillar pod which already has Phantoms in it. I have the Tach and Speedo mocked up, and I have the bigger opening for the small gauges opened up and ready for some holes. My only problem is I cant decide which combo I like best. So..give me some opinions! I came up with 4 ideas taht I think look decent. The dash will retain the stock turn signal and high beam indicators. The three little circles mixed in with the small gauges are check engine, oil level, brake warning, and i might add a coolant level light.
Let me know what you think!!

Justin
Let me know what you think!!
Justin


Joined: Jul 1999
Posts: 1,272
Likes: 2
From: Muskego, WI
Car: 1985 Trans Am
Engine: 350
Transmission: T5
Axle/Gears: 3.70
thanks. I made it using the stock panel.
Camaro's are easier cause there are companies that make them already like Covans.
Camaro's are easier cause there are companies that make them already like Covans.

Thread Starter
Joined: Sep 2002
Posts: 3,685
Likes: 10
From: PA
Car: 86 Trans AM
Engine: LS1 (not stock...)
Transmission: Built T56
Axle/Gears: Strange 12-bolt w/ 3.73
Ok...bringin this thread back instead of starting a new one... I got tired of seeing the autometer boxes sitting around and havin the dash pieces laying around, so tonight I slapped it together to get an idea of how it will fit and how it looks. I love it! I still have to pop in some LEDs or colored bulbs for the check engine light and all that... Fit is awsome... and I was able to retain my stock high beam and turn signal indicators. Check it out... let me know what you think..
Oh and one thing... the oval for the smaller gauges isnt finished. I still have to clean up the oval and use some fiberglass to smooth things out. But it will do for now...I want the car to run darn it!! :drive:
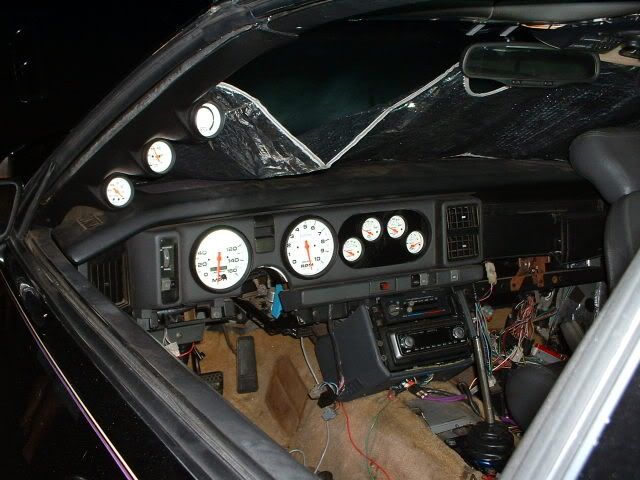
This one is from outside...through the back window.
Let me know what you think!
Justin
Oh and one thing... the oval for the smaller gauges isnt finished. I still have to clean up the oval and use some fiberglass to smooth things out. But it will do for now...I want the car to run darn it!! :drive:
This one is from outside...through the back window.
Let me know what you think!
Justin

Member
Joined: Jun 2005
Posts: 192
Likes: 0
From: indiana, pa
Car: 85 TA
Engine: dont wanna talk about it
Transmission: 700r4 for now
with eight guages monitoring your engine dou you really need a check engine light.....looks nice cant with to see it when you get it all cleaned up
Trending Topics
Thread Starter
Joined: Sep 2002
Posts: 3,685
Likes: 10
From: PA
Car: 86 Trans AM
Engine: LS1 (not stock...)
Transmission: Built T56
Axle/Gears: Strange 12-bolt w/ 3.73
yeah. the gauges wont tell me EVERYTHING... my pillar gauges are vac, fuel pressure, and air/fuel. The air fuel isnt really that helpful because im not using a wideband. The vac gauge is basically there before at the time I needed to fill a hole. haha. I figure since im puttin in the dianostic port and warning lights for oil level and coolant level...might as well retain the SES light.
I cant wait until its cleaned up either!!! The wiring has me a bit worked up...but Im slowly working through it. Its been like 96 degress every day, and its even hotter in the car. so working on under the dash has been delayed a bit..
Justin
I cant wait until its cleaned up either!!! The wiring has me a bit worked up...but Im slowly working through it. Its been like 96 degress every day, and its even hotter in the car. so working on under the dash has been delayed a bit..
Justin
Member
Joined: Jun 2005
Posts: 192
Likes: 0
From: indiana, pa
Car: 85 TA
Engine: dont wanna talk about it
Transmission: 700r4 for now
Originally Posted by ghettocruiser
yeah. The wiring has me a bit worked up...Justin


Thread Starter
Joined: Sep 2002
Posts: 3,685
Likes: 10
From: PA
Car: 86 Trans AM
Engine: LS1 (not stock...)
Transmission: Built T56
Axle/Gears: Strange 12-bolt w/ 3.73
Thanks for the compliments!
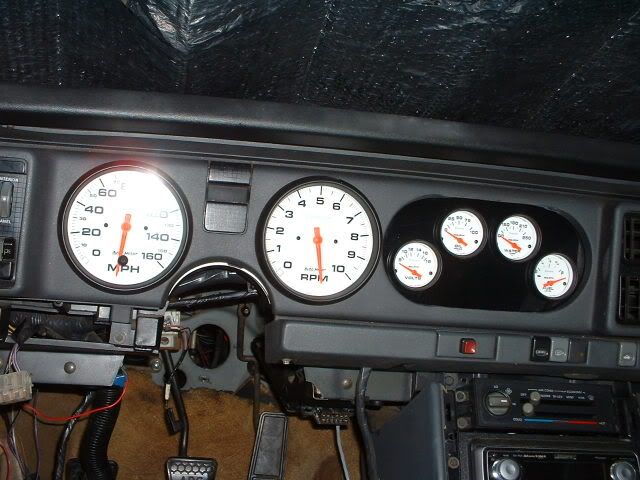
Yup...5" speedo and tach. Had to take alittle material off of the bezel to get them in, but not much. For the other side, its obvious what I cut. And mounted the 2 1/6" gauges in the right half of the old cluster cover.
I intend to use the stock gauge wiring for the backlighting... Since there were more bulbs in the stock cluster, the wiring should be sufficient for my gauges. Im going to try to use the power wire as well as the grounds... however Im not sure how well this will work. Ive tried to do that before and certain gauges get interference from doing that. They like to have their own power and ground. Guess we'll find out!!
Justin
Member
Joined: Jul 2006
Posts: 142
Likes: 0
From: West Virginia
Car: '91 Z-28 Hardtop
Engine: 5.7L TPI L98
Transmission: 700R4
Hehe, you went with the pattern I was gonna vote for. I like the looks of #3, but I thought #4 would be more functional. I figured you would have trouble seeing the Oil and Temp guages using 3 because of the steering wheel.
Looks really nice, good work man.
Looks really nice, good work man.
Joined: Jul 1999
Posts: 1,272
Likes: 2
From: Muskego, WI
Car: 1985 Trans Am
Engine: 350
Transmission: T5
Axle/Gears: 3.70
I seriously recommend buying the painless wiring harness for the gauges, unless you have acess to multipin connectors. Made life alot easier IMO.
Thread Starter
Joined: Sep 2002
Posts: 3,685
Likes: 10
From: PA
Car: 86 Trans AM
Engine: LS1 (not stock...)
Transmission: Built T56
Axle/Gears: Strange 12-bolt w/ 3.73
I didnt realize painless makes a wiring harness just for gauges. Summit has them..but for $68... Seems alittle steep to me. I could buy a couple bucks of connectors, some wire, and a multipin male/female and probably spend less than 20. Alittle solder and heat shrink later and Ill have a harness that is tailored the way I want. But good suggestion!!! If I had gotten the painless engine harness too, I might grab it. I didnt even think to do it that way until you suggested that. I think I will just copy what they did and make it work. I have to see where I can run wires...Not sure how much room I have behind the gauges yet. They are just in there now because I was in impatient. 
Thanks for the compliments!!
Justin
Thanks for the compliments!!
Justin
Joined: Feb 2005
Posts: 4,506
Likes: 95
From: West Warwick RI, postal code: 02893
Car: Building LS3, T56 Z28
Engine: LS3
Transmission: T-56
Axle/Gears: Moser/ 4.11
Not bad, I like how more guys are finally diving in there. Here is mine, in a 91 Camaro Z28.
Thread Starter
Joined: Sep 2002
Posts: 3,685
Likes: 10
From: PA
Car: 86 Trans AM
Engine: LS1 (not stock...)
Transmission: Built T56
Axle/Gears: Strange 12-bolt w/ 3.73
Dennis you have good taste in gauges! Looks good! I LOVE the way these gauges not only clean up the dash, but they give a subtle hint that something just isnt stock about the car. WIthout having to have a big 10" tach on the dash pad. No offense to anyone with a big tach...
Im also keeping my amber/orange lighting as well. I always liked that about my TA... plus it matches my HVAC and other things. I wish Pioneer made a conversion so that my radio was in amber too.....
Justin
Im also keeping my amber/orange lighting as well. I always liked that about my TA... plus it matches my HVAC and other things. I wish Pioneer made a conversion so that my radio was in amber too.....
Justin
Joined: Feb 2005
Posts: 4,506
Likes: 95
From: West Warwick RI, postal code: 02893
Car: Building LS3, T56 Z28
Engine: LS3
Transmission: T-56
Axle/Gears: Moser/ 4.11
Thanks for the compliment. I really like the subtleness about it too. And you are sooo right. Poeple outside the car can't see the big *** Tach and speedo.
I just can't wait to see how fast my 500HP 385 can make that tach move. Lol!
Post pics with them all lit up. It makes for a great desktop. I will try to get pics of mine on at night. Mine even dim with the dimmer switch. (first 2 times I tried wiring them all up they were attached to a toggle.)
I am exited I finally did it the right way.
Thread Starter
Joined: Sep 2002
Posts: 3,685
Likes: 10
From: PA
Car: 86 Trans AM
Engine: LS1 (not stock...)
Transmission: Built T56
Axle/Gears: Strange 12-bolt w/ 3.73
Dennis...
I actually just lit mine up last night. Not totally happy with the shade of amber/orange that they came out as...but still looks killer. I used the originally illumination wires. There were two pairs of gray/blk wires that controlled the old dash lights. They handled 9 bulbs in the original cluster, so I figured they would have no trouble handling 8 bulbs in these gauges.
I also made the wiring harness yesterday for the gauges. Came out pretty good. Wiring them now is going to be a breeze. I got a small fuse panel that accepts ATO style fuses. According to autometer, you can get power from the same source for all the gauges. But they recommend putting each gauge on its own power wire, with a 3amp fuse. So...thats what Im going to do. There are two grounds. Good gauge wire coming from each gauge. The two from the speedo tach come together to a big gauge wire. The 4 from the other guages also come together in one big wire. Should be good for grounding.
I also got my turn signal and high beam indicators working last night. They worked out perfectly! that part of the dash still works like totally stock.
Might try to crank the motor tonight
Justin
Joined: Feb 2005
Posts: 4,506
Likes: 95
From: West Warwick RI, postal code: 02893
Car: Building LS3, T56 Z28
Engine: LS3
Transmission: T-56
Axle/Gears: Moser/ 4.11
Sounds good Justin. Thats pretty much what I did but without the little fuses. Mine is all just fused back in the trunk where my Painless harness is. But yeah it is a very good idea to wire it in a simple straight forward way. I can get my entire guage set up out of my car for whatever reason, in less than 10 minutes.
Autometer is def the way to go.
I used to have the red little bulb condoms on mine. But they made the guages look pink. So i junked the covers and went back to normal. I love it. Good luck with your set up.
ps- I got my motor fired up last night! INSANE is all I have to say. Also, I am def gonna need REAL mufflers, these bullets do nothing, esspecially with a cam that needs to idle at 1K at best. hehe.

Senior Member
Joined: Feb 2004
Posts: 814
Likes: 1
From: Savannah GA
Car: 1982 Trans Am
Engine: 383 chevy
Transmission: T-5
Axle/Gears: 4th gen 10-bolt, posi, 3.42 ratio
I'd like to build something like that. do the later TA stock panels come like that from the factory? my 82 panel is 4 big a$$ holes. great for 5" guages, but not for smaller ones. what year was the panel you used? or was it custom? did you overlay anything on top and re-drill it, or did you just massage existing holes and stuff guages in them? any help would be great. I'm trying to put together a guage cluster for my new 383.
Last edited by flyitlikustolit; Sep 1, 2006 at 01:59 PM. Reason: spelling
Joined: Feb 2005
Posts: 4,506
Likes: 95
From: West Warwick RI, postal code: 02893
Car: Building LS3, T56 Z28
Engine: LS3
Transmission: T-56
Axle/Gears: Moser/ 4.11
I coulod answer all your questions, but it would be a lot easier for me and for you to go check out my car domain page and see all the pics there. The whole process is explained too. I show the step by step, take ten min and check it out, I promise 90% of your Q's will be answered.
Then if you still have somethings that are blurry, no prob, come back and ask me.
Later
-Dennis
Then if you still have somethings that are blurry, no prob, come back and ask me.
Later
-Dennis
Senior Member
Joined: Feb 2004
Posts: 814
Likes: 1
From: Savannah GA
Car: 1982 Trans Am
Engine: 383 chevy
Transmission: T-5
Axle/Gears: 4th gen 10-bolt, posi, 3.42 ratio
I'm in that 10%... I own a trans am, not a camaro, and building a piece out of MDF isn't what i really want. I have aluminum sheet here at work. I'm trying to figure out if the stock guage panel that goes over the cluster in a 85-later TA has to be cut for that oval shape. I own an 82, and 60% of the stuff is different. I think I'm just going to try and peruse the JY next weds when i'm off and see what i find. mayeb i can find a panel to modify to work liek everyone else did. i don't even have guages yet, som I'm not terribly worried. besides, I want to finish my center console first. thanks for the cool pics, nice car, but not really applicable to my situation.

Junior Member
Joined: Oct 2004
Posts: 91
Likes: 0
From: Calgary, Alberta
Car: 1988 Trans Am
Engine: 383 carbed sb
Transmission: th350
Well I have an '88 brid with night rider crap dash.
I picked up a 2 hole (like you have) and 4 hole dash cover for my year car. I plan on running it in a gutted dash. I already have some autometer phantom gauges in my car, and its too bad autometer didn't make more sets of multi gauge 5" gauges, 'cause that would fill the car up nice.
I'm gonna have to do a custom pod on the side like you as well.
Any other idea's and pics?

Thread Starter
Joined: Sep 2002
Posts: 3,685
Likes: 10
From: PA
Car: 86 Trans AM
Engine: LS1 (not stock...)
Transmission: Built T56
Axle/Gears: Strange 12-bolt w/ 3.73
Hey all. Thanks for the compliments as always! I was going to do an overlay like dennis did. However, I didnt completely dislike the stock gauge set up. So seeing as how the 5" gauges almost fit right in...I decided to go this route. The dash bezel was just a regular 4 hole dash bezel. On the right, I carefully cut the area between the two holes and made it as straight as possible. My plans were to fiberglass it alittle to make it look cleaner...but Im saving that for another day. I wanna drive her...
I probably took a different route than a lot of other people. For instance, the original gauge cluster is stillb ehind the dash. It is just a shell of its former self, but it allowed me to install the 4 gauges on the right first...then the speedo and tach second. It also allowed me to retain my stock turn signal and high beam indicators. There were probably much easier ways to do it. I might still re-do it at some point. But it works for now.
I have some pictures of the back of my new cluster...and of the wiring. Ill have to host them but if anyone wants to see them Ill post them up. You can kind of see how I used the old cluster housing and see why it makes things alittle easier to install.
Justin
Senior Member
Joined: Feb 2004
Posts: 814
Likes: 1
From: Savannah GA
Car: 1982 Trans Am
Engine: 383 chevy
Transmission: T-5
Axle/Gears: 4th gen 10-bolt, posi, 3.42 ratio
It makes a lot of sense to do it that way. I'm going to try my hand at something really similar to what you did and find a panel and guage cluster to use as the core pieces. how did you secure the lexan or plexi you used to hole the small guages to the cluster? i see how the 5" guages just sit in the panel. I may be abel to use aluminum sheet... I just need to see what kind of space i have in the dash to work with. i seem to remember the speaker being in the way a tiny bit on the driver's side, but i think with the autometers, it won't be an issue. thanks for the idea guys!!
Thread Starter
Joined: Sep 2002
Posts: 3,685
Likes: 10
From: PA
Car: 86 Trans AM
Engine: LS1 (not stock...)
Transmission: Built T56
Axle/Gears: Strange 12-bolt w/ 3.73
Ah...thats the beauty of using a stock cluster shell... There arent really 4 separate circles for the stock gauges. Its a flat piece of formed plexi allt he way across. So...I completely gutted the drivers side of the cluster except for the white shell. I left the passenger side alone, made my holes, and painted it from the back. Now it can screw to the cluster shell to be solid, and it mates up to the front bezel perfectly.
As for clearance behind the gauges..it is alittle tight. But in no way near the speaker. There is a shell, or pocket behind the gauge cluster. I left that alone..just had to nibble away at it with cutters enough to pass the wires through and clear things here and there.
Ill post pictures tonight when I get home. I will say...with all the little bolts taht hold everything together, things are definetly stable and arent going to move around any. I just cant wait to try them out Car is still on jack stands  .... Soon though.
Justin
As for clearance behind the gauges..it is alittle tight. But in no way near the speaker. There is a shell, or pocket behind the gauge cluster. I left that alone..just had to nibble away at it with cutters enough to pass the wires through and clear things here and there.
Ill post pictures tonight when I get home. I will say...with all the little bolts taht hold everything together, things are definetly stable and arent going to move around any. I just cant wait to try them out
Car is still on jack stands .... Soon though.Justin

Member


Joined: Apr 2001
Posts: 225
Likes: 5
From: CT
Car: 1992 Z/28
Engine: 305
Transmission: Auto
Axle/Gears: 2.73's I think
You may want to consider adding those cups/bevels that tilt the gauges to make them easier to view (since they appear to be pointing between the front seats).
Just a thought!
Just a thought!
Thread Starter
Joined: Sep 2002
Posts: 3,685
Likes: 10
From: PA
Car: 86 Trans AM
Engine: LS1 (not stock...)
Transmission: Built T56
Axle/Gears: Strange 12-bolt w/ 3.73
Gave it a thought. THen I sat in the car. I can see everything perfectly. Maybe the one gauge is alittle hard to see totally. But its the voltage one. And I can see the important part. I might be putting a gauge down in my center console, where the 4th gen cubby/TCS/vert switch goes. Next to the lighter socket. I might use one of those angled deals for that. I wonder if they work with other gauges other than autometer?
Justin
Justin
Senior Member
Joined: Feb 2004
Posts: 814
Likes: 1
From: Savannah GA
Car: 1982 Trans Am
Engine: 383 chevy
Transmission: T-5
Axle/Gears: 4th gen 10-bolt, posi, 3.42 ratio
i like that idea a lot. simple but effective way to get it done. I'm gonna do it. I'd love to see your pics of the wiring and mounting of the whole thing. I'd like to see what kind of connectors you used and things like that, just to make it easier. that way i can buy it all up front and put it together mostly out of the car. thanks ghetto!
Thread Starter
Joined: Sep 2002
Posts: 3,685
Likes: 10
From: PA
Car: 86 Trans AM
Engine: LS1 (not stock...)
Transmission: Built T56
Axle/Gears: Strange 12-bolt w/ 3.73
Ok all...as promised. Here are the pics of the backside of my gauge cluster. Now...I know it looks intimidating or messy. But I assure you the pictures make it look worse than it is. All the wires were first grouped and taped...then I covered them with wire loom wrap. So everything is organized and tidy now. No pics of that of course. Every connection was soldered and heat shrinked. Here come the pics...
This is the small gauge side. Since the stock gauge cluster had more illum. bulbs than I was using, I used the wires behind the dash to feed my gauge lights. There are two sets. 2 positive, and 2 negative. I used one set for the little, and one set for the speedo/tach. Also...the illum. bulbs do not come out with the cluster. The bulbs pop out of the back and stay with the car. Easier that way.

You can see in this pic how I cut away the white cluster to make room for the 5" gauges. I really hacked away at it with a pair of angle cutters. But I was careful to leave enough tot make it sturdy.

You can see the way I ran the wires from the small gauges, over to the big gauges. Kind of blending in and picking up wires as I went along. However...since these pictures Ive had the dash out and took the wires apart and made one loom for the small gauges, and one loom for the big gauges. This is important because you have to install the inner cluster first. Then the outer bezel. I overlooked this small detail the first time around.")

Last pic...and I know they all sort of look the same. This one shows how I left the holes for the turn signal and high beam indicators. The bulb holders that you get with autometer gauges fit perfectly in here. Also, you can use the stock holders from the cluster. But you hvae to solder wires onto them because they usually use the printed circuit.

These are old pics. This is how I cut and modified the stock cluster cover to accept the small gauges. I left 4 mounting points to make it secure. Also, I printed up a guide to make those holes. I used the same drawings that I have up at the top of this thread that I made in CAD. The only thing missing is the holes for the warning lights...which I added after all these pics were taken.


If you have any questions/comments feel free!
Justin
This is the small gauge side. Since the stock gauge cluster had more illum. bulbs than I was using, I used the wires behind the dash to feed my gauge lights. There are two sets. 2 positive, and 2 negative. I used one set for the little, and one set for the speedo/tach. Also...the illum. bulbs do not come out with the cluster. The bulbs pop out of the back and stay with the car. Easier that way.
You can see in this pic how I cut away the white cluster to make room for the 5" gauges. I really hacked away at it with a pair of angle cutters. But I was careful to leave enough tot make it sturdy.
You can see the way I ran the wires from the small gauges, over to the big gauges. Kind of blending in and picking up wires as I went along. However...since these pictures Ive had the dash out and took the wires apart and made one loom for the small gauges, and one loom for the big gauges. This is important because you have to install the inner cluster first. Then the outer bezel. I overlooked this small detail the first time around.
Last pic...and I know they all sort of look the same. This one shows how I left the holes for the turn signal and high beam indicators. The bulb holders that you get with autometer gauges fit perfectly in here. Also, you can use the stock holders from the cluster. But you hvae to solder wires onto them because they usually use the printed circuit.
These are old pics. This is how I cut and modified the stock cluster cover to accept the small gauges. I left 4 mounting points to make it secure. Also, I printed up a guide to make those holes. I used the same drawings that I have up at the top of this thread that I made in CAD. The only thing missing is the holes for the warning lights...which I added after all these pics were taken.
If you have any questions/comments feel free!
Justin
Senior Member
Joined: Feb 2004
Posts: 814
Likes: 1
From: Savannah GA
Car: 1982 Trans Am
Engine: 383 chevy
Transmission: T-5
Axle/Gears: 4th gen 10-bolt, posi, 3.42 ratio
could you do a version of that with 5 guages? how hard is it to do without cad? all i have are a drill, my eyes, and some hole saws..... I don't want to screw this up.
Thread Starter
Joined: Sep 2002
Posts: 3,685
Likes: 10
From: PA
Car: 86 Trans AM
Engine: LS1 (not stock...)
Transmission: Built T56
Axle/Gears: Strange 12-bolt w/ 3.73
if you want...i can do some up tomorrow for you. im sure 5 would fit. im not sure if you can print out what i draw in cad in full size though. i might have to print it for ya and shoot it over in the mail. then you can cut it out and have a full size, "to scale" template. If you have any 5 gauge ideas that you were thinking sketch them up in paint and email them to me. Then I can use cad to see if it will fit. I mean...its nothing reall complicated. I just like using cad because I have the gauges measured out and the opening measured out. Let me know!
Justin
jgindin20@hotmail.com
Justin
jgindin20@hotmail.com
Junior Member
Joined: Apr 2006
Posts: 70
Likes: 0
From: columbus, ohio
Car: 1991 pro street formula
Engine: 355
Transmission: turbo 350 w/ 3200 stall
Axle/Gears: 9" ford detroit locker w/ 456
all these custom dashes are outstanding. that is the reason i keep searching this board, to see what kind of creative fabrication you guys (and gals) come up with. i too was disappointed that no friebird dashes were made on the aftermarket. my idea was on the same line as ghettos. great pics of the wiring too. i am saving these as my day is coming. thanks again.
keep em coming!
keep em coming!


Junior Member
Joined: Jun 2005
Posts: 78
Likes: 0
From: Syracuse, NY
Car: 87 Formula 350
i like what you guys are doing but at the same time i cringe because i am just in love with pontiac orange/red and the look of the 3rd gen gauges...
i'm sure this is a dumb question but does the new speedo display the proper speed when you first plug it in or does it need calibration?
i'm sure this is a dumb question but does the new speedo display the proper speed when you first plug it in or does it need calibration?
Thread Starter
Joined: Sep 2002
Posts: 3,685
Likes: 10
From: PA
Car: 86 Trans AM
Engine: LS1 (not stock...)
Transmission: Built T56
Axle/Gears: Strange 12-bolt w/ 3.73
Yeah i know... I loved my original gauges too. However I love the look of the white face black trim gauges even better. And since I did the LS1 swap...I wanted to have the easiest hook up of the gauges and also more accurate instrumentation. If I left the car stock...I probably wouldnt have replaced the gauges. I made sure to put the matching lights behind the autometers though...so the lighting theme will stay the same.
The speedo that I got is programmable. There are a series of instructions on how to calibrate it...pretty simple really. Its no where near correct when first installed. If it is...you are one lucky SOB and you should play the lotto. haha.
Justin
The speedo that I got is programmable. There are a series of instructions on how to calibrate it...pretty simple really. Its no where near correct when first installed. If it is...you are one lucky SOB and you should play the lotto. haha.
Justin

Supreme Member
iTrader: (3)
Joined: Sep 2005
Posts: 1,685
Likes: 3
From: MD
Car: '88 IROC-Z medium orange metallic
Engine: L98
Transmission: 700R4
Axle/Gears: 3.27
I don't have any pics of it in the car, but here's what I made. I cut out the entire stock gauge bezel and made my own, then epoxied it into the factory plastic piece. It fits into the dash just like original with all the same screws.


Supreme Member
Joined: Sep 2005
Posts: 1,951
Likes: 13
From: Ottawa, ONT
Car: 1987 Firebird
Engine: 355
Transmission: T56
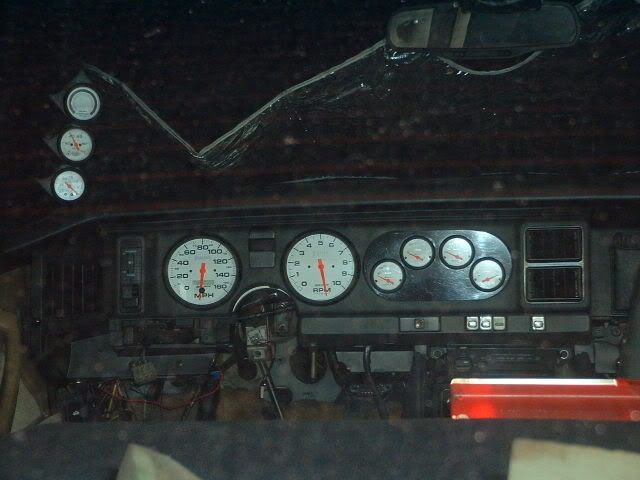
I retro fitted this stuff into my car last night. Took a long 4 hours (with ALOT of snack brakes). Looks real messy and very a-symmetrical, but it works for me. The original oil pressure and engine temp dont work, but all the idiot lights and stuff do. I made it so all the lights on the aftermarket gauges light up red, to match the original gauges. The only one i hate is the BIG ugly vacuum gauge. I wanna retain the "original" look, so im gonna transfer three of the gauges to the A-pillar when i find one, and the vacuum gauge is likely gonna be placed in the console shift plate, like the early z-28 clocks. Everything works, and looks great when lit, so im happy with it as a temp solution!

Thread Starter
Joined: Sep 2002
Posts: 3,685
Likes: 10
From: PA
Car: 86 Trans AM
Engine: LS1 (not stock...)
Transmission: Built T56
Axle/Gears: Strange 12-bolt w/ 3.73
Whoa! Is that a tan dash I see???? Whats the deal with that? Can you post a pic or two more of the entire dash board? Did you paint it? Or is there a different colored dash that Ive never seen before?
And your gauges look fine. As long as you like em and they are functional. just dont go sticking a big 6" tach on the dash pad or you might get persecuted!!
Justin
And your gauges look fine. As long as you like em and they are functional. just dont go sticking a big 6" tach on the dash pad or you might get persecuted!!
Justin
Supreme Member
Joined: Sep 2005
Posts: 1,951
Likes: 13
From: Ottawa, ONT
Car: 1987 Firebird
Engine: 355
Transmission: T56
Oh yea, never heard of the tan interior? The car is 100% original im told, except for the engine. Some AC and cruise parts missing but thats it. I just bought this car a couple months ago, im more of a camaro junkie, still new to birds. But i LOVE the light coloured interior, definately very classy. So no its not painted, just how it is. Its a PAIN to keep clean through, im not even driving yet and ive managed to get it a lil dirty. Everything is tan, except the console, the overhead console, and the main parts of the dash and dash-pad. The front seats are also tan, i just have covers on there for obvious reasons.


Thread Starter
Joined: Sep 2002
Posts: 3,685
Likes: 10
From: PA
Car: 86 Trans AM
Engine: LS1 (not stock...)
Transmission: Built T56
Axle/Gears: Strange 12-bolt w/ 3.73
Hmmm...... I like it. The only thing I wish GM did was get rid of the grey plastic. I think the lighter gray plastic just looks like poo against anything. Now...if they would have made all the pieces black... mmm... black and tan. Such a nice interior color combo IMO.
Thats why I went with black and tan...or grey/black/camel I should say. haha. Thanks for those pics! Definetly not a thirdgen interior you see every day!
Justin
Thats why I went with black and tan...or grey/black/camel I should say. haha. Thanks for those pics! Definetly not a thirdgen interior you see every day!
Justin