
Recovering and modifying a t-top headliner


Thread Starter
Joined: Dec 2000
Posts: 2,361
Likes: 2
From: Buffalo, NY
Car: 1984 Trans Am
Engine: LT1
Transmission: T56
Axle/Gears: 10 bolt w/ 4.10 gears
Recovering and modifying a t-top headliner
I just posted this on my local f-body forum (newyorkfbody.com), and figured I would post it here also.. I might've posted some of this here before but I don't remember how well I wrote it up, so here goes!
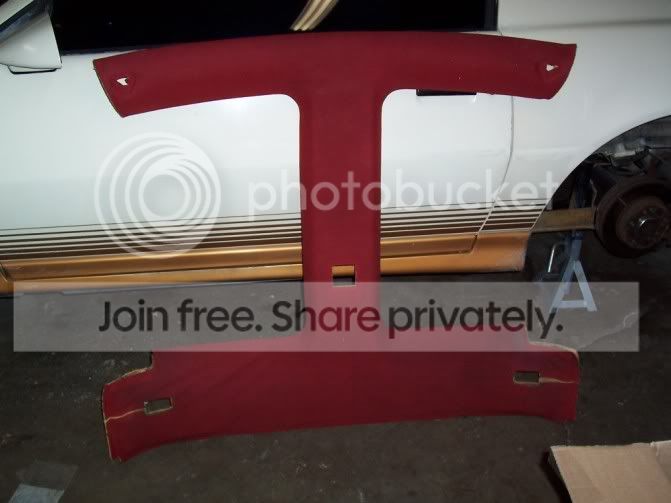
I started with a t-top headliner from a junkyard car that was in exceptionally good condition (considering the age).
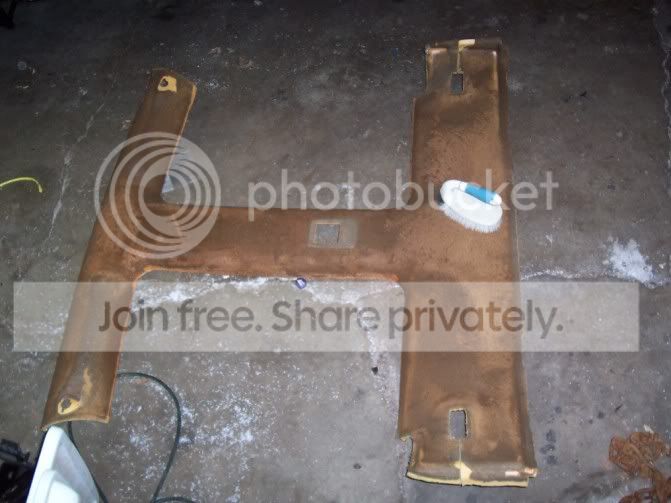
I removed the old headliner material and thoroughly removed the foam backing using a nylon bristle brush. For any areas that were starting to tear, I soaked it with headliner adhesive. Resin would probably work well too.
I wanted to make it smoother than stock by shaving the dome light. I installed a rear view mirror with map lights so the dome light won't be missed.

I cut a piece of cardboard to exactly match the hole. I then cut another piece slightly larger. I used the headliner adhesive to adhere them together. The function of the larger piece (not pictured) is to give a good surface area to adhere to the headliner board. I used a skim coat of good old bondo to smooth over the cardboard since any imperfection will show through the headliner material. I used a palm sander after the bondo set.
I also decided to shave the slit for the rear seatbelts and only keep the hole for the belt to come through. The slit was initially needed because of the 3rd gen lower retractor, but I don't need it any more because I swapped to 4th gen seatbelts without the lower retractor.
The headliner material can be purchased from most fabric stores. It's a felt fabric with a 1/8" foam backing. (Headliner material also works well as a poker table cloth... but that's another project). I had to special order mine due to the color not being stocked normally (it's charcoal). I believe 2 yards is more than enough but I bought more to use on the rear speaker covers and the door panel inserts.
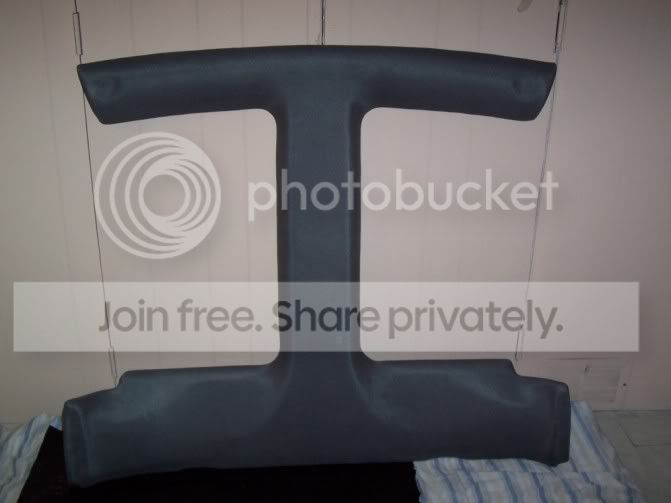
Permatex Heavy Duty Headliner and Carpet Adhesive is the brand I used and hightly recommend. To conform to the curves of the t-top headliner, I had to adhere one small section at a time. The permatex bonds immediately and won't peel away when pulling tight for the next section. It really takes a lot of patience to get it without wrinkles.
Problems not yet solved:
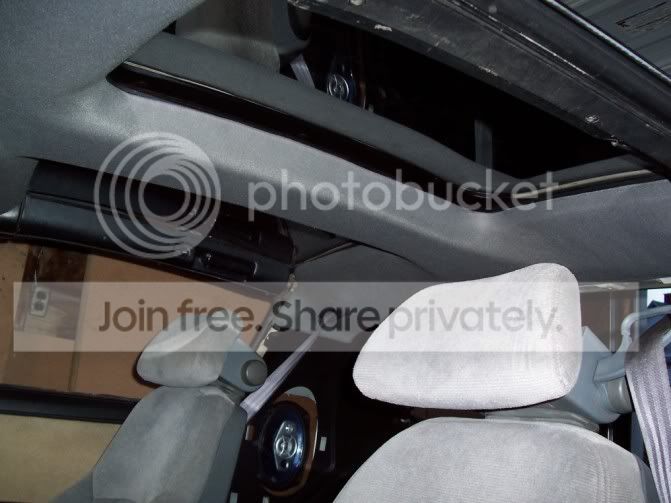
The dome light also helps hold the headliner in place. I tried using adhesive backed velcro in it's place, but it separated from the headliner board easily. I might recommend sewing the velcro to the headliner prior to smoothing with bondo or just finding a better adhesive. It hasn't sagged much so far due to the mount not being there, but I wouldn't want it to experience the added stress over a long period of time.
I started with a t-top headliner from a junkyard car that was in exceptionally good condition (considering the age).
I removed the old headliner material and thoroughly removed the foam backing using a nylon bristle brush. For any areas that were starting to tear, I soaked it with headliner adhesive. Resin would probably work well too.
I wanted to make it smoother than stock by shaving the dome light. I installed a rear view mirror with map lights so the dome light won't be missed.
I cut a piece of cardboard to exactly match the hole. I then cut another piece slightly larger. I used the headliner adhesive to adhere them together. The function of the larger piece (not pictured) is to give a good surface area to adhere to the headliner board. I used a skim coat of good old bondo to smooth over the cardboard since any imperfection will show through the headliner material. I used a palm sander after the bondo set.
I also decided to shave the slit for the rear seatbelts and only keep the hole for the belt to come through. The slit was initially needed because of the 3rd gen lower retractor, but I don't need it any more because I swapped to 4th gen seatbelts without the lower retractor.
The headliner material can be purchased from most fabric stores. It's a felt fabric with a 1/8" foam backing. (Headliner material also works well as a poker table cloth... but that's another project). I had to special order mine due to the color not being stocked normally (it's charcoal). I believe 2 yards is more than enough but I bought more to use on the rear speaker covers and the door panel inserts.
Permatex Heavy Duty Headliner and Carpet Adhesive is the brand I used and hightly recommend. To conform to the curves of the t-top headliner, I had to adhere one small section at a time. The permatex bonds immediately and won't peel away when pulling tight for the next section. It really takes a lot of patience to get it without wrinkles.
Problems not yet solved:
The dome light also helps hold the headliner in place. I tried using adhesive backed velcro in it's place, but it separated from the headliner board easily. I might recommend sewing the velcro to the headliner prior to smoothing with bondo or just finding a better adhesive. It hasn't sagged much so far due to the mount not being there, but I wouldn't want it to experience the added stress over a long period of time.
Re: Recovering and modifying a t-top headliner
Excellent job
When I repair headliners I glue a straitened stiff clothes hanger to the backside with hot glue. I never removed the dome light but this may help your sagging problem
When I repair headliners I glue a straitened stiff clothes hanger to the backside with hot glue. I never removed the dome light but this may help your sagging problem


Senior Member

Joined: Dec 2001
Posts: 862
Likes: 3
From: Cheektowaga., NY, USA
Car: 91 Camaro RS
Engine: 305 TBI LO3
Re: Recovering and modifying a t-top headliner
whadda messy garage.....i may have asked..but did you know/whaddya do when the headliner is cracked like my old one? i'd just call and ask, but you're busy playing w/your car at the track and ill ferget.
Trending Topics
Thread Starter
Joined: Dec 2000
Posts: 2,361
Likes: 2
From: Buffalo, NY
Car: 1984 Trans Am
Engine: LT1
Transmission: T56
Axle/Gears: 10 bolt w/ 4.10 gears
Re: Recovering and modifying a t-top headliner
for minor tears/fraying I just used some of the headliner adhesive to hold the fiberboard together. If it's more serious, I'm thinking resin would work very well for repairs. I'll have to tell you my track story later on.
Member
Joined: Jun 2008
Posts: 172
Likes: 0
From: Chattanooga TN
Car: 87 GTA
Engine: 350 Tune port
Transmission: 700r4,2500 stall
Re: Recovering and modifying a t-top headliner
i got a Q about the 4th gen seat belts how would i go about doing that to my gta
Thread Starter
Joined: Dec 2000
Posts: 2,361
Likes: 2
From: Buffalo, NY
Car: 1984 Trans Am
Engine: LT1
Transmission: T56
Axle/Gears: 10 bolt w/ 4.10 gears
Re: Recovering and modifying a t-top headliner
The front belts are pretty straight forward. The top retractors mount just as the 3rd gen ones do. On the bottom, remove your old retractor and remove the 90 degree bracket that the old retractor mounted to (it's held in with 2 bolts going into the body. one is identical to the large bolt that mounts the retractor and the other is a small 10mm bolt). I ended up removing the plastic sheathing from the bottom of my 4th gen belts, but that isn't required. Then just bolt the metal loop on the bottom of the 4th gen belts into the body in place of the old bracket that you removed.
the rears are a little more difficult, because the reatractor assembly is taller for the 4th gen rears than it is for the 3rd gen units.
the rears are a little more difficult, because the reatractor assembly is taller for the 4th gen rears than it is for the 3rd gen units.
Member
Joined: Jun 2008
Posts: 172
Likes: 0
From: Chattanooga TN
Car: 87 GTA
Engine: 350 Tune port
Transmission: 700r4,2500 stall
Re: Recovering and modifying a t-top headliner
The front belts are pretty straight forward. The top retractors mount just as the 3rd gen ones do. On the bottom, remove your old retractor and remove the 90 degree bracket that the old retractor mounted to (it's held in with 2 bolts going into the body. one is identical to the large bolt that mounts the retractor and the other is a small 10mm bolt). I ended up removing the plastic sheathing from the bottom of my 4th gen belts, but that isn't required. Then just bolt the metal loop on the bottom of the 4th gen belts into the body in place of the old bracket that you removed.
the rears are a little more difficult, because the reatractor assembly is taller for the 4th gen rears than it is for the 3rd gen units.
the rears are a little more difficult, because the reatractor assembly is taller for the 4th gen rears than it is for the 3rd gen units.

Thread
Thread Starter
Forum
Replies
Last Post
Thirdgen89GTA
NW Indiana and South Chicago Suburb
4
Nov 26, 2015 11:04 PM
formula00ra
Interior Parts Wanted
1
Sep 28, 2015 11:50 AM