
roll cage pics with full interior????


Joined: Nov 2006
Posts: 537
Likes: 4
From: Calgary, Alberta, Canada
Car: 89 WS6 TransAm
Engine: LQ408
Transmission: T56 Magnum
Axle/Gears: Strange S60, 4.10s
Re: roll cage pics with full interior????
I used this from summit
http://www.summitracing.com/int/part...-212/overview/
http://www.summitracing.com/int/part...-212/overview/
Joined: Nov 2006
Posts: 537
Likes: 4
From: Calgary, Alberta, Canada
Car: 89 WS6 TransAm
Engine: LQ408
Transmission: T56 Magnum
Axle/Gears: Strange S60, 4.10s
Re: roll cage pics with full interior????
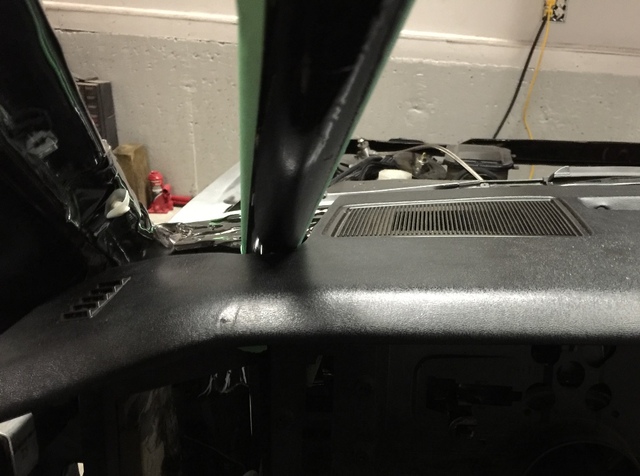
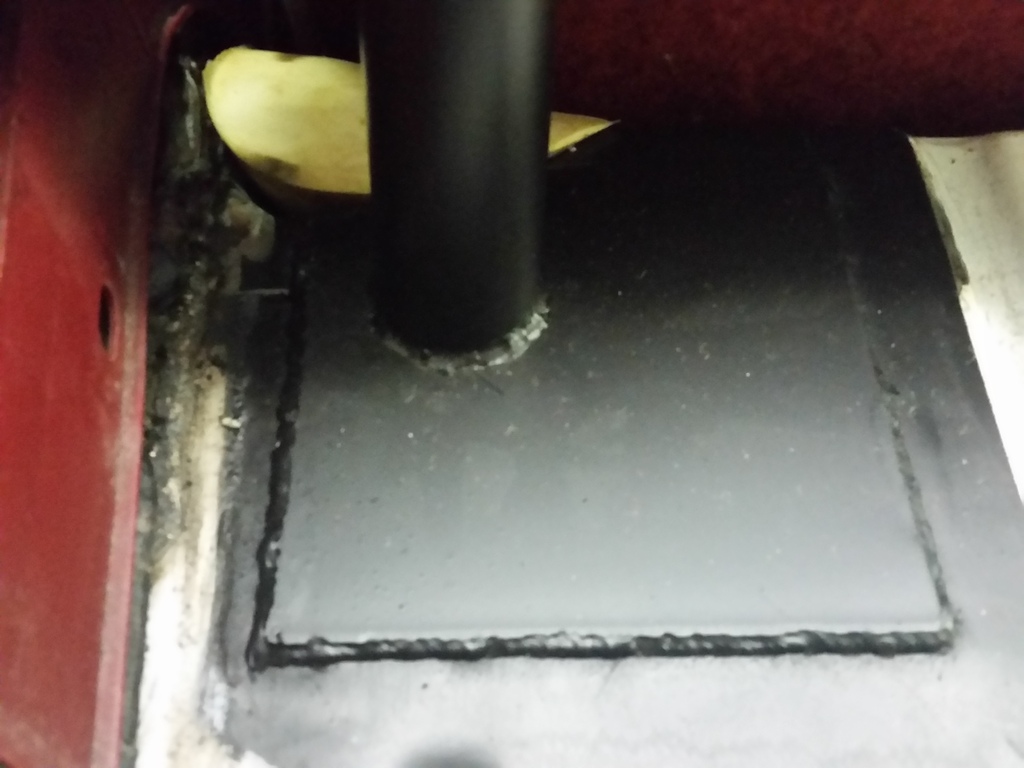
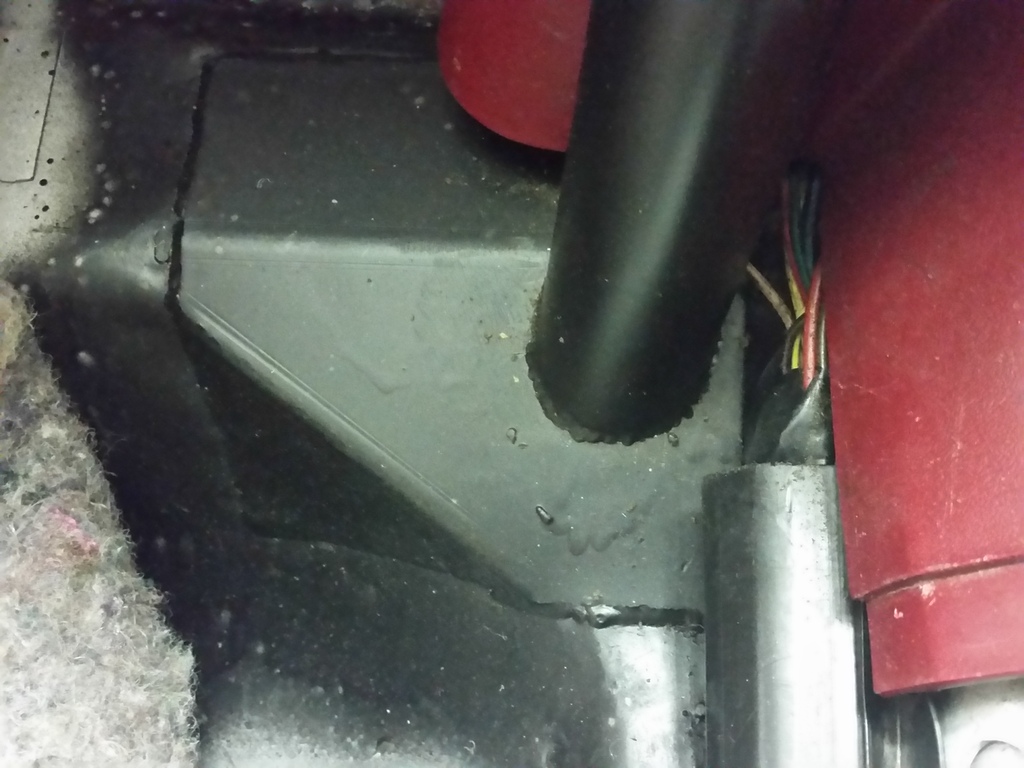
Not quite at the interior installed stage, but wanted to share my heater box install with the front crossbar in place.
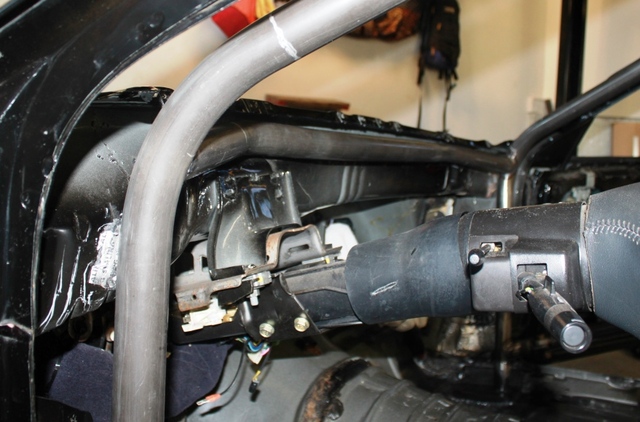
Was a simple cut to fit the heater box in, although I went a little deep with my cut. Easily resolved with some polyurethane sealant.
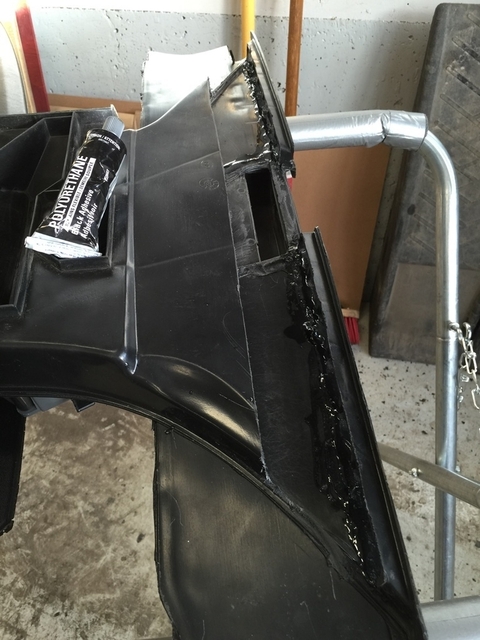
Even with the cut in the heater box, the defrost and all other heater modes will still function as stock, although the defrost will not be as well directed. No plans for winter driving this vehicle, so shouldn't be an issue.
6.5 Kickers in the dash.

Was a simple cut to fit the heater box in, although I went a little deep with my cut. Easily resolved with some polyurethane sealant.

Even with the cut in the heater box, the defrost and all other heater modes will still function as stock, although the defrost will not be as well directed. No plans for winter driving this vehicle, so shouldn't be an issue.

6.5 Kickers in the dash.

Joined: Jun 2002
Posts: 13,576
Likes: 30
From: Harford County, MD
Car: camaro sportcoupe
Engine: 7.0L
Transmission: G-Force GF5R
Axle/Gears: Moser 9"
Re: roll cage pics with full interior????
SFI 45.1 1/2" thick padding:
http://www.summitracing.com/parts/sum-590102/overview/
this will likely be what i'm going to use. 10 pt will be going into my car this winter.
http://www.summitracing.com/parts/sum-590102/overview/
this will likely be what i'm going to use. 10 pt will be going into my car this winter.
Joined: Nov 2006
Posts: 537
Likes: 4
From: Calgary, Alberta, Canada
Car: 89 WS6 TransAm
Engine: LQ408
Transmission: T56 Magnum
Axle/Gears: Strange S60, 4.10s
Re: roll cage pics with full interior????
Installing a 10 point cage puts you in a precarious position when it comes time to re-install the dash pad. With the windshield out, I couldn't see there being any better time to cut the dash pad then now. So, here are some steps I took and a few tips.
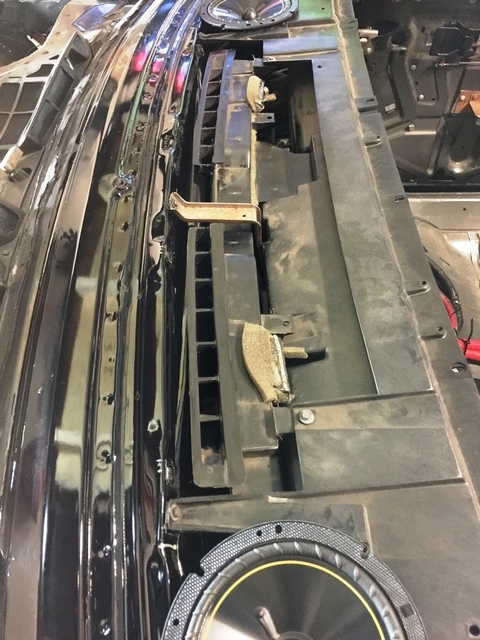
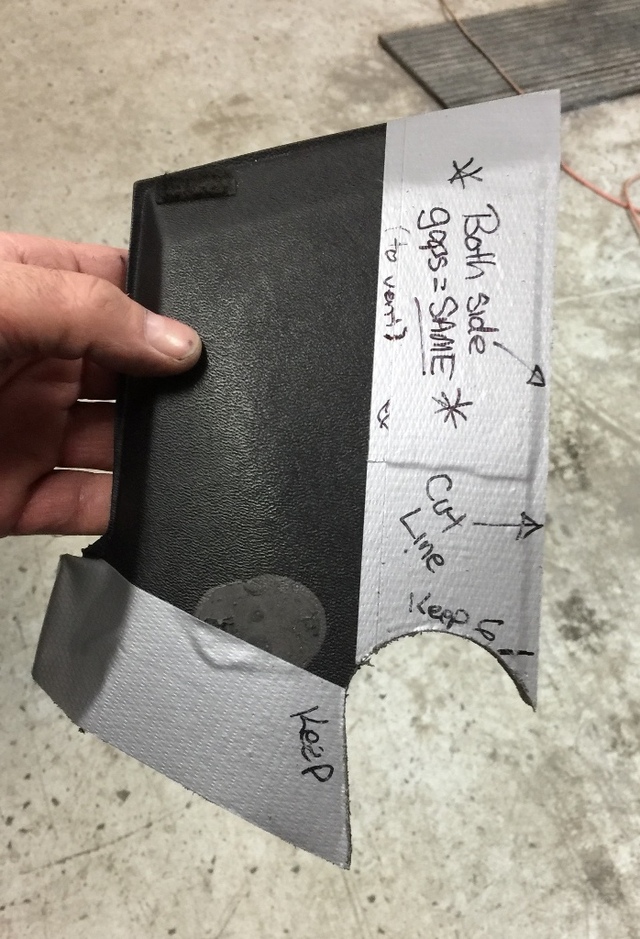
Tip) The front speaker grills are perfectly parallel with the fore/aft of the car centerline, therefore can be used to align the inner cut for each dash bar.
First, I loosely installed the dash pad on top of the dash support, measuring the distance from fully seated at both sides, to ensure it was square with the vehicle. (Measuring the distance underneath between the pass through holes in the dash support mounting bracket and the actual holes in the dash pad itself, making sure both sides are the same distance from their final mounting location.
Next, I used two straight edges to find the inside of each bar at the top of the dash installed height, making sure my measurements between the two straightedges were the same at the front and the back, which ensures my cuts would be square and parallel to each other. This width is the actual distance between the bars at the top of the dash pad installed height. This value can then be used to center these cuts across the dash pad, with the final cut points being equal from the speaker grill at each side. (This is assuming your dash bars are at equal distances from with the vehicle body on both sides. If not, you will have to adjust for the difference.)

Next, determine what angle you wish to make your side cuts at. Mine were made at the same angle as the side vents, however it may have been better to make them even farther forward, towards the windshield as it may hide the cut line even better. How to support the stray dash pad piece later also needs to be considered here.
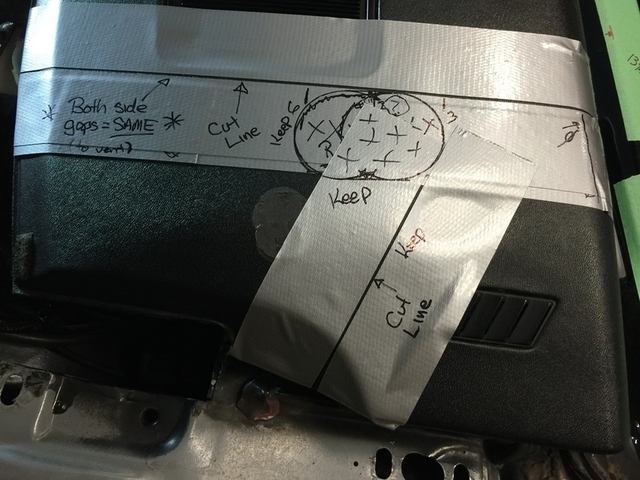
Jigsaw time... Go very slow with your cuts as the steel support brace is not carried throughout the whole dash pad. After cutting, I very lightly rubbed the edge of the cuts with a red scotchbrite pad to further smooth them.
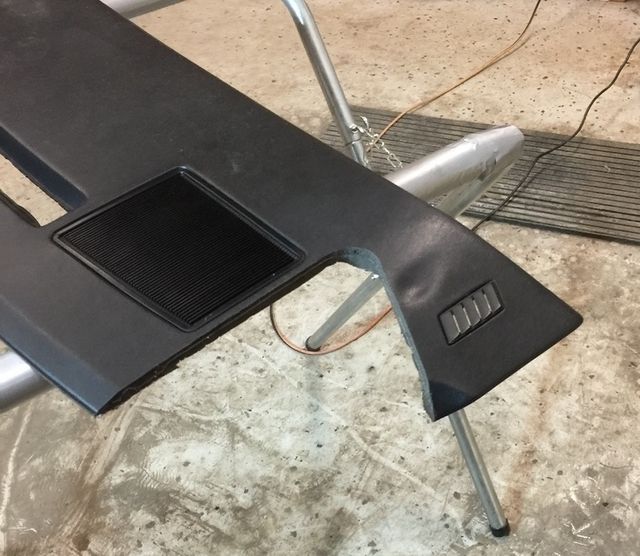
Then cut out the oblong holes for the bars to pass through. This is the most difficult part to get correct, as there are may angles at play.
And the final product in place.
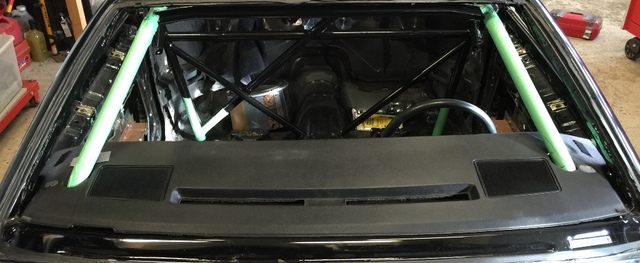
With the jigsaw cutting square to the pad, it is very difficult to match the angle of the hole with the bar, so a slight gap will be hard to eliminate. To further conceal the cuts and gaps around the bar, I am going to look into rollbar grommets options. Here is an example of what I am talking about. http://www.norcal-cobras.com/store/r...k3/mk3rbg.html
Tip) The front speaker grills are perfectly parallel with the fore/aft of the car centerline, therefore can be used to align the inner cut for each dash bar.
First, I loosely installed the dash pad on top of the dash support, measuring the distance from fully seated at both sides, to ensure it was square with the vehicle. (Measuring the distance underneath between the pass through holes in the dash support mounting bracket and the actual holes in the dash pad itself, making sure both sides are the same distance from their final mounting location.
Next, I used two straight edges to find the inside of each bar at the top of the dash installed height, making sure my measurements between the two straightedges were the same at the front and the back, which ensures my cuts would be square and parallel to each other. This width is the actual distance between the bars at the top of the dash pad installed height. This value can then be used to center these cuts across the dash pad, with the final cut points being equal from the speaker grill at each side. (This is assuming your dash bars are at equal distances from with the vehicle body on both sides. If not, you will have to adjust for the difference.)

Next, determine what angle you wish to make your side cuts at. Mine were made at the same angle as the side vents, however it may have been better to make them even farther forward, towards the windshield as it may hide the cut line even better. How to support the stray dash pad piece later also needs to be considered here.

Jigsaw time... Go very slow with your cuts as the steel support brace is not carried throughout the whole dash pad. After cutting, I very lightly rubbed the edge of the cuts with a red scotchbrite pad to further smooth them.


Then cut out the oblong holes for the bars to pass through. This is the most difficult part to get correct, as there are may angles at play.

And the final product in place.

With the jigsaw cutting square to the pad, it is very difficult to match the angle of the hole with the bar, so a slight gap will be hard to eliminate. To further conceal the cuts and gaps around the bar, I am going to look into rollbar grommets options. Here is an example of what I am talking about. http://www.norcal-cobras.com/store/r...k3/mk3rbg.html
Last edited by HP52TA; Feb 12, 2016 at 10:24 PM. Reason: Fixed pics
Joined: Jun 2002
Posts: 13,576
Likes: 30
From: Harford County, MD
Car: camaro sportcoupe
Engine: 7.0L
Transmission: G-Force GF5R
Axle/Gears: Moser 9"
Re: roll cage pics with full interior????
dash looks mint man. won't you have to split those grommets though to use them?
Joined: Nov 2006
Posts: 537
Likes: 4
From: Calgary, Alberta, Canada
Car: 89 WS6 TransAm
Engine: LQ408
Transmission: T56 Magnum
Axle/Gears: Strange S60, 4.10s
Re: roll cage pics with full interior????
Thanks! It is kind of like the 20 footer paint job though. Once you get close the gaps look bigger.
Yes, grommets would have to be cut. I am going to check in with my water cutter contact and see what we can come up with. I am thinking a thin black stainless grommet that can be split, but held together like two pieces of puzzle. We'll see what he can do.
Yes, grommets would have to be cut. I am going to check in with my water cutter contact and see what we can come up with. I am thinking a thin black stainless grommet that can be split, but held together like two pieces of puzzle. We'll see what he can do.


Joined: Nov 2006
Posts: 537
Likes: 4
From: Calgary, Alberta, Canada
Car: 89 WS6 TransAm
Engine: LQ408
Transmission: T56 Magnum
Axle/Gears: Strange S60, 4.10s
Re: roll cage pics with full interior????
Thought you might like this. Good luck.
Joined: Jun 2002
Posts: 13,576
Likes: 30
From: Harford County, MD
Car: camaro sportcoupe
Engine: 7.0L
Transmission: G-Force GF5R
Axle/Gears: Moser 9"
Re: roll cage pics with full interior????
Thanks! It is kind of like the 20 footer paint job though. Once you get close the gaps look bigger.
Yes, grommets would have to be cut. I am going to check in with my water cutter contact and see what we can come up with. I am thinking a thin black stainless grommet that can be split, but held together like two pieces of puzzle. We'll see what he can do.
Yes, grommets would have to be cut. I am going to check in with my water cutter contact and see what we can come up with. I am thinking a thin black stainless grommet that can be split, but held together like two pieces of puzzle. We'll see what he can do.

Junior Member
iTrader: (2)
Joined: Jul 2006
Posts: 83
Likes: 0
From: Florissant, (STL) MO
Car: 1985 Camaro Z28
Engine: LT1
Transmission: 4L60e/SS3600
Axle/Gears: S60/4.30/Spool
Re: roll cage pics with full interior????
Thanks everyone for contributing to this thread so far. I am in the market for a bar because I am almost at the limit N/A and under on the spray. I need to do something here soon. It looks like the general consensus is that S&W make the best pre-made kit for our cars. I have a couple questions before I place my order. I was planning the mild steel kit without the dropped side bars.
1 - What is the side door package? Do I need it?
2 - The Pro Street Runners are the bars that go all the way back? If I order without the rear bars will come down around the spring pockets?
I was wanting to hear from those that have done this before and what your thoughts are about the best way to go at this point.
Joined: Jun 2002
Posts: 13,576
Likes: 30
From: Harford County, MD
Car: camaro sportcoupe
Engine: 7.0L
Transmission: G-Force GF5R
Axle/Gears: Moser 9"
Re: roll cage pics with full interior????
1) side door package is to clear factory arm rests. i deleted my arm rests, to save weight
2) correct, if you order the kit without the pro street rear bars you'll still get bars long enough to go to the spring pocket area, which is where you want them to fall anyway.
if you order just their base kit, you will still get enough bars to do the entire roll bar.
2) correct, if you order the kit without the pro street rear bars you'll still get bars long enough to go to the spring pocket area, which is where you want them to fall anyway.
if you order just their base kit, you will still get enough bars to do the entire roll bar.
Junior Member
iTrader: (2)
Joined: Jul 2006
Posts: 83
Likes: 0
From: Florissant, (STL) MO
Car: 1985 Camaro Z28
Engine: LT1
Transmission: 4L60e/SS3600
Axle/Gears: S60/4.30/Spool
Awesome. Thanks for the info. Since I need to strip my interior because of mice, and I am running the ETs now would be the time.
Senior Member

Joined: Mar 2007
Posts: 574
Likes: 2
From: Muscatine IA
Car: 91 Firebird Formula
Engine: 383
Transmission: built 700r4
Axle/Gears: 4.11, 9inch
Re: roll cage pics with full interior????
Just curious debating on a swing out kit with my install in a couple weeks. How hard is it to get in and out with a fixed bar. Just for an idea I'm 5'11 250lbs.

Supreme Member
iTrader: (13)
Joined: Dec 2002
Posts: 2,535
Likes: 17
From: Bowdon, GA.
Car: 1988 Camaro
Engine: 355, 10.34:1, 249/252 @.050", IK200
Transmission: TH-400, 3500 stall 9.5" converter
Axle/Gears: Ford 9", detroit locker, 3.89 gears
Re: roll cage pics with full interior????
I'm 5'10.5" 275 lbs and no way would I be happy about climbing over a door bar. Maybe if it was a gutted race car with removeable steering wheel and I only had to do it at the track, I could live with it.
But with full interior, some street use, cruz nights, car shows. No way would I have a fixed door bar.
But with full interior, some street use, cruz nights, car shows. No way would I have a fixed door bar.
Joined: Jun 2002
Posts: 13,576
Likes: 30
From: Harford County, MD
Car: camaro sportcoupe
Engine: 7.0L
Transmission: G-Force GF5R
Axle/Gears: Moser 9"
Re: roll cage pics with full interior????
i'm 6'0" 250 and i slide right over mine with no problem i don't like the idea of a removable door bar in the event of an accident. imagine that thing gets torn loose and takes out a kidney or something 
on the flip side, i have installed several bars with swingouts anyway as they are pretty convenient. if the car is street car first, racecar second, i'd consider it. if it's the other way around, keep it fixed.
i don't like the idea of a removable door bar in the event of an accident. imagine that thing gets torn loose and takes out a kidney or something on the flip side, i have installed several bars with swingouts anyway as they are pretty convenient. if the car is street car first, racecar second, i'd consider it. if it's the other way around, keep it fixed.
Junior Member
iTrader: (2)
Joined: Jul 2006
Posts: 83
Likes: 0
From: Florissant, (STL) MO
Car: 1985 Camaro Z28
Engine: LT1
Transmission: 4L60e/SS3600
Axle/Gears: S60/4.30/Spool
Re: roll cage pics with full interior????
Another question. On the 6/8 point bars, how far forward do the door bars go? To the part of the firewall that is at about a 45 degree angle, or the flat part of the floor?
Getting ready to fitting the door bars and thought I would ask?
Getting ready to fitting the door bars and thought I would ask?

Supreme Member
iTrader: (1)
Joined: Dec 2002
Posts: 1,391
Likes: 66
From: MA
Car: 1989 IrocZ
Engine: 421 Dart Stroker
Transmission: 4L60E Cahall Performance Built
Axle/Gears: Midwest Chassis Fab 9/ 3.55 gears
Re: roll cage pics with full interior????
Guess Ill bump this up. Juat got a roll bar done at DMC in Halifax MA. Here are some pics:
Passenger side /clears door handles both sides.
Close and tight to headliner, can still slide it out, unfortunately the factory cardboard one bite the dust, just crumbled to pieces. Took it out to tighten up the fabric because it was sagging. Guess Im getting an abs one now.
Rear hatch welded to floor
Drivers side hoop welded to floor.
We talked about where to put the rear bars and he told me they always put them where mine are. Right over the spring pockets. He even put them up tight against the seat so the sun shade is still operational. Once I get the tranny and motor in he will weld up the tq arm mount and may put another 2 bars off the hoop to the mounting points. All in all a good job. All chromoly.


Passenger side /clears door handles both sides.

Close and tight to headliner, can still slide it out, unfortunately the factory cardboard one bite the dust, just crumbled to pieces. Took it out to tighten up the fabric because it was sagging. Guess Im getting an abs one now.

Rear hatch welded to floor

Drivers side hoop welded to floor.
We talked about where to put the rear bars and he told me they always put them where mine are. Right over the spring pockets. He even put them up tight against the seat so the sun shade is still operational. Once I get the tranny and motor in he will weld up the tq arm mount and may put another 2 bars off the hoop to the mounting points. All in all a good job. All chromoly.
Joined: Sep 2009
Posts: 3,776
Likes: 101
From: Spokane WA
Car: 92 Lingenfelter Z28 articwhite
Engine: Aluminum 615BBC
Transmission: Th400wbrake/curri entps9" locker
Axle/Gears: 4.11/4.30/4.56
Re: roll cage pics with full interior????
IROCZ1989
your door bars look good.. are they just touching..not snug to armrest. and.(swing out?)
your door bars look good.. are they just touching..not snug to armrest. and.(swing out?)
Supreme Member
iTrader: (1)
Joined: Dec 2002
Posts: 1,391
Likes: 66
From: MA
Car: 1989 IrocZ
Engine: 421 Dart Stroker
Transmission: 4L60E Cahall Performance Built
Axle/Gears: Midwest Chassis Fab 9/ 3.55 gears

Joined: Mar 2001
Posts: 10,439
Likes: 2,093
Car: '89 Firebird
Engine: 7.0L
Transmission: T56
Re: roll cage pics with full interior????
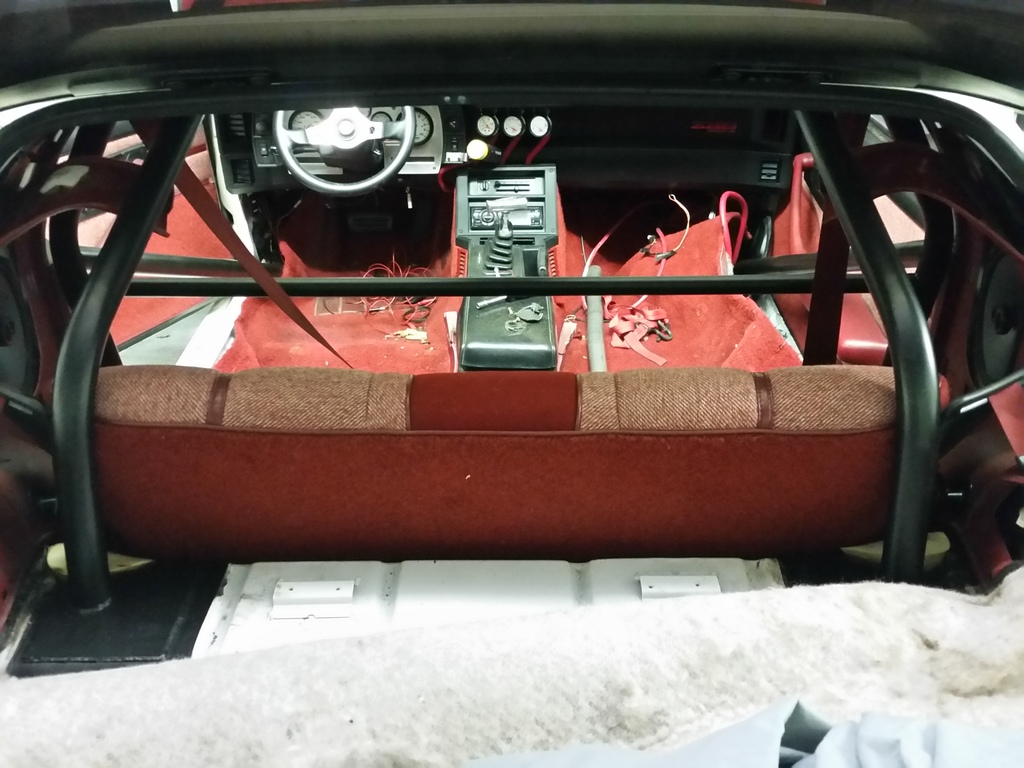
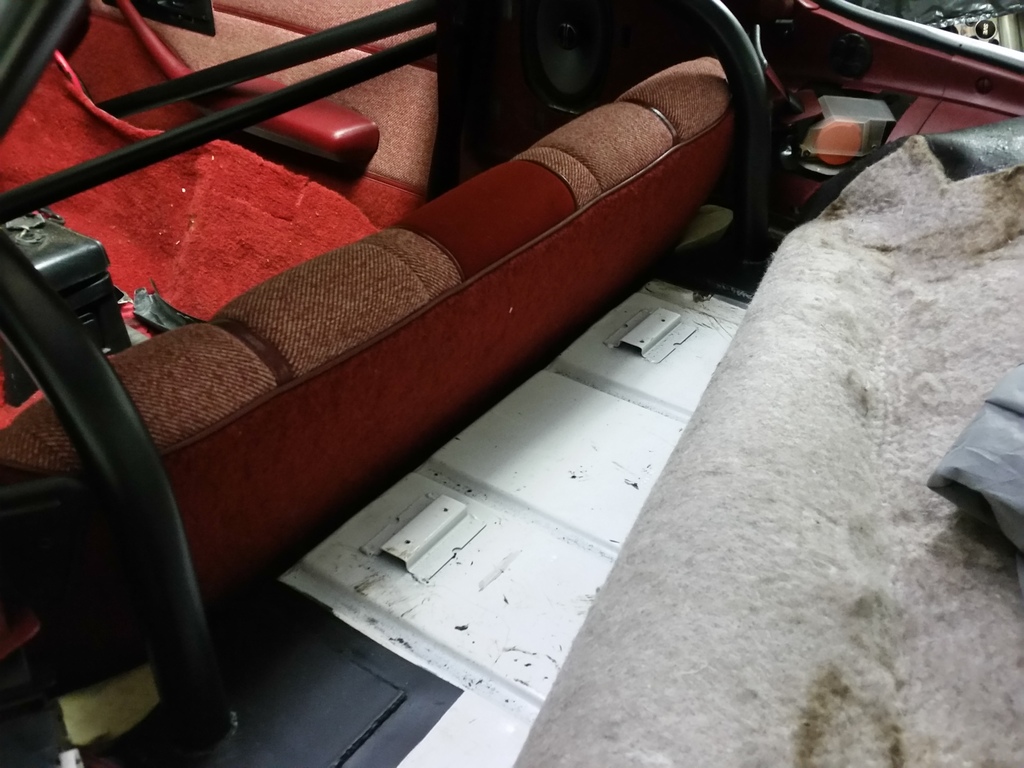
Here's mine. Just finished about a week ago.


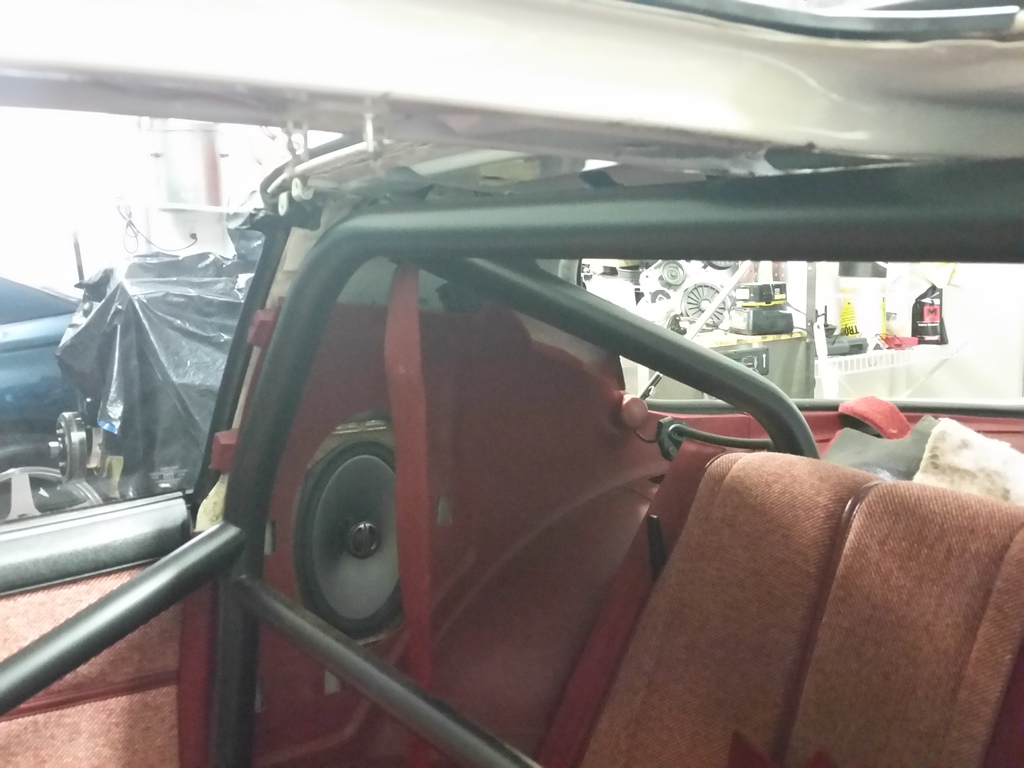
Permanent 6 point built low to the floor to help with chassis rigidity, while a removable side bar (higher location) can be pinned in place to become NHRA compliant. My 4th gen seats are wider than 3rd gen seats so this would be a little easier on a stock 3rd gen car.


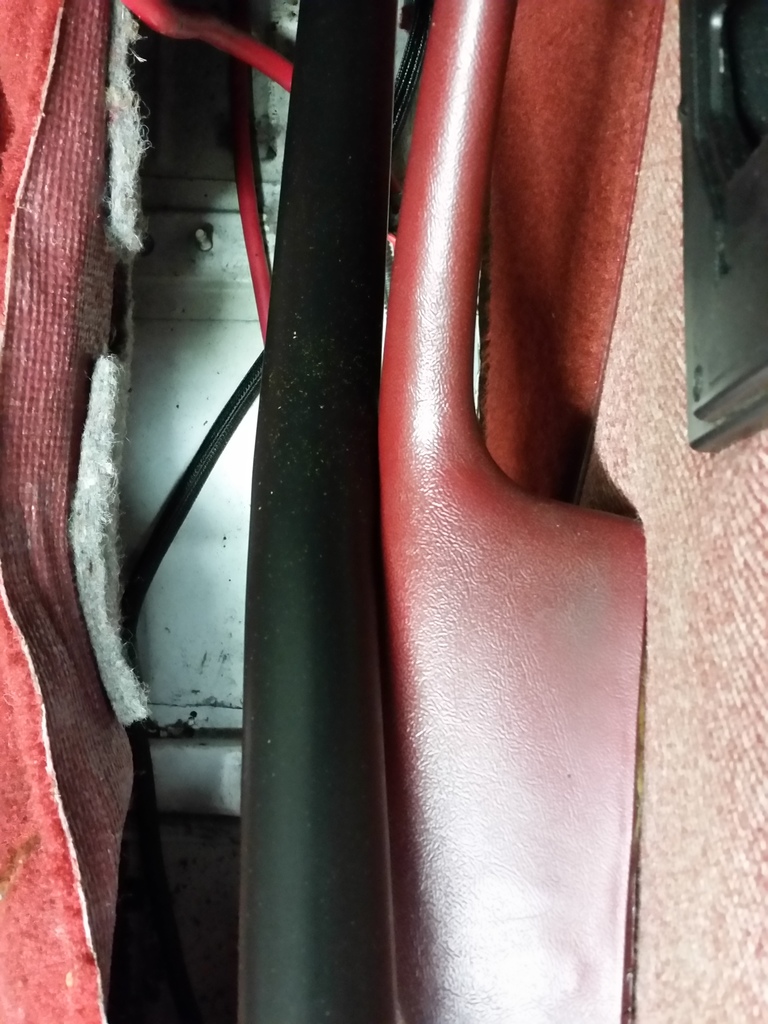
I wanted to keep the rear floor space clear and keep the hoop out of sight from side profile of the car, so that meant mounting in a slightly unusual location and going thru the interior panels.

Pictures of removable side bars before paint.


Permanent 6 point built low to the floor to help with chassis rigidity, while a removable side bar (higher location) can be pinned in place to become NHRA compliant. My 4th gen seats are wider than 3rd gen seats so this would be a little easier on a stock 3rd gen car.
I wanted to keep the rear floor space clear and keep the hoop out of sight from side profile of the car, so that meant mounting in a slightly unusual location and going thru the interior panels.
Pictures of removable side bars before paint.
Last edited by QwkTrip; Jul 9, 2017 at 10:55 PM.
Supreme Member
iTrader: (1)
Joined: Dec 2002
Posts: 1,391
Likes: 66
From: MA
Car: 1989 IrocZ
Engine: 421 Dart Stroker
Transmission: 4L60E Cahall Performance Built
Axle/Gears: Midwest Chassis Fab 9/ 3.55 gears
Re: roll cage pics with full interior????
Here's mine. Just finished about a week ago.


Permanent 6 point built low to the floor to help with chassis rigidity, while a removable side bar (higher location) can be pinned in place to become NHRA compliant. My 4th gen seats are wider than 3rd gen seats so this would be a little easier on a stock 3rd gen car.


I wanted to keep the rear floor space clear and keep the hoop out of sight from side profile of the car, so that meant mounting in a slightly unusual location and going thru the interior panels.

Pictures of removable side bars before paint.


Permanent 6 point built low to the floor to help with chassis rigidity, while a removable side bar (higher location) can be pinned in place to become NHRA compliant. My 4th gen seats are wider than 3rd gen seats so this would be a little easier on a stock 3rd gen car.
I wanted to keep the rear floor space clear and keep the hoop out of sight from side profile of the car, so that meant mounting in a slightly unusual location and going thru the interior panels.
Pictures of removable side bars before paint.
Joined: Mar 2001
Posts: 10,439
Likes: 2,093
Car: '89 Firebird
Engine: 7.0L
Transmission: T56
Re: roll cage pics with full interior????
The lower bar is permanent and is for chassis rigidity. I did the cage to stabilize the roof and hopefully stop the body from cracking at the corner of the windows.
The upper bar is only there to meet NHRA spec for bar height. I might use it once a year and frankly I haven't needed it yet. Car does have enough power to blow past 11.5 but not with the present suspension. It's just a fun street car and will never be made into a drag car.
PS, if you remove the pictures from the quote then it will help keep the thread cleaner.
Joined: Sep 2009
Posts: 3,776
Likes: 101
From: Spokane WA
Car: 92 Lingenfelter Z28 articwhite
Engine: Aluminum 615BBC
Transmission: Th400wbrake/curri entps9" locker
Axle/Gears: 4.11/4.30/4.56
Re: roll cage pics with full interior????
what pic host is still working?
Joined: Mar 2001
Posts: 10,439
Likes: 2,093
Car: '89 Firebird
Engine: 7.0L
Transmission: T56
Re: roll cage pics with full interior????
I have been moving everything to Google. The whole thing has been a royal pain in the butt.
There is a trick to embedding photos from Google. Let me know if you need help.
There is a trick to embedding photos from Google. Let me know if you need help.
Joined: Jun 2002
Posts: 13,576
Likes: 30
From: Harford County, MD
Car: camaro sportcoupe
Engine: 7.0L
Transmission: G-Force GF5R
Axle/Gears: Moser 9"
Re: roll cage pics with full interior????
i need to sit down and figure out what i'm going to do with mine, and if i am going to update my threads or not. i have like 6 copies of those build threads in different parts of the internet.
Joined: Sep 2009
Posts: 3,776
Likes: 101
From: Spokane WA
Car: 92 Lingenfelter Z28 articwhite
Engine: Aluminum 615BBC
Transmission: Th400wbrake/curri entps9" locker
Axle/Gears: 4.11/4.30/4.56
Re: roll cage pics with full interior????
photobucket stopped all the 3rd party hosting. I still have every thing I put on there site..
just need a new host...
just need a new host...
Joined: Jun 2002
Posts: 13,576
Likes: 30
From: Harford County, MD
Car: camaro sportcoupe
Engine: 7.0L
Transmission: G-Force GF5R
Axle/Gears: Moser 9"
Re: roll cage pics with full interior????
no, they're charging $400/yr now for hosting.
Joined: Sep 2009
Posts: 3,776
Likes: 101
From: Spokane WA
Car: 92 Lingenfelter Z28 articwhite
Engine: Aluminum 615BBC
Transmission: Th400wbrake/curri entps9" locker
Axle/Gears: 4.11/4.30/4.56
Re: roll cage pics with full interior????
that puts a stop to it..in my book..i could see payn $50 a year.. after all its been free for years...looking for a lower cost site..
Supreme Member
iTrader: (1)
Joined: Dec 2002
Posts: 1,391
Likes: 66
From: MA
Car: 1989 IrocZ
Engine: 421 Dart Stroker
Transmission: 4L60E Cahall Performance Built
Axle/Gears: Midwest Chassis Fab 9/ 3.55 gears
Re: roll cage pics with full interior????
Why do you need to host pics anymore? You can post pics right from your phone to the reply. Works on my S8. Click picture icon and attach it.
Joined: Jun 2002
Posts: 13,576
Likes: 30
From: Harford County, MD
Car: camaro sportcoupe
Engine: 7.0L
Transmission: G-Force GF5R
Axle/Gears: Moser 9"
Re: roll cage pics with full interior????
can't put it in the "story" like that, i like to type a statment, show a picture, type more, show another picture, etc. that way it reads more like a magazine article and the picture is relevant to the statement.

Joined: Sep 2005
Posts: 654
Likes: 10
From: Windsor, Ontario
Car: 1987 Trans Am
Re: roll cage pics with full interior????
Supreme Member
iTrader: (1)
Joined: Dec 2002
Posts: 1,391
Likes: 66
From: MA
Car: 1989 IrocZ
Engine: 421 Dart Stroker
Transmission: 4L60E Cahall Performance Built
Axle/Gears: Midwest Chassis Fab 9/ 3.55 gears
Re: roll cage pics with full interior????
Well for your situation you have to host pics unfortunately. For the others who want to just post a pic or a couple and you can describe it in the description of said pic just an fyi I guess. Last time I posted pics I found this feature quite handy instead of using photobucket.
Joined: Sep 2009
Posts: 3,776
Likes: 101
From: Spokane WA
Car: 92 Lingenfelter Z28 articwhite
Engine: Aluminum 615BBC
Transmission: Th400wbrake/curri entps9" locker
Axle/Gears: 4.11/4.30/4.56
Re: roll cage pics with full interior????

found a new host for pics..much faster the photobucketfullofadds
and simple...

newest oil pan....pic for expl..(on the wife new carpet...sweet!
)
Last edited by articwhiteZ; Jul 14, 2017 at 07:49 PM.
Joined: Mar 2001
Posts: 10,439
Likes: 2,093
Car: '89 Firebird
Engine: 7.0L
Transmission: T56
Re: roll cage pics with full interior????
It is a multi-step process. Suggest you order a pizza because it is going to be a long night.
Google doesn't give you code to embed pictures in forums. You need an app that will snag the code for you.
Get the Google link for your picture (Share --> Get Link)
and then use this website to convert the link to embed code.
https://ctrlq.org/google/photos/
You'll be given a "direct link" and an "image embed code". Oddly enough the image embed code won't work. You need to copy the direct link and paste it here in the forum and treat it as an image.
[IMG]insert direct link here[/IMG]
If you have a lot of photos to fix then this will be a royal pain in the tush.
Last edited by QwkTrip; Jul 15, 2017 at 01:20 AM.
Joined: Sep 2005
Posts: 1,924
Likes: 329
From: NJ
Car: 1987 IROC-Z
Engine: 406 on N20 w/ EFI
Transmission: P.B. 700R4
Axle/Gears: 12 bolt w/ 3.91
Re: roll cage pics with full interior????
Flickr is the photo hosting website I use. very user friendly and free. can easily post photos onto a forum too
www.flickr.com
www.flickr.com

Joined: Nov 2000
Posts: 1,420
Likes: 5
From: Byhalia MS, just south of memphis
Car: 89 Firebird
Engine: 6.0 LS
Transmission: T-56
Axle/Gears: 3.70
Re: roll cage pics with full interior????
QWK, who did you get your cage from? you have EXACTLY what i want. even the lower bar, is that how the kit is?
Joined: Mar 2001
Posts: 10,439
Likes: 2,093
Car: '89 Firebird
Engine: 7.0L
Transmission: T56
Re: roll cage pics with full interior????
I'm not sure how the cost broke down. I got one bill for several things that were all done at the same time. I'll guess somewhere between $1500 - $2000 for the cage + $500 to paint.
Supreme Member
iTrader: (1)
Joined: Dec 2002
Posts: 1,391
Likes: 66
From: MA
Car: 1989 IrocZ
Engine: 421 Dart Stroker
Transmission: 4L60E Cahall Performance Built
Axle/Gears: Midwest Chassis Fab 9/ 3.55 gears
Re: roll cage pics with full interior????
Thats about what it cost me, chromoly. Well worth it.

Junior Member
Joined: Dec 2019
Posts: 20
Likes: 4
From: Moore ok
Car: 88 Pontiac Firebird GTA
Engine: 305 tpi
Transmission: T5
Axle/Gears: Stock
Re: roll cage pics with full interior????


This first pic is using the stock GTA seat with it reclined back to a comfortable driving position (probably the max I would recline). The second is with the seat sitting upright and my head is clearly above the halo bar. The third the seat is in the same position as the first and as you can see my head hits the halo bar. I am 6 foot tall. This halo bar is in the identical position as what is shown in these pics even closer because I have it cargo strapped to the T-Tops with no space between. I see no way that anyone could put in halo bars in a T-Top third gen. If you moved the halo inboard it would allow it to go further into the roof however you would not be able to lock and unlock the T-Tops and it would then place the halo bar directly above your head. Now if there is some way of sinking the seat mount down further into the floor and still be able to see over the hood to park I am all ears. Where the halo bar needs to be placed and where it is placed on a non T-Top car is the same location as the T-Top mechanism is located covered by plastic covers. Of course in a non T-Top car this area is much smaller and thinner allowing the halo to be in this same location. Again I am 6 foot tall if maybe you were 5 foot 6 or so there maybe no problems.
Joined: Mar 2004
Posts: 1,643
Likes: 50
From: Manitoba
Car: '91 GTA
Engine: 421sbc
Transmission: Powerglide
Axle/Gears: Ford 9" with 3.89
Re: roll cage pics with full interior????
Ditch the stock seat.
I'm pretty sure you have to mount the seat to the bar behind the seat anyway.
I got Kirkey seats, and set them pretty much on the floor, as low as possible
I'm 5 10", and wearing a helmet, I'm away from the bar.
I mounted my seat as far inward of the car as possible
I can still open my T-tops
I'm pretty sure you have to mount the seat to the bar behind the seat anyway.
I got Kirkey seats, and set them pretty much on the floor, as low as possible
I'm 5 10", and wearing a helmet, I'm away from the bar.
I mounted my seat as far inward of the car as possible
I can still open my T-tops

Thread
Thread Starter
Forum
Replies
Last Post
ambainb
Camaros for Sale
11
Apr 25, 2016 09:21 PM
Dialed_In
Firebirds for Sale
2
Aug 20, 2015 01:45 PM