When you click on links to various merchants on this site and make a purchase, this can result in this site earning a commission. Affiliate programs and affiliations include, but are not limited to, the eBay Partner Network.
I went over how to do this in my build thread but I thought I would post this also in the interior section of the site. Good condition, original Thirdgen door panels are getting harder to find and thus more expensive, combine that with the outrageous rates of auto upholstery guys and you've got the perfect recipe for a DIY community.
When you dissect the door panels you'll find out that the panel is just some plastic sheeting, a thin press board material somewhere around 1/16" thick, a thin layer of foam somewhere around 1/8" thick and the fabric. I had a difficult time sourcing 1/16" press board but there are plenty of alternatives. I decided to go with corrugated plastic sheeting. http://www.homedepot.com/p/Coroplast...896S/205351385
This is the stuff that you usually see signs made out of, it's cheap and readily available at any big box home store or sign shop. The upside to using this stuff is that it's weather proof so there is no more need for the plastic sheeting.
Just use the old door panel as a template and trace it's pattern onto the corrugated plastic. You'd do well to clamp the two pieces together so nothing moves while tracing. Be sure to trace all the holes for the door clips. You can use a pair of heavy shears to cut the plastic or a pair of sharp tin snips for the outside. For the inside holes of the arm rest and door handle you can use a razor blade. For the little holes that the plastic door clip fasteners pop through I found it worked best to use a small straight router bit in a die grinder or even a compact router would work. Go carefully and slowly and they will come out perfect.
For the upholstery work the first step is to remove the original fabric from the original panel and use that piece to make a template on your new fabric.
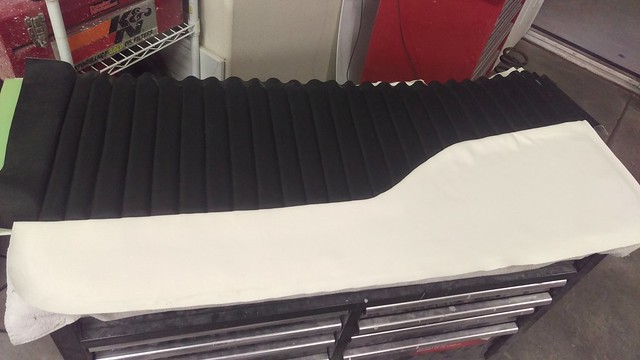
When you make the template it will not be an exact template, you will want to make it wider and slightly taller than the original because as you are sewing the plates the material will slowly be pulled towards the side that you started from. So while in the picture it looks like I have way too much by the time I finished there was only a 2" overhang.
After the new material is cut you need to lay out your sewing lines so you have to answer the question of how wide you want your pleats. I went with two inches wide for the layout, mostly because it was how wide my ruler was. Remember that the pleats will shrink width wise as you sew. My 2" wide layout measured down to 1.75" after being sewn. I put the material on the door panel and went 90* straight down from the top edge of the door panel.
The next thing to do is to cut out the foam. The foam will have the exact tracing as the original fabric since the foam will not shrink. I used 1/2" foam and got some deep pleats, in hindsight 1/4" foam is what I would have preferred.
The next thing you need to do is make a backing cloth for the foam, you do this so the thread has something to hold onto because if you didn't the needle and thread would just rip apart the foam. You can use whatever cloth you want as long as it's not too thick or thin of a fabric. If you can hold the fabric up and see through it then it's too thin. It doesn't even need to be one solid piece. Cut this out slightly larger than the foam piece.
After you cut out the backing cloth you will want to glue the cloth and foam together, do this so the cloth does not start to slide off when sewing.
The way I do it is to glue down the fabric to the material in the area behind where I am going to sew. So if you are moving from left to right you glue down the foam/fabric to the area that is left of the line that you are going to sew. I use glue because if I used safety pins the holes would would show in the "leather" and I don't think clothes pins would secure it enough. After just that area is glues down you fold the material (not the foam) back and over so the line you made is right at the edge or slightly before. You then want to sew the tiniest amount inwards from the edge.
After you sew your that line fold the material back over and it should look like this from the top:
You cant see the thread (hence the term blind pleats) because you folded the material over itself when you had sewn it. Had you not folded the material the stitching would be visible.
If you flip the piece over it should look like this from the Bottom. Notice that the foam is still flat while the "leather" material is pleated. Had you sewn it the reverse the leather would be flat and the cloth backing would be pleated.
Then you just keep repeating those steps to complete the process. Make no mistake about this--It takes a while to do. It took me several hours to do this one piece. If I had an actual upholstery sewing machine I could have been faster. My local upholstery shop wanted hundreds of dollars to do this. It's not difficult by any means, just time consuming.
The bottom piece is much easier to make so I didn't take many pictures of that process. You just trace the old fabric onto the new fabric and cut it out. After that's cut out you just glue the piece of foam onto the back of the upholstery. When the adhesive is dry you should dry fit the pieces together on the plastic sheet and then pin them together. Nothing would be worse then to do all that previous work only to misalign the two pieces and end up with the fabric not fitting or sitting lopsided.
The stock door panels used a combination of glue and staples to hold it together. I decided to use only glue. The adhesive I used was DAP weldwood contact cement.
Their top and trim adhesive (DAP Landau) is supposedly what almost every upholstery shop uses and readily professes it's greatness but it's about $50 for a gallon so I passed on it for now. I've heard good feedback on the normal contact cement by DAP from the DIY community. Many people (amateurs and hobbyists) have said they had problems with the Permatex and 3M spray adhesives when heat was involved so they tried this and it has held much better. I've grown to dislike the permatex products especially when heat over 100� is a concern and the 3M spray products are grossly overpriced.
I slathered the stuff on with a paint brush in two coats letting each dry until tacky which was about ten minutes. Carefully align the panel and Upholstery and then press together.
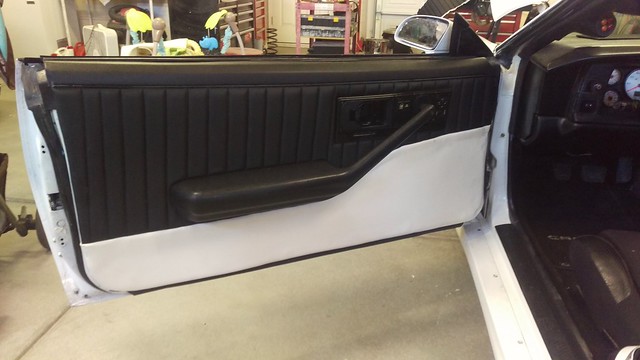
After the glue has set you can twist the door fasteners in place and pop onto the door
That looks fantastic!!!I always wanted to learn how to use a sowing machine.
Thanks. It's not hard, just time consuming. You can use a regular sewing machine for this, no need for a long arm upholstery machine. If you want to get into French seams with contrasting thread though, you'll want a machine meant for upholstery because the thread just gets too thick.


 I always wanted to learn how to use a sowing machine.