
Headliner Trim Repair

Thread Starter


Joined: Jul 1999
Posts: 20,310
Likes: 1,068
From: Salina, KS
Headliner Trim Repair
Today I want to talk about a very important issue that effects adult Thirdgen F-body Vehicles. Yes, I'm talking about the headliner trim panel hanging down, because one or more of the screws have pulled through. Don't dispair, this issue effects all thirdgens from 82-92. If it hasn't happened to your thirdgen YET, it will eventually. Fortunately it's very easy and cheap to repair the screw holes. I'm going to show you how I perform this repair so that you don't spend hours searching junkyards, or begging for a good trim panel in the Parts Wanted Classifieds. 
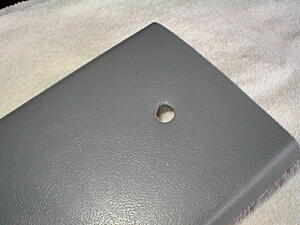
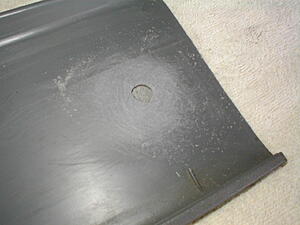
Here we can see the typical issue in all it's busted-azz glory. Sometimes half the screw hole will be ok, other times it'll be blown out like the one pictured here.
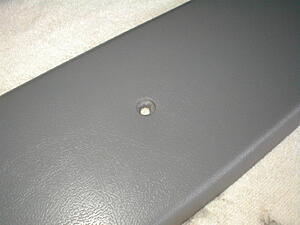
Next we have an unbroken hole, to illustrate how they are supposed to be.

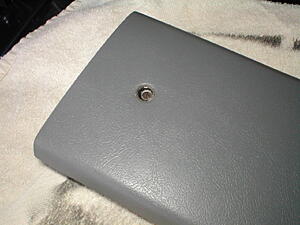
In this photo, you see a hole I previously repaired. This repair dates back to approximately 1998.
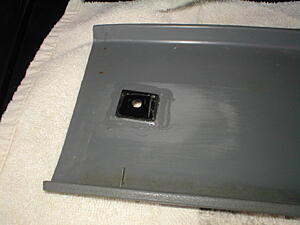
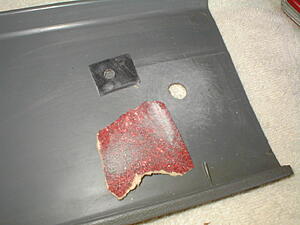
Here from the backside, you can get a good idea how this problem is corrected. By adhering a backing piece of scrap plastic to the back side of the busted hole, we are able to drill a new smaller hole, which the screw will not pull through again.
Bill of Materials
-Scrap Plastic (Since the panel is ABS, ABS would be ideal, but any tough plastic will do.)
-Slow Cure Epoxy (Rule of Thumb, the slower Epoxy cures, the stronger the bond will be. 5 minute epoxy from the hardware store will work, but I recommend a slower curing product. I used 30 minute epoxy from Hobby Lobby, but you can use JBWeld *NOT JBKwik* that can be found almost anywhere.)
-Sand Paper (80 grit is fine, I used some Harbor Freight garbage.)
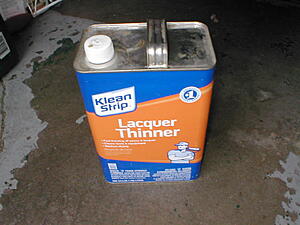
-Solvent (Lacquer Thinner, Isopropyl Alcohol, Acetone, etc.)
-Paper Towels
Tools
-Phillips Screw Driver
-Drill
-1/8"-5/32" Drill Bit
-Cool Whip container Lid
-Epoxy Applicator (tooth pick, match stick, ex-wife's car keys)
Step 1) Once the trim panel is out of the car, the first thing we need to do is to make the back side of our blowed out hole, relatively flat. Any rough bits sticking above the surface, will prevent our backing from adhering. Use a bit of sandpaper to level the area. Don't worry about scratching the inside of the panel, no one will ever see it and we're going to rough it up anyway. Now once the surface is leveled, rough up about 1/2" around the hole. By roughening the surface, we are creating tooth for our adhesive to bite into, and we are increasing the surface area of our bond. In other words, we're making our repair more durable.
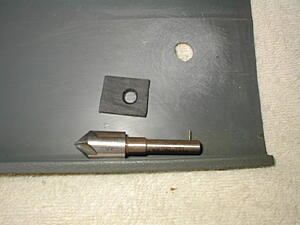
Step 2) Cut your scrap plastic to about a 3/4" square, or round if you want to be different. Rough up the back side of your plastic with sandpaper, for the same reason we abraded the panel. At this time, bore an 1/8" hole in the middle of you scrap. If you're a Fancy-Dan type, you might want to countersink and chamfer your hole for professional results.
Step 3) Grab your Solvent, and a paper towel, and clean all the plastic dust off both your repair scrap, and the trim panel. Scrub it good, there may be traces of mold release, dust, dirt, Armor All, etc and we need both surfaces to be spotlessly clean for the best possible bond. Ok, it's clean? Now clean it again.
Here we can see the typical issue in all it's busted-azz glory.
Sometimes half the screw hole will be ok, other times it'll be blown out like the one pictured here.
Next we have an unbroken hole, to illustrate how they are supposed to be.


In this photo, you see a hole I previously repaired. This repair dates back to approximately 1998.

Here from the backside, you can get a good idea how this problem is corrected. By adhering a backing piece of scrap plastic to the back side of the busted hole, we are able to drill a new smaller hole, which the screw will not pull through again.

Bill of Materials
-Scrap Plastic (Since the panel is ABS, ABS would be ideal, but any tough plastic will do.)
-Slow Cure Epoxy (Rule of Thumb, the slower Epoxy cures, the stronger the bond will be. 5 minute epoxy from the hardware store will work, but I recommend a slower curing product. I used 30 minute epoxy from Hobby Lobby, but you can use JBWeld *NOT JBKwik* that can be found almost anywhere.)
-Sand Paper (80 grit is fine, I used some Harbor Freight garbage.)
-Solvent (Lacquer Thinner, Isopropyl Alcohol, Acetone, etc.)
-Paper Towels
Tools
-Phillips Screw Driver
-Drill
-1/8"-5/32" Drill Bit
-Cool Whip container Lid
-Epoxy Applicator (tooth pick, match stick, ex-wife's car keys)
Step 1) Once the trim panel is out of the car, the first thing we need to do is to make the back side of our blowed out hole, relatively flat. Any rough bits sticking above the surface, will prevent our backing from adhering. Use a bit of sandpaper to level the area. Don't worry about scratching the inside of the panel, no one will ever see it and we're going to rough it up anyway. Now once the surface is leveled, rough up about 1/2" around the hole. By roughening the surface, we are creating tooth for our adhesive to bite into, and we are increasing the surface area of our bond. In other words, we're making our repair more durable.

Step 2) Cut your scrap plastic to about a 3/4" square, or round if you want to be different. Rough up the back side of your plastic with sandpaper, for the same reason we abraded the panel. At this time, bore an 1/8" hole in the middle of you scrap. If you're a Fancy-Dan type, you might want to countersink and chamfer your hole for professional results.


Step 3) Grab your Solvent, and a paper towel, and clean all the plastic dust off both your repair scrap, and the trim panel. Scrub it good, there may be traces of mold release, dust, dirt, Armor All, etc and we need both surfaces to be spotlessly clean for the best possible bond. Ok, it's clean? Now clean it again.

Last edited by Drew; Feb 2, 2020 at 01:11 AM.
Thread Starter
Joined: Jul 1999
Posts: 20,310
Likes: 1,068
From: Salina, KS
Re: Headliner Trim Repair

Step 4) Grab your Epoxy, and your CoolWhip lid, and squirt as close as equal amounts as you can, onto the Mixing Surface. Once your quantities are approximately equal, thoroughly mix them together. Do not mix them on cardboard, you don't want any of the adhesive absorbing into the cardboard, you don't want dirt or fibers from the cardboard contaminating your adhesive. Mix both parts together THOROUGHLY. If you use unequal quantities, or fail to mix the parts completely, your epoxy will cure TOO FAST and it'll be brittle, or it'll NEVER cure leaving you with a gooey mess. Take your time, since you wisely chose an Epoxy with a longer than 5 minute cure time, your Epoxy won't cure while you're thoroughly mixing.


Step 5) Apply your thoroughly mixed Epoxy to your trim panel, in the approximate area the repair piece will cover. Set your repair in place with the center hole aligned with the hole in the panel. Don't be shy with the Epoxy. Don't be stingey, but don't over-do it. A bit of Epoxy around the edges of your repair piece again take advantage of increased surface area, and make the repair more durable.

Step 6) Once you have your repair applied in place with your adhesive, take a final look from the finished side of the trim panel, to be sure your repair piece is where you want it, then set the piece somewhere it'll be safe while the Epoxy cures. Leave it alone for about twice as long as the advertised cure time. 24hrs is probably good.
Step 7) Reinstall the newly repaired panel back in your car. Do not overtighten or strip your screws. Oops! Our new hole we drilled doesn't line up exactly with the hole in the car's body! No problem, drill your hole from 1/8" to 5/32". Still doesn't line up? You goofed up the alignment step, and you're on your own.
Enjoy your refurbished trim panel.


Last edited by Drew; Feb 2, 2020 at 01:26 AM.


Thread
Thread Starter
Forum
Replies
Last Post