When you click on links to various merchants on this site and make a purchase, this can result in this site earning a commission. Affiliate programs and affiliations include, but are not limited to, the eBay Partner Network.
LTX and LSXPutting LT1s, LS1s, and their variants into Third Gens is becoming more popular. This board is for those who are doing and have done the swaps so they can discuss all of their technical aspects including repairs, swap info, and performance upgrades.
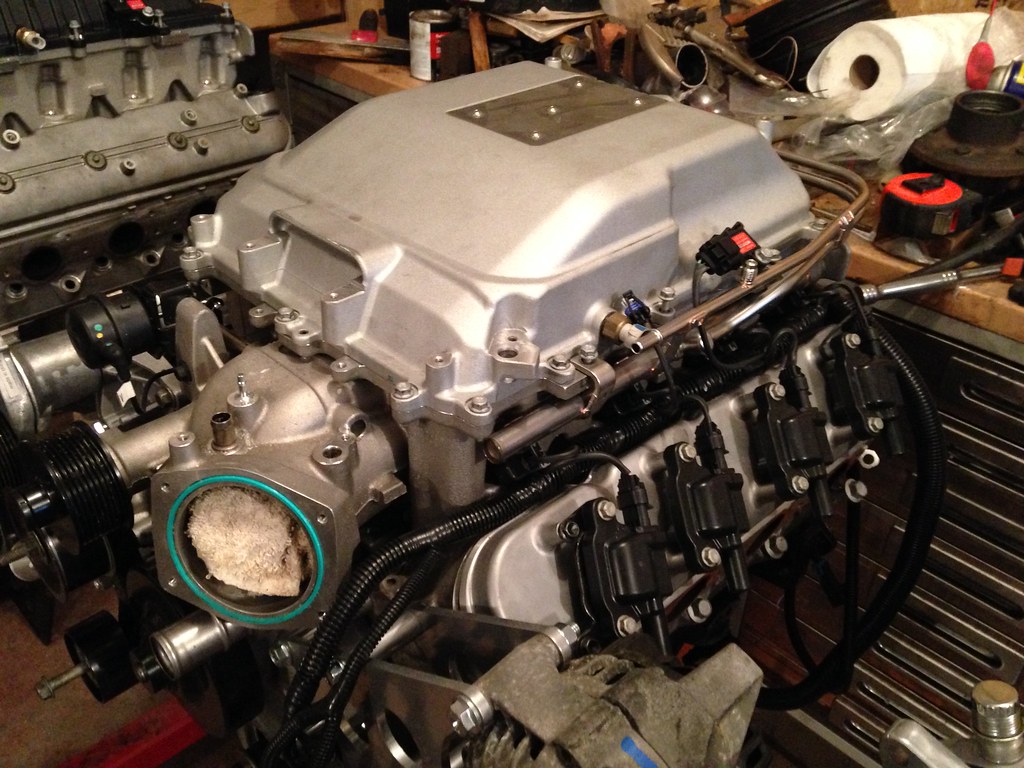
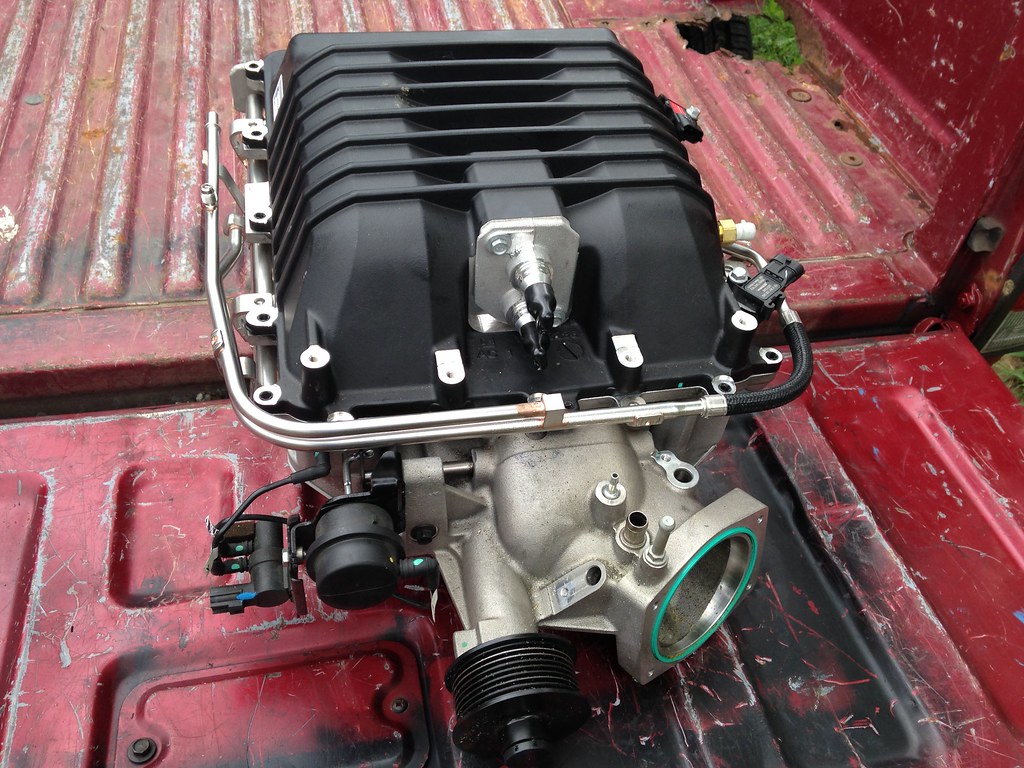
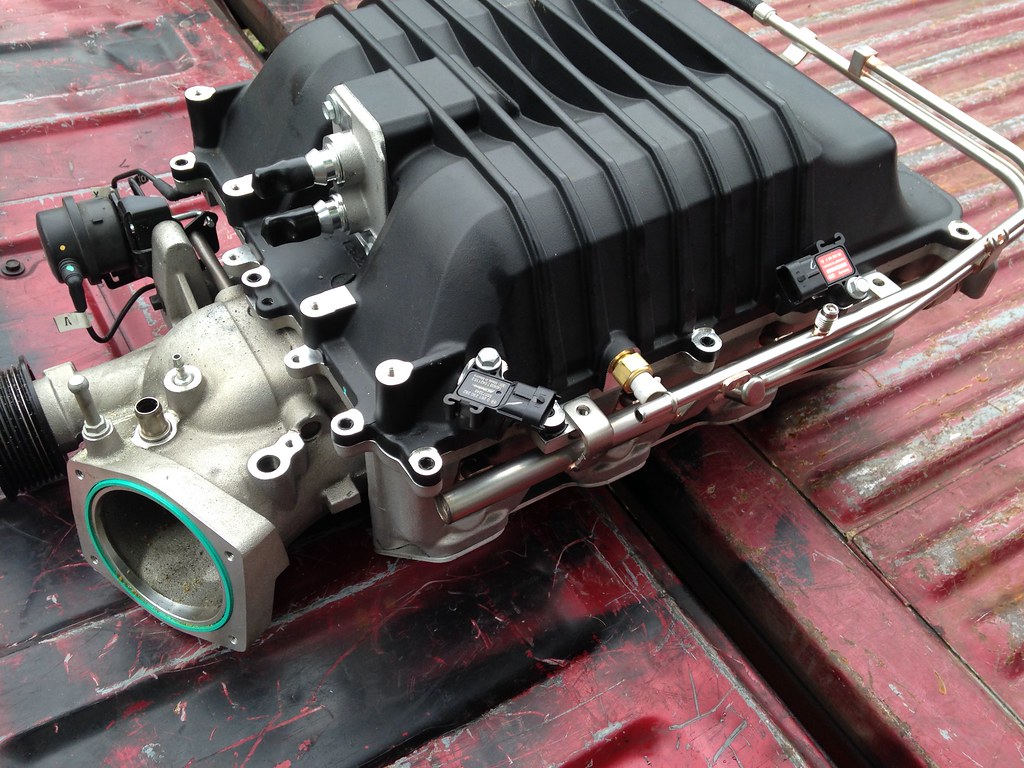
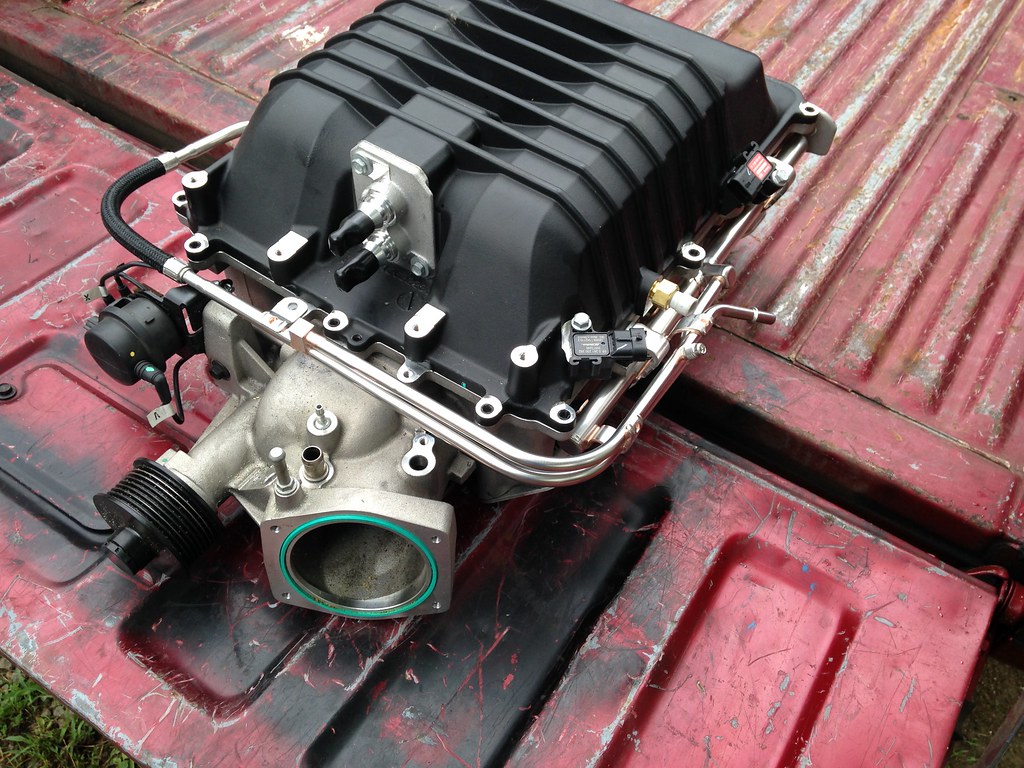
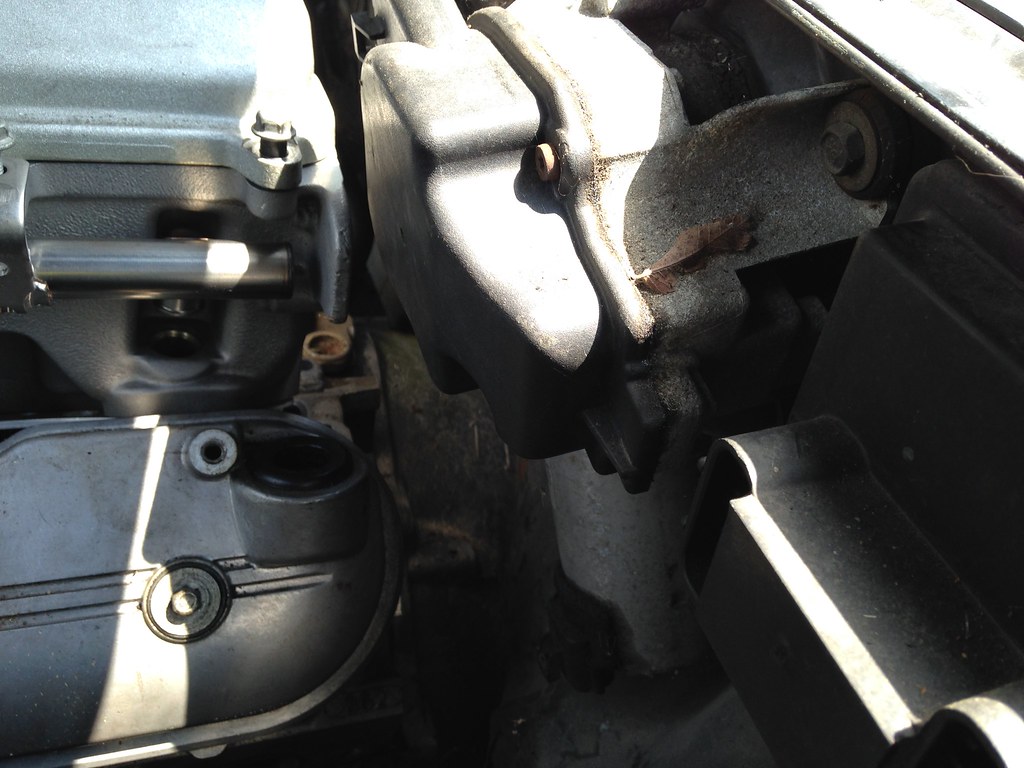
Had a little wrench therapy today. More pics and info on the LSA system
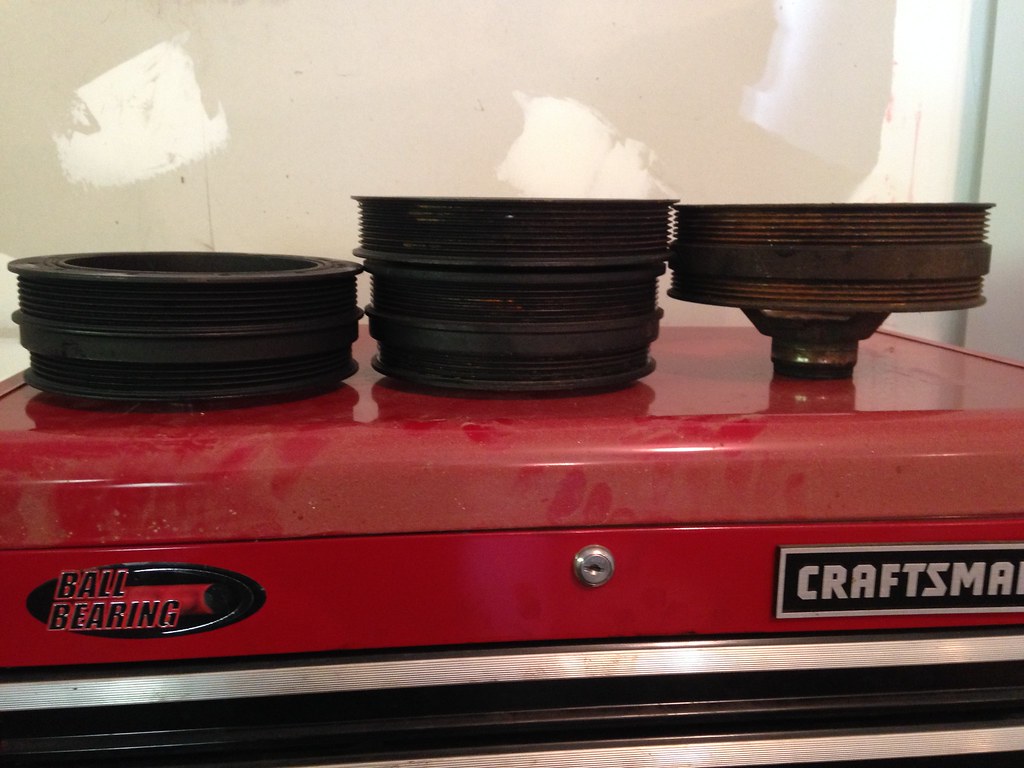
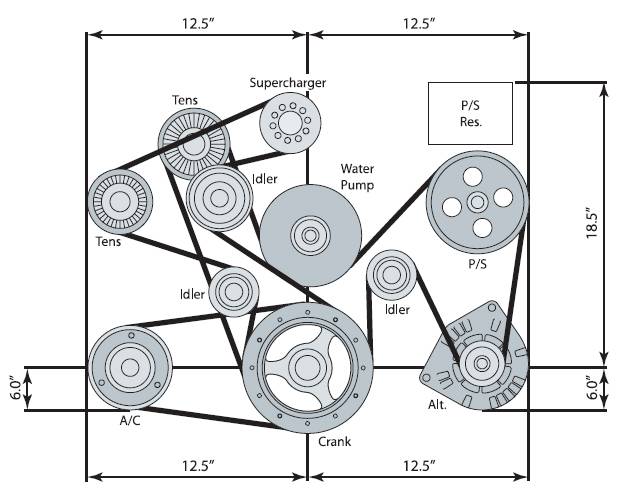
Theres been some debate on where exactly the belt system lies. Heres a pic to explain. Left is a stock corvette balancer, middle stock LSA, right, common every day truck. Ive read from multiple sources that the SC belt rides on the truck spacing. Well, sort of.... Its an 8 rib belt and the middle 6 line up perfectly with the truck's main accy drive. Too bad 8 rib conversions kits add ribs on the front of a pulley, so you'd be at 7 ribs without spacing the SC pulley and tensioner off .135"
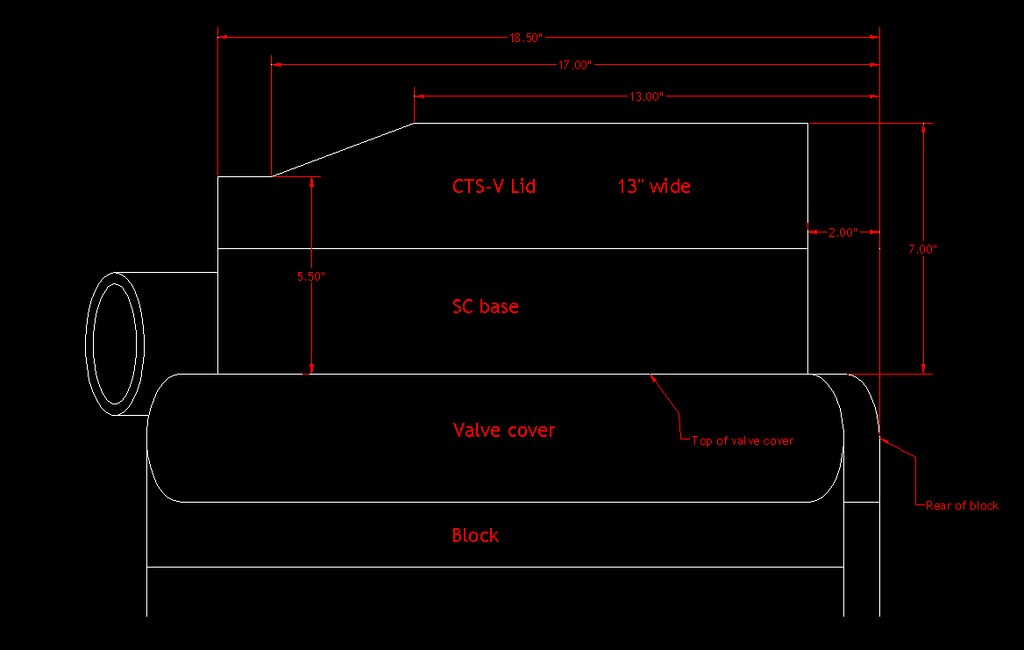
Side profiles of the CTS-V lid (silver) and ZL1 lid (black). I think the CTS-V lid may clear the low hoodline of a 3rd gen because of the front slope
Rough dims of the CTS-V lid
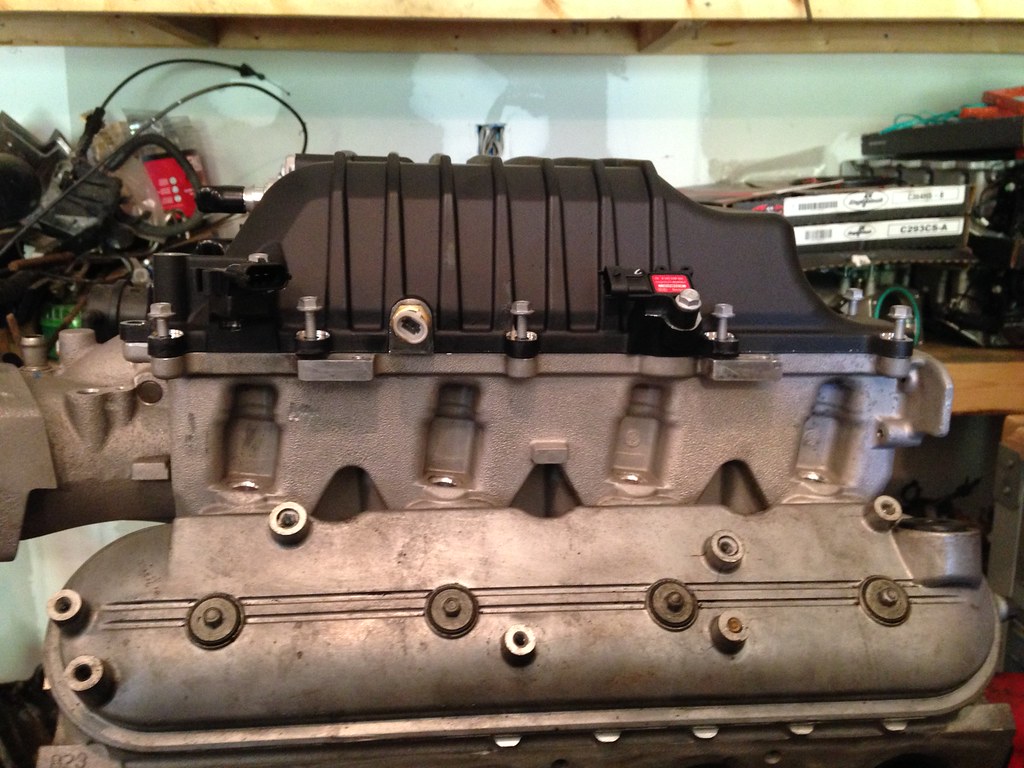
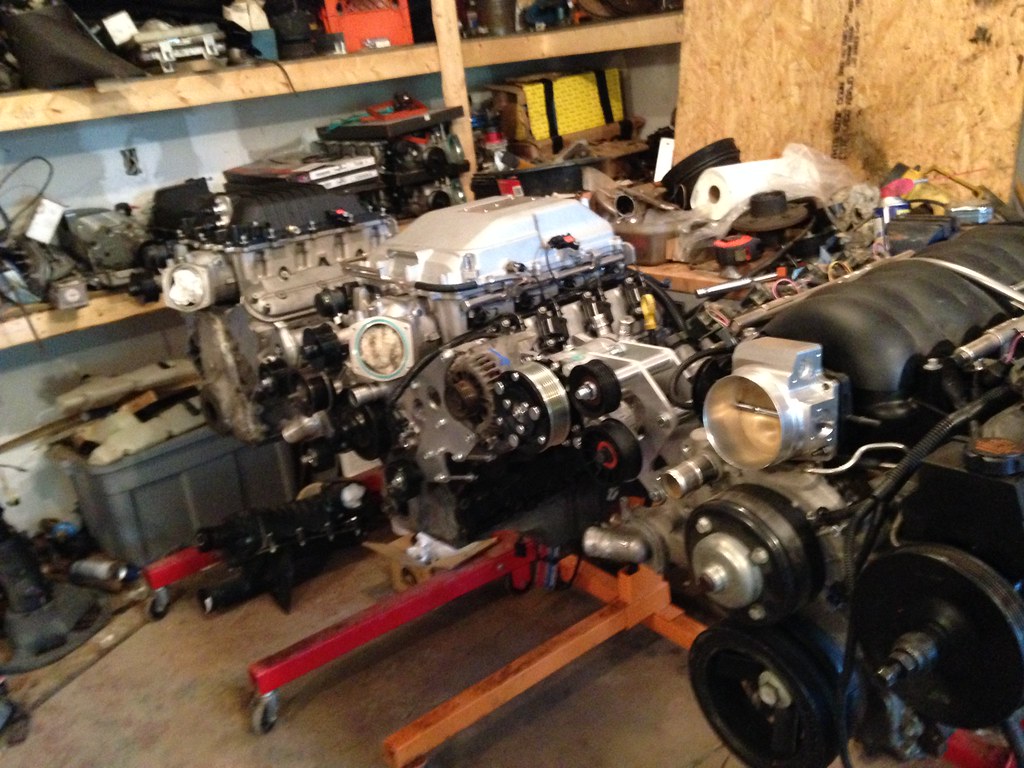
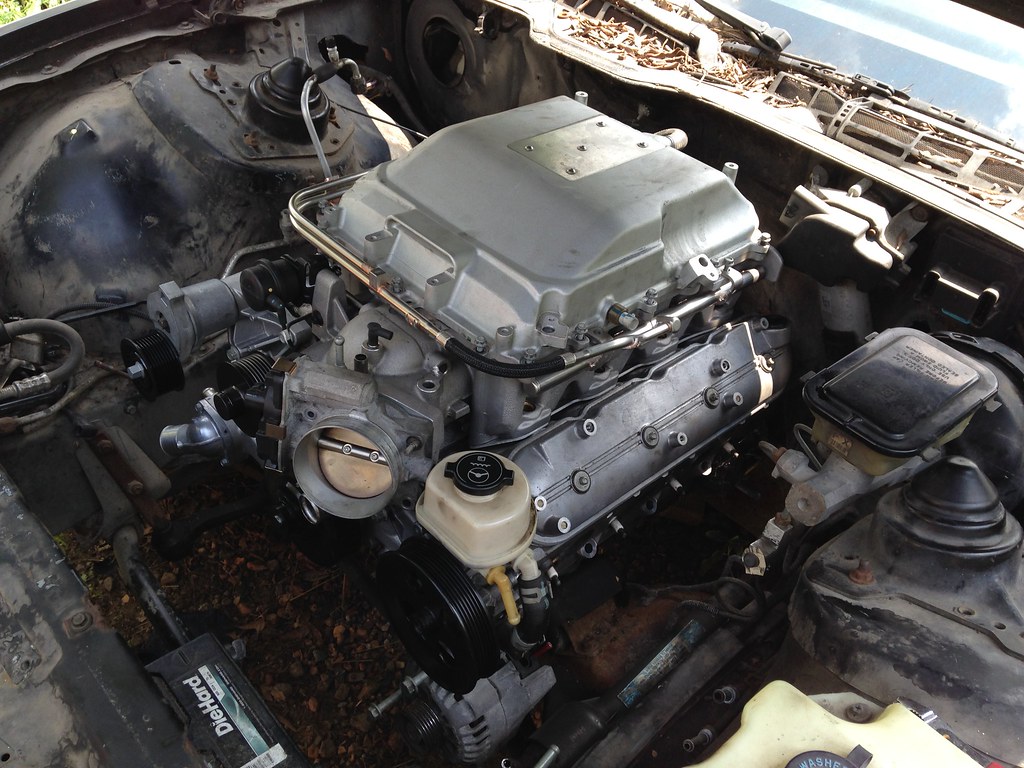
For reference, here are all the other LSx intakes Ive got in the garage. All are measured from the highest part of the block to the highest part of the intake
LS1 6.5"
LS3 7.25" with silencer
LSA CTS-V lid 10.75"
LSA ZL1 lid 11"
GEN III truck minus cover 11"
Edelbrock pro-flo 11.5"
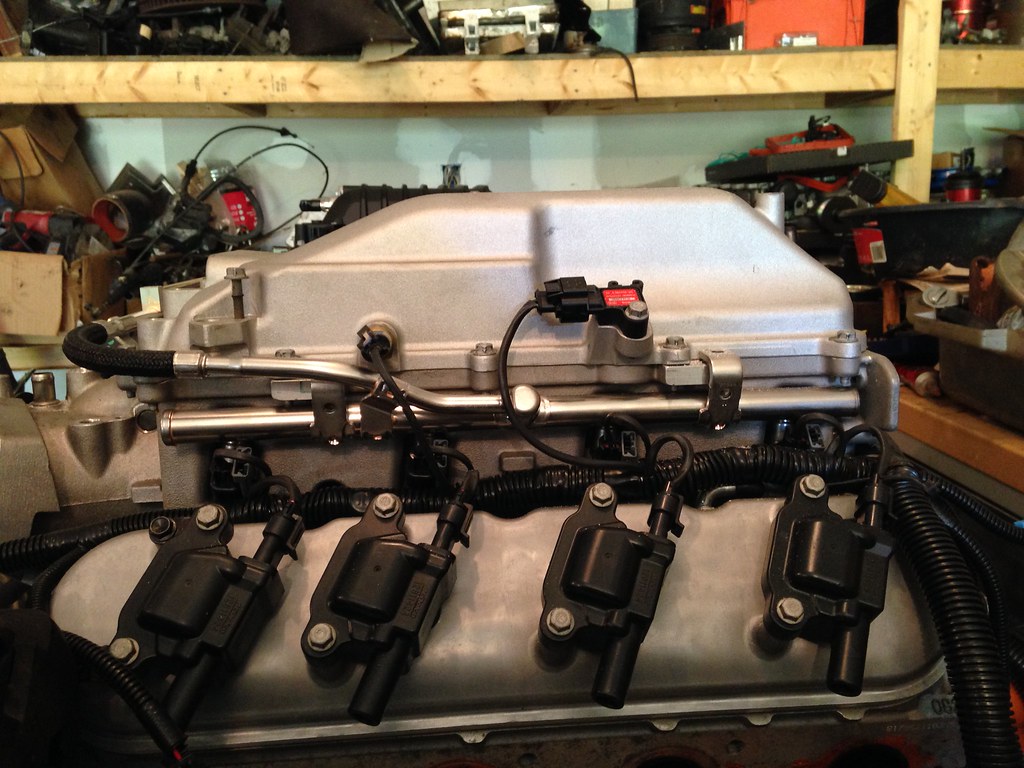
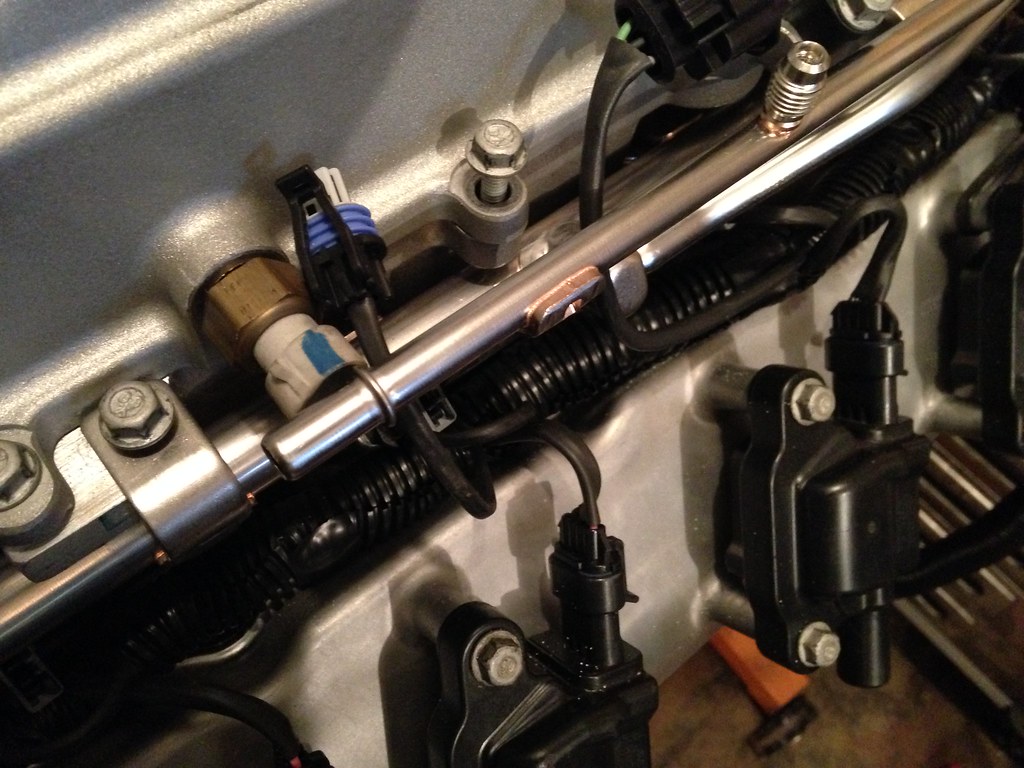
Next, I read somewhere that the fuel rails are reversible like all other LSx. Turns out they are and it looks much better flipped
Down side is the IAT will not clear and Im not bending a brand new fuel rail
I also read the LS9 fuel rail also fits and is a mirror image of the LSA rail, so flipped it should clear the IAT. I cross-referenced GMpartsdirect and both are the exact same price. Going to order one and see how it looks
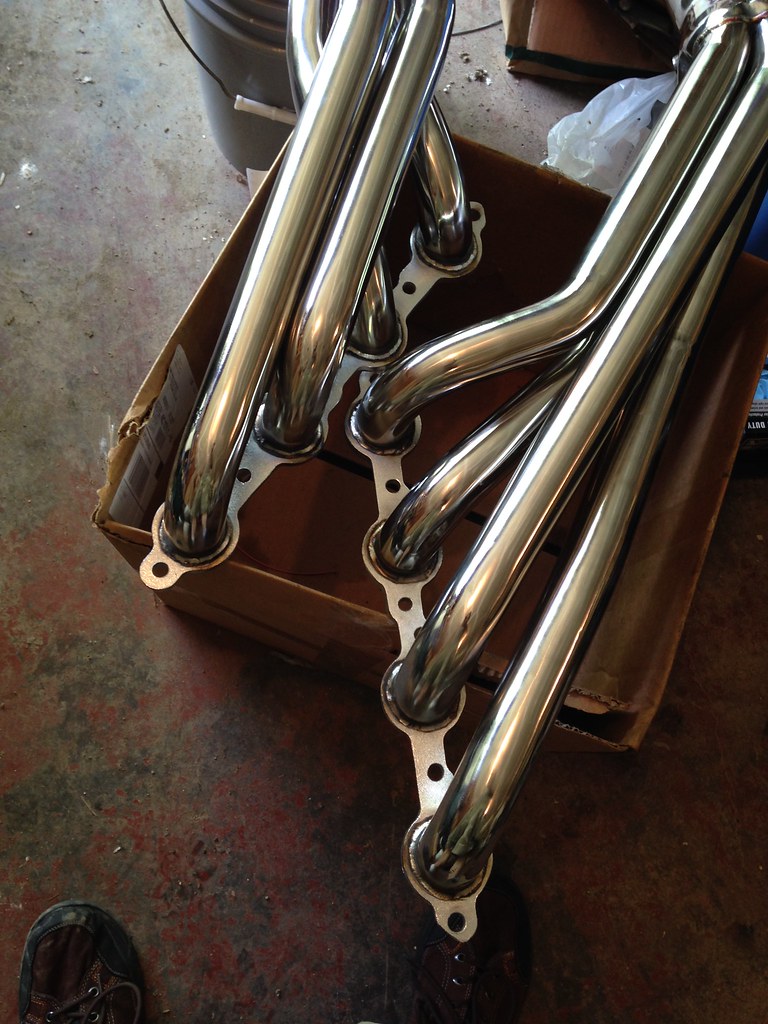
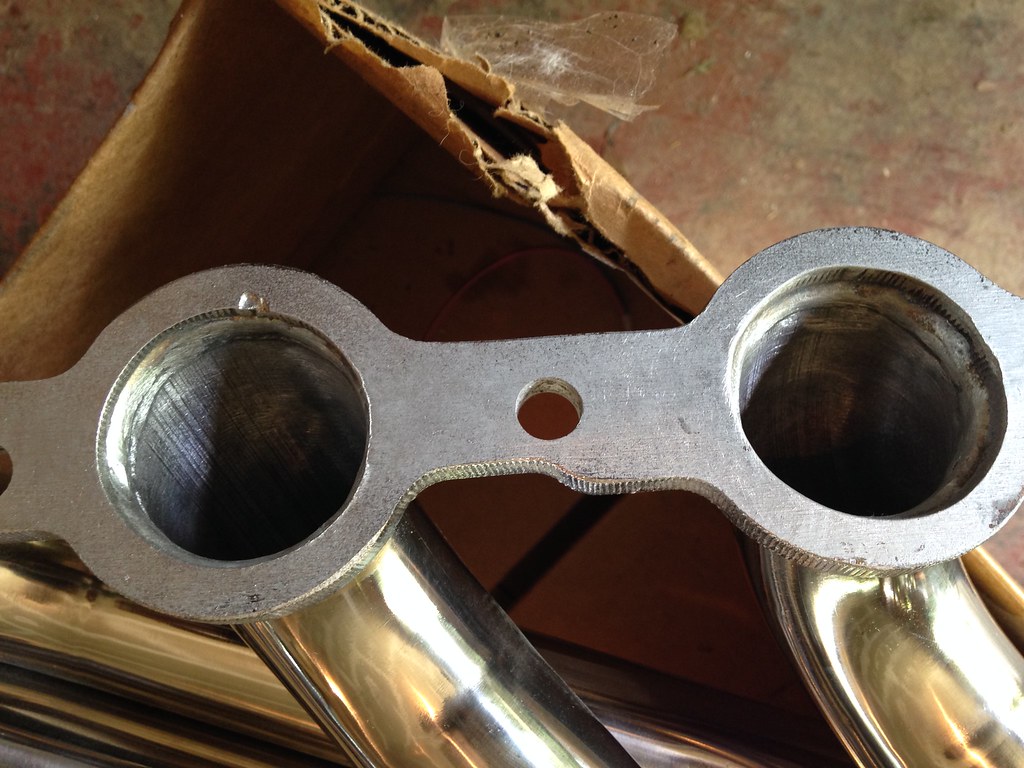
RI headers came in today. They're alot nicer than I had anticipated
Overall look is good quality. Welds look presentable, no major flaws stand out at me. Really wish they werent polished, they'll be the only shiny thing in my engine bay. Hopefully a few heat cycles will cook the shine off
This is the worst port. The welder must be getting good because the internal weld looks as smooth and consistent as the outside TIG. Only flaw is he touched the flange and melted a divot. The gasket still covers completely so it wont hurt anything
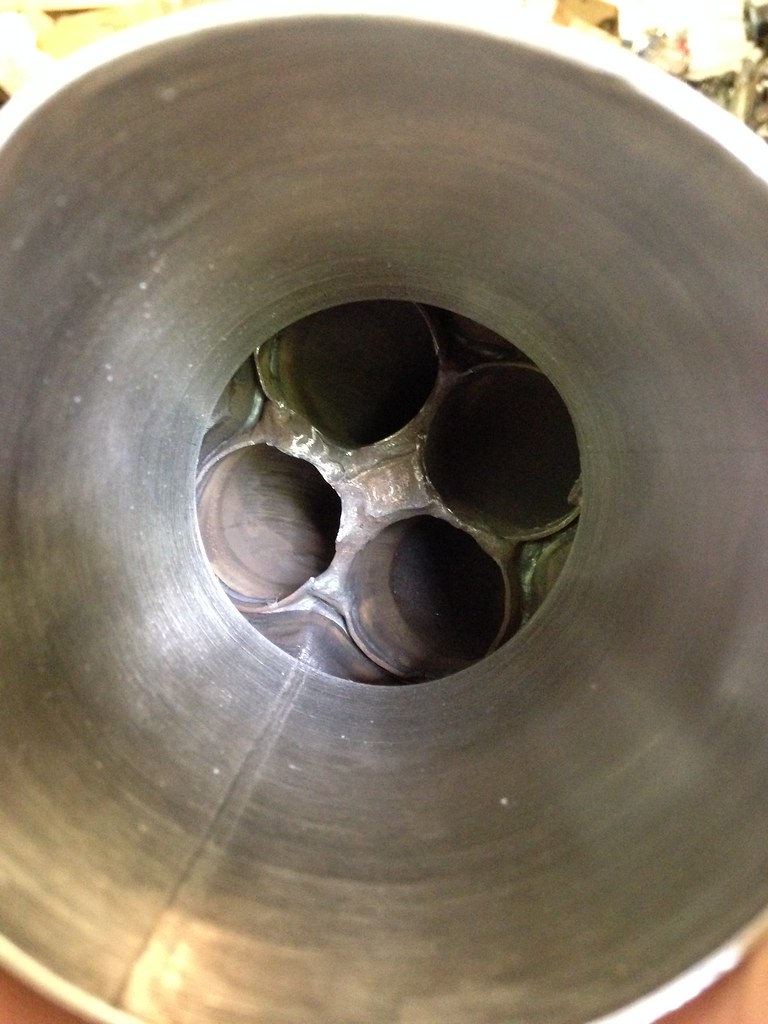
And the collector. Not pretty for sure, but it really doesnt have to be. This isnt a classed racecar hunting down every last ounce of power. Not having a spike in there will hurt scavenging more than the rough material and ugly MIG and its a pretty minor loss. My SC will help with scavenging
I put my stamp of approval on them
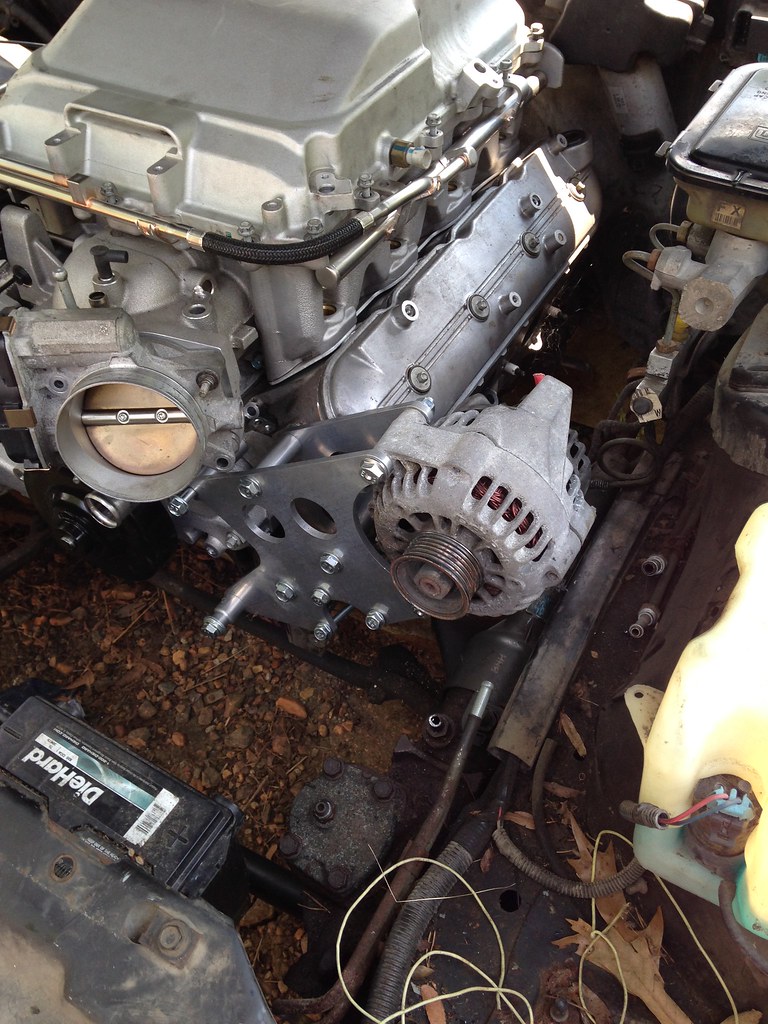
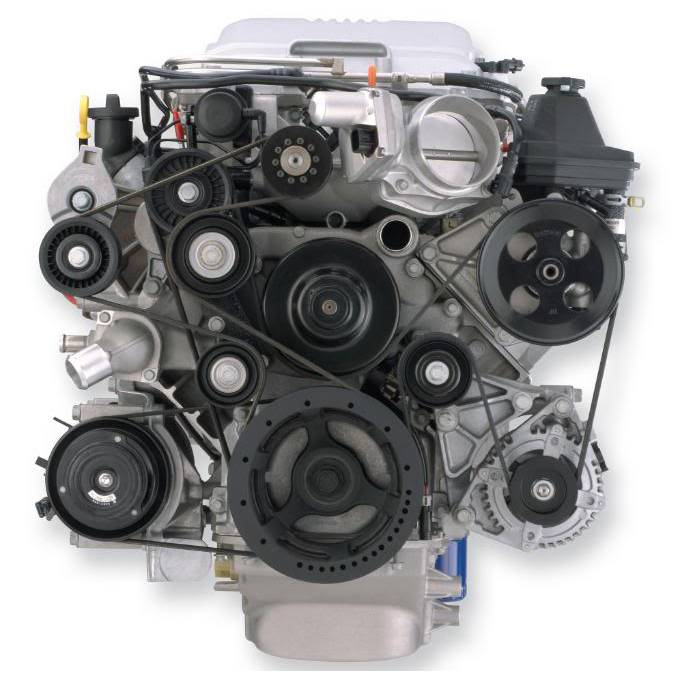
The brown truck also brought new new 92mm TB and PS pump parts. Ill be switching FEAD brackets from ICT billet to holley because I thik the engine looks silly with all cast alum then one CNC bracket front and center. Looks like the LSA TB mount will interfere with the corvette PS reservoir, so thats another hurdle to overcome. Good thing I dropped $50 on it...
Iv been waiting to see the outcome on this. I have seen several cts-v superchargers for rather cheap lately. Problem is I don't have a 6.0 or know how it fits lol. Looking very good though! Keep up the good work
I had a similar dilemma in that they'd be the only shiny thing in the bay, so I decided to wrap mine. Well, my exhaust guy was very adamant about taking it back off saying it'd crystallize the metal... and, frankly, after all I've had to do I don't want to deal with that next so it's off. Hell, I even switched over from a stainless steel braided throttle cable to a black braided throttle cable lol.
As for the rust, time will tell. Mine hasn't seen many miles at all, but they still look good. We'll see.
I swapped out the ICT Billet accessory bracket for a holley LS bracket for aesthetics. Both are roughly the same dims and use the same S10 alt/corvette PS. I thought it looked silly with all cast alum brackets then one billet plate bracket up front. For those wondering, both fit great out of the box, lots of time was spent on them. They can be had in any belt offset needed. The ICT Billet brackets simply need to be ordered for the desired spacing, all bolts and spacers come with along with an idler. The Holley kit is semi-universal. The basic accessory bracket like Im using comes out of the box ready for corvette spacing, all bolts etc. If used in conjunction with the AC bracket R4 or sanden, the install kit needs to be used even on the corvette spacing. Fbody and truck spacing both require install kits, so expect to fork over another $50
Lucky for me the PS reservoir sits in the exact same spot as the TB, so Ill have to go custom
Moving on, the Holley LS valve covers come with a relo-bracket I mistakenly thought was for AC boxes. Its actually for the #1 coil to clear the alt on their kit
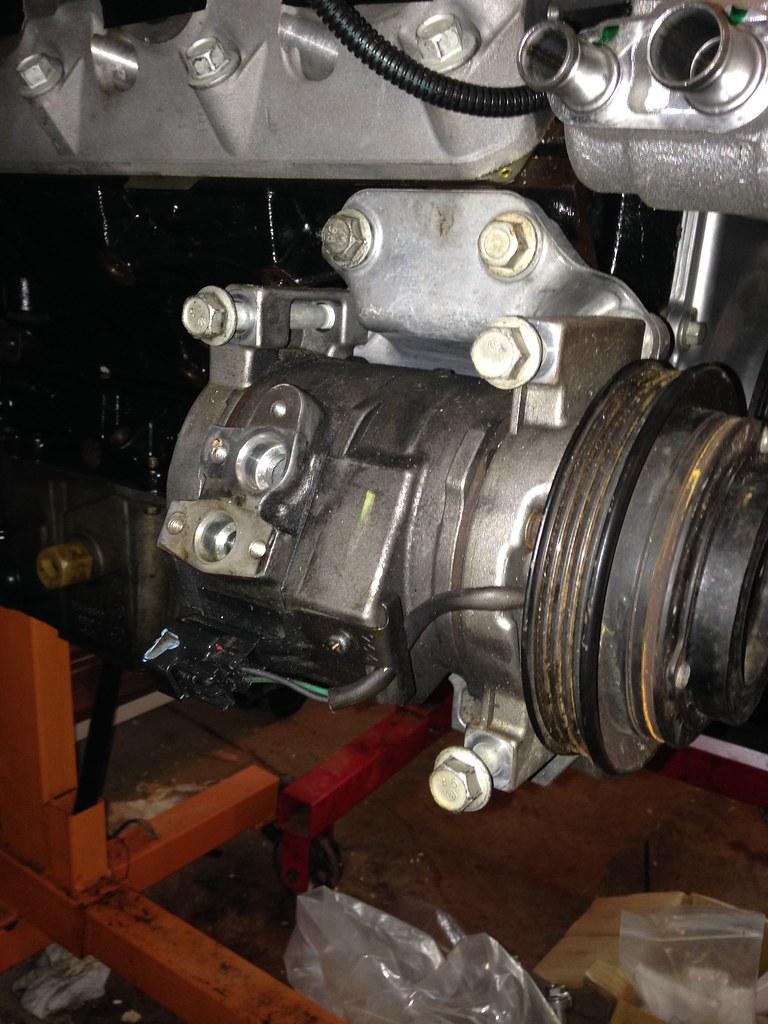
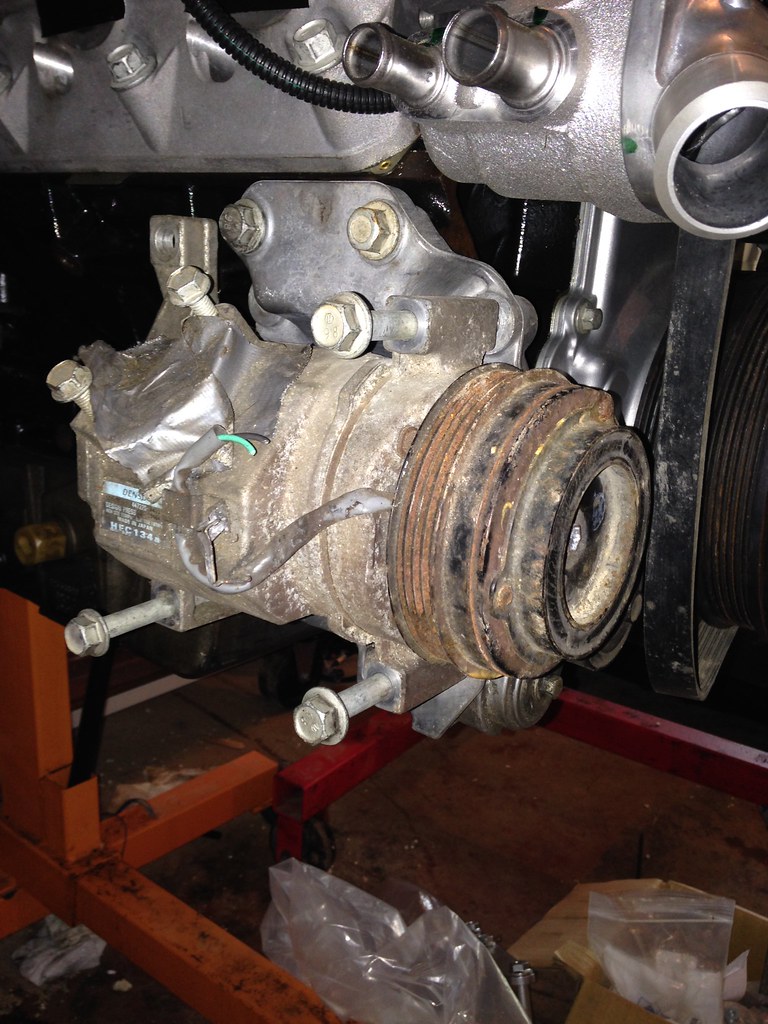
To finish off, heres a CTS-V AC comp/bracket I picked up. Notice the unique ports and bosche electrical connector. Neither are standard and will have to be custom. The electrical would be simple, Id cut the bosche off and crimp a common delphi 2 pin inline in place. Port flange would have to be custom machined. Even more luck, this compressor came in seized, so its mock-up duty only
I read on LS1tech that common truck AC comps bolt right up to the CTS-V bracket via 3/4 bolts. Turns out its BS, The front two bolt will go in but the BL is off enough it wont fit. TL isnt even close. Even then the pulley is not parallel with the balancer, so itd toss a belt almost immediately. It would require grinding or simming off the bracket to mount properly, but thats a small issue. I also stuck a Fbody compressor up for kicks and it wasnt even close. Thumbing through the rockauto catalog, corvette compressors look to mount up similar so they may fit the bracket, but i doubt it. Id prob just get the corvette setup complete going that route. Also, for those wanting to use corvette low mount AC compressors, use the C5 version. Those have ports in the rear so a generic flange and custom hoses wont be much trouble. C6 compressors have side ports which are super tight to the 3rd gen frame rail, so you'll have to either machine a super low profile flange or use a C6 hose with custom ends
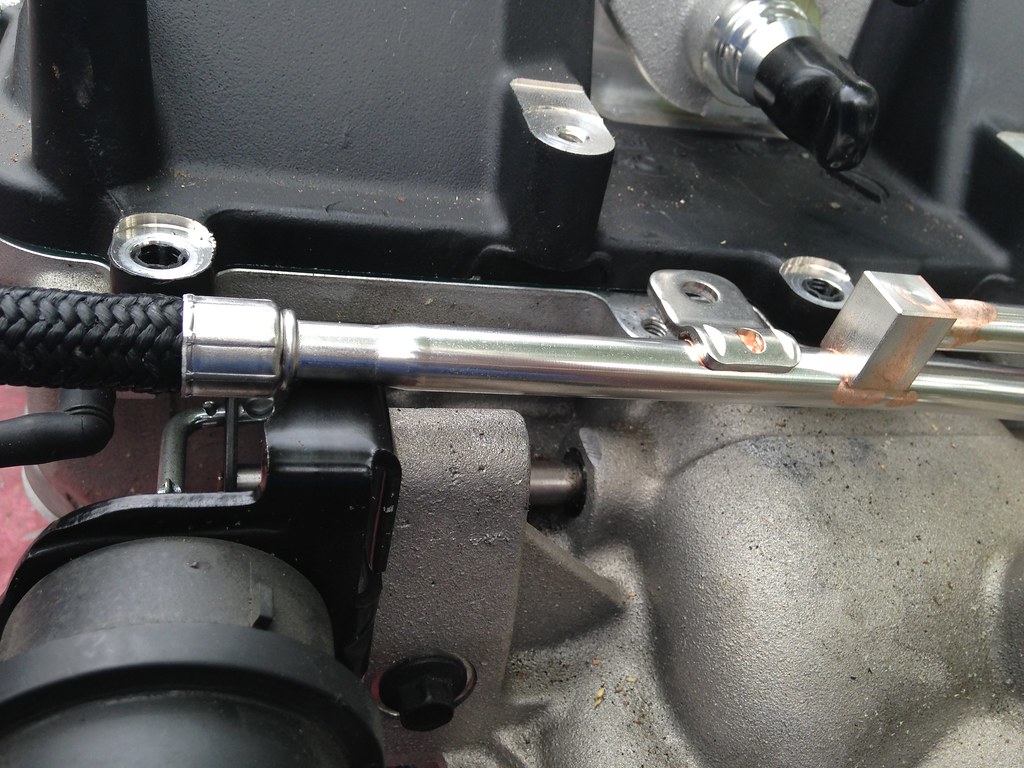
Alright, got a bit of time to play with the mock-up block in my 91 TA today
Turns out the LS9 fuel rail will NOT work with the wiper motor. Ill also have to keep the 1" forward placement just like the techco setup. If I trim the ear off the SC case, the drivetrain can move back slightly, but would require solid mounts. Any engine rock would smack the wiper
Now lets play with some accessories. Here is a GEN I CTS-V LS6/LS2 PS pump. Fitment is good, almost like LS1 Fbody. GEN II CTS-V's with the LSA use the same PS pump/bracket but a different reservoir for more clearance at the TB. I prefer the LSA version because its black and looks OEM. White sticks out like a sore thumb. I do not believe the CTS-V/LSA low mount alt will clear, but aftermarket brackets exist to emulate the Fbody LS1 position with a common S10/Fbody alt that will fit the same belt path. CTS-V low mount alts use a wider bracket and there isnt much room down low to the steering box
This is an ICT Billet bracket emulating the corvette FEAD. The holley LS bracket is very similar and uses the same alt/PS pump. Notice there is tons of room everywhere
To top it all off, heres the money shot. It all fits under a stock firebird hood, so that means itll also fit a stock camaro hood too. No, the ZL1 lid will not fit, I tried that too, so you leave 20hp on the table to keep your stock hood. Worth it? You decide
To sum up, the LSA SC is a go for 3rd gens under the stock hood. With a stock wiper, you need 1" forward motor mounts, so custom DS, bigger K-member notch and maybe a ding or two in the headers required. Any FEAD on the corvette spacing will work, that goes for NA swaps too
OK so to clarify.... since I just ran across a potential deal on a complete ZR1 engine, less front accessories.
Does this make sense?
I can keep the C6 Vette FEAD setup w/ the C6 AC compressor I have on the car,
Get a LS9/Zr1 Vette Lower Balancer, Zr1 Water pump, tensioner etc.
Then I would need a CTSV/LSA plenum & fuel rail for factory hood clearance.
Am I missing anything major?
Also how much interference is there with the ZR1 Plenum, can it be clearance with a reasonable amount of work?
Is there enough room for the factory plastic plenum cover on the LSA?
Thanks for any info you can provide.
Last edited by Lonnie P; Jul 17, 2015 at 08:07 PM.
This stuff is all for the LSA TVS1900 blowers. LS9 TVS2300 SCs are different. ZR1's are dry sump, so the crank snout depth is different, plus the belt drive is twin vs LSA triple. The FEAD is completely different and Im not sure what spacing it uses. Could be unique, everything else related to the LS9 is unique
EX LSA
LS9
If you could figure out what the LS9 pulley spacing was and if for some reason it matched or was close to the LSA, then potentially you could run LSA stuff with new pulleys replacing the LSA 8 ribs for LS9 11 rib versions. If its unique, then you're looking at a custom setup
Also since I found it trying to google aftermarket accessory drives for the LS9, I found a pic of C5/6 accessories with the LSA. While the whole kit new is $530ish isnt a bad deal, the crazy expensive corvette specific alt is a turnoff for future maintenance
Man, I totally forgot about the dry sump.
Lot of complexity there...
Based on the 3rd gen frame setup, I guess it would be easier to retain the wet sump system anyway.
The last picture is intriguing as that is my FEAD setup.
Lingenfelter offers a conversion kit to put a LS9 blower on the LSA.
Not cheap, but includes the modified air inlet & drive components to put the bigger blower on an LSA. I guess it could all come together.
If you used that inlet and the LSA SC parts, your LS9 may fit with a custom balancer and the C5/6 accessories. Wildcard is still the balancer pulley spacing
FWIW, the LS9 externals are the same as a LS3, so all your stuff will bolt to it
Crank spacer from this kit to eliminate the dry sump and get back on a standard belt spacing. Truck spacing is listed, but any balancer can be used. The rest can be sourced individually ALOT cheaper http://www.hotrod.com/how-to/engine/...mp-conversion/
Last piece of the puzzle is figuring out how many ribs the LPE snout will use. LSAs use 8, LS9's 11, so you may need to upgrade some pulleys to cut down on belt slip
Based on the angles of the LS9 setup, it appears the Lingenfelter inlet would be the way to go... the Vette points more toward the front.
From what I can see, the pulleys/belts for the LSA is still 8 rib on the Lingenfelter LS9 conversions.
Then I could use a factory LSA lower pulley or an ATI balancer with aftermarket bolt on SC pulley.
Hoping I can get this engine for a decent price. A friend just bought it for a great price & he is having second thoughts as to if he will now use it. I can't pass it up if he sells it.
The hood was about 2" from closing. Your camaro hood is higher, so notch the bracing and build custom mounts to position the engine where you want it, should fit. Can always mill the ribs off the lid like CTS-V guys do
Looks like my ZR1 deal is going through.
I hate to put the car under the knife again, but this is hard to pass up.
Do you have any dimensional measurements of the ZR1 blower vs the LSA? The ZR1 looks much shorter height wise, but not sure about all the potential interference points.
Looks like my ZR1 deal is going through.
I hate to put the car under the knife again, but this is hard to pass up.
Do you have any dimensional measurements of the ZR1 blower vs the LSA? The ZR1 looks much shorter height wise, but not sure about all the potential interference points.
Speartech put one in their 3rd gen and posted it here. He did some custom work to move the water/heat exchanger inlet to the back of the manifold so the hood would close, or something along those lines
Got my lsa sc on my camaro, and cranked Sunday. Its taken a while to get there, I'm definitely going to need a new hood... Will post pictures momentarily as I figure out how to do it.
Jesse @ Olson Custom works built the six rib pulley that lines up with fbody accessories and had to ad an idler pulley between water pump and power steering pump for belt wrap. Ended up needing a 99 inch belt and may let the tuner tell me if it will work or if he sees slip in data logging.
I have used ctsv Hx and pump and should get that done over the weekend. For now I have no plans for ice box maybe a custom Canton Racing water tank for extra capacity later. Talked to them about using their fender mounted coolant resevoir and converting it for use as water tank and I'll do a 4th gen puke tank mod. Just my thoughts so far.
Yeah the back of my blower case is ALL ON the wiper motor, I may take a cut off wheel and try to shave it down a little right there but its super tight. My aftermarket kmember apparently doesn't allow the 1 inch space like how you fabbed yours.
Since you moved the motor forward did you also have to retap threads for the trans cross member or did it lign up still. I cut the tab on my supercharger but I'm afraid it might still hit under hard accelerations.
Since you moved the motor forward did you also have to retap threads for the trans cross member or did it lign up still. I cut the tab on my supercharger but I'm afraid it might still hit under hard accelerations.
All my crossmembers are one-off's. Prob the easiest part of the conversion
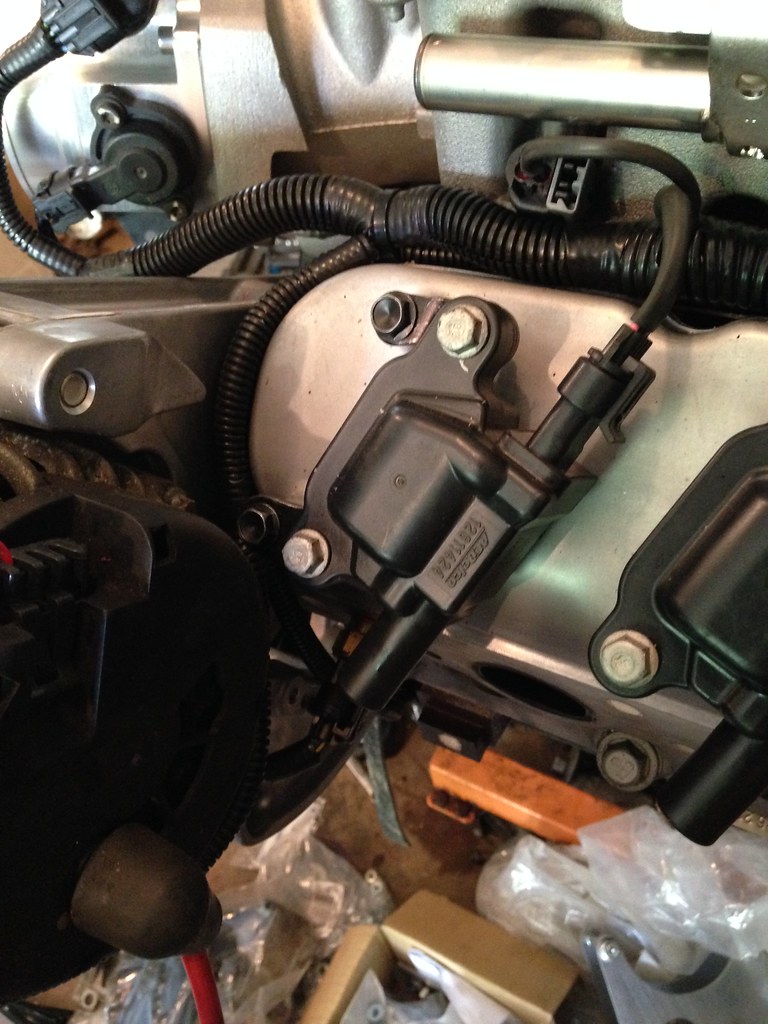
Oh ok. One quick question what you guys do with the sensors and diapraghm that's on the blower? I tried starting mine today but it wouldn't start. I'm mainly thinking its because my tune though.
The vacuum solenoid is required. The top port needs to go to the SC inlet behind the TB
The electric solenoid can be removed as a GEN III PCM cannot control it. Its purpose is to limit boost under preset and computer controlled conditions ie 5psi max in 1st gear
This will leave a port open on the BPV (leave it open to atmo) and an open port on the #2 runner. Use this for AFPR and/or boost gauge. If using neither, cap it
You can also plug the EVAP and inlet MAP both on the SC snout. The BARO sensor on the front of the lid can be removed without consequence
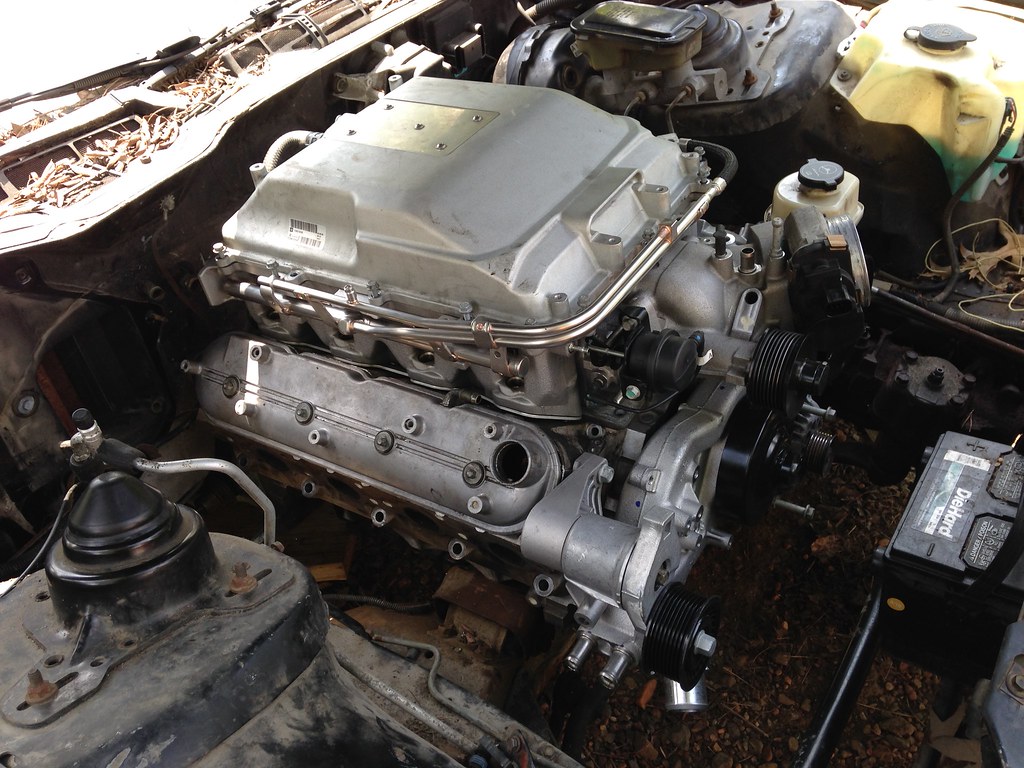
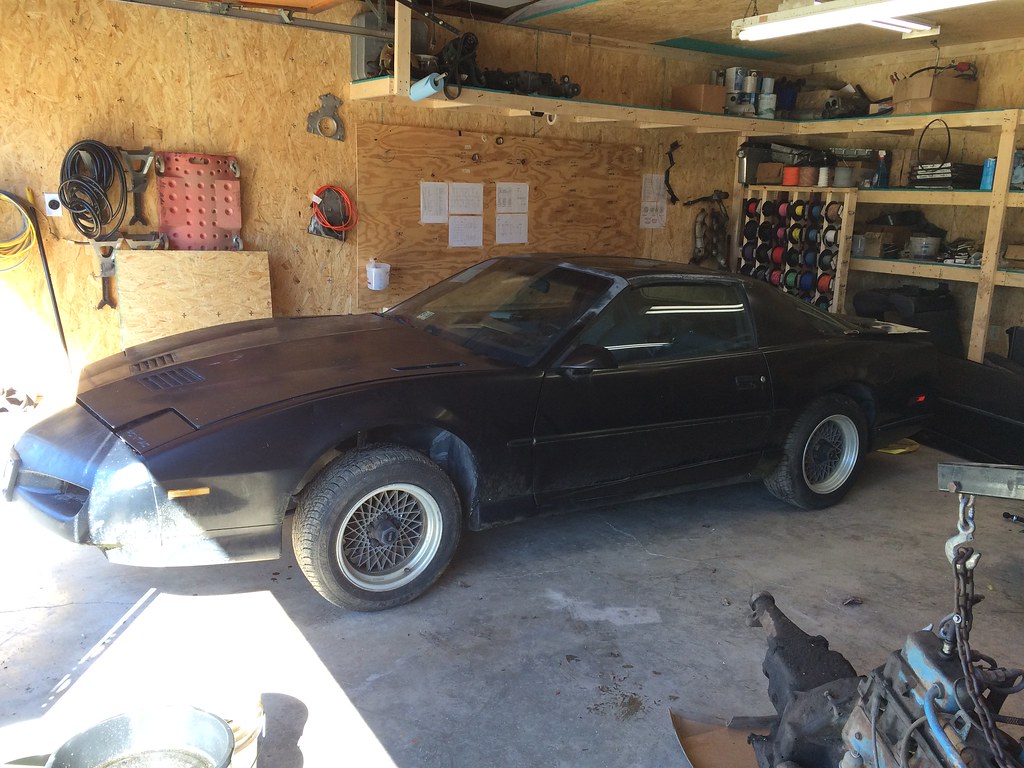
Heres my 91 TA during tear down. Plans are to paint the engine bay this time around. Basic LSA/T56 swap with AC, Fbody LS1 front brakes, LT1 rear disk brakes, 28sp 8.8 conversion, founders rear kit, also tunnel mount TA, custom SFCs, stock exterior, stockish interior, fresh paint and seals all around
Ive lived here a little over 5 months now and this is the first car of mine thats been in the garage
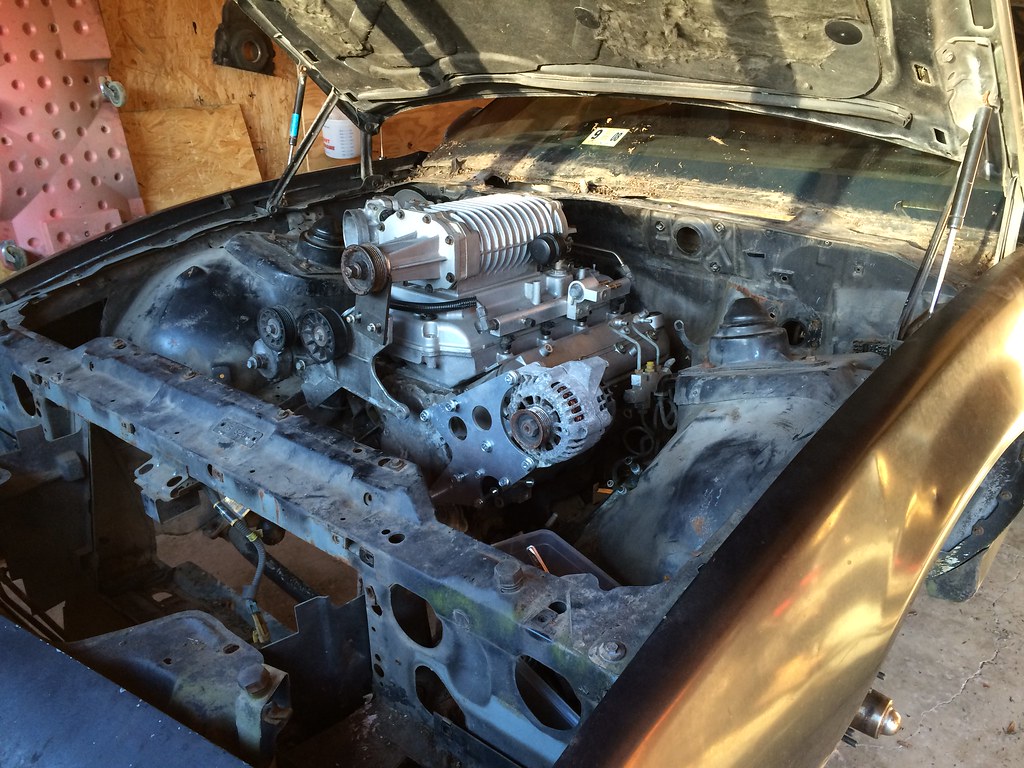
The mock-up LS1 block and a nasty engine bay. ICT billet accessory bracket
Emptied out. Luckily I didnt find any major damage in the engine bay, even under the battery thats been sitting for 5+ years. Surface rust, but nothing through. I also picked up a magnacharger kit recently. Checking fitment for a potential future project. Its way above the hood line...
Next step is to pull the mock-up and paint the engine bay. After that, pull the axle and tank to see if I need to order a replacement. Fun with gas tanks!
Engine bay is painted, K-member modified, mounts built, wired in completely, still hooking stuff up
Down side is my AC notch isnt deep enough so the compressor doesnt fit. D'oh
Its wired for it, so Ill rock the non-AC box until I get up the desire to remove and notch the K-member again. Instead of notching for the oil pan, I cut out the center section and built a removable section. This will make it easier to remove/modify in the future as Im taking out 1/3 of the K-member instead of the whole thing. I will say the 3 pc K makes solid mounts a snap to install. Took me 20-30 mins to put the mounts and K-member in. Here it is pre-paint
Im using a racetronix 450 FP and harness kit. Id build my own harness except racetronix wont warranty their pump without their relay kit. Ive got mixed feelings about it, namely the 10ga kit actually goes down to 16ga in the tank from a few step downs. Also, how its pushing 20a through a pair of pins rated for 7.5a ea. Beyond that, its stupid long in the long runs and too short in the short runs. Ill be cutting 3-4' out of the alt to relay run. The fuse holder behind the alt is exactly 6" long. Theres a convenient boss in the block right there... 8" away. Ill be replacing that short run of cable. Minor mods must be ok because you cant get the 450 pump with the proper in-tank connector. Have to cut the supplied connector off and crimp on a new one. Atleast they supply new terminals and connector pieces
If I do another big single pump, Ill skip all that with an extra long FP connector with fuel resistant cable. Just bore a hole in the top of the sender and seal with JB weld. Do my own relay kit and call it good
I pulled the tank to button up that portion of the conversion anddddddd the tank was junk. To the brim with scale and filth even though it was drained when I first got the car 4 years ago. The sender was missing the bottom few inches and the bottom of the stock FP had crumbled away to nothing. It was pretty bad. New tank/sender are on the way from rock auto, whats another $275 at this point?
To do list:
Fuel system
Custom IC tank
Coolant hoses
Reassemble the front body panels/hood
Brake line mods
Trans crossmember
Mod the new 8.8
Exhaust
Throttle cable/cruise