
89 GTA LS1 swap

Thread Starter
Junior Member
Joined: Feb 2008
Posts: 85
Likes: 2
From: Idaho Falls, Id
Car: lots of Firebirds!
Engine: LS1s, 455
Transmission: t56s all around! lol
89 GTA LS1 swap
Well I figured I'd start a swap thread on here finally. I've got one on ls1tech and I'd imagine most of us LS1 swappers are on there too, but I'll post my progress up here for those who haven't seen it on ls1tech.
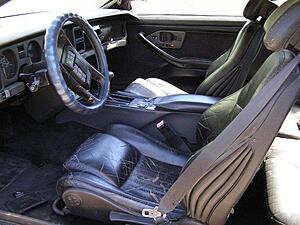
So I had a black 89 GTA in high school. It had Tan leather interior but I always wanted black leather. It was actually originally white but someone had painted it black. I ended up selling that one before I went to Wyoming tech in '01, but I've always kept an eye out for a black one with black leather interior. Who knew they were so hard to find lol. I've only seen a hand full and they were all on ebay. I ended up seeing a black on black 89 on ebay around Christmas of '07. I was in Iraq at the time and it was at Montana Muscle in Stevensville MT. It's only about 4 hrs from where I live, they have a whole yard full of 2nd gen TAs. So I bought it and had my dad pick it up for me. I was just going to leave it stock and drive it while I build my 67, but the engine started knocking and I happened to score a heck of a deal on a wrecked 00 TA. Looking back I shoulda just bought a cheap body since I want to replace everything that makes it a GTA. But now it's worth so much less than what I paid it wouldn't be worth selling it and buying a cheaper one, and even if I rebuild the short block I wouldn't get much more out of it. So LS1 swap it is!
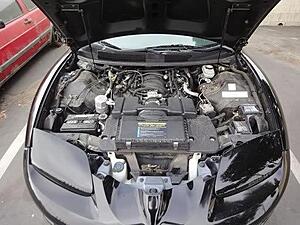
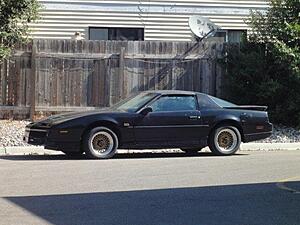
Here's the GTA

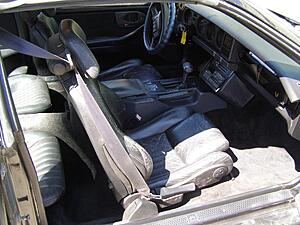
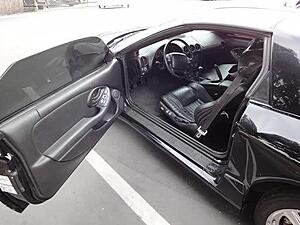
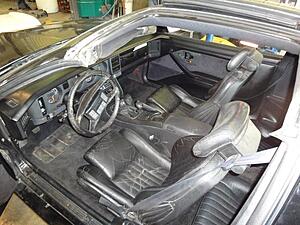
The interior is pretty good other than some cracks in the seats
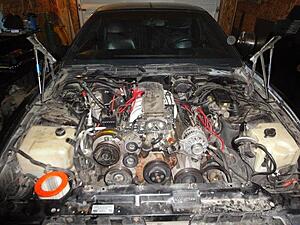
Here's the 00 I'm using for a donor.
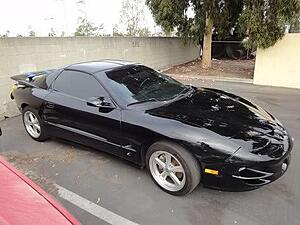
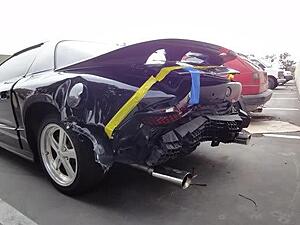
Bought the whole thing for less than what the engine and trans are worth from a Marine that was about to deploy and just wanted it gone. Somebody had rear ended him. It only has 55,000 miles and was in great shape.
So I had a black 89 GTA in high school. It had Tan leather interior but I always wanted black leather. It was actually originally white but someone had painted it black. I ended up selling that one before I went to Wyoming tech in '01, but I've always kept an eye out for a black one with black leather interior. Who knew they were so hard to find lol. I've only seen a hand full and they were all on ebay. I ended up seeing a black on black 89 on ebay around Christmas of '07. I was in Iraq at the time and it was at Montana Muscle in Stevensville MT. It's only about 4 hrs from where I live, they have a whole yard full of 2nd gen TAs. So I bought it and had my dad pick it up for me. I was just going to leave it stock and drive it while I build my 67, but the engine started knocking and I happened to score a heck of a deal on a wrecked 00 TA. Looking back I shoulda just bought a cheap body since I want to replace everything that makes it a GTA. But now it's worth so much less than what I paid it wouldn't be worth selling it and buying a cheaper one, and even if I rebuild the short block I wouldn't get much more out of it. So LS1 swap it is!
Here's the GTA

The interior is pretty good other than some cracks in the seats


Here's the 00 I'm using for a donor.

Bought the whole thing for less than what the engine and trans are worth from a Marine that was about to deploy and just wanted it gone. Somebody had rear ended him. It only has 55,000 miles and was in great shape.


Last edited by t_raven; Jul 20, 2017 at 06:24 AM.
Thread Starter
Junior Member
Joined: Feb 2008
Posts: 85
Likes: 2
From: Idaho Falls, Id
Car: lots of Firebirds!
Engine: LS1s, 455
Transmission: t56s all around! lol
Re: 89 GTA LS1 swap
Feb:
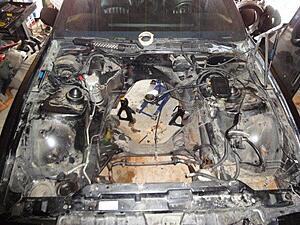
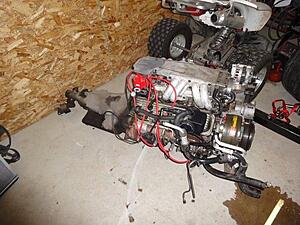
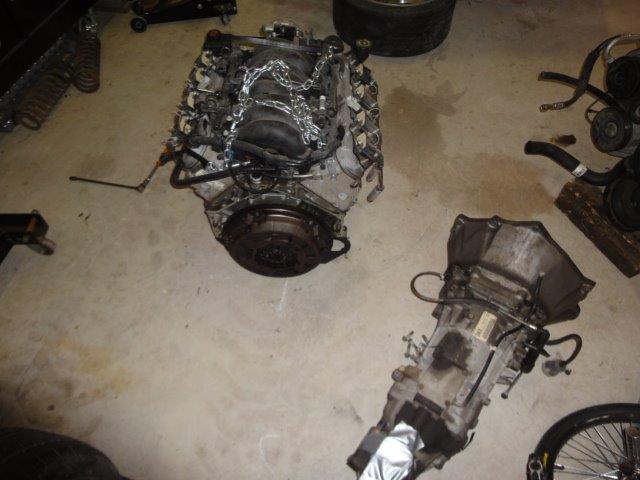
Pulled the L98

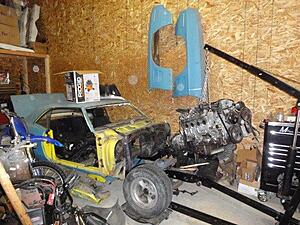
I was originally planning to put the engine, transmission and interior from the donor into my 69 so the donor was already stripped, but I decided to hold off on the 69 and get the 89 ready for summer.
Here's when I dropped the engine out of the 00
My plans are to eliminate the emissions equipment, clean up the engine bay, elimate anything I don't need and hide what I can. I have a set of C6 wheels I'll put on later. I want to get drop spindles, bigger brakes, Koni struts, subframe connectors, UMI caster/camper plates. I might use the 4th gen seats but they aren't perfect so maybe I'll just keep the stock ones until I can recover them later on.
Pulled the L98


I was originally planning to put the engine, transmission and interior from the donor into my 69 so the donor was already stripped, but I decided to hold off on the 69 and get the 89 ready for summer.
Here's when I dropped the engine out of the 00

My plans are to eliminate the emissions equipment, clean up the engine bay, elimate anything I don't need and hide what I can. I have a set of C6 wheels I'll put on later. I want to get drop spindles, bigger brakes, Koni struts, subframe connectors, UMI caster/camper plates. I might use the 4th gen seats but they aren't perfect so maybe I'll just keep the stock ones until I can recover them later on.
Last edited by t_raven; Jul 20, 2017 at 06:29 AM.
Thread Starter
Junior Member
Joined: Feb 2008
Posts: 85
Likes: 2
From: Idaho Falls, Id
Car: lots of Firebirds!
Engine: LS1s, 455
Transmission: t56s all around! lol
Re: 89 GTA LS1 swap
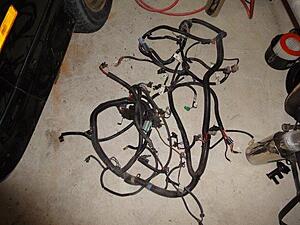
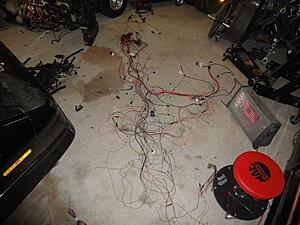
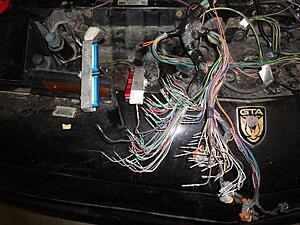
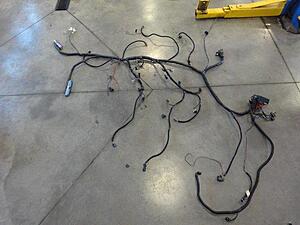
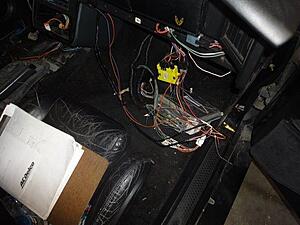
I finished pulling my engine harness
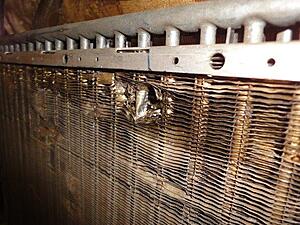
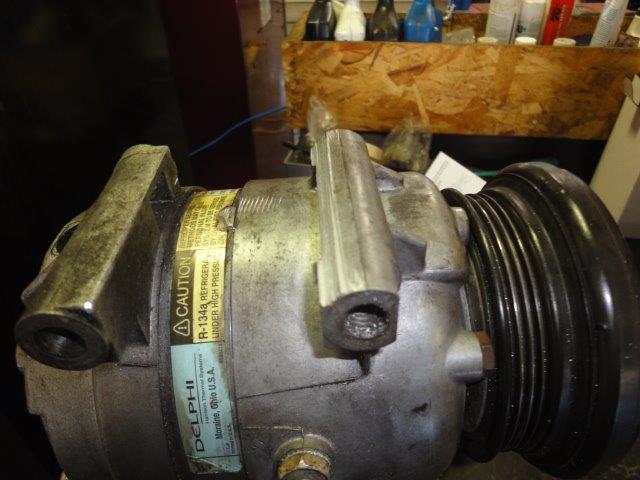
When I parked the car in 08 the AC had a full charge but when I pulled the engine there wasn't much in there. Not sure if this was done before or if I did it when pulling the engine. The oil makes me think one of the trans cooler lines did it, I did bend the crap out of them lol. It doesn't look like it made a hole in the tube but depending on what a new ones costs I might just replace it while I'm at it.
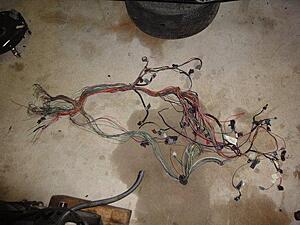
Here's my harness stripped of all conduit

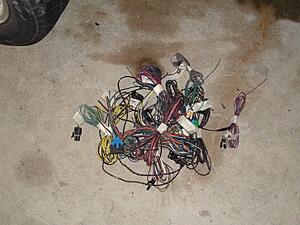
And here it is after removing what I know I don't need. There is probably more to remove but I need to look at some diagrams first.
The pile of wires I removed so far
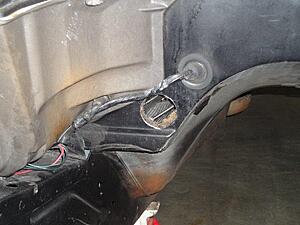
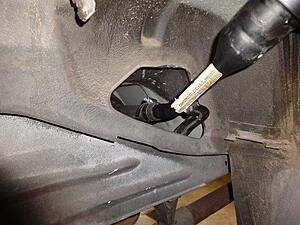
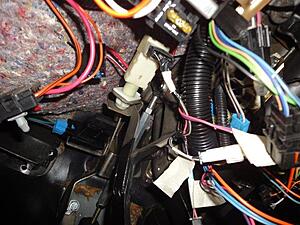
This is the gromet for where the harness passes into the passenger foot well. I've seen guys cut the wires on both sides but I decided to take it apart and remove all the wires before I started cutting anything. It's full of like a hard glue but it all broke apart pretty easy. I'm hoping I can mount my PCM where the orignal ECU was and reuse this gromet on the new harness.


When I parked the car in 08 the AC had a full charge but when I pulled the engine there wasn't much in there. Not sure if this was done before or if I did it when pulling the engine. The oil makes me think one of the trans cooler lines did it, I did bend the crap out of them lol. It doesn't look like it made a hole in the tube but depending on what a new ones costs I might just replace it while I'm at it.

Here's my harness stripped of all conduit

And here it is after removing what I know I don't need. There is probably more to remove but I need to look at some diagrams first.

The pile of wires I removed so far

This is the gromet for where the harness passes into the passenger foot well. I've seen guys cut the wires on both sides but I decided to take it apart and remove all the wires before I started cutting anything. It's full of like a hard glue but it all broke apart pretty easy. I'm hoping I can mount my PCM where the orignal ECU was and reuse this gromet on the new harness.

Last edited by t_raven; Jul 20, 2017 at 06:33 AM.
Thread Starter
Junior Member
Joined: Feb 2008
Posts: 85
Likes: 2
From: Idaho Falls, Id
Car: lots of Firebirds!
Engine: LS1s, 455
Transmission: t56s all around! lol
Re: 89 GTA LS1 swap
I ordered a Tick Performance clutch master cylinder and Monster stage 2 clutch package, comes with remote bleeder line, new slave cylinder etc.
So since my stuff from Tick Performance is on the way I decided to removed the old clutch and flywheel first thing this morning. I had to get it out of my 69. I was originally going to put it in there but I've decided to get the 89 done first since it's in good shape, and take my time doing the body work on the 69. I'll find another LS1 or something down the road when funds allow.
Pulled the trans off the engine

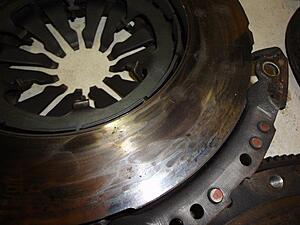
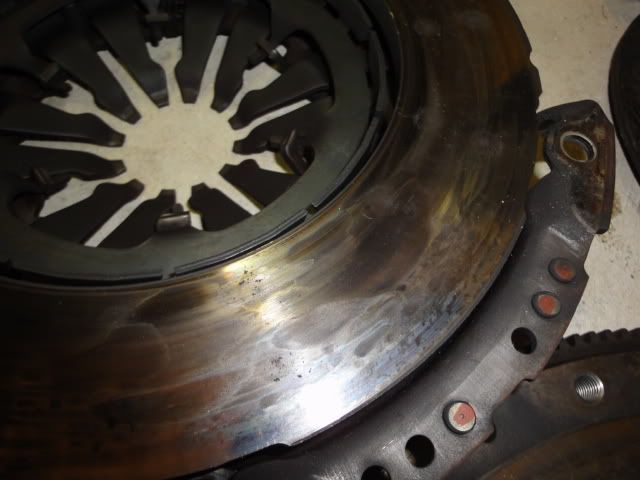
Here are the clutch, PP and FW
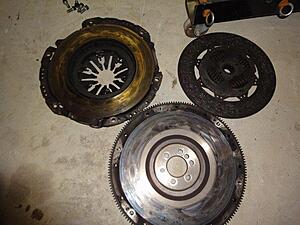
I was expecting it to look better with only 55k miles on it. The car was drivable when I bought it but I only pulled it on and off a trailer so I don't know how good the clutch was. Anybody that knows clutches think it would be worth putting it in my 2001 TA?
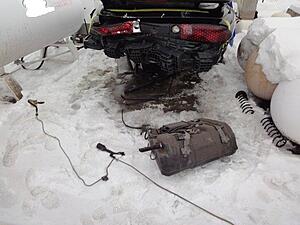
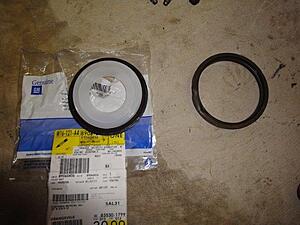
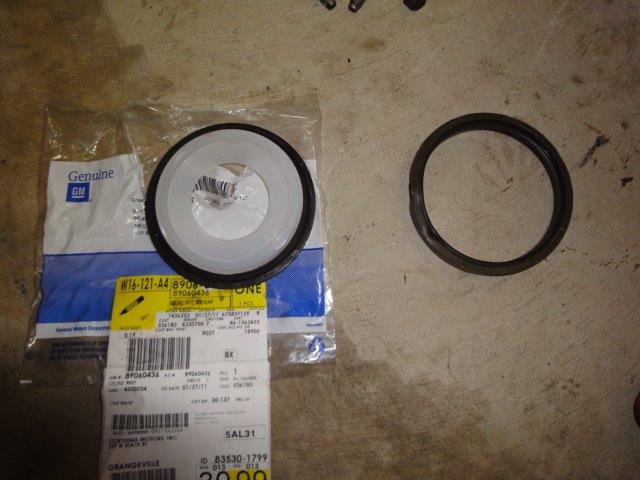
I went to the Chevy dealer to get a rear main seal and oil filter and swung by Napa to get some brake cleaner, so while I was out I went and pulled the tank and fuel line out of the donor. I'm working on the 89 in a big storage unit and I have the parts car and a couple others sitting where my dad works.
Old rear main out and new one before I put it in
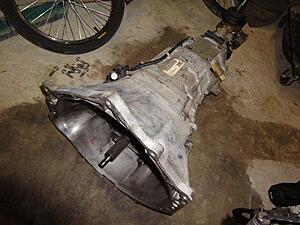
Transmission was filthy
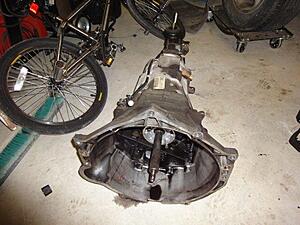
If it wasn't for the snow drifts in front of my storage unit I probably would've taken the engine and trans and pressure washed them, but a couple cans of brake cleaner got it clean enough
So since my stuff from Tick Performance is on the way I decided to removed the old clutch and flywheel first thing this morning. I had to get it out of my 69. I was originally going to put it in there but I've decided to get the 89 done first since it's in good shape, and take my time doing the body work on the 69. I'll find another LS1 or something down the road when funds allow.

Pulled the trans off the engine
Here are the clutch, PP and FW

I was expecting it to look better with only 55k miles on it. The car was drivable when I bought it but I only pulled it on and off a trailer so I don't know how good the clutch was. Anybody that knows clutches think it would be worth putting it in my 2001 TA?

I went to the Chevy dealer to get a rear main seal and oil filter and swung by Napa to get some brake cleaner, so while I was out I went and pulled the tank and fuel line out of the donor. I'm working on the 89 in a big storage unit and I have the parts car and a couple others sitting where my dad works.

Old rear main out and new one before I put it in
Transmission was filthy

If it wasn't for the snow drifts in front of my storage unit I probably would've taken the engine and trans and pressure washed them, but a couple cans of brake cleaner got it clean enough

Last edited by t_raven; Jul 20, 2017 at 06:38 AM.
Thread Starter
Junior Member
Joined: Feb 2008
Posts: 85
Likes: 2
From: Idaho Falls, Id
Car: lots of Firebirds!
Engine: LS1s, 455
Transmission: t56s all around! lol
Re: 89 GTA LS1 swap
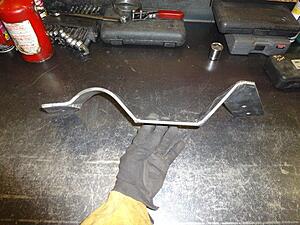
Before I had the donor car I had a different LS1 I was going to put in this GTA so I bought a set of 4th gen pedals off ebay planning to use them. That was before reading that they don't work as well as 3rd gen pedals. So now that I have a whole donor car I have two sets. I figured I'd see what I could do to make the 4th gen pedals fit right. If I'm not satisfied with them I'll get some 3rd gen pedals.
I cut the gas pedal off and drilled the booster stud holes big enough
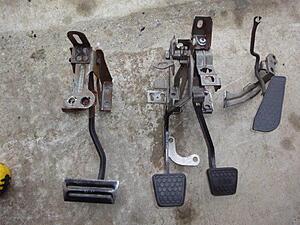
I put them in to see how they fit and the bolt holes line up just fine but the brake pedal was way low with the rod connected. I figured out there are two reasons why
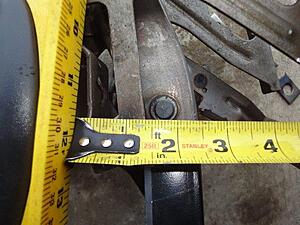
Measuring from the front of the bracket to the pivot bolt the 4th gen set is about 1/8" longer.
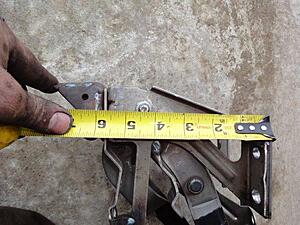
That 1/8" doesn't sound like much but I did some measuring and because of the ratio of the pedal from the pivot to the booster rod pin and from that pin to the pedal it makes about 1/2" difference in pedal height. So I ground out the spot welds on the shims that are welded to the front of the bracket to remove that extra 1/8".
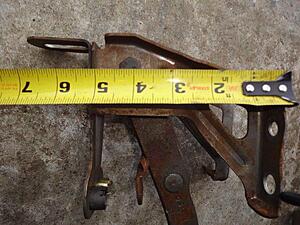
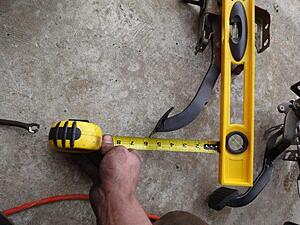
The other thing I measured is how far out the pedal is in relation to the pivot and the booster pin. I put a level from the pivot bolt to the pad of the pedal and measured how far the booster pin was from that line. 4th gen:
3rd gen:
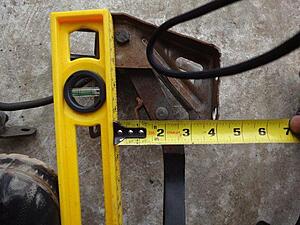
It's hard to tell in those pics but the booster pin is about 1/8" further from the level on the third gen brake pedal, which means the pedal pad is closer to the driver.
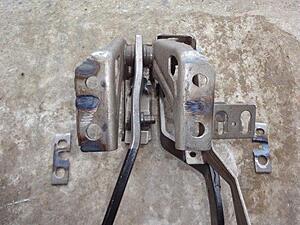
Measured with the straight edge on the line through the pivot and booster pin and measuring how far out the pad is you can see that 1/8" turns into about another 1/2" at the pad

3rd gen 1/2" closer to driver
So those two things contribute to the brake pedal being about 1" lower than the original pedal. I took care of the first problem. I think I'll see what I can do about making the booster rod adjustable so I can put the pedal height where I want it.
Other than brake pedal height I don't see why the 4th gen pedals won't work just fine. I might need to tweek the part the clutch master bolts through but I think that should be easy enough. The holes for the pedal switches are a little bigger though so I'll see if I can use the 4th gen switches.
I cut the gas pedal off and drilled the booster stud holes big enough

I put them in to see how they fit and the bolt holes line up just fine but the brake pedal was way low with the rod connected. I figured out there are two reasons why
Measuring from the front of the bracket to the pivot bolt the 4th gen set is about 1/8" longer.


That 1/8" doesn't sound like much but I did some measuring and because of the ratio of the pedal from the pivot to the booster rod pin and from that pin to the pedal it makes about 1/2" difference in pedal height. So I ground out the spot welds on the shims that are welded to the front of the bracket to remove that extra 1/8".

The other thing I measured is how far out the pedal is in relation to the pivot and the booster pin. I put a level from the pivot bolt to the pad of the pedal and measured how far the booster pin was from that line. 4th gen:

3rd gen:

It's hard to tell in those pics but the booster pin is about 1/8" further from the level on the third gen brake pedal, which means the pedal pad is closer to the driver.
Measured with the straight edge on the line through the pivot and booster pin and measuring how far out the pad is you can see that 1/8" turns into about another 1/2" at the pad

3rd gen 1/2" closer to driver

So those two things contribute to the brake pedal being about 1" lower than the original pedal. I took care of the first problem. I think I'll see what I can do about making the booster rod adjustable so I can put the pedal height where I want it.
Other than brake pedal height I don't see why the 4th gen pedals won't work just fine. I might need to tweek the part the clutch master bolts through but I think that should be easy enough. The holes for the pedal switches are a little bigger though so I'll see if I can use the 4th gen switches.
Last edited by t_raven; Jul 20, 2017 at 06:42 AM.
Thread Starter
Junior Member
Joined: Feb 2008
Posts: 85
Likes: 2
From: Idaho Falls, Id
Car: lots of Firebirds!
Engine: LS1s, 455
Transmission: t56s all around! lol
Re: 89 GTA LS1 swap
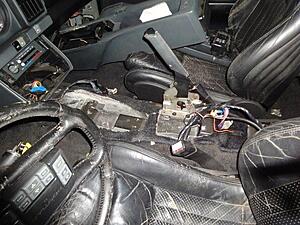
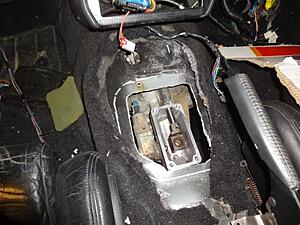
I took the auto shifter and cables out
Then I went a head and stripped the LS1 harness.
I took the PCM connectors off
Removed all the conduit and tape
Then I bundled up individual circuits. On the top are circuits I don't need. Middle is all getting reused, and the bottom bundle was all the injector and coil wires, too many splices there to separate it more than that with out cutting wires so I will mock it up like that and modify it if I need to.
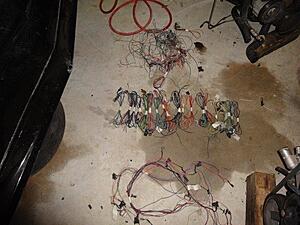
My plan is to have the harness as neat looking as possible, and mount the PCM inside.

Then I went a head and stripped the LS1 harness.
I took the PCM connectors off

Removed all the conduit and tape

Then I bundled up individual circuits. On the top are circuits I don't need. Middle is all getting reused, and the bottom bundle was all the injector and coil wires, too many splices there to separate it more than that with out cutting wires so I will mock it up like that and modify it if I need to.

My plan is to have the harness as neat looking as possible, and mount the PCM inside.
Last edited by t_raven; Jul 20, 2017 at 06:44 AM.
Thread Starter
Junior Member
Joined: Feb 2008
Posts: 85
Likes: 2
From: Idaho Falls, Id
Car: lots of Firebirds!
Engine: LS1s, 455
Transmission: t56s all around! lol
Re: 89 GTA LS1 swap
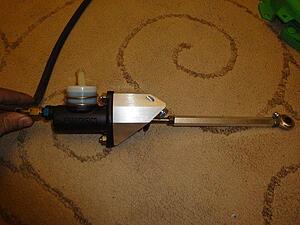
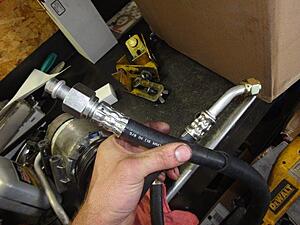
Tick master cylinder and stage 2 Monster clutch package

This is the Tick MC for those who aren't familiar with it. The stock one is a 3/4" bore I believe. The tick one is a 7/8" tilton unit they make a custom bracket and adjustable linkage for. It comes with a new braided line and you can get a remote bleeder for $50.
clutch and flywheel on
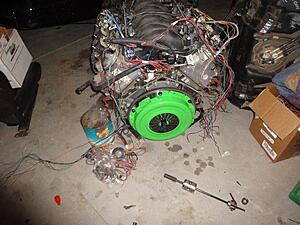
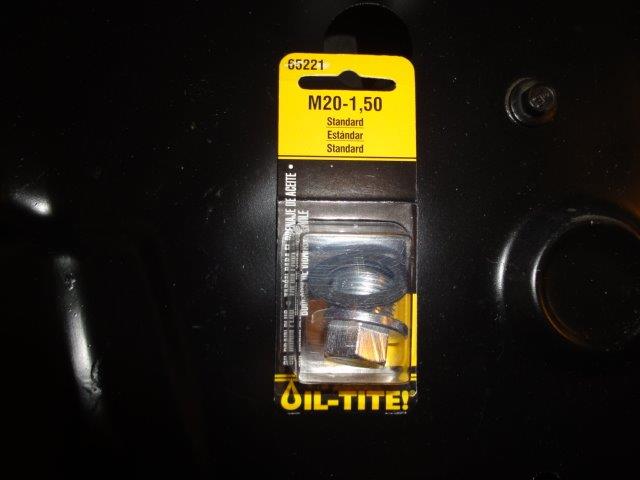
Replacing my skip shift solenoid with a plug. A Subaru oil plug is the same thread but a bit short, not enough length for the crush washer so I'm just going to silicone it
Got the clutch master in
Notched the k-member to clear the compressor
Decided to try solid motor mounts so I ordered a set of those

The t56 in my 01 TA was shifting hard so I decided to put the one that was originally going into the 89 into the 01 and was going to rebuild that one to go in the 89. Well when I got it out of the 01 the pilot bearing had made nice grooves in the input shaft. Luckily I had a core laying around that was going to go in my 67. The guy I got it from said it needed 2nd gear. Tore it down yesterday, the blocker rings and keys in the 3-4 syncro are done but the rest looks pretty good. I ordered a level 2 rebuild kit from tickshift.com.
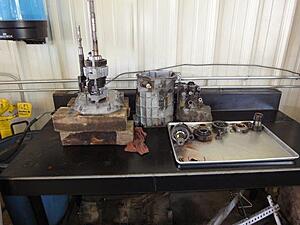
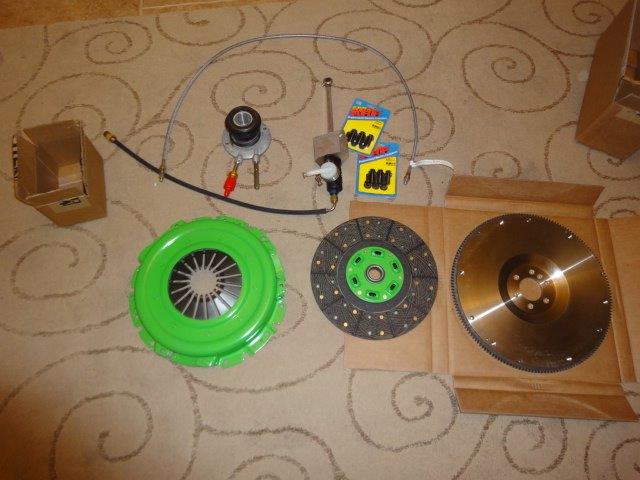
This is the Tick MC for those who aren't familiar with it. The stock one is a 3/4" bore I believe. The tick one is a 7/8" tilton unit they make a custom bracket and adjustable linkage for. It comes with a new braided line and you can get a remote bleeder for $50.

clutch and flywheel on

Replacing my skip shift solenoid with a plug. A Subaru oil plug is the same thread but a bit short, not enough length for the crush washer so I'm just going to silicone it
Got the clutch master in

Notched the k-member to clear the compressor

Decided to try solid motor mounts so I ordered a set of those

The t56 in my 01 TA was shifting hard so I decided to put the one that was originally going into the 89 into the 01 and was going to rebuild that one to go in the 89. Well when I got it out of the 01 the pilot bearing had made nice grooves in the input shaft. Luckily I had a core laying around that was going to go in my 67. The guy I got it from said it needed 2nd gear. Tore it down yesterday, the blocker rings and keys in the 3-4 syncro are done but the rest looks pretty good. I ordered a level 2 rebuild kit from tickshift.com.

Last edited by t_raven; Jul 20, 2017 at 06:49 AM.
Trending Topics
Thread Starter
Junior Member
Joined: Feb 2008
Posts: 85
Likes: 2
From: Idaho Falls, Id
Car: lots of Firebirds!
Engine: LS1s, 455
Transmission: t56s all around! lol
Re: 89 GTA LS1 swap
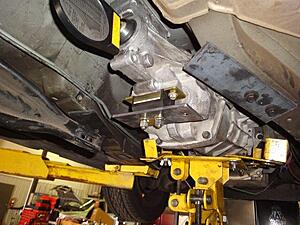
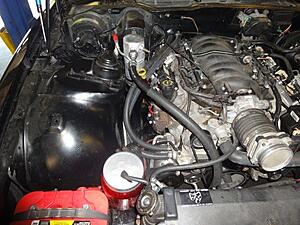
Got my hole boxed in and painted the K member

Set the engine in. Left all the mount bolts loose so I could get it in place
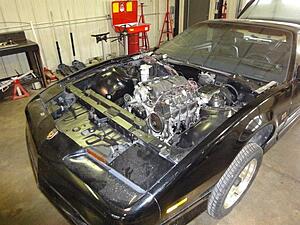
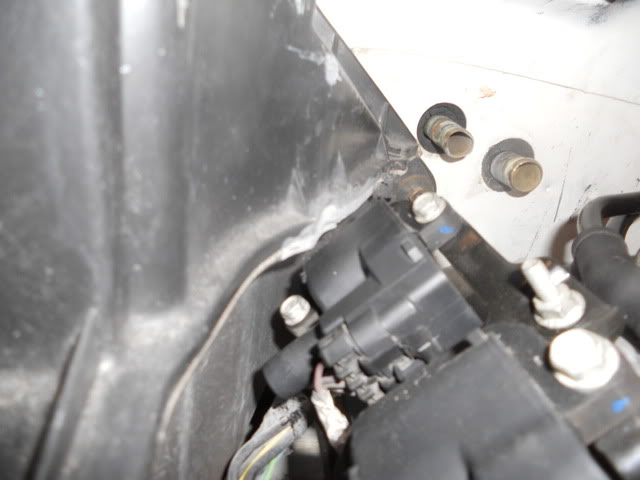
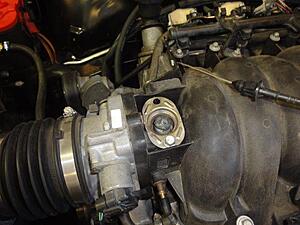
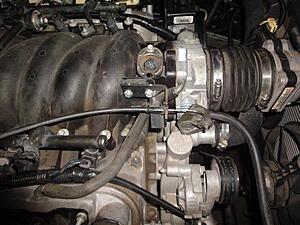
Plenty of clearance on the back and side of the compressor, gottal get the block I need to screw some hoses onto
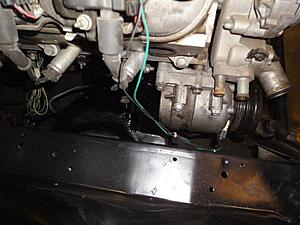
The bottom of the compressor is pretty close to the K member, I should've got a little lower there but should be fine with the solid mounts
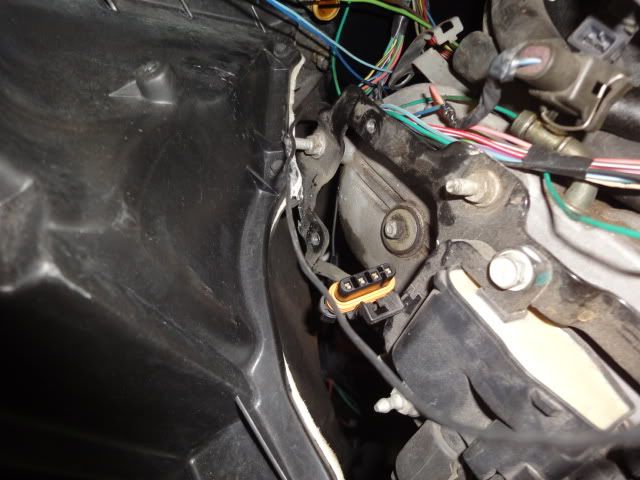
The rear coil on the passenger side won't clear the evap case so I'll see if I can make it fit, if not I'll relocate the coil somewhere.
Ran into another little issue. The driver's O2 sensor doesn't clear so I'll have to plug the hole in the manifold and move the sensor to the pipe.
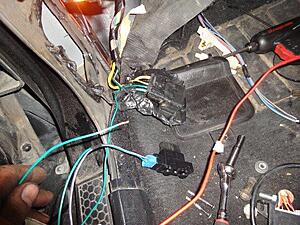
Mostly been working on the harness lately. Finally got it all wired up. I used the relay block from the doner that has the fan relays. this way I can have 2 speed fans like the 00 had. I used the other 2 relays for the fuel pump and a/c compressor. There were enough fuses in the block to have all that I needed and a couple spare. I'm going to use the cruise module from the 00 so that connector is wired into the harness. Everything under the hood is done as far as the harness goes. I have a couple pig tails that will have to be wired inside the cab to go to the pedals, ac control, MIL and diagnostic port.
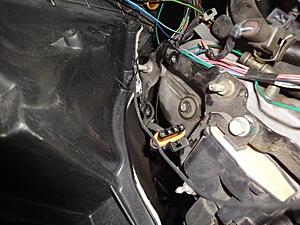
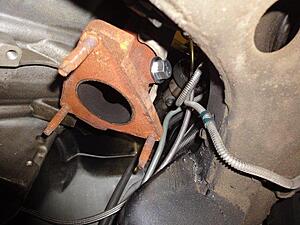
Decided to put the PCM where the original one was so I cut this hole in the firewall and made the harness long enough to reach the PCM.

Set the engine in. Left all the mount bolts loose so I could get it in place

Plenty of clearance on the back and side of the compressor, gottal get the block I need to screw some hoses onto

The bottom of the compressor is pretty close to the K member, I should've got a little lower there but should be fine with the solid mounts

The rear coil on the passenger side won't clear the evap case so I'll see if I can make it fit, if not I'll relocate the coil somewhere.

Ran into another little issue. The driver's O2 sensor doesn't clear so I'll have to plug the hole in the manifold and move the sensor to the pipe.

Mostly been working on the harness lately. Finally got it all wired up. I used the relay block from the doner that has the fan relays. this way I can have 2 speed fans like the 00 had. I used the other 2 relays for the fuel pump and a/c compressor. There were enough fuses in the block to have all that I needed and a couple spare. I'm going to use the cruise module from the 00 so that connector is wired into the harness. Everything under the hood is done as far as the harness goes. I have a couple pig tails that will have to be wired inside the cab to go to the pedals, ac control, MIL and diagnostic port.

Decided to put the PCM where the original one was so I cut this hole in the firewall and made the harness long enough to reach the PCM.

Last edited by t_raven; Jul 20, 2017 at 06:54 AM.
Thread Starter
Junior Member
Joined: Feb 2008
Posts: 85
Likes: 2
From: Idaho Falls, Id
Car: lots of Firebirds!
Engine: LS1s, 455
Transmission: t56s all around! lol
Re: 89 GTA LS1 swap
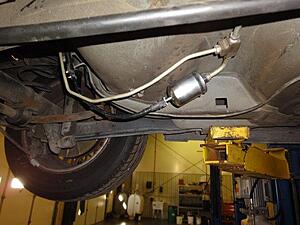
put the 4th gen tank in yesterday. I didn't modify anything, didn't even take off the EVAP canister. From what I've read it should vent fine through the canister where I won't be using the EVAP, the vent valve just stays open. We'll see how it works out. I used the lines from the 4th that go to the filter and a 4th gen filter. The 3rd gen line screwed right into the T from the 4th gen. I'll need an adaptor to hook the fuel line to the fuel rail. The filter needs to be secured still, not sure where I put the bracket.
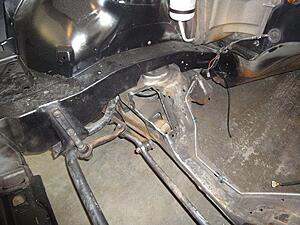
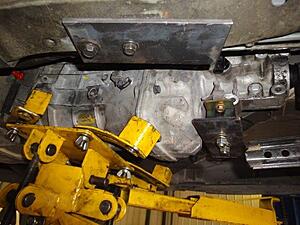
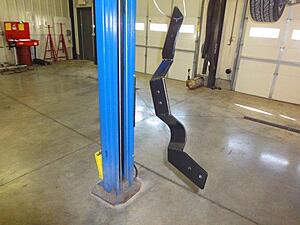
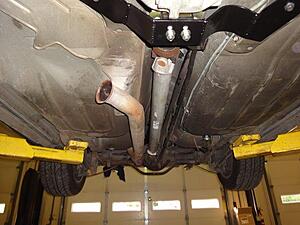
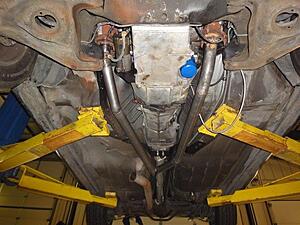
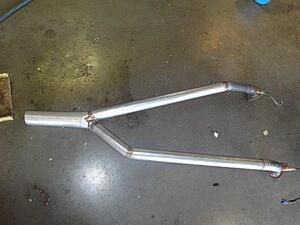
Bolted my transmission up and started fabbing a crossmember
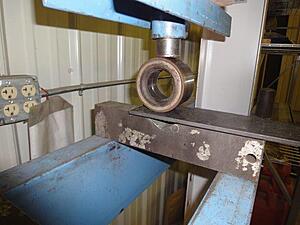
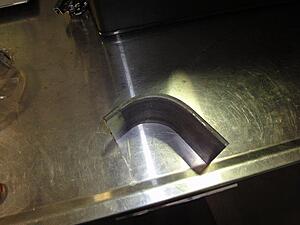
Used an old bearing in the press to curve a pieces
Here it is all welded up
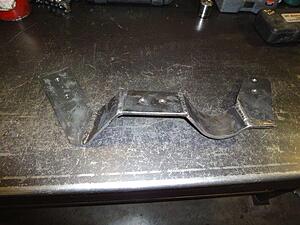
Right side up, the curved piece is for exhaust clearance
And here it is danglin with some paint on it. Cost me $15 and about 2 hrs of time. Alot better than $150 for the ones out there that everyone says don't give any exhaust clearance anyway.

Bolted my transmission up and started fabbing a crossmember


Used an old bearing in the press to curve a pieces


Here it is all welded up

Right side up, the curved piece is for exhaust clearance

And here it is danglin with some paint on it. Cost me $15 and about 2 hrs of time. Alot better than $150 for the ones out there that everyone says don't give any exhaust clearance anyway.

Last edited by t_raven; Jul 20, 2017 at 06:57 AM.
Joined: Sep 2002
Posts: 3,685
Likes: 10
From: PA
Car: 86 Trans AM
Engine: LS1 (not stock...)
Transmission: Built T56
Axle/Gears: Strange 12-bolt w/ 3.73
Re: 89 GTA LS1 swap
Good work! That looks like a perfect donor car too! you should be able to get TONS of good parts off of it, and still have some good stuff to sell. Like the front clip... I sold the front clip off of my donor Z28 for like $650 without headlights. To a guy that was doing a conversion on an LT1 car. So keep that stuff nice you can make some money!
Looks like the exhaust survived the hit on the 01. If its aftermarket, which it kinda looks like it might be, you can use it. Hangers and all. It'll bolt up and look great. Just have to fiddle with the intermediate pipe, which you'll have to do either way.
Man...seeing the PCM connections depinned all at once like that makes me cringe haha.
Good luck! Keeping an eye on your build!
J.
Thread Starter
Junior Member
Joined: Feb 2008
Posts: 85
Likes: 2
From: Idaho Falls, Id
Car: lots of Firebirds!
Engine: LS1s, 455
Transmission: t56s all around! lol
Re: 89 GTA LS1 swap
Good work! That looks like a perfect donor car too! you should be able to get TONS of good parts off of it, and still have some good stuff to sell. Like the front clip... I sold the front clip off of my donor Z28 for like $650 without headlights. To a guy that was doing a conversion on an LT1 car. So keep that stuff nice you can make some money!
Looks like the exhaust survived the hit on the 01. If its aftermarket, which it kinda looks like it might be, you can use it. Hangers and all. It'll bolt up and look great. Just have to fiddle with the intermediate pipe, which you'll have to do either way.
Man...seeing the PCM connections depinned all at once like that makes me cringe haha.
Good luck! Keeping an eye on your build!
J.
Looks like the exhaust survived the hit on the 01. If its aftermarket, which it kinda looks like it might be, you can use it. Hangers and all. It'll bolt up and look great. Just have to fiddle with the intermediate pipe, which you'll have to do either way.
Man...seeing the PCM connections depinned all at once like that makes me cringe haha.
Good luck! Keeping an eye on your build!
J.
Yeah I think I scored on the donor. I've got a high mileage 01 WS6 also so it got the axle and a few other things from the donor. Once the swap is done and I get everything I need for the 01 then I'll part out the rest. Unfortunately when the guy got rear ended he got pushed into the car in front of him so there is a scratch in the front bumber but not too bad. Fenders are good though.

Supreme Member


Joined: Nov 2001
Posts: 2,266
Likes: 37
From: Canada,Ont
Car: 1987 TransAm Ttop
Engine: 2005 LQ4
Transmission: Ls1 T56
Axle/Gears: 3:54
Re: 89 GTA LS1 swap
I find that the 4th gen pedals worked out great and Im using the tick master aswell.By the time I was done adjusting the clutch ..the clutch pedal is just slightly higher than my brake pedal.Barely noticeable height difference between all three pedals and it feels comfortable to me.The tick master and my ls7 clutch feels soo smooth to engage.I think you will be happy with them.Most times I read about horror stories using the 4thgen pedals and using a stock master.The tick master is a nice piece..fit perfectly.
Supreme Member
iTrader: (7)
Joined: Jun 2008
Posts: 1,468
Likes: 0
From: Minnesota
Car: 89 IROC-Z
Engine: 370 LSX, LS3 Top End
Transmission: Built T-56
Axle/Gears: 9" Aluminum Center 3.89's
Re: 89 GTA LS1 swap
Very Nice! Where did you get those solid motor mounts at?

Senior Member
iTrader: (8)
Joined: Sep 2010
Posts: 732
Likes: 0
From: Cincinnati, Ohio
Car: '89 GTA
Engine: 5.7L LS1
Transmission: 4L60E
Axle/Gears: 9 bolt 3.27
Re: 89 GTA LS1 swap
The rear coil will fit if you just trim the seam off eliminating that one screw, and it will still hold its seal.
Do we have enough '89 GTA's with LS motors already or what?

Supreme Member
Joined: Nov 2001
Posts: 2,266
Likes: 37
From: Canada,Ont
Car: 1987 TransAm Ttop
Engine: 2005 LQ4
Transmission: Ls1 T56
Axle/Gears: 3:54
Re: 89 GTA LS1 swap
Thread Starter
Junior Member
Joined: Feb 2008
Posts: 85
Likes: 2
From: Idaho Falls, Id
Car: lots of Firebirds!
Engine: LS1s, 455
Transmission: t56s all around! lol
Re: 89 GTA LS1 swap
Trans crossmember bolted up. When I built it I put an extra piece of the 1/4 inch strap under the trans mount to leave the xmember a little low so I have some room for adjustment if I need it. Better too low and shim it than too high and needing to modify it.

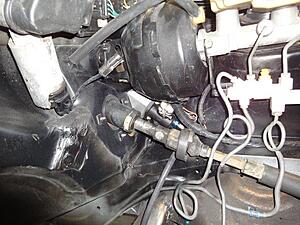
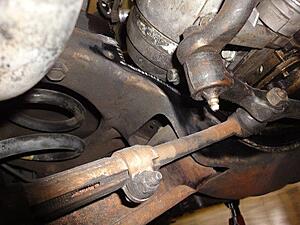
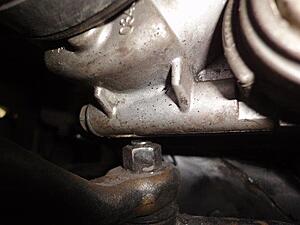
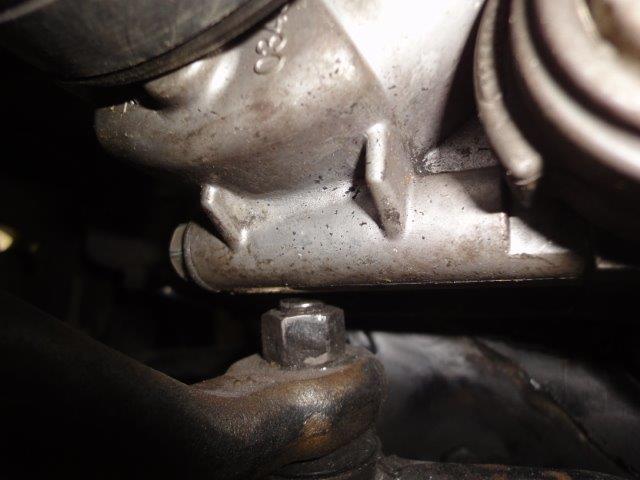
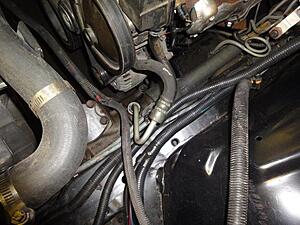
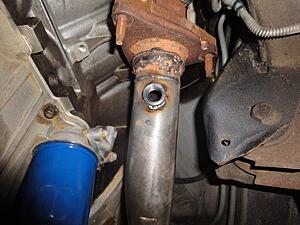
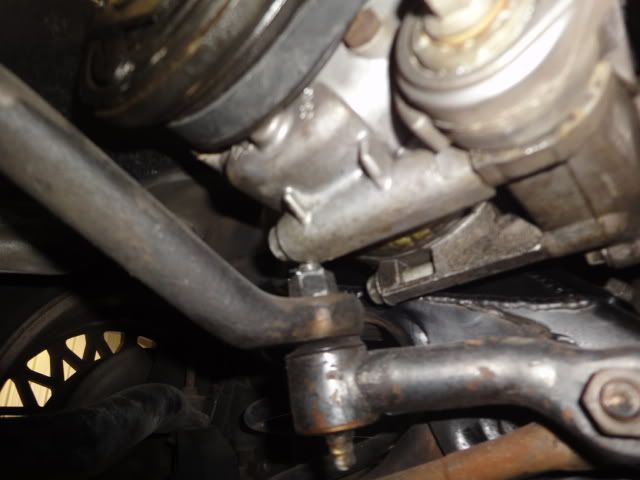
The center link joint on the idler was hitting my compressor

I loosened the idler bolts and slid it down as far as it would go and trimmed the stud a little. It clears now but if I need to raise the trans at all it may tip the engine down enough to be hitting the joint again, we'll see.
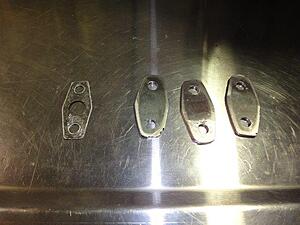
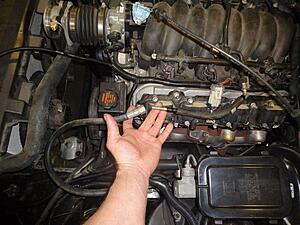
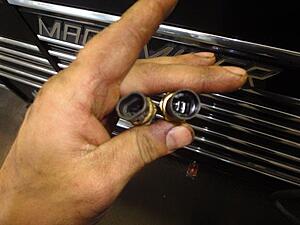
I made some block off plates for the AIR and EGR ports on the manifold. I made the mistake of assuming they were all the same. I used one of the AIR gaskets for a template and made three the same size. The EGR port is bigger. Rather than make a new one I oblonged the holes and it worked but it's a hair narrow.
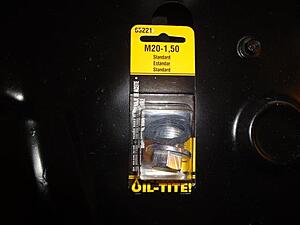
I plugged the O2 hole in the driver's manifold because there isn't room for the sensor. I used an 18 mm oil plug. I also used 20 mm oil plugs to replace the skip shift solenoid and the oil level sensor in the pan.
Put the 4th gen drive shaft in
I'm putting the battery on the passenger side so I put the 4th gen battery cables in. Then I started cutting a hole for the shifter but I'll finish that tomorrow.
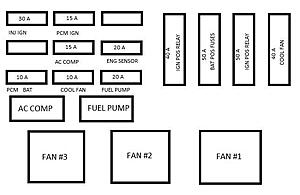
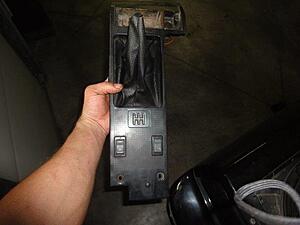
I made this legend for my fuse box. I'm gonna see if the sticker joint in the mall can make a sticker like the original labeled how I have my little drawing
It's getting pretty close. Things left to do:
radiator and heater hoses
AC lines
y pipe
intake pipe
mount PCM
a little wiring in the cab, pedals, ALDL, MIL etc.
Throttle and cruise cables (donor had TCS so the cables are too long)
Plug EGR hole in manifold. My coworker has a lathe so he wants to machine me a nice plug for it
That's about it then I have to figure out how to tune out the VATS so it'll start but I do have HPtuners
I got a call this morning about a job in Kuwait. It's short notice, I'd have to go to Mississippi for training on the 27th. I'm gonna go so I'm hoping to pretty much wrap the car up by then, but I have to put all my stuff in storage so it's going to be a busy week.

The center link joint on the idler was hitting my compressor

I loosened the idler bolts and slid it down as far as it would go and trimmed the stud a little. It clears now but if I need to raise the trans at all it may tip the engine down enough to be hitting the joint again, we'll see.
I made some block off plates for the AIR and EGR ports on the manifold. I made the mistake of assuming they were all the same. I used one of the AIR gaskets for a template and made three the same size. The EGR port is bigger. Rather than make a new one I oblonged the holes and it worked but it's a hair narrow.

I plugged the O2 hole in the driver's manifold because there isn't room for the sensor. I used an 18 mm oil plug. I also used 20 mm oil plugs to replace the skip shift solenoid and the oil level sensor in the pan.

Put the 4th gen drive shaft in

I'm putting the battery on the passenger side so I put the 4th gen battery cables in. Then I started cutting a hole for the shifter but I'll finish that tomorrow.
I made this legend for my fuse box. I'm gonna see if the sticker joint in the mall can make a sticker like the original labeled how I have my little drawing

It's getting pretty close. Things left to do:
radiator and heater hoses
AC lines
y pipe
intake pipe
mount PCM
a little wiring in the cab, pedals, ALDL, MIL etc.
Throttle and cruise cables (donor had TCS so the cables are too long)
Plug EGR hole in manifold. My coworker has a lathe so he wants to machine me a nice plug for it
That's about it then I have to figure out how to tune out the VATS so it'll start but I do have HPtuners
I got a call this morning about a job in Kuwait. It's short notice, I'd have to go to Mississippi for training on the 27th. I'm gonna go so I'm hoping to pretty much wrap the car up by then, but I have to put all my stuff in storage so it's going to be a busy week.
Last edited by t_raven; Jul 20, 2017 at 07:00 AM.
Thread Starter
Junior Member
Joined: Feb 2008
Posts: 85
Likes: 2
From: Idaho Falls, Id
Car: lots of Firebirds!
Engine: LS1s, 455
Transmission: t56s all around! lol
Thread Starter
Junior Member
Joined: Feb 2008
Posts: 85
Likes: 2
From: Idaho Falls, Id
Car: lots of Firebirds!
Engine: LS1s, 455
Transmission: t56s all around! lol
Re: 89 GTA LS1 swap
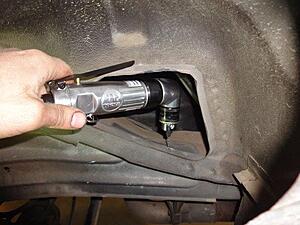
Installed my filler neck
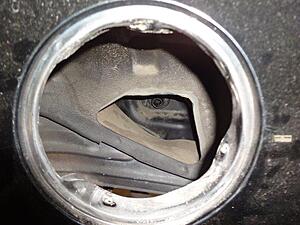
Stuck the 4th gen neck in and marked the hole. My right angle drill made drilling a pilot hole pretty easy. Then I drilled it to the right size from the bottom.
And here it is installed. Used 1" hose
Cut a hole for the shifter. I started with a cut off wheel but the sparks kept starting the carpet insulation on fire lol. So I busted out the plasma cutter. Quicker and blew most of the sparkes down instead of all over the interior
PS lines, I used the 3rd gen return line and the 4th gen supply line. I didn't think the supply line was going to work but with a little bending I made it work
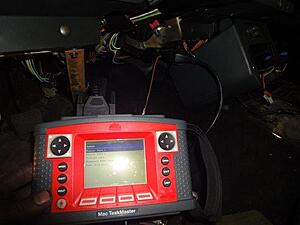
I ran out of shrink tube so I didn't get to finish the interior wiring yet but I temporarily wired up the ALDL and connected the battery. Nothing went up in smoke lol, and I have scan tool communication.
I'm going to bypass the pass key system entirely. I cut the green wire going from the start enable relay to the pass key module. I will use the clutch switch to ground the relay rather than the module. The original shifter switch completes the circuit from the relay to the starter solenoid. Personally I think it was dumb to run such big wires from the ignition switch to a relay, to the shifter, then to the starter rather than using those switches to control a relay. I'll solder the two wires together at the shifter and my neutral safety function will be handled by the clutch switch grounding the start enable relay.
I plan to make a better fuel line later on but for now I'm going to use a barbed fitting to connect the two so I can at least start it before heading off to Kuwait.
I installed the 4th gen upper radiator hose but I couldn't make the lower fit with the 3rd gen radiator, though some guys say they have. I picked up a Gates 21505 which other guys have said works so I'll try that on monday.
Don't need much to start it now. I need to connect the hoses, add fluids and tune out the VATS. I'll build a y pipe but we have a bender at the shop so that won't be too tough. I wanted to buy some mandrel bends to fab one out of but don't have the time to wait for shipping

Stuck the 4th gen neck in and marked the hole. My right angle drill made drilling a pilot hole pretty easy. Then I drilled it to the right size from the bottom.

And here it is installed. Used 1" hose

Cut a hole for the shifter. I started with a cut off wheel but the sparks kept starting the carpet insulation on fire lol. So I busted out the plasma cutter. Quicker and blew most of the sparkes down instead of all over the interior

PS lines, I used the 3rd gen return line and the 4th gen supply line. I didn't think the supply line was going to work but with a little bending I made it work

I ran out of shrink tube so I didn't get to finish the interior wiring yet but I temporarily wired up the ALDL and connected the battery. Nothing went up in smoke lol, and I have scan tool communication.

I'm going to bypass the pass key system entirely. I cut the green wire going from the start enable relay to the pass key module. I will use the clutch switch to ground the relay rather than the module. The original shifter switch completes the circuit from the relay to the starter solenoid. Personally I think it was dumb to run such big wires from the ignition switch to a relay, to the shifter, then to the starter rather than using those switches to control a relay. I'll solder the two wires together at the shifter and my neutral safety function will be handled by the clutch switch grounding the start enable relay.

I plan to make a better fuel line later on but for now I'm going to use a barbed fitting to connect the two so I can at least start it before heading off to Kuwait.

I installed the 4th gen upper radiator hose but I couldn't make the lower fit with the 3rd gen radiator, though some guys say they have. I picked up a Gates 21505 which other guys have said works so I'll try that on monday.
Don't need much to start it now. I need to connect the hoses, add fluids and tune out the VATS. I'll build a y pipe but we have a bender at the shop so that won't be too tough. I wanted to buy some mandrel bends to fab one out of but don't have the time to wait for shipping
Last edited by t_raven; Jul 20, 2017 at 07:15 AM.

Member
Joined: Nov 2010
Posts: 412
Likes: 1
From: Gilbert, AZ
Car: 1990 camaro RS
Engine: 305 TBI
Transmission: 700r4
Axle/Gears: 2.73
Re: 89 GTA LS1 swap
to subscribe and ask a question, does the 4th gen tank bolt right in? other then the fact that you need to mount the neck
Thread Starter
Junior Member
Joined: Feb 2008
Posts: 85
Likes: 2
From: Idaho Falls, Id
Car: lots of Firebirds!
Engine: LS1s, 455
Transmission: t56s all around! lol
Thread Starter
Junior Member
Joined: Feb 2008
Posts: 85
Likes: 2
From: Idaho Falls, Id
Car: lots of Firebirds!
Engine: LS1s, 455
Transmission: t56s all around! lol
Re: 89 GTA LS1 swap
There are a few threads in the stickies about using a 4th gen tank. You use the whole thing with the newer pump module. I cut the harness off the 3rd gen pump and soldered the connector onto the 4th gen tank so it'd plug in. The difference is the resistance of the fuel level sender. There are threads about fixing that on here too. Lots of guys used a 90 ohm sending unit. There are part numbers in a few threads for which senders will fit and are the right resistance. But at $150 + it's not a cheap fix. There's a thread on here about replacing the resisters in the gauge instead. That's what I plan to do since it only costs a couple bucks
Thread Starter
Junior Member
Joined: Feb 2008
Posts: 85
Likes: 2
From: Idaho Falls, Id
Car: lots of Firebirds!
Engine: LS1s, 455
Transmission: t56s all around! lol
Re: 89 GTA LS1 swap
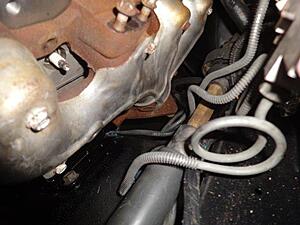
Quite a few guys on here are using a Gates 21505 for a lower radiator hose so I picked one up. It's for some early 90s F250. Got it back to the shop and it was too big so I got back on tgo and most guys were saying they just clamped the crap out of it. Well that just won't do for T Raven so I spent about 10 mins in the back of Oreilly and found this MasterPro 21736. It's the right diameter and the way it's shaped it clears the idler arm nicely.
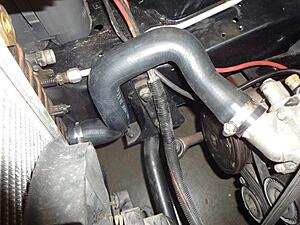
Here it is from the other side. I also used a barbed fitting and a small piece of heater hose to connect the steam vent line to the heater hose line on the radiator. I don't love how it looks but it got the job done for now any way.
Finished up the rest of my PCM wiring. The check engine light and diagnostic port are now wired up and working properly.
Pedal switches in and most of the way wired up. I haven't yet wired the cruise control to the switches
The 99-02 F Bodies have a 2 wire coolant senseor for the PCM and the PCM controls the gauges. I needed a way to control the 89 temp gauge and after some reading figured out the 98 Firebirds use a three wire sensor, 2 for the PCM and 1 for the gauge. It was hard to track down and I had to wait a week to get one. According to the guy my service manager ordered it from the 98 Camaro had the 2 wire sensor, I don't know if that's true or not though. But if you're ever looking for one look it up as a 98 Firebird with a 5.7, part number is 12551708. The V6 had a 3 wire sensor but it is too big for the hole in the LS1 head.

Here it is from the other side. I also used a barbed fitting and a small piece of heater hose to connect the steam vent line to the heater hose line on the radiator. I don't love how it looks but it got the job done for now any way.

Finished up the rest of my PCM wiring. The check engine light and diagnostic port are now wired up and working properly.

Pedal switches in and most of the way wired up. I haven't yet wired the cruise control to the switches

The 99-02 F Bodies have a 2 wire coolant senseor for the PCM and the PCM controls the gauges. I needed a way to control the 89 temp gauge and after some reading figured out the 98 Firebirds use a three wire sensor, 2 for the PCM and 1 for the gauge. It was hard to track down and I had to wait a week to get one. According to the guy my service manager ordered it from the 98 Camaro had the 2 wire sensor, I don't know if that's true or not though. But if you're ever looking for one look it up as a 98 Firebird with a 5.7, part number is 12551708. The V6 had a 3 wire sensor but it is too big for the hole in the LS1 head.

Last edited by t_raven; Jul 20, 2017 at 07:15 AM.
Thread Starter
Junior Member
Joined: Feb 2008
Posts: 85
Likes: 2
From: Idaho Falls, Id
Car: lots of Firebirds!
Engine: LS1s, 455
Transmission: t56s all around! lol
Re: 89 GTA LS1 swap
Cut the end off my EGR tube and welded it shut. It'll do until my coworker mills me a nice plug or I get an LS6 intake
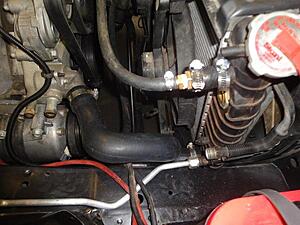
Thought about making a y pipe out of 2 1/2 inch pipe but the flanges from the manafolds are only 2 1/4" and I was able to get a couple 2 1/4" bends here in town for $10 each so I decided to just go with that for now. I'd like to turbo this at some point anyway so if I ever do, or get headers this y pipe won't be permanent.

Welded an O2 bung in the driver's side pipe
Here it is mostly done
And all done and fully welded
Turned off the vats and started it this morning. Just figured out how to turn off all the codes for the emissions equipment I removed so I did that. Now that I've got it figured out. It only took a minute to turn off the skip shift in my 01, so no more of that annoying nonsense.

Thought about making a y pipe out of 2 1/2 inch pipe but the flanges from the manafolds are only 2 1/4" and I was able to get a couple 2 1/4" bends here in town for $10 each so I decided to just go with that for now. I'd like to turbo this at some point anyway so if I ever do, or get headers this y pipe won't be permanent.

Welded an O2 bung in the driver's side pipe

Here it is mostly done

And all done and fully welded

Turned off the vats and started it this morning. Just figured out how to turn off all the codes for the emissions equipment I removed so I did that. Now that I've got it figured out. It only took a minute to turn off the skip shift in my 01, so no more of that annoying nonsense.
Last edited by t_raven; Jul 20, 2017 at 07:18 AM.
Member
Joined: Jul 2009
Posts: 344
Likes: 7
From: Danville, KY
Car: 1988 IROC-Z
Engine: 350 TPI
Transmission: 700R4
Axle/Gears: 3.73
Re: 89 GTA LS1 swap
ya i am currently driving my donor and man that skip shift is annoying and its also kind of hard to put in gear at times. any advice on that?
Thread Starter
Junior Member
Joined: Feb 2008
Posts: 85
Likes: 2
From: Idaho Falls, Id
Car: lots of Firebirds!
Engine: LS1s, 455
Transmission: t56s all around! lol
Re: 89 GTA LS1 swap
Hard to put into gear how and what gears? If it's a specific gear the syncro could be worn out, if it grinds going into a certain gear the blocker rings are probably worn out. If it's hard to put into any gear your clutch could be dragging. Jack the rear wheels off the ground and with it in gear and the clutch in rev it up and if the rear wheels turn the clutch is dragging. Flush it and go from there. Hope that helps.

Joined: Mar 2000
Posts: 43,187
Likes: 45
From: Littleton, CO USA
Car: 82 Berlinetta/57 Bel Air
Engine: L92/LQ4 (both w/4" stroke)
Transmission: 4L80E/4L80E
Axle/Gears: 12B-3.73/9"-3.89
Re: 89 GTA LS1 swap
Here are the clutch, PP and FW
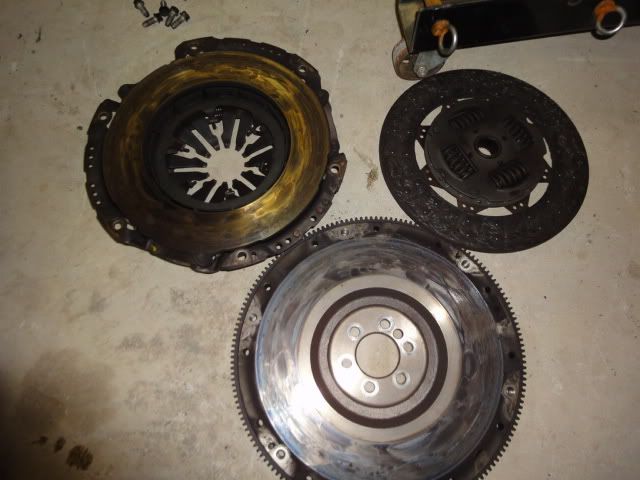
I was expecting it to look better with only 55k miles on it. The car was drivable when I bought it but I only pulled it on and off a trailer so I don't know how good the clutch was. Anybody that knows clutches think it would be worth putting it in my 2001 TA?
I was expecting it to look better with only 55k miles on it. The car was drivable when I bought it but I only pulled it on and off a trailer so I don't know how good the clutch was. Anybody that knows clutches think it would be worth putting it in my 2001 TA?
http://sdparts.com/details/scoggin-d...center/sdls7ck
Thread Starter
Junior Member
Joined: Feb 2008
Posts: 85
Likes: 2
From: Idaho Falls, Id
Car: lots of Firebirds!
Engine: LS1s, 455
Transmission: t56s all around! lol
Re: 89 GTA LS1 swap
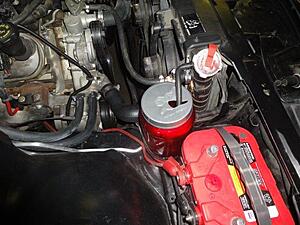
I've been pretty busy at work this week, but I did get a couple little things handled so I could actually drive it. Made a custom over flow bottle. It's temporary of course lol. I want to fab up a nice little aluminum tank, the original plastic one is a huge eye sore.
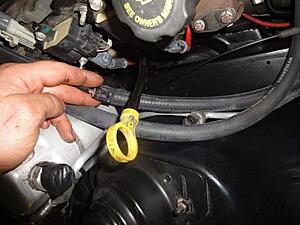
Because of the throttle cable set up on the donor do to the TCS none of the cables would work. The cables from the pedal and the cruise servo both went to a throttle control motor and then a cable from there went to the throttle body, but I managed to make the one from the pedal work by making a new bracket for it. I'll probably buy a braided lokar one or something later on. The cruise cable however not only has the wrong end but is way long. I'll see if I can swap cables, if not I'll be looking for a non TCS cruise control unit. But here's the little bracket I made for the time being
Still gotta make some AC lines but I made the dang pig tail for the pressure switch too short. But hey, after all that wiring I did pretty good if that's the only thing I have to change.
Gonna wrap things up inside and get it all put back together. I've got a 5 speed shifter plate I'll put in for now, but I'll probably switch to the 4th gen console later.
I drove it around the block yesterday. It runs fine, and the vibration with the solid mounts is pretty minimal. It does vibrate quite a bit when engaging the clutch from a stop but I'm thinking it's more because the clutch is chattering, which is a bit annoying with a brand new clutch and flywheel. Maybe it'll quit after a bit of a break in. If not I guess I'll be calling Monster to see what's wrong.

Because of the throttle cable set up on the donor do to the TCS none of the cables would work. The cables from the pedal and the cruise servo both went to a throttle control motor and then a cable from there went to the throttle body, but I managed to make the one from the pedal work by making a new bracket for it. I'll probably buy a braided lokar one or something later on. The cruise cable however not only has the wrong end but is way long. I'll see if I can swap cables, if not I'll be looking for a non TCS cruise control unit. But here's the little bracket I made for the time being

Still gotta make some AC lines but I made the dang pig tail for the pressure switch too short. But hey, after all that wiring I did pretty good if that's the only thing I have to change.

Gonna wrap things up inside and get it all put back together. I've got a 5 speed shifter plate I'll put in for now, but I'll probably switch to the 4th gen console later.

I drove it around the block yesterday. It runs fine, and the vibration with the solid mounts is pretty minimal. It does vibrate quite a bit when engaging the clutch from a stop but I'm thinking it's more because the clutch is chattering, which is a bit annoying with a brand new clutch and flywheel. Maybe it'll quit after a bit of a break in. If not I guess I'll be calling Monster to see what's wrong.
Last edited by t_raven; Jul 20, 2017 at 07:20 AM.
Member

Joined: Jul 2002
Posts: 255
Likes: 9
From: Humid Houston on the Texas coast
Car: '86 Z28
Engine: SDPC TPI 350
Transmission: WC T5
Axle/Gears: 3.23 posi
Re: 89 GTA LS1 swap
The center link joint on the idler was hitting my compressor
I loosened the idler bolts and slid it down as far as it would go and trimmed the stud a little. It clears now but if I need to raise the trans at all it may tip the engine down enough to be hitting the joint again, we'll see.

I loosened the idler bolts and slid it down as far as it would go and trimmed the stud a little. It clears now but if I need to raise the trans at all it may tip the engine down enough to be hitting the joint again, we'll see.
Thanks,
Mike
Thread Starter
Junior Member
Joined: Feb 2008
Posts: 85
Likes: 2
From: Idaho Falls, Id
Car: lots of Firebirds!
Engine: LS1s, 455
Transmission: t56s all around! lol
Re: 89 GTA LS1 swap
No problem, I try to share as much info as I can because I know how frustrating it is to read thread after thread about something and never find the info you need. I can think of a few ways to get more clearance, you could slot the holes in the idler a little, I can't imagine dropping it slightly would affect bump steer too much. You could grind off a little bit of the compressor housing right there, or you could grind quite a bit off the stud in the idler arm. Idealy you want to leave some threads above the top of the nut but the nut is pretty thick and could be trimmed down itself. I don't think the idler arm has a hole for a cotter pin, but I suppose a person could use a castle nut and drill a hole in the stud for a cotter pin, then trim the stud as much as you need too and still have the piece of mind the nut will stay put
Member

Joined: Nov 2010
Posts: 150
Likes: 6
From: Hillsboro, Oregon
Car: 1986 IROC
Engine: LS1
Transmission: T56
Axle/Gears: 3.23 Posi
Re: 89 GTA LS1 swap
I read in another thread where someone recommended putting a 1/8" shim under the lower bolts of the passenger motor mount to help with this.
I'm going to try it, but I have the same issue with coil clearance at the A/C box as shown earlier. I haven't dropped the motor in yet, so I can't say whether or not it's a good idea.
But when things are as tight as shown at the idler arm, 1/8" is a big help. I'll try and remember to edit this post when I find out what it does to my clearance between the A/C box and rear coil.
Great pics! And your swap is much like mine so very helpful. Thanks for sharing Raven.
Thread Starter
Junior Member
Joined: Feb 2008
Posts: 85
Likes: 2
From: Idaho Falls, Id
Car: lots of Firebirds!
Engine: LS1s, 455
Transmission: t56s all around! lol
Re: 89 GTA LS1 swap
I read in another thread where someone recommended putting a 1/8" shim under the lower bolts of the passenger motor mount to help with this.
I'm going to try it, but I have the same issue with coil clearance at the A/C box as shown earlier. I haven't dropped the motor in yet, so I can't say whether or not it's a good idea.
But when things are as tight as shown at the idler arm, 1/8" is a big help. I'll try and remember to edit this post when I find out what it does to my clearance between the A/C box and rear coil.
Great pics! And your swap is much like mine so very helpful. Thanks for sharing Raven.
I'm going to try it, but I have the same issue with coil clearance at the A/C box as shown earlier. I haven't dropped the motor in yet, so I can't say whether or not it's a good idea.
But when things are as tight as shown at the idler arm, 1/8" is a big help. I'll try and remember to edit this post when I find out what it does to my clearance between the A/C box and rear coil.
Great pics! And your swap is much like mine so very helpful. Thanks for sharing Raven.
I forgot to post pics before but I did modify my coil bracket a little bit. I also trimmed the EVAP housing like White 89 posted a picture of. On the coil bracket I cut the rear piece off where the bolt hole is so that I could bend the bracket to let the rear coil sit closer to the valve cover. Me having solid mounts, I don't have to worry too much about clearance on things because the engine stays put, but there are a few ways a person could modify the coil bracket. I thought about modifying it to move the rear two coils ahead as much as possible. I think if the rear coil was 1/2 in further forward it would clear the AC box and the plug wire would probably still be long enough.
On another note, I drove the car again today. I dumped the clutch good one time and that helped with the chattering. It's a lot better now.

Supreme Member
Joined: Nov 2001
Posts: 4,456
Likes: 3
From: Ocean, NJ
Car: Check The Sig
Re: 89 GTA LS1 swap
Looks great! I like the hose how it comes up and over! Looks like I will cross-reference this stuff at work tomorrow. With that shop, and your fab skils, wish you lived closer! That trans cross member looks great!
FYI, the non-TCS throttle cable is still a little too long, and you will have to bend your gas pedal arm.
FYI, the non-TCS throttle cable is still a little too long, and you will have to bend your gas pedal arm.
Joined: Jan 2001
Posts: 3,188
Likes: 59
From: Conroe, TX
Car: 1987 GTA
Engine: LS1
Transmission: 4L60e
Re: 89 GTA LS1 swap
Nice swap and thanks for sharing all of the info. I did quite a bit of trimming on my lower gates hose before calling it good - though having a direct fit option like you found is a much better alternative.
Thread Starter
Junior Member
Joined: Feb 2008
Posts: 85
Likes: 2
From: Idaho Falls, Id
Car: lots of Firebirds!
Engine: LS1s, 455
Transmission: t56s all around! lol
Re: 89 GTA LS1 swap
Finished up the wiring inside and mounted the PCM where the original ECU was. Made a little bracket that bolts to the bottom of the dash frame and hold it up in there. Decided to use the 4th gen console, I like drink holders lol.
Took my compressor back off to get the lines figured out. Trimmed the housing where I needed more clearance for the idler arm.

I went to Evco House of Hose and they had the right fittings to make the 4th gen hose assembly work. $10 per fitting and they didn't even charge me to crimp them on. I wanted a 45* on the bigger fitting but they only had a straight one.
I don't love the routing but at least it works and I have cold air. If I ever do build a turbo set up I'll probably have to re-route the line
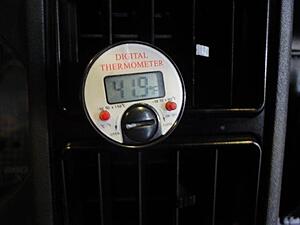
Nice and cold
Just waiting on my pipes and silicone couplers for the intake and it'll be ready to start driving it for now. It sits a little high in the front but not as much as I expected. I'd love to get the lowering spindles I want but I want to change the brakes too so I'd have to get the spindles for newer style calipers, which means I'd have to do brakes at the same time, which means I'd have to put the C6 wheels on, which means I'd have to buy tires etc etc lol. I'll just drive it like this for now

Took my compressor back off to get the lines figured out. Trimmed the housing where I needed more clearance for the idler arm.
I went to Evco House of Hose and they had the right fittings to make the 4th gen hose assembly work. $10 per fitting and they didn't even charge me to crimp them on. I wanted a 45* on the bigger fitting but they only had a straight one.

I don't love the routing but at least it works and I have cold air. If I ever do build a turbo set up I'll probably have to re-route the line

Nice and cold

Just waiting on my pipes and silicone couplers for the intake and it'll be ready to start driving it for now. It sits a little high in the front but not as much as I expected. I'd love to get the lowering spindles I want but I want to change the brakes too so I'd have to get the spindles for newer style calipers, which means I'd have to do brakes at the same time, which means I'd have to put the C6 wheels on, which means I'd have to buy tires etc etc lol. I'll just drive it like this for now

Last edited by t_raven; Jul 20, 2017 at 07:25 AM.

Junior Member
Joined: Dec 2008
Posts: 7
Likes: 0
Re: 89 GTA LS1 swap
y did u have to use ur both of the wire harness 4th and 3ed gen so if i was to get a doner car 02 TRANS AM and i wanted to do the Ls1, Dash, Rear End, Seats, Wouldent it all just be plug and play with like the A/C ALL the Wireing and what ever eles there is
Thread Starter
Junior Member
Joined: Feb 2008
Posts: 85
Likes: 2
From: Idaho Falls, Id
Car: lots of Firebirds!
Engine: LS1s, 455
Transmission: t56s all around! lol
Re: 89 GTA LS1 swap
If you were going to use the dash and the entire 4th gen ac unit then most of the wiring from the 4th gen could be used. No matter how you do it there's going to at least some modification needed.

Supreme Member
iTrader: (1)
Joined: Mar 2007
Posts: 1,237
Likes: 7
From: Apopka, Florida
Car: 1989 Pontiac Trans Am GTA
Engine: cammed LS1
Transmission: Monster SS 4L65E
Axle/Gears: 9 bolt posi w/ 3.70 gears
Re: 89 GTA LS1 swap
I'd love to get the lowering spindles I want but I want to change the brakes too so I'd have to get the spindles for newer style calipers, which means I'd have to do brakes at the same time, which means I'd have to put the C6 wheels on, which means I'd have to buy tires etc etc lol.
 I was looking at putting a Z06 brake kit on mine, but by the time you add everything up, you're looking at a couple grand!
Keep up the good work man.
Thread Starter
Junior Member
Joined: Feb 2008
Posts: 85
Likes: 2
From: Idaho Falls, Id
Car: lots of Firebirds!
Engine: LS1s, 455
Transmission: t56s all around! lol
Re: 89 GTA LS1 swap
Thanks guys. I put this car on hold for a while so I can get some other things done. Put AC in my 67 just in time for winter lol. Rebuilding a wrecked 98 R1, and buying a house. The house is gonna need some work but it's got a 2 car garage and attached shop so I'll have plenty of room for the toys and it'll be more convenient to work on them. Most are in storage right now. I want to do some suspension upgrades next, wheels, tires and brakes. At some point I'll take it all apart, clean things up under the hood and paint it. Also trying to learn more about HPTuners so I can get a good tune on it. Later on I plan to build a front mount turbo for it 
Joined: Sep 2002
Posts: 3,685
Likes: 10
From: PA
Car: 86 Trans AM
Engine: LS1 (not stock...)
Transmission: Built T56
Axle/Gears: Strange 12-bolt w/ 3.73
Re: 89 GTA LS1 swap
Lookin good! You gonna use those nice black 4th gen seats in the 89?? Or were you using interior parts in your 01?
J.
J.
Thread Starter
Junior Member
Joined: Feb 2008
Posts: 85
Likes: 2
From: Idaho Falls, Id
Car: lots of Firebirds!
Engine: LS1s, 455
Transmission: t56s all around! lol
Re: 89 GTA LS1 swap
Not too sure yet, I do like the 3rd gen seats but the 4th gen ones are a little more comfortable. I did swap driver's seats with my 01 because that one had some broken springs in the seat bottom. So I still have a good passenger seat and a driver's seat that needs a little work. I'll either put them in the 89 or recover the 3rd gen seats and leave them in the 89 and use the 4th gen seats in one of my older cars.
Last edited by t_raven; Nov 10, 2011 at 12:30 PM.
Senior Member
Joined: Jun 2001
Posts: 922
Likes: 33
From: Kansas
Car: 91 Z28
Engine: 6.0L LQ9
Transmission: T56
Axle/Gears: Dana 44 3.92
Re: 89 GTA LS1 swap
awesome work on the swap. that tranny x-member is the bee's knees...i haven't bought one yet, and may just be making one now! what did you set your tranny angle at?
that exhaust looks pretty clean too...great work.
that exhaust looks pretty clean too...great work.
Senior Member
iTrader: (3)
Joined: Jan 2010
Posts: 527
Likes: 1
From: Illinois
Car: 89 GTA
Engine: 5.7 TPI L98
Transmission: 700R4 w/ Stage 2 shift kit & stall
Re: 89 GTA LS1 swap
Amazing thread! I've also got an 89 GTA, black on black, but I've got black cloth seats. Other than that our cars look very similar. lol. Makes me really wanna do the swap on mine.
Thread Starter
Junior Member
Joined: Feb 2008
Posts: 85
Likes: 2
From: Idaho Falls, Id
Car: lots of Firebirds!
Engine: LS1s, 455
Transmission: t56s all around! lol
Re: 89 GTA LS1 swap
Thanks for the compliment on the exhaust. I think I could do better but for what I had readily available it works for now.
Do it! lol. I got lucky that I bought such a cheap donor and my 350 was knocking anyway.