
What ever happened to QwkTrip's car anyway?

Thread Starter

Joined: Mar 2001
Posts: 10,438
Likes: 2,093
Car: '89 Firebird
Engine: 7.0L
Transmission: T56
Re: What ever happened to QwkTrip's car anyway?
Updated tank wiring schematic after modifying the Racetronix harness.
Update: revised wiring schematic with underhood power center in post #300, https://www.thirdgen.org/forums/ltx-...ml#post5961350

Update: revised wiring schematic with underhood power center in post #300, https://www.thirdgen.org/forums/ltx-...ml#post5961350
Last edited by QwkTrip; May 22, 2021 at 07:25 PM.
Member
iTrader: (2)
Joined: Feb 2003
Posts: 219
Likes: 0
From: ME
Car: 1986 IROC-Z
Engine: LS1-ish
Transmission: T56 stage II
Axle/Gears: S60 4:10's
Re: What ever happened to QwkTrip's car anyway?
I used the 4th gen factory rubber boot. Even though the 3rd gen hole is oval, I got it to fit well enough for my liking. It felt like it might pop out or come loose, but it's been race proven without issues, haha!
Here you go bud...
Here you go bud...


Member
iTrader: (2)
Joined: Feb 2003
Posts: 219
Likes: 0
From: ME
Car: 1986 IROC-Z
Engine: LS1-ish
Transmission: T56 stage II
Axle/Gears: S60 4:10's
Re: What ever happened to QwkTrip's car anyway?
You're welcome. I got lucky with my dropout and got tons of various parts I was able to reuse. Parts I never would have even known about.
Nice job running the fuel lines by the way! One thing I notice that you did which I wish I would have done is run all the electrical wiring to the tank in one loom. I kept the hotwire kit separate for some reason. Much neater your way.
Nice job running the fuel lines by the way! One thing I notice that you did which I wish I would have done is run all the electrical wiring to the tank in one loom. I kept the hotwire kit separate for some reason. Much neater your way.
Thread Starter
Joined: Mar 2001
Posts: 10,438
Likes: 2,093
Car: '89 Firebird
Engine: 7.0L
Transmission: T56
Re: What ever happened to QwkTrip's car anyway?
Ya, I was laying out wiring on the fuel tank for probably the third time when it dawned on me that I'm running wires up to the fuel pump for no reason other than that's where Racetronix put the connector.
Still contemplating where to mount the relay and where to bring pump B+ wiring into cab. I really want to put the relay inside the cab behind the interior panel below rear speakers (where older cars had a lap belt). But harness isn't long enough and I don't necessarily want to make a hole that large in the firewall to run the wires.
Still contemplating where to mount the relay and where to bring pump B+ wiring into cab. I really want to put the relay inside the cab behind the interior panel below rear speakers (where older cars had a lap belt). But harness isn't long enough and I don't necessarily want to make a hole that large in the firewall to run the wires.


Thread Starter
Joined: Mar 2001
Posts: 10,438
Likes: 2,093
Car: '89 Firebird
Engine: 7.0L
Transmission: T56
Re: What ever happened to QwkTrip's car anyway?
Ya, I've been trying to figure out the same thing for the last couple hours. lol!
Thread Starter
Joined: Mar 2001
Posts: 10,438
Likes: 2,093
Car: '89 Firebird
Engine: 7.0L
Transmission: T56
Re: What ever happened to QwkTrip's car anyway?
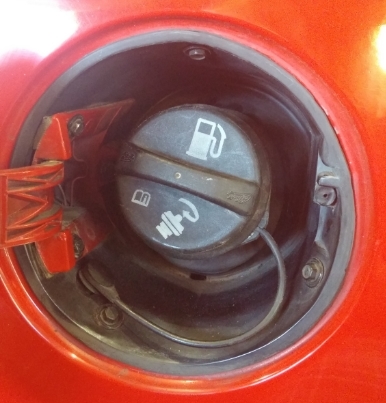
Fuel tank and heat shields are up in place and won't be coming down again.  And remember those radiator hose clamps I bought from the Chevy dealer that were too small? Turns out they are perfect size for the filler neck.

And remember those radiator hose clamps I bought from the Chevy dealer that were too small? Turns out they are perfect size for the filler neck. Last edited by QwkTrip; Apr 17, 2019 at 08:20 PM.
Member
iTrader: (2)
Joined: Feb 2003
Posts: 219
Likes: 0
From: ME
Car: 1986 IROC-Z
Engine: LS1-ish
Transmission: T56 stage II
Axle/Gears: S60 4:10's
Re: What ever happened to QwkTrip's car anyway?
Good planning with the filler right there. I put my filler hose on with the tank in the car, BOOO! I didn't want to drop the tank again and that was not a wise decision!
Oh and by the way, I think you had mentioned about the fuel filter being too small for the bracket. I noticed the same thing when I was test fitting mine, and I ended up putting some wide 3M rubber tape around the filter to make it fit snug in the bracket.
Oh and by the way, I think you had mentioned about the fuel filter being too small for the bracket. I noticed the same thing when I was test fitting mine, and I ended up putting some wide 3M rubber tape around the filter to make it fit snug in the bracket.
Member
iTrader: (2)
Joined: Feb 2003
Posts: 219
Likes: 0
From: ME
Car: 1986 IROC-Z
Engine: LS1-ish
Transmission: T56 stage II
Axle/Gears: S60 4:10's
Thread Starter
Joined: Mar 2001
Posts: 10,438
Likes: 2,093
Car: '89 Firebird
Engine: 7.0L
Transmission: T56
Re: What ever happened to QwkTrip's car anyway?
I spent hours tonight deliberating where to mount the Racetronix relay, how to provide an excellent ground, and how to pass wiring through the firewall without interfering with the rear seat. Then I realized it doesn't have to be this way. Nobody in their right mind would put a relay outside near the fuel tank if wiring from scratch. So I'm not going to either. I'm cutting the Racetronix harness again and putting the relay inside the car or in the engine bay.
Re: What ever happened to QwkTrip's car anyway?
I built my own twin relay setup and mounted them just inboard of the RR LCA well away from the exhaust. For ground, I spliced a 12ga into the original ground from the sender and double ringed it to the chassis on the opposite side. I used a wire wheel to buzz the paint off both areas for a good bare metal ground. They were sealed bosche relays, so they were fine there. My SFCs were 2" tubes, so running the wires F-R just meant through the pass tube. I was opposed to boring small holes in the body for wires to pass through
Thread Starter
Joined: Mar 2001
Posts: 10,438
Likes: 2,093
Car: '89 Firebird
Engine: 7.0L
Transmission: T56
Re: What ever happened to QwkTrip's car anyway?
So you bring up something else I was trying to figure out last night.... Where is that ground located? My car has been apart too long to remember. I assumed the BLK wire on firewall Weatherpack connector is the original pump ground, not sender ground. Maybe I don't remember right?
Last edited by QwkTrip; Mar 26, 2015 at 08:18 AM.
Re: What ever happened to QwkTrip's car anyway?
No, no, no, back at the sender. The ground coming out was for the original fuel pump and fuel level sender. My pumps exceeded the wire size so the feeds/grounds were drilled through the top and sealed with epoxy. Since the old ground is still used, I tapped into it with the new larger pump grounds and ran them to new points on the chassis near the tank. That keeps the old ground, add two new larger gauge grounds and everything still works like stock
Thread Starter
Joined: Mar 2001
Posts: 10,438
Likes: 2,093
Car: '89 Firebird
Engine: 7.0L
Transmission: T56
Re: What ever happened to QwkTrip's car anyway?
Bear with me, I sold my original wiring with the old fuel tank so I don't have it for reference. The only thing I have left back there is the original Weatherpack on the back firewall behind rear seats.
So if I understand right, the original fuel pump and sender were on the same ground, connected to the BLK wire in the Weatherpack connector on rear firewall. There weren't separate grounds.
So if I understand right, the original fuel pump and sender were on the same ground, connected to the BLK wire in the Weatherpack connector on rear firewall. There weren't separate grounds.
Thread Starter
Joined: Mar 2001
Posts: 10,438
Likes: 2,093
Car: '89 Firebird
Engine: 7.0L
Transmission: T56
Re: What ever happened to QwkTrip's car anyway?
I have most things tidied up now in the back end. Still trying to find some soft brake lines that fit. I have a pile of new steel braided brake hoses that I will be selling. Thinking of doing a custom order.
I have a double hump crossmember that does not accept a torque arm mount. I looked at every torque arm on the market and decided to go with Hawks Thirdgen "Sinister" torque arm. I'm telling you, Bruce has knocked it out of the ball park with this one! It is a mid-length arm (shorter than stock) made by UMI and sold exclusively through Hawks Thirdgen. It is top notch, and IT IS A BEAST! Just look at that thing! Fit up perfectly to the axle and it comes with a weld-in crossbar with a hump for extra exhaust clearance, plates, and other hardware.
Update: There was too little ground clearance with this unit. Ended up removing it and having a custom torque arm fabricated. See post #789, https://www.thirdgen.org/forums/ltx-...ml#post6149848

My car originally had drum brakes so I had to guess what brake lines to buy for the 12 bolt. I went for '92 lines for disc brake cars because they had PBR calipers. Those lines might as well come off a Fiat. I had to reshape the entire thing, taking out bends, putting in bends, trying to extend them down the axle further. It would have been easier to make lines from scratch but I already had money in these stainless lines so I used them. I also had to cut the spring wrap in to two pieces because it was too short to be in all the right locations. Here is my finished product. Believe me, that is damn good considering what I had to work with.

That brake hose bracket delayed me a week. I didn't know the disc brake cars had brackets like this. I just couldn't make the brake lines package right and it dawned on me that I must be missing something. Sure enough, I can see brackets in pictures on the internet. I spent hours on the internet looking for OE style brackets. I found it at www.andyz28.com and it comes in a set (left and right). Now hopefully you won't burn your time trying to figure this out.


Strange 12 bolt mounted up in car. Kenny Brown double adjustable panhard rod with spherical joints. Hotchkis drop springs that I had to buy because my old drop springs were too large diameter to fit in the BRM a-arm pockets. And the old Suspension Techniques sway bar I installed back in 1993.

Kenny Brown adjustable control arms. Poly bushing on frame side, spherical joint on axle side. Founders drop brackets that I had to bend the hell out of to make them fit. Also had to drill out the bolt holes bigger for the control arms. They have some lax quality control over there.

I have a double hump crossmember that does not accept a torque arm mount. I looked at every torque arm on the market and decided to go with Hawks Thirdgen "Sinister" torque arm. I'm telling you, Bruce has knocked it out of the ball park with this one! It is a mid-length arm (shorter than stock) made by UMI and sold exclusively through Hawks Thirdgen. It is top notch, and IT IS A BEAST! Just look at that thing!
Fit up perfectly to the axle and it comes with a weld-in crossbar with a hump for extra exhaust clearance, plates, and other hardware.Update: There was too little ground clearance with this unit. Ended up removing it and having a custom torque arm fabricated. See post #789, https://www.thirdgen.org/forums/ltx-...ml#post6149848
My car originally had drum brakes so I had to guess what brake lines to buy for the 12 bolt. I went for '92 lines for disc brake cars because they had PBR calipers. Those lines might as well come off a Fiat. I had to reshape the entire thing, taking out bends, putting in bends, trying to extend them down the axle further. It would have been easier to make lines from scratch but I already had money in these stainless lines so I used them. I also had to cut the spring wrap in to two pieces because it was too short to be in all the right locations. Here is my finished product. Believe me, that is damn good considering what I had to work with.
That brake hose bracket delayed me a week. I didn't know the disc brake cars had brackets like this. I just couldn't make the brake lines package right and it dawned on me that I must be missing something. Sure enough, I can see brackets in pictures on the internet. I spent hours on the internet looking for OE style brackets. I found it at www.andyz28.com and it comes in a set (left and right). Now hopefully you won't burn your time trying to figure this out.
Strange 12 bolt mounted up in car. Kenny Brown double adjustable panhard rod with spherical joints. Hotchkis drop springs that I had to buy because my old drop springs were too large diameter to fit in the BRM a-arm pockets. And the old Suspension Techniques sway bar I installed back in 1993.
Kenny Brown adjustable control arms. Poly bushing on frame side, spherical joint on axle side. Founders drop brackets that I had to bend the hell out of to make them fit. Also had to drill out the bolt holes bigger for the control arms. They have some lax quality control over there.
Last edited by QwkTrip; May 22, 2021 at 07:25 PM.
Thread Starter
Joined: Mar 2001
Posts: 10,438
Likes: 2,093
Car: '89 Firebird
Engine: 7.0L
Transmission: T56
Re: What ever happened to QwkTrip's car anyway?
One of the things I did today was put up the exhaust. This is the Hawks Thirdgen (Stainless Works) 3" dual Y-pipe to single 3.5" exhaust that goes with their 2" primary headers they developed for LS7. Fit like a glove. No issues whatsoever. It is all V-band clamps from front to back except for one side of Y-pipe has a slip joint to allow for final adjustment, and the inlet and outlet of the muffler is slip joint. Really easy to install.

Over the axle takes a nice route. The stock rear hangers are replaced by special brackets to keep it up high.

Single inlet and outlet with a down facing slant cut tip. I didn't want pipes sticking out under the bumper. Dust clouds off the road when you take off are an added bonus.

Over the axle takes a nice route. The stock rear hangers are replaced by special brackets to keep it up high.
Single inlet and outlet with a down facing slant cut tip. I didn't want pipes sticking out under the bumper. Dust clouds off the road when you take off are an added bonus.
Last edited by QwkTrip; Apr 17, 2019 at 08:19 PM.
Thread Starter
Joined: Mar 2001
Posts: 10,438
Likes: 2,093
Car: '89 Firebird
Engine: 7.0L
Transmission: T56
Re: What ever happened to QwkTrip's car anyway?
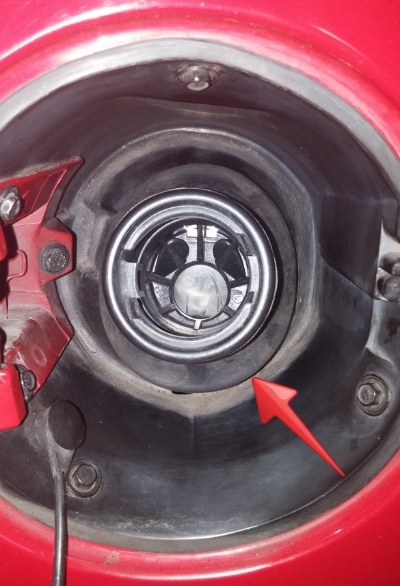
I've been trying to figure out how I'm going to run wiring into the car from the fuel tank without a water leak or creating new holes in the firewall. I've come up with something. 
I removed the original Weather-Pack connector from firewall. It is useless to me with the small pump wiring. I tried to load the connector with 12 gage wire but the connector has a solid molded housing that is impenetrable. All the wiring for fuel tank needs to pass through to interior with no water leaks AND stay low profile under the carpet. I simply cannot find an electrical connector on the market that can do the job. I have no choice but to use some type of grommet.

This is what I came up with. It consists of a sheet metal plate that I made to cover the hole, the original wire cover plate on the interior side, and a S-shaped drain tube.

The drain tube has a flange that will seal to the inside of the plate. I will dope it with sealant to make sure it stays sealed and put a zip tie on the outside to keep it pulled up tight to the metal plate. The tube is barely large enough to pull all the wires through. It is a really snug fit.

The tube will point downward on the outside of the car so no water can get in. It is so long that water can't track up the wires into the car. And because it points down it will create a drip loop with the harness. Original cover plate will be installed inside the car just like stock. I will post picture of finished product after the install.
Update: Pictures installed on car in post #317, https://www.thirdgen.org/forums/ltx-...ml#post5967792

I made a clean place to create a chassis ground for the pump. This is beside the rear seat, behind the plastic side panel. It is next to where all the wiring follows the stock routing so very easy to access, and ground will stay clean inside the car.

I essentially disassembled the entire Racetronix harness and putting it back together to suit me. The pump relay is mounted in engine bay next to where my new under hood fuse center will be located. I used one of the original weld nuts on the firewall. I will probably not use the Racetronix alternator connection and in-line fuse, but rather use an existing pump circuit built into my new fuse center.
Update: I ended up eliminating the Racetronix relay too and running the fuel pump wire to a relay inside the power center. See post #300, https://www.thirdgen.org/forums/ltx-...ml#post5961350

I removed the original Weather-Pack connector from firewall. It is useless to me with the small pump wiring. I tried to load the connector with 12 gage wire but the connector has a solid molded housing that is impenetrable. All the wiring for fuel tank needs to pass through to interior with no water leaks AND stay low profile under the carpet. I simply cannot find an electrical connector on the market that can do the job. I have no choice but to use some type of grommet.
This is what I came up with. It consists of a sheet metal plate that I made to cover the hole, the original wire cover plate on the interior side, and a S-shaped drain tube.
The drain tube has a flange that will seal to the inside of the plate. I will dope it with sealant to make sure it stays sealed and put a zip tie on the outside to keep it pulled up tight to the metal plate. The tube is barely large enough to pull all the wires through. It is a really snug fit.
The tube will point downward on the outside of the car so no water can get in. It is so long that water can't track up the wires into the car. And because it points down it will create a drip loop with the harness. Original cover plate will be installed inside the car just like stock. I will post picture of finished product after the install.
Update: Pictures installed on car in post #317, https://www.thirdgen.org/forums/ltx-...ml#post5967792
I made a clean place to create a chassis ground for the pump. This is beside the rear seat, behind the plastic side panel. It is next to where all the wiring follows the stock routing so very easy to access, and ground will stay clean inside the car.
I essentially disassembled the entire Racetronix harness and putting it back together to suit me. The pump relay is mounted in engine bay next to where my new under hood fuse center will be located. I used one of the original weld nuts on the firewall. I will probably not use the Racetronix alternator connection and in-line fuse, but rather use an existing pump circuit built into my new fuse center.
Update: I ended up eliminating the Racetronix relay too and running the fuel pump wire to a relay inside the power center. See post #300, https://www.thirdgen.org/forums/ltx-...ml#post5961350
Last edited by QwkTrip; May 22, 2021 at 07:24 PM.
Joined: Jun 2002
Posts: 13,576
Likes: 30
From: Harford County, MD
Car: camaro sportcoupe
Engine: 7.0L
Transmission: G-Force GF5R
Axle/Gears: Moser 9"
Re: What ever happened to QwkTrip's car anyway?
this is turning out super clean Qwk...i expect nothing less from you
Thread Starter
Joined: Mar 2001
Posts: 10,438
Likes: 2,093
Car: '89 Firebird
Engine: 7.0L
Transmission: T56
Re: What ever happened to QwkTrip's car anyway?
Thanks! I'm not doing a beautiful restoration like some folks. Heck, I didn't even bother to clean anything in the engine bay or under body. But I do like things tidy.
Joined: Jun 2002
Posts: 13,576
Likes: 30
From: Harford County, MD
Car: camaro sportcoupe
Engine: 7.0L
Transmission: G-Force GF5R
Axle/Gears: Moser 9"
Re: What ever happened to QwkTrip's car anyway?
me too. i like things that are easy to work on. this build looks like it's going to be so reliable, you won't need to work on it, lol. you can see my build thread here if you have a chance.
https://www.thirdgen.org/forums/orga...t-updates.html
https://www.thirdgen.org/forums/orga...t-updates.html
Thread Starter
Joined: Mar 2001
Posts: 10,438
Likes: 2,093
Car: '89 Firebird
Engine: 7.0L
Transmission: T56
Re: What ever happened to QwkTrip's car anyway?
Wow! You're going all out with a serious runner! Your skill sets are waaaay beyond mine. Nice job!
Joined: Sep 1999
Posts: 1,496
Likes: 60
From: Danville, IN
Car: 1991 Camaro Z28
Engine: LS1
Transmission: 4L60E
Axle/Gears: Strange 12 Bolt, 3.42
Re: What ever happened to QwkTrip's car anyway?
Do you have any more pics of that torque arm? I'm in the market for one and have never seen that one installed. Build is looking great!
Thread Starter
Joined: Mar 2001
Posts: 10,438
Likes: 2,093
Car: '89 Firebird
Engine: 7.0L
Transmission: T56
Re: What ever happened to QwkTrip's car anyway?
http://www.hawksthirdgenparts.com/82...le-torque-arm/
Nope.

Supreme Member
iTrader: (3)
Joined: Mar 2015
Posts: 1,072
Likes: 48
From: Minnesota
Car: 84 Z28
Engine: 383 Stroker
Transmission: 700R4
Axle/Gears: 3.73
Re: What ever happened to QwkTrip's car anyway?
Haven't done anything with the car in a few months and the garage is uncomfortably cold now. Decided to dismantle my 4th gen harness in the warmth of my basement.
The harness seemed like a real mess until the very end when suddenly all that was left were commons for fuel injectors, O2 sensors, and a few other connectors. i didn't cut a single thing yet except the heater element wires for the rear O2 sensors since those will be ditched. I did de-pin a few connectors to make bundling of wires possible.
Messy!

5 hours later organized and everything labeled twice!

The harness seemed like a real mess until the very end when suddenly all that was left were commons for fuel injectors, O2 sensors, and a few other connectors. i didn't cut a single thing yet except the heater element wires for the rear O2 sensors since those will be ditched. I did de-pin a few connectors to make bundling of wires possible.
Messy!
5 hours later organized and everything labeled twice!
Thread Starter
Joined: Mar 2001
Posts: 10,438
Likes: 2,093
Car: '89 Firebird
Engine: 7.0L
Transmission: T56
Re: What ever happened to QwkTrip's car anyway?
Finished product. I will confess that I did not do this myself. I dropped it off at a welding shop and they did it real quick. I did paint it though!

Installed on car. Completely eliminated the interference to AC box by moving the coil from under the AC box to above the AC box. Plenty of reach left in the spark plug wire.

Just a reminder what was done for anybody else that wants to do this.

I will confess that I did not do this myself. I dropped it off at a welding shop and they did it real quick. I did paint it though! Installed on car. Completely eliminated the interference to AC box by moving the coil from under the AC box to above the AC box. Plenty of reach left in the spark plug wire.
Just a reminder what was done for anybody else that wants to do this.
Last edited by QwkTrip; Apr 17, 2019 at 08:18 PM.
Thread Starter
Joined: Mar 2001
Posts: 10,438
Likes: 2,093
Car: '89 Firebird
Engine: 7.0L
Transmission: T56
Re: What ever happened to QwkTrip's car anyway?
Laid the front brake lines on K-member this weekend. Doesn't look like much work but it was. Lines straightened, bent, shortened, and re-flared on both sides, and K-member in and out of the car several times to achieve this.
Nevermind the uprights to master cylinder. I haven't touched those yet and it will look totally different when I'm done, but I can do that work with everything in the car. Note to self: Next time install the brakes lines BEFORE installing the engine!

I put zip ties around the bars for the brake line to sit on, and then zip tied the brake line to the bars. Hoping this method will prop up the lines a bit to minimize paint being rubbed off the k-member.

Nevermind the uprights to master cylinder. I haven't touched those yet and it will look totally different when I'm done, but I can do that work with everything in the car. Note to self: Next time install the brakes lines BEFORE installing the engine!
I put zip ties around the bars for the brake line to sit on, and then zip tied the brake line to the bars. Hoping this method will prop up the lines a bit to minimize paint being rubbed off the k-member.
Last edited by QwkTrip; Apr 17, 2019 at 08:18 PM.
Thread Starter
Joined: Mar 2001
Posts: 10,438
Likes: 2,093
Car: '89 Firebird
Engine: 7.0L
Transmission: T56
Re: What ever happened to QwkTrip's car anyway?
I tried to reuse the old brake lines for the new setup but it was just looking like crap. Wrong routing, wrong length, and too many wrong bends I couldn't massage out. So I decided to redo all the lines and make my own. It took a lot of patience and a large pile of scraps, but I finally formed nice lines and I am very happy with the results! These photos just don't give a feel for how nice those brake lines look in person!

Front passenger line dropping over the steering shaft down to the K-member. The front driver side (coming off right side of tee) was clipped to the frame and does not touch the K-member at all. You've probably noticed the brakes lines have a copper color. I used a special tube made of a copper nickel alloy that is much easier to work with than stainless steel and it has good anti-corrosion properties. I think it was called EZ Bend but I can't remember for sure. It is used on high end luxury cars like the Maybach.

Front driver line and the rear line dropping down between subframe and steering column. Both are clipped to the subframe just under the steering shaft. I could not reuse the original spring wrap on the rear line because it was too small to fit over the new 1/4 inch line. I bought new stainless spring wrap that I still need to slip on (I still have straight tube at the axle and haven't finished the job yet).

Now I'm going to be honest, making all my own brake lines was a pain in the butt with the engine in the car! And I spent a lot more money on tools than I anticipated. There is a real temptation, especially with the short master cylinder lines, to just grab it with your hands and start bending. But it will look like total crap if you do that. Just be patient, use a pen to mark your next bend (location and angle), make one bend at a time, trial fit, and repeat. And be very careful with the last bend and cut or the tube nut won't line up with the fitting. The only time I made bends by hand was tiny little adjustments for final fit, or long gentle bends like the runs across k-member.
Another issue is the tubing comes in a tight coil and can't be successfully worked with until it is straightened out. I couldn't even make symmetrical flares because of the arc in the tube. I ended up buying a tube straightener from Eastwood. That's $240 so be prepared for that hidden cost if you buy coiled tubing.

All the aftermarket parts (roll stop, prop valve) use SAE double inverted flare, but everything stock on the car had various sizes of ISO metric bubble flare. You'll need tools for both. I splurged on this one and got a MasterCool hydraulic flaring kit. Another $300 gone but no regrets on this one. It sure made easy work of flaring tube ends.

Stock rear line is 6mm tube. You can buy 6mm but it is not common and most people won't have tools to flare it. I used 1/4" tube instead, which is a little bigger. The stock metric fittings won't slide over 1/4" tube so you'll have to drill out the inside of the stock metric fittings to reuse it. No concerns since the fluid seal is made to the flare, not the inner diameter of the fitting.
I had several "auto store" tube benders and they were all junk. Throw them all away and get a quality tool. I got the Summit Racing triple head 180 degree tube bender. That is actually an Imperial 470-FH and the Summit price is a huge discount! Don't worry about having a small or large bender. They're all too big to work with in the car. Just get one that works well and can make tight bends.
And speaking of working well.... turns out there is a learning curve to bending tube too. Let's just say I threw away a lot of tube trying to make the master cylinder lines. Those short lines are difficult with all the complex 3D bends. And it is especially difficult to make the last bend and final cut so that the tube lines up with the fitting. I didn't get it right until I began using a sharpie pen to mark the exact location of the bend.
Now when you bend the line it will pooch a bit on the sides. Problem is the spring wrap fits tight enough that any little tiny "out of round" situation will stop you from sliding the spring wrap over the tube. I stumbled on a fix for that too. If you put the spring wrap over the tube first and use the next size up groove in the bender, then it will make perfect mandrel looking bends and the spring wrap will slide freely on the tube after the bend. You do have to bend in multiple steps or it will pull and stretch the spring wrap. The spring wrap also makes smooth, kink free bends when you do it by hand too. It's just like using a spring type tube bender.
Front passenger line dropping over the steering shaft down to the K-member. The front driver side (coming off right side of tee) was clipped to the frame and does not touch the K-member at all. You've probably noticed the brakes lines have a copper color. I used a special tube made of a copper nickel alloy that is much easier to work with than stainless steel and it has good anti-corrosion properties. I think it was called EZ Bend but I can't remember for sure. It is used on high end luxury cars like the Maybach.
Front driver line and the rear line dropping down between subframe and steering column. Both are clipped to the subframe just under the steering shaft. I could not reuse the original spring wrap on the rear line because it was too small to fit over the new 1/4 inch line. I bought new stainless spring wrap that I still need to slip on (I still have straight tube at the axle and haven't finished the job yet).
Now I'm going to be honest, making all my own brake lines was a pain in the butt with the engine in the car! And I spent a lot more money on tools than I anticipated. There is a real temptation, especially with the short master cylinder lines, to just grab it with your hands and start bending. But it will look like total crap if you do that. Just be patient, use a pen to mark your next bend (location and angle), make one bend at a time, trial fit, and repeat. And be very careful with the last bend and cut or the tube nut won't line up with the fitting. The only time I made bends by hand was tiny little adjustments for final fit, or long gentle bends like the runs across k-member.
Another issue is the tubing comes in a tight coil and can't be successfully worked with until it is straightened out. I couldn't even make symmetrical flares because of the arc in the tube. I ended up buying a tube straightener from Eastwood. That's $240 so be prepared for that hidden cost if you buy coiled tubing.
All the aftermarket parts (roll stop, prop valve) use SAE double inverted flare, but everything stock on the car had various sizes of ISO metric bubble flare. You'll need tools for both. I splurged on this one and got a MasterCool hydraulic flaring kit. Another $300 gone but no regrets on this one. It sure made easy work of flaring tube ends.
Stock rear line is 6mm tube. You can buy 6mm but it is not common and most people won't have tools to flare it. I used 1/4" tube instead, which is a little bigger. The stock metric fittings won't slide over 1/4" tube so you'll have to drill out the inside of the stock metric fittings to reuse it. No concerns since the fluid seal is made to the flare, not the inner diameter of the fitting.
I had several "auto store" tube benders and they were all junk. Throw them all away and get a quality tool. I got the Summit Racing triple head 180 degree tube bender. That is actually an Imperial 470-FH and the Summit price is a huge discount! Don't worry about having a small or large bender. They're all too big to work with in the car. Just get one that works well and can make tight bends.
And speaking of working well.... turns out there is a learning curve to bending tube too. Let's just say I threw away a lot of tube trying to make the master cylinder lines. Those short lines are difficult with all the complex 3D bends. And it is especially difficult to make the last bend and final cut so that the tube lines up with the fitting. I didn't get it right until I began using a sharpie pen to mark the exact location of the bend.
Now when you bend the line it will pooch a bit on the sides. Problem is the spring wrap fits tight enough that any little tiny "out of round" situation will stop you from sliding the spring wrap over the tube. I stumbled on a fix for that too. If you put the spring wrap over the tube first and use the next size up groove in the bender, then it will make perfect mandrel looking bends and the spring wrap will slide freely on the tube after the bend. You do have to bend in multiple steps or it will pull and stretch the spring wrap. The spring wrap also makes smooth, kink free bends when you do it by hand too. It's just like using a spring type tube bender.
Last edited by QwkTrip; Apr 17, 2019 at 08:17 PM.
Thread Starter
Joined: Mar 2001
Posts: 10,438
Likes: 2,093
Car: '89 Firebird
Engine: 7.0L
Transmission: T56
Re: What ever happened to QwkTrip's car anyway?
And here is my new brake schematic.
Update: I redid the hard lines due to chronic leaks. New schematic in post #583, https://www.thirdgen.org/forums/ltx-...ml#post6074511

Update: I redid the hard lines due to chronic leaks. New schematic in post #583, https://www.thirdgen.org/forums/ltx-...ml#post6074511
Last edited by QwkTrip; May 22, 2021 at 07:23 PM.
Member
iTrader: (2)
Joined: Feb 2003
Posts: 219
Likes: 0
From: ME
Car: 1986 IROC-Z
Engine: LS1-ish
Transmission: T56 stage II
Axle/Gears: S60 4:10's
Re: What ever happened to QwkTrip's car anyway?
All the aftermarket parts (roll stop, prop valve) use SAE double inverted flare, but everything stock on the car had various sizes of ISO metric bubble flare. You'll need tools for both. I splurged on this one and got a MasterCool hydraulic flaring kit. Another $300 gone but no regrets on this one. It sure made easy work of flaring tube ends.


Last edited by coptzer; Apr 25, 2015 at 08:11 AM.
Thread Starter
Joined: Mar 2001
Posts: 10,438
Likes: 2,093
Car: '89 Firebird
Engine: 7.0L
Transmission: T56
Re: What ever happened to QwkTrip's car anyway?
The inverted double flare turn out really nice with this tool. Metric bubble flare is hit and miss and seems very sensitive to set up. I threw away more than one. The metric bubble is why I had to buy the tube straightener because I was getting a lack of symmetry.
The metric side of this kit is not ideal. It assumes you have metric lines, but the stock front lines are 3/16". The metric line gripper is too small for the 3/16" tube. I had to use the gripper for 3/16 inverted flare which puts a different angle on the back of the flare head where the tube nut cinches up. Also, the flare ends up a little smaller diameter than stock. I don't think it will cause issues but I don't know yet.
But this kit does more than that. I can make GM quick connect tube ends, and I am ordering the dies for AN fittings so I can go hard line to -6 AN in my fuel system.
Member


Joined: Jul 2002
Posts: 255
Likes: 9
From: Humid Houston on the Texas coast
Car: '86 Z28
Engine: SDPC TPI 350
Transmission: WC T5
Axle/Gears: 3.23 posi
Re: What ever happened to QwkTrip's car anyway?
You've probably noticed the brakes lines have a copper color. I used a special tube made of a copper nickel alloy that is much easier to work with than stainless steel and it has good anti-corrosion properties. I think it was called EZ Bend but I can't remember for sure. It is used on high end luxury cars like the Maybach.
Believe it or not it can be ordered from Autozone. Summit also carries.
M
Joined: Jun 2002
Posts: 13,576
Likes: 30
From: Harford County, MD
Car: camaro sportcoupe
Engine: 7.0L
Transmission: G-Force GF5R
Axle/Gears: Moser 9"
Re: What ever happened to QwkTrip's car anyway?
what is the part number for the flare tool? and you say you can get a set of dies to do 37* flares as well?
yeah...i'm interested, lol! it sucks that it costs so much. for one job, i'd say splurging $750+ on tools is a little much, but i think i'm going to be doing more in the long term and want these tools on hand, lol.
yeah...i'm interested, lol! it sucks that it costs so much. for one job, i'd say splurging $750+ on tools is a little much, but i think i'm going to be doing more in the long term and want these tools on hand, lol.
Thread Starter
Joined: Mar 2001
Posts: 10,438
Likes: 2,093
Car: '89 Firebird
Engine: 7.0L
Transmission: T56
Re: What ever happened to QwkTrip's car anyway?
This stuff: http://agscompany.com/product-catego...-lines/nicopp/
Believe it or not it can be ordered from Autozone. Summit also carries
Believe it or not it can be ordered from Autozone. Summit also carries
Mastercool 71098 for the AN 37 degree dies
Yep, I kept putting off the purchase of the straightener for that very reason. Wasn't getting anywhere so I finally ordered it and immediately made progress and got the job done. It is getting to the point I just want to be done and I don't care what I spend to get there.
Thread Starter
Joined: Mar 2001
Posts: 10,438
Likes: 2,093
Car: '89 Firebird
Engine: 7.0L
Transmission: T56
Re: What ever happened to QwkTrip's car anyway?
Hey, mw66nova. I got the AN kit and flared stainless 3/8" line. First flare the OD was too large and I couldn't slide a Fragola fitting over the flare. Put a dab of oil on the die and tried again. Flaring felt much smoother that time and I didn't squeeze so tight in order to limit the OD of the flare. Fitting didn't slide over but the treads did walk over by turning. Cinched up to the mating AN quick connect adapter and torqued 1/4 turn. I now have hard line able to connect to the fuel filter inlet, or hose, or whatever I want.
No telling if it will leak until I prime the fuel system, and that will be a while.
No telling if it will leak until I prime the fuel system, and that will be a while.
Joined: Jun 2002
Posts: 13,576
Likes: 30
From: Harford County, MD
Car: camaro sportcoupe
Engine: 7.0L
Transmission: G-Force GF5R
Axle/Gears: Moser 9"
Re: What ever happened to QwkTrip's car anyway?
this is fantastic i am fighting with a cheap parts store flaring tool on my current project at the moment. it sucks. don't have the $300+ for the mastercool kit at the moment so i'll continue the good fight for now, but i need to get one of these for sure
i am fighting with a cheap parts store flaring tool on my current project at the moment. it sucks. don't have the $300+ for the mastercool kit at the moment so i'll continue the good fight for now, but i need to get one of these for sure Junior Member
iTrader: (2)
Joined: Aug 2012
Posts: 56
Likes: 0
From: Illinois
Car: 86 Z28
Engine: '06 LQ4
Transmission: GTO T56
Axle/Gears: 3.73 S60
Re: What ever happened to QwkTrip's car anyway?
http://www.plumberscrib.com/ridgid-4...l8gaAsrI8P8HAQ
Member
iTrader: (2)
Joined: Feb 2010
Posts: 460
Likes: 3
Car: '89 Camaro
Engine: LS1
Transmission: 4L65/70E
Axle/Gears: 9 Inch, 3.70 gears
Re: What ever happened to QwkTrip's car anyway?
There are adapter fittings to go from the standard inverter m inverted flats to the metric bubble flare, I used them on my car when I put in the line lock. If anyone is interested I put the part numbers in my line lock installation thread, they can be found at auto zone and the like.
Thread Starter
Joined: Mar 2001
Posts: 10,438
Likes: 2,093
Car: '89 Firebird
Engine: 7.0L
Transmission: T56
Re: What ever happened to QwkTrip's car anyway?
You can use adapters if you're not willing to make your own flares.
I reused the stock tube nuts at master cylinder and brake hoses. No adapters. Flare the front lines using 4.75mm ISO bubble flare, and rear line using 6mm ISO bubble. The only adapters in my system are at the NPT threads on aftermarket parts (roll stop, prop valve).
I reused the stock tube nuts at master cylinder and brake hoses. No adapters. Flare the front lines using 4.75mm ISO bubble flare, and rear line using 6mm ISO bubble. The only adapters in my system are at the NPT threads on aftermarket parts (roll stop, prop valve).
Thread Starter
Joined: Mar 2001
Posts: 10,438
Likes: 2,093
Car: '89 Firebird
Engine: 7.0L
Transmission: T56
Re: What ever happened to QwkTrip's car anyway?
I've been working on fuel lines and my ideas are changing from my original plans. Main issues are:
I'm going to drop soft line off the fuel tank part way down the body and then plug in to hard line with quick connect fittings. Then I'm going to run hard line for feed and return to provide extra support for the fuel filter that is sitting in the stock bracket. The hard line will be long enough to be held by two of the stock fuel line brackets so things are rigid. And I will probably run hard line to the front of car where it will tie in with soft line again and jump to the fuel rail.
Now I tried to make a tight bend in the hard line so I could connect the hard line directly to the fuel filter quick connect, but I just couldn't make the bend close enough to the end of the tube to fit everything in the pocket under the car. So I'm keeping a lot of the AN fittings in order to package things the way I want. I will post pictures when I'm done. I've already done some mock up and it is going to turn out real nice.
I had to shop around a bit to find black fittings in some of the stuff. I wasn't going to have a blue fitting in the middle of all that!

- The stock fuel filter bracket under the car is actually quite flimsy. Turns out the stock steel lines lent it a lot of physical support.
- I'm not very excited about having soft lines under the car. Doesn't seem very street smart.
I'm going to drop soft line off the fuel tank part way down the body and then plug in to hard line with quick connect fittings. Then I'm going to run hard line for feed and return to provide extra support for the fuel filter that is sitting in the stock bracket. The hard line will be long enough to be held by two of the stock fuel line brackets so things are rigid. And I will probably run hard line to the front of car where it will tie in with soft line again and jump to the fuel rail.
Now I tried to make a tight bend in the hard line so I could connect the hard line directly to the fuel filter quick connect, but I just couldn't make the bend close enough to the end of the tube to fit everything in the pocket under the car. So I'm keeping a lot of the AN fittings in order to package things the way I want. I will post pictures when I'm done. I've already done some mock up and it is going to turn out real nice.
I had to shop around a bit to find black fittings in some of the stuff. I wasn't going to have a blue fitting in the middle of all that!
Last edited by QwkTrip; Aug 18, 2020 at 07:53 PM.
Junior Member
iTrader: (4)
Joined: Apr 2005
Posts: 35
Likes: 0
From: Wasilla, Alaska
Car: 92 Z28
Engine: L76 in the works.....
Transmission: T56
Axle/Gears: 3:73
Re: What ever happened to QwkTrip's car anyway?
The car is coming along great!
It makes me feel a little better knowing that I'm not the only one who's swap is going to take YEAR'S to complete.
Love the progress, keep up the good work.
It makes me feel a little better knowing that I'm not the only one who's swap is going to take YEAR'S to complete.
Love the progress, keep up the good work.
Thread Starter
Joined: Mar 2001
Posts: 10,438
Likes: 2,093
Car: '89 Firebird
Engine: 7.0L
Transmission: T56
Re: What ever happened to QwkTrip's car anyway?
I've used up most the coil of stainless fuel line on mistakes and I'm giving up on it. Too difficult to work with that material. It is very strong which necessitates perfection in the layout because it will not flex. I've gotten lines with perfect bends, or perfect length, or perfect flares, but not all together at the same time. Not being able to make short bends by hand also makes it impossible for me to make nice parallel runs of two lines.
So I ordered up more of the nickel copper line in 3/8" size. First impression is I really like what I see. I should be able to bend both lines at the same time for parallel runs and make small adjustments by hand. But the best thing is the ID is bigger than the stainless line and on par with 6 AN hose. Summit stainless 3/8" came in at 7.75mm ID measurement, and Summit ni-copp 3/8" measures at 8.0mm ID. Every little bit helps.
I'm going to try to lay new hard line again this weekend and knock out the fuel system.
Last edited by QwkTrip; May 14, 2015 at 10:50 PM.
Thread Starter
Joined: Mar 2001
Posts: 10,438
Likes: 2,093
Car: '89 Firebird
Engine: 7.0L
Transmission: T56
Re: What ever happened to QwkTrip's car anyway?
Well, I don't like the nickel copper line either. It worked fine for smaller brake lines but it is way too soft for 3/8" line. Problem is it goes out of round when straightened, so much so that you can't even run a tube cutter around it. And it wrinkles when bent with a tube bender. But I can successfully route it the way I want so I'm using it anyway.
I have found a few tricks to work with it. Taking some arc out of it by hand before running through the tube straightener helps roundness. Straightening in multiple steps also helps roundness. And making bends very quickly (not slow) nearly eliminates wrinkles on the inside of the bend. The best results happen when I make bends over my leg.
But I won't be able to form quick connect fittings because the roundness just isn't good enough for an o-ring seal. So plans are changing and I'm doing AN flares on all hard line.
Thread Starter
Joined: Mar 2001
Posts: 10,438
Likes: 2,093
Car: '89 Firebird
Engine: 7.0L
Transmission: T56
Re: What ever happened to QwkTrip's car anyway?
Waaaaay too much time and money went in to making these two lines.  But at least I am happy with the end result. Return line is above, and feed line is on bottom.

And this is all it amounts to. Simple and neat. The hard line provides good support for the fuel filter bracket so it does not wobble. That was really the goal here. I will be running hard line to the front too, but that should be easy. Parallel runs held in place by original fuel line brackets. Quick connect fittings up by the fuel tank where hose will attach. The small line is the rear brake line that I still need to finish up.

Update: This is what the finished product looks like.

But at least I am happy with the end result. Return line is above, and feed line is on bottom.And this is all it amounts to. Simple and neat. The hard line provides good support for the fuel filter bracket so it does not wobble. That was really the goal here. I will be running hard line to the front too, but that should be easy.
Parallel runs held in place by original fuel line brackets. Quick connect fittings up by the fuel tank where hose will attach. The small line is the rear brake line that I still need to finish up.Update: This is what the finished product looks like.
Last edited by QwkTrip; Jun 19, 2018 at 11:49 PM.
Thread Starter
Joined: Mar 2001
Posts: 10,438
Likes: 2,093
Car: '89 Firebird
Engine: 7.0L
Transmission: T56
Re: What ever happened to QwkTrip's car anyway?
Haven't worked on the car since May. Been modifying my Ecoboost truck instead.
But I started tinkering again on the Firebird and making a bit more progress. Finished all the hard lines for brakes, and completely finished fuel lines. Also began working on chassis wiring. Created a harness for dual radiator fans, and starter motor. Also customized wiring for HVAC so that I can run AC compressor clutch and radiator fans with the Holley HP controller. Now running wiring for roll stop.
Things are looking a bit more tidy under hood.
Thread Starter
Joined: Mar 2001
Posts: 10,438
Likes: 2,093
Car: '89 Firebird
Engine: 7.0L
Transmission: T56
Re: What ever happened to QwkTrip's car anyway?
I was going to make my own fuse/relay panel using the Delphi modular system, but I stumbled across a pre-made kit that is nearly identical to what I was going to do so there is no point in going through the effort or expense of making my own. http://shop.bp-automotive.com/LSX-24...?categoryId=10
Those idiots wired up the box wrong. Some of their instructions are a bit confusing so I double checked the AC relay myself just to be sure things were really the way I assumed and lo and behold I find they wired the relay wrong. So now I have to run through the entire power center from top to bottom and double check every wire, connection, fuse and relay pinout. I shouldn't have to do this!
Last edited by QwkTrip; Sep 10, 2015 at 12:55 AM.
Thread Starter
Joined: Mar 2001
Posts: 10,438
Likes: 2,093
Car: '89 Firebird
Engine: 7.0L
Transmission: T56
Re: What ever happened to QwkTrip's car anyway?
I had a fantastic weekend of progress! I dug in to the fuse/relay center and corrected wiring. I finished my engine harness!!!!!!!! Hate might be a bit of a strong word, but I have not enjoyed working on that engine harness. I also made some decisions about fuel pump wiring and started working on that.
This is my engine harness. It is completely plug-'n-play with my car. It started life as a Holley HP LS1/LS3 hybrid harness but I tore it down and built it back up again to suit me. The Holley harness is not complete for an LS1 engine (as much as they want you to believe it is) so I had to borrow sub-sections of my other LS1 harness to make a complete harness. I also tossed the Holley relay that is used for fuel pump, coils, and injectors.

The engine harness plugs into connectors I made. One is for everything that passes through C100, and the other is for everything that connects to the underhood power center (power feeds, A/C control, fuel pump control, fans control).

Pinouts of the two 8-pin connectors.

I had three options for how to run fuel pump. (1) Holley HP fuel pump relay; (2) Racetronix 'Hot Wire' kit I purchased earlier; and (3) The underhood power center that I added to the car. I decided to use parts of each for a seamless integration. The Holley ECM runs the fuel pump relay in the underhood power center. I modified the power center to use the larger Racetronix wire, and everything else from the Racetronix kit gets tossed (in-line fuse and relay). Hmmmm.... I guess all I really did was put a larger wire in the power center but it seemed more involved than that at the time!

Backside of the underhood power center. Just pop the back cover off and you have access to all the wiring.

Fuel pump wire swapped out with the larger wire from Racetronix Hot Wire kit. It used the same type of connector as the fuse box, only difference was tang vs. tangless. I just cut the tang off and snapped it into place in the fuse box. While I was in there I moved a few other wires to correct the mistakes the builder made.

That rats nest of wiring cleans up nice after re-assembling the power center.

I have quite a bit of wiring left to do but the engine bay is cleaning up bit by bit! Sure looks a lot more tidy than it did before!

Hate might be a bit of a strong word, but I have not enjoyed working on that engine harness. I also made some decisions about fuel pump wiring and started working on that.This is my engine harness. It is completely plug-'n-play with my car. It started life as a Holley HP LS1/LS3 hybrid harness but I tore it down and built it back up again to suit me. The Holley harness is not complete for an LS1 engine (as much as they want you to believe it is) so I had to borrow sub-sections of my other LS1 harness to make a complete harness. I also tossed the Holley relay that is used for fuel pump, coils, and injectors.
The engine harness plugs into connectors I made. One is for everything that passes through C100, and the other is for everything that connects to the underhood power center (power feeds, A/C control, fuel pump control, fans control).
Pinouts of the two 8-pin connectors.
I had three options for how to run fuel pump. (1) Holley HP fuel pump relay; (2) Racetronix 'Hot Wire' kit I purchased earlier; and (3) The underhood power center that I added to the car. I decided to use parts of each for a seamless integration. The Holley ECM runs the fuel pump relay in the underhood power center. I modified the power center to use the larger Racetronix wire, and everything else from the Racetronix kit gets tossed (in-line fuse and relay). Hmmmm.... I guess all I really did was put a larger wire in the power center but it seemed more involved than that at the time!
Backside of the underhood power center. Just pop the back cover off and you have access to all the wiring.
Fuel pump wire swapped out with the larger wire from Racetronix Hot Wire kit. It used the same type of connector as the fuse box, only difference was tang vs. tangless. I just cut the tang off and snapped it into place in the fuse box. While I was in there I moved a few other wires to correct the mistakes the builder made.
That rats nest of wiring cleans up nice after re-assembling the power center.
I have quite a bit of wiring left to do but the engine bay is cleaning up bit by bit! Sure looks a lot more tidy than it did before!
Last edited by QwkTrip; Sep 7, 2019 at 06:08 PM.