
How to Install an LS2 in an LS1 Car


Thread Starter
Member
Joined: May 2011
Posts: 286
Likes: 0
From: Andalusia, AL
Car: 1991 Camaro RS
Axle/Gears: Stock
How to Install an LS2 in an LS1 Car
saw this on another forum, has great information so i thought i'd post it here.
To utilise the existing LS1 harness and LS1 computer the simplest way is to convert the new block back to 2005 LS2 spec.
Step 1
Inspect your new block.
When looking towards the rear of your new engine on the passenger side at the back, behind where the starter goes is the Crankshaft Position Sensor. What colour is the actual sensor ?
Black..[you have a 24x crankshaft reluctor wheel].. go to Step 4
Grey ..[you have a 58x crankshaft reluctor wheel].. go to Step 2
Grey Crankshaft Position Sensor (CKP)
Thread Starter
Member
Joined: May 2011
Posts: 286
Likes: 0
From: Andalusia, AL
Car: 1991 Camaro RS
Axle/Gears: Stock
Re: How to Install an LS2 in an LS1 Car
Step 2
Grey Crankshaft Position Sensor..[you have a 58x crankshaft reluctor wheel]....[you also have a 4x camshaft timing gear]..
The LS1 computer can only work with a 24x crankshaft reluctor wheel and black crank sensor.......and can only work with a 1x camshaft timing gear.
Changing the Crankshaft Reluctor Wheel
2a You need to drain the oil and remove the oilpan. You need to remove the Crankshaft from the engine. The reluctor wheel is shrunk onto the crankshaft.
Pic of 58x Crankshaft Reluctor on Crankshaft

Pic of 24x Crankshaft Reluctor on Crankshaft

Pics of 24x Crankshaft Reluctor Part No 12559353


2b Removing the 58x reluctor wheel and installing the new 24x reluctor wheel correctly is not something you want to try at home.
To install the 24x reluctor and align it correctly you need an oven and a special alignment tool.
Pic of Goodson Alignment tool in use.

This process is best done by a professional engine builder. Even using the tool it is still possible to install the 24x reluctor upside down......and then your engine wont start.
2c Re-Install the Crankshaft with the newly installed 24x reluctor ring into your engine.
2d Change your Crankshaft Position Sensor ....remove the grey (CKP) and install a black LS1 Crankshaft Position (CKP) Sensor Part No 12560228
Grey Crankshaft Position Sensor..[you have a 58x crankshaft reluctor wheel]....[you also have a 4x camshaft timing gear]..
The LS1 computer can only work with a 24x crankshaft reluctor wheel and black crank sensor.......and can only work with a 1x camshaft timing gear.
Changing the Crankshaft Reluctor Wheel
2a You need to drain the oil and remove the oilpan. You need to remove the Crankshaft from the engine. The reluctor wheel is shrunk onto the crankshaft.
Pic of 58x Crankshaft Reluctor on Crankshaft
Pic of 24x Crankshaft Reluctor on Crankshaft
Pics of 24x Crankshaft Reluctor Part No 12559353
2b Removing the 58x reluctor wheel and installing the new 24x reluctor wheel correctly is not something you want to try at home.
To install the 24x reluctor and align it correctly you need an oven and a special alignment tool.
Pic of Goodson Alignment tool in use.
This process is best done by a professional engine builder. Even using the tool it is still possible to install the 24x reluctor upside down......and then your engine wont start.
2c Re-Install the Crankshaft with the newly installed 24x reluctor ring into your engine.
2d Change your Crankshaft Position Sensor ....remove the grey (CKP) and install a black LS1 Crankshaft Position (CKP) Sensor Part No 12560228
Thread Starter
Member
Joined: May 2011
Posts: 286
Likes: 0
From: Andalusia, AL
Car: 1991 Camaro RS
Axle/Gears: Stock
Re: How to Install an LS2 in an LS1 Car
Step 3
....[you also have a 4x camshaft timing gear]..
The LS1 computer can only work with a 24x crankshaft reluctor wheel and black crank sensor.......and can only work with a 1x camshaft timing gear.
Pic of 4x Camshaft Timing Gear......3 bolt, 2006 style [will not work with LS1 computer]

Pic of 4x Camshaft Timing Gear.........1 large central bolt, 2007+ style [will not work with LS1 computer]

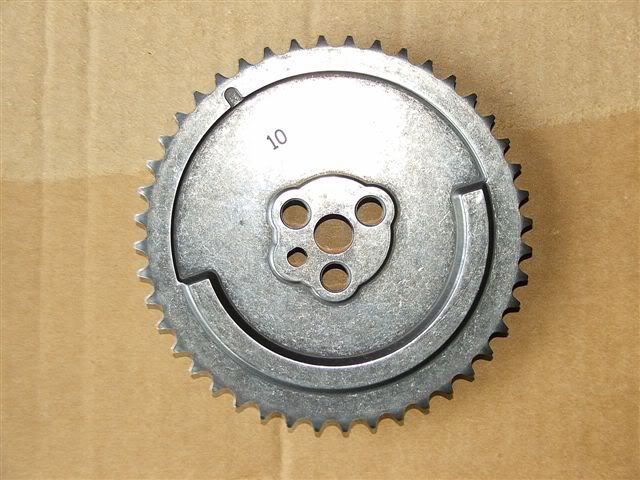
Pic of 1x Camshaft Timing Gear.......3 bolt, 2005 LS2 style
Part No 12576407
If you decide on a double roller timing set, then you'll need the LS2 double roller version. It has the 180 degree (1x) timing lump on the cam gear. [The LS1 cam gear has no timing lump]


3a
You need to have a 3 bolt cam core fitted.....any LS1 style cam will do, or a stock 2005/2006 LS2 cam. The 1x Camshaft Timing Gear will only fit onto a 3 bolt cam core.
Pic of 2005 style LS2 Camshaft Timing Gear assembled.....this is the only LS1 computer compatible arrangement.

3b
LS2 Front timing Cover.
The LS2 front timing cover includes the Camshaft Position Sensor (CMP).
The latest LS2 front timing cover
Part No 12600325 has a grey CMP sensor....this still works with 2005 LS2 1x Camshaft Timing Gear
Older Style LS2 front timing covers (no longer available new from GM) had a black CMP sensor...they work with 2005 LS2 1x Camshaft Timing Gear also


So you've completed the Crankshaft Reluctor Wheel swap to 24x, the Crankshaft Position Sensor to black, and the Camshaft Timing Gear to 1x......proceed to Step 4. You have Converted to 2005 LS2 specs.
....[you also have a 4x camshaft timing gear]..
The LS1 computer can only work with a 24x crankshaft reluctor wheel and black crank sensor.......and can only work with a 1x camshaft timing gear.
Pic of 4x Camshaft Timing Gear......3 bolt, 2006 style [will not work with LS1 computer]
Pic of 4x Camshaft Timing Gear.........1 large central bolt, 2007+ style [will not work with LS1 computer]
Pic of 1x Camshaft Timing Gear.......3 bolt, 2005 LS2 style
Part No 12576407
If you decide on a double roller timing set, then you'll need the LS2 double roller version. It has the 180 degree (1x) timing lump on the cam gear. [The LS1 cam gear has no timing lump]
3a
You need to have a 3 bolt cam core fitted.....any LS1 style cam will do, or a stock 2005/2006 LS2 cam. The 1x Camshaft Timing Gear will only fit onto a 3 bolt cam core.
Pic of 2005 style LS2 Camshaft Timing Gear assembled.....this is the only LS1 computer compatible arrangement.
3b
LS2 Front timing Cover.
The LS2 front timing cover includes the Camshaft Position Sensor (CMP).
The latest LS2 front timing cover
Part No 12600325 has a grey CMP sensor....this still works with 2005 LS2 1x Camshaft Timing Gear
Older Style LS2 front timing covers (no longer available new from GM) had a black CMP sensor...they work with 2005 LS2 1x Camshaft Timing Gear also
So you've completed the Crankshaft Reluctor Wheel swap to 24x, the Crankshaft Position Sensor to black, and the Camshaft Timing Gear to 1x......proceed to Step 4. You have Converted to 2005 LS2 specs.
Thread Starter
Member
Joined: May 2011
Posts: 286
Likes: 0
From: Andalusia, AL
Car: 1991 Camaro RS
Axle/Gears: Stock
Re: How to Install an LS2 in an LS1 Car
Step 4
You need to check and measure the oilpan on your new LS2 engine to ensure it fits in your car.
Alternatively clean thoroughly and then swap the following from your old LS1 engine onto the new LS2 block.
Oil pickup tube with a new O ring
Windage tray
Oil pan
Dipstick tube
Dipstick
[With some LS2 engines the dipstick tube fits into the lower section of the block....not into the side of the oilpan. If your oilpan takes the dipstick tube directly.....then you need to plug the dipstick tube hole in the lower LS2 block......a small aluminium freeze plug should do the trick]
Check/refill the LS2 with oil.
Thread Starter
Member
Joined: May 2011
Posts: 286
Likes: 0
From: Andalusia, AL
Car: 1991 Camaro RS
Axle/Gears: Stock
Re: How to Install an LS2 in an LS1 Car
Step 5
Fitting LS1 Knock Sensors.
The LS2 knock sensors are a 2 wire type and have a small thread (M8). They are located mid block down near the pan rail. Follow this diagram to install single wire LS1 sensors Part No 12589867 on your LS2 block.

Fitting LS1 Knock Sensors.
The LS2 knock sensors are a 2 wire type and have a small thread (M8). They are located mid block down near the pan rail. Follow this diagram to install single wire LS1 sensors Part No 12589867 on your LS2 block.
Thread Starter
Member
Joined: May 2011
Posts: 286
Likes: 0
From: Andalusia, AL
Car: 1991 Camaro RS
Axle/Gears: Stock
Re: How to Install an LS2 in an LS1 Car
Step 6
Inspect the Crankshaft Harmonic Balancer and Waterpump Pulley.
Pic Corvette style Balancer and W/P Pulley
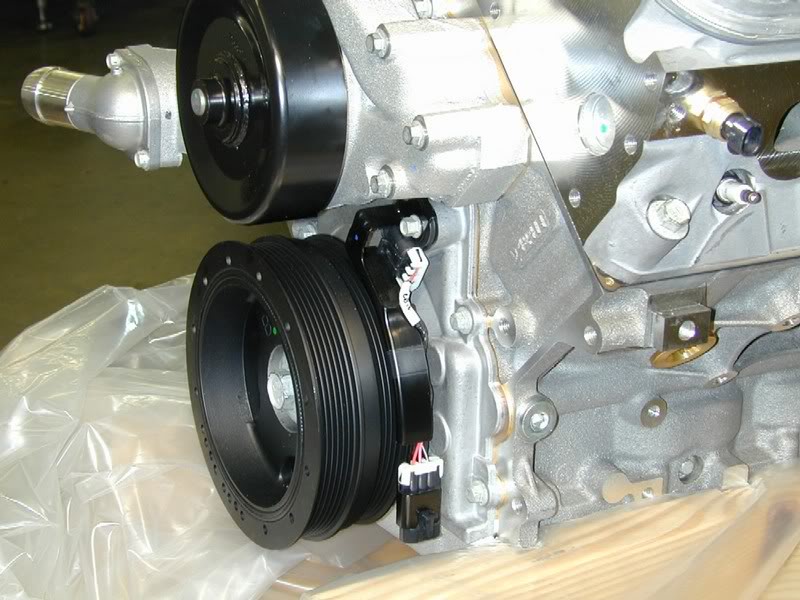
Pic 2004-2006 GTO/F body style Balancer and W/P Pulley

The belts both run about 3/4" further away from the block with GTO and Fbody than with the Corvette Style. You may have to change the waterpump (you cant just change the pulley) and the Crankshaft Harmonic Balancer (Crank Pulley) to suit the pulley alignment of your cars current belt driven accessories.
Pic GTO/Fbody Harmonic Balancer (Crank Pulley)

Pic Fbody v Y body (Corvette) Harmonic Balancers

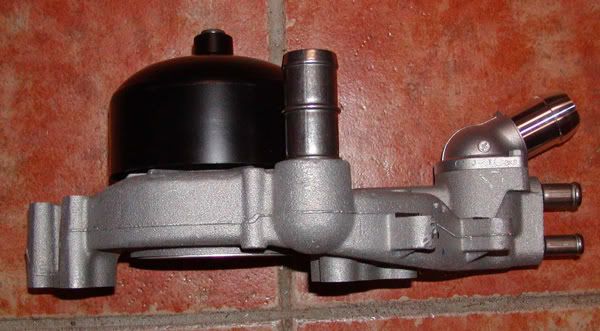
Pic Corvette Style Water Pump

Pic Fbody/GTO Style Water Pump
Harmonic Balancer Bolt Part No 12557840
Inspect the Crankshaft Harmonic Balancer and Waterpump Pulley.
Pic Corvette style Balancer and W/P Pulley
Pic 2004-2006 GTO/F body style Balancer and W/P Pulley
The belts both run about 3/4" further away from the block with GTO and Fbody than with the Corvette Style. You may have to change the waterpump (you cant just change the pulley) and the Crankshaft Harmonic Balancer (Crank Pulley) to suit the pulley alignment of your cars current belt driven accessories.
Pic GTO/Fbody Harmonic Balancer (Crank Pulley)
Pic Fbody v Y body (Corvette) Harmonic Balancers
Pic Corvette Style Water Pump
Pic Fbody/GTO Style Water Pump
Harmonic Balancer Bolt Part No 12557840
Thread Starter
Member
Joined: May 2011
Posts: 286
Likes: 0
From: Andalusia, AL
Car: 1991 Camaro RS
Axle/Gears: Stock
Re: How to Install an LS2 in an LS1 Car
Step 7
Install Flywheel/Flexplate as per LS1.
Install Engine Mounting brackets as per LS1.
Install the LS2 engine into the car.
Connect bell housing, clutch, gearbox etc as per LS1.
Connect headers as per LS1.
Install front driven accessories as per LS1.
If you are using an LS2 intake manifold, or an [LS3/L76 (for L92 heads only)] intake manifold.....these have the MAP sensor at the front of the intake. You will need a MAP sensor extension harness. See below Pic.
You will need a Knock Sensor extension harness to reach from the valley area down to each side of the lower block where the knock sensors now are. See below Pic.
You will need a Cam Sensor extension harness to reach from the rear of the block to the LS2 front timing cover. See below Pic.
MAP, Cam Sensor, Knock Sensor extension harnesses.

Depending on the Manufacturer of the Cam Sensor harness extension, it may plug directly into the cam sensor or it may plug into the end of the short GM extension. Cam sensor female socket and short GM extension female sockets are slightly different.
Cam Sensor Extension Harness plugs in.....

It is possible to make your own extension harnesses.....all are straight through wired, except the cam sensor extension harness.
Cam Sensor Extension Harness is a Cross-over. See Pic below.

If you are using LS2 fuel injectors you will need EV6 to EV1 injector harness adapters. See Pic Below.

Connect all electrical harnesses and the appropriate extensions in the same areas as you would with an LS1.
Install Flywheel/Flexplate as per LS1.
Install Engine Mounting brackets as per LS1.
Install the LS2 engine into the car.
Connect bell housing, clutch, gearbox etc as per LS1.
Connect headers as per LS1.
Install front driven accessories as per LS1.
If you are using an LS2 intake manifold, or an [LS3/L76 (for L92 heads only)] intake manifold.....these have the MAP sensor at the front of the intake. You will need a MAP sensor extension harness. See below Pic.
You will need a Knock Sensor extension harness to reach from the valley area down to each side of the lower block where the knock sensors now are. See below Pic.
You will need a Cam Sensor extension harness to reach from the rear of the block to the LS2 front timing cover. See below Pic.
MAP, Cam Sensor, Knock Sensor extension harnesses.
Depending on the Manufacturer of the Cam Sensor harness extension, it may plug directly into the cam sensor or it may plug into the end of the short GM extension. Cam sensor female socket and short GM extension female sockets are slightly different.
Cam Sensor Extension Harness plugs in.....
It is possible to make your own extension harnesses.....all are straight through wired, except the cam sensor extension harness.
Cam Sensor Extension Harness is a Cross-over. See Pic below.
If you are using LS2 fuel injectors you will need EV6 to EV1 injector harness adapters. See Pic Below.
Connect all electrical harnesses and the appropriate extensions in the same areas as you would with an LS1.
Trending Topics
Thread Starter
Member
Joined: May 2011
Posts: 286
Likes: 0
From: Andalusia, AL
Car: 1991 Camaro RS
Axle/Gears: Stock
Re: How to Install an LS2 in an LS1 Car
Step 8
Throttle Body.
If you are using the LS2 90mm intake manifold or LS3/L76 (in conjunction with L92 heads only) 90mm intake manifold then you probably received an Electronic 90mm Throttle Body.
90mm ETB pic

There is currently no simple or cheap way to convert these ETB's into cable drive to suit older cars.
For cars already fitted with a Fly By Wire foot pedal and originally fitted with a smaller LS1 ETB there are adapter wiring harnesses available to suit the newer 90mm ETB's.
For older cars without Fly By Wire, the answer is to fit a 4 bolt 90mm cable type Throttle Body. You will also need to buy a new cable bracket to fit the 90mm intake manifold......except the Holley 90mm does come with the necessary bracket.
Pic of 90mm Cable TB

Another option you have if your LS2 is fitted with cathedral port heads is to re-use your old intake manifold/injector/throttle body combination off your LS1.
This would save having to buy a 90mm cable throttle body, MAP extension harness and fuel injector harness adapters.
The LS6 intake, FAST 78mm and FAST 90mm all perform as well or better than the LS2 90mm intake manifold.
[Stock LS2 heads , casting number 243 are cathedral type.]
Throttle Body.
If you are using the LS2 90mm intake manifold or LS3/L76 (in conjunction with L92 heads only) 90mm intake manifold then you probably received an Electronic 90mm Throttle Body.
90mm ETB pic
There is currently no simple or cheap way to convert these ETB's into cable drive to suit older cars.
For cars already fitted with a Fly By Wire foot pedal and originally fitted with a smaller LS1 ETB there are adapter wiring harnesses available to suit the newer 90mm ETB's.
For older cars without Fly By Wire, the answer is to fit a 4 bolt 90mm cable type Throttle Body. You will also need to buy a new cable bracket to fit the 90mm intake manifold......except the Holley 90mm does come with the necessary bracket.
Pic of 90mm Cable TB
Another option you have if your LS2 is fitted with cathedral port heads is to re-use your old intake manifold/injector/throttle body combination off your LS1.
This would save having to buy a 90mm cable throttle body, MAP extension harness and fuel injector harness adapters.
The LS6 intake, FAST 78mm and FAST 90mm all perform as well or better than the LS2 90mm intake manifold.
[Stock LS2 heads , casting number 243 are cathedral type.]
Thread Starter
Member
Joined: May 2011
Posts: 286
Likes: 0
From: Andalusia, AL
Car: 1991 Camaro RS
Axle/Gears: Stock
Re: How to Install an LS2 in an LS1 Car
Here's a neat kit if you're starting with an unfinished Gen4 block.

SDPC has put together a complete kit of components that are required when you upgrade from a GEN3 (LS1 / LS6) engine to the newer GEN4 design. (Wet sump only)
The kit includes:
Gen4 front cover kit with sensor
Gen4 valley cover kit
Gen4 lifter guides w/bolts
Gen4 timing chain dampner
Billet single roller timing set (specify 24x or 58x application)
http://sdparts.com/details/scoggin-d...nter/sdls2ck-1
to see the entire thread, click the link below:
http://www.ls2.com/forums/showthread.php?t=626014
Last edited by 1SICK90RS; Nov 25, 2011 at 04:35 PM.

Thread Starter
Member
Joined: May 2011
Posts: 286
Likes: 0
From: Andalusia, AL
Car: 1991 Camaro RS
Axle/Gears: Stock
Re: How to Install an LS2 in an LS1 Car
P/N's
90mm Throttle Body: 17095239
90mm Throttle Body Seal: 12576549
Cam: 12574519
Connecting Rod: 12568734
Coolant tube (Front): 12578838
Coolant plugs (rear): 212563325
Dipstick: 12570788
Engine block: 12568950
Exhaust Manifold (C6 right): 12576061
Exhaust Manifold (C6 left): 12569388
Exhaust Manifold (GTO right): 12563278
Exhaust Manifold (GTO left): 12563277
Flywheel: 12571611
Fuel Rail: 12572174
Intake Manifold: 89017648
Intake Manifold Gasket: 12533587
Intake Manifold Bolt: 12552344
LS2 fuel injector o-rings (orange): 89017587
LS2 fuel rail: 12572174
LS2 Crate Motor: 19156261
Map Sensor: 16212460
Map Sensor Seal: 16194007
Oil Deflector: 12558189
Oil Pump: 17801830
Oil Pan (GTO): 12581209
Oil Pan (C6): 12581810
Oil Pick Up Screen: 12558750
PCM: (2005 GTO, SSR and Corvette): 12597883
Sprak Plug Wires: 89018058
T56 Trans: 88958729
Timing Chain: 12586482
Valve Springs: 12586484
Valve (Intake): 12563063
Valve Cover: 25534399
Water Pump Kit: 89017592

Thread Starter
Member
Joined: May 2011
Posts: 286
Likes: 0
From: Andalusia, AL
Car: 1991 Camaro RS
Axle/Gears: Stock
Re: How to Install an LS2 in an LS1 Car
Sensors and Locations

3. Oil Pressure Sensor. 12616646
4. Use LS1 knock sensors (2 x 12589867) with original M8 bosses tapped out to M10.
5. Coolant Temperature Sensor 12608814
6. Camshaft Position Sensor (CMP) 12591720, comes as part of Gen4 Front timing cover 12600325.

1. MAP sensor LS2 12614970
2. EVAP purge solenoid valve LS2 12597341
6. Crankshaft Position Sensor (CKP) (Black for 24x) 12560228
3. Oil Pressure Sensor. 12616646
4. Use LS1 knock sensors (2 x 12589867) with original M8 bosses tapped out to M10.
5. Coolant Temperature Sensor 12608814
6. Camshaft Position Sensor (CMP) 12591720, comes as part of Gen4 Front timing cover 12600325.
1. MAP sensor LS2 12614970
2. EVAP purge solenoid valve LS2 12597341
6. Crankshaft Position Sensor (CKP) (Black for 24x) 12560228
Supreme Member
iTrader: (4)
Joined: Nov 2003
Posts: 1,194
Likes: 0
From: santa barbara,ca
Car: 1990 iroc z
Engine: LSX 376 F1A
Transmission: 4l60e
Axle/Gears: 12 bolt 3.42
Re: How to Install an LS2 in an LS1 Car
i am using the lingenfelter converter box on my lsx376 crate motor and i can tell you it works great, no issues at all and when i had pocket build me my harness i had him use ev6 connectors instead of ev1.
Thread Starter
Member
Joined: May 2011
Posts: 286
Likes: 0
From: Andalusia, AL
Car: 1991 Camaro RS
Axle/Gears: Stock
Re: How to Install an LS2 in an LS1 Car
i believe speed scene is doing my harness, they said that they would use an lq9 harness, with ls2 sensor ends, and locations. we'll see what happens, might just send it to pocket just for piece of mind.
Last edited by 1SICK90RS; Nov 29, 2011 at 07:58 PM.
Senior Member
iTrader: (5)
Joined: Dec 2008
Posts: 719
Likes: 0
From: Alabama
Car: 1986 camaro
Engine: ls2
Transmission: FLT stage 6 60e
Axle/Gears: 8.8 with 3.73's
Re: How to Install an LS2 in an LS1 Car
1sick90rs i see your claiming to have a ls2 block from tsp for $1200$ on your facebook.. is this true?
Thread Starter
Member
Joined: May 2011
Posts: 286
Likes: 0
From: Andalusia, AL
Car: 1991 Camaro RS
Axle/Gears: Stock
Re: How to Install an LS2 in an LS1 Car
yes, i have an ls2 block. i can not break the crate until i repay my dad for it. do not reply to anymore of my threads as you are now going on my ignore list. thank you have a nice day

Thread
Thread Starter
Forum
Replies
Last Post
NBrehm
Engine/Drivetrain/Suspension Parts for Sale
1
Aug 25, 2015 11:49 PM