When you click on links to various merchants on this site and make a purchase, this can result in this site earning a commission. Affiliate programs and affiliations include, but are not limited to, the eBay Partner Network.
LTX and LSXPutting LT1s, LS1s, and their variants into Third Gens is becoming more popular. This board is for those who are doing and have done the swaps so they can discuss all of their technical aspects including repairs, swap info, and performance upgrades.
Little bit done. Mounted UMI camber/caster plate, converted one OEM strut to coil over (for mock up) and test fit wheel. Test fit back wheel and will likely have to cut off bump stop...
Drove up to Eastwood this morning....cool place. Bought some body work supplies.
Had to throw away my original doors due to rust out. Had picked up a set of z28 doors (drilled for side skirts) a while back. Got around to welding up the holes for the rockers on one of the doors today. Little bit at a time LOL
Mounted the other donor door. Removed the glass from them since they were both chipped up top. Fortunately, the glass from my OEM doors are in good shape. Probably won't reinstall glass until after paint.
Rear AFCO coilover shocks mounted and changed out the rear wheel studs to proper length for the wheels.
Forgot how much I hate playing the nothing fits together game. There wheels fit ultra tight over the 5/8" studs. studs fit ok through the holes in the wheels, just tolerance stackup with the bolt circle makes everything tight. Need to ream the holes out a touch.
Might get some tires this weekend and actually push the car out of the garage for the first time since 2012 LOL.
This will let me get the body out of the garage while I sand and prime the various body panels (I'm taking everything down to bare metal)...Goal is to paint the car before end of summer.
I'd then like to tackle the roll cage (S&W moly 10-pt) and interior rejuvenation during the winter.
Last edited by Fireball; May 18, 2016 at 06:41 PM.
Got a bit done yesterday. Removed the front windshield (it was nasty and had a crack). Will make it easier to do the final paint work without it in place. Also disassembled the mirrors for paint.
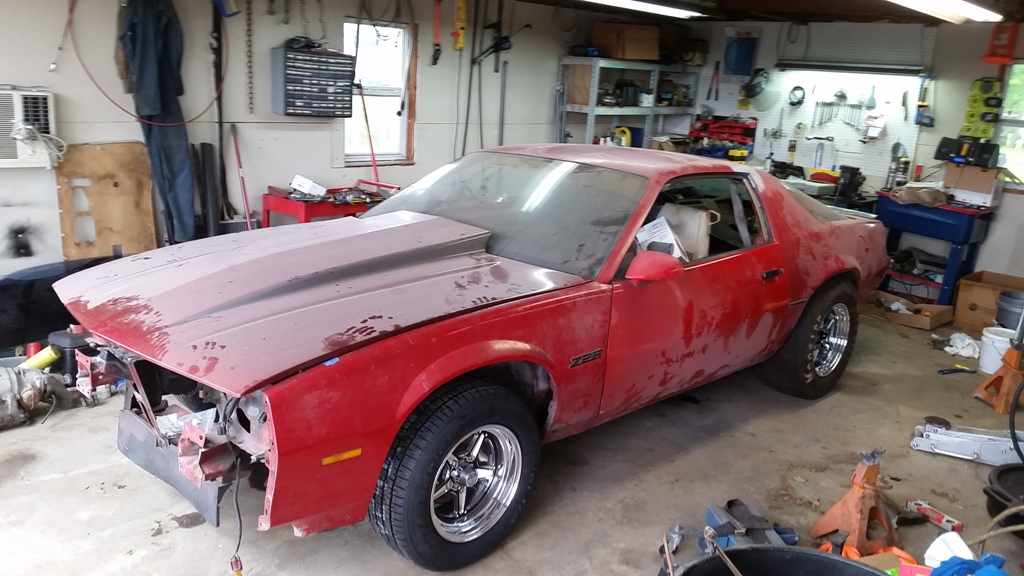
Car did not originally come with a rear spoiler, I picked up the pieces a while back and started drilling holes to mount it...got the left and middle pieces in...still need to do the right one.
ugh...mounted the right piece last night and realized the hatch was horribly out of alignment....the right side stuck back almost 1/2"
Wasn't the upper hinges since the glass is in good alignment, so I knew it was the hatch panel....so I disassembled the panel. probably better this way for a proper paint job. Once painted I can align it properly with the body and glue it back on with windshield urethane. This is quickly turning into a big project LOL
This should be expected with all thirdgens lol. I'd recommend aligning the hatch just a little inside when you first mount it. It will get pushed back out just a tad after it settles. I can't remember what the body guys said but not much, like 1/16-1/8" or so.
ugh...mounted the right piece last night and realized the hatch was horribly out of alignment....the right side stuck back almost 1/2"
Wasn't the upper hinges since the glass is in good alignment, so I knew it was the hatch panel....so I disassembled the panel. probably better this way for a proper paint job. Once painted I can align it properly with the body and glue it back on with windshield urethane. This is quickly turning into a big project LOL
I have been fiddling with the hatch alignment for the 30 years I have owned mine. Many different methods and two repaints of the car later it still is not 100%. Get the alignment where you can live with it and drive it for a few months to allow settling before painting.
I have been fiddling with the hatch alignment for the 30 years I have owned mine. Many different methods and two repaints of the car later it still is not 100%. Get the alignment where you can live with it and drive it for a few months to allow settling before painting.
M
Not really an option since car will be in paint later this summer. I'm going to set it inward a bit with the expectation it'll creep out. worse case I can tweak the hinge alignment. Still 1-2 years before it is street worthy...
This is a cool build. Need some updates. I love the twin turbos, wish I could do it on my 6.0 build but living in the south I gotta have A/C. It does make me think about a single turbo kit though.
Sorry for the hiatus...the wife and I ended up inheriting a 'project car' from her family. For sentimental reasons, we jumped into that project and put the third gen on hold. Did a frame up restoration on it in just under 1 year. It's a neat car but the complete opposite of the Camaro
We finished the model A last spring then I got the go-ahead to build a BIG garage. 48x44 main area with a 12x44 storage area. Fully insulated and heated. Still finishing up the garage then hopefully will start tinkering on the Camaro again later this year. Going to be nice working in a shop with a lift and enough room to spread out
Finally some progress! I discovered that the motor plate I used in my old 4th gen fits perfectly, other than needing to be clearanced around the steering box. Purchased an AEM mid plate which I still need to install. I spent all weekend making the passenger header that has only taken me years to get to LOL.
Need to order some 3" bends for the downpipes and figure out what wastegates I want to run.
Some progress today....cut the mounting brackets off the intercooler, cut a notch in the core support (to allow the IC to tilt further back toward the radiator). welded on new aluminum angle at the correct angle and cleco'ed in place
The outlet pipe almost makes it through...I think with some minor additional trimming and with a 3" aluminum elbow I'll be able to make it through
I should have more time now to focus on this project again...
Pulled out the engine to get the mid plate installed and to get some fab work done in the engine bay. Mocked up a repop battery tray (old one was in bad shape)
Got the IC outlet pipe to fit (still super snug even after extensive cutting). I'll be removing the rad cap in favor of a separate expansion tank.
Picked up a set of 5th gen seats...I'll make them work...found a good thread on here which gave me ideas.
Last edited by Fireball; May 13, 2019 at 09:11 AM.
Cut a bracket out of 3/16 steel and welded to the frame rail for the passenger motor plate to bolt to. Still need to do the driver side.
Also got more hot side completed on passenger side - managed to squeeze in the WG and will be able to snake the output underneath to the downpipe (or to atmosphere). Did get it fully welded yesterday - just didn't take a photo. Yes the hood closes