When you click on links to various merchants on this site and make a purchase, this can result in this site earning a commission. Affiliate programs and affiliations include, but are not limited to, the eBay Partner Network.
LTX and LSXPutting LT1s, LS1s, and their variants into Third Gens is becoming more popular. This board is for those who are doing and have done the swaps so they can discuss all of their technical aspects including repairs, swap info, and performance upgrades.
If it's the return line, why not simply put a piece of FI hose? That's what a lot of people are doing off the filter since the pressure is far less than the feed line.
Edit: Btw, I haven't been getting many, if any, responses to my thread so you aren't alone. lol
Last edited by R13_Braz; Mar 25, 2015 at 11:30 AM.
After thinking about it, the FI hose should work. The only downside I can see is if there is no barb on the plastic line to help hold the hose/clamp is place. Should be able to be done though. Just have to remove the clips.
Dont clamp hose on the pressure side of any quick connect, it risks blowing off. Dorman sells plastic quick connects with a barb fitting to clamp on to (use fuel injection clamps, bolt not worm screw) if you must mod it. Alternatively, russel sells -6 quick connects, both male and female. I have a diagram in the additional info thread of the LS1 swap sticky
FWIW, the tool to disconnect the OEM line is not expensive and will come in handy if you service other GM vehicles in the future. Wouldnt hurt to hang on to it and use the OEM lines if they fit. One less things to have to figure out
Hey Pocket, nice to see you are still here.
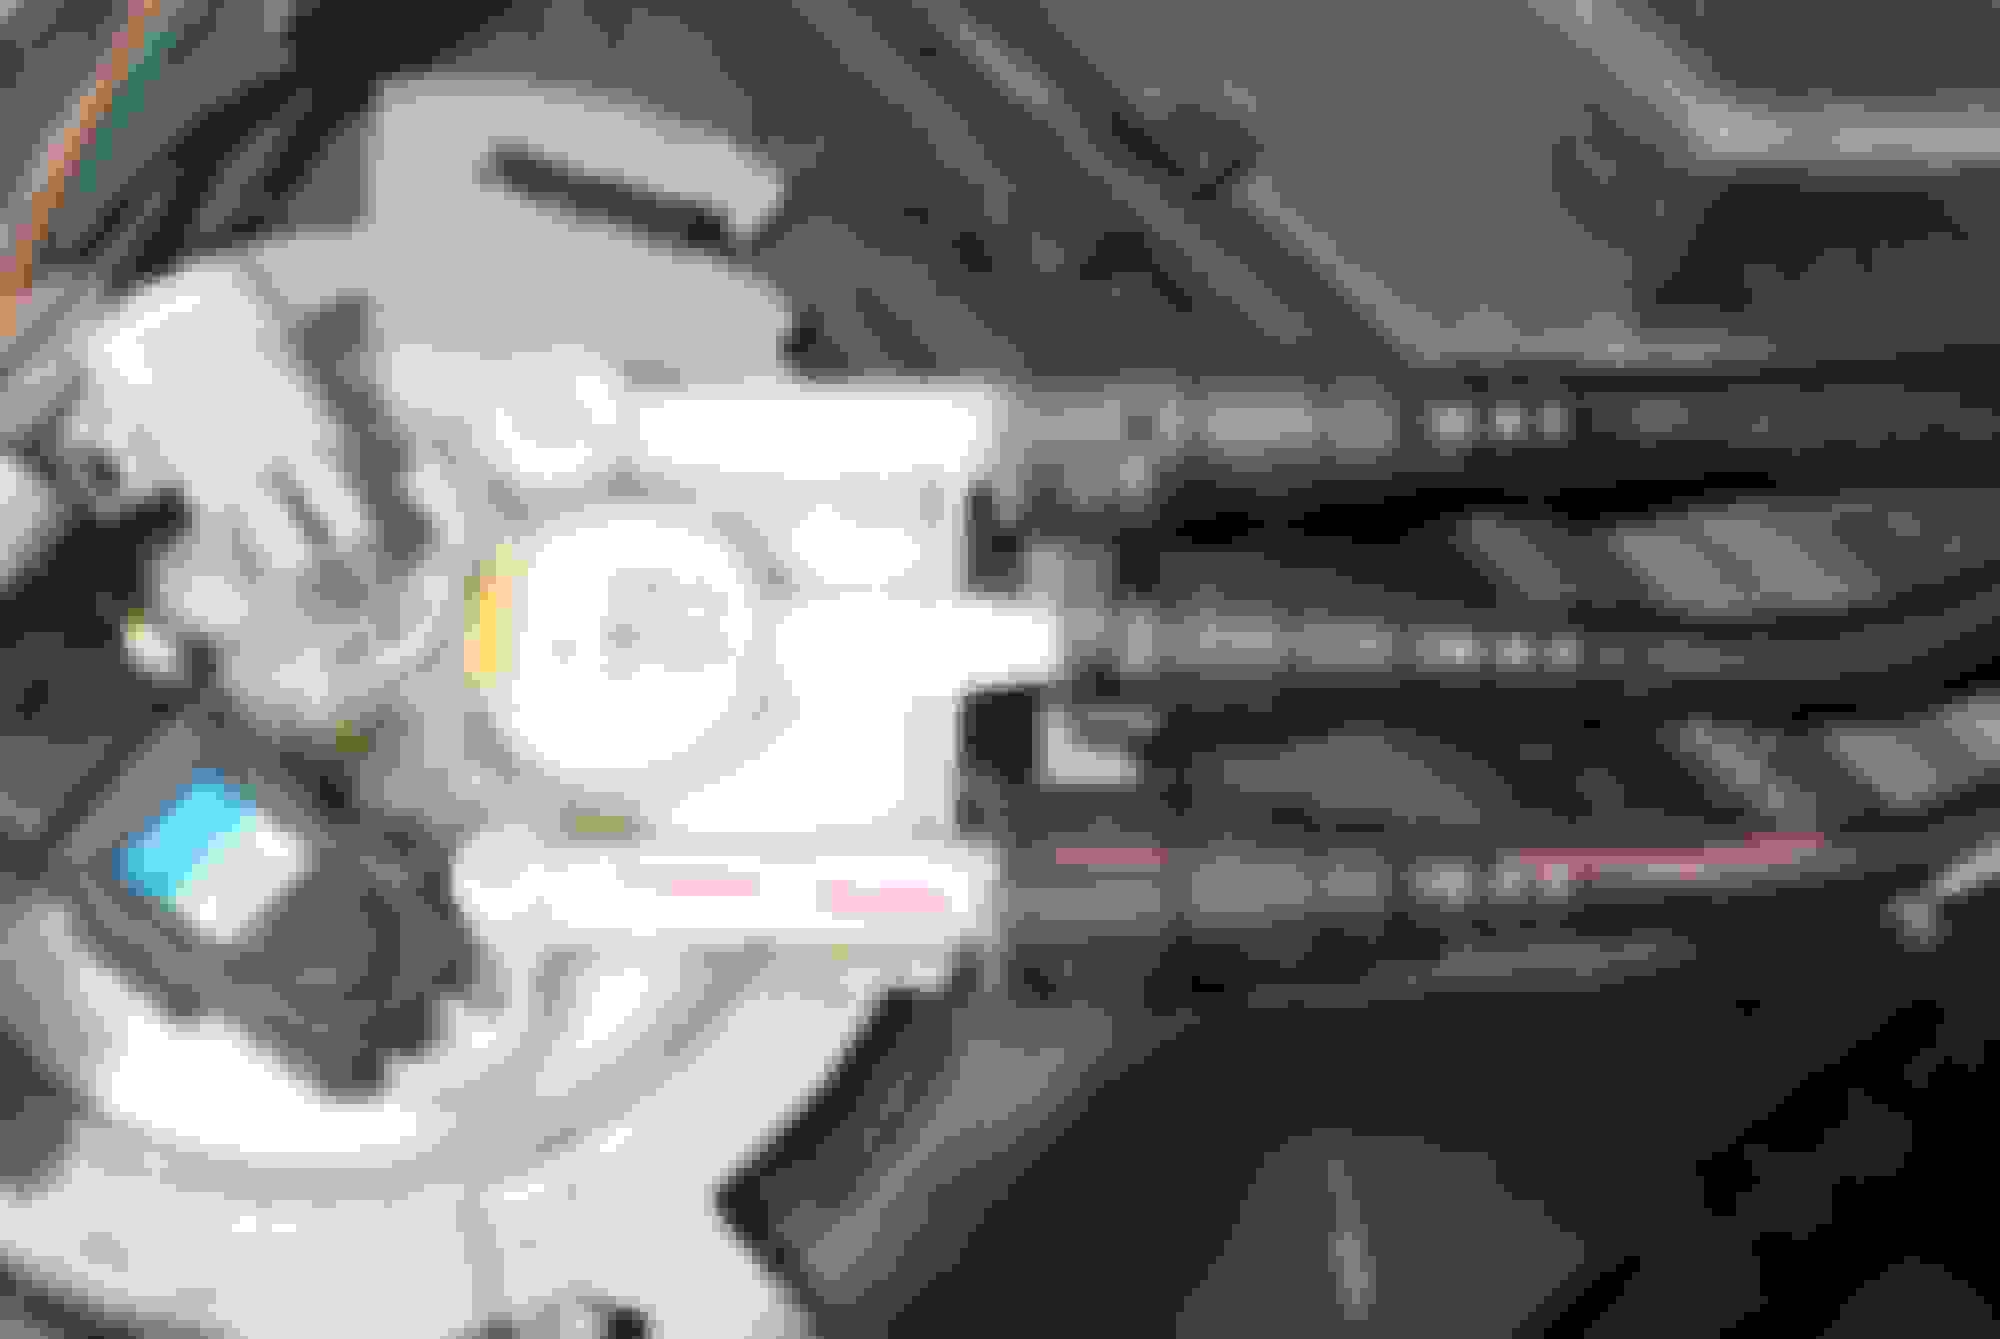
Here is where my fuel line problem is: I have the complete fuel line system out of the Caprice. It's just too long and the metal quick connects (need to use the tool to disconnect) are not the same as the plastic "pinch to disconnect" fittings on the fuel tank. I don't think there is a way to modify the plastic fuel lines with different (pinch to release) fittings. I also don't think you can just cut the plastic fuel lines and use a barbed end fitting on it. If this is so, I guess I'll have to run a new fuel line with the correct fittings.
Here is the fuel assembly connections used on the 2002 Camaro tank:
Here is the connector coming from the 2002 tank line:
Can you put the plastic "pinch to release " connector on the Caprice's plastic fuel line? Does anyone clip the plastic lines to the plastic connectors?
If I can do this, I would be able to use the Caprice fuel lines and make my life easier.
AH, I just watched a video on how to repair plastic fuel lines. I can buy the connectors, cut the lines, heat up the fuel lines and push the connectors into the now soft plastic lines. I'm going to give this a try and will report back.
I just cam across this thread and would like to say thanks. I'm just starting my project and already had some questions I had answered just by reading this. Good luck on the car and keep us informed.
I just cam across this thread and would like to say thanks. I'm just starting my project and already had some questions I had answered just by reading this. Good luck on the car and keep us informed.
Thanks for the kind words, BUT are you sure you want to get into this project? There are so many little annoying problems that nobody seems to talk about. I'm in too deep to pull the plug now. For example, wiring the PCM from a newer Chevy to my older Camaro ............I just don't see the light at the end of the tunnel. Then there is the motor mount problem. Maybe you caught me at a dark moment on this project. I had to take a break after we couldn't get the motor mounts to line up and we have the K-member out of the car. Well, good luck, maybe you'll have better success than we are having.
You'll get there. Just remember when it's all said and done you'll have a nice LT1 camaro. Before I read this I was unsure if I wanted to keep the fuel injection or go carb'd...after reading you wiring and fuel line issue I've made up my mind...carb'd for sure lol. Good luck with the rest of it I'm interested on what you find out about the mounts.
Here's what we did to complete the motor mount issue: We used the driver's side Camaro bracket that mounts to the block. (Same as the Caprice). For the pass side we used the bracket from the Caprice pass side. The Caprice mounted this bracket up side down (single hole on top) with the mounting holes on the rear 3 mounting holes. You see, the motor mounts on the Caprice are set back and the forward hole on the block is used for the A/C mounting bracket. But you use the 3 mounting holes that are forward on the block including the mounting hole the Caprice used for the A/C bracket. I know, clear as mud. Pictures coming.
Shows the correct mounting using the Caprice bracket
This shows the difference between the Camaro backet and the Caprice bracket. Notice the point where the motor mount inserts contact the bracket.
Now I need a new clutch disc. Probably go with an OEM one for now. So, we'll install the pilot bearing, disc, clutch, and bell housing. Then the hydraulic clutch linkage and then the transmission. After that the motor and tranny will be ready to roll under the Camaro. But first, time to install the fuel tank and lines. Next the rear end. Sounds easy, but I'm sure there are obstacles just waiting to jump out and spoil the day.
Clutch is in. Bell housing is on. This tranny is heavy so I'm waiting for my son to help install it. The FSM said to torque the pressure plate to 30 lb-ft. To me that seems low.
Okay, it's back to fuel injectors. We need 32 lb injectors. I saw somewhere that a company sells rebuilt injectors that are flow balanced and ready to go. I can't find that company. They had a great video showing how their injectors compare to others. Any ideas who they are?
I found the place to get fuel injectors. FIC (fuel injector connection). Talked with Jeff, Jon was busy, and ordered the 32 Bosch III injectors. You have a choice either new, $440 or refurbished for $203 and if you get the better o rings, $235. I went with the refurbished. The only problem with refurbished is the coils, you don't know about how old they are. But they are flow balanced and tested. The guys over on the Corvette forum like this company.
Tranny Question: Does the fork have anything that goes on the tips that ride on the release bearing? All my T5s had nylon on the tips of the fork.
I just stumbled across this thread. God job so far and kudos for sticking with it.
It gets difficult when you don't have an f-body pull out motor to work with - I know the feeling.
For fuel lines may I suggest AN lines. I wouldn't trust a recrimp for those plastic lines simply because it will be operating at 45-50 psi. The last thing you want is for it to blow off and spray on something hot causing a fire.
Thanks for the advice. The plastic lines will only be temp. Our fuel pressure regulator will be at 43psi or so, not the LSx pressure. We're also planning conduit to cover and protect the lines.
Here is our fix on the crack where the steering box bolts to the frame:
This was our first try at using our welder. It's a little sloppy, but it got the job done. We added a couple of strips to give a little added strength.
You can check post #80 to see how it was before. We did spot welding so we wouldn't warp the metal. A long bead might have caused problems. Still learning.
Thanks for your reply. I was wondering if anyone was following it. We're waiting for new water pump bolts which I lost somewhere in the tear down process. We're almost to the point where we can undercoat the car. Then in goes the gas tank. BTW, welcome Drifter Joe to our forum.
You should be getting pretty close to hitting the road with this bad boy right? You definitely put a lot of effort into this build. I'm probably just going to build the top end of my LT1 and call it good. Ported heads and a cam. The bottom end was rebuilt and bored .30 over less than 10,000 miles ago. It'll be a sad day when I sacrifice my 94 Z28 for this project. But in the end I think third gens look way better. Plus my 94 is really rough around the edges and fourth gens are everywhere these days
You should be getting pretty close to hitting the road with this bad boy right? You definitely put a lot of effort into this build. I'm probably just going to build the top end of my LT1 and call it good. Ported heads and a cam. The bottom end was rebuilt and bored .30 over less than 10,000 miles ago. It'll be a sad day when I sacrifice my 94 Z28 for this project. But in the end I think third gens look way better. Plus my 94 is really rough around the edges and fourth gens are everywhere these days
Getting close.?..........not even close. The body is still on jack stands with no electrics or wiring installed and it still needs some body work. Once we get the fuel tank and the differential in, we'll see how well the drive train will slide under the car. I'm sure there will be lots of mods and fab work ahead of us. BUT, it's still fun. I agree with you about the looks of the 3rd gens. When done right they look mean. 4th gens look like lawn darts, but they do have some improvements. I have a 93 Pontiac Firebird Formula V8 that is rough but still that LT1 runs great. I just can't figure out how to get the starter out as the exhaust is rusted in place and I don't want to replace the exhaust. That would start another project and I don't think my marriage could handle that.
Haha well the engine and tranny are ready to go. Call the body work good and slap everything together!! lol. Haha yea rusty exhaust is tricky. Best bet is to heat the living hell out of it and pray that the bolts come out.
Haha well the engine and tranny are ready to go. Call the body work good and slap everything together!! lol. Haha yea rusty exhaust is tricky. Best bet is to heat the living hell out of it and pray that the bolts come out.
Been lurking for awhile and following the build. I have my own swap going on right now and all the info has been helpful. So don't give up keep up the great work. Like to see what it all looks like so I will know. I might never get mine done....lol
I'm going to do a swap just like this to my 91 RS. I'm definitely going to be following this, and remember that when you're done all your hard work will have paid off.
Thanks for the replies. Keeps me motivated. We took a little break, but will be getting back to it shortly. We're deciding on which spark plug wires to go with. I like the MSD's but they are red. We'd like blue as in Taylor's.
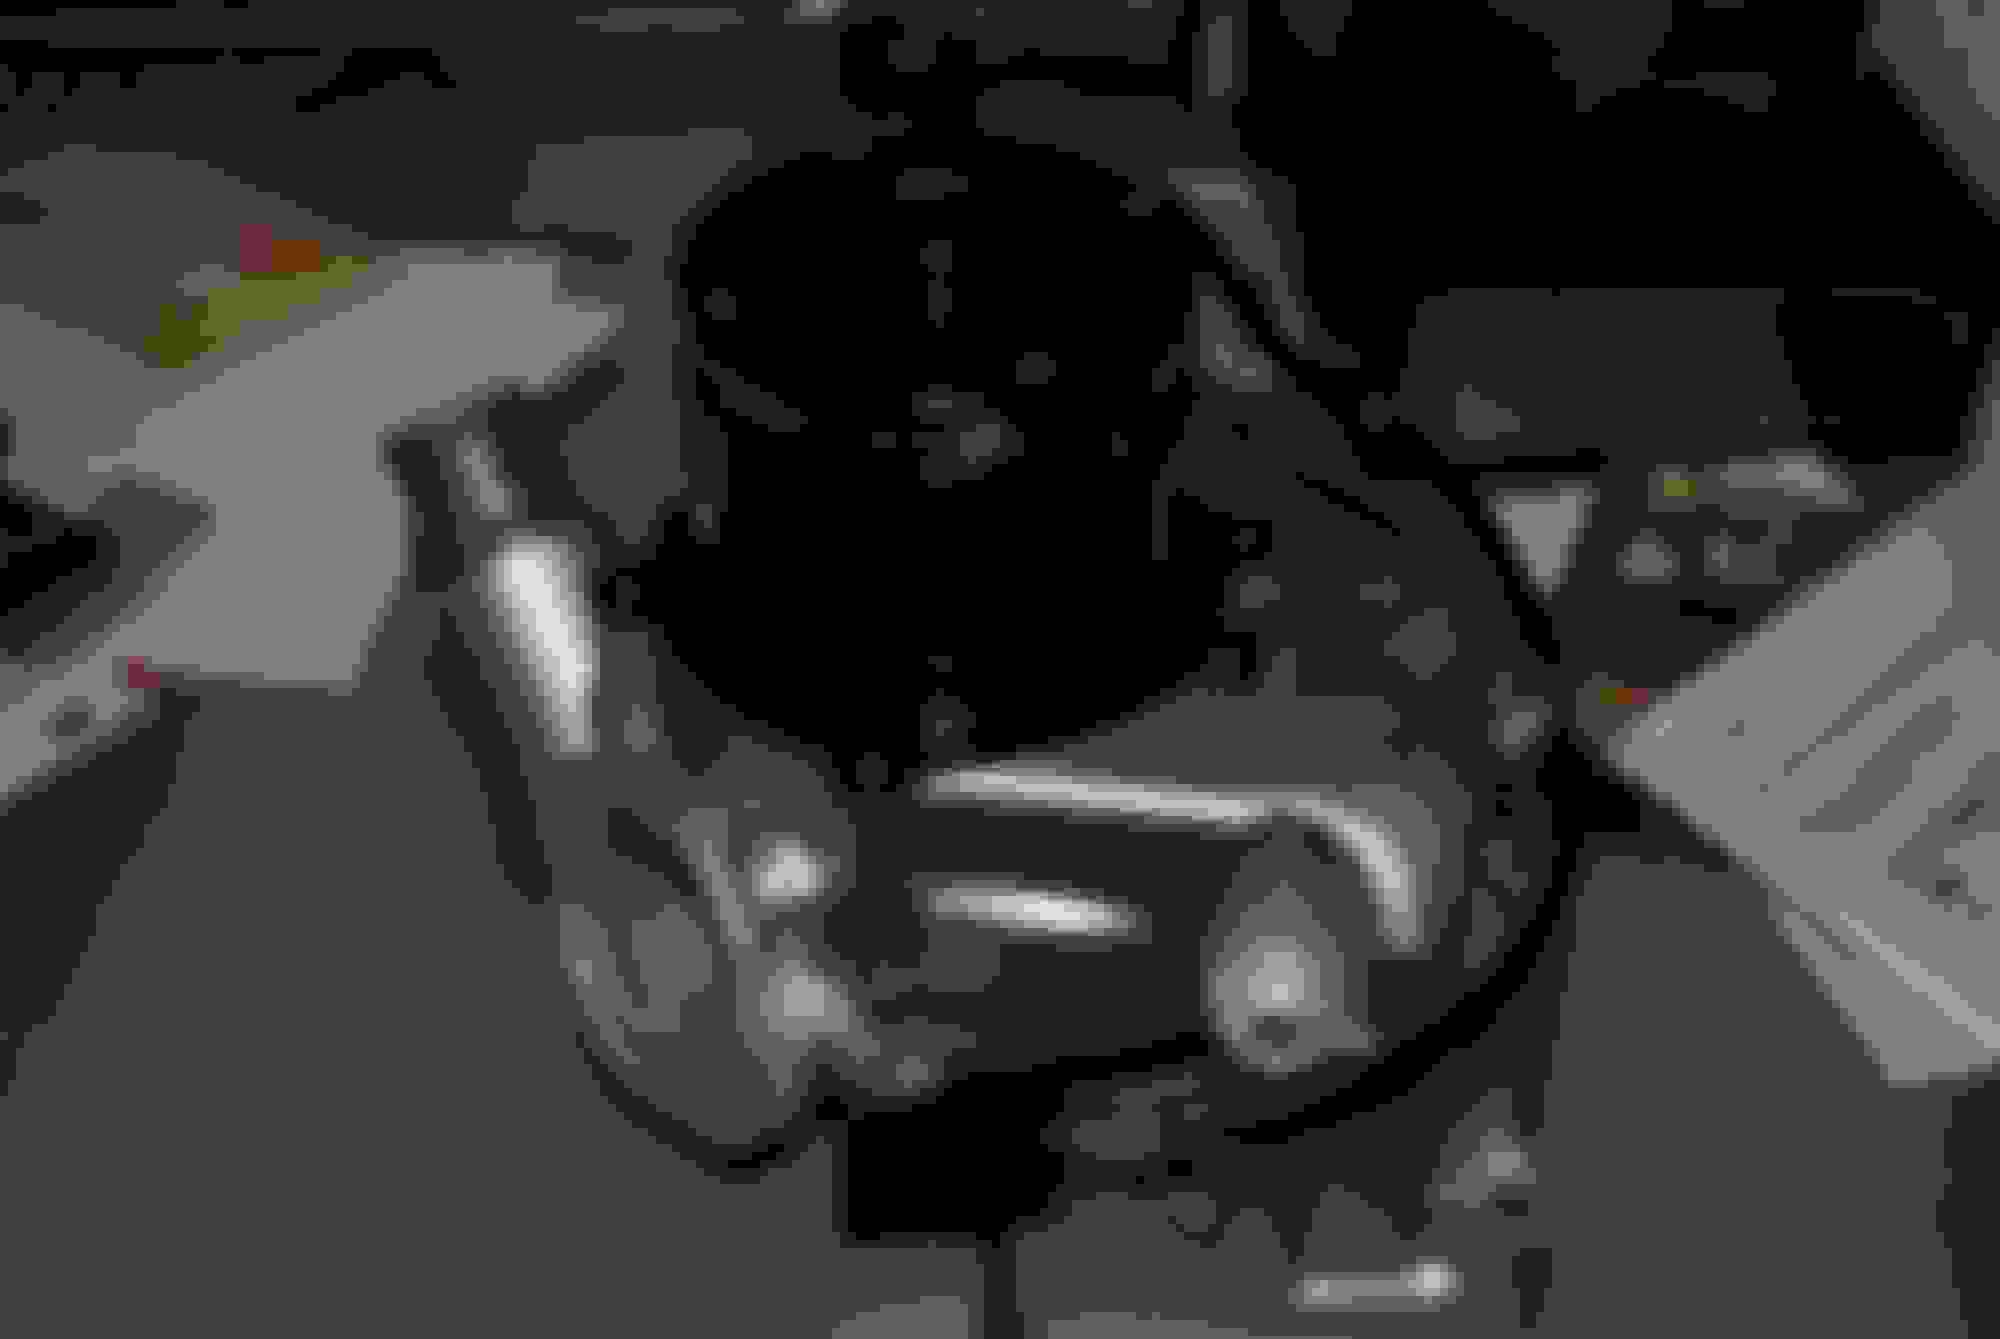
I'll try again. This photo shows the housing. First remove the cover on the front. Save the 6 bolts and inspect the O ring around the cover. You'll most likely need to replace it. The dealership can get them.
Now comes the hard part. You have to remove the impeller assembly. It's pressed in. The way the factory assembled the impeller assembly goes like this, First the impeller assembly is put in from the front. then the bearing is pressed in from the back while the impeller is supported. If your water pump is old (say 15 years or so) the bearing is probably rust welded to the shaft. So you can't just press the shaft out from the back, you probably break the housing. I broke 2 of them. So, I cut the impeller blade off the shaft with a small cutting wheel. This allowed me to press the remaining shaft out the back. There is an embossing where the bearing slides into that you can use to support the housing (with a large socket). Now you can press the shaft out the back. This photo shows the embossing. The shaft is removed.
Next, you have to seal the hole where the bearing and shaft came out. Meziere electric water pump came with a freeze out type plug, but I'm into "over kill" and had the hole welded close along with the weep hole.
The Meziere electric water pump comes with instructions and I just added a few extras with this post. Once you complete this mod, you'll never have to replace the housing (except if you have to remove the opti) again. If the pump fails it will take you 30 minutes to remove the 6 cover bolts and unplug the wires and replace the pump. And you gain a few ponies. I've had this pump in my 92 Vette for 7 years and it runs great.
I just wrote an article and before I could get it submitted, the "gateway timed out" Lost it all.
I got burned by timeout a couple of times in years past taking my time composing posts. Now I compose and link images in a temporary MS Word document first. Then copy and past to the forum without worrying about a time limit.
Thanks for your reply. I was wondering if anyone was following it. We're waiting for new water pump bolts which I lost somewhere in the tear down process. We're almost to the point where we can undercoat the car. Then in goes the gas tank. BTW, welcome Drifter Joe to our forum.
I'm not on here very often, but I usually catch up on your progress when I do get on.
Still working on it just slowly. Waiting for the money to catch up. I've decided on Dyno Don's headers and "Y" pipe. As soon as my funds catch up, I'll order them. I got the Moroso plug wires and I'll see how they fit as soon as I get the headers.
Water pump looks great. I understand why you went ahead and welded the drive port closed, considering the optispark is right behind that. I took extra care making sure the water pump was in as good a shape as it could be. I had to block off the port for the oil cooler, but just decided to use an expandable rubber plug since it's facing away from the opti. Might go with threading the hole and using a real plug though.
Believe it or not I'm still following. My project has been put off and put off again due to things out of my control, but it is anything but forgotten about. I'm hesitant to pull the old motor in my '91 before I come up for orders as I don't want to have to move across the country with a half-done project.
Thanks for the info and documentation on the water pump, and your project is looking great!
Good luck on your orders. I hope it's somewhere you like.
I had to send the wires back as they were for a Camaro not the Vette accessory set up. The coil wire was way too short as the coil is on the pass side of the Vette engine set up.
Cool thread strick1. It's nice to put a project to the name! Keep at er and good luck! I hope u have it together before I pull the 350 to make her 383 so I ca. See some results from you r end.
Good luck on your orders. I hope it's somewhere you like.
I had to send the wires back as they were for a Camaro not the Vette accessory set up. The coil wire was way too short as the coil is on the pass side of the Vette engine set up.
I'm actually trying to stay here in VA because I've become rooted so deeply here. I just need confirmation that I can stay before I go pulling that motor haha.


")