
My custom F1A installed pictures


Thread Starter
Junior Member
iTrader: (1)
Joined: Jun 2009
Posts: 59
Likes: 0
From: York PA
Car: 1989 camaro
Engine: 357 procharged
Transmission: turbo 400 with Transbrake
Axle/Gears: 342 posi
My custom F1A installed pictures
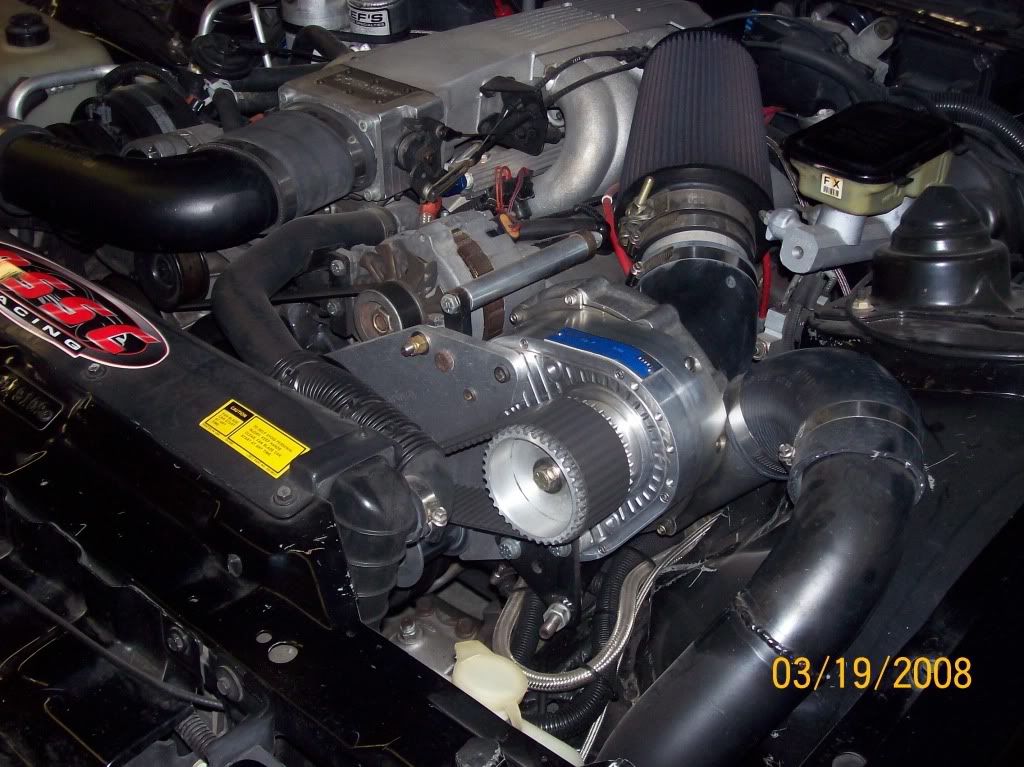
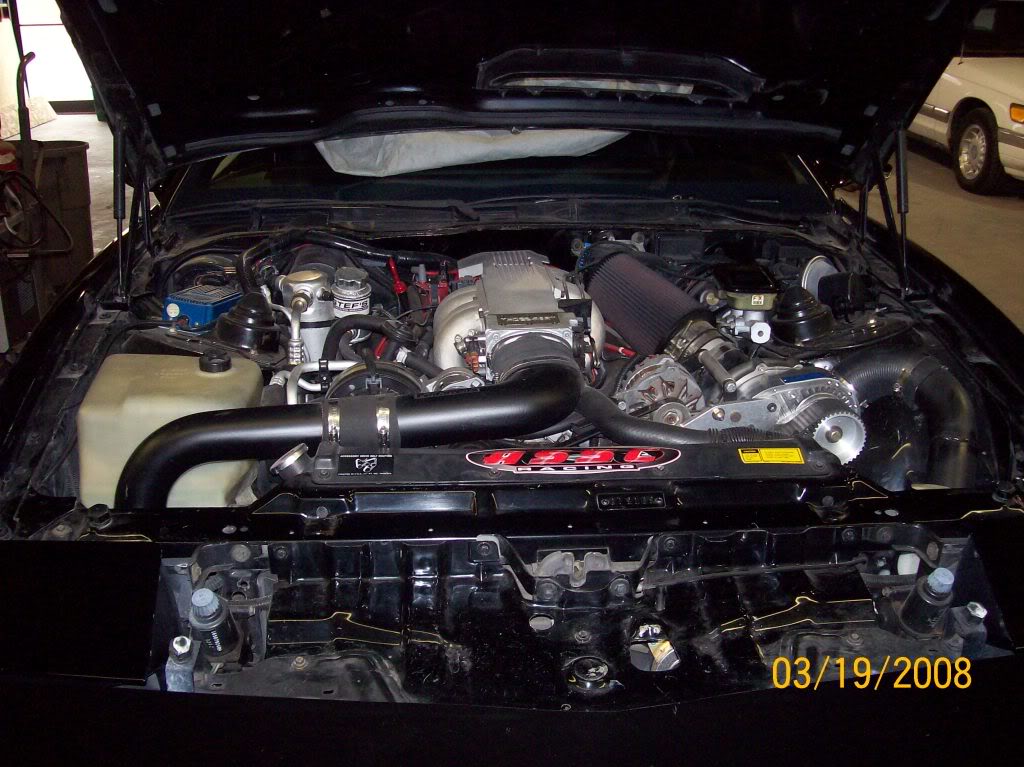
Here are some picture of my install that i have been working on for the past year. I have a little tunning to do yet in the spring.


Joined: Sep 2003
Posts: 25,896
Likes: 430
From: Pittsburgh PA
Car: 89 Iroc-z
Engine: 555 BBC Turbo
Transmission: TH400
Axle/Gears: MWC 9� 3.00
Re: My custom F1A installed pictures
Looks good! whats the motor setup? How much power you expecting on that beast?

Supreme Member

Joined: Aug 1999
Posts: 2,441
Likes: 1
From: sweden
Car: GTA -89
Engine: Blown 415"
Transmission: 4L80E
Axle/Gears: Strange 12-bolt
Re: My custom F1A installed pictures
looking good!
I like your Master cylinder, what have you done to the brake setup?
/N.
I like your Master cylinder, what have you done to the brake setup?
/N.
Thread Starter
Junior Member
iTrader: (1)
Joined: Jun 2009
Posts: 59
Likes: 0
From: York PA
Car: 1989 camaro
Engine: 357 procharged
Transmission: turbo 400 with Transbrake
Axle/Gears: 342 posi
Re: My custom F1A installed pictures
Because of where my supercharger sits I needed mire room so I changed it over to manual brakes and got rid of the stock setup. It worked good I have a ton if room thier on the drivers side now. The setup should be around 700-750 at the crank. I can't wait to get it on the dyno and get it running right.
Thread Starter
Junior Member
iTrader: (1)
Joined: Jun 2009
Posts: 59
Likes: 0
From: York PA
Car: 1989 camaro
Engine: 357 procharged
Transmission: turbo 400 with Transbrake
Axle/Gears: 342 posi
Re: My custom F1A installed pictures
I did all of of the pipping and mounting of the intercooler. I had someone paint all if the pipes. They are all seamless which looks better too. I'll post a picture of the fount mount later.

Senior Member
Joined: Jul 2001
Posts: 765
Likes: 0
Car: 1991 Conv. TA
Engine: Forged 350 with D-1SC
Re: My custom F1A installed pictures
Wow Eric,
Really nicely done.
I have a setup based on the design of list member Willie.
It is a D-1SC with dual intercoolers.
Please give some updates once you have it out a bit!
Sean
Really nicely done.
I have a setup based on the design of list member Willie.
It is a D-1SC with dual intercoolers.
Please give some updates once you have it out a bit!
Sean
Last edited by mypontiac; Dec 20, 2009 at 08:57 PM.
Trending Topics
Joined: Feb 2005
Posts: 4,506
Likes: 93
From: West Warwick RI, postal code: 02893
Car: Building LS3, T56 Z28
Engine: LS3
Transmission: T-56
Axle/Gears: Moser/ 4.11
Re: My custom F1A installed pictures
What is the difference between a normal F1 and an F1A? I am looking to make a setup just like this for my 91. I have a 12 bolt and am going to be getting my T-56 beefed up to take my new motor, but I have been hunting for a setup that I can copy so that I am not running in circles trying to make the power that I want.
Would you be willing to give me some insight on the details of your setup once you have it all tunned up? I have been looking for over a year to find someone doing what I want.
Thanks for any insight. The car/setup looks amazing.
Would you be willing to give me some insight on the details of your setup once you have it all tunned up? I have been looking for over a year to find someone doing what I want.
Thanks for any insight. The car/setup looks amazing.
Joined: Jul 2003
Posts: 10,538
Likes: 206
From: NYC / Jersey
Car: 1990 Trans Am GTA
Engine: Turbo 305 w/MS2
Transmission: 700R4
Re: My custom F1A installed pictures
Originally Posted by dennisbernal91z
What is the difference between a normal F1 and an F1A?...
Senior Member
iTrader: (8)
Joined: Jun 2009
Posts: 768
Likes: 2
From: Peoria, AZ
Car: 91 Z28, 2000 T/A
Engine: SBC 355, LS1
Transmission: T56, T56
Axle/Gears: 10bolt 3.73, 3.42
Re: My custom F1A installed pictures
That is a super clean setup.
Damn good idea to move the radiator inlet to the pass side so you don't have to contend with the belt too. The seamless 1 piece pipes are awesome looking!
Damn good idea to move the radiator inlet to the pass side so you don't have to contend with the belt too. The seamless 1 piece pipes are awesome looking!
Joined: Feb 2005
Posts: 4,506
Likes: 93
From: West Warwick RI, postal code: 02893
Car: Building LS3, T56 Z28
Engine: LS3
Transmission: T-56
Axle/Gears: Moser/ 4.11
Re: My custom F1A installed pictures
I have that Procharger sheet printed up at home. I have compared them before, I still don't see why the F1A exists. It seems very close to the F1.
-Rated for 50 more HP
-75 cfm more max flow
-.25" smaller inducer diameter
-.5" smaller exducer diameter
-4,000 more max RPMs
What do all these changes get you? Seems a tiny bit smaller and maybe spins a bit faster?
I am trying to get to my goals with a D1SC on pump gas, and intercooled. I want to get somewhere in the 700HP range. Impossible? Is that why you needed a F1A?
Senior Member
iTrader: (8)
Joined: Jun 2009
Posts: 768
Likes: 2
From: Peoria, AZ
Car: 91 Z28, 2000 T/A
Engine: SBC 355, LS1
Transmission: T56, T56
Axle/Gears: 10bolt 3.73, 3.42
Re: My custom F1A installed pictures
700hp isn't impossible with a D1, but you will likely have the blower maxed out. The F1A can spin a few more RPM than the regular F1 therefore it can make more power and push more air. The price is the same for the F1 and F1A if I remember correctly, so why not just get the F1A. I agree though why make two blowers that are that close in specs.
Thread Starter
Junior Member
iTrader: (1)
Joined: Jun 2009
Posts: 59
Likes: 0
From: York PA
Car: 1989 camaro
Engine: 357 procharged
Transmission: turbo 400 with Transbrake
Axle/Gears: 342 posi
Re: My custom F1A installed pictures
Lets see where to start. well if any one has any questions about my set up please ask. I had to do everything for myself nothing on my kit was bolt on, everything was custom. I can help and answer questions to people trying to do the same thing.
The main reason that I went with the F1A kit is because I wanted to have something that I could turn up even higher when I have the money to build a new motor and I would be maxed out if I would of bought a DSC1 kit. I am making some where between 18-20 lbs of boost with the kit I have now and I wouldnt have been able to do that with the other kits and still have room to grow. It was only $500 to go up to the next kit.
As so the radiator it is a double pass, that is why the inlet and the return is on the same side. It wouldnt clear the belt to have it on the other side.
The biggest thing that you probably cant see is how far down the supercharger is mounted so it clears the hood, that was the biggest thing I told procharger when ordering my kit I would not cut the hood to make it fit, I also cut the finder a little bit to and fiberglassed it back shut, look like its made to fit perfect.
Here are some of the pictures of the front mount...
Joined: Oct 2003
Posts: 508
Likes: 9
From: Columbus, Ohio
Car: 1986 Iroc
Engine: Afr 408
Transmission: T56 Magnum
Axle/Gears: Moser 9" 3.70s
Re: My custom F1A installed pictures
Eric, great job man!
What intercooler did you use? What did you use to paint the piping? Did you paint the inside? I see you used the relocation block/bracket from ati. I have a very similar setup to yours, except I didn't need the block. I couldn't get it to work, so I used the standard mount pattern. I can kinda see where you had to modify the strut tower. Do you maybe have a closer picture? I was able to stuff everthing under the stock hood, but I did have to cut a little bracing. 18-20 lbs! WOW!!
What intercooler did you use? What did you use to paint the piping? Did you paint the inside? I see you used the relocation block/bracket from ati. I have a very similar setup to yours, except I didn't need the block. I couldn't get it to work, so I used the standard mount pattern. I can kinda see where you had to modify the strut tower. Do you maybe have a closer picture? I was able to stuff everthing under the stock hood, but I did have to cut a little bracing. 18-20 lbs! WOW!!
Joined: Sep 2003
Posts: 25,896
Likes: 430
From: Pittsburgh PA
Car: 89 Iroc-z
Engine: 555 BBC Turbo
Transmission: TH400
Axle/Gears: MWC 9� 3.00
Re: My custom F1A installed pictures
What did the kit include? headunit and brackets to mount and thats it?
Joined: Feb 2005
Posts: 4,506
Likes: 93
From: West Warwick RI, postal code: 02893
Car: Building LS3, T56 Z28
Engine: LS3
Transmission: T-56
Axle/Gears: Moser/ 4.11
Re: My custom F1A installed pictures
I don't care about cutting my hood. Would it fit under a stock hood. I run a 3" Cervini hood. More room than stock anyways.
I would really wanna know about the hood issue. I don't care about the fender, I can cut and weld that as well no problem.
A little more info on the origional placment of the head unit would be great. Thanks for all your insight so far. I agree that the head unit increase in price of $500 does seem worth it. The MAX PSI out of the D1SC says 32 I think on prochargers site, but I would assume that is not very realistic. After I do this setup, I will not be changing it, so I may just stick to maxing out a D1SC, not sure. I will be building up my motor at the same time. I already have a forged crank, rods and just need blower pistons. So I am going to 1 setup here, not a "I will build up more later" setup. For you Eric, I agree that is the way to go. Everything looks great. I have some fab skills and work next to a machine shop so getting something touched up or made is not a big deal.
All the detail you can provide is greatly appreciated. Even minute details that you may think are not a big deal. I am trying to have this entire thing down on paper before I spend a dime.
The motor I have now was sorta built on the fly for a 300 shot of N20, with the car done and where I am in my life, with how much I drive it, SC is just the way to go. I want to be more carefull this time.
Joined: Oct 2003
Posts: 508
Likes: 9
From: Columbus, Ohio
Car: 1986 Iroc
Engine: Afr 408
Transmission: T56 Magnum
Axle/Gears: Moser 9" 3.70s
Re: My custom F1A installed pictures
Dennis, I bought a D1sc "kit" that included the standard sbc "carb application" bracket. It included a 12 rib belt and pulleys. The head unit just made contact with the stock Iroc hood where there was bracing. I cut out a small section of the bracing and everyting fits fine. Also, I have a smaller pulley, so a larger pulley might hit the hood.
You could message me for further info or I could start a new thread, I don't want to clog up Eric's. (My apologies).
You could message me for further info or I could start a new thread, I don't want to clog up Eric's. (My apologies).
Thread Starter
Junior Member
iTrader: (1)
Joined: Jun 2009
Posts: 59
Likes: 0
From: York PA
Car: 1989 camaro
Engine: 357 procharged
Transmission: turbo 400 with Transbrake
Axle/Gears: 342 posi
Re: My custom F1A installed pictures
This kit was put together by procharger for me. It came with the head unit, brackets, belt, race valve, pulleys, and bolts. I also paid for the polished everything too. I also bought a universal pipe kit from prochager too and used what I could from the kit. Oh the intercooler is made by treadstone. It saved me alot of money and well its just as good as any other one.
The head unit and pulley would have never cleared the hood it they wouldnt have gave me the relocation block to set the unit down and to the fender, even then the pulley is very close to the hood. When I do a smaller pulley it will be better.
I will say this after working on this project of putting this super charger kit on for hours upon hours, it was far from a bolt on kit compared to any other smaller kits, BUT WORTH IT ALL.
Joined: Feb 2005
Posts: 4,506
Likes: 93
From: West Warwick RI, postal code: 02893
Car: Building LS3, T56 Z28
Engine: LS3
Transmission: T-56
Axle/Gears: Moser/ 4.11
Re: My custom F1A installed pictures
Thats interesting that Thomas Aquinas says he can close a normal hood. From what I understand the D1SC and the F1 have the same outter dimentions. Is that so? If it is then wouldn't the F1 fit under an Iroc hood too?
Just noticing some inconsistencies here and want to get a full understanding. So far the info has been very helpfull.
Just noticing some inconsistencies here and want to get a full understanding. So far the info has been very helpfull.
Senior Member
iTrader: (8)
Joined: Jun 2009
Posts: 768
Likes: 2
From: Peoria, AZ
Car: 91 Z28, 2000 T/A
Engine: SBC 355, LS1
Transmission: T56, T56
Axle/Gears: 10bolt 3.73, 3.42
Re: My custom F1A installed pictures
It looks to me like he has the universal Small Block Chevy main bracket not the 88-92 specific bracket. Thus the neccesity to use the adapter bracket and trim the strut tower.
The F body bracket puts the blower further forward and at about the height that eric's blower is at.
The F1A on the Fbody specific bracket fits under the hood with no modification. I helped put one on a 92.
The F body bracket puts the blower further forward and at about the height that eric's blower is at.
The F1A on the Fbody specific bracket fits under the hood with no modification. I helped put one on a 92.
Joined: Sep 2003
Posts: 25,896
Likes: 430
From: Pittsburgh PA
Car: 89 Iroc-z
Engine: 555 BBC Turbo
Transmission: TH400
Axle/Gears: MWC 9� 3.00
Re: My custom F1A installed pictures
Oh the intercooler is made by treadstone. It saved me alot of money and well its just as good as any other one.
Joined: Feb 2005
Posts: 4,506
Likes: 93
From: West Warwick RI, postal code: 02893
Car: Building LS3, T56 Z28
Engine: LS3
Transmission: T-56
Axle/Gears: Moser/ 4.11
Re: My custom F1A installed pictures
OK, now we are getting somewhere. There is a SBC bracket and an 88-92 F-body bracket? The specific braket makes is so you don't have to cut the fender and so on?
Then great. What is needed for that bracket to work? Do you need to have the stock brackets on the car?
I just have a GEN I SBC with no stock anything anymore.
Then great. What is needed for that bracket to work? Do you need to have the stock brackets on the car?
I just have a GEN I SBC with no stock anything anymore.
Thread Starter
Junior Member
iTrader: (1)
Joined: Jun 2009
Posts: 59
Likes: 0
From: York PA
Car: 1989 camaro
Engine: 357 procharged
Transmission: turbo 400 with Transbrake
Axle/Gears: 342 posi
Re: My custom F1A installed pictures
Ok know I remember why I have the bracket I have. The f-body bracket will not allow for a 12 rib belt like I have it will only allow for a 8 rib belt that's why I have the set that I have.
Senior Member
iTrader: (8)
Joined: Jun 2009
Posts: 768
Likes: 2
From: Peoria, AZ
Car: 91 Z28, 2000 T/A
Engine: SBC 355, LS1
Transmission: T56, T56
Axle/Gears: 10bolt 3.73, 3.42
Re: My custom F1A installed pictures
OK, now we are getting somewhere. There is a SBC bracket and an 88-92 F-body bracket? The specific braket makes is so you don't have to cut the fender and so on?
Then great. What is needed for that bracket to work? Do you need to have the stock brackets on the car?
I just have a GEN I SBC with no stock anything anymore.
Then great. What is needed for that bracket to work? Do you need to have the stock brackets on the car?
I just have a GEN I SBC with no stock anything anymore.
Senior Member
iTrader: (8)
Joined: Jun 2009
Posts: 768
Likes: 2
From: Peoria, AZ
Car: 91 Z28, 2000 T/A
Engine: SBC 355, LS1
Transmission: T56, T56
Axle/Gears: 10bolt 3.73, 3.42
Re: My custom F1A installed pictures
I think my only saving grace will be that I have an Oil Fed D1 and the angle of the blower looks to be different thent he SC units. (I don't have the correct main bracket.....yet) But it damn sure does look like it's going to be a squeeze when it comes to the radiator inlet.
Joined: Feb 2005
Posts: 4,506
Likes: 93
From: West Warwick RI, postal code: 02893
Car: Building LS3, T56 Z28
Engine: LS3
Transmission: T-56
Axle/Gears: Moser/ 4.11
Re: My custom F1A installed pictures
I don't mind getting whatever brackets I need to get this thing to fit. I would rather run stock style brackets and mod the body less than the other way around.
But I DEFINETLY will want to run the 12 rib pully. What will happen if I try to run the Stock style bracket with a 12 rib? What will hit? What is the main concern?
Is it the rad. outlet? I need to change that anyways, so I don't see that as being a big problem.
So correct me if I am wrong, but this should work right...
Stock pullies/brackets, 88-92 brackets for a D1SC, 12 Rib pully, modified Radiator/aftermarket with oposite outlet.
Senior Member
iTrader: (8)
Joined: Jun 2009
Posts: 768
Likes: 2
From: Peoria, AZ
Car: 91 Z28, 2000 T/A
Engine: SBC 355, LS1
Transmission: T56, T56
Axle/Gears: 10bolt 3.73, 3.42
Re: My custom F1A installed pictures
I don't know specifically, because I haven't put mine together. It definitely looks tight between the pulley/belt and the radiator inlet with the FB main bracket and the 12 rib setup.

Joined: Sep 2009
Posts: 3,776
Likes: 101
From: Spokane WA
Car: 92 Lingenfelter Z28 articwhite
Engine: Aluminum 615BBC
Transmission: Th400wbrake/curri entps9" locker
Axle/Gears: 4.11/4.30/4.56
Re: My custom F1A installed pictures
Looks good..this is the setup going into my Z28 and the new 427.
this is not my car.. jUST SHOWING THE SET UP.
the same bracket and procharger getting used.
Keeping all the parts in place with the intercooler
Bracket
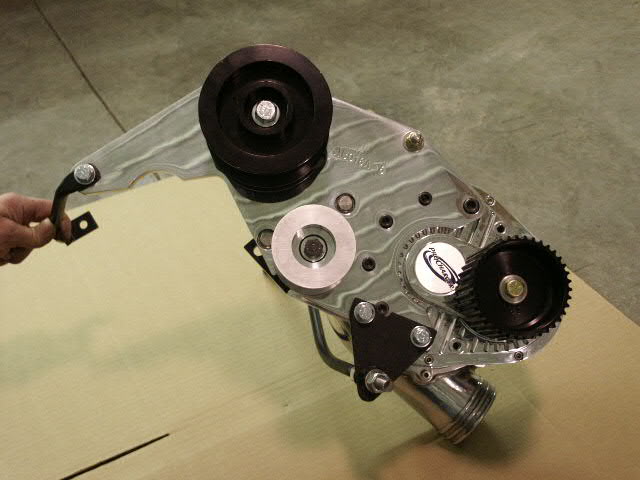
the only other thing is ill be making a fresh AIR pick up coming over the top. to get air from the front of the car..with filter on that end..
this is not my car.. jUST SHOWING THE SET UP.
the same bracket and procharger getting used.
Keeping all the parts in place with the intercooler
Bracket
the only other thing is ill be making a fresh AIR pick up coming over the top. to get air from the front of the car..with filter on that end..
Last edited by articwhiteZ; Dec 23, 2009 at 02:05 PM.
Joined: Feb 2005
Posts: 4,506
Likes: 93
From: West Warwick RI, postal code: 02893
Car: Building LS3, T56 Z28
Engine: LS3
Transmission: T-56
Axle/Gears: Moser/ 4.11
Re: My custom F1A installed pictures
OK, so looks like there is a lot of space for the head unit of you use the stock style brackets on the motor and then use the 88-92 specific brackets for the SC. No problems with the brakes, the fender, anything.
Still not going to jump out and buy anything till I get more confirmation, but loos like I am going back to the stock style bracketry.... sorta sux, but oh well. Serp, water pump and alt will be nice again.
Still not going to jump out and buy anything till I get more confirmation, but loos like I am going back to the stock style bracketry.... sorta sux, but oh well. Serp, water pump and alt will be nice again.

Senior Member

Joined: Aug 2004
Posts: 991
Likes: 24
From: Peoria, AZ
Re: My custom F1A installed pictures
OK, so looks like there is a lot of space for the head unit of you use the stock style brackets on the motor and then use the 88-92 specific brackets for the SC. No problems with the brakes, the fender, anything.
Still not going to jump out and buy anything till I get more confirmation, but loos like I am going back to the stock style bracketry.... sorta sux, but oh well. Serp, water pump and alt will be nice again.
Still not going to jump out and buy anything till I get more confirmation, but loos like I am going back to the stock style bracketry.... sorta sux, but oh well. Serp, water pump and alt will be nice again.
With the 88-92 serpentine bracket the F1A fits just fine. With a 12 rib, it will be tight on the radiator inlet but it does fit. There are a couple of threads in here about that with pictures. With the Procharger cog drive it will also fit. Again, it's very tight but it will fit. If you use the ATI sprag clutch cog pulley for the blower, you need a custom radiator or you have to move the blower toward the firewall about 2 inches to get a radiator hose on.
Joined: Jul 2003
Posts: 10,538
Likes: 206
From: NYC / Jersey
Car: 1990 Trans Am GTA
Engine: Turbo 305 w/MS2
Transmission: 700R4
Re: My custom F1A installed pictures
Originally Posted by dennisbernal91z
I have that Procharger sheet printed up at home. I have compared them before, I still don't see why the F1A exists. It seems very close to the F1. What do all these changes get you? Seems a tiny bit smaller and maybe spins a bit faster?
Joined: Feb 2005
Posts: 4,506
Likes: 93
From: West Warwick RI, postal code: 02893
Car: Building LS3, T56 Z28
Engine: LS3
Transmission: T-56
Axle/Gears: Moser/ 4.11
Re: My custom F1A installed pictures
Believe me I fully understand that but from my point of view, I am a mechanical engineer that works as a product engineer so I have an idea how much of a pain in the *** it is to put a part out, and I would not do it unless there is a really good reason. Companies will always try to downsize their options unless there is real $ coming in from them. I just found it interesting that when compared with all the other SC that they have, the next one up always has a pretty significant increase. Then there is the F1 to F1A, almost no real inrease at all.
I understand your example with cams, but it doesn't apply here. Each cam is a machined part on its own. Once you have the capital investment spent on the machine that grinds them, you can have infinite products at no real cost to you, appart from reseach of what people want you to grind. SC are assemblies, with bearings compressors and so on... When you want to offer another one, there is a lot more invested in that idea, the F1A has specific characteristics to itself so it must have specific parts to make it that way. That is another shelf in a warehouse, another few hundred hours you have to pay an engineer to design the parts, if it needs cast parts that are different then you have the $30,000 mold. (This case it shares the F1 case, I know).
Anyways, my point is that it is strange for such a tinny change to the F1 when you don't see P1As and so on. Just making an observation and was wondering if anyone had specific info from Procharger as to why it is offered.
My car makes 420 FWHP with a a 250 shot of N20 on top of that, last year I drove it to work everyday during the spring and summer, I am very aware that people have thier specific needs for thier specific setups.
Supreme Member
iTrader: (3)
Joined: Jun 2000
Posts: 1,680
Likes: 2
From: CT
Car: Used to drive a camaro
Re: My custom F1A installed pictures
Ask Procharger why they offer the F1 and F1A and you'll get their reason, anything else is clogging this thread. Its like asking why the TKO600 and TKO500 are offered when theirs only minor differences between the two or the SPEC stage 3 clutch and stage 3+
Joined: Feb 2005
Posts: 4,506
Likes: 93
From: West Warwick RI, postal code: 02893
Car: Building LS3, T56 Z28
Engine: LS3
Transmission: T-56
Axle/Gears: Moser/ 4.11
Re: My custom F1A installed pictures
Don't think I am "clogging" this thread. I am looking for info from a person who has spent a good amount of money going with one SC as opposed to another. I figure they would know what is going on with the setups.
You examples don't apply either AC.
What realy clogs threads are people posting things saying that they are. If the poster of the thread has a real problem with the discustion or doesn't know the answer to the questions, then they will say so.
Pretty straight forward to me.
You examples don't apply either AC.
What realy clogs threads are people posting things saying that they are. If the poster of the thread has a real problem with the discustion or doesn't know the answer to the questions, then they will say so.
Pretty straight forward to me.
Thread Starter
Junior Member
iTrader: (1)
Joined: Jun 2009
Posts: 59
Likes: 0
From: York PA
Car: 1989 camaro
Engine: 357 procharged
Transmission: turbo 400 with Transbrake
Axle/Gears: 342 posi
Re: My custom F1A installed pictures
After reading all of the threads its just makes me wonder. When I bought my kit there is a reason that I have the set up I have with the brackets that they sent me but I'm not sure why. I thought they told me that the F1A wouldnt fit on the stock bracket with the 12 rib belt, but I guess thats wrong. Oh well my set up works the way it is just alot more work then most people I guess.
Supreme Member
iTrader: (3)
Joined: Jun 2000
Posts: 1,680
Likes: 2
From: CT
Car: Used to drive a camaro
Re: My custom F1A installed pictures
Dennis, the F1A is for people and configs that don't want to or can't go to the F2. The F1A is technically more than the F1 and less than the F2 according to the specs. My example of the stage 3 and stage 3+ clutch are EXACTLY applicable, maybe not the tranny, but there are numerous other examples if I gave it the time to research.
I agree that companies traditionally don't release products unless there is a moderate ROI on the product, BUT like you and others will notice, there is an increase in specifications (RPM, CFM, etc) from the F1A vs F1.
Now back to the original post, I'm really curious how you found a radiator with an opposing outlet vs stock. Very cool idea.
I don't know if you've run a procharger unit before but I've always found theres a lot of flex in the blower bracket. I found this that is a very cool idea IMO to combat it. I plan on fabbing up the same thing this summer:
Last edited by AC; Dec 28, 2009 at 08:35 PM.
Supreme Member
Joined: Aug 1999
Posts: 2,441
Likes: 1
From: sweden
Car: GTA -89
Engine: Blown 415"
Transmission: 4L80E
Axle/Gears: Strange 12-bolt
Re: My custom F1A installed pictures
My solution on getting rid of flexing brackets and bending bolts with procharger unit.
https://www.thirdgen.org/forums/fabr...r-bracket.html
/N.
https://www.thirdgen.org/forums/fabr...r-bracket.html
/N.
Senior Member
iTrader: (8)
Joined: Jun 2009
Posts: 768
Likes: 2
From: Peoria, AZ
Car: 91 Z28, 2000 T/A
Engine: SBC 355, LS1
Transmission: T56, T56
Axle/Gears: 10bolt 3.73, 3.42
Re: My custom F1A installed pictures
AC, I like the pic that you posted it's an awesome idea! Probably not something you could run unless you have solid motor mounts though I think.
GTA, Yea I'd say you beefed up the mount just a tad bit! I was actually surprised at how much you can flex the bracket by hand, let alone how much it could deflect during operation!
GTA, Yea I'd say you beefed up the mount just a tad bit! I was actually surprised at how much you can flex the bracket by hand, let alone how much it could deflect during operation!
Supreme Member
Joined: Aug 1999
Posts: 2,441
Likes: 1
From: sweden
Car: GTA -89
Engine: Blown 415"
Transmission: 4L80E
Axle/Gears: Strange 12-bolt
Re: My custom F1A installed pictures
Yeah, I have bent a few of the long bolts....
When I noticed how much the bracket was flexing I decided to build my own. I also removed the lowerst idler pullet to get rid of some stress on the bracket, Works perfect now, except too low boost
When I noticed how much the bracket was flexing I decided to build my own. I also removed the lowerst idler pullet to get rid of some stress on the bracket, Works perfect now, except too low boost
Joined: Feb 2005
Posts: 4,506
Likes: 93
From: West Warwick RI, postal code: 02893
Car: Building LS3, T56 Z28
Engine: LS3
Transmission: T-56
Axle/Gears: Moser/ 4.11
Re: My custom F1A installed pictures
Are people that are experiencing flexing running the 12 rib setup? Or does everyone have this flexing issue?
I agree with Will that attaching the head unit with a solid link to the strut tower might fatigue the case unless you allow there to be some flex. Seems like it would be OK with solid motor mounts.
Quick side question, if you run the stock brackets for the thirdgen, then get the procharger brackets for it, does your power steering get moved/changed in any way? I would assume it would. Thanks for any more info.
And for people running the F1A, what made you make the change from the F1?
Also how much PSI are people pushing with no Meth injection on the street? I want to stay away from having to fill something as long as possible, but if it is something I have to do to reach the #s I want, I will. I want to shoot for about 700 HP.
Senior Member
iTrader: (8)
Joined: Jun 2009
Posts: 768
Likes: 2
From: Peoria, AZ
Car: 91 Z28, 2000 T/A
Engine: SBC 355, LS1
Transmission: T56, T56
Axle/Gears: 10bolt 3.73, 3.42
Re: My custom F1A installed pictures
The stock accessories are not affected in anyway. The only thing you have to move is the driver side cooling fan because of the lower idler pulley. There are pics/instruction on what you need to do in the installation manual. I have a slim flexalite setup I will be running when I put the blower on, so I didn' pay that much attention to the fan mod when reading through.
My buddy went with the F1A vs the D1SC because he would have the D series unit pretty much maxed out (running 15 psi) and he wanted to be able to run more boost in the future. Not sure of a reason to spend the money to go from an F1 to an F1A if you already have the F1.
He is running 15 psi on pump gas, no meth or anything like that, it will easily make 600 rwhp.
Joined: Sep 2003
Posts: 25,896
Likes: 430
From: Pittsburgh PA
Car: 89 Iroc-z
Engine: 555 BBC Turbo
Transmission: TH400
Axle/Gears: MWC 9� 3.00
Re: My custom F1A installed pictures
Also how much PSI are people pushing with no Meth injection on the street? I want to stay away from having to fill something as long as possible, but if it is something I have to do to reach the #s I want, I will. I want to shoot for about 700 HP.
Made 640whp at 12.5 psi so you can see I got some issues with only gaining 50whp with 5 more psi. I honestly want closer to 800 all said and done
 Hope to go 8.99
 Supreme Member
iTrader: (3)
Joined: Jun 2000
Posts: 1,680
Likes: 2
From: CT
Car: Used to drive a camaro
Re: My custom F1A installed pictures
On the mount idea, by using a turnbuckle style mount you would still allow torsional or rotational movent. When you get torque twist on the motor mounts, its up/down and not forward backard right? I have bracket flex on the P1SC, I've seen the D1-SC flex so I'd imagine the F1 and F1A will / do experience it as well.
Last edited by AC; Dec 29, 2009 at 02:58 PM.
Senior Member
iTrader: (8)
Joined: Jun 2009
Posts: 768
Likes: 2
From: Peoria, AZ
Car: 91 Z28, 2000 T/A
Engine: SBC 355, LS1
Transmission: T56, T56
Axle/Gears: 10bolt 3.73, 3.42
Re: My custom F1A installed pictures
On the mount idea, by using a turnbuckle style mount you would still allow torsional or rotational movent. When you get torque twist on the motor mounts, its up/down and not forward backard right? I have bracket flex on the P1SC, I've seen the D1-SC flex so I'd imaging the F1 and F1A will / do experience it as well.
Joined: Feb 2005
Posts: 4,506
Likes: 93
From: West Warwick RI, postal code: 02893
Car: Building LS3, T56 Z28
Engine: LS3
Transmission: T-56
Axle/Gears: Moser/ 4.11
Re: My custom F1A installed pictures
I agree adding more support would be a great idea, I just don't think adding it in that way would be the best idea. Not the safest idea.
Something that constrains the head unit in the same way it is held now, but with more force would be idea, but of course the hardest thing to do. Once I get my setup I will see what I can do. In a case like this adding ribs to plates seems like a great idea because then you reduce the flex at the source, not just ban-aiding a problem with what could turn out to be another problem.
To me adding another attachment point on a vertex that is convenient, not calculated would introduce a variable that I would not feel comfprtable with... Again not saying it wouldn't work jsut fine.
I will be buying my stock brackets tonight... After that I clean them up and get them plated, the search for a head unit will start for real.
Senior Member
Joined: Aug 2004
Posts: 991
Likes: 24
From: Peoria, AZ
Re: My custom F1A installed pictures
For those that are worried about bracket flex, ASSC Racing sells additional reinforcement for the bracket that will reduce or eliminate the bracket flex. There are a few threads on here showing how they bolt in.
Joined: Feb 2005
Posts: 4,506
Likes: 93
From: West Warwick RI, postal code: 02893
Car: Building LS3, T56 Z28
Engine: LS3
Transmission: T-56
Axle/Gears: Moser/ 4.11
Re: My custom F1A installed pictures
Wow great info. I will search that right away. No point in re-inventing the wheel!
Supreme Member
iTrader: (3)
Joined: Jun 2000
Posts: 1,680
Likes: 2
From: CT
Car: Used to drive a camaro
Re: My custom F1A installed pictures
I should have mentioned Prochargers added bracket for 40bux. Its nice but requires you to bolt the bracket to the back of the alternator. Fixes the flex issue but is not an option for those of us who have clocked the alternator back.
Adding ribs to the back or front face of the main bracket is a nice idea though.
Eric89SC, how much flex have you noticed when you blip the throttle. If you give it a good stab looking under the hood you'll see something I'm sure, I'm just curious how much off a 12rib and a Fseries head unit.
I've been toying with the idea of a F1 or F1A for awhile but it only depends if I can unload my P1SC at a decent price. Procharger will upgrade a P1SC to a D1SC for about 1400 bux but doesn't go bigger because the f series is of course a new case and not just internals. So for a bit more you can step up to a really nice head unit (like yours).
Last edited by AC; Jan 5, 2010 at 08:43 AM.