
Del-A-Lum Bushing Install Problem?

Thread Starter
Joined: Oct 2005
Posts: 652
Likes: 0
From: Crestview, Florida
Car: 86 IROC-Z
Engine: 370 LQ9
Transmission: T56 Magnum
Axle/Gears: 3.73
Del-A-Lum Bushing Install Problem?
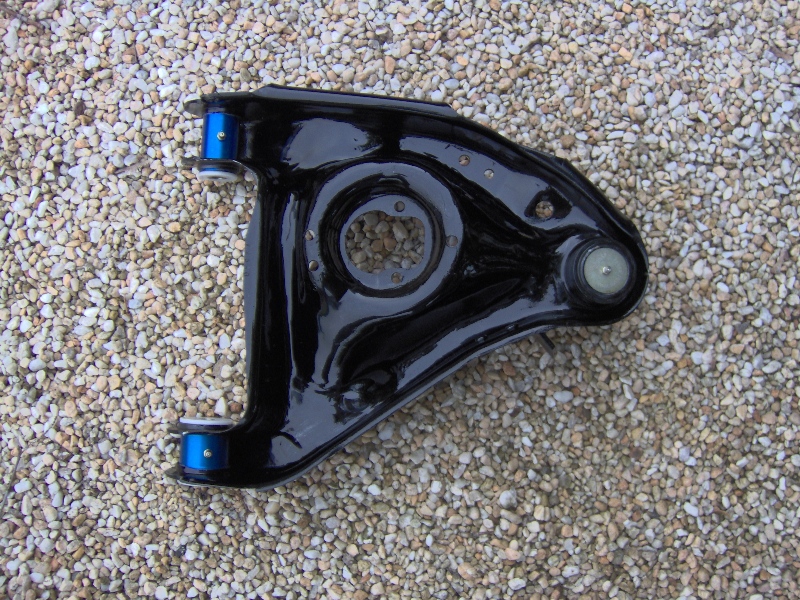
I pressed out the old bushings. Went to install the Del A Lum bushing, and it seems no where close to even fitting in the a arm. I pressed the other side out and the same thing; wont fit. I centered the bushing as best I could since Ive heard its a tight fit, and it was a no go. The brace shot out, and the bushing received some damage.
A-arms are the stock ones off my 86 Iroc. I'll get some pics tomorrow.
EDIT:
Im guessing the metal sleeve needs to come out???
A-arms are the stock ones off my 86 Iroc. I'll get some pics tomorrow.
EDIT:
Im guessing the metal sleeve needs to come out???
Last edited by Rich92 RS; Sep 9, 2011 at 08:25 PM.

Senior Member
iTrader: (8)
Joined: Sep 2010
Posts: 732
Likes: 0
From: Cincinnati, Ohio
Car: '89 GTA
Engine: 5.7L LS1
Transmission: 4L60E
Axle/Gears: 9 bolt 3.27
Re: Del-A-Lum Bushing Install Problem?
When I put the poly bushings in my A-arms I could have done them myself as I do have a press but I decided to send them to someone who was recommended to me. When I picked them up he said they were an absolute bear, I can only imagine what del-a-lum bushings are like.

Joined: Aug 2006
Posts: 12,813
Likes: 110
From: Central NJ
Car: 86 Trans Am
Engine: 408 stroker sbc
Transmission: TKO600
Axle/Gears: Moser full floater m9, 3:70 trutrac
Senior Member
iTrader: (8)
Joined: Sep 2010
Posts: 732
Likes: 0
From: Cincinnati, Ohio
Car: '89 GTA
Engine: 5.7L LS1
Transmission: 4L60E
Axle/Gears: 9 bolt 3.27
Re: Del-A-Lum Bushing Install Problem?
Senior Member

Joined: May 2006
Posts: 589
Likes: 86
From: Pittsburgh, PA
Car: 91 Formula
Engine: 2012 LS9
Transmission: 4L80E
Axle/Gears: Strange 60 3.54:1
Re: Del-A-Lum Bushing Install Problem?
Yes you have to remove the entire factory bushing & exterior shell.
They press in from the outside.
Install the outer blue shell, then press the inner sleeve inside the delrin bushing, lube, then push inside the outer shell.
They press in from the outside.
Install the outer blue shell, then press the inner sleeve inside the delrin bushing, lube, then push inside the outer shell.
Last edited by Lonnie P; Sep 9, 2011 at 09:28 PM.
Thread Starter
Joined: Oct 2005
Posts: 652
Likes: 0
From: Crestview, Florida
Car: 86 IROC-Z
Engine: 370 LQ9
Transmission: T56 Magnum
Axle/Gears: 3.73
Re: Del-A-Lum Bushing Install Problem?
Worked on removing the shells and they were a pain at first. The hardest part was figuring out a technique to remove them, after that it wasn't too bad. Once I get the bushing installed, I'll post a step by step on the whole procedure with pics.
Hopefully these things are worth it.
Hopefully these things are worth it.
Senior Member
Joined: Apr 2006
Posts: 685
Likes: 0
From: CT
Car: 1988 Iroc
Engine: 5.7L
Transmission: '96 T56, Hurst Shifter, Mech VSS
Axle/Gears: 3.45 9 Bolt
Re: Del-A-Lum Bushing Install Problem?
Worked on removing the shells and they were a pain at first. The hardest part was figuring out a technique to remove them, after that it wasn't too bad. Once I get the bushing installed, I'll post a step by step on the whole procedure with pics.
Hopefully these things are worth it.
Hopefully these things are worth it.
Trending Topics
Supreme Member
iTrader: (2)
Joined: Sep 2006
Posts: 2,118
Likes: 15
From: Houston, TX
Car: 1989 GTA
Engine: SuperRam 350
Transmission: Pro Built S/S TH700R4
Axle/Gears: 3.27

Supreme Member
iTrader: (2)
Joined: Aug 2001
Posts: 1,081
Likes: 3
From: Peoria, IL USA
Car: 91 GTA
Engine: 377ci
Transmission: T56
Axle/Gears: QP Ford 9" 3.70s
Re: Del-A-Lum Bushing Install Problem?
One of the absolute best upgrade I ever did to my car! Period!, and I have alot of upgrades. I get asked all the time how my car stays so flat through the corners at the road course and autocross. If you have ever scene a stock or close to stock thirdgen autocross they kind of thrash around pretty good (pitching and rolling). I have other mods but these seriously got me 60% of the way to a decent handling car.
Last edited by DAVECS1; Nov 20, 2011 at 11:27 PM.
Thread Starter
Joined: Oct 2005
Posts: 652
Likes: 0
From: Crestview, Florida
Car: 86 IROC-Z
Engine: 370 LQ9
Transmission: T56 Magnum
Axle/Gears: 3.73
Re: Del-A-Lum Bushing Install Problem?
Never wrote a step by step, but heres a break down of what I did.
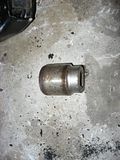
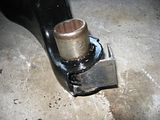
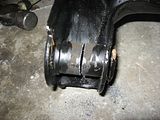
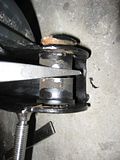
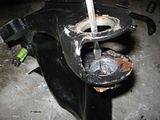
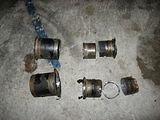
Start off by removing the rubber bushings from the shells. I simply drilled multiple holes through the rubber, until it basically all feel out.
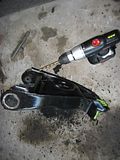
To remove the metal shells, I used two different techniques. For the larger shells I was able to find a socket that fit perfect over the shells edge. I just hammered those out, with a 8 lb sledge hammer. I used the angle iron supplied with the del-a-lum bushings to keep from hammering the frames of the a-arm together.
The smaller shells were a pain, and took the most time. I started off by using a sawzall to cut them in half. Then I hammered various chisels between the two cut half’s. Use the vise grips to twist and turn the shell once theres enough material to grab onto. I used a c clamp to keep the frame of the a-arm from spreading too much. Only one of the half’s would start moving out, so I cut the remaining shell flush on the inside or as close as I could. Then used a flat head screwdriver and carefully hammered it out. Again using the vise grips once there was enough to grab onto.
After I was done I ended up finding a thread that explained how to remove the smaller shells a different way. It involved using a dremel, and cutting slits on the shells lip I think. Heres the link: https://www.thirdgen.org/forums/post...23-post12.html
Tools used:
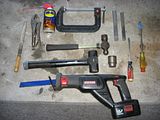
Drilled out rubber bushing:
Socket:
Sawzall shell:
Hammering out the other side:
All out:
Start off by removing the rubber bushings from the shells. I simply drilled multiple holes through the rubber, until it basically all feel out.
To remove the metal shells, I used two different techniques. For the larger shells I was able to find a socket that fit perfect over the shells edge. I just hammered those out, with a 8 lb sledge hammer. I used the angle iron supplied with the del-a-lum bushings to keep from hammering the frames of the a-arm together.
The smaller shells were a pain, and took the most time. I started off by using a sawzall to cut them in half. Then I hammered various chisels between the two cut half’s. Use the vise grips to twist and turn the shell once theres enough material to grab onto. I used a c clamp to keep the frame of the a-arm from spreading too much. Only one of the half’s would start moving out, so I cut the remaining shell flush on the inside or as close as I could. Then used a flat head screwdriver and carefully hammered it out. Again using the vise grips once there was enough to grab onto.
After I was done I ended up finding a thread that explained how to remove the smaller shells a different way. It involved using a dremel, and cutting slits on the shells lip I think. Heres the link: https://www.thirdgen.org/forums/post...23-post12.html
Tools used:

Drilled out rubber bushing:

Socket:


Sawzall shell:


Hammering out the other side:

All out:

Last edited by Rich92 RS; Nov 20, 2011 at 09:53 PM.
Thread Starter
Joined: Oct 2005
Posts: 652
Likes: 0
From: Crestview, Florida
Car: 86 IROC-Z
Engine: 370 LQ9
Transmission: T56 Magnum
Axle/Gears: 3.73
Re: Del-A-Lum Bushing Install Problem?
I dont have any pics of installing the del-a-lums, and for some reason have no recollection of how I pressed them in. All I remember is to make sure to point the grease fitting at an angle you can get at when the a-arms are installed on the car, before you press them in. Double and triple check.
Car is still down unfortunately, its getting close though. Everything suspension wise has been upgraded at the same time along with the ls1 swap.
Sweet. I cait wait to get this thing on a road course/autocross.
Car is still down unfortunately, its getting close though. Everything suspension wise has been upgraded at the same time along with the ls1 swap.
One of the absolute best upgrade I ever did to my car! Period!, and I have alot of upgrades. Igett asked all the tim how my car stays so flt through the corners at the road course and autocross. If you have everscene a stock or close to stock thirdgen autocross they kind of thrash around pretty good (pitching and rolling). I have other mods but these seriously got my 60% of the way to a decent handling car.
Last edited by Rich92 RS; Nov 20, 2011 at 09:50 PM.

Thread
Thread Starter
Forum
Replies
Last Post
1992rs/ss
NW Indiana and South Chicago Suburb
14
Jan 31, 2025 05:10 PM
1992rs/ss
Engine/Drivetrain/Suspension Parts for Sale
16
Jan 28, 2016 09:58 PM
NBrehm
Engine/Drivetrain/Suspension Parts for Sale
0
Aug 5, 2015 07:57 PM