

Swap question. A/C Gurus lets see what will work!

Thread Starter

Joined: Sep 2002
Posts: 3,685
Likes: 10
From: PA
Car: 86 Trans AM
Engine: LS1 (not stock...)
Transmission: Built T56
Axle/Gears: Strange 12-bolt w/ 3.73
Swap question. A/C Gurus lets see what will work!
Hey guys/gals how's it going? Im getting to the nitty gritty with my LS1 swap into my 87. I have a whole 99 camaro parts car...so Im trying to use as much of it as I can. I decided to notch my crossmember and retain the LS1 A/C system. It blows 100% colder than my 3rd gen set up, and I just dont want to spend the cash to fix mine, then get the brackets to make it work. So...here is my question. Ive read through some threads that mentioned using some of the 4th gen heater/AC box stuff. Im not interested in using the ENTIRE heater box (unless its not that big of a pain to make fit) What Im curious to know is... Can I mix and match possibly? Can I keep my 3rd gen heater box assembly, but use the A/C parts out of the 4th gen? This would help in more than one way. First, I know there arent any leaks. Second, the connections are much easier to work with than the screw on kind. Third, I wouldnt have to mess with custom lines.
So...that being said...lets get some thinking caps on. Anyone ever disassemble either the 4th gen or the 3rd gen heater box. Any pics or comparisons of the insides?? I imagine that there could be a way to combine the two... Using the entire 4th gen heater box seems alittle bit of a pain due to having to modify the firewall...
I did read about someone who was attempting it. I think his TGO name was amorget or something to that nature. It was back in 2002 that he was attempting this I think. Maybe he can chime in with his progress or findings??
Let me know what you guys think about it... Thanks in advance!
Justin


Joined: Sep 2005
Posts: 27,953
Likes: 2,463
Car: Yes
Engine: Usually
Transmission: Sometimes
Axle/Gears: Behind me somewhere
You shouldn't have to do anything at all.
There's nothing inside the heater box that has anything to do with the A/C, except the evaporator. The evaporator is just some tubing all kind of wadded up. It does not care what kind of compressor is pushing the refrigerant through it, or what engine it's mounted to. Just hook the lines up, maybe flush it first and get a new orifice tube for R-134A, and use it.
There's nothing inside the heater box that has anything to do with the A/C, except the evaporator. The evaporator is just some tubing all kind of wadded up. It does not care what kind of compressor is pushing the refrigerant through it, or what engine it's mounted to. Just hook the lines up, maybe flush it first and get a new orifice tube for R-134A, and use it.
Thread Starter
Joined: Sep 2002
Posts: 3,685
Likes: 10
From: PA
Car: 86 Trans AM
Engine: LS1 (not stock...)
Transmission: Built T56
Axle/Gears: Strange 12-bolt w/ 3.73
So there isnt a "heater core" looking part in there for the A/C?? Ive never been inside a HVAC box so I dont know what the parts look like. If its just some wadded tubing, I should be able to swap to the 4th gen insides.
My reason for wanting to do this instead of just making lines is simple. I had a leak in my old system somewhere...no idea where. I have the complete 4th gen stuff sitting around. I know it was all in great shape. SO...if I can simply swap in the 4th gen evaporator it will solve a couple problems. One...no leaks... Two...no custom lines. I already have the 4th gen lines. There is plenty of room for the 4th gen drier, and Ive heard that I can use the 4th gen condensor as well. Nothing custom, no weird fittings, all good parts. I guess Ill take apart the 4th gen box..nothing to loose there. Ill see how it compares with a third gen one. I wish I could find some pics of the two somewhere.
Thanks for the input!
Justin
Thread Starter
Joined: Sep 2002
Posts: 3,685
Likes: 10
From: PA
Car: 86 Trans AM
Engine: LS1 (not stock...)
Transmission: Built T56
Axle/Gears: Strange 12-bolt w/ 3.73
Ok...found a couple pics that kind of make me happy. They justify taking some things apart.
Here is the 3rd gen evap.:


Here is the 4th gen evap.:

They seem pretty similar in size. Hard to say from the pics...but atleast I know there is nothing silly going on. They are the same basic shape and size.
Justin
Here is the 3rd gen evap.:
Here is the 4th gen evap.:
They seem pretty similar in size. Hard to say from the pics...but atleast I know there is nothing silly going on. They are the same basic shape and size.
Justin
Supreme Member
iTrader: (2)
Joined: Dec 2005
Posts: 1,739
Likes: 4
From: Beaufort South Carolina
Car: 1983 Camaro Z/28
Engine: LU5 305 CFI
Transmission: 700R4
Axle/Gears: J65/G80/G92-3.23
The 4th gen A/C system was setup from the start to use 134A.134A,as you probably know,operates at a much higher pressure than R12.If you can use the whole system in your 3rd gen it will be more efficent.
Thread Starter
Joined: Sep 2002
Posts: 3,685
Likes: 10
From: PA
Car: 86 Trans AM
Engine: LS1 (not stock...)
Transmission: Built T56
Axle/Gears: Strange 12-bolt w/ 3.73
Hey thanks for the info. I wasnt aware that the 134a had that much of a pressure difference. Thats even more reason for me to want to use all of the 4th gen stuff. Last time I had my old system checked, I had already converted it to 134a since the system was leaking and had nothing in it. I took it to an A/C shop and he said I have a couple small leaks, and that the charge that he put in would last through the summer and probably leak out by the next summer. Which it did. Since Ill be tearing a good deal of my dash apart to get rid of stuff I dont need, now would be a good time to get to the HVAC box. I just hope I dont have to pull the entire dash to do it...
Justin
Justin
Thread Starter
Joined: Sep 2002
Posts: 3,685
Likes: 10
From: PA
Car: 86 Trans AM
Engine: LS1 (not stock...)
Transmission: Built T56
Axle/Gears: Strange 12-bolt w/ 3.73
Well...not sure if anyone is interested...but Im going to update this as I go anyways. I got the 4th gen heater box out... What a pain in the ***. I had the dash out already...another pain. But there were screws outside, inside, hidden under sealant paper... Then it finally has to come out from the inside. Then a handful of little screws later and you can yank out hte evaportator.
Then...I did a search on the boards...because I hadnt even considered how to get the 3rd gen one out. Seems as tho its really easy because you can remove the evap without removing the whole box. SWEET! This makes it so much easier. No removing the dash and box to find out it wont work.
Monday is the day my 305 is coming out...since I have off all day. I plan to check the evap fit first thing..before i even start cleaning the bay. Ill shoot some pics and post them...maybe someone will find it useful in the future.
Justin
Trending Topics
Thread Starter
Joined: Sep 2002
Posts: 3,685
Likes: 10
From: PA
Car: 86 Trans AM
Engine: LS1 (not stock...)
Transmission: Built T56
Axle/Gears: Strange 12-bolt w/ 3.73
Well.. alittle update if anyone wants.. The 4th gen EVAP does not fit into the stock 3rd gen spot. Its to long (front to back). I guess I could have stopped there and decided to get lines made... but Im stubborn I guess. I removed the HVAC box complete from the 3rd gen to size things up better. I needed an extra inch and a half at the most on the front of the box. So... I cut off the front of the 3rd gen box, and I cut off the front of the 4th gen box and started triming them together. They were surprisingly close.
So...I attached the two together with pieces of aluminum and pop rivets. Then I fiberglassed over it to seal it and make it look like one piece. Next step is to paint it and make it look good. Once its done, I think that it will almost look like all one piece.
Anyone interested in pics???
Justin
So...I attached the two together with pieces of aluminum and pop rivets. Then I fiberglassed over it to seal it and make it look like one piece. Next step is to paint it and make it look good. Once its done, I think that it will almost look like all one piece.
Anyone interested in pics???
Justin
Thread Starter
Joined: Sep 2002
Posts: 3,685
Likes: 10
From: PA
Car: 86 Trans AM
Engine: LS1 (not stock...)
Transmission: Built T56
Axle/Gears: Strange 12-bolt w/ 3.73
Ok..got the top ready to go... here are a couple pics. Some people are probably going to think this is alittle too much to make the A/C plug and play...but, I had the parts, it only took a couple days of fabrication, and I learned how to use fiberglass. AND...check out the neat little cubby for my PCM now. Right where the old drier used to be...since the 4th gen drier gets moved forward. I will also be using the 4th gen bracket for that part. Should Look fairly clean when done... any opinions? I havent glassed the top yet...thats today. The box is going to be glassed inside and out where the two meet. Should be sealed and really strong by the time Im done.
Sorry for the size... The old junk...
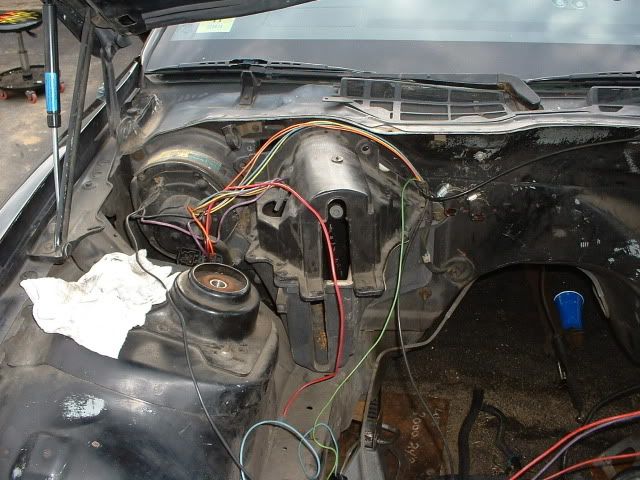
This is with the bottom glassed, and the top ready to glass. The silver stuff is really study aluminum tape. Its like heavy alum. foil with a really sticky back. I used it to make things alittle smoother as well as to form the upper transition to make it look better.
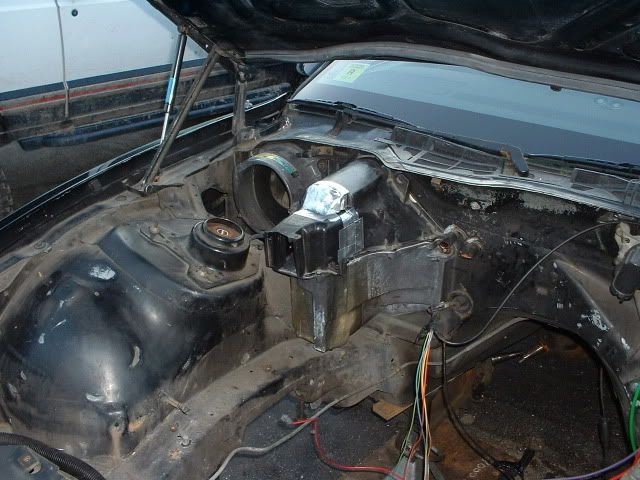
Ill post a finished pic after some paint hopefully this weekend...
Justin
Sorry for the size... The old junk...
This is with the bottom glassed, and the top ready to glass. The silver stuff is really study aluminum tape. Its like heavy alum. foil with a really sticky back. I used it to make things alittle smoother as well as to form the upper transition to make it look better.
Ill post a finished pic after some paint hopefully this weekend...
Justin

Thread
Thread Starter
Forum
Replies
Last Post
BikeFarm
Engine/Drivetrain/Suspension Wanted
4
Aug 11, 2015 11:35 PM
db057
TBI
10
Aug 11, 2015 10:11 PM