
Suspension Rebuild DONE!! Latest status & results & etc!


Thread Starter
Supreme Member
Joined: Mar 2000
Posts: 13,414
Likes: 6
From: Central NJ, USA
Car: 1986 Firebird
Engine: 2.8 V6
Transmission: 700R4
Suspension Rebuild DONE!! Latest status & results & etc!
THE JOB IS DONE!! Hell's friggin yeah!! The car's at the alignment shop today!! 
Here's the scoop, taking off from <a href="https://www.thirdgen.org/techbb2/showthread.php?threadid=186444" target="newwin">Day number three</a>'s update! I can't remember right now what steps were done on what day... so I'm going to merge it all into one.
Assembly of LCA's with new parts
Finished disassembling the ES poly bushings, final step of http://www.por15.com (the actual paint application step) done to lower control arms.
Lubed up new bushings, installed into control arms. Sequence was: 1) Applied anti-sieze to the LCA's bushing holes. Installed new outer shells into control arms (without the polygraphite bushing in the middle). Lubed the inside of the metal sleeve with the ES grease (as Karl calls it, whale snot). I used the balljoint press to push the shells into the control arm; it worked great.
Next, I lubed up the rear leg's poly bushing (short/fat bushing), outer surface (touches shell) and inner surface (hole for metal sleeve of bolt). Pushed it right in with my hand- cool! Lubed up the front leg's bushing (long/skinny) and pushed it into the control arm, it took more pushing, but went in. Next, lubed up the center sleeve for the rear bushing, pushed it in by hand- nice and easy! Tried the same with the front leg's bushing- went in half way and got stuck. Started smacking it with a center punch and hammer- wound up splitting the sleeve!! (oops) Used the hammer and a screwdriver to remove the front leg's bushing and sleeve.
2nd try; added more lube to the front bushing (I dont want squeaks. We hear squeaks and think "Cool, polyurethane!" 99.9% of other people hear squeaks and think "That car sounds like a heap of junk."). Lubed up the center sleeve. Pushed the center sleeve into the center of the bushing. Now I pushed the front leg's bushing (with the metal bolt sleeve in the middle) into the front leg's shell (in the LCA). Got it almost all the way in except for an inch. Rigged up the balljoint press, it pushed it in the rest of the way, nice and easy.
Put more anti-sieze on the hole for the balljoint. Set up the balljoint press. It's a bit tricky; there's 4 pieces to the press, and then the LCA, AND the balljoint. So here's a tip! Flip the a-arm upside down. Drop the balljoint into the hole. Assemble the press around the upside-down LCA/balljoint combination. That way you can eyeball how the balljoint is getting pressed into the LCA. Remember it MUST be pressed in evenly!! It can't be angled to the side (just like pressing in a bearing or a seal). Got the press set up, flipped the control arm on it's side, and used my foot and a 15" breaker bar to press the balljoint in- success!
I repeated this for the other side.
Gotta go; be back in a bit with more details!
Here's the scoop, taking off from <a href="https://www.thirdgen.org/techbb2/showthread.php?threadid=186444" target="newwin">Day number three</a>'s update! I can't remember right now what steps were done on what day... so I'm going to merge it all into one.
Assembly of LCA's with new parts
Finished disassembling the ES poly bushings, final step of http://www.por15.com (the actual paint application step) done to lower control arms.
Lubed up new bushings, installed into control arms. Sequence was: 1) Applied anti-sieze to the LCA's bushing holes. Installed new outer shells into control arms (without the polygraphite bushing in the middle). Lubed the inside of the metal sleeve with the ES grease (as Karl calls it, whale snot). I used the balljoint press to push the shells into the control arm; it worked great.
Next, I lubed up the rear leg's poly bushing (short/fat bushing), outer surface (touches shell) and inner surface (hole for metal sleeve of bolt). Pushed it right in with my hand- cool! Lubed up the front leg's bushing (long/skinny) and pushed it into the control arm, it took more pushing, but went in. Next, lubed up the center sleeve for the rear bushing, pushed it in by hand- nice and easy! Tried the same with the front leg's bushing- went in half way and got stuck. Started smacking it with a center punch and hammer- wound up splitting the sleeve!! (oops) Used the hammer and a screwdriver to remove the front leg's bushing and sleeve.
2nd try; added more lube to the front bushing (I dont want squeaks. We hear squeaks and think "Cool, polyurethane!" 99.9% of other people hear squeaks and think "That car sounds like a heap of junk."). Lubed up the center sleeve. Pushed the center sleeve into the center of the bushing. Now I pushed the front leg's bushing (with the metal bolt sleeve in the middle) into the front leg's shell (in the LCA). Got it almost all the way in except for an inch. Rigged up the balljoint press, it pushed it in the rest of the way, nice and easy.
Put more anti-sieze on the hole for the balljoint. Set up the balljoint press. It's a bit tricky; there's 4 pieces to the press, and then the LCA, AND the balljoint. So here's a tip!
Flip the a-arm upside down. Drop the balljoint into the hole. Assemble the press around the upside-down LCA/balljoint combination. That way you can eyeball how the balljoint is getting pressed into the LCA. Remember it MUST be pressed in evenly!! It can't be angled to the side (just like pressing in a bearing or a seal). Got the press set up, flipped the control arm on it's side, and used my foot and a 15" breaker bar to press the balljoint in- success!I repeated this for the other side.
Gotta go; be back in a bit with more details!

Thread Starter
Supreme Member
Joined: Mar 2000
Posts: 13,414
Likes: 6
From: Central NJ, USA
Car: 1986 Firebird
Engine: 2.8 V6
Transmission: 700R4
(laughs) It damn well better!! I spent enough time on it!! I panicked last night when I pulled into Quick Check; my car was visibly tilted.... the dashboard was lower on the left side. Turns out I was just parked on a tilt.
More details!!
LCA prep
Using 3M "Nascar" duct tape I taped the new spring insulators to the top of the springs. (Yes, taping them is by-the-GM-book.) Then I placed the spring onto the LCA, being careful to align the spring to the drain/locator holes, and connected the two with my internal spring compressor. I compressed the spring as much as possible.
LCA install, or, "what a pain"
Placed hydraulic jack under LCA, raised LCA up to crossmember. By-the-book, I installed the front leg of the LCA first, and then the rear leg. (I forgot at first, and wondered why the hell the LCA wouldn't fit into the crossmember.) Raised the jack enough to get the front leg's pivot bolt in. Then I had to "fight" to get the rear leg's bolt in. My dad helped me; I had to pry the control arm, and he told me which way to pry it to align the bolt hole with the crossmember. Finally got the damned bolt in. I spent a good hour or so on that rear leg! I loosely put the pivot nuts on.
Since the spring was still compressed, I removed the jack from under the LCA's center and repositioned it so it was catching the lip of the LCA just in front of the balljoint. I installed the spindle, upper strut mount, and strut. Don't forget to transfer the strut piston bumper and dust sheild from the old strut to the new strut. (Side note- my piston bumper looked like it was cut in half.) I installed this stuff pretty trick- I removed the lanyard that was holding the new KYB strut in a compressed position. The strut extended itself, and I put the bumper and dust cover over the piston. Then I flipped the strut upside down and placed the lanyard back over the whole assembly.
Bolted the strut to the spindle, bolted a new strut mount to the car, aimed the strut piston for the hole in the strut mount, and cut the lanyard. The strut moved up perfectly to poke thru the hole.
Realized the hex key for the center shaft was a metric 6mm key; which I didn't have. Ran to Strauss Auto and picked one up. Used a 3/4" wrench on the strut-to-strut-mount nut while holding the center shaft still with the hex key.
Removed the jack from under the LCA. Un-compressed the spring. Repeated all this on the other side.
Dad came out and asked me if the spring seated itself okay. I said of course it did... then I said actually I didn't re-check itself. Sure enough, the upper part of the spring didn't seat in it's pocket. I had to install the spring compressor again, compressed the spring as far as I could, aimed the spring at it's pocket with an old tire iron, and un-did the compressor. Voila! It seated okay.
Okay, gotta go, more later.
More details!!
LCA prep
Using 3M "Nascar" duct tape
I taped the new spring insulators to the top of the springs. (Yes, taping them is by-the-GM-book.) Then I placed the spring onto the LCA, being careful to align the spring to the drain/locator holes, and connected the two with my internal spring compressor. I compressed the spring as much as possible.LCA install, or, "what a pain"
Placed hydraulic jack under LCA, raised LCA up to crossmember. By-the-book, I installed the front leg of the LCA first, and then the rear leg. (I forgot at first, and wondered why the hell the LCA wouldn't fit into the crossmember.) Raised the jack enough to get the front leg's pivot bolt in. Then I had to "fight" to get the rear leg's bolt in. My dad helped me; I had to pry the control arm, and he told me which way to pry it to align the bolt hole with the crossmember. Finally got the damned bolt in. I spent a good hour or so on that rear leg! I loosely put the pivot nuts on.
Since the spring was still compressed, I removed the jack from under the LCA's center and repositioned it so it was catching the lip of the LCA just in front of the balljoint. I installed the spindle, upper strut mount, and strut. Don't forget to transfer the strut piston bumper and dust sheild from the old strut to the new strut. (Side note- my piston bumper looked like it was cut in half.) I installed this stuff pretty trick- I removed the lanyard that was holding the new KYB strut in a compressed position. The strut extended itself, and I put the bumper and dust cover over the piston. Then I flipped the strut upside down and placed the lanyard back over the whole assembly.
Bolted the strut to the spindle, bolted a new strut mount to the car, aimed the strut piston for the hole in the strut mount, and cut the lanyard. The strut moved up perfectly to poke thru the hole.
Realized the hex key for the center shaft was a metric 6mm key; which I didn't have. Ran to Strauss Auto and picked one up. Used a 3/4" wrench on the strut-to-strut-mount nut while holding the center shaft still with the hex key.
Removed the jack from under the LCA. Un-compressed the spring. Repeated all this on the other side.
Dad came out and asked me if the spring seated itself okay. I said of course it did... then I said actually I didn't re-check itself. Sure enough, the upper part of the spring didn't seat in it's pocket. I had to install the spring compressor again, compressed the spring as far as I could, aimed the spring at it's pocket with an old tire iron, and un-did the compressor. Voila! It seated okay.
Okay, gotta go, more later.

Member
Joined: Sep 2002
Posts: 124
Likes: 0
From: Northern Indiana
Car: '99 Ranger (Need 3G)
Engine: 2.5L
Transmission: AOD
Way to go TomP!! I bet ur car handles Soooo much better now! How hard was the whole rebuild process? Do you mind me asking how much you spent?? I need to rebuild my Camaro's front end and I was wonderin how much its gonna run me!! I think my Camaro will be on the road here in like 2 weeks!! I can't wait!! Now you need to show us some pics of that hot roddin beast tom!!
Now you need to show us some pics of that hot roddin beast tom!! Thread Starter
Supreme Member
Joined: Mar 2000
Posts: 13,414
Likes: 6
From: Central NJ, USA
Car: 1986 Firebird
Engine: 2.8 V6
Transmission: 700R4
It probably depends on mileage; I had to fight bolts that had rusted to the inner sleeve on the factory bushing (aka nut comes off bolt easily, but bolt doesn't come out of control arm because it's friggin' stuck!!) with an air powered cut-off tool, air powered grinder, and electric 4.5 inch angle grinder. Oh yeah and a hacksaw and some creative prying with a long "construction-style" prybar. For information on that hell, check out <a href="https://www.thirdgen.org/techbb2/showthread.php?s=&threadid=185664" target="newwin">Day 1 status</a> and <a href="https://www.thirdgen.org/techbb2/showthread.php?s=&threadid=186057" target="newwin">Day 2 status</a> and <a href="https://www.thirdgen.org/techbb2/showthread.php?s=&threadid=186444" target="newwin">Day 3 status</a> and <a href="https://www.thirdgen.org/techbb2/showthread.php?s=&threadid=187054" target="newwin">Day 4/5/6 "quick status"</a>. It also probably depends on where you live; we get a buttload of rain in NJ. Someone in Arizona probably wouldn't have this problem. (sigh)
Okay, so back to the info!! I left off with Dad saving me from having the driver's side jacked up in the air because of an unseated spring.. and probably from being embarassed when I'd eventually bring the car to the alignment shop. "Yeah I rebuilt everything!" "Yeah well you sure messed up the spring." "Oh-er, um, did I?" Yeah that woulda sucked..
Steering linkage assembly
I already had all the steering linkage out of the car (tie rods, center link, idler arm). Had a hell of a fight trying to separate the pitman arm from the center link! Dad suggested we get a tie rod pickle fork (smaller gap then my balljoint fork); Dad was right again- the sucker came off in a few minutes- although it took a hell of a lot of pounding. <a href="https://www.thirdgen.org/techbb2/showthread.php?s=&threadid=186554" target="newwin">For more info, see this message.</a> I did purchase two rag joints- the replacement disc ($10), and the actual joint ($40)- more on that later. Hopefully that'll be this weekend's project- the quick ratio box.
Tie rods
Took the linkage into the basement; man was it greasy. Tried to assemble the inner-sleeve-outer tie rod ends together to be the same length; just used a ruler. **Put some chassis grease on the threads of the tie rod ends before threading them into the adjuster. (From the GM service manual.) Dumb problem: Couldn't thread the inner tie rod into the adjuster? Why? I forgot that the inner rod end is reverse threaded and has to be turned counter-clockwise. (Duh) Tried to assemble the adjuster clamps the same way that my alignment shop did, so they wouldn't hit the frame (thanks, RBob). The tie rod ends came very close to each other inside the sleeve; much closer then the original non-moog tie rod ends were inside the original non-moog sleeve.
Idler arm
Bolted it easily up to the frame. I had marked the position of the bolts with whiteout, so I put it into the same location as the original piece. (Frame has slotted adjustment holes for up/down movement.) In order not to move the idler arm as you tighten the bolts, remember to tighten the nuts from inside the engine compartment. If you hold the nut still with a wrench and use a ratchet on the bolts (accessible by a hole in the frame that's visible from the front of the inner fender well), as the bolts turn, they'll slide the idler arm down.
Center link hell
Slid some chassis grease (I use valvoline syntec) onto the centerlink's studs (entire stud including threads and bottom of joint). Then I unlocked the steering wheel with the key. Under the car, turned the pitman arm by hand until the center link would push up exactly into the pitman arm and idler arm. Couldn't get both to push up evenly. If it fit in the idler arm it wouldn't go into the pitman arm, and vise versa. After a lot of cursing; I finally took the idler arm off the frame. (Shoulda listened to the directions) Installed the center link to the pitman arm and the "loose" idler arm, just threaded the castellated nuts on hand-tight. Re-assembled the idler arm to the frame. Got stuck on the "turning bolt and ruining position of idler arm" problem mentioned above, and went to bed.
Tie rods to center link and spindles (steering knuckles)
Woke up, realized that I should turn the nuts instead of the bolts, and got the idler arm into position. Put grease on the tie rod studs. Slid the tie rod boots over the joints, which wiped the grease off the studs, so I added a bit more grease. Cleaned the attachment point at the spindle with a paper towel from old grease "inside" the hole. Had to turn the linkage (with the steering wheel; the non-greased idler arm wasn't moving) to prevent interference of the inner tie rod joint with the frame (clearance was not enough to get the inner tie rod stud into the center link). Textbook install; slid both studs into their holes, threaded the nuts on, only finger-tight. Repeated for the driver's side (including turning the steering wheel.) Asked my dad to turn the steering wheel lock-to-lock as I watched the clearance between the adjuster clamps and the frame- all was good, so I gave the sleeve bolts their final torque spec (only 15 ft/lbs). **Don't try to make the clamp ends touch all the way as is shown in the GM Service Manual (or Haynes book)!! It's just a picture as an example. Follow the torque spec and the "minimum 1/8th inch gap" spec.
Finishing the linkage
Installed grease fittings everywhere (5/16 inch socket). Torqued all bolts to spec (35 ft/lbs). I used castellated nuts everywhere. Followed procedure by tightening the nut (not loosening) just enough to get the cotter pins to slide through. Made a note to remind myself to somehow increase the clearance between the pitman arm and radiator hose; ever since I got the car, that castellated nut & cotter pin have rubbed into the bottom of the lower rad hose. Made a bigger note to grease all the fittings!!
Misc tasks
I put the end links back on the car. Like RBob said a while ago, the holes in my lower control arms became elongated, and now look like ovals. I'll have to weld a plate over them - later on.
I greased all the fittings multiple times with Mobil 1 synthetic chassis lube. (Can't find Valvoline syntec for my grease gun anymore.) It's very hard to tell with new boots how much grease is going in.
I reinstalled the rotors and calipers. Didn't bother to repack the bearings, just did that a month or so ago. Brake lines look in bad shape, gotta replace 'em soon. The "plan" is to replace all brakes in the front with new... but I can't wait too long for the brake hoses. Note that the brake-hose-clamp-to-strut bolt is NOT threaded on these KYB GR-2 struts. I had to first get the bolt into the strut (as it cut it's own threads), then remove the bolt, then clamp the brake hose to the strut. I double-checked that I had re-capped the master cylinder.
Tried sliding the bubble gauge (for camber) onto the rotor.
final torquing
Torqued upper strut mount bolts to 20 ft/lbs. Tightened strut-to-mount bolt as best I could with that weak "swing-out" hex key set. I gotta buy a socket for a 6mm allen key from Sears to get some real torque on that sucker.
The LCA pivot nuts have to be tightened with the weight of the car on the ground, so I put the tires on. Lowered the car to the ground- wow was it low! Thought I'd be slick and roll the car to the edge of my garage, where the little "ramp" is to the driveway. I figured I could lay in that spot and reach the lca bolts.
After a half hour of trying, I gave up. Couldn't see anything under there. Couldn't swing a wrench, definately couldn't get the torque wrench in there. So I pushed the car back into the garage, raised the front up, and put it on jackstands on the outer edge of the spring perches. This way the weight of the car would be on the control arms... close enough for me. I'll figure out another way some other time. (The idea is not to induce a "preload" into the bushings- if you tightened them with the control arms hanging down, and then took the car off jacks, the bushing would "twist" and it would be trying to raise the car upwards. By tightening the bushigns with the weight on the control arms, the bushings's don't get any twist, and they act as they should instead of trying to "return" to the original twisted-up position.)
The jacking setup seemed dangerous; the lca's "hinged upward" on the jackstands and made the stands tilt out to the sides!!! Took me a while to get it to raise up like that and have it be safe. Be careful!! Once the car was up safe (and I left the hydraulic jack under the crossmember for added safety; didn't want a control arm smashing my skull into the floor), I was able to torque the pivot nuts. What a pain. Could only get a little swing on the wrench. That 60 ft/lbs took forever, and I was so tired, it felt like 200 ft/lbs. Dropped the car back to the ground. Cleaned up the garage as best as I could. Looked at the tires from teh front of the car and noticed how badly the alignment was off.
Road test!!!
Got in the car, stuck one foot out, and pushed the car out of the garage. It scraped badly on the little ramp. Once I got into the driveway, I hit the brakes- AGH! No brakes!!! The car barely stopped before going into the street and hitting the ONE car that was coming down the road at 3:00AM. Realized that, duh, I had to remove the calipers. To do that, I retracted the pistons. I never extended the pistons (by pumping the brake pedal a few times) to the rotors. Oops.
Started the engine (fired right up), and slowly came out of the driveway. (SCRAPE!!! Seems like the damn clamp at the cat.) Went for a ride... bumps were no problem, but man, forget about going straight or turning. My tires squealed while going straight!
Final step: Alignment
Got the alignment yesterday. Told the guy I had changed it all and NEEDED an alignment fast. He worked me into the schedule (very cool for a last-minute thing). The fiance' drove me to get my car... lets just say HOLY FRIGGIN SHT!!! WOW!!! OUT FRIGGIN STANDING! HELL MF'IN YEAH!! Driving is a thrill again!! It takes turns beautifully! And the new stance, with the lowering springs? The car looks great.
Okay, so back to the info!!
I left off with Dad saving me from having the driver's side jacked up in the air because of an unseated spring.. and probably from being embarassed when I'd eventually bring the car to the alignment shop. "Yeah I rebuilt everything!" "Yeah well you sure messed up the spring." "Oh-er, um, did I?" Yeah that woulda sucked..Steering linkage assembly
I already had all the steering linkage out of the car (tie rods, center link, idler arm). Had a hell of a fight trying to separate the pitman arm from the center link! Dad suggested we get a tie rod pickle fork (smaller gap then my balljoint fork); Dad was right again- the sucker came off in a few minutes- although it took a hell of a lot of pounding. <a href="https://www.thirdgen.org/techbb2/showthread.php?s=&threadid=186554" target="newwin">For more info, see this message.</a> I did purchase two rag joints- the replacement disc ($10), and the actual joint ($40)- more on that later. Hopefully that'll be this weekend's project- the quick ratio box.
Tie rods
Took the linkage into the basement; man was it greasy.
Tried to assemble the inner-sleeve-outer tie rod ends together to be the same length; just used a ruler. **Put some chassis grease on the threads of the tie rod ends before threading them into the adjuster. (From the GM service manual.) Dumb problem: Couldn't thread the inner tie rod into the adjuster? Why? I forgot that the inner rod end is reverse threaded and has to be turned counter-clockwise. (Duh) Tried to assemble the adjuster clamps the same way that my alignment shop did, so they wouldn't hit the frame (thanks, RBob). The tie rod ends came very close to each other inside the sleeve; much closer then the original non-moog tie rod ends were inside the original non-moog sleeve.Idler arm
Bolted it easily up to the frame. I had marked the position of the bolts with whiteout, so I put it into the same location as the original piece. (Frame has slotted adjustment holes for up/down movement.) In order not to move the idler arm as you tighten the bolts, remember to tighten the nuts from inside the engine compartment. If you hold the nut still with a wrench and use a ratchet on the bolts (accessible by a hole in the frame that's visible from the front of the inner fender well), as the bolts turn, they'll slide the idler arm down.
Center link hell
Slid some chassis grease (I use valvoline syntec) onto the centerlink's studs (entire stud including threads and bottom of joint). Then I unlocked the steering wheel with the key. Under the car, turned the pitman arm by hand until the center link would push up exactly into the pitman arm and idler arm. Couldn't get both to push up evenly. If it fit in the idler arm it wouldn't go into the pitman arm, and vise versa. After a lot of cursing; I finally took the idler arm off the frame. (Shoulda listened to the directions) Installed the center link to the pitman arm and the "loose" idler arm, just threaded the castellated nuts on hand-tight. Re-assembled the idler arm to the frame. Got stuck on the "turning bolt and ruining position of idler arm" problem mentioned above, and went to bed.
Tie rods to center link and spindles (steering knuckles)
Woke up, realized that I should turn the nuts instead of the bolts, and got the idler arm into position. Put grease on the tie rod studs. Slid the tie rod boots over the joints, which wiped the grease off the studs, so I added a bit more grease. Cleaned the attachment point at the spindle with a paper towel from old grease "inside" the hole. Had to turn the linkage (with the steering wheel; the non-greased idler arm wasn't moving) to prevent interference of the inner tie rod joint with the frame (clearance was not enough to get the inner tie rod stud into the center link). Textbook install; slid both studs into their holes, threaded the nuts on, only finger-tight. Repeated for the driver's side (including turning the steering wheel.) Asked my dad to turn the steering wheel lock-to-lock as I watched the clearance between the adjuster clamps and the frame- all was good, so I gave the sleeve bolts their final torque spec (only 15 ft/lbs). **Don't try to make the clamp ends touch all the way as is shown in the GM Service Manual (or Haynes book)!! It's just a picture as an example. Follow the torque spec and the "minimum 1/8th inch gap" spec.
Finishing the linkage
Installed grease fittings everywhere (5/16 inch socket). Torqued all bolts to spec (35 ft/lbs). I used castellated nuts everywhere. Followed procedure by tightening the nut (not loosening) just enough to get the cotter pins to slide through. Made a note to remind myself to somehow increase the clearance between the pitman arm and radiator hose; ever since I got the car, that castellated nut & cotter pin have rubbed into the bottom of the lower rad hose. Made a bigger note to grease all the fittings!!
Misc tasks
I put the end links back on the car. Like RBob said a while ago, the holes in my lower control arms became elongated, and now look like ovals. I'll have to weld a plate over them - later on.
I greased all the fittings multiple times with Mobil 1 synthetic chassis lube. (Can't find Valvoline syntec for my grease gun anymore.) It's very hard to tell with new boots how much grease is going in.
I reinstalled the rotors and calipers. Didn't bother to repack the bearings, just did that a month or so ago. Brake lines look in bad shape, gotta replace 'em soon. The "plan" is to replace all brakes in the front with new... but I can't wait too long for the brake hoses. Note that the brake-hose-clamp-to-strut bolt is NOT threaded on these KYB GR-2 struts. I had to first get the bolt into the strut (as it cut it's own threads), then remove the bolt, then clamp the brake hose to the strut. I double-checked that I had re-capped the master cylinder.
Tried sliding the bubble gauge (for camber) onto the rotor.
final torquing
Torqued upper strut mount bolts to 20 ft/lbs. Tightened strut-to-mount bolt as best I could with that weak "swing-out" hex key set. I gotta buy a socket for a 6mm allen key from Sears to get some real torque on that sucker.
The LCA pivot nuts have to be tightened with the weight of the car on the ground, so I put the tires on. Lowered the car to the ground- wow was it low!
Thought I'd be slick and roll the car to the edge of my garage, where the little "ramp" is to the driveway. I figured I could lay in that spot and reach the lca bolts.After a half hour of trying, I gave up.
Couldn't see anything under there. Couldn't swing a wrench, definately couldn't get the torque wrench in there. So I pushed the car back into the garage, raised the front up, and put it on jackstands on the outer edge of the spring perches. This way the weight of the car would be on the control arms... close enough for me. I'll figure out another way some other time. (The idea is not to induce a "preload" into the bushings- if you tightened them with the control arms hanging down, and then took the car off jacks, the bushing would "twist" and it would be trying to raise the car upwards. By tightening the bushigns with the weight on the control arms, the bushings's don't get any twist, and they act as they should instead of trying to "return" to the original twisted-up position.)The jacking setup seemed dangerous; the lca's "hinged upward" on the jackstands and made the stands tilt out to the sides!!! Took me a while to get it to raise up like that and have it be safe. Be careful!! Once the car was up safe (and I left the hydraulic jack under the crossmember for added safety; didn't want a control arm smashing my skull into the floor), I was able to torque the pivot nuts. What a pain. Could only get a little swing on the wrench. That 60 ft/lbs took forever, and I was so tired, it felt like 200 ft/lbs. Dropped the car back to the ground. Cleaned up the garage as best as I could. Looked at the tires from teh front of the car and noticed how badly the alignment was off.
Road test!!!
Got in the car, stuck one foot out, and pushed the car out of the garage. It scraped badly on the little ramp. Once I got into the driveway, I hit the brakes- AGH! No brakes!!! The car barely stopped before going into the street and hitting the ONE car that was coming down the road at 3:00AM. Realized that, duh, I had to remove the calipers. To do that, I retracted the pistons. I never extended the pistons (by pumping the brake pedal a few times) to the rotors. Oops.
Started the engine (fired right up), and slowly came out of the driveway. (SCRAPE!!! Seems like the damn clamp at the cat.) Went for a ride... bumps were no problem, but man, forget about going straight or turning. My tires squealed while going straight!
Final step: Alignment
Got the alignment yesterday. Told the guy I had changed it all and NEEDED an alignment fast. He worked me into the schedule (very cool for a last-minute thing). The fiance' drove me to get my car... lets just say HOLY FRIGGIN SHT!!! WOW!!! OUT FRIGGIN STANDING! HELL MF'IN YEAH!! Driving is a thrill again!! It takes turns beautifully! And the new stance, with the lowering springs? The car looks great.
Last edited by TomP; Jun 25, 2003 at 12:15 PM.

Banned
Joined: May 2003
Posts: 564
Likes: 0
Car: 88 BMW 535i
Engine: 3.5L M30
Transmission: 4HP22E
Originally posted by TomP
Got in the car, stuck one foot out, and pushed the car out of the garage. It scraped badly on the little ramp. Once I got into the driveway, I hit the brakes- AGH! No brakes!!! The car barely stopped before going into the street and hitting the ONE car that was coming down the road at 3:00AM. Realized that, duh, I had to remove the calipers. To do that, I retracted the pistons. I never extended the pistons (by pumping the brake pedal a few times) to the rotors. Oops.
Got in the car, stuck one foot out, and pushed the car out of the garage. It scraped badly on the little ramp. Once I got into the driveway, I hit the brakes- AGH! No brakes!!! The car barely stopped before going into the street and hitting the ONE car that was coming down the road at 3:00AM. Realized that, duh, I had to remove the calipers. To do that, I retracted the pistons. I never extended the pistons (by pumping the brake pedal a few times) to the rotors. Oops.

Trending Topics

Supreme Member
Joined: Aug 2002
Posts: 3,827
Likes: 1
From: Gainesville, FL
Car: 1988 Chevy Camaro Hardtop
Engine: Turbocharged/Intercooled 3.1
Transmission: World Class T5 5 Speed
Nah, he almost hit the one car coming down the road, right?
Uh oh... I can feel it being muttered already....
Pics?
Uh oh... I can feel it being muttered already....
Pics?
Thread Starter
Supreme Member
Joined: Mar 2000
Posts: 13,414
Likes: 6
From: Central NJ, USA
Car: 1986 Firebird
Engine: 2.8 V6
Transmission: 700R4
Hehe,yeah, it stopped just in time before hitting the car. Didn't type it out right.
And yes definately I'm going to get all these pics together for a page. I took 99% of them with my digital camera so I don't have to waste time scanning them. Don't know how much time will be spent resizing them thought (3megapixel quality). Figure in the next few weeks...
And yes definately I'm going to get all these pics together for a page. I took 99% of them with my digital camera so I don't have to waste time scanning them. Don't know how much time will be spent resizing them thought (3megapixel quality). Figure in the next few weeks...

Supreme Member
Joined: Dec 2000
Posts: 1,128
Likes: 0
From: UCIrvine or SFV, CA
Car: 1999 Pontiac Trans Am
Engine: LS1 - 346 ci
Transmission: 4L60E
I use Photo Resizer Pro from www.showyourphotos.com to resize all my huge pix. Multiple pix at once! (Except it dies in 30 days) but hey if you do all the pix it won't make a difference!

Thread Starter
Supreme Member
Joined: Mar 2000
Posts: 13,414
Likes: 6
From: Central NJ, USA
Car: 1986 Firebird
Engine: 2.8 V6
Transmission: 700R4
Thanks! Yeah it definately makes for a new car feeling; the car takes bumps like my rental Malibu did- I barely feel 'em!!
Lowering the rear
Tuesday I put on the new rear shocks and springs. (Didn't have enough energy to type anymore yesterday!) Just a basic install, no problems... raise car by axle, support by jackstands under frame, lower axle, remove lower shock bolts, lower axle more until the springs get loose (without stressing the body-to-axle brake hose!), reach up, take springs down, reverse procedure to install.
I did hit one barrier though. One spring had an extra "curl" to the top end of it. I don't mean an extra coil, I mean an extra curl. The spring curved inward at the top (looks like maybe how they cut it?) an extra few millimeters. It wouldn't seat into the upper spring isolator!! So what did I do? Busted out the air grinder again. I ground a notch (with a cylindrical stone) into the upper spring isolator- it's metal-covered rubber. After grinding the notch in, the spring fit great.
Put it all back up; now I'm wondering if the car is too low in the rear. Looks like the P245/60r15's are ready to take a bite out of my quarter panel's wheel well lip. I'm not about to get rid of those tires; they're brand new... so I have a few options. My import-loving friend (not a fast/furious kinda guy, a technical guy) says that with the new shocks, I probably won't bottom out. He suggests (and I'm going to try it) just driving around like this for a week to see what happens. That's Option #1.
Option #2 = get a new set of the upper spring isolators. They don't make our design anymore. The only design GM makes is the one used in the 4th gen f-bodies (94-up), and they're about an inch thicker. They're cheap enough to put in...
Option #3 = go back to my original 250,000 mile springs. The car wasn't much higher with 'em, it still looked great. Only bummer is that these springs ARE worn out...
Option #4 = get new stock rear springs... but I think that'll jack the rear really high.
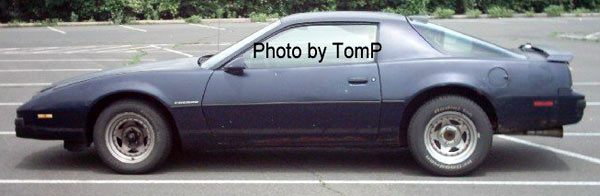
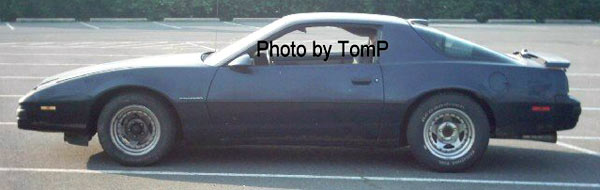
Anyone want to see pictures?? (From TomP? Wow! ) Here's two... shrunk down 35% from original. I got the before/after shot; parked in the same spot, stood in the same spot, but stupidly, didn't hold the camera at the same height.
Lowering the rear
Tuesday I put on the new rear shocks and springs. (Didn't have enough energy to type anymore yesterday!) Just a basic install, no problems... raise car by axle, support by jackstands under frame, lower axle, remove lower shock bolts, lower axle more until the springs get loose (without stressing the body-to-axle brake hose!), reach up, take springs down, reverse procedure to install.
I did hit one barrier though. One spring had an extra "curl" to the top end of it. I don't mean an extra coil, I mean an extra curl. The spring curved inward at the top (looks like maybe how they cut it?) an extra few millimeters. It wouldn't seat into the upper spring isolator!! So what did I do? Busted out the air grinder again. I ground a notch (with a cylindrical stone) into the upper spring isolator- it's metal-covered rubber. After grinding the notch in, the spring fit great.
Put it all back up; now I'm wondering if the car is too low in the rear. Looks like the P245/60r15's are ready to take a bite out of my quarter panel's wheel well lip.
I'm not about to get rid of those tires; they're brand new... so I have a few options. My import-loving friend (not a fast/furious kinda guy, a technical guy) says that with the new shocks, I probably won't bottom out. He suggests (and I'm going to try it) just driving around like this for a week to see what happens. That's Option #1.Option #2 = get a new set of the upper spring isolators. They don't make our design anymore. The only design GM makes is the one used in the 4th gen f-bodies (94-up), and they're about an inch thicker. They're cheap enough to put in...
Option #3 = go back to my original 250,000 mile springs. The car wasn't much higher with 'em, it still looked great. Only bummer is that these springs ARE worn out...
Option #4 = get new stock rear springs... but I think that'll jack the rear really high.
Anyone want to see pictures?? (From TomP? Wow!
) Here's two... shrunk down 35% from original. I got the before/after shot; parked in the same spot, stood in the same spot, but stupidly, didn't hold the camera at the same height. Thread Starter
Supreme Member
Joined: Mar 2000
Posts: 13,414
Likes: 6
From: Central NJ, USA
Car: 1986 Firebird
Engine: 2.8 V6
Transmission: 700R4
Here's the AFTER shot!
Here's the after picture! Final combination was Suspension Techniques V6 lowering springs, KYB GR-2 front struts, KYB gas-a-just rear shocks, KYB strut mounts, Energy Suspension bushings in lower control arms, Moog ball joints, and all steering linkage uses new Moog parts.
Thread Starter
Supreme Member
Joined: Mar 2000
Posts: 13,414
Likes: 6
From: Central NJ, USA
Car: 1986 Firebird
Engine: 2.8 V6
Transmission: 700R4
Aw damn, shoulda thought of doing this picture in the first place! Makes it easier to see a change (can fit both on the screen at once)...
Oh and did I mention absolutely, positively NO squeaks??
Oh and did I mention absolutely, positively NO squeaks??
Supreme Member
Joined: Aug 2002
Posts: 3,827
Likes: 1
From: Gainesville, FL
Car: 1988 Chevy Camaro Hardtop
Engine: Turbocharged/Intercooled 3.1
Transmission: World Class T5 5 Speed
Very freakin' Nice man!! 
*tosses ya a cold one* Congratulations, on a job well done!
*tosses ya a cold one* Congratulations, on a job well done!
Thread Starter
Supreme Member
Joined: Mar 2000
Posts: 13,414
Likes: 6
From: Central NJ, USA
Car: 1986 Firebird
Engine: 2.8 V6
Transmission: 700R4
Thanks!!! See what I mean about how low the rear is? Yikes... Now the car just needs a bath... or, I should at Least clean the tires or something.
I'm going to get together a main pricelist sometime this weekend. I'll even include tools, most of which could've been rented for $0.
I'm going to get together a main pricelist sometime this weekend. I'll even include tools, most of which could've been rented for $0.
Supreme Member
Joined: Aug 2002
Posts: 3,827
Likes: 1
From: Gainesville, FL
Car: 1988 Chevy Camaro Hardtop
Engine: Turbocharged/Intercooled 3.1
Transmission: World Class T5 5 Speed
Yeah... looks almost like you couldn't trimmed a very slight amount from the front springs - but hey, maybe they'll come down, as the springs settle in!
Thread Starter
Supreme Member
Joined: Mar 2000
Posts: 13,414
Likes: 6
From: Central NJ, USA
Car: 1986 Firebird
Engine: 2.8 V6
Transmission: 700R4
I definately believe the front will come down more (although I don't want it to)! I used new front spring isolators. My original ones were squashed pretty flat. I think once the new rubber starts to squash, the car is going to come down a bit more. Just realized yesterday that my car doors won't "clear" a tall curb anymore. My buddy rode in my car for the first time, and I had to parallel park; he had the foresight to open the door slowly. I never would've thought of that...
Oh yeah and I gave the suspension a workout- wow.. good stuff!! It grips turns like nothing else!!
I used new front spring isolators. My original ones were squashed pretty flat. I think once the new rubber starts to squash, the car is going to come down a bit more. Just realized yesterday that my car doors won't "clear" a tall curb anymore. My buddy rode in my car for the first time, and I had to parallel park; he had the foresight to open the door slowly. I never would've thought of that...Oh yeah and I gave the suspension a workout- wow.. good stuff!! It grips turns like nothing else!!

Junior Member
Joined: Jan 2002
Posts: 64
Likes: 0
From: Ohio
Car: 1987 Pontiac Firebird
Engine: 2.8lt V6
Transmission: TH700R4
My rear suspension looks like your does now, and it is original. I think its time for a new suspension and i was wondering what you had on there before cuz im not really for the whole lowered look.
Thread Starter
Supreme Member
Joined: Mar 2000
Posts: 13,414
Likes: 6
From: Central NJ, USA
Car: 1986 Firebird
Engine: 2.8 V6
Transmission: 700R4
Before, I had stock springs and Gabriel hi-jacker air shocks. I used to run the air shocks at 90 PSI, which raised the back end up almost 2 inches. I had P275/60r15 tires on the back, which is a 28 inch tall tire. (Stock tires=26.16 inches tall.) So there was no obscene gap between the tire and wheel well lip.
Then I wanted "out" of the raised rear/big tire look that I had since '94. I put P245/60r15's on the back- 26.76 inches tall. So I lowered the air shocks to 40 psi. That's the combination you're seeing in the "before" pic- the car with about a 1/4 inch lift in the back.
I went with lowering springs to give the car a new look... like I said, it was raised up since '94. I still have the P245/60r15's in the rear. Front's are now P225/60r15's (25.8 inches tall) instead of the stock P215/60r15's (26.16 inches tall).
I don't recommend air shocks at all; they destroy the upper shock mounts. Both of mine shattered; I had to rebuild them with a 1/4 inch of plate steel.
What size are the tires that you have in the back? Could that be throwing the stance off?
[edit] Project for today (if my friends are still at work when I leave here)- put the new power steering pump on. Gotta change the pulley and bracket over... bought a pulley puller/installer set by Astro Pneumatic. Local store wanted too much for the OTC set... they wanted $68, can get it online for $40, so I just spent $30 on the AP set. Hell it's probably "good enough"; I shouldn't be using it that much anyway. Hm. I hope I have some power steering fluid at home.
Last edited by TomP; Jun 27, 2003 at 03:33 PM.
Junior Member
Joined: Jan 2002
Posts: 64
Likes: 0
From: Ohio
Car: 1987 Pontiac Firebird
Engine: 2.8lt V6
Transmission: TH700R4
my car has 215/65/15 goodyear eagle gtII's. I like the tires and they are almost new, its just that the rear end looks like it is sagging really bad and it it rides pretty rough. I put new shocks on when i bought it, but they didnt help much and they were cheap ones. So i figure that i need new springs and new shocks. I am prolly going to get replacement ones, would you recommend the regular or should i get the HD ones. I have a custom speaker box in the trunk and i often carry alot of people. I just want the rear end to be a little higher than it is now.

Banned
Joined: Nov 2002
Posts: 864
Likes: 0
From: greenvill sc
Originally posted by TomP
Aw damn, shoulda thought of doing this picture in the first place! Makes it easier to see a change (can fit both on the screen at once)...
Oh and did I mention absolutely, positively NO squeaks??
Aw damn, shoulda thought of doing this picture in the first place! Makes it easier to see a change (can fit both on the screen at once)...
Oh and did I mention absolutely, positively NO squeaks??

are you planning on getting new wheels? when i first go my iroc wheels and put them on my car with the stuff on it was awsome...
16/8 (dryrotted and bald tires) made a crap load of differance compared to the 15/7 (with new bfg's)
wheel and tires make a big difference in the way a car looks and feels...
Thread Starter
Supreme Member
Joined: Mar 2000
Posts: 13,414
Likes: 6
From: Central NJ, USA
Car: 1986 Firebird
Engine: 2.8 V6
Transmission: 700R4
87bandit, you should probably start a new message with your question or ask on the suspension forum. Can't offer anything else useful besides helping out with what I've done to my suspension... sorry!
Xcelerate, honestly, I don't like the looks of 16 inch wheels. All the tires are new (P225/60r15 front, P245/60r15 rear), so the most I'd do is buy my same wheels in aluminum; right now they're steel (heavy).
I put the power steering pump on; it was awesome!!! Pulling the pulley off was somewhat rough; thought I was going to snap the tool, waited a minute and tried again- I guess it just needed a minute's worth of pressure because when I went back to it, it came right off. Now it feels like a true suspension rebuild! And then the pump went out. Went to the beach last night... came back, started the car, and heard a hellacious groaning from the engine. Thought the p/s pump died. Got home; it's low on fluid... see the pressure fitting at the pump leaking. Tightened it, still leaks. Pulled it out this morning, get this: Pep Boys rebuild has two orange caps plugging the rear mounting holes. I just removed the one cap for the upper rear mounting stud (18mm socket). Old pump had a bolt in the lower one, I figured hey it's just a mounting bolt, I won't bother swapping it, and I'll leave the plastic thing in. WRONG. Plastic bitch must've melted or something; that's where the leak was from. Moved the lower bolt to the new pump and all is fine- for now. 
Xcelerate, honestly, I don't like the looks of 16 inch wheels. All the tires are new (P225/60r15 front, P245/60r15 rear), so the most I'd do is buy my same wheels in aluminum; right now they're steel (heavy).
I put the power steering pump on; it was awesome!!! Pulling the pulley off was somewhat rough; thought I was going to snap the tool, waited a minute and tried again- I guess it just needed a minute's worth of pressure because when I went back to it, it came right off. Now it feels like a true suspension rebuild! And then the pump went out.
Went to the beach last night... came back, started the car, and heard a hellacious groaning from the engine. Thought the p/s pump died. Got home; it's low on fluid... see the pressure fitting at the pump leaking. Tightened it, still leaks. Pulled it out this morning, get this: Pep Boys rebuild has two orange caps plugging the rear mounting holes. I just removed the one cap for the upper rear mounting stud (18mm socket). Old pump had a bolt in the lower one, I figured hey it's just a mounting bolt, I won't bother swapping it, and I'll leave the plastic thing in. WRONG. Plastic bitch must've melted or something; that's where the leak was from. Moved the lower bolt to the new pump and all is fine- for now. 
Supreme Member
Joined: Jan 2001
Posts: 7,604
Likes: 1
From: ****SoCal, USA****
Tom
SUPERB FUN JOB!
The front does "settle" down somewhat.
After having done this to my Corvette, it does settle, eventually.
You stretched the rear springs with the Air Shocks.
NOT MUCH but the constant road travel up & down with the pressure to "Keep" a certain ride height..
My 85 Firebird constantly hits curbs upon opening door passenger side.
It's all original, even with the new shocks, I still have to worry about the passenger door.
NO big deal.
Whale Snot...
Actually it's Marine Grease.
You did grease the bolts going thru the bushings and you did grease all washers (both sides) used, too, correct?
You also want to grease the sway bar as it goes thru the bushings, too.
Yeah, been there, going to be doing soon on the Firebird, too.
Yes, so worth it really is.
PS watch out for the rain, as your car is much more unforgiving in the wet, now.
The power steering stuff is very difficult to tighten, very difficult, no true access for the "power" needed for secure tightening.
Great going.
Great typing.
Happy to see another doing the "teh" problem as I often do!
Help me understand, better, about "oblongated" steering linkage holes on A Arms.
Thread Starter
Supreme Member
Joined: Mar 2000
Posts: 13,414
Likes: 6
From: Central NJ, USA
Car: 1986 Firebird
Engine: 2.8 V6
Transmission: 700R4
Oh yeah man, I slathered the bolts up with anti-sieze. I don't want those SOB's ever to rust again!!! Although there were no washers on the control arm bolts; and that suspension's never been touched yet.
When I get all the pics up, I'll have to see; I'm sure I took a picture of that elongated end-link hole in the a-arm. Oh and I didn't have to lube any sway bar bushings because I already changed them a while ago! That's why I didn't bother to buy the Energy Suspension "full" polyurethane kit; I already had the sway bar mounting bushings and the sway bar end links and the trans mount. Didn't make sense to re-buy parts I already had - especially since the kit only "saved" an extra $2.00 over buying all the parts individually!
Although there were no washers on the control arm bolts; and that suspension's never been touched yet.When I get all the pics up, I'll have to see; I'm sure I took a picture of that elongated end-link hole in the a-arm. Oh and I didn't have to lube any sway bar bushings because I already changed them a while ago!
That's why I didn't bother to buy the Energy Suspension "full" polyurethane kit; I already had the sway bar mounting bushings and the sway bar end links and the trans mount. Didn't make sense to re-buy parts I already had - especially since the kit only "saved" an extra $2.00 over buying all the parts individually! Supreme Member

Joined: Jun 2002
Posts: 4,029
Likes: 6
From: Illinois
Car: 1988 Trans Am
Engine: 305 TPI
Sounds great Tom. That was a lot of stuff you installed at one time too. I thought just adding a BMR sway bar, poly enlinks and KYBs made a dramatic improvement over stock.
It must be even more fun with the rest of the things you did.
It must be even more fun with the rest of the things you did.
Thread Starter
Supreme Member
Joined: Mar 2000
Posts: 13,414
Likes: 6
From: Central NJ, USA
Car: 1986 Firebird
Engine: 2.8 V6
Transmission: 700R4
Thanks! Yeah it's definately a blast to drive; but I'm getting one bit of annoyance. When I take a hard sharp turn, I can feel the rear "bouncing" a bit. I guess it's time to do the rear LCA's with poly, and box the rear control arms/panhard rod.
I always had an issue with boxing those pieces; how do I make sure water (and therefore that damned rust) can't puddle inside? Well I think I figured the answer out; I won't box the ends, where the bushings are. This would leave the ends slightly open for water to drain out as I drive. Plus I can fit a paintbrush in there (a long skinny one) to apply some POR-15 to my welds.
Of course that'll have to be one lonnnnng paintbrush to be able to paint the inside of a boxed panhard rod with por-15... Supposedly you can soak steel wool in POR-15, put a "hook" on it, and drag it thru an exhaust pipe to coat the inside of the exhaust pipe (with the high-temp por-15). I wonder if I could do that with the boxed panhard rod. Hmm....
I always had an issue with boxing those pieces; how do I make sure water (and therefore that damned rust) can't puddle inside? Well I think I figured the answer out; I won't box the ends, where the bushings are. This would leave the ends slightly open for water to drain out as I drive. Plus I can fit a paintbrush in there (a long skinny one) to apply some POR-15 to my welds.
Of course that'll have to be one lonnnnng paintbrush to be able to paint the inside of a boxed panhard rod with por-15...
Supposedly you can soak steel wool in POR-15, put a "hook" on it, and drag it thru an exhaust pipe to coat the inside of the exhaust pipe (with the high-temp por-15). I wonder if I could do that with the boxed panhard rod. Hmm.... Supreme Member
Joined: Jan 2001
Posts: 7,604
Likes: 1
From: ****SoCal, USA****
I wouldn't suggest ya waste the time on boxing acontrol arm.
Buying the GOOD ones or making your own GOOD ones is so much easier.....
IF ya box the stock ones, the part ya truly need to "do" is the end pieces.
There isn't much there to really work with (strength wise) on a stock rear control arm.....
IF ya found a spare stock one (loose in yard) and saw a pic of the aftermarket ones, ya can make then easier.
As I said before, your car is now more unforgiving.
You are discovering that on the twisty roads.

Member
Joined: Feb 2002
Posts: 298
Likes: 0
From: Griswold CT
Car: 91 Z28
Engine: L98 350
Transmission: Tire Chirpin A4
Well I am bringing this post back from the dead. I basically did the same procdure on my car and went thru all the agrrivation TomP highlighted here. All in all it is worth it though. Car feels way tight. Now all I have to do is raplace the rag joint and get the right offset wheels and I will be set. On a side not for torqueing the Front control arms at curb height i jacked up the car and used two decent sections of 4x4 hard wood to set the tires down on each side, which gave me just enough clearance to wiggle unedr the car and Torque the a arm bolts. Anthoer thig to anyone who is gonna do this project, is to get a decent jack with a big dish and a rubber insert to jack the car with. I used a cheapy jack and dented my framing around my trans tunnel all to hell. Also jack stands that are wide enough to fit the rail would help too.

Member
Joined: May 2003
Posts: 242
Likes: 0
Best way to install ball joint is to freeze the joints for about an hour, then use a flame wrench to heat up the control arm. Sucker will pop right in.. same thing works on piston pins, too.
Just thought i'd throw that in.
Just thought i'd throw that in.
Supreme Member
Joined: Jan 2001
Posts: 7,604
Likes: 1
From: ****SoCal, USA****
Totally agree!
Lots of fun that way, too!
NO hand held propane torches are not that effective as the heating agent.
Have BIG bucket of water, too, standing by.
For placing the arm into, after a short bit of air cool down.
Poly bushings can melt quickly, I discovered!
Lots of fun that way, too!
NO hand held propane torches are not that effective as the heating agent.
Have BIG bucket of water, too, standing by.
For placing the arm into, after a short bit of air cool down.
Poly bushings can melt quickly, I discovered!

Senior Member
Joined: Nov 2002
Posts: 647
Likes: 1
From: Orange County, CA
Car: 86 TA
Engine: 305 TPI
Transmission: 700R4 - 2200 stall
Axle/Gears: 3.42 posi
Tom,
Did your dust covers fit back on your new KYB strut mounts??
I cant seem to get mine to fit..
Thanks...
Did your dust covers fit back on your new KYB strut mounts??
I cant seem to get mine to fit..
Thanks...
Member
Joined: Oct 2002
Posts: 229
Likes: 0
From: Cheyenne, WY
Car: '89 Camaro RS
Engine: LB8 V6 MFI
Transmission: T-5 5-speed
Axle/Gears: 3.42:1
Tom,
Here's those images a little larger than the 2nd group of photos, but smaller than the first batch.
They've been resized and cropped in Photoshop.
By the way, great job there... I'll have to do that after I get the new interior in this '89 RS.
Here's those images a little larger than the 2nd group of photos, but smaller than the first batch.
They've been resized and cropped in Photoshop.
By the way, great job there... I'll have to do that after I get the new interior in this '89 RS.
Thread Starter
Supreme Member
Joined: Mar 2000
Posts: 13,414
Likes: 6
From: Central NJ, USA
Car: 1986 Firebird
Engine: 2.8 V6
Transmission: 700R4
Wow, I went thru hell on that rebuild... damn- it seems like 20 years ago. That reminds me, I still gotta install that quick ratio steering box and new rag joint...
Anyway, thanks for the crop (and for keeping my tagline on my windows), MrMetal!
Diggler, ya know, I never tried the strut nut covers. My alignment shop lost one on me (and I didn't notice until a few months later so I couldn't blame them for sure), so I took the other one off, got a junkyard replacement for the other, and tucked them away. I always figured I'd put 'em on when I restored the car, but never did. In fact... I wonder where the Hell I put them!!! Uh-oh. If I find 'em, I'll try 'em out and let ya know. It would suck if they don't fit.
Senior Member
Joined: Oct 2001
Posts: 718
Likes: 1
From: Hli�skj�lf / Pensacola, FL
Car: Camaro
Engine: 3800
Transmission: T5
Mine have been exposed for a few months now. Sure would like to be able to cover them back up though... not sure if it really matters, but it'd make me feel better
-Bud
-Bud
Supreme Member
Joined: Oct 2002
Posts: 1,259
Likes: 0
From: Los Angeles, Ca.
Car: Base Firebird
Engine: TPI 350
Transmission: T56
Axle/Gears: D44
hey TomP, how do you like those springs? did u get them from ebay? I decided to use Sprint springs (which i got on ebay) because a friend of mine has them. How harsh is your ride? I have the same shock/strut setup as you, and it feels almost like i have blocks inplace of my springs when i go over speed bumps.
oh, and i like the stance after u put all the crap in... how many fingers is your wheelgap? mine still needs to settle in the front (3 finger in the front and 2 finger in the back)
here's the only pic i have of my new stance... made my dad give a thumbs up lol.

oh, and i like the stance after u put all the crap in... how many fingers is your wheelgap? mine still needs to settle in the front (3 finger in the front and 2 finger in the back)
here's the only pic i have of my new stance... made my dad give a thumbs up lol.
Last edited by 90firebird; Jul 10, 2004 at 04:57 AM.
Thread Starter
Supreme Member
Joined: Mar 2000
Posts: 13,414
Likes: 6
From: Central NJ, USA
Car: 1986 Firebird
Engine: 2.8 V6
Transmission: 700R4
I bought the springs directly from Suspension Techniques- I actually had them dropped shipped (extra $50) to get them faster. The ride is great, but yeah, over bumpy pot-hole roads, it feels like the car is going to shake itself apart. You should hear me cursing...
I think all the guys responsible for paving the roads are driving around in luxury cars and they don't feel the bumps. I bet if I had them ride in my car (or any lowered car), they'd re-pave all the roads asap!
I think all the guys responsible for paving the roads are driving around in luxury cars and they don't feel the bumps. I bet if I had them ride in my car (or any lowered car), they'd re-pave all the roads asap!
Supreme Member
Joined: Apr 2003
Posts: 1,111
Likes: 0
From: Vancouver, BC
Car: '86 Camaro SC, '16 QX60
Engine: 2.8 V6 POWER, 3.5L V6 N/A
Transmission: T-5, CVT
I put in the Suspension Techniques springs too (actually, so far only the front ones). I like the springs and the look of the car, but they ARE rock hard on bumps and pot-holes. I went with Tokico shocks and struts because the KYBs were going to take too long to ship in. I was able to put the dust shields back on the front struts and they seem to fit okay.

Junior Member
Joined: Feb 2004
Posts: 21
Likes: 0
From: L.A, California
Car: 1992 Chevy Camaro RS
Engine: 3.1L 60* V6
Transmission: 4 Speed Automatic (700-R4)
suspension technique springs
I actually installed them because they are the only choice for our cars, but I'm very pleased with them. I installed there sway bars and koni adjustable shocks...after my tire change to 235/60-15 and a custom alignment to .03 negative camber and 4 1/2" positive caster (good luck finding a shop that will do a custom alignment) there car handles great... not a freaggin' tilt (excuse my french) but the only down side is it really shows how weak the chasis is .........No I can't wait to put the sub frame connectors and miracle bar and a front strut bar....and here is my question.....
Which strut tower brace fits our v6 without a problem or mods....I bought the kenny brown 3-point and it doesd not fit. I want to be sure before I buy one.....
Just for your info....I kept up mith my friends 2004 subaru WRX w/ modded suspension in the mountain roads......not bad for only 150 hp ........and 3000lbs.
I recommend the sus tech springs and sway bar combo.....but you have to get a sub frame connector and a steering brace at least. oh koni shocks kick ***:lala:

Thread
Thread Starter
Forum
Replies
Last Post
83 Crossfire TA
Suspension and Chassis
0
Sep 8, 2015 12:06 PM
1Aauto
Sponsored Vendors
0
Sep 2, 2015 01:35 PM