Custom Air Dam (pics)
 07-28-2011, 07:07 PM
#1
Member
Thread Starter
Join Date: Apr 2011
Location: New York
Posts: 122
Likes: 0
Received 0 Likes
on
0 Posts
Car: 88 Firebird Trans Am
Engine: 305 tpi
Transmission: 700r4 shift kit
Axle/Gears: Posi
Custom Air Dam (pics)
Hey guys just made a air dam out of diamond plate. The stock one looked like it didn't work good so i made this one. What do you think?
 07-28-2011, 07:15 PM
#2
Supreme Member
Join Date: Jan 2009
Location: Columbus Ohio
Posts: 1,126
Likes: 0
Received 0 Likes
on
0 Posts
Car: 91 Z28,64ImpalaSS4094spd,67 Galaxy
Engine: Dart 415Profiler hd,cmprlrs,Hlly750
Transmission: Built 700R4, 3200 stall
Axle/Gears: 3:89 Moser 9"
Re: Custom Air Dam (pics)
I think that's great until you hit something with it, then you'll realise why they made them to be flexible, nice work though...
07-28-2011, 07:21 PM
#4
Supreme Member
iTrader: (5)
Join Date: Jan 2009
Location: league city
Posts: 2,928
Likes: 0
Received 3 Likes
on
3 Posts
Car: SOLD!!!!!
Re: Custom Air Dam (pics)
with the bottom bend it seems as though you are wanting it to force air up. and that is not what it is designed to do. it is designed to create a low pressure area so air will be prominate in the rad area.
07-28-2011, 07:21 PM
#5
Supreme Member
iTrader: (5)
Join Date: Mar 2011
Location: Central Texas
Posts: 2,893
Likes: 0
Received 4 Likes
on
4 Posts
Car: GTA
Engine: 350 TPI
Transmission: 700R4
Axle/Gears: Aussie 9-bolt/3.27 posi
Re: Custom Air Dam (pics)
I think between it being stiff & angled forward, it'll rip off the first time it drags. The angle will make the edge dig in when it drags & with it being so stiff, it'll just rip the mounting bolts out.
07-28-2011, 07:33 PM
#6
Member
Thread Starter
Join Date: Apr 2011
Location: New York
Posts: 122
Likes: 0
Received 0 Likes
on
0 Posts
Car: 88 Firebird Trans Am
Engine: 305 tpi
Transmission: 700r4 shift kit
Axle/Gears: Posi
Re: Custom Air Dam (pics)
yeah it will probably rip off but i never bottom out my driveway is low and no speed bumps, hope it lasts a while!
07-28-2011, 07:43 PM
#7
Trending Topics
 07-28-2011, 09:42 PM
#9
Senior Member

Join Date: Mar 2010
Location: LI, NY
Posts: 864
Likes: 0
Received 2 Likes
on
2 Posts
Car: 1985 IROC-Z
Engine: 355
Transmission: T5
Axle/Gears: 3.42 10 Bolt Posi
Re: Custom Air Dam (pics)
Design is wrong it probably wont work as intended. Bend is too aggressive, it might not promote air to move across radiator. Id like to see if the temps rise at all. Let us know. I think it would look a little better with a less aggressive bend IMHO. Cool
07-29-2011, 01:12 AM
#10
Supreme Member
iTrader: (7)

Join Date: Jan 2006
Location: Santa Rosa, Cali
Posts: 1,160
Likes: 0
Received 1 Like
on
1 Post
Car: 1988 IROC 5.7 Money Pit
Engine: (being built; modified TPI ZZ4
Transmission: 2200 stall/ stage 3 700R4
Axle/Gears: freshened 3.27 in 9.bolt/
Re: Custom Air Dam (pics)
Two things that I find interesting about this. Firstly; that you mention, Joey, you never scrape your inner air dam. Secondly, I'm interested in 'one92rs' description of, or attempted description of keeping the air in a low pressure area near the radiator.
Joey,- I think it's a fine idea although you must be one of a million that dosn't get any scraping along your factory plastic unit. Yours is the very first item that came up in 'SEARCH'. Mine not only hit's ALL the time, but is warped out of shape, so I was checking to see if anyone had done an aluminum unit that carried a rubber 'scrapper' area down along the bottom two-four inches AND if someone had designed some nice installation brackets to hold the unit in place.
I also was thinking of angling it a bit forward so that it had a bit of an aggresive 'rake' to the shape. However, one92rs just reminded me that there's an engineered purpose to the original plastic part that I'll have to keep in mind. So can the rest of you help me rough in the correct shape a bit better?
Soon I'll be yanking the old engine and installing the new 355 with a super charger and a heavily set up suspension so i can drive high speed road coarses for long distances without overheating. Teach Me! Nitro-Nicky
07-29-2011, 07:49 AM
#11
Senior Member
Join Date: Mar 2009
Location: 47798 Germany
Posts: 505
Likes: 0
Received 0 Likes
on
0 Posts
Car: '89 RS camaro 305 TBI
Engine: LO3
Transmission: 700R4
Axle/Gears: yep, has those too (stock)
Re: Custom Air Dam (pics)
I feel sorry for the first rabbit you'll encounter with that slicer under the car.
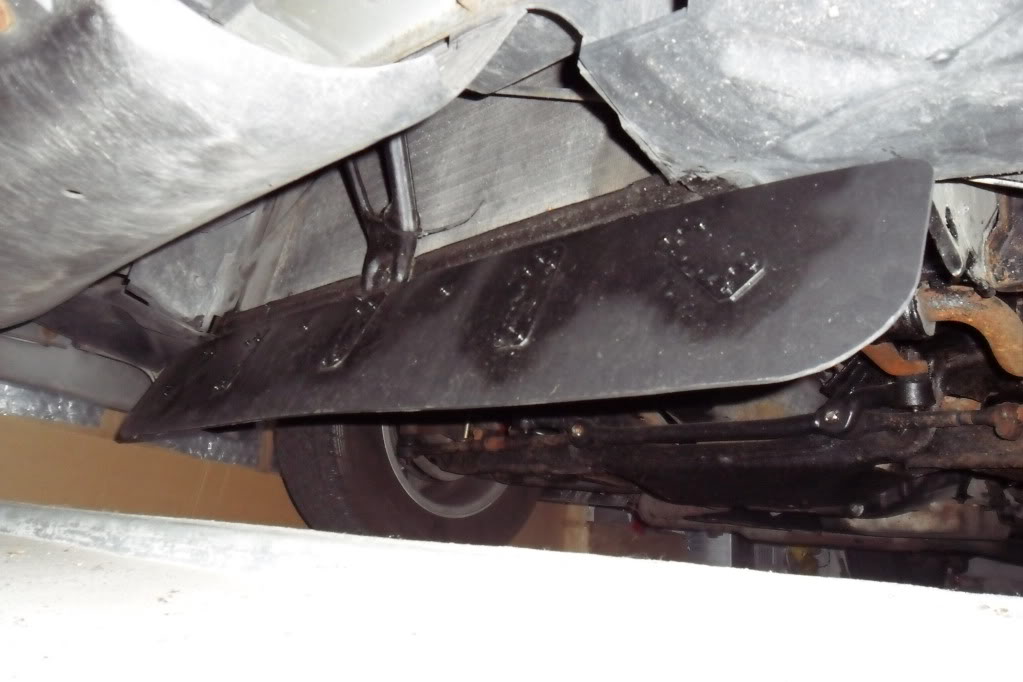
I also made my own air baffle.
As you can see in the first picture it has more surface then the original air baffle.
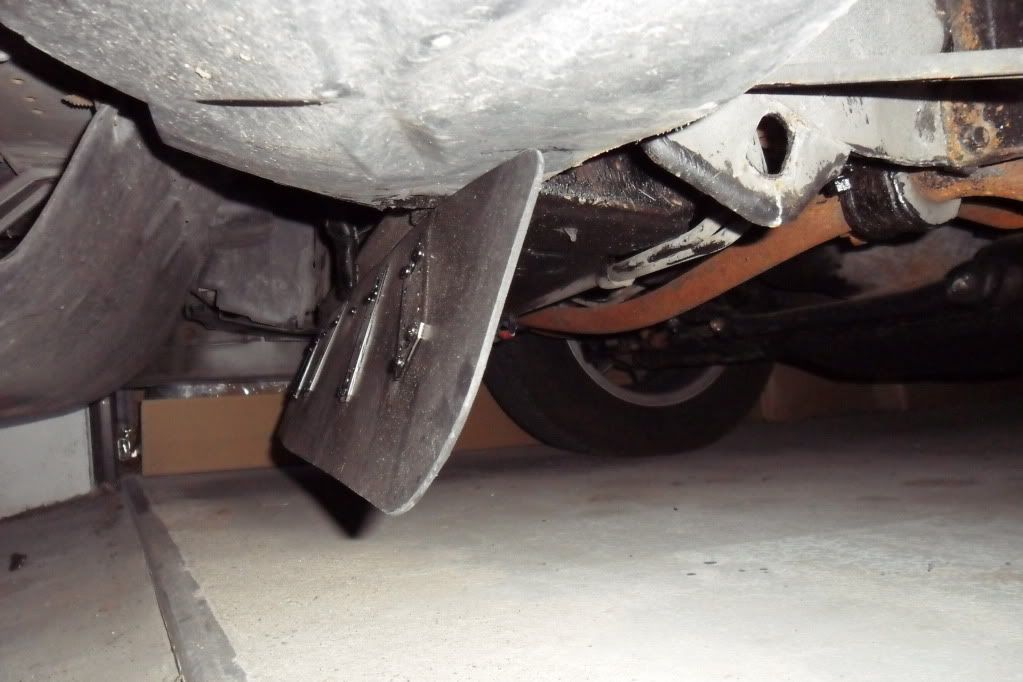
As you can see in the 2nd picture it reduces the depth of the high pressure intake area, but has more of a rake to it then the stock air baffle.
Due to the baffle being slightly wider and deeper the volume of the low pressure area behind the baffle increases. The rake and added width also does a bit towards moving more air through the radiator.

Testing this summer to me proved 3 things
1) it cools better then the stock article at speeds below 30 mph (about 20-25 mph is the miimum speed to maintain a steady low temperature with this piece installed)
2) it holds up at speeds of up to 130 mph (haven't tested at higher speeds yet because I need a perfectly clear road in case the baffle does snap after all.
3) when I hit something it's slightly flexible. If I hit something hard enough to break something, the baffle breaks, half of it remains (which still provides some cooling, but lots of dirty air under the car) but no vital components get damaged.
Making replacements costs me $5/baffle
I'll stick with this untill I have the time to sort out the complete cooling concept.
This includes getting a front licence plate that doesn't block the front grille insert, a dual fan setup, ceramic coated or white headers, and a working cowl hood.
I also made my own air baffle.
As you can see in the first picture it has more surface then the original air baffle.
As you can see in the 2nd picture it reduces the depth of the high pressure intake area, but has more of a rake to it then the stock air baffle.
Due to the baffle being slightly wider and deeper the volume of the low pressure area behind the baffle increases. The rake and added width also does a bit towards moving more air through the radiator.
Testing this summer to me proved 3 things
1) it cools better then the stock article at speeds below 30 mph (about 20-25 mph is the miimum speed to maintain a steady low temperature with this piece installed)
2) it holds up at speeds of up to 130 mph (haven't tested at higher speeds yet because I need a perfectly clear road in case the baffle does snap after all.
3) when I hit something it's slightly flexible. If I hit something hard enough to break something, the baffle breaks, half of it remains (which still provides some cooling, but lots of dirty air under the car) but no vital components get damaged.
Making replacements costs me $5/baffle
I'll stick with this untill I have the time to sort out the complete cooling concept.
This includes getting a front licence plate that doesn't block the front grille insert, a dual fan setup, ceramic coated or white headers, and a working cowl hood.
07-29-2011, 02:05 PM
#12
Supreme Member
iTrader: (7)
Join Date: Jan 2006
Location: Santa Rosa, Cali
Posts: 1,160
Likes: 0
Received 1 Like
on
1 Post
Car: 1988 IROC 5.7 Money Pit
Engine: (being built; modified TPI ZZ4
Transmission: 2200 stall/ stage 3 700R4
Axle/Gears: freshened 3.27 in 9.bolt/
Re: Custom Air Dam (pics)
I appreciate the posted specifics. My most recent 'speed trip' was across three states. There was a family emergency involved and I pushed it between 120-155 mph on empty back highways as often was possible. I sure wish it would have been in the IROC. If every Japanese product can now perform to those levels, we ought to be able to copy across with enought time and effort (and inhieritance!). Hopefully it happens before they start unplugging all the gaspumps...
07-29-2011, 02:14 PM
#13

Re: Custom Air Dam (pics)
I appreciate the posted specifics. My most recent 'speed trip' was across three states. There was a family emergency involved and I pushed it between 120-155 mph on empty back highways as often was possible. I sure wish it would have been in the IROC. If every Japanese product can now perform to those levels, we ought to be able to copy across with enought time and effort (and inhieritance!). Hopefully it happens before they start unplugging all the gaspumps...


Hopefully whatever the emergency was, eveything is fine now.
Also, I am not an aerodynamics engineer, but a big flat piece of ... flap or whatever you want to call it in that spot, regardless of whether it's angled or whatever, is going to create a low pressure area behind it because it deflects away from there.
07-29-2011, 02:18 PM
#14
Member
Join Date: Sep 2009
Location: wisconsin
Posts: 414
Likes: 0
Received 1 Like
on
1 Post
Car: 1992 Pontiac Firebird Base
Engine: 305 TBI
Transmission: 700r4, B&M shifter & shift kit inst
Axle/Gears: 3:23....10 bolt
Re: Custom Air Dam (pics)
I feel sorry for the first rabbit you'll encounter with that slicer under the car.
I also made my own air baffle.
As you can see in the first picture it has more surface then the original air baffle.
As you can see in the 2nd picture it reduces the depth of the high pressure intake area, but has more of a rake to it then the stock air baffle.
Due to the baffle being slightly wider and deeper the volume of the low pressure area behind the baffle increases. The rake and added width also does a bit towards moving more air through the radiator.

Testing this summer to me proved 3 things
1) it cools better then the stock article at speeds below 30 mph (about 20-25 mph is the miimum speed to maintain a steady low temperature with this piece installed)
2) it holds up at speeds of up to 130 mph (haven't tested at higher speeds yet because I need a perfectly clear road in case the baffle does snap after all.
3) when I hit something it's slightly flexible. If I hit something hard enough to break something, the baffle breaks, half of it remains (which still provides some cooling, but lots of dirty air under the car) but no vital components get damaged.

Making replacements costs me $5/baffle
I'll stick with this untill I have the time to sort out the complete cooling concept.
This includes getting a front licence plate that doesn't block the front grille insert, a dual fan setup, ceramic coated or white headers, and a working cowl hood.
I also made my own air baffle.
As you can see in the first picture it has more surface then the original air baffle.
As you can see in the 2nd picture it reduces the depth of the high pressure intake area, but has more of a rake to it then the stock air baffle.
Due to the baffle being slightly wider and deeper the volume of the low pressure area behind the baffle increases. The rake and added width also does a bit towards moving more air through the radiator.
Testing this summer to me proved 3 things
1) it cools better then the stock article at speeds below 30 mph (about 20-25 mph is the miimum speed to maintain a steady low temperature with this piece installed)
2) it holds up at speeds of up to 130 mph (haven't tested at higher speeds yet because I need a perfectly clear road in case the baffle does snap after all.
3) when I hit something it's slightly flexible. If I hit something hard enough to break something, the baffle breaks, half of it remains (which still provides some cooling, but lots of dirty air under the car) but no vital components get damaged.
Making replacements costs me $5/baffle
I'll stick with this untill I have the time to sort out the complete cooling concept.
This includes getting a front licence plate that doesn't block the front grille insert, a dual fan setup, ceramic coated or white headers, and a working cowl hood.
07-29-2011, 03:09 PM
#15
Senior Member
Join Date: Mar 2009
Location: 47798 Germany
Posts: 505
Likes: 0
Received 0 Likes
on
0 Posts
Car: '89 RS camaro 305 TBI
Engine: LO3
Transmission: 700R4
Axle/Gears: yep, has those too (stock)
Re: Custom Air Dam (pics)
Not quite sure if it warrants an own thread.
It�s a hackjob/ghetto fix really.
If I do however not like how the stock baffle works once the rest of my cooling setup is in place, I might make a more permanent version of this baffle.
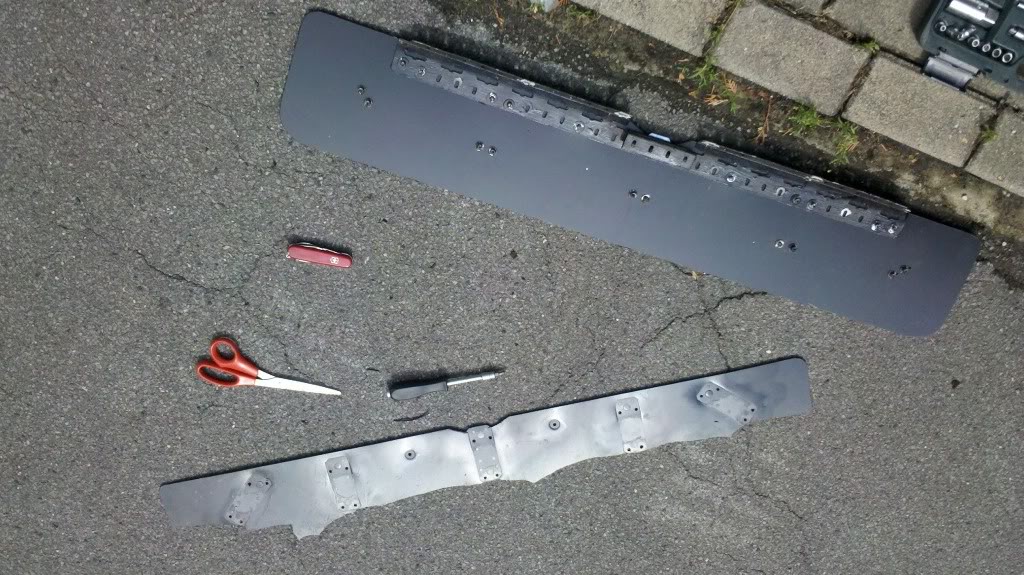
All I did here is:
take a 90 degree angle, and hit it with a hammer untill it has roughly the 110� angle it now has.
Took a sheet of closed cell PVC foamboard (goes under different names in different countries) and cut out a 48" x 6" section, rounded the corners, used a reamer to make the holes in the styrofoam, a bunch of nuts and bolts and washers to screw things together.
In the latest version, due to not having a bigger piece of metal at hand to support the foamboard, I used some metal strips for supports.
T make a fancy version of the same, using the OP�s aluminum piece would be a good start. Cut out all the bits you don�t need, then drill some holes and use bolts, nuts and washers to screw things together.
Maybe I should make a sketch with some measurements for people who want to do this right, rather then my ghetto piece
PS: the baffle I made has about 4" clearance. Can�t go lower because it barely scrapes when backing into my garage. Makes a nasty sound, but at least the pavement in front of my garage is always clean :P
It�s a hackjob/ghetto fix really.
If I do however not like how the stock baffle works once the rest of my cooling setup is in place, I might make a more permanent version of this baffle.
All I did here is:
take a 90 degree angle, and hit it with a hammer untill it has roughly the 110� angle it now has.
Took a sheet of closed cell PVC foamboard (goes under different names in different countries) and cut out a 48" x 6" section, rounded the corners, used a reamer to make the holes in the styrofoam, a bunch of nuts and bolts and washers to screw things together.
In the latest version, due to not having a bigger piece of metal at hand to support the foamboard, I used some metal strips for supports.
T make a fancy version of the same, using the OP�s aluminum piece would be a good start. Cut out all the bits you don�t need, then drill some holes and use bolts, nuts and washers to screw things together.
Maybe I should make a sketch with some measurements for people who want to do this right, rather then my ghetto piece
PS: the baffle I made has about 4" clearance. Can�t go lower because it barely scrapes when backing into my garage. Makes a nasty sound, but at least the pavement in front of my garage is always clean :P
Last edited by the solitaire; 07-29-2011 at 03:16 PM.

Thread
Thread Starter
Forum
Replies
Last Post
BurlyChev
Tech / General Engine
14
08-22-2015 01:52 PM