
My LT1 pbr brake swap onto Third Gen axle

Thread Starter
Member
Joined: Apr 2006
Posts: 114
Likes: 0
From: Utah
Car: 1985 Iroc Z-28
Engine: 305 TPI
Transmission: 700R4
My LT1 pbr brake swap onto Third Gen axle
Post reserved for my swap that I did...used two axles to create the one I wanted... Updates to come within a few minutes...
My camaro has been sitting for about 5 1/2 years, and it is time to get it back on the road. I actually took my wife to Prom in this IROC, she was my high school girlfriend. Good memories, and cool car.
This has likely been covered a few times, but I thought I would share my experience. I bought an axle out of a 96 TA for the PBR brakes. As it has been sitting, the fuel pump wouldn't fire anymore. Good timing...the rear axle needs to be moved out of the way to drop the tank anyways, so I did it all together. Amazingly...after sitting for many years, it fired right up and idled smoothly with a couple gallons of fresh gas. After I fired it up, and was pumped to hear it roar to life, it was time to decide what I wanted to do with the axle.
I decided that I didn't want the super wide stance, and I didn't want to switch wheels. I really like the look of the factory IROC wheels. I did some searching, and found threads here and there. But I didn't find one that spoke specifically about swapping the 96 PBRs onto the 87 axle (I have an 85, but the axle was replaced a few years back when I grenaded the original axle). There are likely threads about this...but again I just thought I would give it a whirl.
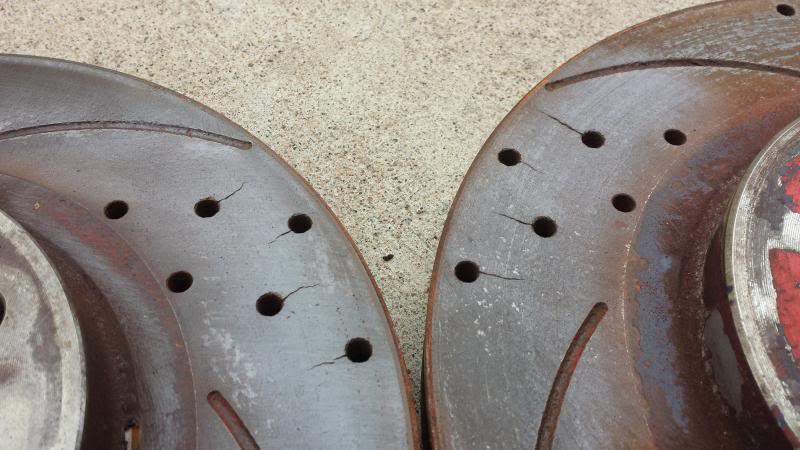
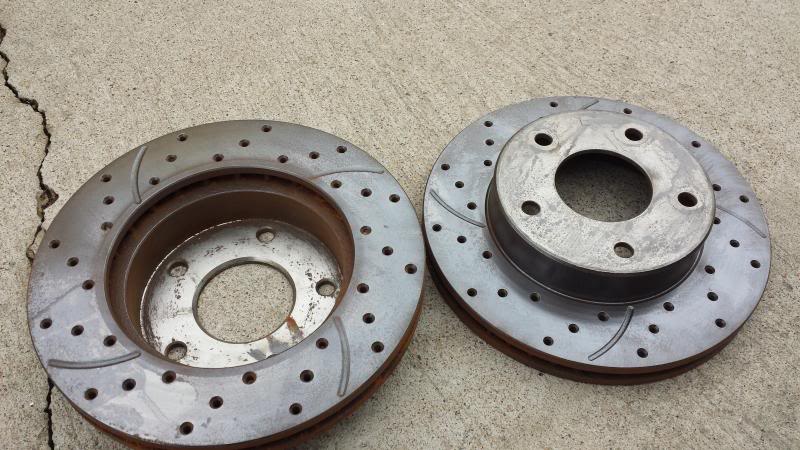
Outer View of 3rd Gen Delco Moraine steel calipers and rotor. It is too bad these cross drilled/slotted rotors won't be used, the only have about 2-3k miles on them. I went through a couple of sets of Delco Moraine calipers before I parked the Camaro, and never could get them working right even with all the adjustments.
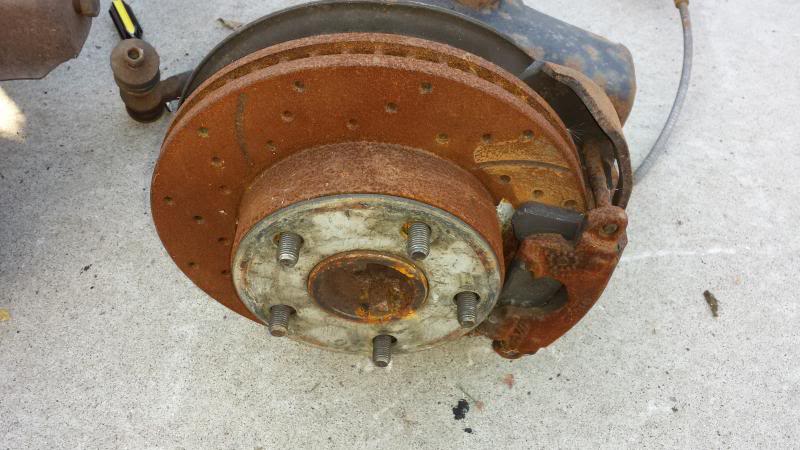
Outer View of 4th Gen PBR caliper and rotor:
Inboard view of 3rd gen Delco Moraine calipers and rotor. Notice the backing plate/caliper mount. It covers the entire rotor:
Inboard view of the 4th Gen PBR caliper and rotor. Notice that the backing plate is much smaller...only to space the caliper out, it doesn't act like a dust shield like on the Delco brakes:
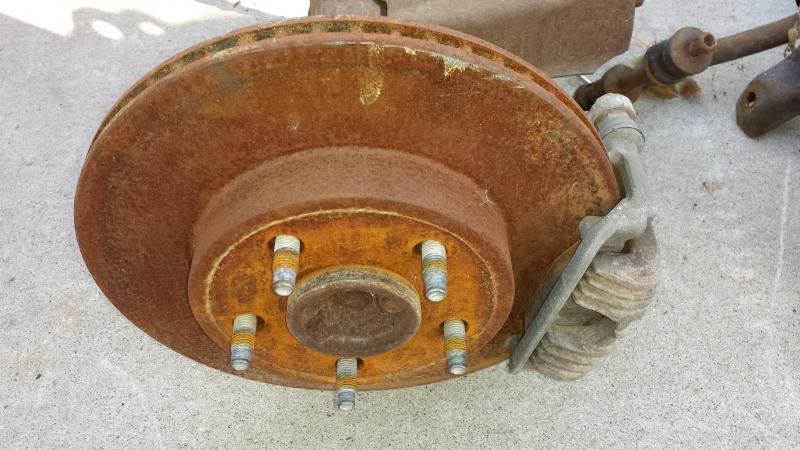
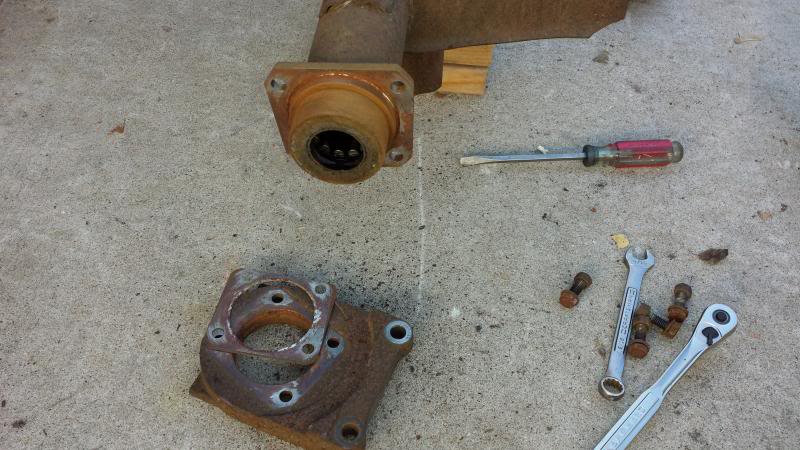
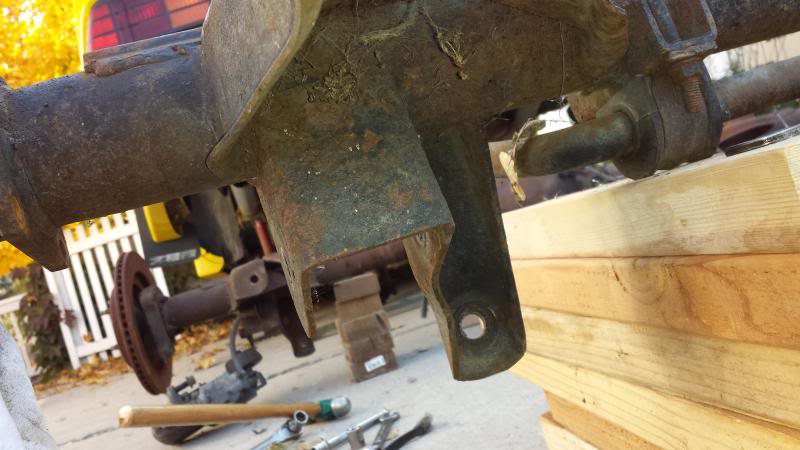
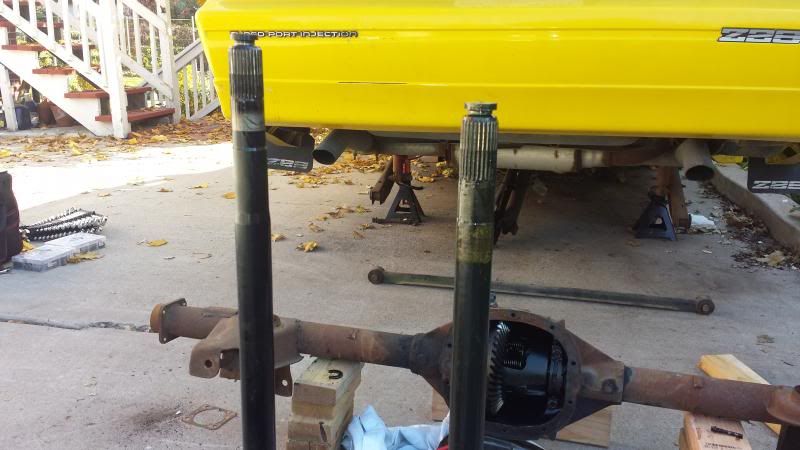
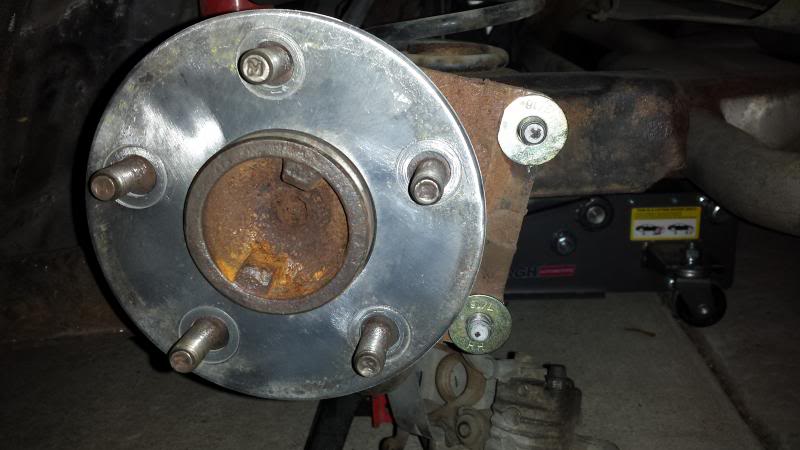
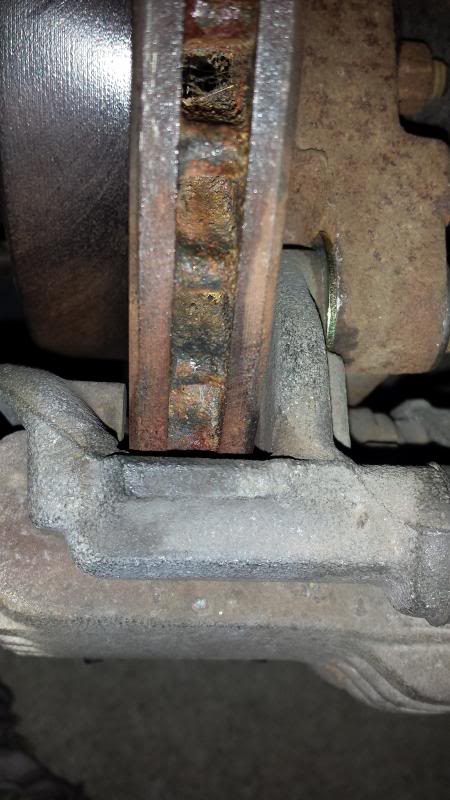
Side by side view of the axles. 4th Gen on the left, 3rd Gen on the right. I was worried about the clearance of the caliper on the coil spring perch. However, these brakes were used IIRC on the late 80's-92 axles. It fit just fine, but there is a very small space for a drain tube when purging the air from the brakes when bleeding. The PBR's also have a steel dampner thing, it sits very close to the LCA bracket. This is a problem for those that have relocator brackets, but works fine with unmodified control arms and brackets.

Remove the calipers and rotors from both axles. I did one side at a time in case I needed the other side to reference part locations.
Since the caliper backing plates/mounts had to be swapped over, it means you must remove the axle shafts. You have to pop the cover off of the diff, so get yourself some good fluid and inspect the gears while you are in there. Other threads recommended a 6 sided boxed end 5/16 wrench (NOT a 12 point), but I didn't have one. With a short extension and a 1/4 ratchet, a quick smack on the ratchet broke the bolt loose. I did note that the bolt wasn't in very good shape. The previous person to work on it rounded the edges a bit. So I used the bolt from the 4th gen axle as it was in better shape. However, I am glad that I didn't just toss the 4th gen axle in and hit the road. The center pin bolt was barely hand tight in the donor axle. I would hate to have the rear end come apart at highway speed.
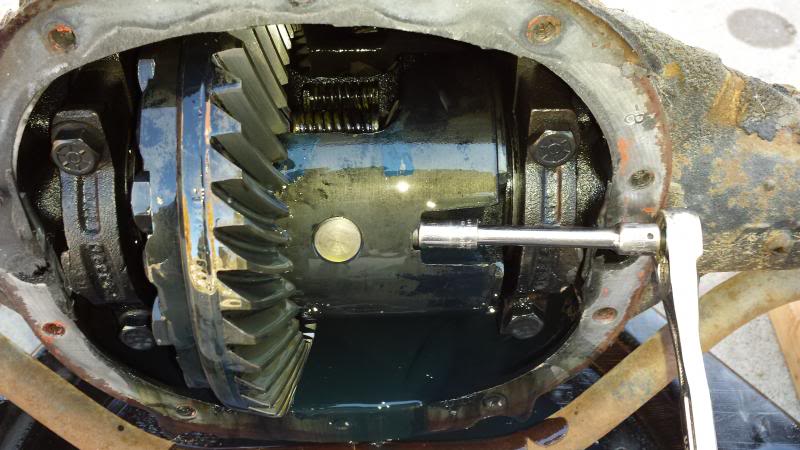
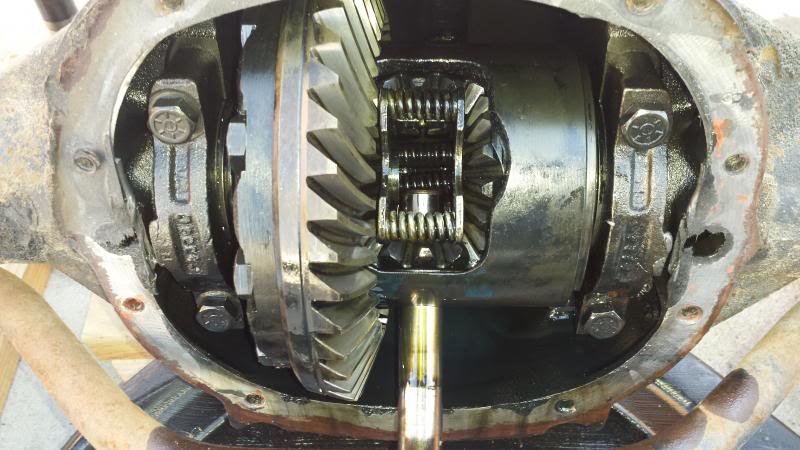
After the bolt is out, I rotated the pinion to see the opposite side of the center pin. With a bit of pressure using my thumb, the center pin easily started pushing out. I rotated the pinion back and pulled the center pin down and out of the way. This allows you to push the axle shaft inward, and remove the c-clip. I used a mechanics magnet on a stick, and a small screw driver to rotate the c-clip up and then pull it out. The axle shafts then pull outward and giving you access to the backing plates. Here is the center pin pushed out of the way to remove the C-clips:
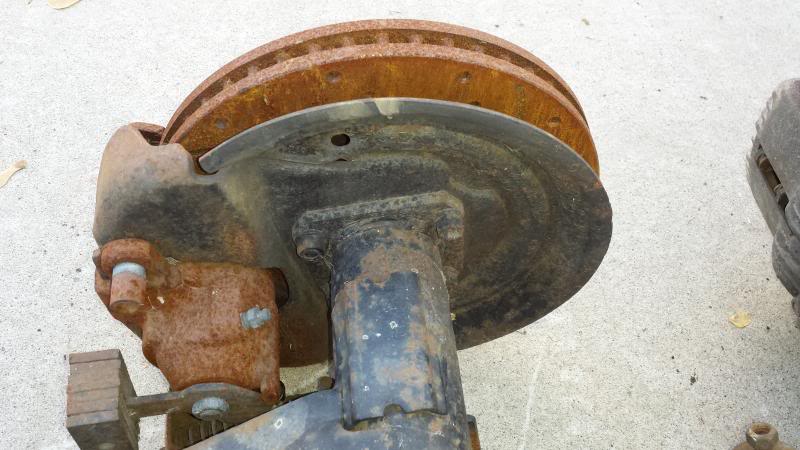
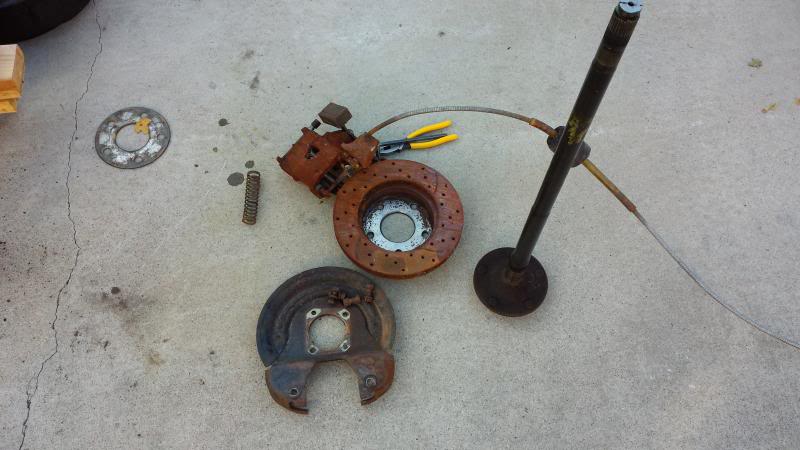
Here is a shot of the old 3rd Gen axle shaft, huge backing plate, and caliper:
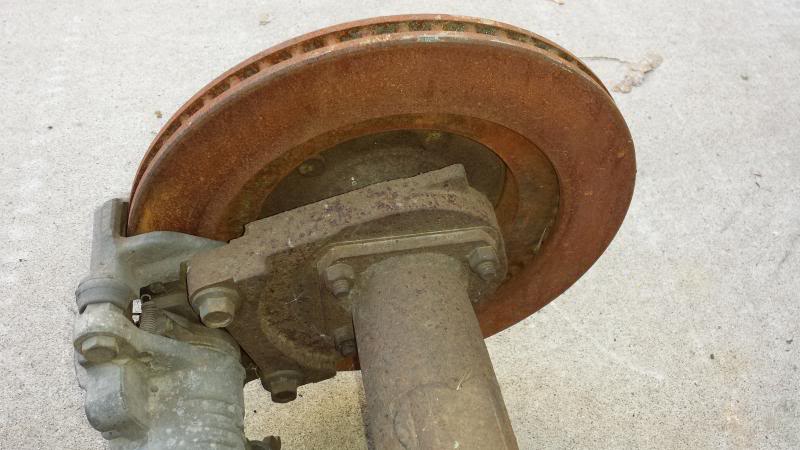
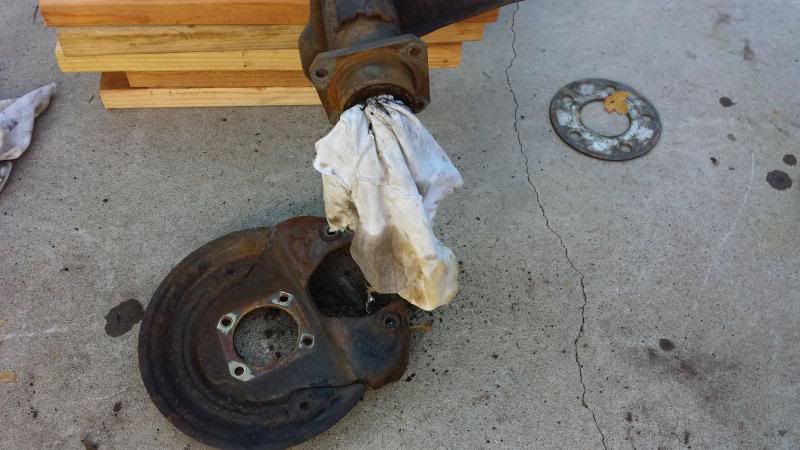
3rd gen with axle shaft and caliper backing plate removed. I must have tipped the axle hard driver when I moved it. There was some extra fluid in that axle shaft that spilled out, so I stuffed a rag into it. I did not change the bearings and seals at this point. If I need to though, it is easy enough so I didn't worry about it today.
4th Gen with axle shaft and caliper backing plate removed. Notice the thin spacer...this was only on the driver's side on the donor axle. It sat between the axle flange and the caliper plate. It measured about 30 thousands IIRC. I did NOT install this on the 3rd gen axle as I only had one. If I should, someone please let me know.
My camaro has been sitting for about 5 1/2 years, and it is time to get it back on the road. I actually took my wife to Prom in this IROC, she was my high school girlfriend. Good memories, and cool car.
This has likely been covered a few times, but I thought I would share my experience. I bought an axle out of a 96 TA for the PBR brakes. As it has been sitting, the fuel pump wouldn't fire anymore. Good timing...the rear axle needs to be moved out of the way to drop the tank anyways, so I did it all together. Amazingly...after sitting for many years, it fired right up and idled smoothly with a couple gallons of fresh gas. After I fired it up, and was pumped to hear it roar to life, it was time to decide what I wanted to do with the axle.
I decided that I didn't want the super wide stance, and I didn't want to switch wheels. I really like the look of the factory IROC wheels. I did some searching, and found threads here and there. But I didn't find one that spoke specifically about swapping the 96 PBRs onto the 87 axle (I have an 85, but the axle was replaced a few years back when I grenaded the original axle). There are likely threads about this...but again I just thought I would give it a whirl.
Outer View of 3rd Gen Delco Moraine steel calipers and rotor. It is too bad these cross drilled/slotted rotors won't be used, the only have about 2-3k miles on them. I went through a couple of sets of Delco Moraine calipers before I parked the Camaro, and never could get them working right even with all the adjustments.

Outer View of 4th Gen PBR caliper and rotor:

Inboard view of 3rd gen Delco Moraine calipers and rotor. Notice the backing plate/caliper mount. It covers the entire rotor:

Inboard view of the 4th Gen PBR caliper and rotor. Notice that the backing plate is much smaller...only to space the caliper out, it doesn't act like a dust shield like on the Delco brakes:

Side by side view of the axles. 4th Gen on the left, 3rd Gen on the right. I was worried about the clearance of the caliper on the coil spring perch. However, these brakes were used IIRC on the late 80's-92 axles. It fit just fine, but there is a very small space for a drain tube when purging the air from the brakes when bleeding. The PBR's also have a steel dampner thing, it sits very close to the LCA bracket. This is a problem for those that have relocator brackets, but works fine with unmodified control arms and brackets.

Remove the calipers and rotors from both axles. I did one side at a time in case I needed the other side to reference part locations.
Since the caliper backing plates/mounts had to be swapped over, it means you must remove the axle shafts. You have to pop the cover off of the diff, so get yourself some good fluid and inspect the gears while you are in there. Other threads recommended a 6 sided boxed end 5/16 wrench (NOT a 12 point), but I didn't have one. With a short extension and a 1/4 ratchet, a quick smack on the ratchet broke the bolt loose. I did note that the bolt wasn't in very good shape. The previous person to work on it rounded the edges a bit. So I used the bolt from the 4th gen axle as it was in better shape. However, I am glad that I didn't just toss the 4th gen axle in and hit the road. The center pin bolt was barely hand tight in the donor axle. I would hate to have the rear end come apart at highway speed.

After the bolt is out, I rotated the pinion to see the opposite side of the center pin. With a bit of pressure using my thumb, the center pin easily started pushing out. I rotated the pinion back and pulled the center pin down and out of the way. This allows you to push the axle shaft inward, and remove the c-clip. I used a mechanics magnet on a stick, and a small screw driver to rotate the c-clip up and then pull it out. The axle shafts then pull outward and giving you access to the backing plates. Here is the center pin pushed out of the way to remove the C-clips:

Here is a shot of the old 3rd Gen axle shaft, huge backing plate, and caliper:

3rd gen with axle shaft and caliper backing plate removed. I must have tipped the axle hard driver when I moved it. There was some extra fluid in that axle shaft that spilled out, so I stuffed a rag into it. I did not change the bearings and seals at this point. If I need to though, it is easy enough so I didn't worry about it today.

4th Gen with axle shaft and caliper backing plate removed. Notice the thin spacer...this was only on the driver's side on the donor axle. It sat between the axle flange and the caliper plate. It measured about 30 thousands IIRC. I did NOT install this on the 3rd gen axle as I only had one. If I should, someone please let me know.

Last edited by 85IrocZ-28; Nov 2, 2013 at 01:44 AM.
Thread Starter
Member
Joined: Apr 2006
Posts: 114
Likes: 0
From: Utah
Car: 1985 Iroc Z-28
Engine: 305 TPI
Transmission: 700R4
Re: My LT1 pbr brake swap onto Third Gen axle
Please excuse my lack of knowledge with the correct terminology, I will attempt to explain the pics and what I was doing...
It was time to closely inspect and see if this would work.
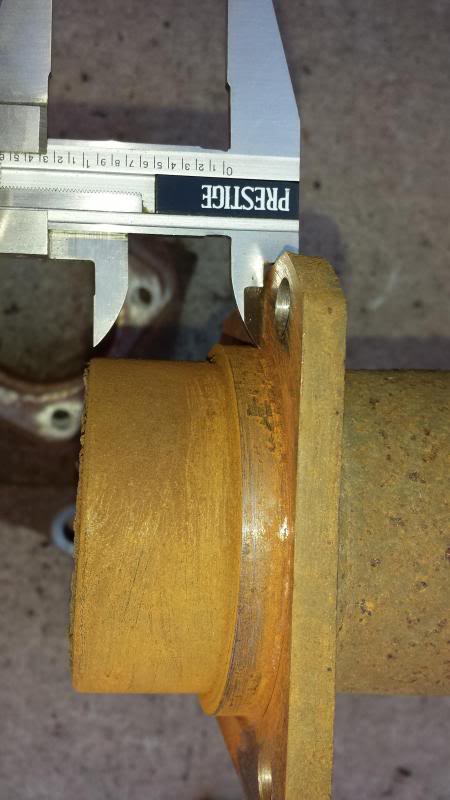
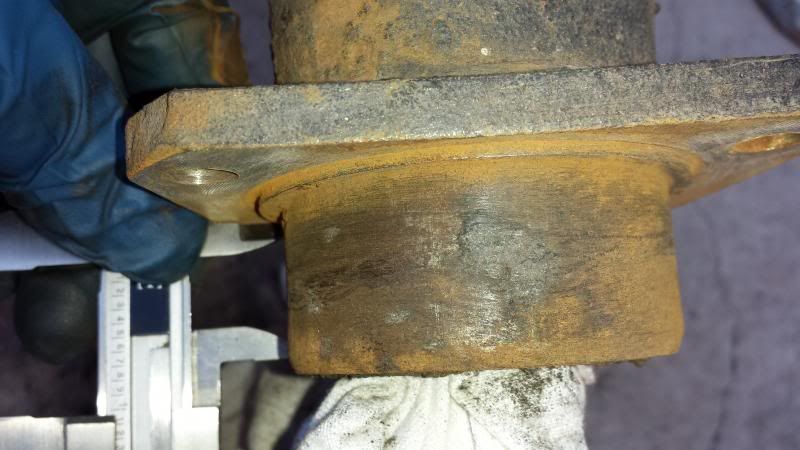
Measuring the distance (estimating) from the backing plate to the end of the housing on the 3rd Gen. Note the small hat (larger diameter section of the housing that protrudes from the backing plate and centers the dust shield/caliper mount):

Measuring the distance (estimating) from the backing plate to the end of the housing on the 4th Gen. Not the same, but the rotor hats are also different. The biggest difference is that the hat on the 4 gen axle is much bigger...like 1/4 inch instead of 1/16 of an inch. However, the bolt pattern on the axle housings is the same, and when tightened onto the 3rd gen housing, the 4th gen caliper bracket centered just fine:
Estimating the deepness of the rotor hat as it rests on the axle shaft end plate (3rd gen rotor). It is deeper than the 4th gen rotor.
Estimating the deepness of the rotor hat as it rests on the axle shaft end plate (4th gen rotor):
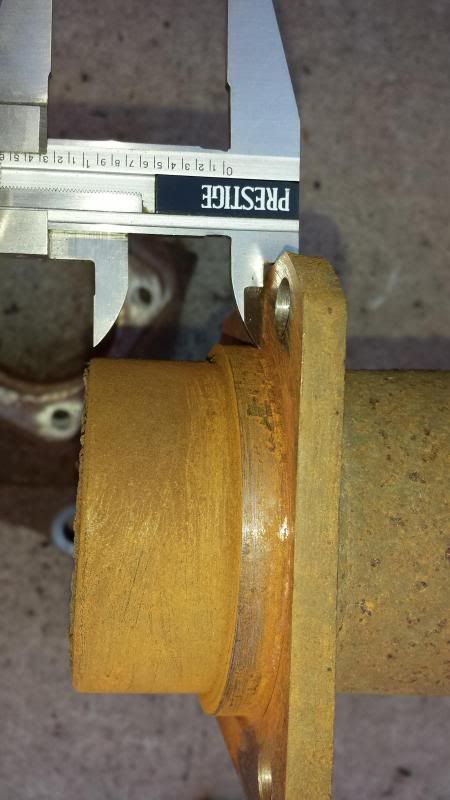
To help center the caliper over the rotor, I used the wheel spacer that came on the IROC drum brakes as a spacer between the axle shaft end plate and the rotor. In this pic, I was testing to see if it would fit inside of the rotor had. It did. I tried assembly without the spacer in between, and it would not work. The caliper would impact the inside surface of the rotor. With the spacer inside the rotor hat and with the 4th gen brakes installed on the 3rd gen axle, everything fits, but just barely. The caliper structure sits very close to the outer rotor surface, and the caliper is not perfectly centered. That is why I mentioned above that I would prefer a spacer that is not quite as thick. But There was still plenty of room to install the calipers with brake pads that are ~80%.
Note that before final install, I used a wire wheel to clean up the inside of the rotor had, the wheel spacer, and the axle shaft end plate so as to have flat mating surfaces for each piece.

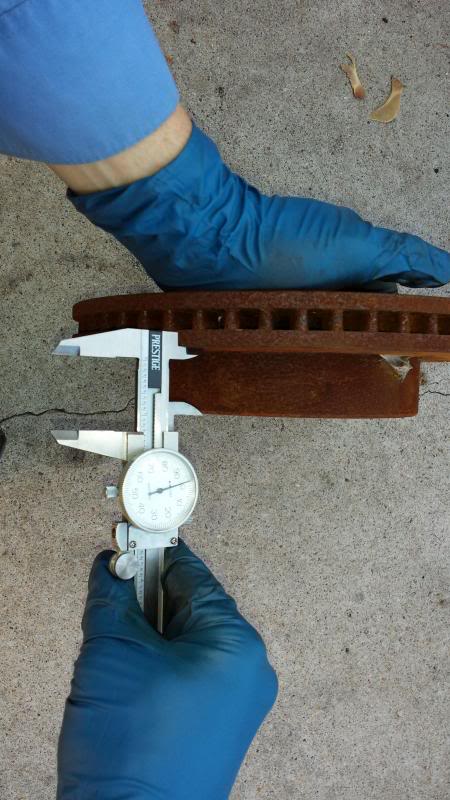
Measuring the spacer that came on the drum brake axle in 85 from the factory. I would actually like to find spacers that are about 1/2 this thick, I think it would allow for a better centering of the caliper over the rotor.

Comparison of axle shaft's between the 3rd and 4th Gen. The 4th gen shafts are longer obviously, but I was surprised to see that they were much thicker than the 3rd gen axles that had several layers of tapering down before the splines engage in the carrier.

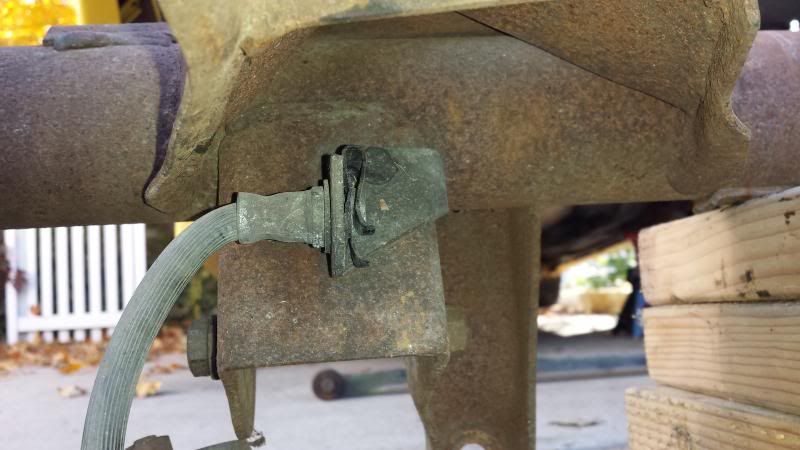
The third gen had a steel hard line all the way from the junction block T on the diff housing to the drivers rear caliper, and only a soft line on the passenger side. I always thought this was wierd. If you look at the 4th gen housing in the back ground, you will see a drivers side mount for the junction between the soft and hard line. Since I would be using the 4 gen PBR's, I wanted to use the section of soft line:
I just drilled a hole to match the 4th gen as is shown in this pic, and moved the mount over to the third gen Axle when I installed the calipers and rotors.

I don't have a pic of the caliper sitting slightly off center above the rotor, but I can say that it was pretty much the same on the 4th gen axle as well. Next time I have the wheels off, I will snap a pic of the rotors. The wire wheel cleaned them up, and they look great. I don't imagine they have more than 5K on them, they are in great shape. I will be upgrading the front brakes next spring, along with a new booster and proportioning valve. I believe that this car has needed a new vac booster since I bought it in 97. The brakes have never been that great, but they did work better before the throttle would drop to idle. I look forward to having much better braking on the IROC.
It was time to closely inspect and see if this would work.
Measuring the distance (estimating) from the backing plate to the end of the housing on the 3rd Gen. Note the small hat (larger diameter section of the housing that protrudes from the backing plate and centers the dust shield/caliper mount):

Measuring the distance (estimating) from the backing plate to the end of the housing on the 4th Gen. Not the same, but the rotor hats are also different. The biggest difference is that the hat on the 4 gen axle is much bigger...like 1/4 inch instead of 1/16 of an inch. However, the bolt pattern on the axle housings is the same, and when tightened onto the 3rd gen housing, the 4th gen caliper bracket centered just fine:

Estimating the deepness of the rotor hat as it rests on the axle shaft end plate (3rd gen rotor). It is deeper than the 4th gen rotor.

Estimating the deepness of the rotor hat as it rests on the axle shaft end plate (4th gen rotor):

To help center the caliper over the rotor, I used the wheel spacer that came on the IROC drum brakes as a spacer between the axle shaft end plate and the rotor. In this pic, I was testing to see if it would fit inside of the rotor had. It did. I tried assembly without the spacer in between, and it would not work. The caliper would impact the inside surface of the rotor. With the spacer inside the rotor hat and with the 4th gen brakes installed on the 3rd gen axle, everything fits, but just barely. The caliper structure sits very close to the outer rotor surface, and the caliper is not perfectly centered. That is why I mentioned above that I would prefer a spacer that is not quite as thick. But There was still plenty of room to install the calipers with brake pads that are ~80%.
Note that before final install, I used a wire wheel to clean up the inside of the rotor had, the wheel spacer, and the axle shaft end plate so as to have flat mating surfaces for each piece.

Measuring the spacer that came on the drum brake axle in 85 from the factory. I would actually like to find spacers that are about 1/2 this thick, I think it would allow for a better centering of the caliper over the rotor.

Comparison of axle shaft's between the 3rd and 4th Gen. The 4th gen shafts are longer obviously, but I was surprised to see that they were much thicker than the 3rd gen axles that had several layers of tapering down before the splines engage in the carrier.

The third gen had a steel hard line all the way from the junction block T on the diff housing to the drivers rear caliper, and only a soft line on the passenger side. I always thought this was wierd. If you look at the 4th gen housing in the back ground, you will see a drivers side mount for the junction between the soft and hard line. Since I would be using the 4 gen PBR's, I wanted to use the section of soft line:

I just drilled a hole to match the 4th gen as is shown in this pic, and moved the mount over to the third gen Axle when I installed the calipers and rotors.

I don't have a pic of the caliper sitting slightly off center above the rotor, but I can say that it was pretty much the same on the 4th gen axle as well. Next time I have the wheels off, I will snap a pic of the rotors. The wire wheel cleaned them up, and they look great. I don't imagine they have more than 5K on them, they are in great shape. I will be upgrading the front brakes next spring, along with a new booster and proportioning valve. I believe that this car has needed a new vac booster since I bought it in 97. The brakes have never been that great, but they did work better before the throttle would drop to idle. I look forward to having much better braking on the IROC.
Last edited by 85IrocZ-28; Nov 2, 2013 at 01:43 AM.
Supreme Member
Joined: Dec 2000
Posts: 1,271
Likes: 1
From: stallings,n.c.
Car: 1989 camaro rs convertable
Engine: 305 tbi
Transmission: 700r4
Axle/Gears: 7.5"3.42 gears forth gen 2000 camar
Re: My LT1 pbr brake swap onto Third Gen axle
Please excuse my lack of knowledge with the correct terminology, I will attempt to explain the pics and what I was doing...
It was time to closely inspect and see if this would work.
Measuring the distance (estimating) from the backing plate to the end of the housing on the 3rd Gen. Note the small hat (larger diameter section of the housing that protrudes from the backing plate and centers the dust shield/caliper mount):
Measuring the distance (estimating) from the backing plate to the end of the housing on the 4th Gen. Not the same, but the rotor hats are also different. The biggest difference is that the hat on the 4 gen axle is much bigger...like 1/4 inch instead of 1/16 of an inch. However, the bolt pattern on the axle housings is the same, and when tightened onto the 3rd gen housing, the 4th gen caliper bracket centered just fine:
Estimating the deepness of the rotor hat as it rests on the axle shaft end plate (3rd gen rotor). It is deeper than the 4th gen rotor.

Estimating the deepness of the rotor hat as it rests on the axle shaft end plate (4th gen rotor):

To help center the caliper over the rotor, I used the wheel spacer that came on the IROC drum brakes as a spacer between the axle shaft end plate and the rotor. In this pic, I was testing to see if it would fit inside of the rotor had. It did. I tried assembly without the spacer in between, and it would not work. The caliper would impact the inside surface of the rotor. With the spacer inside the rotor hat and with the 4th gen brakes installed on the 3rd gen axle, everything fits, but just barely. The caliper structure sits very close to the outer rotor surface, and the caliper is not perfectly centered. That is why I mentioned above that I would prefer a spacer that is not quite as thick. But There was still plenty of room to install the calipers with brake pads that are ~80%.
Note that before final install, I used a wire wheel to clean up the inside of the rotor had, the wheel spacer, and the axle shaft end plate so as to have flat mating surfaces for each piece.

Measuring the spacer that came on the drum brake axle in 85 from the factory. I would actually like to find spacers that are about 1/2 this thick, I think it would allow for a better centering of the caliper over the rotor.
Comparison of axle shaft's between the 3rd and 4th Gen. The 4th gen shafts are longer obviously, but I was surprised to see that they were much thicker than the 3rd gen axles that had several layers of tapering down before the splines engage in the carrier.
The third gen had a steel hard line all the way from the junction block T on the diff housing to the drivers rear caliper, and only a soft line on the passenger side. I always thought this was wierd. If you look at the 4th gen housing in the back ground, you will see a drivers side mount for the junction between the soft and hard line. Since I would be using the 4 gen PBR's, I wanted to use the section of soft line:

I just drilled a hole to match the 4th gen as is shown in this pic, and moved the mount over to the third gen Axle when I installed the calipers and rotors.
I don't have a pic of the caliper sitting slightly off center above the rotor, but I can say that it was pretty much the same on the 4th gen axle as well. Next time I have the wheels off, I will snap a pic of the rotors. The wire wheel cleaned them up, and they look great. I don't imagine they have more than 5K on them, they are in great shape. I will be upgrading the front brakes next spring, along with a new booster and proportioning valve. I believe that this car has needed a new vac booster since I bought it in 97. The brakes have never been that great, but they did work better before the throttle would drop to idle. I look forward to having much better braking on the IROC.
It was time to closely inspect and see if this would work.
Measuring the distance (estimating) from the backing plate to the end of the housing on the 3rd Gen. Note the small hat (larger diameter section of the housing that protrudes from the backing plate and centers the dust shield/caliper mount):
Measuring the distance (estimating) from the backing plate to the end of the housing on the 4th Gen. Not the same, but the rotor hats are also different. The biggest difference is that the hat on the 4 gen axle is much bigger...like 1/4 inch instead of 1/16 of an inch. However, the bolt pattern on the axle housings is the same, and when tightened onto the 3rd gen housing, the 4th gen caliper bracket centered just fine:
Estimating the deepness of the rotor hat as it rests on the axle shaft end plate (3rd gen rotor). It is deeper than the 4th gen rotor.
Estimating the deepness of the rotor hat as it rests on the axle shaft end plate (4th gen rotor):
To help center the caliper over the rotor, I used the wheel spacer that came on the IROC drum brakes as a spacer between the axle shaft end plate and the rotor. In this pic, I was testing to see if it would fit inside of the rotor had. It did. I tried assembly without the spacer in between, and it would not work. The caliper would impact the inside surface of the rotor. With the spacer inside the rotor hat and with the 4th gen brakes installed on the 3rd gen axle, everything fits, but just barely. The caliper structure sits very close to the outer rotor surface, and the caliper is not perfectly centered. That is why I mentioned above that I would prefer a spacer that is not quite as thick. But There was still plenty of room to install the calipers with brake pads that are ~80%.
Note that before final install, I used a wire wheel to clean up the inside of the rotor had, the wheel spacer, and the axle shaft end plate so as to have flat mating surfaces for each piece.
Measuring the spacer that came on the drum brake axle in 85 from the factory. I would actually like to find spacers that are about 1/2 this thick, I think it would allow for a better centering of the caliper over the rotor.
Comparison of axle shaft's between the 3rd and 4th Gen. The 4th gen shafts are longer obviously, but I was surprised to see that they were much thicker than the 3rd gen axles that had several layers of tapering down before the splines engage in the carrier.
The third gen had a steel hard line all the way from the junction block T on the diff housing to the drivers rear caliper, and only a soft line on the passenger side. I always thought this was wierd. If you look at the 4th gen housing in the back ground, you will see a drivers side mount for the junction between the soft and hard line. Since I would be using the 4 gen PBR's, I wanted to use the section of soft line:
I just drilled a hole to match the 4th gen as is shown in this pic, and moved the mount over to the third gen Axle when I installed the calipers and rotors.
I don't have a pic of the caliper sitting slightly off center above the rotor, but I can say that it was pretty much the same on the 4th gen axle as well. Next time I have the wheels off, I will snap a pic of the rotors. The wire wheel cleaned them up, and they look great. I don't imagine they have more than 5K on them, they are in great shape. I will be upgrading the front brakes next spring, along with a new booster and proportioning valve. I believe that this car has needed a new vac booster since I bought it in 97. The brakes have never been that great, but they did work better before the throttle would drop to idle. I look forward to having much better braking on the IROC.
Thread Starter
Member
Joined: Apr 2006
Posts: 114
Likes: 0
From: Utah
Car: 1985 Iroc Z-28
Engine: 305 TPI
Transmission: 700R4
Re: My LT1 pbr brake swap onto Third Gen axle
They bolted on. However, during my test drive down the block today, I found that I need to make some adjustments. The spacer is about 150 thousands of an inch, but I need something a bit thinner. I am hoping to find some spacers that are between 1/2 to 3/4 as thick. There is a little bit of movement in the axle shafts (in and out) at the c-clips, so the caliper touched the rotor and made a squealing sound when I turned left. I suppose that I could also used some hardened material to space the caliper out, and remove the spacer under the rotor. After I find a solution that works best, I will report back.
Thread Starter
Member
Joined: Apr 2006
Posts: 114
Likes: 0
From: Utah
Car: 1985 Iroc Z-28
Engine: 305 TPI
Transmission: 700R4
Re: My LT1 pbr brake swap onto Third Gen axle
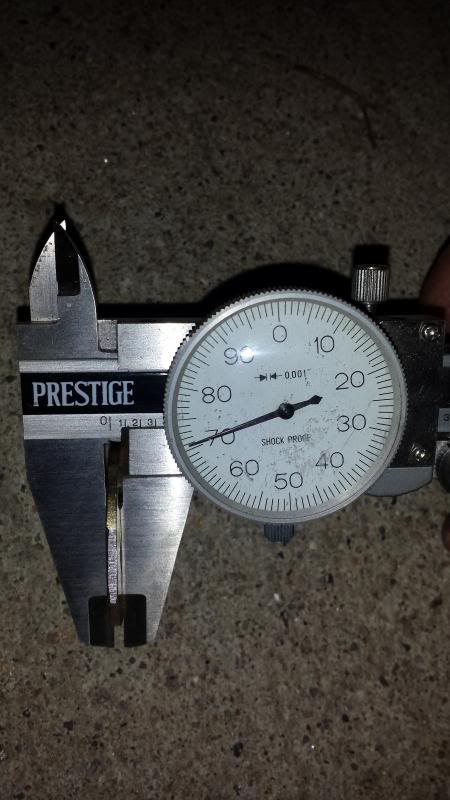
I decided last night to take a wheel and rotor off to measure the hub and inner rotor hat diameter to see if some spacers I found on E-bay would work. With the factory IROC wheel spacer between the rotor and the face of the axle shaft, the inner edge of the outer caliper frame section impacts the wheel very slightly when the axle shaft moves outward (C-clips allow minor movement of the axle shaft). With the factory spacer removed from the inside of the rotor hat, and the rotor installed as intended, the inner side of the rotor impacts the caliper frame enough that the rotor will not spin at all.
The factory wheel spacer is 150/1000's of an inch. Ideally, we would want a 75/1000's of a factory spacer to be placed in the rotor hat between the rotor and axle shaft face. The thinnest I could find were 1/8 inch (125/1000's of an inch) and 3mm (118/1000's of an inch). I never did finish the measurements to see if the 3mm universal spacers would work because of something else I noticed.
When I removed the caliper, I could see that it did not rest flat against the backing plate. In fact, it only rested against the backing plate in the two rounded areas exactly where it bolts on.
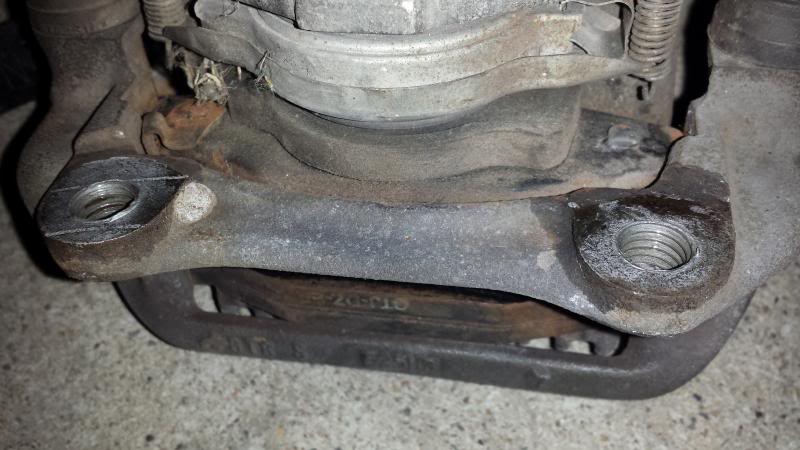
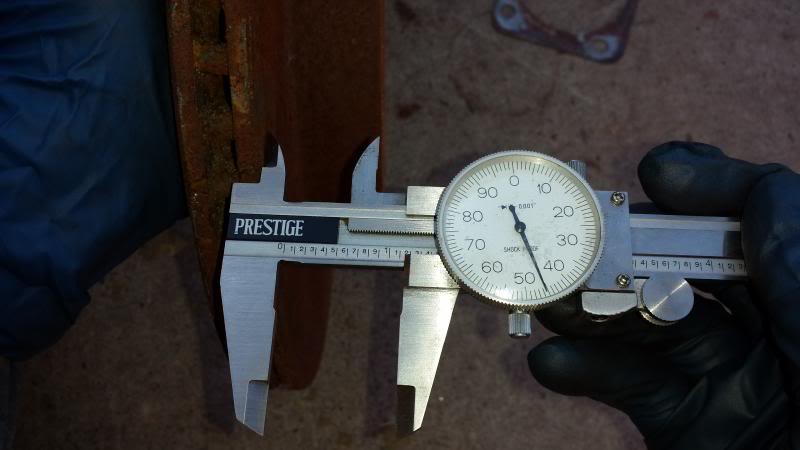
So I started thinking about using grade 8 washers. I had some 3/8 washers at my house, but the bolt would not fit through them. Rather than drill them out, I ran up to my local ace hardware and purchased some 7/16 grade 8 washers. I took my dial caliper with me to measure them...70/1000's of an inch. Perfect! Nearly half the thickness of the factory wheel spacer, and they would set my caliper centered over the rotor.
As I thought may happen, the washer inner diameter worked with the bolts, but the outer diameter was too large to rest flat against the backing plate. A few minutes on my bench grinder made the quick mod that was needed to make them fit. I just ground one edge down a bit.
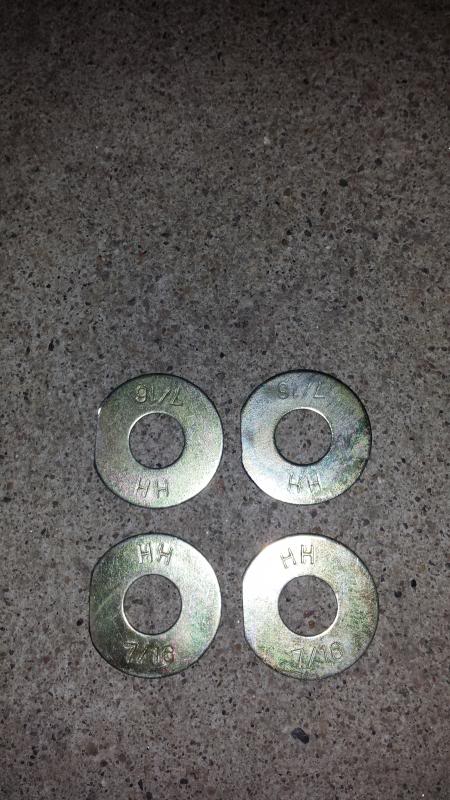
This pic shows the washers on the backing plate in place, they will go between the caliper and the backing plate. The Factory wheel spacer moves the rotor out 150/1000's and these washers move the caliper outward 70/1000's. You can see the factory wheel spacer in place on the face of the axle shaft.
Final pic of the night: You can see that the caliper now rests centered above the rotor by using the factory wheel spacers between the rotor and the axle shaft, and $1.88 in grade 8 washers between the caliper and the backing plate. You can also see the top washer in place. It was a bit tricky to get on, I just had to make sure they rotated to the proper orientation as I tightened the caliper on.
If anyone has any feedback for me, or questions about this process let me know. Also, if anyone has any concerns about the methods used, please let me know. I have retained my factory axle width and tire spacing. The spacer sits inside instead of outside of the rotor, so wheel location is the same.
Many likely know this, but I could't find it when I searched and I thought I would add my experience.
Conclusion: You can install LT1 PBRs from a 96 trans am axle on a Factory 3rd gen axle that came with the Delco Moraine calipers.
The factory wheel spacer is 150/1000's of an inch. Ideally, we would want a 75/1000's of a factory spacer to be placed in the rotor hat between the rotor and axle shaft face. The thinnest I could find were 1/8 inch (125/1000's of an inch) and 3mm (118/1000's of an inch). I never did finish the measurements to see if the 3mm universal spacers would work because of something else I noticed.
When I removed the caliper, I could see that it did not rest flat against the backing plate. In fact, it only rested against the backing plate in the two rounded areas exactly where it bolts on.

So I started thinking about using grade 8 washers. I had some 3/8 washers at my house, but the bolt would not fit through them. Rather than drill them out, I ran up to my local ace hardware and purchased some 7/16 grade 8 washers. I took my dial caliper with me to measure them...70/1000's of an inch. Perfect! Nearly half the thickness of the factory wheel spacer, and they would set my caliper centered over the rotor.

As I thought may happen, the washer inner diameter worked with the bolts, but the outer diameter was too large to rest flat against the backing plate. A few minutes on my bench grinder made the quick mod that was needed to make them fit. I just ground one edge down a bit.

This pic shows the washers on the backing plate in place, they will go between the caliper and the backing plate. The Factory wheel spacer moves the rotor out 150/1000's and these washers move the caliper outward 70/1000's. You can see the factory wheel spacer in place on the face of the axle shaft.

Final pic of the night: You can see that the caliper now rests centered above the rotor by using the factory wheel spacers between the rotor and the axle shaft, and $1.88 in grade 8 washers between the caliper and the backing plate. You can also see the top washer in place. It was a bit tricky to get on, I just had to make sure they rotated to the proper orientation as I tightened the caliper on.

If anyone has any feedback for me, or questions about this process let me know. Also, if anyone has any concerns about the methods used, please let me know. I have retained my factory axle width and tire spacing. The spacer sits inside instead of outside of the rotor, so wheel location is the same.
Many likely know this, but I could't find it when I searched and I thought I would add my experience.
Conclusion: You can install LT1 PBRs from a 96 trans am axle on a Factory 3rd gen axle that came with the Delco Moraine calipers.
Last edited by 85IrocZ-28; Nov 13, 2013 at 01:42 PM.


Joined: Aug 1999
Posts: 5,276
Likes: 469
From: RI
Car: 1984 Camaro Berlinetta
Engine: LT1
Transmission: T56 6-speed
Axle/Gears: 4.11 LS1 Rear End
Re: My LT1 pbr brake swap onto Third Gen axle
I'd put a few hundered miles on it and then raise the rear, inspect the wear patterns and check all bolts for tourqe. Might also be a good idea to use some threadlock on the hardware too - just to be sure !
Great thread by the way.
I've had caliper-washer/spacers lossen up on me in the past. I found it shortly after an LS front brake upgrade so thankfully I found it before things got "ugly" !!

Great thread by the way.
I've had caliper-washer/spacers lossen up on me in the past. I found it shortly after an LS front brake upgrade so thankfully I found it before things got "ugly" !!
Thread Starter
Member
Joined: Apr 2006
Posts: 114
Likes: 0
From: Utah
Car: 1985 Iroc Z-28
Engine: 305 TPI
Transmission: 700R4
Re: My LT1 pbr brake swap onto Third Gen axle
Awesome feedback, I like the threadlock idea. Your experience is what I was looking for, I want to make sure this is done right. Thanks!
LS front brakes are next on my list. It was my DD in high school, then 10 more years after HS. But now that I drive a sedan with nice brakes, my goal is to give the IROC much better stopping power before I do any engine upgrades.
LS front brakes are next on my list. It was my DD in high school, then 10 more years after HS. But now that I drive a sedan with nice brakes, my goal is to give the IROC much better stopping power before I do any engine upgrades.
Trending Topics


Joined: Aug 1999
Posts: 19,282
Likes: 103
From: Lawrence, KS
Car: Met. Silver 85 IROC/Sold
Engine: 350 HO Deluxe (350ci/330hp)
Transmission: T-5 (Non-WC)
Axle/Gears: Limited Slip 3.23's
Re: My LT1 pbr brake swap onto Third Gen axle
Nice write up. You can see OE type spacers in post #2 of the following link:
https://www.thirdgen.org/forums/faq-...iscs-89-a.html
JamesC
https://www.thirdgen.org/forums/faq-...iscs-89-a.html
JamesC
Thread Starter
Member
Joined: Apr 2006
Posts: 114
Likes: 0
From: Utah
Car: 1985 Iroc Z-28
Engine: 305 TPI
Transmission: 700R4
JamesC, I have read posts of yours for years. You seem to be a resident brake expert, thanks for the reply. My fourth Gen donor axle had one shim on the drivers side. It measured around 25 or 30 thousandths iirc. As there wasnt one on the pass side, I didn't reinstall it. If I had, I likely wouldn't have needed the washers. The passenger side (once everything was on the third gen axle) want hanging up at all. However, the drivers side was just a bit. When I change the rotors and pads next summer, it will be interesting to see if there is enough give in the caliper to allow the install, or if I have to pull the washers and reinstall the shim to space the caliper more inboard.
The calipers are perfectly centered over the rotor right now. With the shim, they would be much further inboard, and barely clear the inner side of the rotor. You could stack shims though...
Has anyone else spaced the rotor out using spacers between the rotor and axle face? I am curious to see what other solutions there are.
Last edited by 85IrocZ-28; Nov 22, 2013 at 12:15 AM.
Thread Starter
Member
Joined: Apr 2006
Posts: 114
Likes: 0
From: Utah
Car: 1985 Iroc Z-28
Engine: 305 TPI
Transmission: 700R4
Re: My LT1 pbr brake swap onto Third Gen axle
It appears that my rears are doing well. I have little stopping power though, my booster is bad. It really felt weak when I was driving it in years past. But after sitting for 5 years, it is toast.
I just received a set of LS1 front calipers/brackets/cross drilled and slotted rotors off of ebay for $103. The rotors have surface rust, but look very new. That cost alone covers the cost of brackets and caliper cores, I felt like it was a good deal. I also had some brackets burned (buddy did it for free).
I will modify my spindles and work on installing the front brakes when it warms up again in the spring. I plan on swapping to the LS1 master cylinder and booster to complete my brake system. The LT1 and LS1 calipers have the same rear caliper bore size, so the LS1 master should work perfect. I may install the wilwood adjustable prop valve as well, we shall see.
Last edited by 85IrocZ-28; Dec 4, 2013 at 10:43 AM.

Supreme Member
iTrader: (3)
Joined: Feb 2003
Posts: 2,470
Likes: 6
From: Waterford, MI
Car: 1998 Camaro Z28
Engine: 6.0L
Transmission: 4L60E
Axle/Gears: 3.73
Re: My LT1 pbr brake swap onto Third Gen axle
Maybe I missed it, but what size are your wheels? 15" or 16"? I'm curious if these will fit in 15" wheels.
Thread Starter
Member
Joined: Apr 2006
Posts: 114
Likes: 0
From: Utah
Car: 1985 Iroc Z-28
Engine: 305 TPI
Transmission: 700R4
Re: My LT1 pbr brake swap onto Third Gen axle
I am running the 16 inch factory IROC wheels. They may fit 15's, not sure. Right now it is covered in 12" of snow. When it warms up a bit, I will get under it and look at the clearance to see if a 15" wheel looks like a possibility. I don't know of anyone local that has a 15 inch wheel I could borrow though to test, or I would.
Thread Starter
Member
Joined: Apr 2006
Posts: 114
Likes: 0
From: Utah
Car: 1985 Iroc Z-28
Engine: 305 TPI
Transmission: 700R4
Re: My LT1 pbr brake swap onto Third Gen axle
Well, I am now thinking about the fronts and I am finally looked at my parts a bit closer today (wire wheeled the rotors).
I purchased the front LS1 caliper brackets, calipers and rotors used on e-bay, shipped for $102. It was essentially the cost of the cores, and I am glad I didn't pay any more than that because the rotors will only be good for mock up. It is amazing what can hide below rust and dust.
I also cleaned up my old rotors with a wire wheel, and will be selling them locally if anyone wants them. Luckily we have a local media website (much more popular than craigslist in Utah) that is pretty good for buying/selling items.
I purchased the front LS1 caliper brackets, calipers and rotors used on e-bay, shipped for $102. It was essentially the cost of the cores, and I am glad I didn't pay any more than that because the rotors will only be good for mock up. It is amazing what can hide below rust and dust.

I also cleaned up my old rotors with a wire wheel, and will be selling them locally if anyone wants them. Luckily we have a local media website (much more popular than craigslist in Utah) that is pretty good for buying/selling items.

Last edited by 85IrocZ-28; Feb 16, 2014 at 12:48 AM.

Joined: Apr 2004
Posts: 3,001
Likes: 62
From: Salt Lake City, Utah
Car: 1988 camaro "SS"/ 1991 305/T5
Engine: 383 LT1 in progress/LT1TBI 355 soon
Transmission: Probuilt 700R4 3600 stall/ T5
Axle/Gears: Moser axles, 3.42 Eaton Posi
Re: My LT1 pbr brake swap onto Third Gen axle
Did you check KSL? What part of utah are you in? I'm actually wanting to do this exact swap for my 91. I'm in west jordan. There are a TON of LT/LS brakes in the local pink and pulls.
Thread Starter
Member
Joined: Apr 2006
Posts: 114
Likes: 0
From: Utah
Car: 1985 Iroc Z-28
Engine: 305 TPI
Transmission: 700R4
Re: My LT1 pbr brake swap onto Third Gen axle
Good to hear from another UT fbody driver, I am in West Bountiful. I picked up caliper rebuild kits from O'Reily, ordered new drilled/slotted rotors and Hawks hps pads from Summit. I am going to use my existing rotors for the hubs, and knuckles. I also bought new front brake hoses. I will likely start the mods soon.
The reason I went with LT rears: they have the same piston bore size as the LS with a small difference in rotor size, but less complications with the e brake cables.
I did sell the Delco/Moraine setup on KSL.
The reason I went with LT rears: they have the same piston bore size as the LS with a small difference in rotor size, but less complications with the e brake cables.
I did sell the Delco/Moraine setup on KSL.
Last edited by 85IrocZ-28; Apr 14, 2014 at 11:37 PM.

Junior Member
Joined: Jun 2020
Posts: 81
Likes: 2
Car: 1987 z28 T Tops
Re: My LT1 pbr brake swap onto Third Gen axle
Which one is the drum? They both look like they are disk? I want to convert my 1987 z28 rear drum to disk. Should it just be cheaper to buy a 3rd gen diff with disk then to buy a conversion kit? I want to keep my irocs
Thread Starter
Member
Joined: Apr 2006
Posts: 114
Likes: 0
From: Utah
Car: 1985 Iroc Z-28
Engine: 305 TPI
Transmission: 700R4
Re: My LT1 pbr brake swap onto Third Gen axle
I originally had drums. I swapped in a third gen disc brake axle, the disk brake components were a poor design and did not work well. So I picked up a fourth gen axle (wider) and pulled the brake components off of the fourth gen (great design, much better than 3rd gen and much cheaper than an aftermarket kit). You could go aftermarket, but you will spend more. By moving the 4th gen brakes to a 3rd gen axle, I was able to retain the 3rd gen width with an inexpensive brake upgrade.
Junior Member
Joined: Jun 2020
Posts: 81
Likes: 2
Car: 1987 z28 T Tops
Re: My LT1 pbr brake swap onto Third Gen axle
I originally had drums. I swapped in a third gen disc brake axle, the disk brake components were a poor design and did not work well. So I picked up a fourth gen axle (wider) and pulled the brake components off of the fourth gen (great design, much better than 3rd gen and much cheaper than an aftermarket kit). You could go aftermarket, but you will spend more. By moving the 4th gen brakes to a 3rd gen axle, I was able to retain the 3rd gen width with an inexpensive brake upgrade.
Thread Starter
Member
Joined: Apr 2006
Posts: 114
Likes: 0
From: Utah
Car: 1985 Iroc Z-28
Engine: 305 TPI
Transmission: 700R4
Re: My LT1 pbr brake swap onto Third Gen axle
You could buy all the parts, but I think I picked the axle up for $100 or so, and it was cheaper to do that than buy calipers, caliper brackets, brake pads, rotors, etc...the pads and rotors were in okay shape, although I planned on updating them at some point.
Junior Member
Joined: Jun 2020
Posts: 81
Likes: 2
Car: 1987 z28 T Tops
Re: My LT1 pbr brake swap onto Third Gen axle
thanks! I guess ill keep the drums and keep a lookout for a cheap 4th gen rear end like the one you found. I'll be patient lol

Thread
Thread Starter
Forum
Replies
Last Post
Eric-86sc
Engine/Drivetrain/Suspension Parts for Sale
3
Apr 3, 2016 03:52 PM
1992 Trans Am
Engine/Drivetrain/Suspension Parts for Sale
1
Aug 8, 2015 08:16 PM