When you click on links to various merchants on this site and make a purchase, this can result in this site earning a commission. Affiliate programs and affiliations include, but are not limited to, the eBay Partner Network.
I'm sorry to hear about the diagnosis. I wish you all the best. I've been following this build since the day you started it and I look forward to seeing you finish this project.
Thank you for the good wishes. I am committed to beat this AND finish my car and drive it. Finishing the car will be my motivation to get through the chemo. Hopefully by spring 2018 I'll be cancer free and the car will be track ready.
Thank you for the good wishes. I am committed to beat this AND finish my car and drive it. Finishing the car will be my motivation to get through the chemo. Hopefully by spring 2018 I'll be cancer free and the car will be track ready.
Wretched737, thanks for your concern. Chemo SUCKS!!!!! My chemo infusion last 3 days, every 2 weeks. I am sick as a dog for the next 7 or 8 days and feel almost human the last 2 days. Then it starts all over again. I will get through this. It is only supposed to run for 6 months. A strong motivational point for me is to have my project done around that time so I could drive it and shake it down during the Fall. I try to get out in the garage on my "good" days and get little projects out of the way. Trouble is I fatigue real easy so some days it is only and hour or so and I am beat.
Here is a couple things I did over the last few weeks.
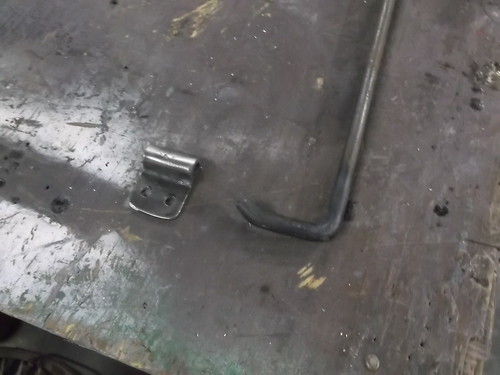
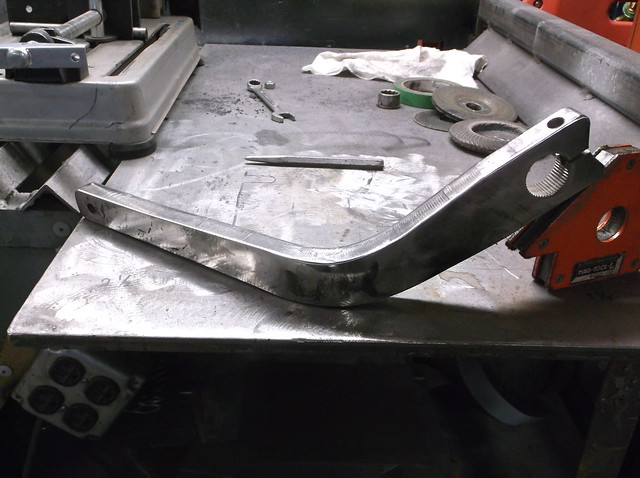
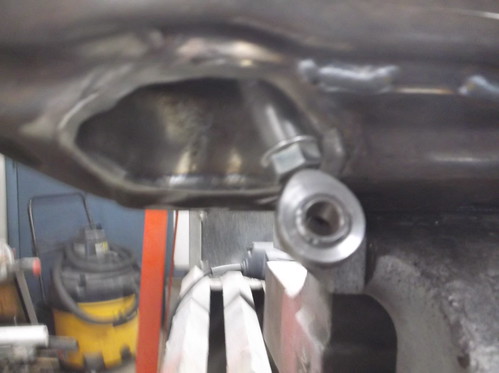
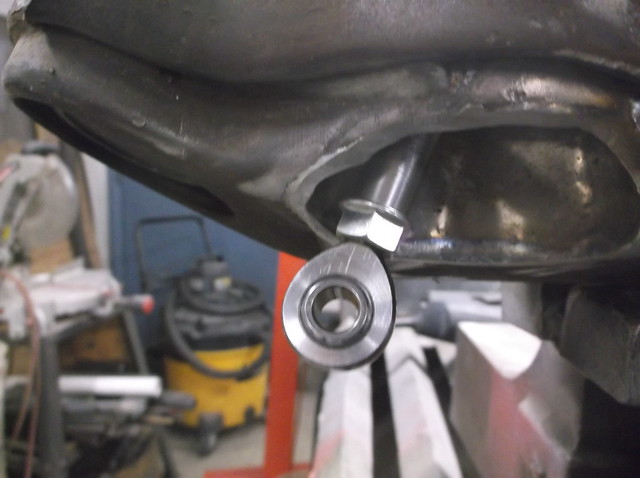
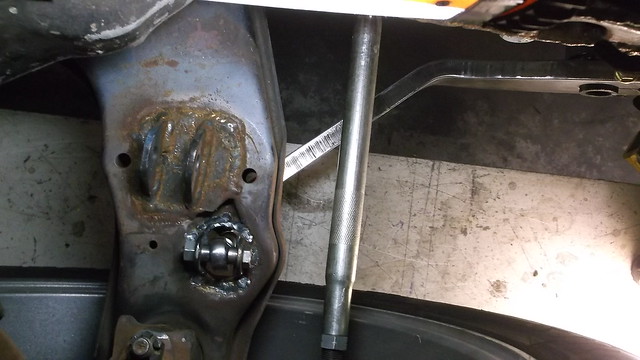
Tow loop...cut slit into front valance that lines up with bumper mount. Cut loop from 1/4" steel plate, 3" wide with 2" hole. Tow loop welds to underside of bumper.
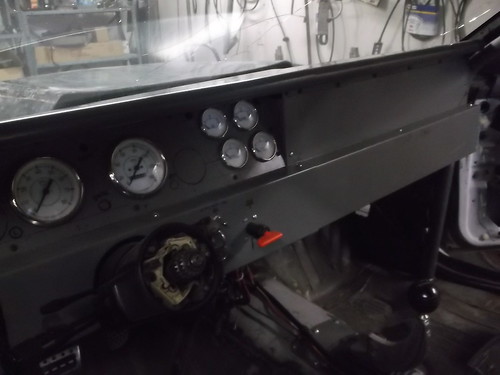
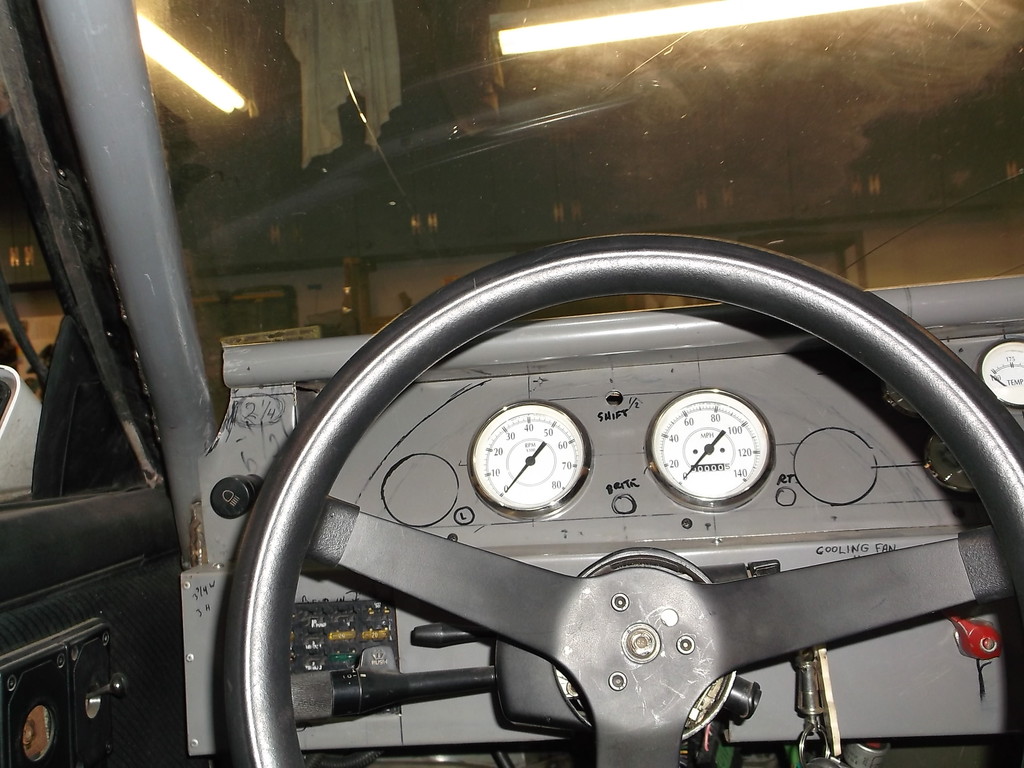
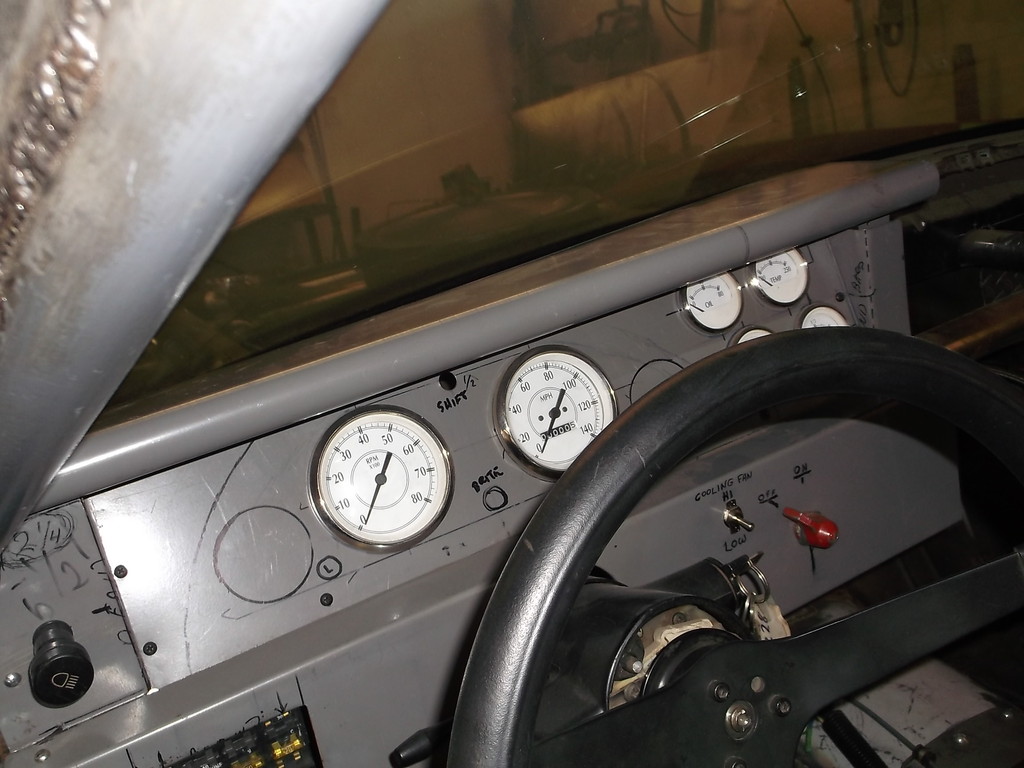
Another small project...I was concerned about the height of the custom dash I had made. The top cover panel angled straight up from the base of the windshield and sat about as high as a 3" cowl hood. It really restricted the view to the right. This would make it very hard to hit an apex at the track or autox. I thought about making a simple, flat top from sheet aluminum but didn't want a thin, sharp edge facing the driver and passenger. In one of my more lucid moments I had the idea of just bending down the last 4" of the dash top. Ha, problem solved. It lowered the top edge of dash by at least 1 1/2" and the crease it made provides extra stiffness to a long flat flimsy panel.
Here is an open invitation to anyone living near Kent, OH 44240 that would like to help me get this car road worthy by September to send me a PM. Car is in a decent garage, Lights, heat, air compressor, welder and torches. I am committed on getting it done but will probably need help.
My mom just got cleared of pancreatic cancer after a 2 year battle.
FIGHT ON!!!
MG I must have overlooked your post. Thanks for your support and congratulations to your mom on beating her cancer!
Once I healed up from the initial surgery I felt fine, good as new. Nw that I am on chemo I am sick everyday almost. The cure seems worse then the illness????
Sorry to hear how hard the chemo is. My father in law went through it and I can't say it ever got easier. Its literally killing you with hopes that it kills the cancer first. I have a friend who is a chemist and working on some of the new cancer treatments, he tells me by the time I'm an old man.... Chemo therapy will look as ancient as blood letting when it comes to treatment options.
Keep the progress coming, progress is progress no matter how small it may be. If I ever am in your neck of the woods I'll reach out with an offer to help get the car moving
wretched, t hing s are going a little better. Chemo doc has adjusted meds so not near as sick between treetments. Headache doc did a nerve block procedure that lessened the intensity of the pain so Nother plus. Just fighting the fatigue of chemo and dizzy Ness of headache meds.
For a "wretched" guy you show a lot of care and concern and I thank you.
I did get rack and pinion bolted in but it looks like I am off a tooth so wheels not straight. I'll have take back out to correct. DANG! Ordered some 2ga battery cable to wire up trunk mount battery. Found best deal was to order a set of 20ft jumper cables. I got twice the length for half the cost of cable only.
So still plugging away here and also helping friend with exhaust in 85 Camar w/200R4 and long tubes. I had to cut up his $250 BMR xmember and make a 5" hump on right side for a custom dual 2.5 to single 3.5 merge pipe to fit through. What a fiasco!!! Looks like it will all work aND stay about level with sfc's.
Hang tough David. You're in our thoughts and prayers. There are a lot of folks pulling for you and looking forward to the day you're better and can get the car completed. I've learned a ton from you so far and am looking forward to learning a ton more.
Hang tough David. You're in our thoughts and prayers. There are a lot of folks pulling for you and looking forward to the day you're better and can get the car completed. I've learned a ton from you so far and am looking forward to learning a ton more.
sleepinshed, thank you for the care and concern, thoughts and prayers. I have had many people from tgo and pro-touring.com send messages of support and it really brightens my day.
I am glad you are enjoying my build. The car is unlike any other 3rd Gen I have seen on this site. I set out to correct what I saw as GM's deficiencies and I think I have accomplished that.
it kills me that the car is so close (attached garage) but I am lucky to put in an hour or two a week on it. I hit half way mark on my chemo rounds Monday so 3 more months. Woohoo!!!! Side effects can hang around long as fter chemo is over so will have to wait and see how quick I can bounce back.
Sleepinshed sounds like you bought headers for you car and gave them to your wife for an aniversary gift. Lol
wretched, t hing s are going a little better. Chemo doc has adjusted meds so not near as sick between treetments. Headache doc did a nerve block procedure that lessened the intensity of the pain so Nother plus. Just fighting the fatigue of chemo and dizzy Ness of headache meds.
For a "wretched" guy you show a lot of care and concern and I thank you.
I did get rack and pinion bolted in but it looks like I am off a tooth so wheels not straight. I'll have take back out to correct. DANG! Ordered some 2ga battery cable to wire up trunk mount battery. Found best deal was to order a set of 20ft jumper cables. I got twice the length for half the cost of cable only.
So still plugging away here and also helping friend with exhaust in 85 Camar w/200R4 and long tubes. I had to cut up his $250 BMR xmember and make a 5" hump on right side for a custom dual 2.5 to single 3.5 merge pipe to fit through. What a fiasco!!! Looks like it will all work aND stay about level with sfc's.
thanks again for checking in
David
Glad to hear you're still chugging along. Staying busy and having a purpose can make or break you.
And I'm not a really a wretched guy its just been a handle I've been using since I was a teen and I'm in too deep now to change
I at least hope she has a nice car to drive and not some pieced together third gen. Yeah your in troubled. lol
still plugging away. Got the relocated battery all wired up. Replacing steering rack now. Next on list is making a cold air box to fit under the cowl hood. Idea is to make a sealed cold air box that will sit on the cowl and not rely on sealing to bottom of hood. Kind of a modified NASCAR air box but raised to clear dizzy and firewall.
still plugging away. Got the relocated battery all wired up. Replacing steering rack now. Next on list is making a cold air box to fit under the cowl hood. Idea is to make a sealed cold air box that will sit on the cowl and not rely on sealing to bottom of hood. Kind of a modified NASCAR air box but raised to clear dizzy and firewall.
it looks like photobucket.com is holding my pictures hostage. They want me to pat $339.00 a year to let me post pictures to a third party site. Not sure what to do.
Ive been following this build probably as long as Ive been working on my own, 454 single turbo build. I would be honored to help you, in any way possible, finish this amazing project. PLEASE email me, if you need anything machined, turned, whatever. Im 27 and have an entire machine shop to my disposal, anything you need, I will do, dont worry about cost. Its heart wrenching to see what youve been going through. I will take some vaca and fly to where you are & do whatever needs to be done to get this car going. I have HAAS VF-1, VF-4, HL-2 & Gerber/Thermwood 3, 4, and 5 axis CNC Routers (for prototype/production), manual lathes, vacuum/heat forming, etc.
PLEASE keep me in mind in the future, I will be there.
bvahnee, I really appreciate your offer but biggest need is bodywork. There are some small welding jobs to finish up and small projects like CAI and such to finish. I tried to build this using off the shelf parts and not custom machined pieces. It makes cheaper and easy to replace.
I have friends and family ready to help finish the car when I get done with chemo next month. Prognosiss is very good for full remisdion. Hopefully I can enjoy it in 2018.
Finally done with chemo. The doctor canceled the last session so now I can start living a more normal life. July was a total wash out due to cumulative effects of chemo. Side effects can take months to clear up but I have been off chemo 3 weeks now and can already see some improvement. Hopefully I can get back at it in the next week or so.
thanks to everyone who voiced their concer, wished me well, or whispered a prayer.
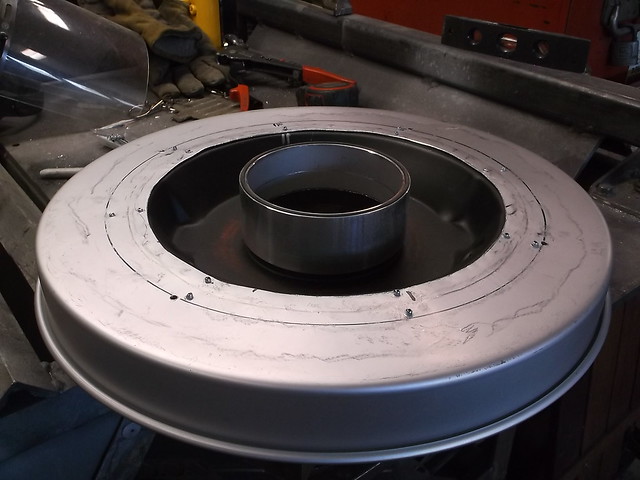
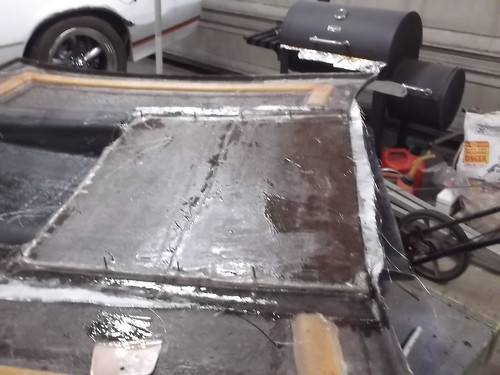
finally getting back to working on the car after, a lapse of over 2 months. The last major project for the car is tocut down the 6"cowl hood and make some kind of cold air intake. After looking at lots of post I decided to use the 18" cake pan method of building an air pan to seal to the bottom of my hood.
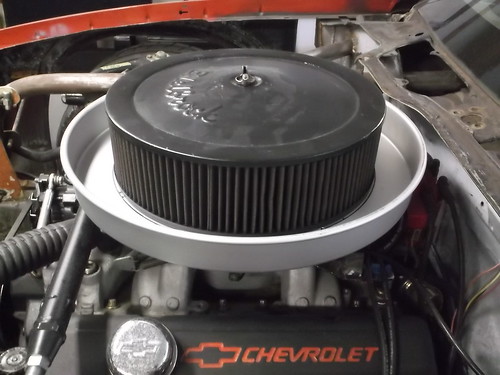
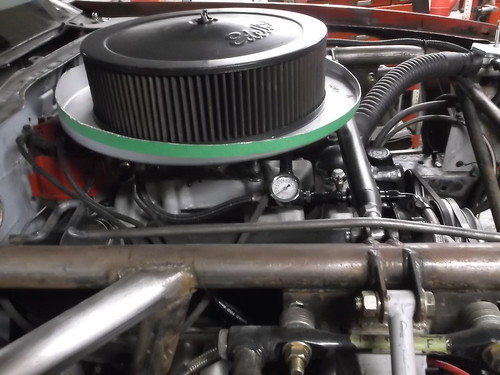
My first task was to raise the air filter so the pan would clear the distributor and also place the filter up inside the hood. I bought a 2" aluminum filter spacer from Allstar. This got the pan about 1 1/2" above the distributor. To mount the pan, I cut a 12" hole in it and riveted it to the bottom of the filter base. Once the hood modifications are done I will seal the pan to the underside of the hood. I will post pictures once I set up a new account with a hosting site.
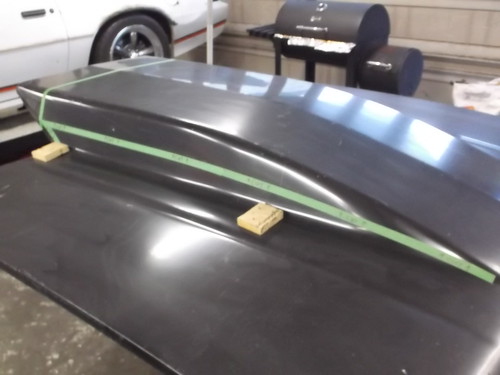
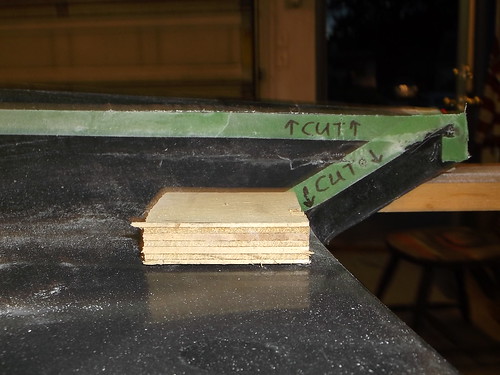
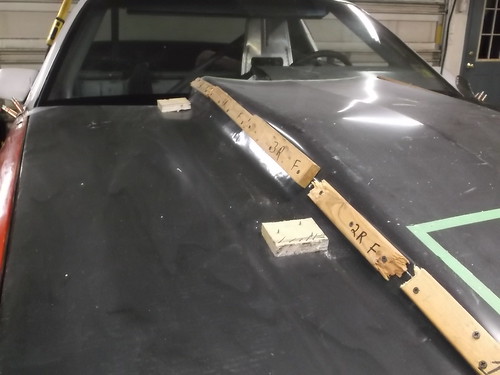
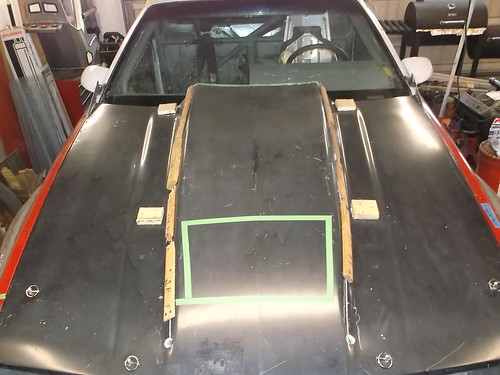
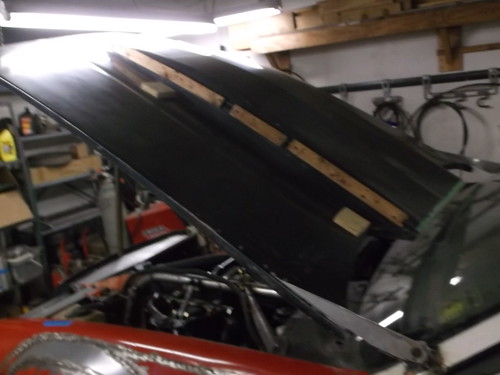
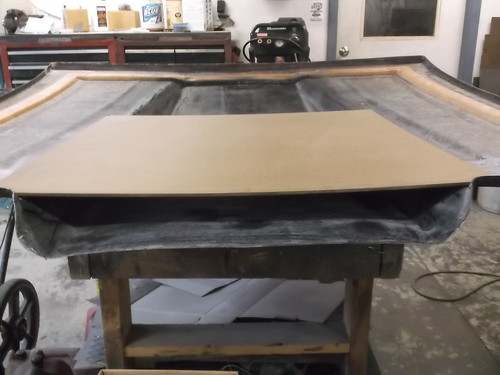
The hood I am using is a Harwood pin on 6" cowl hood I bought several years ago for cheap. The plan was always to cut the height of the cowl down and now was the time to do it. I'm shooting for about a 3" height. To get the section cuts the same height and shape I made a cardboard template. After tracing the shape on both sides I used masking tape to further highlight the cut line. Before i did any cutting on the hood i bolted two wooden braces to the underside of the hood, spanning the gap of the raised scoop.
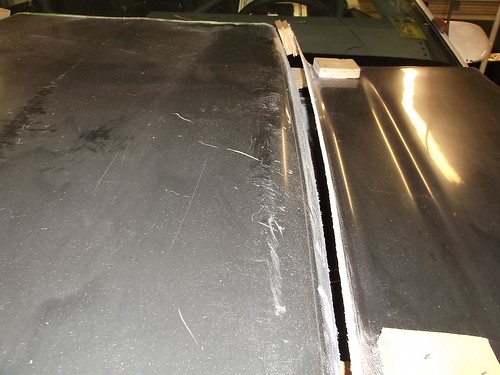
Before i could lower the scoop i had to shorten the rear section that hung over the cowl and windshield. After eyeballing where i thought the scoop would end at i cut about 6" off the back of the scoop. To start the cut I drilled 3/4" holes at the front of the hood. These will allow the scoop to bend down at the front without cracking. I used a sabre saw to cut both sides along my tape line. Using a wide blade screwdriver I pryed out the lower side of the scoop allowing the top half of the scoop to drop inside. Due to the tapered sides of the cowl scoop the farther to the rear of hood the wider the gap between the upper and lower halves. At the very rear of the hood the gap was about 1" per side. Now I had to figure a way to fill in or close the gap.
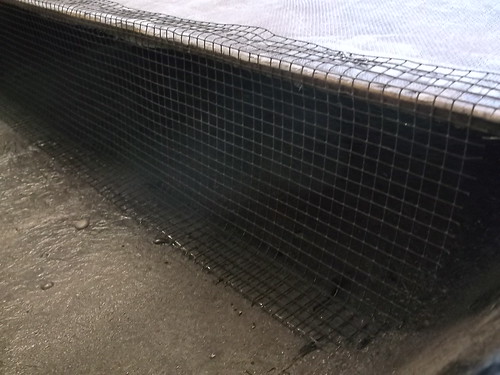
for a couple days I tried to come up with different means to fill in the tapering gap. The best idea I came up with was to use wood blocks to set the gap an scoop height and the fill in between the blocks with expandable foam, then cover and blend everything together with multiple layers af fiberglass mat.
That's a lot of fiberglass and bodywork that I am just not into, so I started looking at ways to close up the gap so I could just bond the top and bottom halves back together. Since fiberglass is just plastic I thought maybe I could use a heat gun to alow me to soften and bend in the longer lower side panels to mate up with the top. Using the piece I cut off of the back of the scoop as a test I found I could heat up/soften the fiberglass and reposition it quite a bit without cracking the fiberglass or the gel coat. Holding the heated fiberglass in position till it cooled fixed the panel to its new position.
Starting at the front of the scoop where the gap was the narrowest I heated up about 6" at a time and using short strips of scrap wood and drywall screws pulled the top and bottom panels together. Although this was a slow process it worked very well. Towards the back of the scoop where the gap got wider it took several tries at heating and pulling the sides together to close the gap. Once the sides were pulled together I went back over the panels with the heat gun to give a final "set".
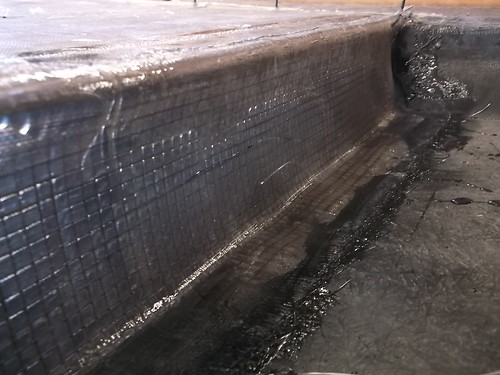
To bond the scoop back together I had to disassemble all my wood bracing and sand the mating surfaces to remove the gel coat and rough up the surfaces. What a mess that made!!! With the mating surfaces sanded and cleaned I mixed up some resin and used a paint brush to put heavy coats on both mating surfaces. Then I had to go through the whole sequence of clamping the upper and lower panels back together.
it seems like I did not add enough harder in the resin and it is drying very slowly. This was probably a good thing as it took about 3 hours to reclamp the hood back together. We are having unusually warm sunny weather so I have placed the hood outside to dry. This seems to be working and I may be able to unclamp the hood this evening.
Last edited by 83RDRACR; Oct 9, 2017 at 12:43 PM.
Reason: Correct misspellings and add pics
finally getting back to working on the car after, a lapse of over 2 months. The last major project for the car is tocut down the 6"cowl hood and make some kind of cold air intake. After looking at lots of post I decided to use the 18" cake pan method of building an air pan to seal to the bottom of my hood.
My first task was to raise the air filter so the pan would clear the distributor and also place the filter up inside the hood. I bought a 2" aluminum filter spacer from Allstar. This got the pan about 1 1/2" above the distributor. To mount the pan, I cut a 12" hole in it that was offset 1" and riveted it to the bottom of the filter base. The offset centers the filter with the hood. Once the hood modifications are done I will seal the pan to the underside of the hood. I will post pictures once I set up a new account with a hosting site.
The hood I am using is a Harwood pin on 6" cowl hood I bought several years ago for cheap. The plan was always to cut the height of the cowl down and now was the time to do it. I'm shooting for about a 3" height. To get the section cuts the same height and shape I made a cardboard template. After tracing the shape on both sides I used masking tape to further highlight the cut line. Before i did any cutting on the hood i bolted two wooden braces to the underside of the hood, spanning the gap of the raised scoop.
Before i could lower the scoop i had to shorten the rear section that hung over the cowl and windshield. After eyeballing where i thought the scoop would end at i cut about 6" off the back of the scoop. To start the cut I drilled 3/4" holes at the front of the hood. These will allow the scoop to bend down at the front without cracking. I used a sabre saw to cut both sides along my tape line. Using a wide blade screwdriver I pryed out the lower side of the scoop allowing the top half of the scoop to drop inside. Due to the tapered sides of the cowl scoop the farther to the rear of hood the wider the gap between the upper and lower halves. At the very rear of the hood the gap was about 1" per side. Now I had to figure a way to fill in or close the gap.
for a couple days I tried to come up with different means to fill in the tapering gap. The best idea I came up with was to use wood blocks to set the gap an scoop height and the fill in between the blocks with expandable foam, then cover and blend everything together with multiple layers af fiberglass mat.
That's a lot of fiberglass and bodywork that I am just not into, so I started looking at ways to close up the gap so I could just bond the top and bottom halves back together. Since fiberglass is just plastic I thought maybe I could use a heat gun to alow me to soften and bend in the longer lower side panels to mate up with the top. Using the piece I cut off of the back of the scoop as a test I found I could heat up/soften the fiberglass and reposition it quite a bit without cracking the fiberglass or the gel coat. Holding the heated fiberglass in position till it cooled fixed the panel to its new position.
Starting at the front of the scoop where the gap was the narrowest I heated up about 6" at a time and using short strips of scrap wood and drywall screws pulled the top and bottom panels together. Although this was a slow process it worked very well. Towards the back of the scoop where the gap got wider it took several tries at heating and pulling the sides together to close the gap. Once the sides were pulled together I went back over the panels with the heat gun to give a final "set".
To bond the scoop back together I had to disassemble all my wood bracing and sand the mating surfaces to remove the gel coat and rough up the surfaces. What a mess that made!!! With the mating surfaces sanded and cleaned I mixed up some resin and used a paint brush to put heavy coats on both mating surfaces. Then I had to go through the whole sequence of clamping the upper and lower panels back together.
it seems like I did not add enough harder in the resin and it is drying very slowly. This was probably a good thing as it took about 3 hours to reclamp the hood back together. We are having unusually warm sunny weather so I have placed the hood outside to dry. This seems to be working and I may be able to unclamp the hood this evening.
as I was writing that last post a city cop slapped a ticket onto a small enclosed trailer that I had moved from in front of my garage to the yard along side my house. Because I live on a corner lot all of my property except the back yard is considered a "front yard" . Just my luck.
The car is in a drivable condition even though it doesn't have a hood yet. We are in a hot dry spell so decided to take the car out and shake it down. I have had some fuel pump issues and wanted to see if I had eliminated the problem.
Started out driving on back county roads. Narrow, twisty, and some rough patches. Also there were several railroad crossings with uneven tracks. Happy to report that nothing dragged or scraped, even though the front xmember is only 4" off the ground. The car ran well so I decided to take it out for its first highway run.
Since the speedometer isn't hooked up yet I had to use other cars to gauge my speed. Speed limit was 70mph and 2000-2200 rpm in 5th gear kept me up with other cars. A group of 3 cars zipped by in the left lane and I pulled in behind them for a couple miles. I figure we were doing 80-85 mph as tach was 2800-3000 rpm.
The car, steering, suspension all felt really good and stable. Oil pressure and temp was good. There was some driveline vibration at the higher speeds which I kind of expected since driveshaft isn't balanced. After about 10 miles I pulled off the highway and into a gas station to look the car over. No leaks, nothing hanging loose on or under the car...all looked good. Headed back toward home.
it's about an 8 mile drive from xway back to my house. With a little over a mile to go the engine started to sputter and lose power. Pumping the gas kept it going a little longer but engine quit and I coasted to curb. I let the car sit for just a minute or two and tried to restart. I could hear the fuel pump running and after engine crnaked over a few times it fired and ran fine the rest of the way home.
the next day I met up with a couple other tgo members and drove to an informal meet and greet with other third gen owners. The event was about 20 miles away with some city and highway driving. As we approached the exit ramp my car once again lost power and stalled, this while traveling 65mph. I was able to coast to and down the ramp. I was able to restart the car and it ran for about 3 blocks and stalled again. After sitting for just a couple minutes the car restarted and ran fine. On the return home the car again stalled just a few blocks from home.
Dennis, I realized after i posted this that about 20" of fuel lin run along the right side floor pan next to the door pinch weld. The muffler is directly below that section of floor. That is probably my heat source. I will wrap the fuel lines in a heat sleeve and see if that eliminates the problem. if anything it gives me a good reason to take the car out for another extended drive.
Last edited by 83RDRACR; Sep 27, 2017 at 08:14 PM.
Reason: edit smiley
83RDRACR: In Flikr, click on the image you want to post, then click on the download button, it looks like a down arrow. Then click, "view all sizes".
After that click any size you want to share. I tend to do "medium 800".
Now you have the image on your screen at the size you want.
Right click "copy image address".
Go to TGO post and type [IMG] then paste the image address followed by [/IMG].
When you post the image will be show up. Hope that helps.
Ok so I got the coel hood shortened. From top of scoop to flat area of hood directly beside the scoop the height is 3 1/4". I can live with that. From sitting in the car it appears lower than the top of the dash.
But the hood IS big, it's about 60" long and wide. I certainly dont want to lift that off and find some place to put it every time I want to look under the hood. The solution...put hinges on it. I originally thought I would have to add significant bracing to keep the hod from cracking when lifted and supported at the front. I realized that because of the cowl scoop in the center of the hood and the 1" lip around the perimeter that the hood was very stiff front to back. That allowed me to make some pretty simple hinges that I pop riveted and glassed to the underside of the hood.
The length and height of the hinge was dictated by the cowl scoop position at the windshield. The pivot point had to be slightly above and behind the back edge of the scoop so it would lift away from the windshield. They actually mount to the A-pillar.
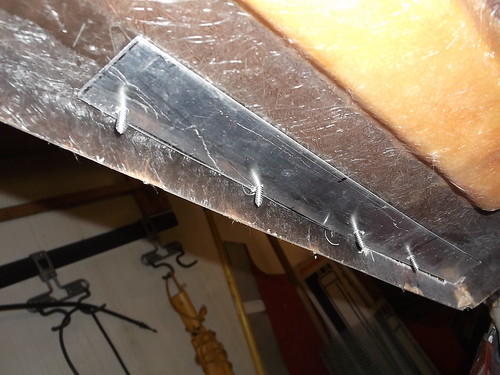
Hinges are made from 1/8" aluminum plate. A slot was cut into the edge of the hood towards the rear and the hinge slipped through from underneath. Underside of hinge is 2" wide and 16" long. It was temporarily attached with sheet metal screws and permanently attached with 3/16" pop rivets.
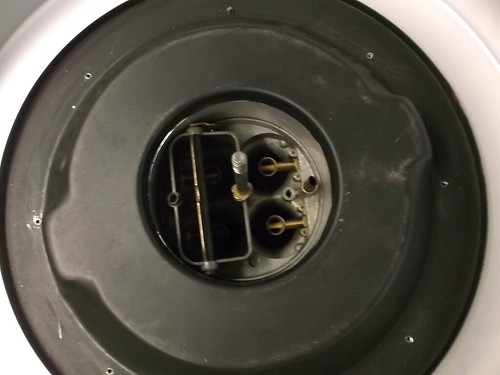
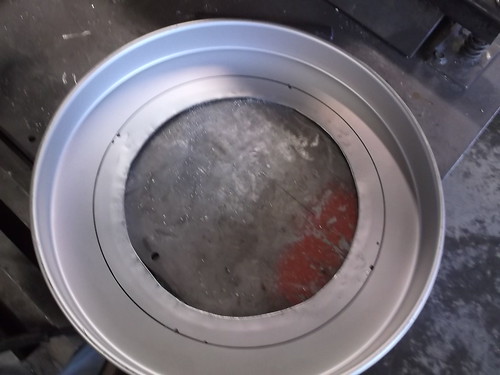
Next I wanted to seal the air filter to the underside of the scoop. I followed the example posted by another tgo member (sorry I cant recall his username) who used an 18" cake pan as the base. I cut an 12" whole in the cake pan to match the bottom of my air filter base plate and pop riveted it on.
To get the pan to clear the distributor I used an 2" aluminum air filter spacer.
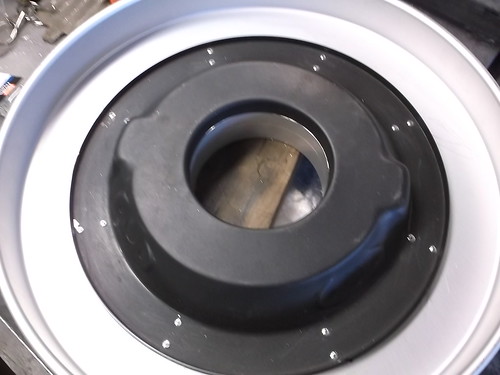
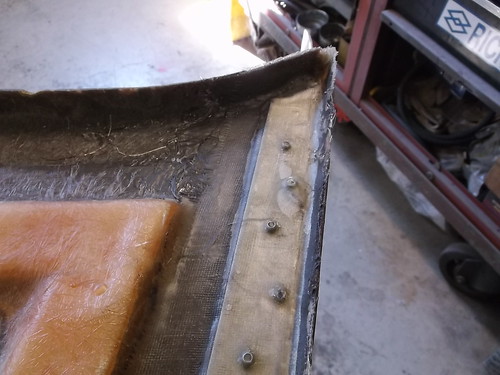
now to close off the bottom of the cowl scoop so the cake pan has something to seal against. Again using ideas from the other tgo member I cut a piece of 3/16 hardboard to span the gap and about 27" long. I covered what would be the top side of the board with resin and a layer of fiberglass mat and then screwed it onto the hood. I then applied several layers of mat and resin to the bottom side to bond the board to the bottom of the hood.
To close off the front of the cowl scoop I used 1/4" screen as a backer and then applied several layers of glass mat over the screen.
While I had the resin and mat out I bonded the aluminum hinge brackets to the underside of the hood as well.
I cut a 17" diameter hole into the hardboard for the air filter to fit into. To determine its location I measured from the inside edge of both front fenders to the air filter stud and another measurement from base of windshield to stud.
opening matched up very well.
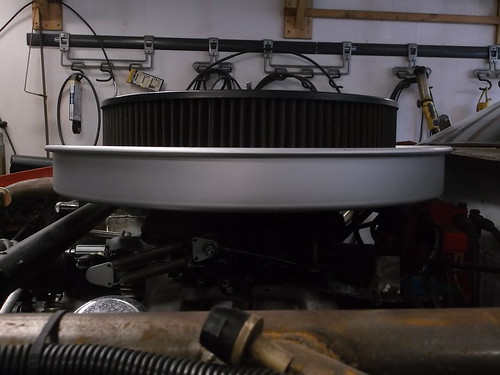
The cake pan is too tall to let the hood close so trimming is needed. The hood slopes down back to front, so more material off the front of the pan than the rear. I took a little bit off at a time, using masking tape as a guide line to keep the cut smooth and somewhat even.
once the hood closed without interference I took modeling clay and placed small lumps around top edge of pan and then gently closed the hood. Clay wads compressed showing clearance to hood from 1/4" to almost nothing. I will increase and even out the gap and then order some "bulb" style edge gasket from mcmaster-carr.
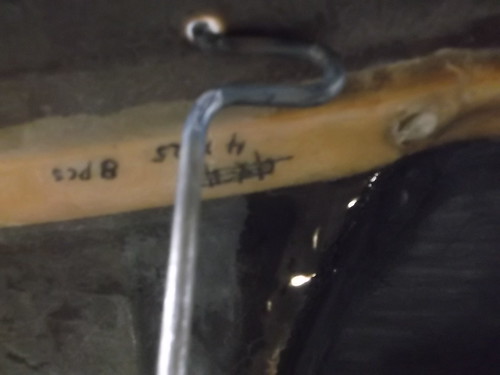
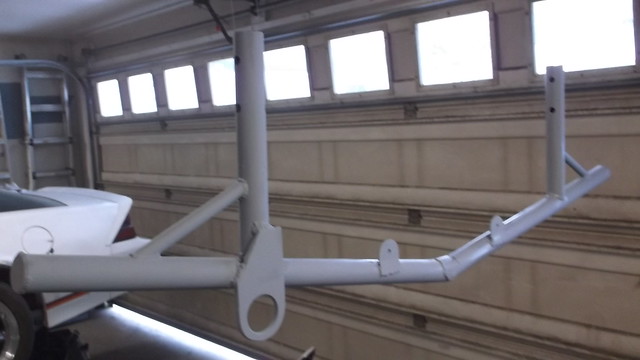
So now I have a functional, pin-on cowl hood, that is hinged at the rear. Up till now I've been using a cutoff broom handle to prop it up. Thats not cool so I set out to make a proper prop rod for it.
From 3/8" steel rod....top end
Bottom end with mounting bracket
Top of rod hooks into hood pin hole.
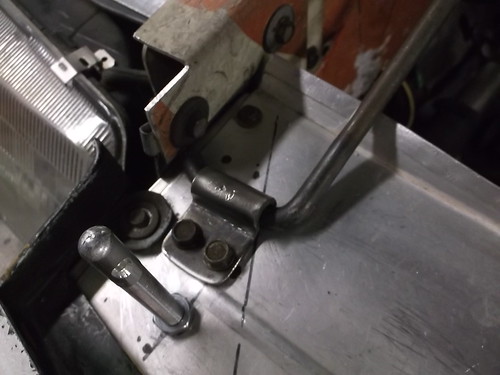
Bottom mounted to aluminum tray
folded down for storage. I welded a small retainer bracket to strut bar to hold prop rod in place.
Except for body work on the hood I think it is finished. I am no body man by a long shot and have little experience with fiberglass but all said I think it turned out well. It is very strong and the hinges and hood prop work great. I have put about 100 miles on the car this past week trying to track down an intermittent fuel problem and the hood is very stable at highway speeds with no shaking or lifting. Also visibility is good.
you can see top of cowl scoop is just below top of dash.
Thanks solo4c. I raised the k-member up about 3" so that placed the rack into the damper and pulleys.
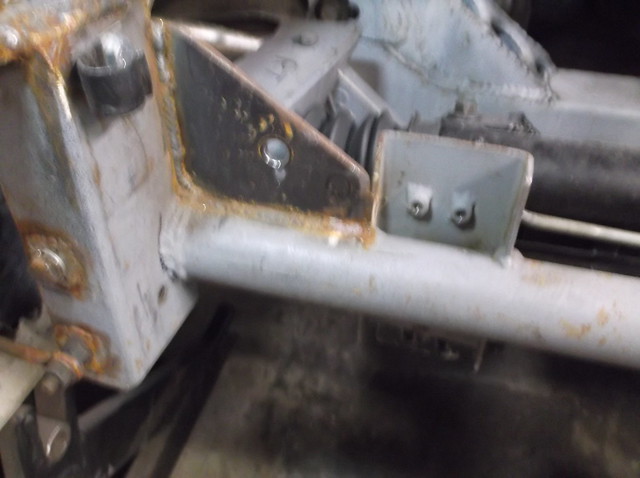
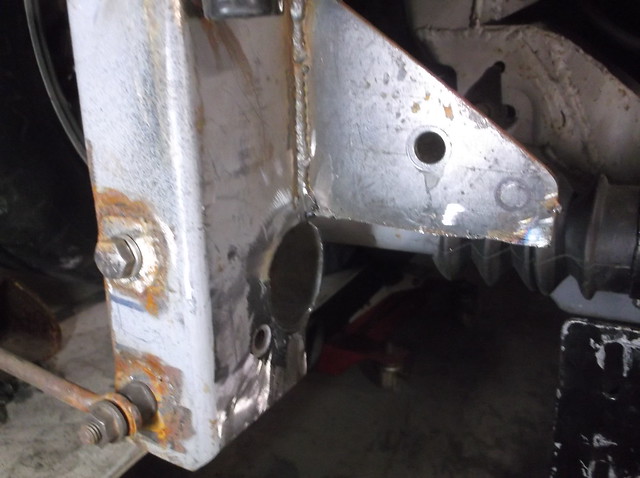
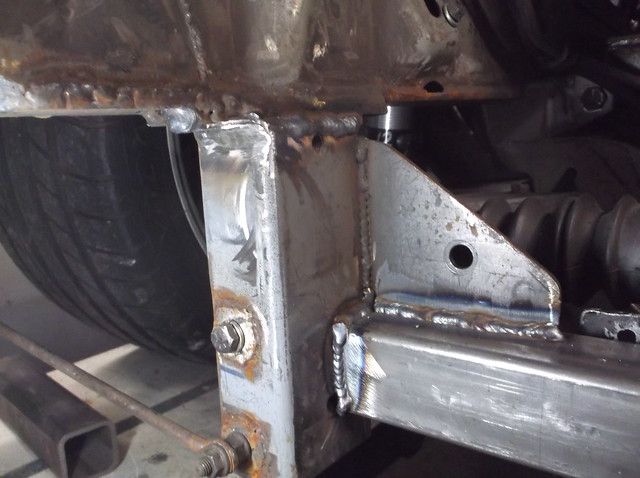
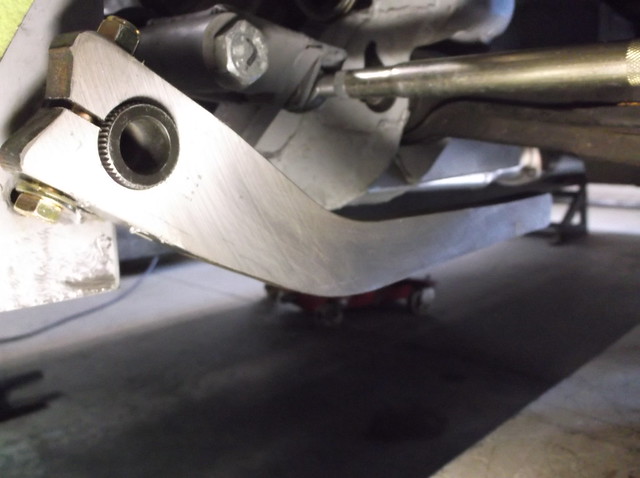
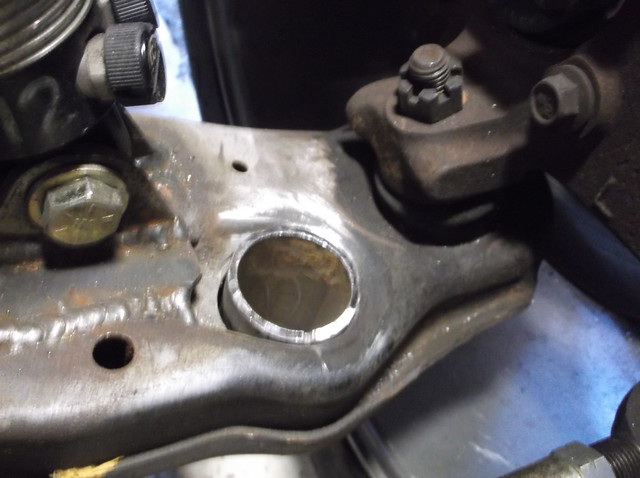
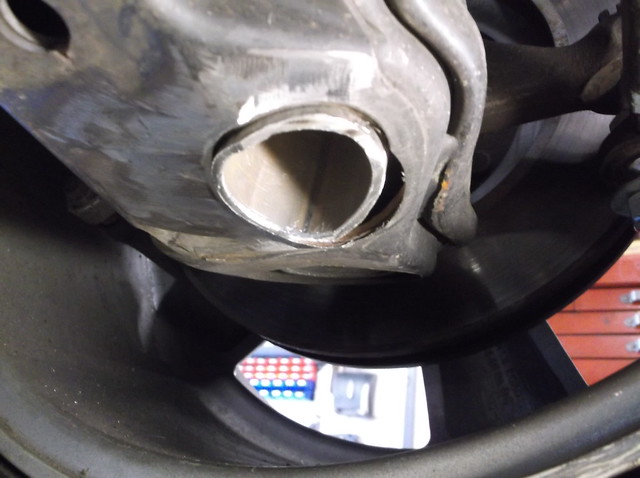
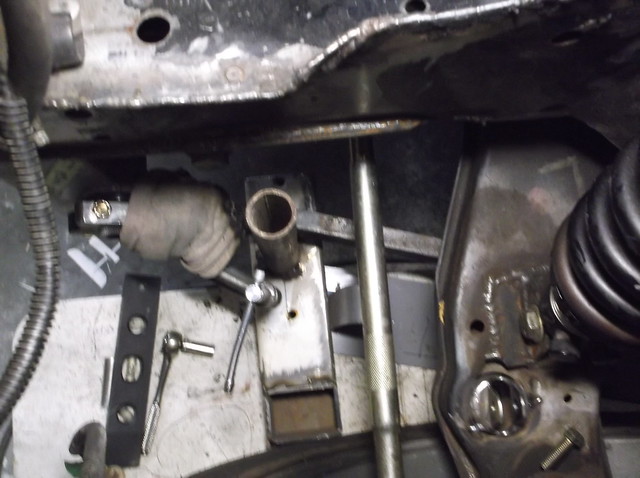
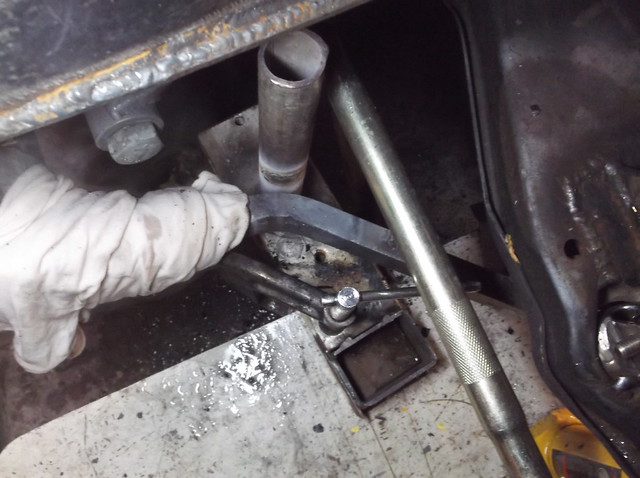
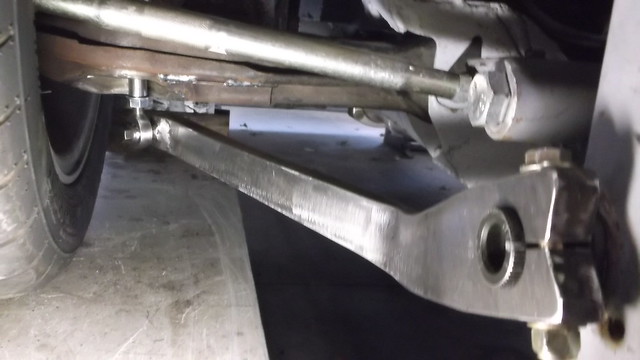
Anyway I've been picking away at the car as my health allows and I have run into a little problem. last month I ordered a splined, hollow sway bar and straight steel arms from Speedway Engineering. It's a 1 3/8 bar with 1 1/4 ends, 49 spline. I made the mount for the bar a couple years ago as that doubles as the crossmember the rack bolts to. Since I didn't have the bar at the time I used a new piece of 1 1/4" tubing in place of the bar. It turns out that the tubing wasn't perfectly true like the sway bar causing the right end of the mount to be slightly twisted, preventing the sway bar from passing through the bearing on the end. Also the diameter of the tube used for the crossmember is a little small giving me no room to fudge. the fix for this is is to replace the crossmember with larger tube and reposition the right side bearing mount. this will be a chore as both are welded in rather heavily. Brackets like this on both ends and rectangular tube on left has to be cut loose and turned slightly to the right as viewed.
It came out a lot easier than I expected using a sawsall and 4 1/2 cutoff wheel.
I cut 3 sides of the rectangular down stay and using an 18" crescent wrench, twisted it until the sway bar passed thru both bearings and spun freely. leaving the sway bar in place i tacked the down stay in place. For the crossmember itself I decided to use 2" x .120 square tubing. That will let me clear a 1 5/8 sway bar and made welding back in and remounting the rack and pinion a lot easier.
lower rack mount
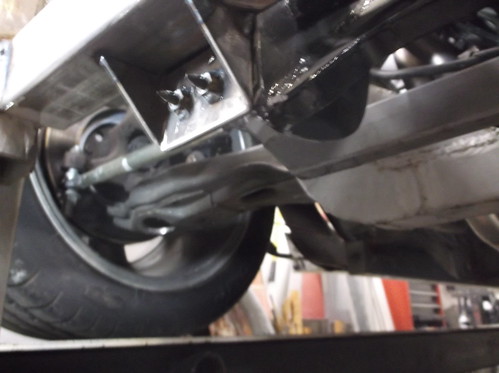
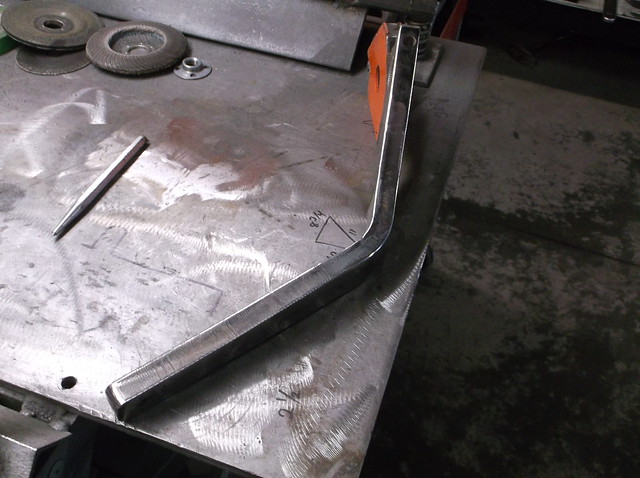
The next problem to crop up was that the straight sway bar arms would cause interference with the movement of the rack.
To correct this I had to order new arms with a 30* angle. We won't talk about what it cost to ship 12lbs of steel back and forth across the country. Anyway the offset arms fixed the problem.
This is the angle the arm will have at ride height.
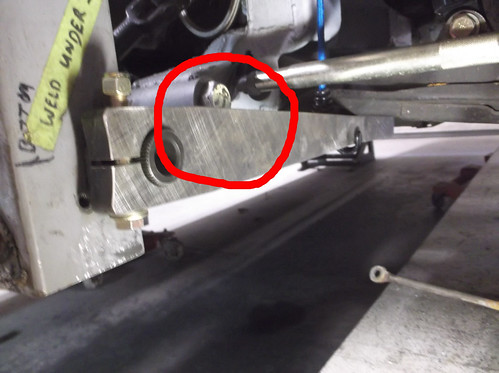
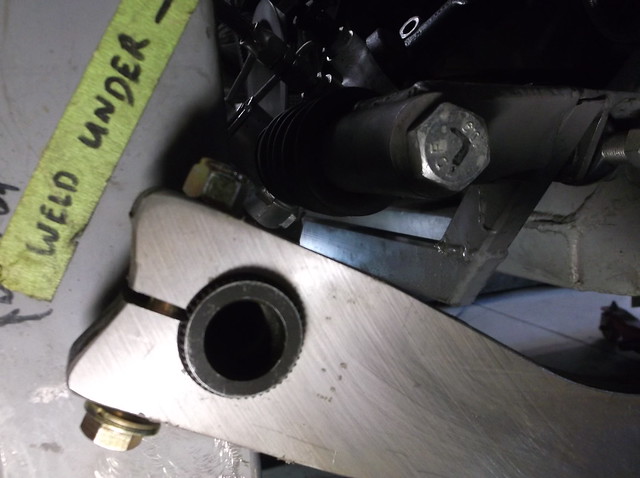
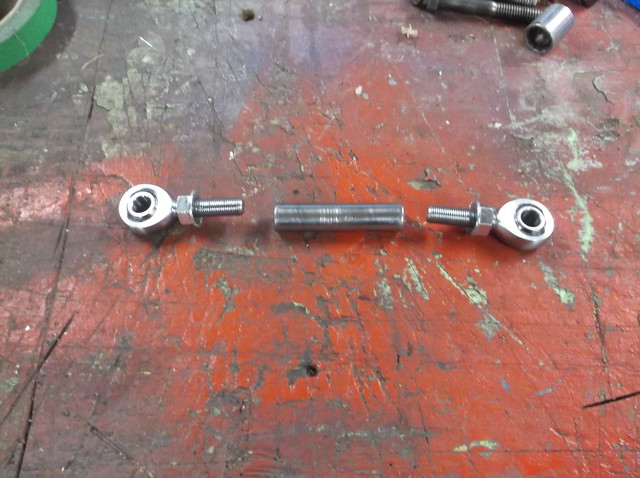
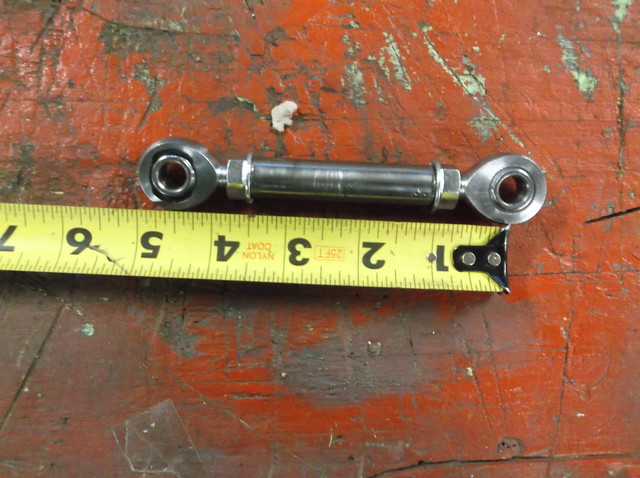
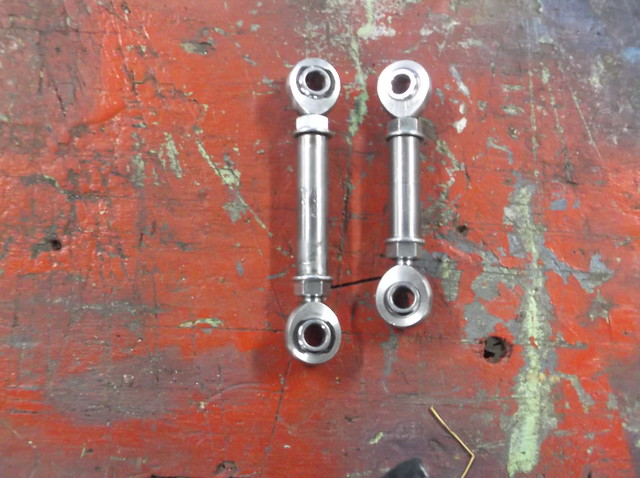
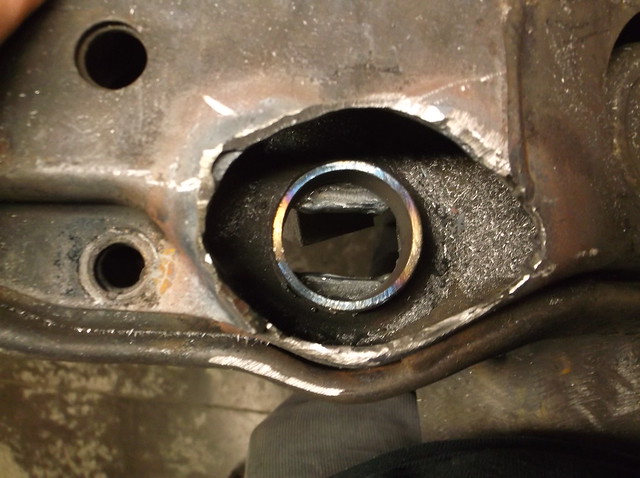
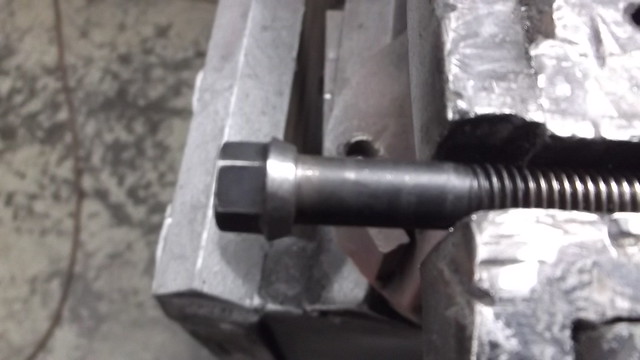
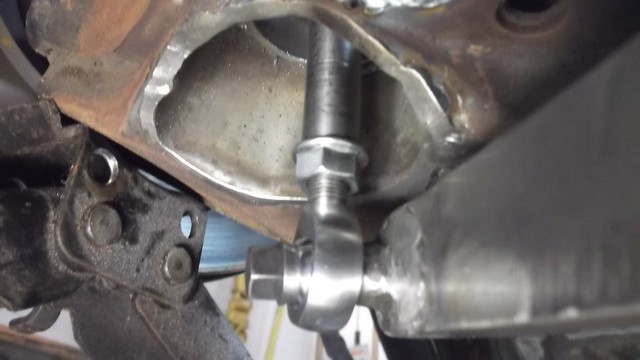
For sway bar links i'll be using chromoly 3/8 heim joints from QA1. They are rated at 9500psi static load so should be strong enough. To mount the heims to the lower A arm I had to open up the hole where the stock sway bar link passes through. A 1 5/8 hole saw fit down into the recess in the arm so I opened the whole up with that. The stock A arms are a multi piece boxed affair that has a about a 1" void between top and bottom. To strengthen this area I made a sleeve from some 1 5/8 roll bar tubing. this will be welded in top and bottom and allow room for the link between the heims to move around some as the suspension moves up and down.
I'll be making tabs to mount the upper heim to the top of the A arm and the lower heim will bolt directly to the side of the sway bar arm. The link will be short (about 5 1/2" oal) and quite rigid with no rubber or urethane bushings to compress.
In removing the front valance, bumper and radiator to gain access to the sway bar crossmember I got affirmation of some of the ease-of-access provisions I had hoped to build into this car. The valance came off after removing just 12 bolts and a couple screws. I did not have to touch any of the lights or sockets. The front bumper came off with 4 bolts. And finally the radiator including the electric fan and front duct work all came out as one piece (six bolts, 2 hose clamps and an electrical plug).
I've got to go pick up the heims and then I can get on with bending those 3/4" thick sway bar arms.
Okay, I got the heim joints and a short length of 1/2" x .095 tubing to make the links.
The .095 wall tubing gives me the correct id to tap the 3/8-24 threads for the heim joints to thread into. Center to center is about 4 1/2" and they may need to go a little shorter.
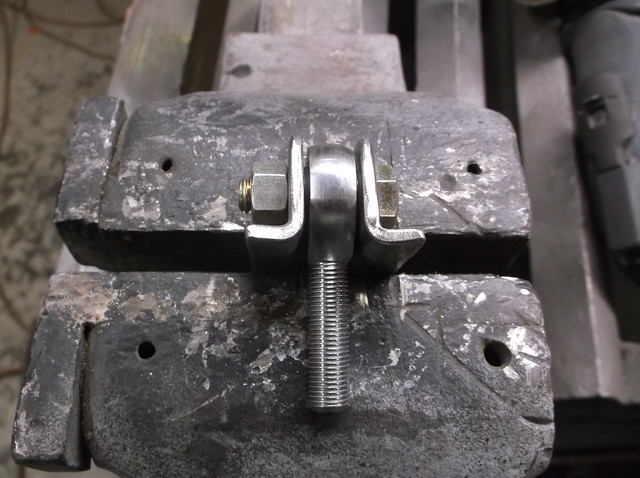
They will attach to the short pieces of tubing I cut and inserted into the A-arms with these brackets.
And set in place in the A-arm
By making the upper mounting bracket as short as possible it allows the bottom of the link to move side to side and front to back through a pretty good arc. I shouldn't have to worry about it binding up when the A-arm moves up and down bout I will check it through full suspension travel.
With the link set in place I now had a target to bend the sway bar arm to. I knew my torch tanks were getting low but thought I could at least get one side done. NOPE! I got about 10* bend but need another 35*-40* yet.
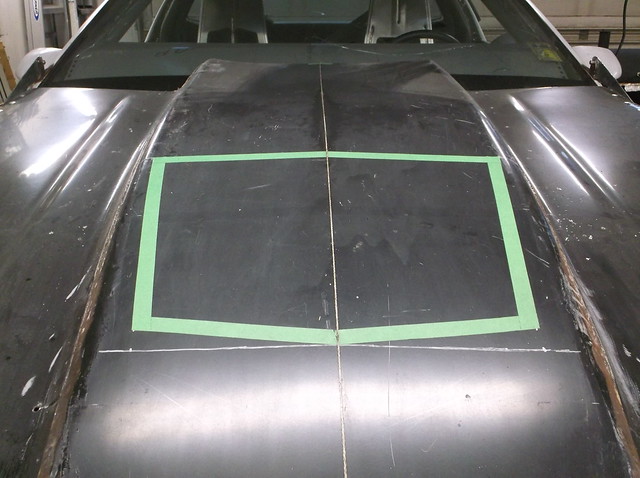
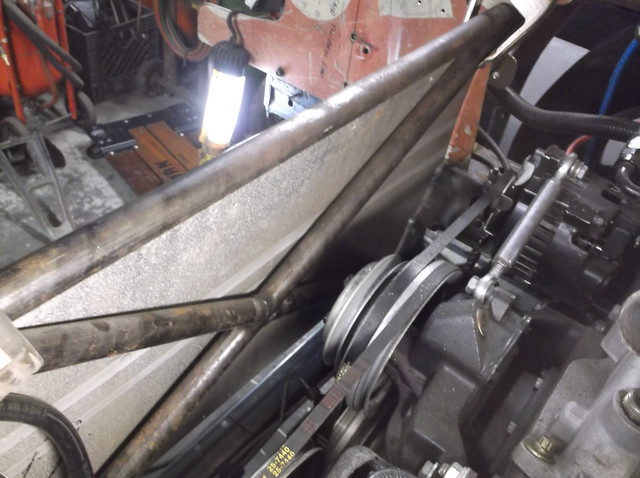
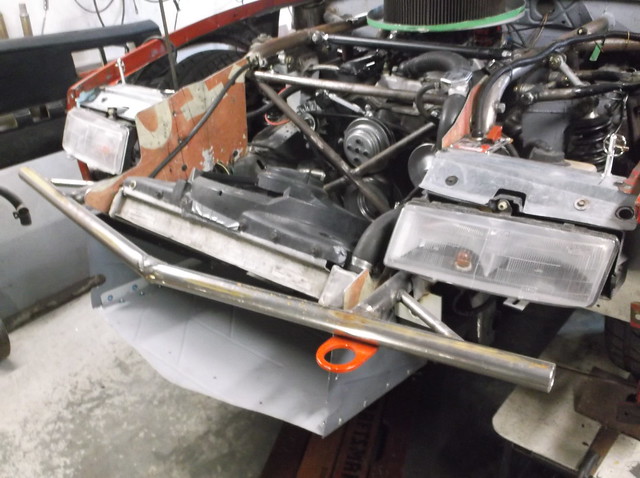
With the sway bar on hold till I get the tanks filled I took advantage of having the radiator out to explore the possibility of an air extraction hood vent. For max air flow I have decided on a single large opening would work better than some type of louvered grill. The opening will be forward of the accessory belts and pulleys so no worries about rain/water issues.
Proposed vent placement.
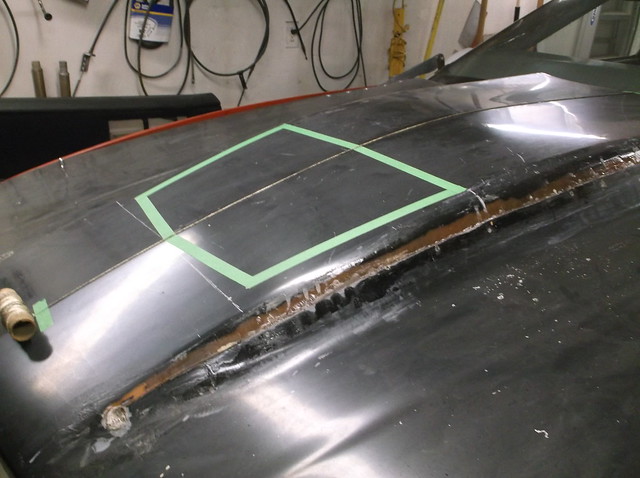
I tried to make the opening as large as possible. The rear of the opening is just a couple of inches forward of the cold air box for the air cleaner and the front of the opening is about where the factory core support would have been. I calculated the area at about 235 in/sq which is a little larger than the grill opening.
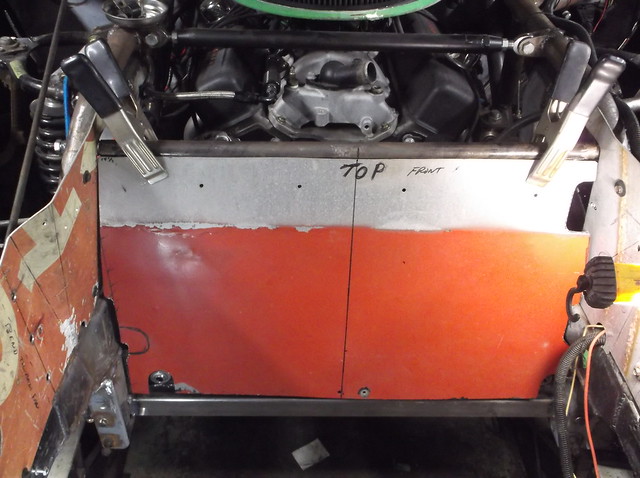
The rear of the opening will curve down and drop over the top of the x-brace that mounts ahead of the belts and pulleys. The x-brace has a slight rearward tilt to it and when covered with an aluminum panel it will direct/force the air out through the hood vent. The area around the electric cooling fan is already sealed off on the sides with aluminum panels that extend nearly to the bottom of the hood. To get the most efficiency from the vent I will have to make some short side skirts that will finish off sealing the hood to the side panels. I am hoping this will get rid of 80% or more of the air that comes through the radiator out from under the hood. This should reduce high speed lift and maybe create a little down force.
you can see above how the panels form a 3 sided box that will force most of the air out of the hood vent. The bottom of the radiator sits very close to the lower crossmember. The radiator is mounted at a 45* forward angle and the electric fan is angled up off the radiator, blowing the air more up than rearward.
A couple more pics.
Please note that the gap between the tube bumper and the top of the radiator has been filled in with a metal panel. Also to help create a low pressure area over the hood vent I will mold a 2" tall (maybe taller) lip at the front of the opening and taper it down the sides to the rear, This will give the vent a more finished look and add a little stiffness back in.
David
Enjoyed your new posts. Your engineering is great and your work is inspiring. Moving the front wheels forward helped the balance of the car weight and visual. dropping body over suspension verses spring cutting allows good dynamics. Thanks.
Tex
David
Enjoyed your new posts. Your engineering is great and your work is inspiring. Moving the front wheels forward helped the balance of the car weight and visual. dropping body over suspension verses spring cutting allows good dynamics. Thanks.
Tex
Tex, thanks for following along and the kind words. Moving the front wheels forward was always part of the plan. It just seemed to make more sense than the usual engine setback. Given that I was going to ditch the strut front end anyway it was a no brainer.
all of the suspension mods were done with the ride height set at 5 inches which is over 4 inches lower than stock. Because the suspension was designed around the ride height, the angles of the front lower a-arm, the tie rods and the rear control arms and panhard bar are level and neutral. This gives me the luxury to adjust their angles to change roll centers and anti squat.
the front suspension and steering was by far the biggest challenge and is still fighting me as I try to get the sway bar arms connected to the lower a-arms. The mount I showed in the last post turned out to be to restrictive and the link bound up during suspension travel. I had to open up the bottom of the a-arm quite a bit to give the link room to travel. I'll post pics later on the fix.
it's a little ironic I guess but when I was at Summit Racing the other day to get the him joints I found a set of BMR 4th gen, tubular lower a-arms on their scratch and dent rack for half the cost of new set. It was perfect timing as I had to pull the stock lowers out to modify. But with having had to stop working money is tight so I walked away and modified the stockers.
Got the tanks filled finally and both sway bar arms are bent.
you can see in the last photo I have drilled the 3/8" hole in the end of the arm to attach the arm to the link. Center line of the hole is about 3/4" from end of arm. This centered the link inside the 1 5/8" tube in the A-arm at ride height.
This looked good but I ended up with all kind of binding issues during suspension travel. I'll detail that in my next post.
The heim joints can pivot 12 degrees to either side but my upper mount is to restrictive and binds after just a few degrees of misalignment. Also the link rod binds in the tube after about 1 1/4" travel in droop or compression. Clearly some changes are in order.
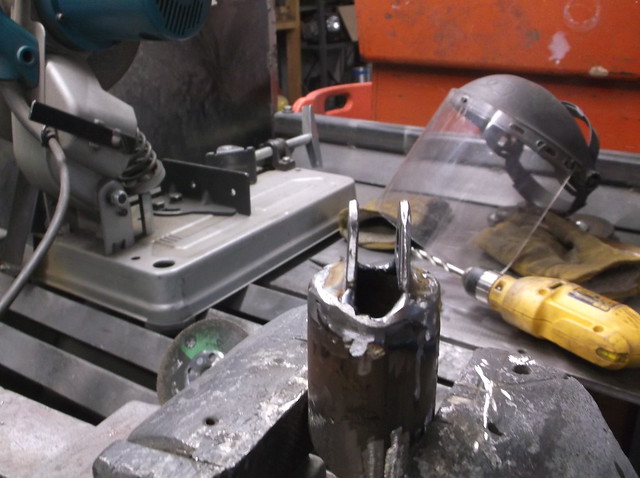
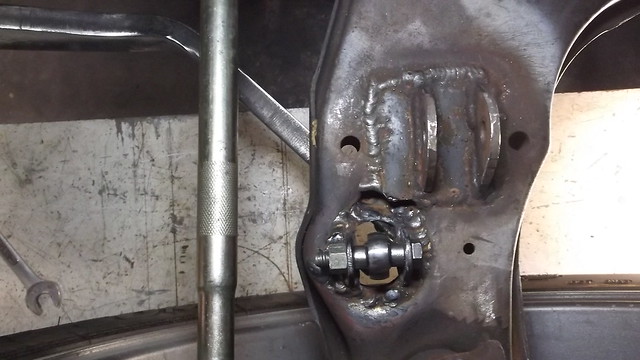
First order of business was to redo the upper mount for the link. I cut the mounting ears off and moved them farther apart. Moving the mounting tabs farther apart meant I needed some 3/8" misalignment bushings to center the heim joint and allow it pivot. You can buy misalignment bushing for larger size heims like 1/2" and up but I couldn't find any for the 3/8" so I made some.
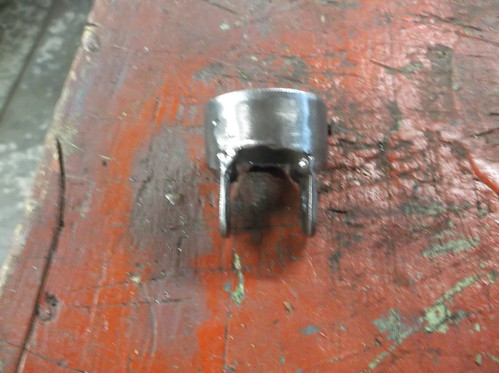
The bushings couldn't be too wide or very large in diameter if they were going to fit in the narrow upper mount and allow the heim to pivot. After looking around the garage I decided to try making them from 5/15 nuts. I jammed 4 nuts on a length of all thread, chucked it in my drill press and and buzzed the flats off the nuts with the 4 1/2" grinder and drilled the center to 3/8". I also cut the length of the tube down quite a bit.
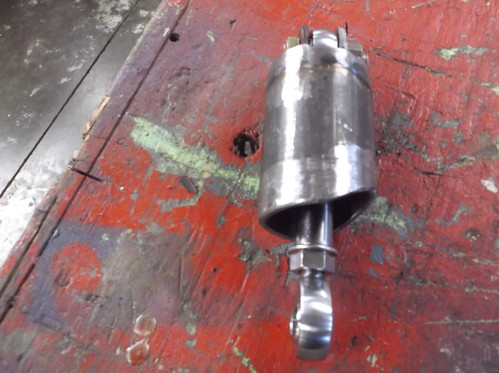
Revised upper mount
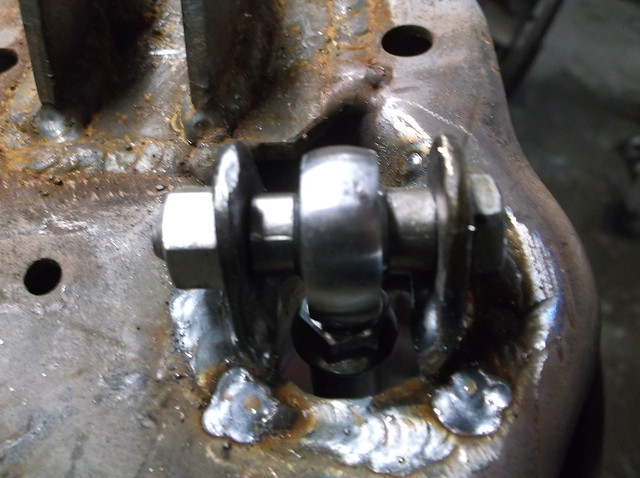
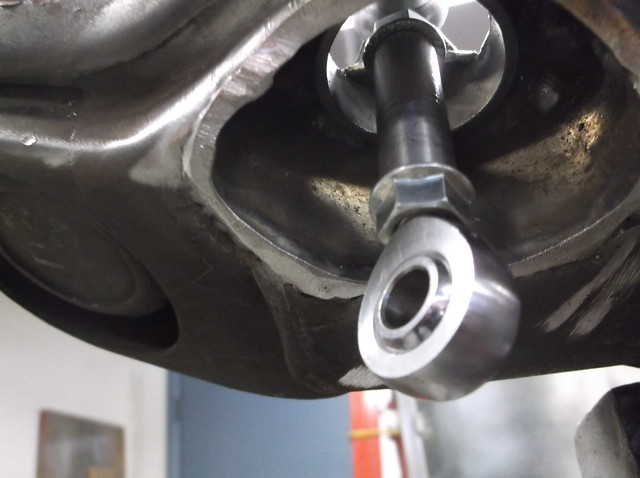
mounted in A-arm with spacers and heim joint
I also shortened the link by a 1/2". This will keep the sway bar arm above the lower lip of the rim.
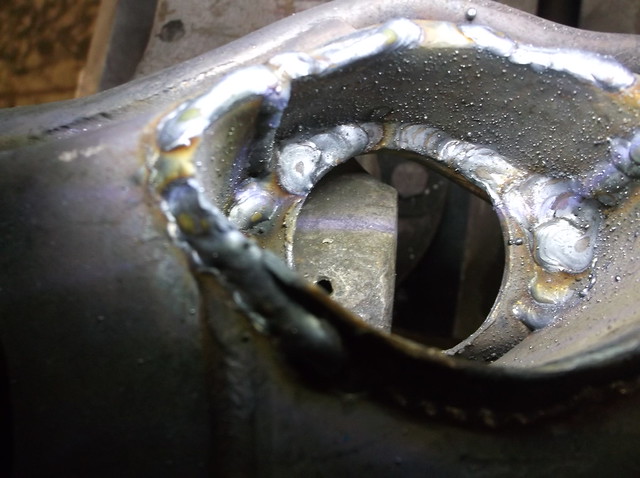
To fix the binding at the bottom of the A-arm I enlarged the lower hole into a football shape. This gave me the clearance I needed but compromised the strength of the A-arm. To add some strength back in I boxed in the entire opening with 1/16 steel sheet and fully welded inside and out. I am thinking the arm is stronger now than the OE.
And results of modifications...plenty of articulation!
Of course with all the modifications and after running the suspension up and down several times I decided the link needed to be moved out towards the end of the sway bar arm for a better alignment. Instead of drilling another hole in the arm I cut a slot into the end of the arm that let me slide the mounting bolt fore and aft until I found the best location.
This ended up being right at the end of the arm. I will be welding the rest of the slot closed and also closing off the open end. I need to make another misalignment bushing for where the heim bolts to the side of the sway bar arm. It will be different from the top spacers and will show it next post.
On a personal side note, the cancer doc gave me the "all clear" yesterday. Looks like together we kicked my colon cancer in the a$$!!!!!!. Big thanks to all the doctors and nurses who took care of me. Their professionalism and compassion were phenomenal and helped my family and I get through a pretty rough time.
To fill in the slot I cut a piece of 3/8 rod, rounded one end and set it in the closed end of the slot. Then I filled the remainder of the space with weld, having the welder set on its highest setting for deepest penetration. To help locate the whole at the end of the arm and to space the heim joint out away from the arm I threaded a 10mm flange head nut onto a bolt shank and chucked it in the drill press. Used the angle grinder to grind the flats off and into a tapered shape. I drilled the threads out to 3/8" and tack welded it onto the sway bar arm. after welding the end of the slot shut the area for the bolt whole was partially obstructed by weld. Using the tapered spacer as a guide I opened the whole back up. This worked out real well.
I wanted a real strong mounting bolt to hold the link to the arm. Looking in my bolt bins I came up with some ARP bolts. I think they were from a water pump kit. I also tapered the integral flat washer on the bolt head to allow for more misalignment.
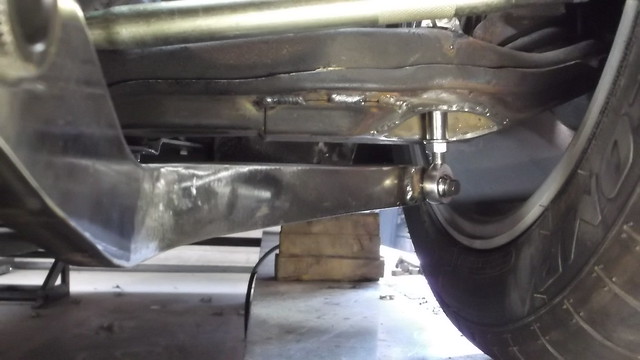
and all assembled...
with it all connected I removed the coil over shocks and ran the suspension through 6" of travel and had no binding. The suspension only has about 4 1/2" of travel so I should be ok.
With the binding issue solved I duplicated the mount on the left side. Again with both sides attached I cycled the suspension and had no binding issues.
I would really like to eventually run a 18 x 11 wheel with 315's at all 4 corners. It looks like the arm and link will clear the wider wheel.
Here is how it looks all connected.
Left side top view
bottom view
and same for right side
It took 2 months to get this done and I still have to replace the bushings and ball joints, sandblast and paint them but I feel good with the end result. I am hoping the 1 3/8 sway bar will let me use lighter springs. I have 400lb now and hope to go 350 or 325.
I'm sorry I missed the latest round of updates but everything looks great!
All I'd like to say is, leave everything alone that you don't NEED to touch. I want to see this thing tear up some streets this spring!!
Wretched, thanks for checking in. I really want to get car painted and looking respectable. Started the slow process of disassembly and finishing up lots of little things that were just kind of mocked up. Also some welding that needs finished. Definitely looking to get it on the road next summer.
in the last 2 years a nearby road course,was repaved and reopened. They have at least one open track day a month that I would like to go to. Also a local club has biweekly autocross events so plenty of incentives to get it back on the road. It's been a long and involved project but I was able to stick to my original plan. It seems to have turned out pretty good but more road and track time will verify if my changes were worth the effort.
So I have started to take the car apart for painting. As I am doing this I will be cleaning and painting all the brackets and panels that I made and installed. Because I didn't know if this car would even drive straight when finished I didn't spend any time trying to make things pretty, just functional. Also there were a couple items I had purchased at a swap meet that needed to be installed so that will be shown.
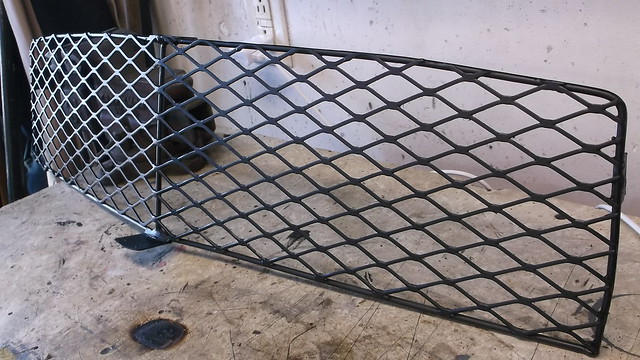
First part to come back off the car was the rubber nose and the first part to get cleaned and painted was the grille. Because I didn't prep and paint things as i made them most now have some surface rust on them that requires sanding or bead blasting to remove. It looks like made a lot of extra work for myself because of this.
Refinished grille
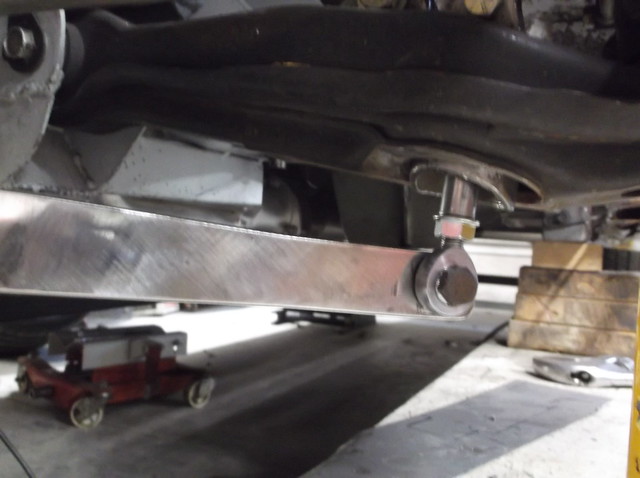
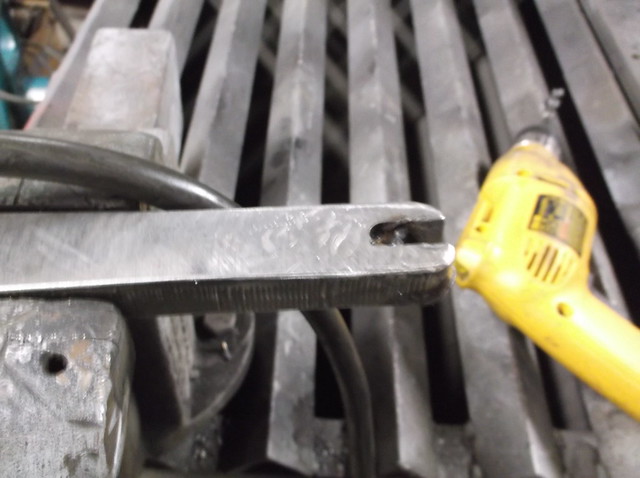
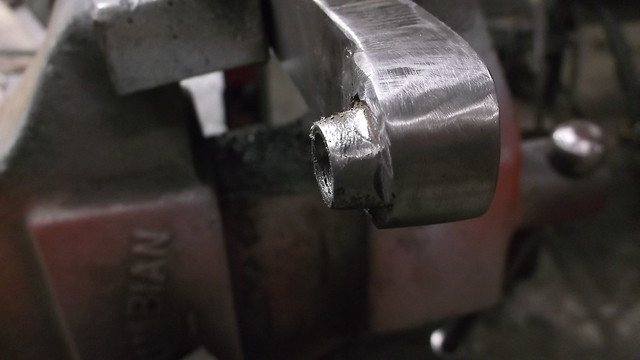
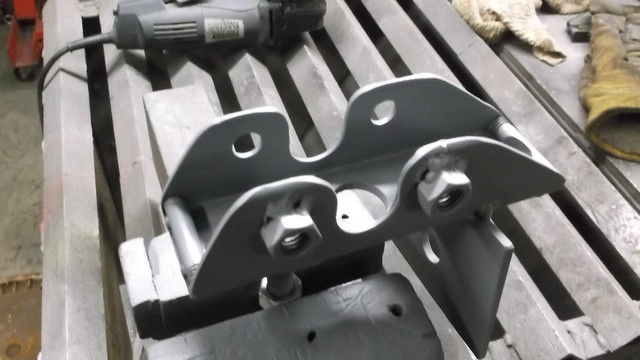
Next the bumper. I put a little extra weld on the tow hook and capped the ends.
Then the bumper brackets. These seemed big and clunky so I cut away about half of the metal on the sides and drilled a couple lightening holes in the bottom.
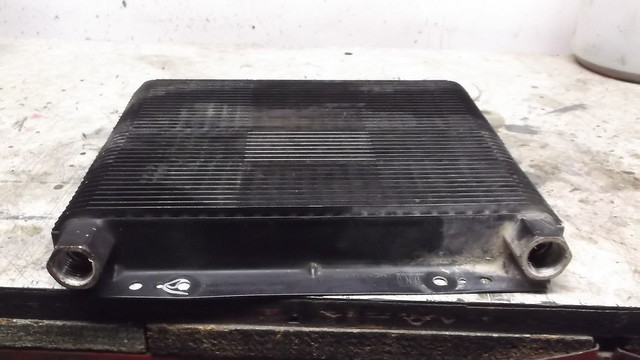
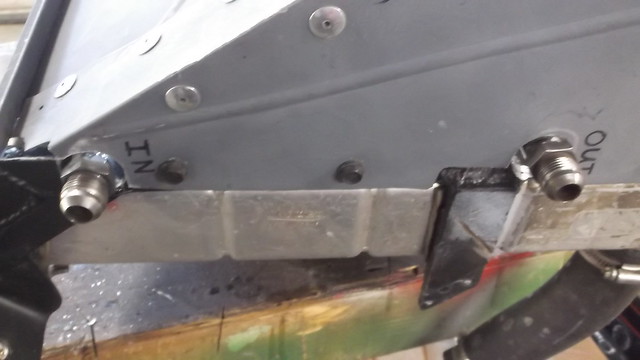
This gave me access to the radiator/fan assembly. One of the swap met buys was a nice plate style oil cooler. With the radiator up on the bench I could fab some brackets and mount it up. Deciding how the cooler should sit posed a small problem because of oil hose routing considerations. I decided the fittings should point to the left side and the hoses would connect outside of the intake air shroud.
here is the cooler, $15 at the swap meet. About 12x12 overall and 1/2 npt inlets.
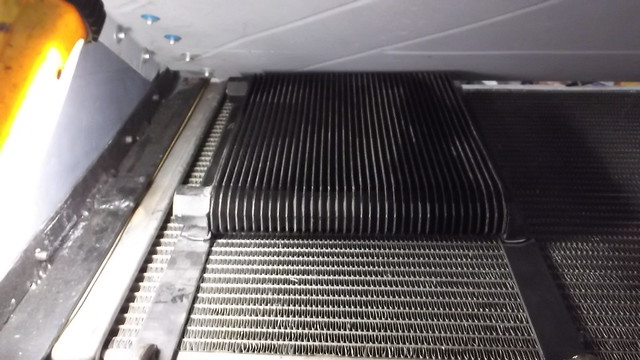
positioned to mount like this on 1x1/8 steel strap.
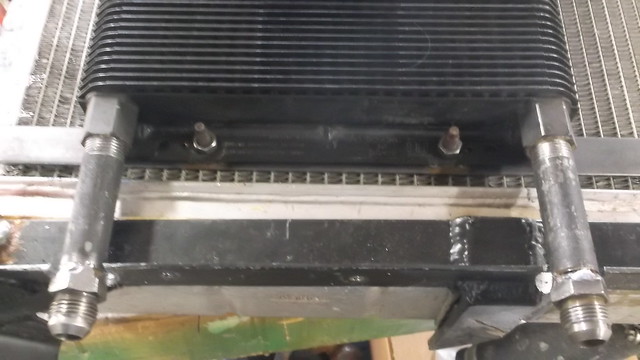
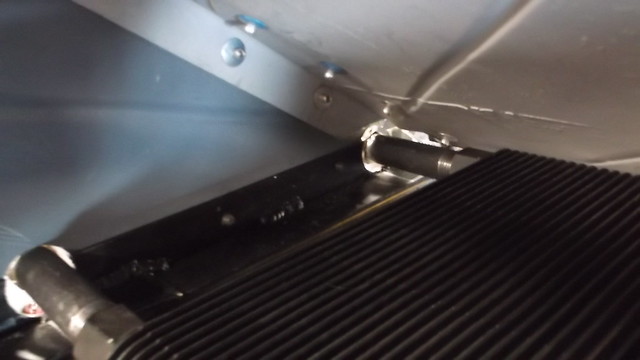
I had to notch the radiator mounting frame and shroud and used 1/2"npt x 4" pipe nipples to extend inlet and outlet out the side of the shroud. I welded steel -10an nipples to the pipe. Now I can connect and disconnect the oil hoses without having to reach inside the shroud.
When you mount any type of fluid cooler on it's side like this you just have to remember that the inlet has to be on the bottom or lower end of the cooler to avoid trapping air in the cooler tubes.


 its just been a handle I've been using since I was a teen and I'm in too deep now to change