
The Auto Dimming Mirror Thread

Thread Starter
Supreme Member
iTrader: (4)
Joined: Sep 2004
Posts: 2,069
Likes: 5
From: MN
Car: 85 SC, 86 Berlinetta
Engine: V6, V8
Transmission: 700r4, 700r4
The Auto Dimming Mirror Thread
Everything below is from observation to help others learn more about their dimming mirrors or is looking to purchase one. I’ve found that people have purchased mirrors only to find that they don’t work, are the wrong type, or won’t fit. Again these are from my observations and if anyone has found anything different please post here so I can update this thread. This is based on Gentex mirrors only.
Mechanical Mirror:
I had a curious interest in these mirrors when I purchased one and found that it didn’t work. It was kind of fun fixing it and finding out how they work. Lately I’ve found that some people want to keep their vehicle original including this mirror and that there is no support or information for them.
Edit: Here is an early brochure describing it's operation and the vehicles it was available in.
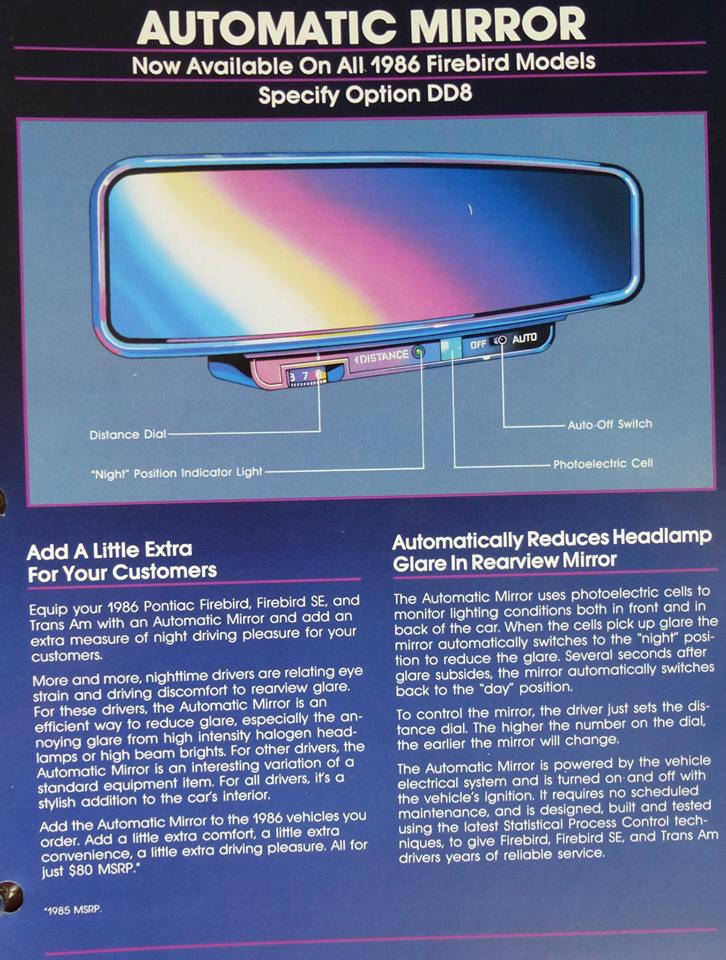

The mechanical mirror although very old, is an interesting and yet simple device in that it uses two photoelectric sensors to determine a difference in light between the front of the unit and the back. It features an adjustable sensitivity dial as well as an LED indicating when it is in dimming mode. It also has a safety feature that returns the mirror to non-dimming mode whenever the car is put into reverse.
I’ve noticed quite a few differences in these mirrors and could use some help in determining which mirrors were used in Thirdgens throughout the eighties. Below are images of some of the differences I’ve noticed in the mirrors but it would help to know what styles were used in which cars.
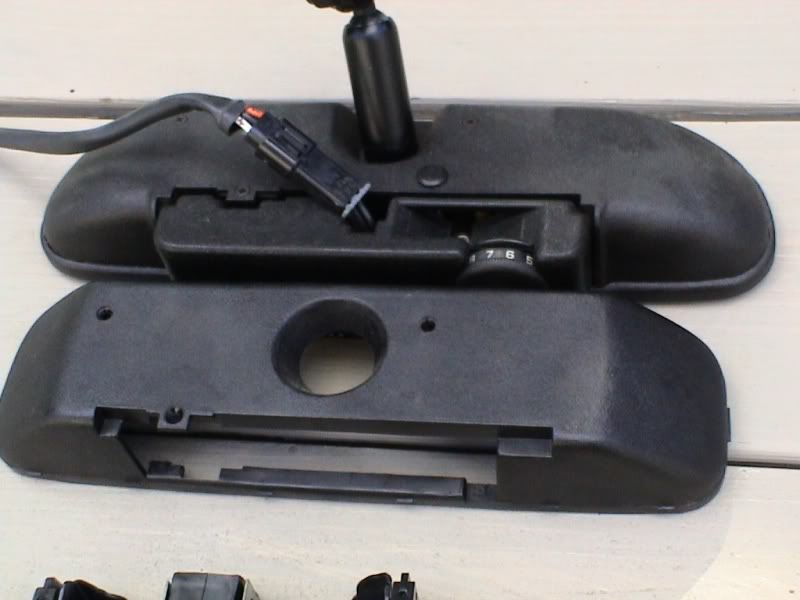
Below are the differences in the body of the mirrors (One is longer and has a curved back, while the other is more rectangular and has an angled back):
Attachment 427490
Differences in the lower section (note the curved area around where the wiring exits):
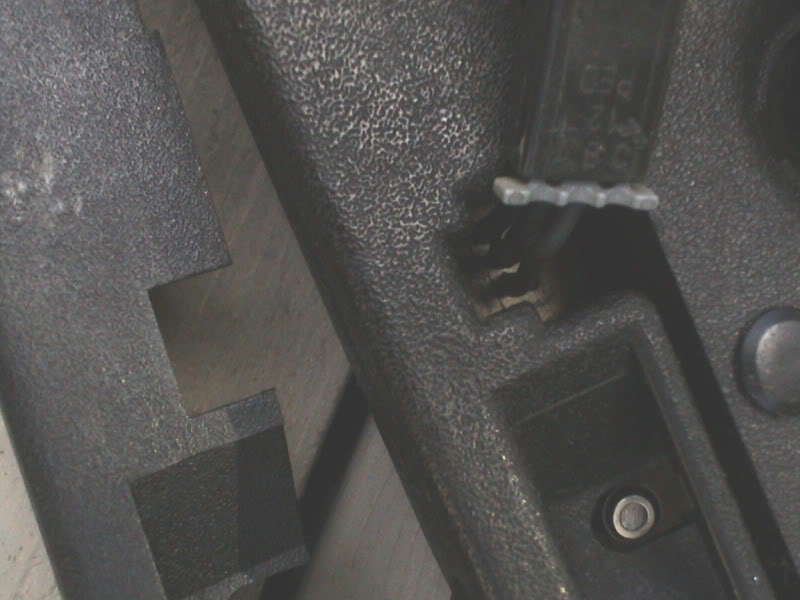
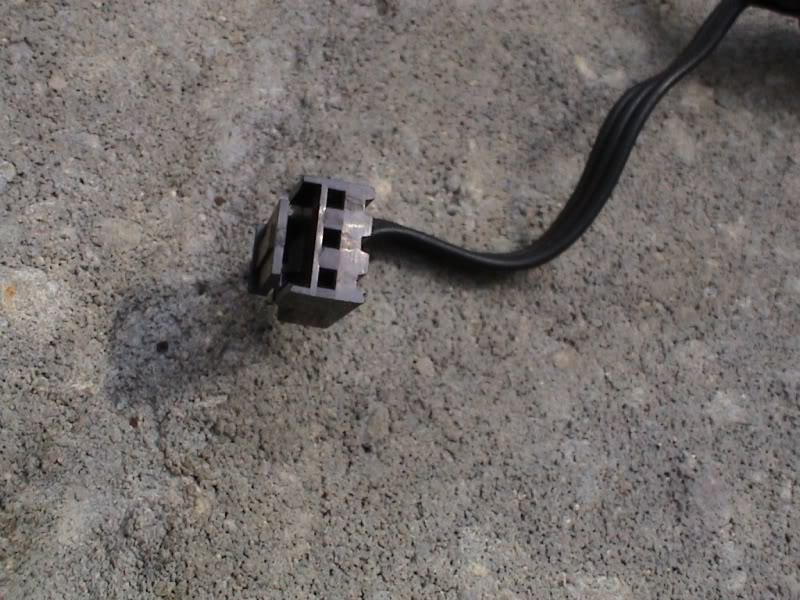
And also many use a connector that is attached to the main board of the mirror (as shown below) while others have a wire lead as shown above. From my observations Thirdgens use the connector as shown below.
Observed Wring:
The basic functions of all dimming mirrors rely on three wires and are as follows:
It’s not practical to depend on the colors of the wiring to determine how to hook up or test the unit because the wiring color can vary depending on the vehicle or leads that happen to come with it (if any). You can however look inside of the unit and see the designation for each pin (or lead) on the circuit board itself. This is the only recommended way of determining what the leads are.
From observation, this is the typical layout for the leads for both mechanical and electro-chromatic mirrors.
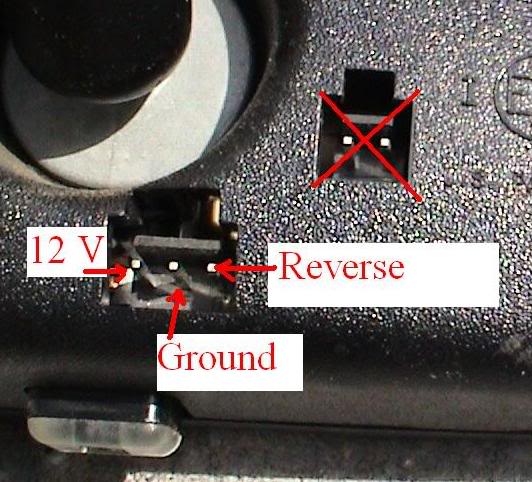
The connector noted with the red X over it may have been used to power an external mirror on cars such as a 1995 Buick Riviera.
What the connector looks like:
Mechanical Mirror:
I had a curious interest in these mirrors when I purchased one and found that it didn’t work. It was kind of fun fixing it and finding out how they work. Lately I’ve found that some people want to keep their vehicle original including this mirror and that there is no support or information for them.
Edit: Here is an early brochure describing it's operation and the vehicles it was available in.
The mechanical mirror although very old, is an interesting and yet simple device in that it uses two photoelectric sensors to determine a difference in light between the front of the unit and the back. It features an adjustable sensitivity dial as well as an LED indicating when it is in dimming mode. It also has a safety feature that returns the mirror to non-dimming mode whenever the car is put into reverse.
I’ve noticed quite a few differences in these mirrors and could use some help in determining which mirrors were used in Thirdgens throughout the eighties. Below are images of some of the differences I’ve noticed in the mirrors but it would help to know what styles were used in which cars.
Below are the differences in the body of the mirrors (One is longer and has a curved back, while the other is more rectangular and has an angled back):
Attachment 427490
Differences in the lower section (note the curved area around where the wiring exits):
And also many use a connector that is attached to the main board of the mirror (as shown below) while others have a wire lead as shown above. From my observations Thirdgens use the connector as shown below.
Observed Wring:
The basic functions of all dimming mirrors rely on three wires and are as follows:
- 12V
- GND
- Reverse back up – (I’ve found that it’s triggered by +12V. It acts as a safety feature that returns the mirror to non-dimmed status.)
It’s not practical to depend on the colors of the wiring to determine how to hook up or test the unit because the wiring color can vary depending on the vehicle or leads that happen to come with it (if any). You can however look inside of the unit and see the designation for each pin (or lead) on the circuit board itself. This is the only recommended way of determining what the leads are.
From observation, this is the typical layout for the leads for both mechanical and electro-chromatic mirrors.
The connector noted with the red X over it may have been used to power an external mirror on cars such as a 1995 Buick Riviera.
What the connector looks like:
Last edited by Scorpner; Mar 19, 2018 at 12:30 PM.
Thread Starter
Supreme Member
iTrader: (4)
Joined: Sep 2004
Posts: 2,069
Likes: 5
From: MN
Car: 85 SC, 86 Berlinetta
Engine: V6, V8
Transmission: 700r4, 700r4
Re: The Auto Dimming Mirror Thread
To test a mechanical dimming mirror:
Since these mirrors are often around 20 years old they don’t always behave as they should. Because of this I’ve found a few things that help determine what’s going on.
Power:
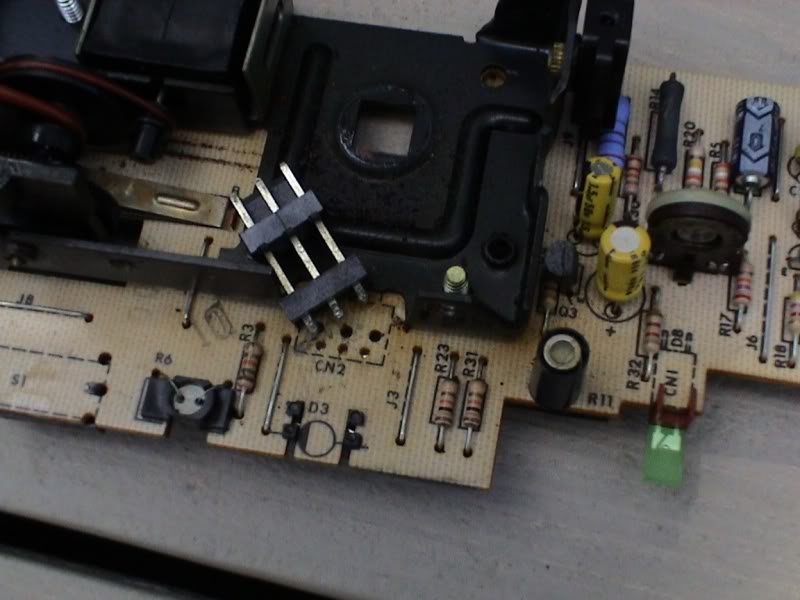
The on/off function is indicated by the green LED above the sensitivity dial. It stays on as long as the unit is powered up. The switches are sometimes intermittent so this will help determine if it’s getting power and that it’s constant. It may be necessary to darken the room to see it since it isn’t very bright. If the power is intermittent it could be the switch but also check the connector where it attaches to the main board. I’ve noticed cold solder joints at this location.
Sensitivity (distance) dial:
The distance label on the front refers to the sensitivity dial which allows adjustment of when the dimming function is activated.
Center LED:
The center LED indicates if the mirror is in dimming mode, not if it’s on or off. It has nothing to do with distance even though the label is right next to it.
Testing the mirror:
Testing it is really simple. Set it down on a table with the mirror facing your direction. Hook up the power and ground using an old harness so that positive and negative won’t cross even if the unit moves. Then turn it on. Observe that the distance LED lights up. The unit may move depending on where it was when it was last powered up. The center LED should be off at this time. Now shine a light on the photoelectric sensor on the front (mirror side) of the unit and watch for the center LED to light up. (Don’t stare at the light in the mirror.) If this doesn’t happen, adjust the distance dial from near (lower numbers) to far (higher numbers) until it does. If the LED does not light up then you may need to turn off or dim the surrounding lights for it to activate. Or you can try covering the other sensor. It’s necessary for there to be a great enough difference between the front and rear sensors. Once the center LED lights up, you should hear the motor and be able to see the mirror move to the dimming position within a short period and then stop. If the center LED lights up but you do not hear the motor or see it move within a short period of time, or hear it running continuously, shut the unit off and read below. Otherwise you may test the reverse function by applying +12V to the reverse lead. With the flashlight in place it’s a good time to check the functionality of the unit by switching the reverse on and off. If the center light never activates, then you know it has a problem detecting the difference in the light.
The reason for watching the LED instead of listening for the motor is that these units often fail in such a way the motor or the components on the main board are over stressed causing further damage. If the center LED lights up and it remains quiet or continuously runs, then something is wrong. I’ve noticed a couple of different scenarios with these mirrors when they fail.
One is that the belts and pulleys are often loaded with dirt and grease. The motor may be loose and actually contact the opposing pulley.
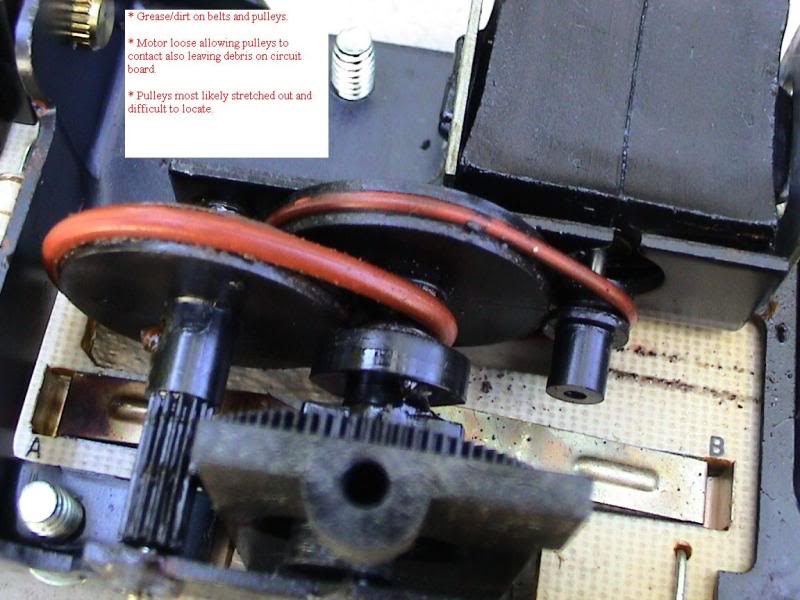
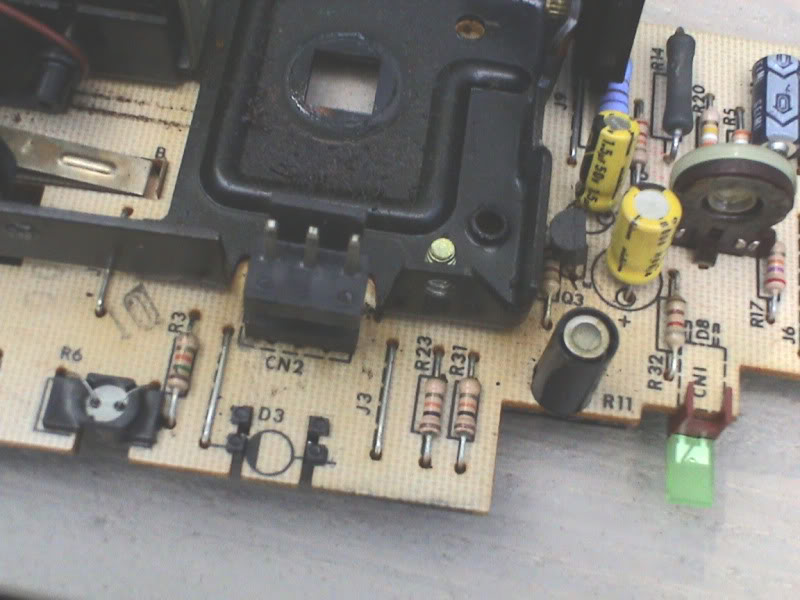
In other cases, the gears have little or no grease and the drive train tends to seize up and hold the motor in place. Even after loosening up the drive train and applying grease it seems the motor still has trouble and may come to a stop. Then the components on the right hand side of the main board tend to quickly over heat. I’ve noticed that these units tend to have a more secure mount for the motor and that the contacts shown as A and B have more corrosion. I’m assuming that the slop in the motor mount and belt along with the grease allowed the motor and output circuits to survive a less stressful life than these drier ones I’ve found.
Electro-chromatic:
These mirrors have no internal moving parts and the later ones are variable depending on the difference in the amount of light between the sensors.
Testing electro-chromatic:
The electro-chromatic is easy to test. Set it down on a table with the mirror facing your direction. Hook up the power and ground using an old harness so that positive and negative won’t cross even if the unit moves. Then turn it on by depressing the switch in the center. The switch itself should light up. Shine a light on the photoelectric sensor on the front (mirror side) of the unit and watch for the mirror to darken. Don’t stare at the light in the mirror. It’s easy to see the mirror darken by observing at an angle. If the mirror does not darken then you may need to turn off or dim the surrounding lights for it to activate. Or you can try covering the other sensor. It’s necessary for there to be a great enough difference between the front and rear sensors.
Mounting to the window:
It should also be noted that there are differences in the size of the mounting tabs used to attach the mirror to the window. So if you’re purchasing one keep in mind to buy one that’s similar or be ready to switch what’s attached to your window. The older mirrors typically use the smaller style but this is NOT always the case. The flared style often does not use a bolt to secure it to the mounting tab, but is locked into place via a spring lock. These are typically found on newer vehicles.

I started a list:
Year/model..........Body(Curved/ Square)..........Wiring (Plug-in/Lead sticking out.)
1986 IROC ...............____...........................Plug-in
1987 GTA .................Curved..........
1987 IROC ................Square.......................Plug-in
2-'86 IROC-Zs ...........Square.......................Plug-in w/ 2" extension
87 LT ........................Square.......................Plug-in w/ 2" extension
86 Z28 ......................Square.......................Plug-in w/ 2" extension
1987 IROC.................Curved.......................Plug-in
1992 GTA .................Curved.................................
Note: Some models include the plastic harness clip attached to mirror arm.
.
Since these mirrors are often around 20 years old they don’t always behave as they should. Because of this I’ve found a few things that help determine what’s going on.
Power:
The on/off function is indicated by the green LED above the sensitivity dial. It stays on as long as the unit is powered up. The switches are sometimes intermittent so this will help determine if it’s getting power and that it’s constant. It may be necessary to darken the room to see it since it isn’t very bright. If the power is intermittent it could be the switch but also check the connector where it attaches to the main board. I’ve noticed cold solder joints at this location.
Sensitivity (distance) dial:
The distance label on the front refers to the sensitivity dial which allows adjustment of when the dimming function is activated.
Center LED:
The center LED indicates if the mirror is in dimming mode, not if it’s on or off. It has nothing to do with distance even though the label is right next to it.
Testing the mirror:
Testing it is really simple. Set it down on a table with the mirror facing your direction. Hook up the power and ground using an old harness so that positive and negative won’t cross even if the unit moves. Then turn it on. Observe that the distance LED lights up. The unit may move depending on where it was when it was last powered up. The center LED should be off at this time. Now shine a light on the photoelectric sensor on the front (mirror side) of the unit and watch for the center LED to light up. (Don’t stare at the light in the mirror.) If this doesn’t happen, adjust the distance dial from near (lower numbers) to far (higher numbers) until it does. If the LED does not light up then you may need to turn off or dim the surrounding lights for it to activate. Or you can try covering the other sensor. It’s necessary for there to be a great enough difference between the front and rear sensors. Once the center LED lights up, you should hear the motor and be able to see the mirror move to the dimming position within a short period and then stop. If the center LED lights up but you do not hear the motor or see it move within a short period of time, or hear it running continuously, shut the unit off and read below. Otherwise you may test the reverse function by applying +12V to the reverse lead. With the flashlight in place it’s a good time to check the functionality of the unit by switching the reverse on and off. If the center light never activates, then you know it has a problem detecting the difference in the light.
The reason for watching the LED instead of listening for the motor is that these units often fail in such a way the motor or the components on the main board are over stressed causing further damage. If the center LED lights up and it remains quiet or continuously runs, then something is wrong. I’ve noticed a couple of different scenarios with these mirrors when they fail.
One is that the belts and pulleys are often loaded with dirt and grease. The motor may be loose and actually contact the opposing pulley.
In other cases, the gears have little or no grease and the drive train tends to seize up and hold the motor in place. Even after loosening up the drive train and applying grease it seems the motor still has trouble and may come to a stop. Then the components on the right hand side of the main board tend to quickly over heat. I’ve noticed that these units tend to have a more secure mount for the motor and that the contacts shown as A and B have more corrosion. I’m assuming that the slop in the motor mount and belt along with the grease allowed the motor and output circuits to survive a less stressful life than these drier ones I’ve found.
Electro-chromatic:
These mirrors have no internal moving parts and the later ones are variable depending on the difference in the amount of light between the sensors.
Testing electro-chromatic:
The electro-chromatic is easy to test. Set it down on a table with the mirror facing your direction. Hook up the power and ground using an old harness so that positive and negative won’t cross even if the unit moves. Then turn it on by depressing the switch in the center. The switch itself should light up. Shine a light on the photoelectric sensor on the front (mirror side) of the unit and watch for the mirror to darken. Don’t stare at the light in the mirror. It’s easy to see the mirror darken by observing at an angle. If the mirror does not darken then you may need to turn off or dim the surrounding lights for it to activate. Or you can try covering the other sensor. It’s necessary for there to be a great enough difference between the front and rear sensors.
Mounting to the window:
It should also be noted that there are differences in the size of the mounting tabs used to attach the mirror to the window. So if you’re purchasing one keep in mind to buy one that’s similar or be ready to switch what’s attached to your window. The older mirrors typically use the smaller style but this is NOT always the case. The flared style often does not use a bolt to secure it to the mounting tab, but is locked into place via a spring lock. These are typically found on newer vehicles.
I started a list:
Year/model..........Body(Curved/ Square)..........Wiring (Plug-in/Lead sticking out.)
1986 IROC ...............____...........................Plug-in
1987 GTA .................Curved..........
1987 IROC ................Square.......................Plug-in
2-'86 IROC-Zs ...........Square.......................Plug-in w/ 2" extension
87 LT ........................Square.......................Plug-in w/ 2" extension
86 Z28 ......................Square.......................Plug-in w/ 2" extension
1987 IROC.................Curved.......................Plug-in
1992 GTA .................Curved.................................
Note: Some models include the plastic harness clip attached to mirror arm.
.
Last edited by Scorpner; Feb 20, 2011 at 09:37 AM.
Joined: May 2008
Posts: 1,361
Likes: 52
From: Alabama
Car: 87 GTA
Engine: 5.7 TPI
Transmission: 700r4
Axle/Gears: 3:27 BW 9 bolt
Re: The Auto Dimming Mirror Thread
I think mine is the top one (longer one). My car is at the paint shop right now but when I get it back I will check to be sure. I know the green light on mine comes on when the switch is moved to "on", but the motor part doesn't work. I tried shining a flashlight on it at night and still nothing, no noise or anything.
Moderator

Joined: Jun 2000
Posts: 8,464
Likes: 219
From: Florida
Car: 87 IROC-Z, 82 Pace Car
Re: The Auto Dimming Mirror Thread
The motor on mine did nothing when I got my car. Two years later, I went to Camaro Superfest in Michigan and was talking to an Eastern Michigan Camaro Club member that knows alot about vehicle repairs. I've spoken with him many times before, but never met him. While at that show, he gave me 2 more mirrors in hopes that I could get mine working from the parts on those mirrors. Neither mirror looked like mine, but I swapped the motor and my mirror came to life. A little soldering and some troubleshooting, I had and still have a working mirror! Thanks Greg (EMCC)
Thread Starter
Supreme Member
iTrader: (4)
Joined: Sep 2004
Posts: 2,069
Likes: 5
From: MN
Car: 85 SC, 86 Berlinetta
Engine: V6, V8
Transmission: 700r4, 700r4
Re: The Auto Dimming Mirror Thread
Good to hear about getting it working again!
Do you know what body style and connector it has? I started a list.
Thanks for the help so far!
Do you know what body style and connector it has? I started a list.
Thanks for the help so far!
Joined: Jun 2006
Posts: 1,700
Likes: 17
From: Southern California
Car: 1987 Camaro LT
Engine: LG4 w/ SLP headers & a 3" catback
Transmission: THM700R4 (Stock)
Axle/Gears: Stock 2.73 gears. No Posi
Trending Topics
Thread Starter
Supreme Member
iTrader: (4)
Joined: Sep 2004
Posts: 2,069
Likes: 5
From: MN
Car: 85 SC, 86 Berlinetta
Engine: V6, V8
Transmission: 700r4, 700r4
Re: The Auto Dimming Mirror Thread
Make sure that the belts and pulleys are clean. If they're stretched you could try alcohol. Even though it tends to dry belts out, at this point it's not as much of an issue. Also on some models the motor bracket can be moved to take up the slack. Unfortunately, I don't know of a source for the belts. I've contacted the manufacturer as well as their main distributor and they weren't any help.

Junior Member
Joined: Oct 2008
Posts: 2
Likes: 0
Re: The Auto Dimming Mirror Thread
Make sure that the belts and pulleys are clean. If they're stretched you could try alcohol. Even though it tends to dry belts out, at this point it's not as much of an issue. Also on some models the motor bracket can be moved to take up the slack. Unfortunately, I don't know of a source for the belts. I've contacted the manufacturer as well as their main distributor and they weren't any help.

Supreme Member
Joined: Sep 2002
Posts: 9,192
Likes: 20
From: Cary, North Carolina
Car: 1992 RS
Engine: Carbed 350
Transmission: 700R4
Axle/Gears: 3.42 posi
Re: The Auto Dimming Mirror Thread
By looking at the pics. it would seem that any rubber o-ring the right size would suffice - maybe try the plumbing section at the hardware store or Home Depot/Lowes to see if there's anything comparable.
Although I don't have a dimming mirror, this is very interesting. Never knew there was a mechanical version with little motors/gears that actually flipped the mirror for you - that's too cool for the time period.
Although I don't have a dimming mirror, this is very interesting. Never knew there was a mechanical version with little motors/gears that actually flipped the mirror for you - that's too cool for the time period.
Thread Starter
Supreme Member
iTrader: (4)
Joined: Sep 2004
Posts: 2,069
Likes: 5
From: MN
Car: 85 SC, 86 Berlinetta
Engine: V6, V8
Transmission: 700r4, 700r4
Re: The Auto Dimming Mirror Thread
I don't have any that would be worthwhile measuring. I was given some by an engineer at my old job to fix one that I had, but it was out of a different material and wasn't the correct size either. The mirror will work if the belt is off size as long as it doesn't create too much drag. I would measure what you have, guesstimate what size it should be and buy a couple extra one size up and one size down. I believe it is a simple O-ring, they just go by different names sometimes.
Another option is moving to a non-mechanical one to replace it, but the tab on the window may be a different size and might need to be replaced. They are much more reliable though.
Another option is moving to a non-mechanical one to replace it, but the tab on the window may be a different size and might need to be replaced. They are much more reliable though.
Joined: Jun 2006
Posts: 1,700
Likes: 17
From: Southern California
Car: 1987 Camaro LT
Engine: LG4 w/ SLP headers & a 3" catback
Transmission: THM700R4 (Stock)
Axle/Gears: Stock 2.73 gears. No Posi
Re: The Auto Dimming Mirror Thread
Bummer on the belts. But I did check out the Gentex model with the compas on it. That might be a worthwhile investment. Don't really think I would want the one with the temperature on it as well.
Supreme Member
Joined: Sep 2002
Posts: 9,192
Likes: 20
From: Cary, North Carolina
Car: 1992 RS
Engine: Carbed 350
Transmission: 700R4
Axle/Gears: 3.42 posi
Re: The Auto Dimming Mirror Thread
Don't tell anyone, but I had a Ford Exploder with the temp/compass in the mirror - drove to upstate NY one weekend in Jan, and it was interesting to watch the temp go from 60 to -10 in the course of the 12 hour drive that night. The last 10 it fell was during white out conditions between Buffalo and Watertown - talk about a tight spincter muscle 
Joined: Jun 2006
Posts: 1,700
Likes: 17
From: Southern California
Car: 1987 Camaro LT
Engine: LG4 w/ SLP headers & a 3" catback
Transmission: THM700R4 (Stock)
Axle/Gears: Stock 2.73 gears. No Posi
Re: The Auto Dimming Mirror Thread
Don't sweat it about the Explorer. I have a 2001 Explorer Sport 4x4 and on the roof console every so often in the winter time, it says "ICE". Hey i'm like not that far from Downtown L.A. so it's a trip to see ICE when I get in to go to work. I read on the manual that once it gets under a certain temp outside it will read that. Too bad in the summer it doesn't say "IT'S F*****G HOT" 
Thread Starter
Supreme Member
iTrader: (4)
Joined: Sep 2004
Posts: 2,069
Likes: 5
From: MN
Car: 85 SC, 86 Berlinetta
Engine: V6, V8
Transmission: 700r4, 700r4
Re: The Auto Dimming Mirror Thread
I have some of the later ones for $30-$40. But you'd probably need to swap the mount on the window. The wiring should match though. >>>Link

Joined: Feb 2004
Posts: 1,942
Likes: 30
From: Levittown Pa
Car: 89 Iroc Convertible
Engine: 305 TPI
Transmission: 700R4
Axle/Gears: 3.27 Posi 9 bolt PBR
Re: The Auto Dimming Mirror Thread
I recently found one of the newer lcd style dimming mirrors in a 93 roadmaster.It was interesting due to the fact that it had the 2 maplights on the bottom.I wanted to swap it into my 89 iroc vert but the wiring is different.Mine has a 3 prong connector while the newer mirror has a 4 prong connector.I figured out the wiring for maplights and dim function so Im gonna try and splice a 3 prong connector on to it and see what happens.I dont want to cut my factory wiring.I also have a nice one with the compass that came from a 90`s cadillac
Member
Joined: Dec 2005
Posts: 268
Likes: 0
From: Owensboro, Ky
Car: 1987 Iroc-Z28
Engine: 305 TPI
Transmission: 700r4
Axle/Gears: G92 3.23, G80, J65 disc
Re: The Auto Dimming Mirror Thread
i have a 1987 IROC and it has a square but with no leads/pigtail coming from the mirror.
Thread Starter
Supreme Member
iTrader: (4)
Joined: Sep 2004
Posts: 2,069
Likes: 5
From: MN
Car: 85 SC, 86 Berlinetta
Engine: V6, V8
Transmission: 700r4, 700r4
Thread Starter
Supreme Member
iTrader: (4)
Joined: Sep 2004
Posts: 2,069
Likes: 5
From: MN
Car: 85 SC, 86 Berlinetta
Engine: V6, V8
Transmission: 700r4, 700r4
Re: The Auto Dimming Mirror Thread
I recently found one of the newer lcd style dimming mirrors in a 93 roadmaster.It was interesting due to the fact that it had the 2 maplights on the bottom.I wanted to swap it into my 89 iroc vert but the wiring is different.Mine has a 3 prong connector while the newer mirror has a 4 prong connector.I figured out the wiring for maplights and dim function so Im gonna try and splice a 3 prong connector on to it and see what happens.I dont want to cut my factory wiring.I also have a nice one with the compass that came from a 90`s cadillac
Last edited by Scorpner; Mar 16, 2010 at 11:45 AM.
Joined: Feb 2004
Posts: 1,942
Likes: 30
From: Levittown Pa
Car: 89 Iroc Convertible
Engine: 305 TPI
Transmission: 700R4
Axle/Gears: 3.27 Posi 9 bolt PBR
Re: The Auto Dimming Mirror Thread
There is no headliner in that car cause its a convertible.The wiring is tucked up under the plastic trim piece that runs along the top of the windshield.I need to get a 3 prong connector from another mirror and splice it to the wiring on the newer mirror.Seems like every mirror Im finding has a 4 prong connector on it.
Joined: Nov 2002
Posts: 6,668
Likes: 414
From: Oyth
Car: 89RS vert
Engine: Erod
Transmission: 4L65e
Axle/Gears: BW, 3.27
Re: The Auto Dimming Mirror Thread
You can make the newer style mounts fit the older smaller brackets by squeezing the newer mounts in a vise to fit the smaller bracket on the windshield.Or can also unbolt the entire mount on the back of the mirror & bolt it onto the newer style.This way you can keep the OE mount on the windshield.Just pull apart the plastic housing.
If you have the older mechanical dimmer & want to switch to a newer chromatic style, but dont want to cut/splice your harness.Just cut the pigtail from the newer mirror w/about 1.5 inches of wire.Strip about 1/4 insulation & tin the leads.Then just plug them into your original plug.This way you dont have to cut your original harness if you ever want to switch back.I did this with mine after the older mechanical type shorted out & i could'nt find a replacement.So i "upgraded", but kept the harness as is.
I have swapped mirrors twice, first the standard chromatic & now to one with a compass.I have since found 2-3 of the older mechanical dimmer type, but yet to switch back.Some day i will though.They're just too nostalgic to throw out.Plus you can adjust the sensitivity.
Most of the mechanical dimming mirrors ive found that dont have the plug on the main board.Were from non f-bodies & one in an late 80's Mustang.The shorter type ive pulled from a few caddies.
Last edited by 84 1LE; Oct 19, 2014 at 03:41 PM.
Joined: Jul 2005
Posts: 1,428
Likes: 2
From: Guilford, Connecticut
Car: 1988 IROC-Z camaro
Engine: 355 TPI
Transmission: tko 500
Axle/Gears: Dana 44 3.31 posi pbr brakes
Re: The Auto Dimming Mirror Thread
Try a bike store. No joke the rubber bands that are used to hold the computers to the handlebars look almost identical (they come in different lengths too). I cant tell how big those are because its not right in front of me but that would be a good bet for new belts.
Joined: Sep 2007
Posts: 1,591
Likes: 132
From: Fayette County, OH
Car: basic third gens
Engine: that I like
Transmission: to restore
Axle/Gears: and enjoy
Re: The Auto Dimming Mirror Thread
Both of my '86 IROC-Zs have the squared-off mirror with the plug on the board. However, both have about a 2 inch extension harness that plugs into the harness of the car. One is a hardtop car with a clip to hold the harness in place. The t-top car does not have this clip, but it may have disappeared when the windshield was installed several years back. I have a spare mirror that is identical, and has the clip for the harness. I sort of remembering it coming from a hardtop Berlinetta.
Joined: Feb 2004
Posts: 1,942
Likes: 30
From: Levittown Pa
Car: 89 Iroc Convertible
Engine: 305 TPI
Transmission: 700R4
Axle/Gears: 3.27 Posi 9 bolt PBR
Re: The Auto Dimming Mirror Thread
Besides F Bodies I have found the mechanical distance mirrors in Buick Riviera,Oldsmobile Trofeo and Cadillacs.
Thread Starter
Supreme Member
iTrader: (4)
Joined: Sep 2004
Posts: 2,069
Likes: 5
From: MN
Car: 85 SC, 86 Berlinetta
Engine: V6, V8
Transmission: 700r4, 700r4
Re: The Auto Dimming Mirror Thread
Thanks 86blackiroc, it's starting to look like the '86-'87 IROC's had the square style.
my82roc, yes I've even seen the later style in Chryslers as well. I think they're all basically the same, but when you have two next to each other they all seem to have something different from the other one which makes it interesting.
my82roc, yes I've even seen the later style in Chryslers as well. I think they're all basically the same, but when you have two next to each other they all seem to have something different from the other one which makes it interesting.
Joined: Feb 2004
Posts: 1,942
Likes: 30
From: Levittown Pa
Car: 89 Iroc Convertible
Engine: 305 TPI
Transmission: 700R4
Axle/Gears: 3.27 Posi 9 bolt PBR
Re: The Auto Dimming Mirror Thread
I have a very nice working one that was pulled from an 88 Riviera.It has the curved back and the wire goes directly into the mirror
Joined: Aug 1999
Posts: 5,279
Likes: 472
From: RI
Car: 1984 Camaro Berlinetta
Engine: LT1
Transmission: T56 6-speed
Axle/Gears: 4.11 LS1 Rear End
Re: The Auto Dimming Mirror Thread
Here are the mirrors I've got. The one described as from an 87 LT was factory installed and so was the one described as from an 86 Z28.

The only one that might not have been factory installed in the car was the one described as from an 88 IROC. You will notice that the wires lead out of the unit - not a plug in.... & that the wires are longer than the wiring on the confirmed ThirdGen version. ( a thirdGen plug has been spliced onto it. ) You might also notice that it has an enlargement adapter for the windshield button on it. Not sure how it got in there - but it was inside a car I parted years back !
The one described as from a 95 Impala SS is a "twilight sentinal" (?) auto dimming with duel maplights..... I've installed this type into most of my cars.

P.S. Just found an NOS unit on E-Bay. "The nos part number is 998974 with group#10.185. "
http://cgi.ebay.com/ebaymotors/NOS-8...Q5fAccessories
Hope it helps in some way !

The only one that might not have been factory installed in the car was the one described as from an 88 IROC. You will notice that the wires lead out of the unit - not a plug in.... & that the wires are longer than the wiring on the confirmed ThirdGen version. ( a thirdGen plug has been spliced onto it. ) You might also notice that it has an enlargement adapter for the windshield button on it. Not sure how it got in there - but it was inside a car I parted years back !
The one described as from a 95 Impala SS is a "twilight sentinal" (?) auto dimming with duel maplights..... I've installed this type into most of my cars.
P.S. Just found an NOS unit on E-Bay. "The nos part number is 998974 with group#10.185. "
http://cgi.ebay.com/ebaymotors/NOS-8...Q5fAccessories
Hope it helps in some way !
Thread Starter
Supreme Member
iTrader: (4)
Joined: Sep 2004
Posts: 2,069
Likes: 5
From: MN
Car: 85 SC, 86 Berlinetta
Engine: V6, V8
Transmission: 700r4, 700r4
Re: The Auto Dimming Mirror Thread
Hey thanks, I appreciate that! I'll add the confirmed ones that you posted.
I have come across a couple similar to the 88 IROC but they both have the curved back. One routes the wiring exactly the same way and the adapter for the button is also larger on both. It could have changed to that style later on and I had thought I had figured it out earlier, but the rev numbers on the circuit board inside contradicted how I had thought things went. I've never seen anything like the one from the Impala though. That's pretty cool.
Is there a way to confirm the part number on the Ebay one? If there is I'll add that one as well.
Thanks again.
Joined: Aug 1999
Posts: 5,279
Likes: 472
From: RI
Car: 1984 Camaro Berlinetta
Engine: LT1
Transmission: T56 6-speed
Axle/Gears: 4.11 LS1 Rear End
Re: The Auto Dimming Mirror Thread
Here's a picture of the part number on the NOS package:
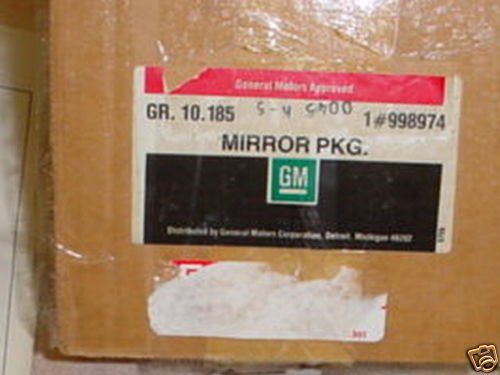
There's a lot of good info here; Glad I was able to add a little - even if it was just a little !
There's a lot of good info here; Glad I was able to add a little - even if it was just a little !
Thread Starter
Supreme Member
iTrader: (4)
Joined: Sep 2004
Posts: 2,069
Likes: 5
From: MN
Car: 85 SC, 86 Berlinetta
Engine: V6, V8
Transmission: 700r4, 700r4
Re: The Auto Dimming Mirror Thread
Thanks, I guess what I meant was if it's listed by GM as a mirror for a Thirdgen. I actually tried calling earlier and they didn't recognize the number.
I'd have to say though you've helped a lot. I learned quite a few things.
I'd have to say though you've helped a lot. I learned quite a few things.
Joined: Feb 2004
Posts: 1,942
Likes: 30
From: Levittown Pa
Car: 89 Iroc Convertible
Engine: 305 TPI
Transmission: 700R4
Axle/Gears: 3.27 Posi 9 bolt PBR
Re: The Auto Dimming Mirror Thread
Here are the mirrors I've got. The one described as from an 87 LT was factory installed and so was the one described as from an 86 Z28.
The only one that might not have been factory installed in the car was the one described as from an 88 IROC. You will notice that the wires lead out of the unit - not a plug in.... & that the wires are longer than the wiring on the confirmed ThirdGen version. ( a thirdGen plug has been spliced onto it. ) You might also notice that it has an enlargement adapter for the windshield button on it. Not sure how it got in there - but it was inside a car I parted years back !
The one described as from a 95 Impala SS is a "twilight sentinal" (?) auto dimming with duel maplights..... I've installed this type into most of my cars.
P.S. Just found an NOS unit on E-Bay. "The nos part number is 998974 with group#10.185. "
http://cgi.ebay.com/ebaymotors/NOS-8...Q5fAccessories
Hope it helps in some way !
Joined: Aug 1999
Posts: 5,279
Likes: 472
From: RI
Car: 1984 Camaro Berlinetta
Engine: LT1
Transmission: T56 6-speed
Axle/Gears: 4.11 LS1 Rear End
Re: The Auto Dimming Mirror Thread
My harness is wired with
Red - Power
Pink - Ignition
Black - Ground
White - Courtesy
Green - Brake ( I think )
The mirror itself dictates power and ground to the map-lights using the buttons "on demand". (these power and grounds are most likely shared internally ) The Ignition wire sends power to the dimmer electronics only when the car is in RUN ( dimmer also uses a common ground ). Courtesy is input from door switches or other switched ground. ( courtesy also uses a common power ). Lt green is to turn of the dimmer, I never connected it, I think it's looking for switched power. ( input to brake lights ?? )
My Berlinetta has different wiring than your car. I fed the courtesy wire using the Purple wire from my Light Module so it's on a timer with the rest of the courtesy system. If I used the door jam sending unit than it would only turn those mirror lights on until the door was closed, rather than using the timer.
You should be able to wire the mirror for on demand or switched as long as you have the wires connected correctly. Splice the 1 wire remaining on the mirror harness to a switched ground source and see if that works for Ya' !
P.S. It sounds as if you are feeding the dimmer in the mirror with Power at all times. You might want to reconsider this and splice it to a switched positive ( IGN) wire to reduce parasitic loss and to protect the dimmer circuitry.
Last edited by John in RI; Dec 20, 2009 at 05:59 PM. Reason: P.S.
Thread Starter
Supreme Member
iTrader: (4)
Joined: Sep 2004
Posts: 2,069
Likes: 5
From: MN
Car: 85 SC, 86 Berlinetta
Engine: V6, V8
Transmission: 700r4, 700r4
Re: The Auto Dimming Mirror Thread
The green one is probably connected to a switch on the shifter. It acts as a safety feature that returns the mirror to non-dimmed status when the car is put in reverse.
Senior Member
iTrader: (1)
Joined: Apr 2004
Posts: 536
Likes: 0
From: Prescott Valley AZ
Car: 87 Iroc Showcar - Saturday Nite Hun
Engine: 383 4-Bolt Truck Hyd Roller MiniRam
Transmission: B&M 700R4 - Edge 3200
Axle/Gears: BW 9 Bolt-TA Cover & Stud Kit - 3.2
Re: The Auto Dimming Mirror Thread
Glad to see this thread.
Mine worked for about one week after took delivery of the car
in early 87.
One thing that didn't work and didn't fix all this time.
Things warm up, going to see if can get it working with this thread.
Later
Mine worked for about one week after took delivery of the car
in early 87.
One thing that didn't work and didn't fix all this time.
Things warm up, going to see if can get it working with this thread.
Later
Joined: Aug 1999
Posts: 5,279
Likes: 472
From: RI
Car: 1984 Camaro Berlinetta
Engine: LT1
Transmission: T56 6-speed
Axle/Gears: 4.11 LS1 Rear End
Re: The Auto Dimming Mirror Thread
returns the mirror to non-dimmed status when the car is put in reverse
YES !!! The Lt. Green wire splices to the Lt Green reverse wire ! ( Sorry for the brain-fart ! )
Joined: Feb 2004
Posts: 1,942
Likes: 30
From: Levittown Pa
Car: 89 Iroc Convertible
Engine: 305 TPI
Transmission: 700R4
Axle/Gears: 3.27 Posi 9 bolt PBR
Re: The Auto Dimming Mirror Thread
Yes I did have the dimmer wire running to constant power.As suggested I have since removed that from the constant power.I hooked up the remaining wire to the one unused terminal and when power is applied it turns on both maplights regardless of what position the switches are in so I figure that is the courtesy light wire.Guess Ill have to run a seperate wire for the dimmer since the old mirror has a 3 wire connector and the new one has a 4 wire connector.That would make the most sense since the original mirror wasnt a dimming type and Im left with one odd wire which is for the dimmer
Last edited by my82roc; Dec 21, 2009 at 10:10 AM.
Moderator


Joined: Mar 2001
Posts: 14,298
Likes: 197
From: Doghouse �������������������������������������� Car: 1989 Formula 350 Vert Engine: 350 L98 Transmission: 700R4 Axle/Gears: B&W 3.27
Car: 87 Formula T-Top, 87 Formula HT
Engine: 5.1L TPI, 5.0L TPI
Transmission: 700R4, M5
Axle/Gears: Sag 3.73, B&W 3.45
Re: The Auto Dimming Mirror Thread
The Lt Green wire attaches to the 12V power to the backup lights... I actually installed an auto-dimming LCD version in my 87... no one notices but me... Love it! I have one ready for my 89 Formula Vert too  .
.
As for the mounting brackets, my 1990 Riviera had the exact mounting bracket as my 87 Formula.
The extra two wire connector in the first post with the X through it was used to power an external mirror on my 1995 Buick Riviera IIRC...
John
. As for the mounting brackets, my 1990 Riviera had the exact mounting bracket as my 87 Formula.
The extra two wire connector in the first post with the X through it was used to power an external mirror on my 1995 Buick Riviera IIRC...
John
Thread Starter
Supreme Member
iTrader: (4)
Joined: Sep 2004
Posts: 2,069
Likes: 5
From: MN
Car: 85 SC, 86 Berlinetta
Engine: V6, V8
Transmission: 700r4, 700r4
Re: The Auto Dimming Mirror Thread
Thank you, I noted what you mentioned about the connector by the image.
Joined: Jun 2000
Posts: 5,364
Likes: 51
From: Enschede, Netherlands
Car: 82 TA 87 IZ L98 88 IZ LB9 88 IZ L98
Engine: 5.7TBI 5,7TPI 5.0TPI, 5,7TPI
Transmission: T5, 700R4, T5, 700R4
Axle/Gears: 3.08, 3.27, 3.45, 3.27
Re: The Auto Dimming Mirror Thread
Where does the info that only the 87 gta got the curved mirror come from?? my 87 iroc had the curved one, not the square
Thread Starter
Supreme Member
iTrader: (4)
Joined: Sep 2004
Posts: 2,069
Likes: 5
From: MN
Car: 85 SC, 86 Berlinetta
Engine: V6, V8
Transmission: 700r4, 700r4
Re: The Auto Dimming Mirror Thread
That would be post #3. I'll add yours as well. Do you know if it plugs in at the mirror, or is the lead permanently connected?
Thanks!
Thanks!
Joined: Jun 2000
Posts: 5,364
Likes: 51
From: Enschede, Netherlands
Car: 82 TA 87 IZ L98 88 IZ LB9 88 IZ L98
Engine: 5.7TBI 5,7TPI 5.0TPI, 5,7TPI
Transmission: T5, 700R4, T5, 700R4
Axle/Gears: 3.08, 3.27, 3.45, 3.27
Re: The Auto Dimming Mirror Thread
plugs in at the mirror, I even have the white locking clip that goes in there, my connector is not like the ones above though, it has a tang on one side so it can only go in 1 way
Thread Starter
Supreme Member
iTrader: (4)
Joined: Sep 2004
Posts: 2,069
Likes: 5
From: MN
Car: 85 SC, 86 Berlinetta
Engine: V6, V8
Transmission: 700r4, 700r4
Re: The Auto Dimming Mirror Thread
Thank you. I'll add a pic of it if you're willing, but I understand that it isn't always easy to get a clear image of it.
Member
Joined: May 2007
Posts: 270
Likes: 0
From: Gainesville, FL
Car: 85 Z28
Engine: 305 TPI
Transmission: 700R4
Re: The Auto Dimming Mirror Thread
For cars that came with factory auto-dimming mirrors, does the dimming work without the car running or does the key have to be in the RUN or ACC position to make them dim? I would have assumed the latter, but thought I'd ask before working out where to run the wires from.

Moderator
Joined: Mar 2001
Posts: 14,298
Likes: 197
From: Doghouse �������������������������������������� Car: 1989 Formula 350 Vert Engine: 350 L98 Transmission: 700R4 Axle/Gears: B&W 3.27
Car: 87 Formula T-Top, 87 Formula HT
Engine: 5.1L TPI, 5.0L TPI
Transmission: 700R4, M5
Axle/Gears: Sag 3.73, B&W 3.45
Re: The Auto Dimming Mirror Thread
As seen above it will turn off with the ignition off, It should not work in ACC position, but it would not hurt anything. It does draw power, so you would want it to turn off when the car is not running.
John
John
Member
Joined: May 2007
Posts: 270
Likes: 0
From: Gainesville, FL
Car: 85 Z28
Engine: 305 TPI
Transmission: 700R4
Re: The Auto Dimming Mirror Thread
Yeah, I was pretty sure that it would be better to wire it up to switched power. Makes perfect sense, and I was about 90% sure that this the way that GM did it when I asked the question. It's just that it would be so much easier to go with unswitched power since I could steal juice from the orange wire to overhead console/map light just a few feet away.
Oh well, I'd rather do a job right than take a short cut. I'll run switched power up the driver's side A-pillar and under the headliner. Thanks very much for the quick answers!
Oh well, I'd rather do a job right than take a short cut. I'll run switched power up the driver's side A-pillar and under the headliner. Thanks very much for the quick answers!

Junior Member
Joined: Jun 2015
Posts: 1
Likes: 0
Re: The Auto Dimming Mirror Thread
Does anybody rebuild these? I have a mechanical dimming mirror for my '88 Cadillac Brougham. Works most of the time but sometimes I have to nudge it along for the motor to dim the mirror. It's almost like it gets to a certain point and gets stuck.
Moderator
Joined: Mar 2001
Posts: 14,298
Likes: 197
From: Doghouse �������������������������������������� Car: 1989 Formula 350 Vert Engine: 350 L98 Transmission: 700R4 Axle/Gears: B&W 3.27
Car: 87 Formula T-Top, 87 Formula HT
Engine: 5.1L TPI, 5.0L TPI
Transmission: 700R4, M5
Axle/Gears: Sag 3.73, B&W 3.45
Re: The Auto Dimming Mirror Thread
It sounds like the unit is worn, you might have to do rebuild it yourself. You can try places like specmo they are a licensed GM electronics place, I know they do digital and analog IP's as well as most Delco radios
https://www.specmo.com/
They are jerks, and they are expensive, but if it gets the job done...
John

Senior Member

Joined: Feb 2007
Posts: 881
Likes: 15
Re: The Auto Dimming Mirror Thread
Here is another thread that might help if your trying to rebuild it yourself. There is one resistor that I have replaced on several of these that seem to burn out quite often.
https://www.thirdgen.org/forums/hist...rear-view.html
https://www.thirdgen.org/forums/hist...rear-view.html