
Tablet install with custom digital climate control


Thread Starter
Member
iTrader: (1)
Joined: Nov 2008
Posts: 120
Likes: 2
From: TX
Car: 1990 Iroc-Z
Engine: 5.7 TPI
Transmission: 700r4
Axle/Gears: 3.23
Tablet install with custom digital climate control
Hello fellow thirdgen owners, I thought you guys might be interested in my Tablet install WIP.
The goals:
Supplies
To begin with
The tablet:
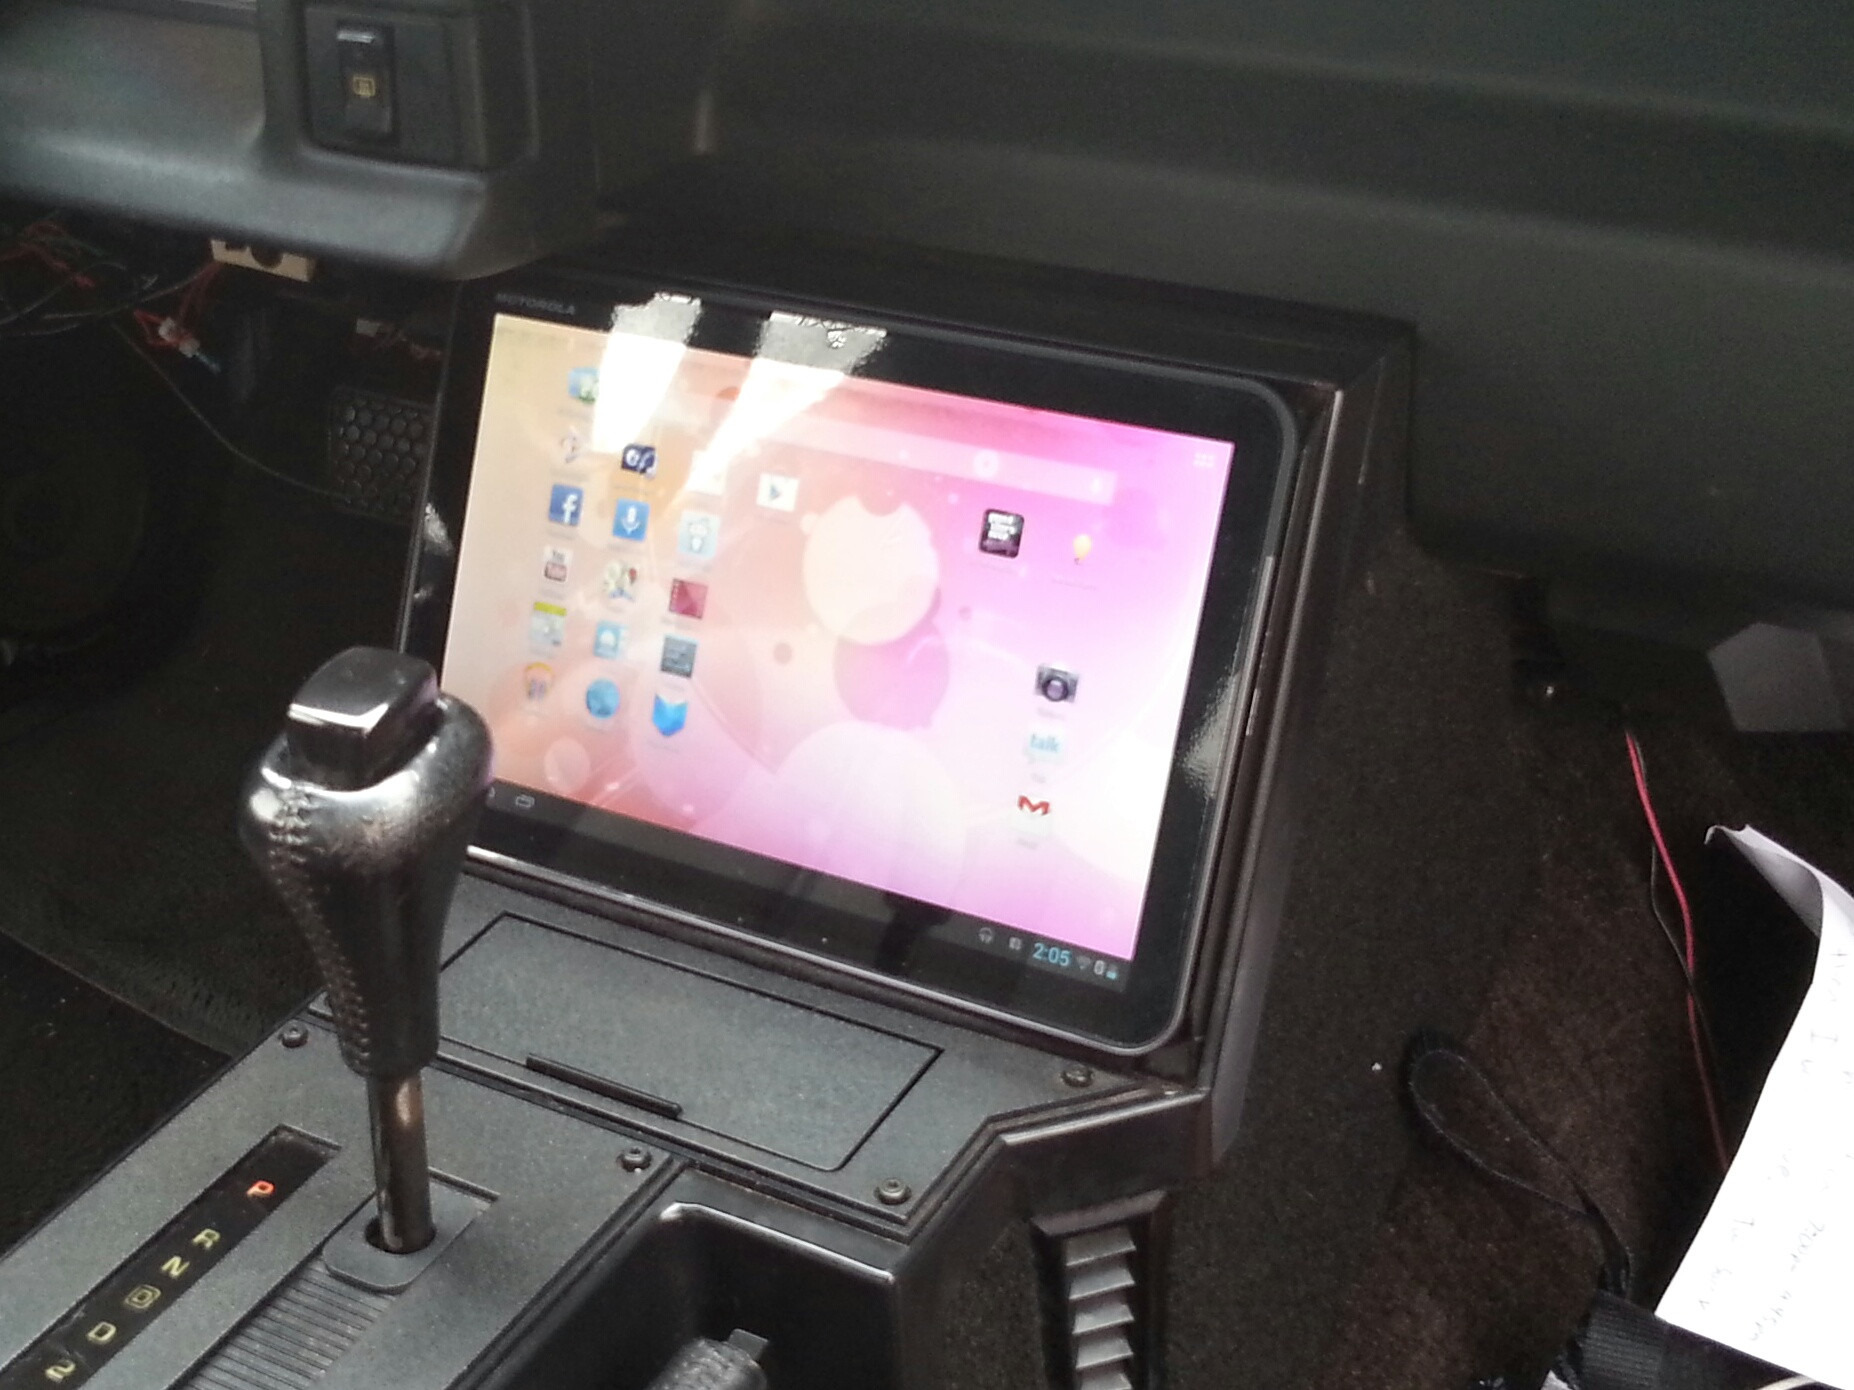
I chose the XOOM because it is the only 10" tablet that fits in the space. It is literally the perfect size, within 1/4" in both width and height. As an added bonus, the USB port is on the bottom, so I can run a cable without it sticking out the top.
Mounting the Tablet:
I cut lengths of angle aluminum, drilled holes where the factory plastic cover went, and mounted them to each side. I painted them a matte black to match the car's plastict trim. I then ran velcro down each side, and on the back of the tablet, so I can easily remove the tablet when I take it out.
The vaccum vent selector
The blower motor:
The Hot/Cold door cable:
AC compressor switch
Climate control temperature sensor
Voice control button
Third party Stereo AUX in for ipods
Screen on/off button
The app:
SOME PICS:


I am not really happy with the way the button and volume **** plate looks, so that is subject to change.
I cant seem to find the video of it in operation yet, and it still has some software bugs I have to work out. I will update when this gets done hopefully this summer.
I hope you enjoyed it!
The goals:
- 10� Xoom tablet install in the radio/AC location
- Full HVAC control through the tablet
- Full stereo control through the tablet
- Climate control through cabin air temperature sensor
- Push-button voice control for navigation, music, google searches, etc with Google Now
- No permanent modifications to anything, so reverting to stock is easy.
Supplies
- 10� Motorola Xoom android tablet running 4.2 Jellybean
- IOIO microprocessor board
- Bluetooth dongle so the Xoom can be removed without wires.
- Multiple MOSFET transistors, Op-amps, wiring
- 2 RC plane servo�s
- Plexiglas sheets for the control unit.
- The IOIO board is a really cool little microprocessor board designed to run off anything between 5 and 14 volts (don�t quote me on that). It has 40+ pins that can be turned on/off, take voltage input as well as PWM input/output. What�s great about this is it is designed to run from Android devices through USB, and comes with an awesome little SDK for interfacing between your app and the pins. You just tell it to turn on a pin, read from a pin, send a PWM signal with a specified pulse length/frequency, etc. The possibilities are endless.
To begin with
- I removed the radio and HVAC control panels, as well as the plastic bezel
- I then used the stock radio box as a measuring guide, and cut the Plexiglas to shape and assembled using machine screws for easy disassembly
- Cut a hole in the back for the Vacuum lines, vent control cable, and a single wiring harness connector.
- Made multiple levels in the box for component locations
The tablet:
I chose the XOOM because it is the only 10" tablet that fits in the space. It is literally the perfect size, within 1/4" in both width and height. As an added bonus, the USB port is on the bottom, so I can run a cable without it sticking out the top.
Mounting the Tablet:
I cut lengths of angle aluminum, drilled holes where the factory plastic cover went, and mounted them to each side. I painted them a matte black to match the car's plastict trim. I then ran velcro down each side, and on the back of the tablet, so I can easily remove the tablet when I take it out.
The vaccum vent selector
- I took an RC plane servo, and drilled a hole on the rotating arm to fit the circular vaccum selector�s alignment pin. And a screw through the center into the servo front mounted it very nicely.
- The servo is controlled directly from one of the 5v output pins on the IOIO board, and by controlling the PWM frequency, I can control the rotation of the servo. This in principle does the same thing as moving the lever on the stock stuff.
- I used an opticoupler to separate the IOIO circuit from the noisy car circuit. This is just a really fast relay-type component that uses an LED on one side, and a photo-sensor on the other. When the LED turns on, the other side turns on. So its basically an optical relay.
- I just had to find the frequencies that corresponded with the different vent selections, so I found 200ppm corresponds with MAX, 450 corresponds with BI-Level, etc.
The blower motor:
- The blower motor was easy. I used another pin on the IOIO board, and a large MOSFET transistor. The IOIO board sent a 5v PWM signal to turn the transistor on/off, and in turn turned the transistor switched a 12v from the battery on/off.
- By controlling the pulse length on this pin, I had analog blower motor speeds from off to max.
The Hot/Cold door cable:
- I used another 5v pin on the board to control another servo. The servo has an aluminum arm cut to the same radius as the original selector lever. So by using another PWM circuit, I could rotate the arm from full forwards, and full backwards. The cable housing was mounted to the Plexiglas (in multiple layers for strength) and the arm had a screw that slipped through the cable loop. So in essence by controlling the Pulse width on that pin, I controlled how far to move the arm.
AC compressor switch
- I used a simple hobby relay to turn the ac compressor on/off using another opti-coupler and one of the IOIO pins
Climate control temperature sensor
- I went and bought a thermistor from digikey, took 5v from the IOIO board, ran it through the thermistor mounted somewhere in the cabin, and a IOIO board input pin from the thermistor measured the voltage drop, relaying it to the app. I still need to calibrate this, by matching temps with the voltages.
Voice control button
- I simply ran a 5v wire to a button, and back into another �input� pin on the board.
Third party Stereo AUX in for ipods
- I used a simple interrupting aux jack from RadioShack. It has 2 inputs and one output. When you plug a headphone cable into one end, it causes the other input to disconnect. So I had one input from the Xoom, and the output was to my 4channel amp in the back.
- Volume is controlled by a simple Potentiometer I bought at radioshack.
Screen on/off button
- Same as voice control button.
The app:
- Currently the app is just a bunch of boring sliders and switches. I will be working on a nice interface at some point. (I am an app developer, so this is the fun part!)
SOME PICS:


I am not really happy with the way the button and volume **** plate looks, so that is subject to change.
I cant seem to find the video of it in operation yet, and it still has some software bugs I have to work out. I will update when this gets done hopefully this summer.
I hope you enjoyed it!
Joined: Nov 2007
Posts: 845
Likes: 4
From: Salt Lake
Car: 1989 IROC & ROLL-Z
Engine: L98 Vortec FIRST TPI
Transmission: T56, Mech Speedo
Axle/Gears: G92 J65 3.27
Re: Tablet install with custom digital climate control
Kenny,
I am very impressed with your work. Very creative integrating the tablet the way you have. Almost makes me want to convert mine. I'm sure you put in a fair amount of work to this project.
I would love to see screen shots of your HVAC control interface if you get a chance.
I am very impressed with your work. Very creative integrating the tablet the way you have. Almost makes me want to convert mine. I'm sure you put in a fair amount of work to this project.
I would love to see screen shots of your HVAC control interface if you get a chance.
Last edited by Keoman; Apr 20, 2014 at 10:59 PM.

Junior Member
Joined: Nov 2008
Posts: 2
Likes: 0
Re: Tablet install with custom digital climate control
Will your app work with any android tablet? If so is the app available for download on the play store? This is an awesome project by the way, I've had this idea in my head for quite a while just never had the time or dev skills to attempt it

Member
Joined: Jul 2009
Posts: 238
Likes: 1
From: Oklahoma
Car: genesis, equus, f250, camaro, other
Engine: 5.7
Transmission: t5
Re: Tablet install with custom digital climate control
Im not a fan of tablets in cars (in general) but, you're very creative, and it looks well done. Kudos!
Supreme Member


Joined: Apr 2010
Posts: 1,027
Likes: 11
From: Modesto, California
Car: 88 Firebird Formula
Engine: LO5 5.7 TBI/Ebl Flash
Transmission: 700R4
Axle/Gears: 2.73 stock rear end
Re: Tablet install with custom digital climate control
Wow! Great work, do the HVAC/Climate controls appear on the tablet?
Senior Member

Joined: Aug 2004
Posts: 682
Likes: 0
From: Shippensburg, PA
Car: 1981 Buick Century Wagon
Engine: 87 GN engine
Transmission: 2004R
Axle/Gears: 3.73
Re: Tablet install with custom digital climate control
Nice, would love to see the HVAC interface and some video.

Member
Joined: Aug 2012
Posts: 128
Likes: 0
Re: Tablet install with custom digital climate control
Seriously nice work! I was actually debating about doing this with my '94 Mercury Villager as a college senior project. I went with a semi-autonomous R/C truck with a burning laser communicating over TCP/IP with a webcam thing instead.
Once the budget allows (just graduated in engineering, so by definition, I'm broke - but no debt ), I shall be building a camaro to my liking and this very well may be on the list of mods. One question I do have is how you get the tablet and app to start up and shut down with the ignition switch. I am also curious how one could integrate a normal radio in there. The stereo output to speakers would be relatively easy, but I haven't figured out how to get a standard AM/FM radio within the pad yet. Unfortunately, I don't really think it's possible as most tablets (to my knowledge) don't have AM/FM capability, so you'd have to use a 3rd party device hooked to the line in. Cheers!
Once the budget allows (just graduated in engineering, so by definition, I'm broke - but no debt
), I shall be building a camaro to my liking and this very well may be on the list of mods. One question I do have is how you get the tablet and app to start up and shut down with the ignition switch. I am also curious how one could integrate a normal radio in there. The stereo output to speakers would be relatively easy, but I haven't figured out how to get a standard AM/FM radio within the pad yet. Unfortunately, I don't really think it's possible as most tablets (to my knowledge) don't have AM/FM capability, so you'd have to use a 3rd party device hooked to the line in. Cheers! Last edited by kcducttaper; May 28, 2014 at 10:42 AM.
Trending Topics
Joined: Sep 2002
Posts: 3,685
Likes: 10
From: PA
Car: 86 Trans AM
Engine: LS1 (not stock...)
Transmission: Built T56
Axle/Gears: Strange 12-bolt w/ 3.73
Re: Tablet install with custom digital climate control
NICE PROJECT!!! I admire your ability to work with the other electronics, and getting the manual controls to function! Some of your pics arent working..hope they come back up! VERY excited to see where you go with this!
I have a tablet project going on in my Subaru. Mostly due to being bored over the winter. No where near as in depth as you, but its been quite a project. I used a Nexus 7. I added 4 extra side connectors, and re-wired all 8 side connectors to have USB and an external switch control. Building a slide in dock that will use POGO connectors, and allow me to slide the tablet in and out. Entire dash bezel will slide out on sliders and let me remove it.
Here are two pics of an in progress. Its just electric taped behind the bezel haha. On screen gauges work 100% and are user selectable. If my radio and hvac werent on the same board, I would have replaced the radio all together. Now it just works with it. Also integrated my Parrot Bluetooth display into the bezel.


Sorry to hijack! Just want to promote more tablet projects! I actually have two of these set up similar and want to use one in my TA. But to completely replace the head unit. Its too complicated and hard to see in the car. Tablet wtih big buttons and minimal settings will be better!
J.
I have a tablet project going on in my Subaru. Mostly due to being bored over the winter. No where near as in depth as you, but its been quite a project. I used a Nexus 7. I added 4 extra side connectors, and re-wired all 8 side connectors to have USB and an external switch control. Building a slide in dock that will use POGO connectors, and allow me to slide the tablet in and out. Entire dash bezel will slide out on sliders and let me remove it.
Here are two pics of an in progress. Its just electric taped behind the bezel haha. On screen gauges work 100% and are user selectable. If my radio and hvac werent on the same board, I would have replaced the radio all together. Now it just works with it. Also integrated my Parrot Bluetooth display into the bezel.
Sorry to hijack! Just want to promote more tablet projects! I actually have two of these set up similar and want to use one in my TA. But to completely replace the head unit. Its too complicated and hard to see in the car. Tablet wtih big buttons and minimal settings will be better!
J.


Junior Member
Joined: Nov 2020
Posts: 2
Likes: 1
Re: Tablet install with custom digital climate control
What would it take for you to build me that kit Kenney001 I am very interested I just ain�t to good with figuring out how to put it all together now install I could do please lmk I got the funds and will pay thanks

Thread
Thread Starter
Forum
Replies
Last Post
The_Phoenix
Interior Parts for Sale
12
Feb 4, 2016 07:10 AM
toronto formula
Engine/Drivetrain/Suspension Parts for Sale
15
Nov 10, 2015 06:17 AM