
Update pics of my LS1 swap. Custom 4th gen A/C pictures...

Thread Starter
Joined: Sep 2002
Posts: 3,685
Likes: 10
From: PA
Car: 86 Trans AM
Engine: LS1 (not stock...)
Transmission: Built T56
Axle/Gears: Strange 12-bolt w/ 3.73
Update pics of my LS1 swap. Custom 4th gen A/C pictures...
Hey all. Just thought Ide do one more thread for my swap. The next thread I post up will be of me.... 
Everything is just about finished in the engine bay. I need to loom up a few more wires and double check everything before I fire it again. Im particularily proud of my A/C set up. Its completely 4th gen. Picked up some new oil for the system, and new seals online for super cheap. Got a new drier since the old one was laying opened for awhile. Anyway..here are a couple pics. If they are big...sorry. Photobucket has a weird resizing thing now...
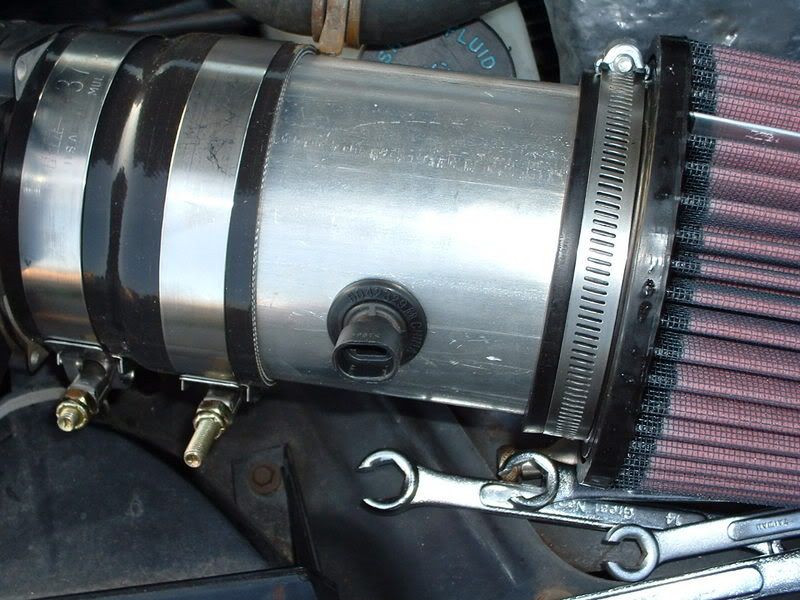
Here is my intake set up and a couple more pics. I found a nice grommet for the IAT at advance auto. Its for a nissan...I can get the part number if anyone wants. But it fits great.
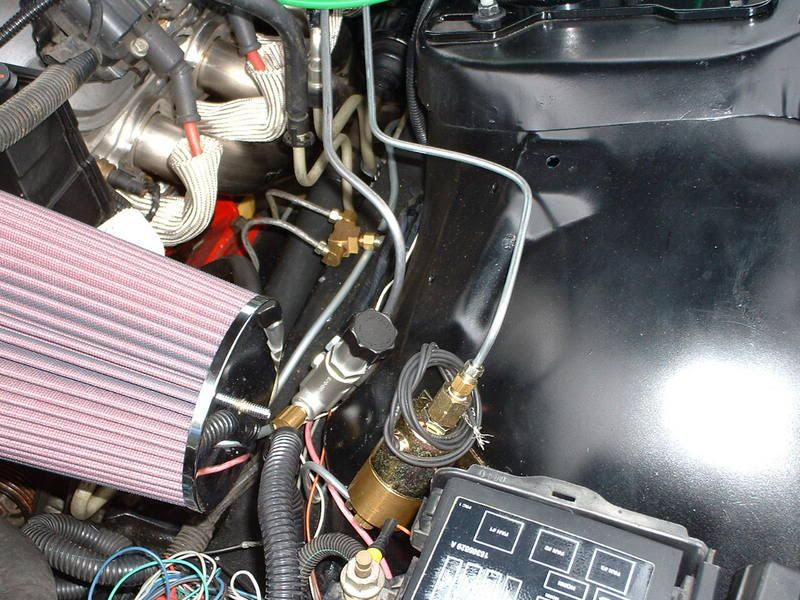
And finally my rear proportioning valve and line lock courtesy of SJM Manufacturing. The kit is for an LS1 car. But the pre-bent and flared lines worked with alittle tweaking. No searching for fittings. No worrying about my bubble flares not being right. Every flare that I had to make was a standard double flare. Made things go real smooth. Im not happy with how its mounted...but it will work for now.
Any questions feel free..
Justin
Everything is just about finished in the engine bay. I need to loom up a few more wires and double check everything before I fire it again. Im particularily proud of my A/C set up. Its completely 4th gen. Picked up some new oil for the system, and new seals online for super cheap. Got a new drier since the old one was laying opened for awhile. Anyway..here are a couple pics. If they are big...sorry. Photobucket has a weird resizing thing now...
Here is my intake set up and a couple more pics. I found a nice grommet for the IAT at advance auto. Its for a nissan...I can get the part number if anyone wants. But it fits great.
And finally my rear proportioning valve and line lock courtesy of SJM Manufacturing. The kit is for an LS1 car. But the pre-bent and flared lines worked with alittle tweaking. No searching for fittings. No worrying about my bubble flares not being right. Every flare that I had to make was a standard double flare. Made things go real smooth. Im not happy with how its mounted...but it will work for now.
Any questions feel free..
Justin
Senior Member
iTrader: (2)
Joined: Nov 2001
Posts: 920
Likes: 0
From: AL,USA
Car: 1990 Formula
Engine: 95 LT1
Transmission: T56
Axle/Gears: Weak 7.5 with 4.10s
You have to give more details on the A/C setup. What did you use for an evaporator? Hoses? What did you have to do to the A/C box? I haven't seen anyone do it like you have. Please post pics if you have them.
Thread Starter
Joined: Sep 2002
Posts: 3,685
Likes: 10
From: PA
Car: 86 Trans AM
Engine: LS1 (not stock...)
Transmission: Built T56
Axle/Gears: Strange 12-bolt w/ 3.73
Ok...the scoop on the A/C. My reasoning was simple. The 99 camaro A/C blew cold before I took it apart. My 87 A/C blew warm. Even after having it professionally recharged...then retrofitted and charged again with 134... Plus I wasnt about to re-use that ugly 3rd gen compressor. I had a donar car...the 99 was complete. So I had an evap, hoses, condensor, drier, compressor, correct pressure switch...everything.
It became obvious that the only real hurdle was the EVAP. While similar in size and shape...the 4th gen wont fit in the thirdgen box. So...I thought...Wouldnt it be nice if the 4th gen box would bolt into the thirdgen. No dice there either. The only obvious solution was to graft half the 4th gen HVAC box onto the 3rdgen. I figured if I hacked up my 3rd gen box...and it didnt work...Ide just ditch A/C all together and get the heater delete box.
It sounds like a lot of work...but once you see how close the shapes of the boxes are...its not too bad. Actually. If I had ever fiberglassed before, I could have finished it quicker...and made it look better.
So...to sum it up. Its back half, top and bottom, of 3rd gen HVAC box, and front half, top and bottom, of 4th gen box. 4th gen evap, drier, condensor, hoses, compressor, etc etc.. Even the drier bracket will work with alittle tweaking. There is already a bolt there for it to bolt too!
Enough of me babbling..on to some pics.
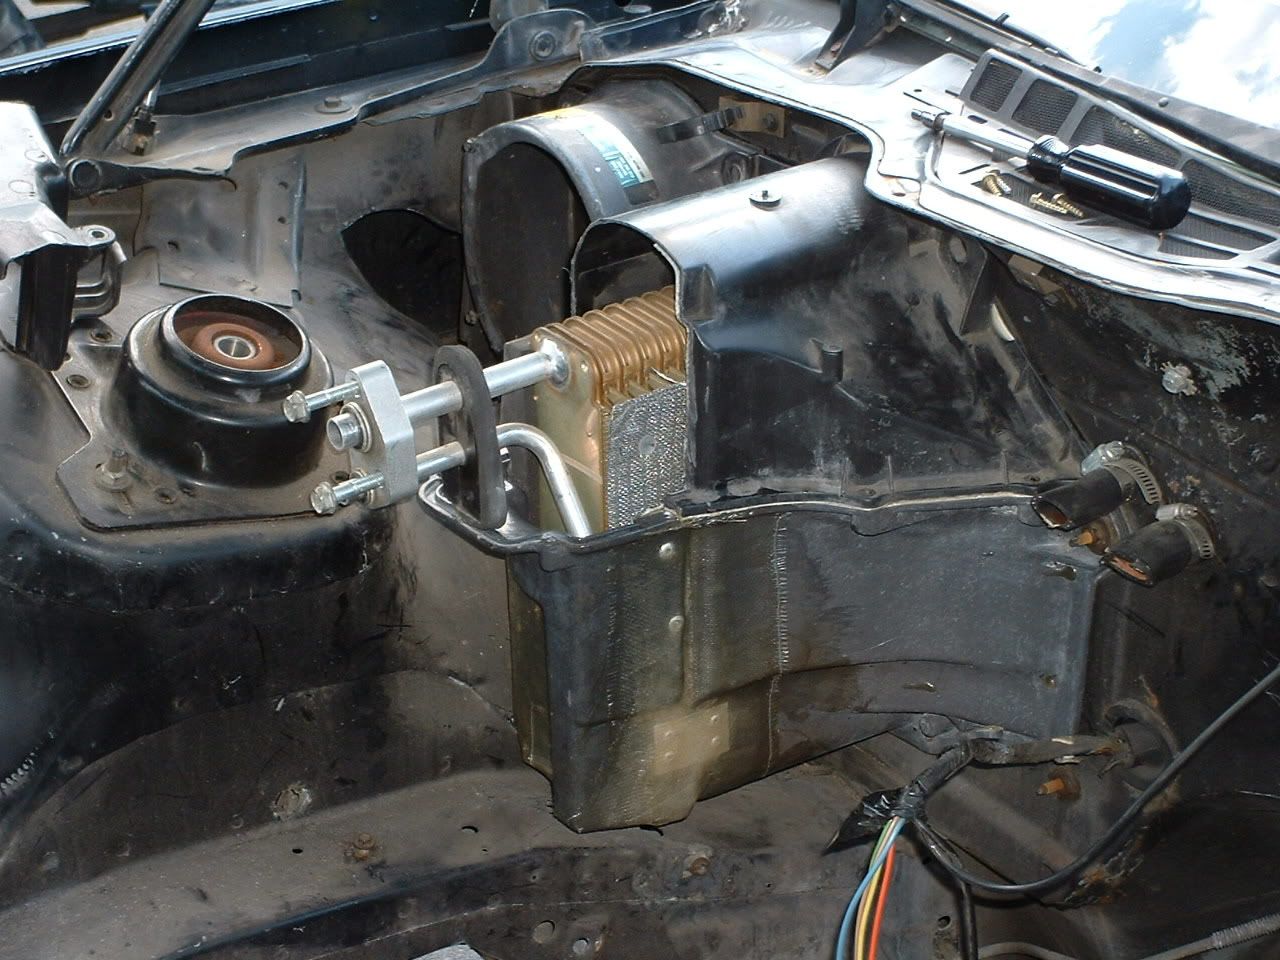
This pic is posted in the cooling forum too...but here is the access I have to the High side connector. Its easily reached. That line is really easy to tweak. After alittle careful bending, it fits perfect.
Old box.
Fitting the bottoms... they are fiberglass like material. Hard and brittle.

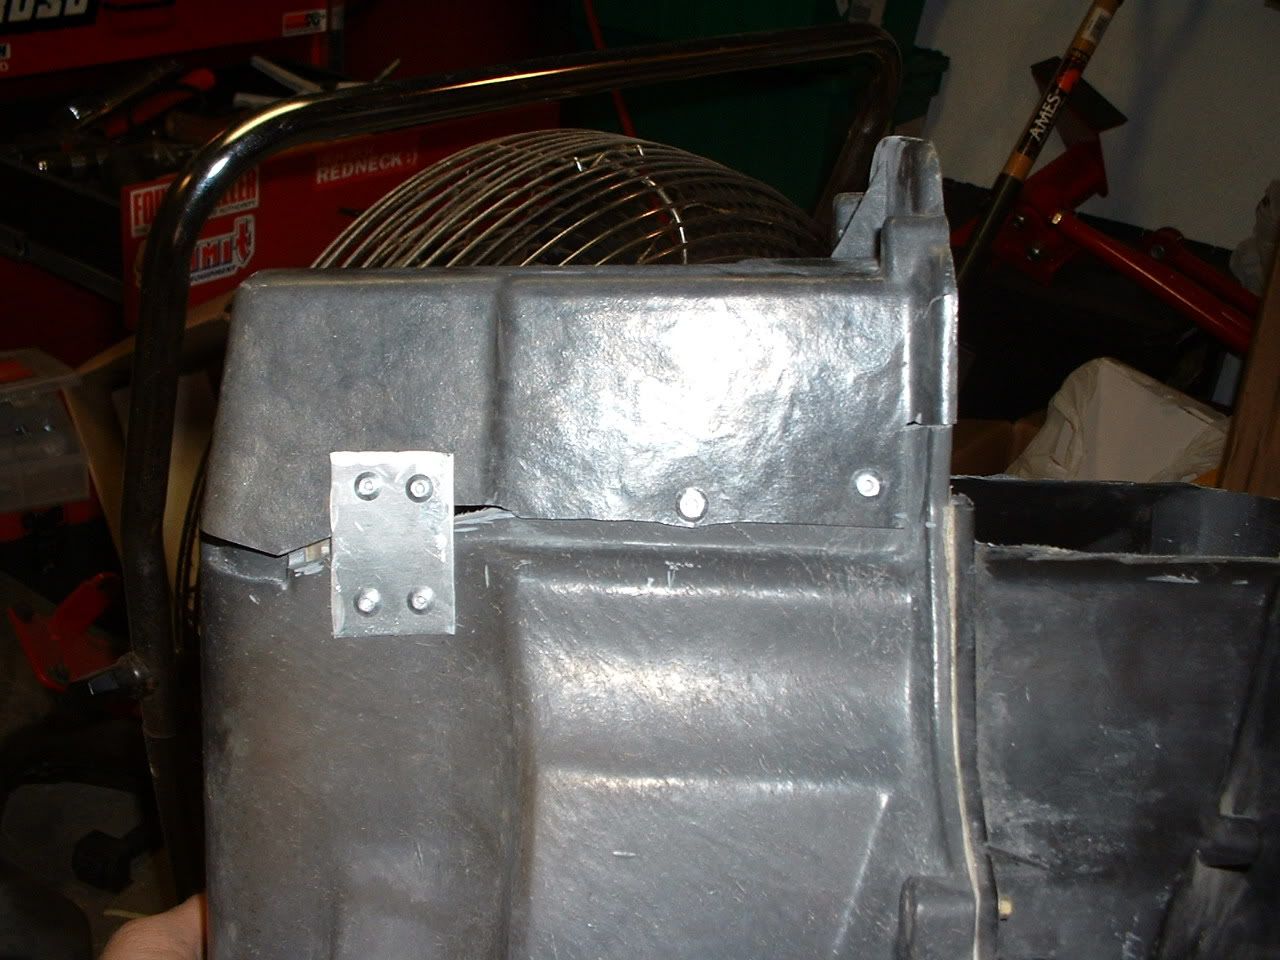
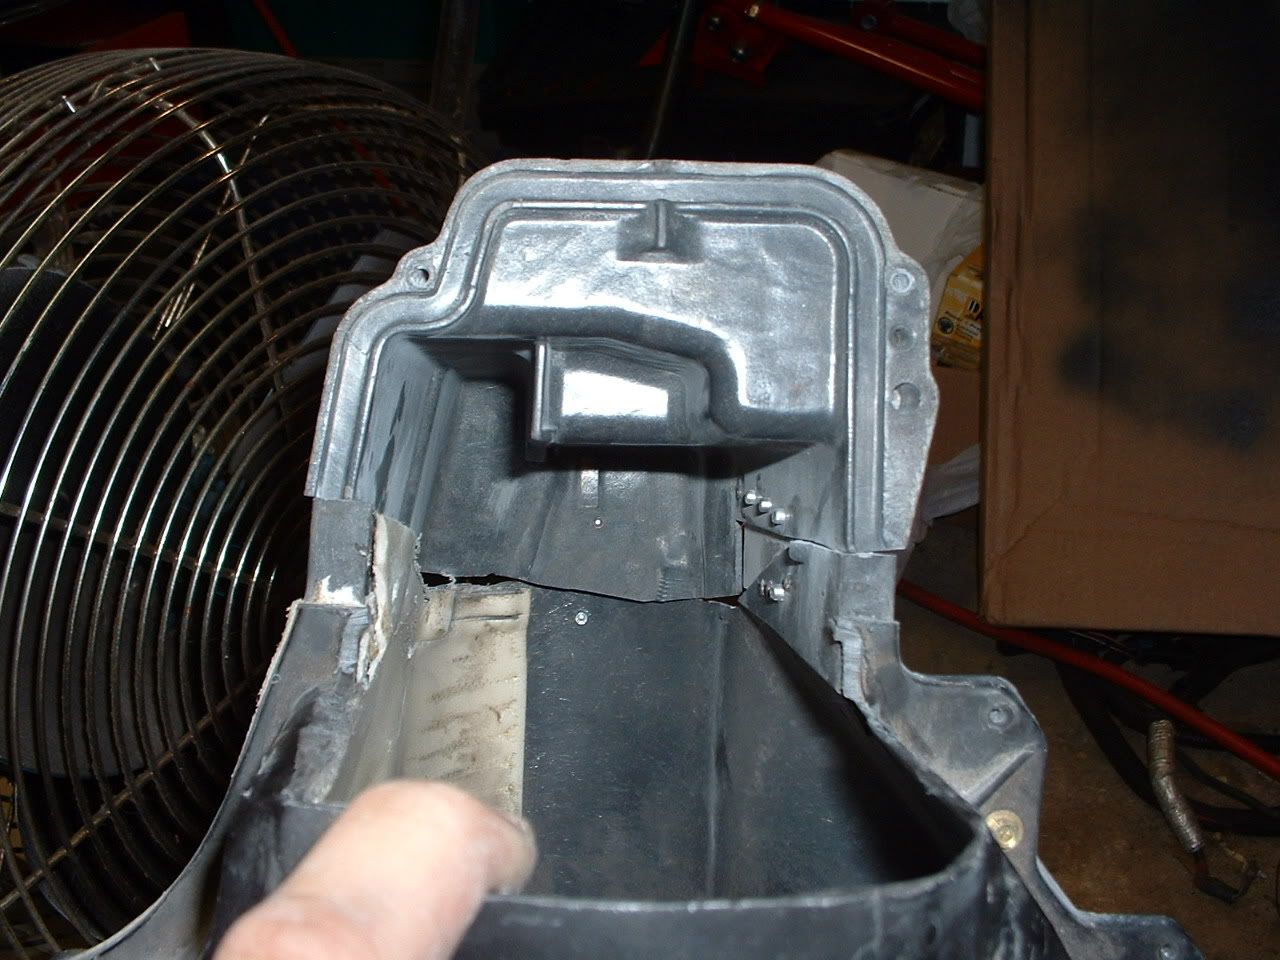
Ok...a couple steps skipped here. This is after fiberglassing the crap out of it. Inside and out. It is air tight. This pic is also with the top cut in half...and the evap sitting in place.
Front of the 4th gen top...

I used thick aluminum foil tape to shape the top of the box.
Notice how the evap sits in the box... There is a slight gap in the back. This is part of the reason I had to do all this. The one tube for the evap runs back there. I used some high density foam to fill this gap so the air doesnt go past the evap.
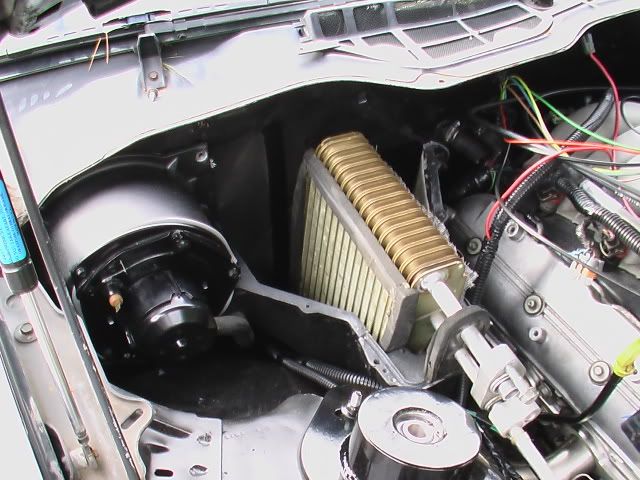
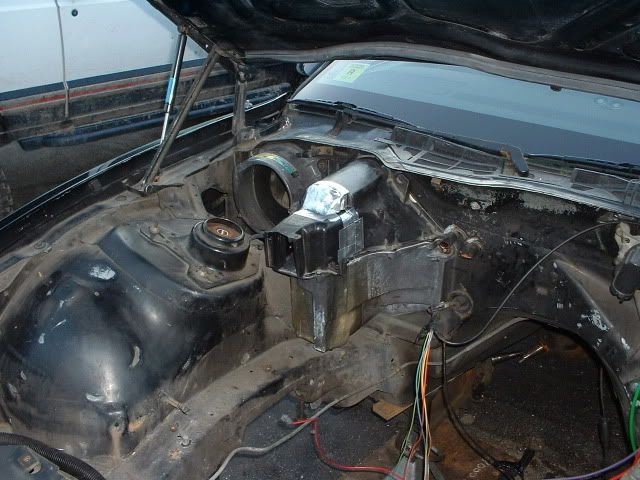
To make the box look good...I used a textured paint I found at home depot. Might have been rustoleum... Not sure. But the texture makes it look like plastic and hides a lot of the imperfections. I basically only tried to make the top look good. You cant see the bottom at all...so i just painted it. The top though...I sanded, and used bondo, and smoothed it out as best as I could. Im happy with it... Now to see if it works. Just in time for cold weather
Anyother questions feel free. I can get more pics if requested.
Justin
It became obvious that the only real hurdle was the EVAP. While similar in size and shape...the 4th gen wont fit in the thirdgen box. So...I thought...Wouldnt it be nice if the 4th gen box would bolt into the thirdgen. No dice there either. The only obvious solution was to graft half the 4th gen HVAC box onto the 3rdgen. I figured if I hacked up my 3rd gen box...and it didnt work...Ide just ditch A/C all together and get the heater delete box.
It sounds like a lot of work...but once you see how close the shapes of the boxes are...its not too bad. Actually. If I had ever fiberglassed before, I could have finished it quicker...and made it look better.
So...to sum it up. Its back half, top and bottom, of 3rd gen HVAC box, and front half, top and bottom, of 4th gen box. 4th gen evap, drier, condensor, hoses, compressor, etc etc.. Even the drier bracket will work with alittle tweaking. There is already a bolt there for it to bolt too!
Enough of me babbling..on to some pics.
This pic is posted in the cooling forum too...but here is the access I have to the High side connector. Its easily reached. That line is really easy to tweak. After alittle careful bending, it fits perfect.
Old box.
Fitting the bottoms... they are fiberglass like material. Hard and brittle.
Ok...a couple steps skipped here. This is after fiberglassing the crap out of it. Inside and out. It is air tight. This pic is also with the top cut in half...and the evap sitting in place.
Front of the 4th gen top...
I used thick aluminum foil tape to shape the top of the box.
Notice how the evap sits in the box... There is a slight gap in the back. This is part of the reason I had to do all this. The one tube for the evap runs back there. I used some high density foam to fill this gap so the air doesnt go past the evap.
To make the box look good...I used a textured paint I found at home depot. Might have been rustoleum... Not sure. But the texture makes it look like plastic and hides a lot of the imperfections. I basically only tried to make the top look good. You cant see the bottom at all...so i just painted it. The top though...I sanded, and used bondo, and smoothed it out as best as I could. Im happy with it... Now to see if it works. Just in time for cold weather
Anyother questions feel free. I can get more pics if requested.
Justin

Joined: Apr 2002
Posts: 2,029
Likes: 2
From: Ohio
Car: 88' Iroc-Z
Engine: LQ9
Transmission: T-56
Axle/Gears: 3.42
so are you using the 4th gen blower motor?
If you could make some kind of a write up on this it would be great. This is one of the hurdles I have to get passed because I like my air conditioning. If you can go any more in depth that would be great. How does the 4th gen condenser mount? I thought it would attach to my 4th gen radiator on the clips but i was wrong.
If you could make some kind of a write up on this it would be great. This is one of the hurdles I have to get passed because I like my air conditioning. If you can go any more in depth that would be great. How does the 4th gen condenser mount? I thought it would attach to my 4th gen radiator on the clips but i was wrong.
Thread Starter
Joined: Sep 2002
Posts: 3,685
Likes: 10
From: PA
Car: 86 Trans AM
Engine: LS1 (not stock...)
Transmission: Built T56
Axle/Gears: Strange 12-bolt w/ 3.73
87... Ill try to answer your questions for ya.
Im still using the 3rd gen blower. I thought about trying to make more of the 4th gen HVAC box work, but it goes through the firewall on a 4th gen. And teh blower mounts inside. I wasnt about to cut a hole that big to try to mount that box. May have been easier...may have been a nightmare.
Ill start with the condensor. Mine fit right behind the 4th gen radiator..just like in the 4th gen. It is sort of tight down on the passenger side, where the compressor hose bolts to the condensor. But if you muscle it in there, you can make some room. It might not be totally in the clips, or sitting completely level, but its not going anywhere. The compressor is unmodified. just bolt it in after clearancing the k-member. The pics above describe how to make the evap work... there might be easier ways than what I did, but it worked great for me. Just a lot of cutting and fitting and cutting and fitting etc etc.
Then...magically...everything fits. The drier falls right where I was hoping. I was able to use the 4th gen holder with an existing hole in my fender. The hose from the condensor fits perfect with the evap after alittle tweaking. The hose that goes from the compressor to the condensor is a bit of a pain. It has to make a sort of sharp bend...and it took some convincing for it to not kink. Im not sure why a/c hose can kink in the first place...but whatever.
I know that probably doesnt help you much more...but ide almost have to stand in front of the car and show you. Now I havent charged the system yet. And its 30 degrees outside now, so Im not sure I will before winter comes. But I have no reason to believe that it wont work.
If you still have some questions, or want me to go over anything specific...let me know and Ill try to help ya out some more. can probably snap some new pics if you let me know what you want to see.
Justin
Joined: Apr 2002
Posts: 2,029
Likes: 2
From: Ohio
Car: 88' Iroc-Z
Engine: LQ9
Transmission: T-56
Axle/Gears: 3.42
it'll be awhile before i have an engine to go in the car, somewhere around late spring i guess. but i was wanting to mock all this up to get ready for it to go in. I'll be using one of the aftermarket k-members so clearancing wont have to be done. i'm going to buy a new drier since i hear there is a good chance they'll thrash your compressor. And I'm going to get a new compressor. Your blower motor i wasn't sure of it looked alot cleaner than the 3rd gen one that's why i asked if it was 4th gen. i'm guessing you cleaned and painted it then? I got a complete 4th gen a/c setup from a guy who turned his into a racecar for $40 compressor and all. so when i recieve all that i'll be able to mock it up and see exactly what your talking about.
Trending Topics


Joined: Sep 1999
Posts: 4,354
Likes: 308
From: NJ
Car: 92 Firebird
Engine: 4.8 LR4
Transmission: T56
Axle/Gears: 3.45 9 Bolt
I would like that PN for the grommet, I need to relocate my MAT too and the grommet that came with what I bought is too big
Member
Joined: Jun 2006
Posts: 227
Likes: 1
From: SW Iowa
Car: '88 Formula
Engine: 406, CF heads, Comp 212/218, Rhoads
Transmission: WC T5, 0.61 option
Axle/Gears: 10-bolt 3.08, re-ground Auburn Posi
Man, this is great! I did the R134a upgrade and it works, but not near as cold as it should be. R12 stuff doesn't have the heat exchange capacity that R134a needs. As you know, the fix is to upgrade compressor, evap, condensor, and drier with R134a components. So I've been wondering how to fit the 4th-gen evap into my existing box. Or what aftermarket one would work.
My radiator is a thick Griffin that doesn't fit exactly, either. So if the condensor doesn't fit exactly, no problem. That's why they call it "custom." ")
So the 4th gen compressor fits the 3rd-gen mount? Excellent! I was hoping to be able to use one of the newer compressors that don't pull as much power. (Like my 400 cares about the A/C compressor!)
On my TBI setup, my compressor sits on top, on the passenger side. So I shouldn't have the issue with the hose between compressor and condensor that you had. At least not the same issue!
Exactly what I was looking for. Can't thank you enough!

I'm copying these pics to my hard drive now, just to be sure I don't lose track of them.
Ill start with the condensor. Mine fit right behind the 4th gen radiator..just like in the 4th gen. It is sort of tight down on the passenger side, where the compressor hose bolts to the condensor. But if you muscle it in there, you can make some room. It might not be totally in the clips, or sitting completely level, but its not going anywhere.
On my TBI setup, my compressor sits on top, on the passenger side. So I shouldn't have the issue with the hose between compressor and condensor that you had. At least not the same issue!
I'm copying these pics to my hard drive now, just to be sure I don't lose track of them.
Thread Starter
Joined: Sep 2002
Posts: 3,685
Likes: 10
From: PA
Car: 86 Trans AM
Engine: LS1 (not stock...)
Transmission: Built T56
Axle/Gears: Strange 12-bolt w/ 3.73
No problem man. Glad I could help. One thing tho.. THe 4th gen compressor doesnt fit just because... It goes in along with the LS1 Im not sure if a 4th gen compressor could fit up to the thirdgen block..maybe with some thinkin it could. But the rest you could use. Let me know if you have any more questions.
scooter:...sorry man. I didnt forget about ya. I was trying to track down the part number for that grommet. I remember keeping the back of the package to use as a reference later when I wrote down part numbers. But that sucker is no where to be found. I got it at advanced auto...and its the only one that looks like that. If you zoom in on the picture, you might be able to make out a number on the rubber. Not sure if that would help ya. If I come across the number, Ill PM you with it so I know you get it.
Justin
Im not sure if a 4th gen compressor could fit up to the thirdgen block..maybe with some thinkin it could. But the rest you could use. Let me know if you have any more questions.scooter:...sorry man. I didnt forget about ya. I was trying to track down the part number for that grommet. I remember keeping the back of the package to use as a reference later when I wrote down part numbers. But that sucker is no where to be found. I got it at advanced auto...and its the only one that looks like that. If you zoom in on the picture, you might be able to make out a number on the rubber. Not sure if that would help ya. If I come across the number, Ill PM you with it so I know you get it.
Justin
Joined: Sep 1999
Posts: 4,354
Likes: 308
From: NJ
Car: 92 Firebird
Engine: 4.8 LR4
Transmission: T56
Axle/Gears: 3.45 9 Bolt
Thread Starter
Joined: Sep 2002
Posts: 3,685
Likes: 10
From: PA
Car: 86 Trans AM
Engine: LS1 (not stock...)
Transmission: Built T56
Axle/Gears: Strange 12-bolt w/ 3.73
Will do. I looked at my pictures of that grommet..a.nd I still cant make the numbers out clearly. But next time I think about it, Ill look for the package, and Ill look on the grommet to get the numbers for sure. They probably wont correspond to the parts store numbers. But you can look in the package and see if it has those numbers. Like I said...it was the only one that looked like that. Man I just wish I remembered were I put the back of the package.
J.
J.
Supreme Member
iTrader: (2)
Joined: Mar 2005
Posts: 2,820
Likes: 5
From: East Tennesse
Car: 1991 RS Camaro
Engine: L03 (want LS1)
Transmission: 700R-4 (and T56)
Axle/Gears: 4th Gen 3.23 posi
Re: Update pics of my LS1 swap. Custom 4th gen A/C pictures...
Sweet. Subscribing for future reference. I may give this a whirl in AC world. Did you have to modify and fabricate any of the AC lines? This looks alot simpler than what I was going to do...lol. Especially with a couple of friends with alot of fiberglassing experience.
Last edited by 91_5.7_TPI; Mar 19, 2009 at 02:37 PM.
Thread Starter
Joined: Sep 2002
Posts: 3,685
Likes: 10
From: PA
Car: 86 Trans AM
Engine: LS1 (not stock...)
Transmission: Built T56
Axle/Gears: Strange 12-bolt w/ 3.73
Re: Update pics of my LS1 swap. Custom 4th gen A/C pictures...
haha..wow this thread is a blast from the pass!
All the parts are 100% 4th gen and 100% unmodified.
Here it all is. Yes it comes out as a system. I never have to even crack a line open to remove the system. One more benefit to the swap that I hadnt planned on.
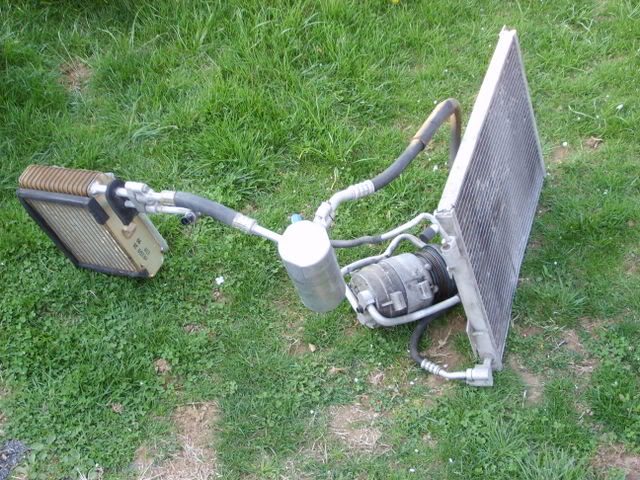
And a shot of the finished set up...since I never posted one in here. While Im posting pictures...
If you need some help...I can try to remember what all I did. Let me know.
J.
All the parts are 100% 4th gen and 100% unmodified.
Here it all is. Yes it comes out as a system. I never have to even crack a line open to remove the system.
One more benefit to the swap that I hadnt planned on. And a shot of the finished set up...since I never posted one in here. While Im posting pictures...
If you need some help...I can try to remember what all I did. Let me know.
J.
Supreme Member
iTrader: (2)
Joined: Mar 2005
Posts: 2,820
Likes: 5
From: East Tennesse
Car: 1991 RS Camaro
Engine: L03 (want LS1)
Transmission: 700R-4 (and T56)
Axle/Gears: 4th Gen 3.23 posi
Re: Update pics of my LS1 swap. Custom 4th gen A/C pictures...
Blast from the past.... I didn't even read the post dates lol. It's helpfull though. I'm pretty sure I'll go this route when I swap. Looks clean and I don't have to recharge anything lol.
Joined: Mar 2000
Posts: 43,187
Likes: 46
From: Littleton, CO USA
Car: 82 Berlinetta/57 Bel Air
Engine: L92/LQ4 (both w/4" stroke)
Transmission: 4L80E/4L80E
Axle/Gears: 12B-3.73/9"-3.89
The compressor outlet pipe that goes back toward the engine wouldn't clear the notch I put in my stock K-member. Rather than pull the engine again to redo the notch, I figured I'd just get a custom outlet manifold that puts both pipes to the outside.
On Probation
iTrader: (9)
Joined: Feb 2005
Posts: 2,042
Likes: 2
From: So Cal
Car: 87 IROC-Z
Engine: LsX
Transmission: MN12 6speed
Axle/Gears: 3:42
Re: Update pics of my LS1 swap. Custom 4th gen A/C pictures...
the front portion of the hvac box is a 4th gen unit?
Thread Starter
Joined: Sep 2002
Posts: 3,685
Likes: 10
From: PA
Car: 86 Trans AM
Engine: LS1 (not stock...)
Transmission: Built T56
Axle/Gears: Strange 12-bolt w/ 3.73
Re: Update pics of my LS1 swap. Custom 4th gen A/C pictures...
Yup. Up until that point, I wasnt sure if I was keeping A/C or ditching it. So rather than cutting up my firewall to try to fit the 4th gen hvac box...which wont even work without the 4th gen dash I dont think....I decided to hack up the boxes. Figured worst comes to worst Ide just ditch it all and go to a delete box. Turned out better than I thought it would though.
J.
J.
Supreme Member
iTrader: (1)
Joined: Jun 2006
Posts: 1,067
Likes: 0
From: Guelph, Ontario
Car: 89 IROC/05 RX8
Engine: LS1/LS1
Transmission: T56/T56
Axle/Gears: 3.42 GM/3.55 8.8
Re: Update pics of my LS1 swap. Custom 4th gen A/C pictures...
For curiosity's sake, why'd you put an external IAT instead of using the one in the MAF (looks like an 85mm you got in there)
Know the advantage for using meth in boost situations, but why here?
Know the advantage for using meth in boost situations, but why here?
Thread Starter
Joined: Sep 2002
Posts: 3,685
Likes: 10
From: PA
Car: 86 Trans AM
Engine: LS1 (not stock...)
Transmission: Built T56
Axle/Gears: Strange 12-bolt w/ 3.73
Re: Update pics of my LS1 swap. Custom 4th gen A/C pictures...
Hmmm... Good question. My only answer to it is thats how the motor was set up when I got it. haha.
Also, I think Ide need a different adapter harness. One that has the MAF plug and the IAT plug since my harness uses two circuits for this. Im guessing the vettes or trucks or whatever vehicle the SLP maf is based off of had the IAT and MAF wiring going into the one plug.
I wouldnt mind it being contained in one unit though. Less separate wiring and no sensor. I have about 4 MAF sensors that Im taking to the tuner. A ZO6, a truck one, and a Stock one. The SLP one I have now is throwing codes and Ide rather not use it since it messes with the PCM. Ide rather take care of all that sort of stuff in the tune. SO maybe if I end up with a MAF with the IAT built in Ill make it work somehow.
J.
Joined: Mar 2000
Posts: 43,187
Likes: 46
From: Littleton, CO USA
Car: 82 Berlinetta/57 Bel Air
Engine: L92/LQ4 (both w/4" stroke)
Transmission: 4L80E/4L80E
Axle/Gears: 12B-3.73/9"-3.89
SheldonZ28, your question confused me. The IAT on my 2000 SS looks exactly like his. The seller was nice enough to include the grommet, even.
Supreme Member
iTrader: (1)
Joined: Jun 2006
Posts: 1,067
Likes: 0
From: Guelph, Ontario
Car: 89 IROC/05 RX8
Engine: LS1/LS1
Transmission: T56/T56
Axle/Gears: 3.42 GM/3.55 8.8
Re: Update pics of my LS1 swap. Custom 4th gen A/C pictures...
Hmmm... Good question. My only answer to it is thats how the motor was set up when I got it. haha.
Also, I think Ide need a different adapter harness. One that has the MAF plug and the IAT plug since my harness uses two circuits for this. Im guessing the vettes or trucks or whatever vehicle the SLP maf is based off of had the IAT and MAF wiring going into the one plug.
I wouldnt mind it being contained in one unit though. Less separate wiring and no sensor. I have about 4 MAF sensors that Im taking to the tuner. A ZO6, a truck one, and a Stock one. The SLP one I have now is throwing codes and Ide rather not use it since it messes with the PCM. Ide rather take care of all that sort of stuff in the tune. SO maybe if I end up with a MAF with the IAT built in Ill make it work somehow.
J.
Also, I think Ide need a different adapter harness. One that has the MAF plug and the IAT plug since my harness uses two circuits for this. Im guessing the vettes or trucks or whatever vehicle the SLP maf is based off of had the IAT and MAF wiring going into the one plug.
I wouldnt mind it being contained in one unit though. Less separate wiring and no sensor. I have about 4 MAF sensors that Im taking to the tuner. A ZO6, a truck one, and a Stock one. The SLP one I have now is throwing codes and Ide rather not use it since it messes with the PCM. Ide rather take care of all that sort of stuff in the tune. SO maybe if I end up with a MAF with the IAT built in Ill make it work somehow.
J.
We've got OEM GM 85mm maf's on a couple 1200+ hp cars, no problem at all.
Five7 - The 85mm (Zo6 & 02+ vette's, 99+ trucks) MAF's have a 5 pin connector rather then a 3pin. In the 85mm maf's, the IAT is incorperated into the MAF, so you dont need to run a seperate IAT. Alot of times, an adapter harness will make use of the 3 pins in the MAF, then leave the secondary IAT, rather then fitting it all into 1 (not sure why)
I chopped the IAT & MAF sensor pigtales and fit on a 5pin end, works like a charm

Thread Starter
Joined: Sep 2002
Posts: 3,685
Likes: 10
From: PA
Car: 86 Trans AM
Engine: LS1 (not stock...)
Transmission: Built T56
Axle/Gears: Strange 12-bolt w/ 3.73
Re: Update pics of my LS1 swap. Custom 4th gen A/C pictures...
Yeah...what he said. haha.
Ive been told by several people that the stock 75mm (or whatever it is) MAF sensor is still fine for my application. However with a 90mm throttle body, I set my whole intake track with 4" components. I just dont see a reason to neck down for the smaller MAF.
Right now, Im tossing codes for MAF frequency. Thats why I want to ditch the SLP unit, and either go with the 85mm truck unit, or the ZO6 unit and have the frequency max changed in the tune. Ive got a whole box of MAFs and intake pieces to make something work. Going to leave it up to my next tuner as to what one gets left in.
J.

Senior Member

Joined: Feb 2009
Posts: 874
Likes: 18
From: Brisbane, Australia
Car: 1985 Pontiac TransAM
Engine: 400SBC 24x conversion
Transmission: T700r Stage2 Shiftkitted
Axle/Gears: 2.77 9 Bolt
Re: Update pics of my LS1 swap. Custom 4th gen A/C pictures...
Are there any clearance differences with the LS1 block and exhaust compared to the L98/TPI?
I'm in Australia (land of convicts and right hand driving) and the headers are already dangerously close to the steering column due to the engine being off center to allow you guys more steering column clearance.
I want to do the LS1 swap but i have all of 1inch clearance between the headers and steering column, so if there's any extra room taken up by the ls1 motor... i cant do it

Re: Update pics of my LS1 swap. Custom 4th gen A/C pictures...
hey what wiper motor did you use my 3rd gen wont fit unless I cut the Fuel rail covers and I dont really want to do that
Thread Starter
Joined: Sep 2002
Posts: 3,685
Likes: 10
From: PA
Car: 86 Trans AM
Engine: LS1 (not stock...)
Transmission: Built T56
Axle/Gears: Strange 12-bolt w/ 3.73
Re: Update pics of my LS1 swap. Custom 4th gen A/C pictures...
The wiper motor/cover from both my 87 and 86 fit fine. The only thing... Im not running the internal pump in the cover. I removed it because Im using a 4th gen washer bottle with the built in pump. So I just have wires running up into the cover to plug into the original pump connections.
Otherwise...I have no clearance issues with the wiper motor or cover from either year.
evilstuie: Are you trying to do the swap on a right hand drive car?? Im not sure but the headers are built around the left hand drive set up. There is plenty of room on my car...and the headers fit pretty tight. Might be something to talk to Hawks about on the phone or something. I have a pic where Im holding the PCM in a potential mounting spot, that might give you a good indication of the room over on the passenger side.

Best I got...not sure what the RHD cars look like.
J.
Otherwise...I have no clearance issues with the wiper motor or cover from either year.
evilstuie: Are you trying to do the swap on a right hand drive car?? Im not sure but the headers are built around the left hand drive set up. There is plenty of room on my car...and the headers fit pretty tight. Might be something to talk to Hawks about on the phone or something. I have a pic where Im holding the PCM in a potential mounting spot, that might give you a good indication of the room over on the passenger side.
Best I got...not sure what the RHD cars look like.
J.
Senior Member
Joined: Feb 2009
Posts: 874
Likes: 18
From: Brisbane, Australia
Car: 1985 Pontiac TransAM
Engine: 400SBC 24x conversion
Transmission: T700r Stage2 Shiftkitted
Axle/Gears: 2.77 9 Bolt
Re: Update pics of my LS1 swap. Custom 4th gen A/C pictures...
Thanks for that, thats perfect.
I'll use the pcm width as a measurement and check with mine.
Because the engine is off-center it gives you guys more space to play with near the steering but squishes ours right up
The plastic bit on the steering cover is half melted away from the heat coming off the headers on mine.
But it looks about the same distance so it should be good.
Still on the fence as to which way to go with cash, AU$8000 to spend on my current motor, or ls1 swap, or crate motor.
I want maximum torque/hp and fuel injection.
Member
iTrader: (2)
Joined: Nov 2004
Posts: 379
Likes: 4
From: New Mexico
Car: 87 Firebird,
Engine: lq4
Transmission: gto t56 (mn12)
Re: Update pics of my LS1 swap. Custom 4th gen A/C pictures...
After posting on your monster thread I found this thread. I see what you mean about a custom evap box! I'm always learning something from your threads. I also tried to fit the 4th gen hvac unit in the 87 and found that there is no easy way to do it. Modifying the evap box seems to be the easiest. Did you notice how small the opening is for the 3rd gens compared to the 4th. Also the distance between evap and the evap box is about two inches at its widest point. Lame!
Thread Starter
Joined: Sep 2002
Posts: 3,685
Likes: 10
From: PA
Car: 86 Trans AM
Engine: LS1 (not stock...)
Transmission: Built T56
Axle/Gears: Strange 12-bolt w/ 3.73
Re: Update pics of my LS1 swap. Custom 4th gen A/C pictures...
Yeah the evap core is what really screws things up. Since the 4th gen has both connections up top and the 3rd gen has one at the top and one at the bottom. And I thought it wouldnt be a problem...but the 4th gen core has a pipe running up the back side of it. So it wont just fit into the old box. Thats what prompted me to modify the front of the HVAC box to give me the room.
I can honestly say that I went into this projecting with the thought that it probably wouldnt work. I was totally prepared to ditch the a/c completely haha. But it turned out great. Hopefully it works good this summer haha.
J.
I can honestly say that I went into this projecting with the thought that it probably wouldnt work. I was totally prepared to ditch the a/c completely haha. But it turned out great. Hopefully it works good this summer haha.
J.
Member


Joined: Jul 2002
Posts: 255
Likes: 9
From: Humid Houston on the Texas coast
Car: '86 Z28
Engine: SDPC TPI 350
Transmission: WC T5
Axle/Gears: 3.23 posi
Re: Update pics of my LS1 swap. Custom 4th gen A/C pictures...
Well summer is almost over. How did it work for you? How hot have your PA summer days been? Do you have any numbers on interior verses outside temps?
Thread Starter
Joined: Sep 2002
Posts: 3,685
Likes: 10
From: PA
Car: 86 Trans AM
Engine: LS1 (not stock...)
Transmission: Built T56
Axle/Gears: Strange 12-bolt w/ 3.73
Re: Update pics of my LS1 swap. Custom 4th gen A/C pictures...
Funny you should ask...I put an A/C thermometer in it yesterday on the way home.
First...I dont think I mentioned it in this thread, but I added a heater control valve. I made a special thread about it. It's helped a good deal.
Im not sure of the exact ambient temp yesterday, but it was hot. Ide say the air was about 88-90. On the highway, where I was sitting in traffic, it had to be close to 100. My IAT temps get near 100 on the highway, so thats a general idea.
The thermometer in my vent read 55 with the A/C cranking and me moving about 25mph. Thats WAY better than it was without the control valve. And plenty cool enough for me. Swapping to cloth seats for the hot months helped too.
All I can say is...the t-top shades, plus the a/c makes that thing a nice ride when its really hot. All I need now is tinted windows to help keep the temps down when its parked.
J.
Member
Joined: Jul 2002
Posts: 255
Likes: 9
From: Humid Houston on the Texas coast
Car: '86 Z28
Engine: SDPC TPI 350
Transmission: WC T5
Axle/Gears: 3.23 posi
Re: Update pics of my LS1 swap. Custom 4th gen A/C pictures...
55F outlet temp is pretty good. When I do the swap I want to ditch my R12 system and install the full fourth-gen R134 system as you did. I've picked up an auction third-gen evap box and fourth-gen core and box to also follow your pioneer way.
I saw your heater valve thread. Pretty slick install...
At which connection in the fourth-gen system did GM locate the orifice tube? I am thinking of fabbing some custom fit hard lines and I was wondering what might need to be salvaged from the OEM lines and reused in my fabs.
Mike
I saw your heater valve thread. Pretty slick install...
At which connection in the fourth-gen system did GM locate the orifice tube? I am thinking of fabbing some custom fit hard lines and I was wondering what might need to be salvaged from the OEM lines and reused in my fabs.
Mike
Thread Starter
Joined: Sep 2002
Posts: 3,685
Likes: 10
From: PA
Car: 86 Trans AM
Engine: LS1 (not stock...)
Transmission: Built T56
Axle/Gears: Strange 12-bolt w/ 3.73
Re: Update pics of my LS1 swap. Custom 4th gen A/C pictures...
Mike,
I cant recall 100%, but I think the orifice tube is in the hard line where it connects to the evap core. I think... As long as you have the connections figured out, you can probably do whatever you want with the lines. The OEM 4th gen lines fit pretty good, and look decent with a little tweaking.
If you need any help...dont hesitate to ask. Ill help ya if I can.
J.

Thread
Thread Starter
Forum
Replies
Last Post
ambainb
Camaros for Sale
11
Apr 25, 2016 09:21 PM