When you click on links to various merchants on this site and make a purchase, this can result in this site earning a commission. Affiliate programs and affiliations include, but are not limited to, the eBay Partner Network.
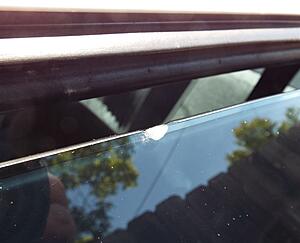
A very typical issue with Thirdgens is dried out, cracked, and crumbling or missing window stop bumpers inside the doors. Under ideal conditions, the rubber window stop bumper contacts a shelf at the bottom of the inner door when the window is rolled down. The bumper absorbs some of the force, as well as prevents rattles, and keeping the window from rolling down too far. When the bumpers dry out and start to get brittle, they crack and split when they're compressed, and eventually they crumble and fall off the window regulator. Aside from everything else, without the bumper, the top of the glass can catch on the weatherstrip screws, and can get chipped.
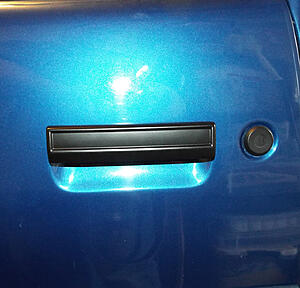
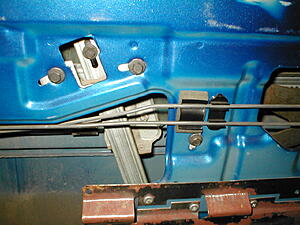
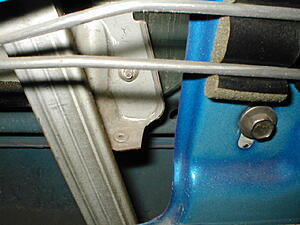
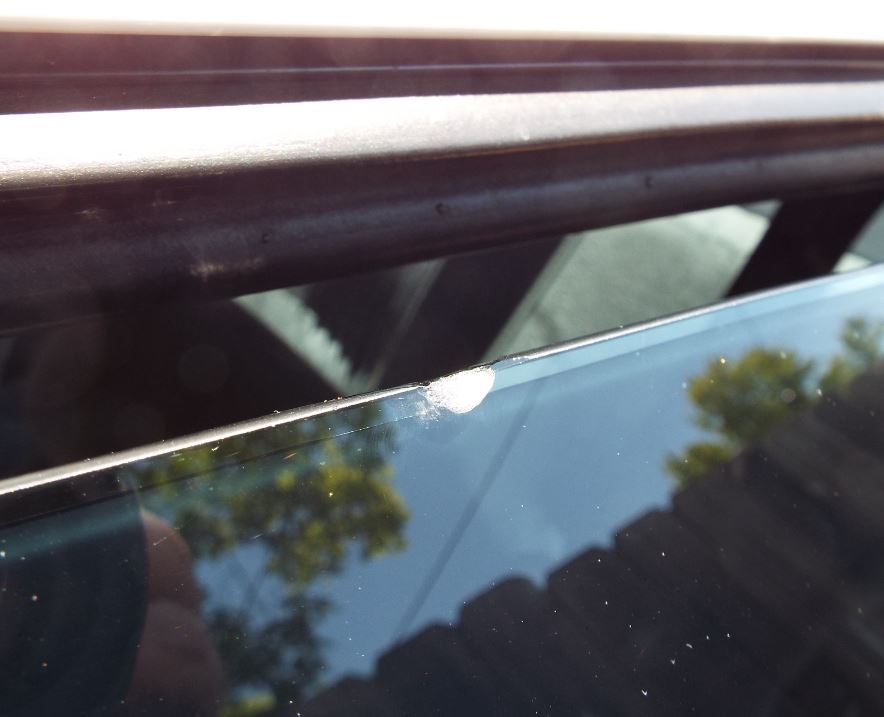
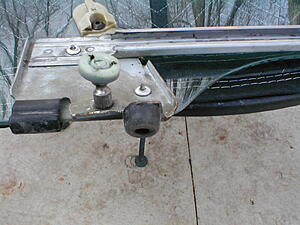
The visible result, chipped glass from catching the dew wipe screws.
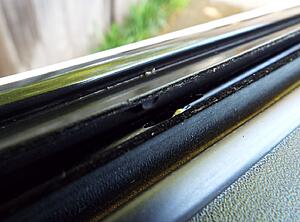
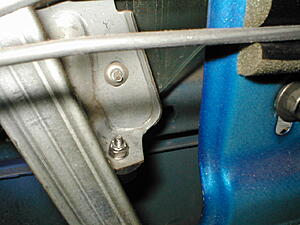
The screw, and damage showing the window below the screw head.
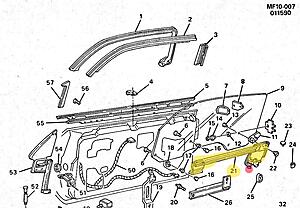
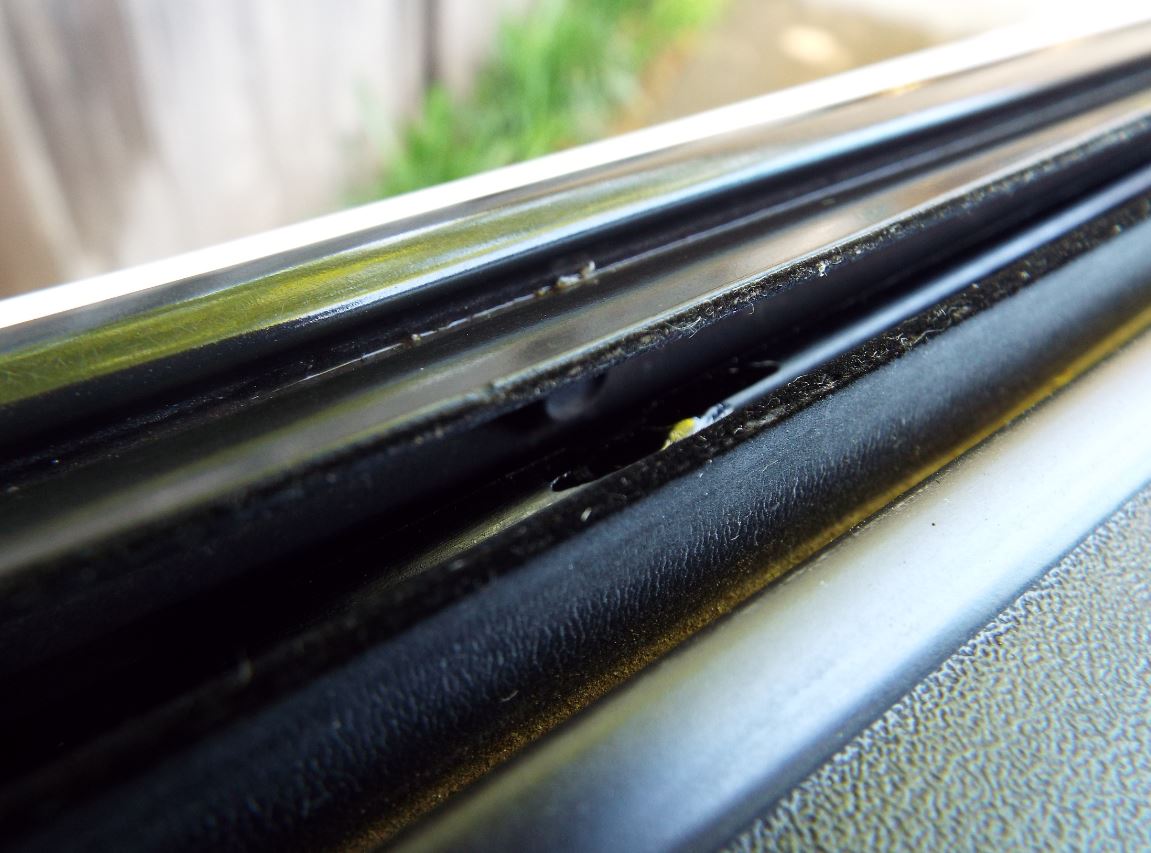
The problem...
This diagram shows the bumper highlighted in Pink. GM considers the bumper a permanent part of #21, the window track. OER offers a reproduction that may or may not be a feasible replacement. I was able to find a source for rubber bumpers that are very similar to the originals.
With the new bumper in hand, all we need to do is remove the door panel. I'm not going to go over the entire procedure to remove the door panel. It's pretty easy, with a few exceptions.
- If you have a Camaro or Firebird with the large black rectangular trim panel around the inner door handle, just know that most of the Torx screws are fakes molded into the plastic. They're easy to spot if you know what to look for, or you can tap on them with the end of your Torx driver and listen for a metallic clink or plastic tap, or check them with a magnet... Whatever, but if you try to unscrew molded plastic, you'll just tear them up.
- On Firebirds with the oddly shaped gray trim around the door handle, you'll need to carefully pry out the black trim cap, and do the same with the Firebird logo trim cap. The logo cap has it's clips at the top and bottom, very carefully pry from the sides to get behind it, and they snap out.
- Also, the plastic upper trim across the top of the door panel is a permanent part of the door panel. Remove everything below the trim, pry the plastic retainers loose around the outside of the door panel, roll the window all the way down, and push in on the door panel trim, while wiggling a bit, and after a few minutes the trim should pop free. Don't force it, you can also try sliding it a bit toward the front and rear of the car. There are approximately four spots along the trim that snap into the door, when they're all unclipped the trim piece and door panel lifts off as one piece.
Once the door panel is removed, roll the window about a third of the way down, and you'll be able to see the rivet and possibly what's left of the old bushing through one of the large openings on the inside of the door.
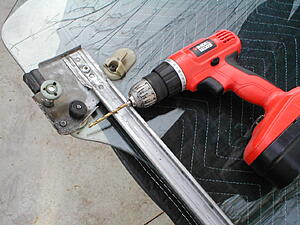
It's a bit tight inside the door to drill the rivet as you would normally. I've tried a few ways to remove the old rivet, and I've settled on cutting or grinding away the head of the rivet with a Dremel tool and a cut off disc or grinding wheel. Once the top of the rivet is gone, the rivet can be tapped out and the remains of the original bumper should come right off.
The new rubber bumper can be riveted back to the window track, or it can be mounted with a screw and nut. I've been using 10-24x1" stainless steel screws, a #10 washer, and a nylon insert lock nut, for an install that won't rattle loose, and is servicable in the future if the bumper should need replacing again. Snug the screw/nut tight enough the bumper doesn't move, but don't overtighten.
From here, the job is done aside from reassembling the door panel. This is also a good time to replace a missing or damaged moisture shield between the door panel and inner door, or clean and lubricate the door latch, window tracks, power locks, replace the belt weatherstrip/window scraper, etc.
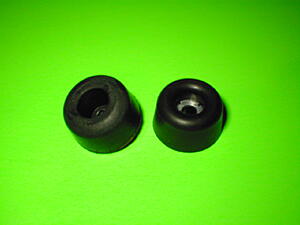
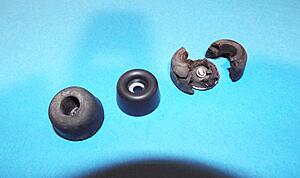
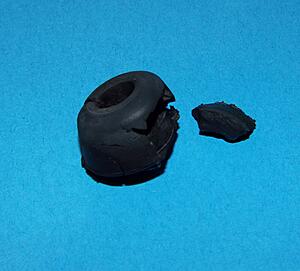
The bumper on the left is from a manual window car, the one in the middle is one of my reproductions, and the one on the right is what's left of the bumper I fished from the door of my 61k mile Iroc with power windows. Years ago I fished similar chunks out of my Formula's door.
If the window is out of the door, it's maybe a little more difficult than if the window is installed in the door.
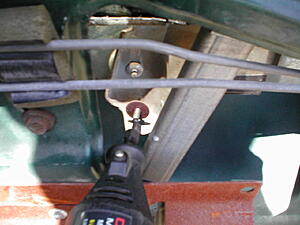
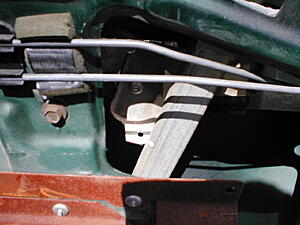
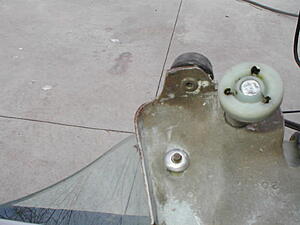
In these pics you can see the original bumper, still riveted to the window track, and the rivet that will need to be drilled.
Drill the rivet, and the bumper will come out easily. Then just bolt the new one on with a screw, washer, and nylon lock nut.
Great writeup. Big in Help stopping window rattles.
While these aren't the exact size I used, I cut off the stud/washer on one side and used these for my window stops. (stole mine from efi fox body air boxes)
Thanks for the approval! I'm working through my to-do list, taking pics along the way. Anything that I figure applies to the average thirdgen, and isn't often covered, I consider making a thread. Hopefully someone will find the info helpful.
Thanks for the write-up Drew.
I replaced mine years ago with a modified polyurethane bump stop.
But recently I ran across a post somewhere that said to use bicycle brake pads.
I think they might actually work perfectly. Available everywhere - and cheap too.
I don't know about everyone else, but I'm certainly guilty of pushing the switches to the down position, flipping through a good read like Moby Dick, or War and Peace, then checking if the window is finally down... :P The bumper on power window cars seems to take a lot of abuse since you don't 'feel' the window physically bottoming out. On some thirdgens, you can see or feel the door panel flex when the window bottoms out and the regulator flexes the inner door structure.
I've been putting off ripping into the doors on the "nice" cars for several years. Doesn't bother me much tearing daily driver/beaters apart to lube the door internals, or whatever, but on the unmolested cars I generally prefer to leave them alone if I can. So I'm paying for that a bit now, replacing the window stop bumpers, belt/window scraper weatherstrips, cleaning and lubing door latches, lubing locks, identifying and resolving rattles... Nearly finished with the first of three cars that need to be addressed. When it's all said and done, I'll be ready for a nice vacation.
I'm taking a lot of photos and notes as I go so I can write up the solutions I've come up with.
...replacing the window stop bumpers, belt/window scraper weatherstrips, cleaning and lubing door latches, lubing locks, identifying and resolving rattles...
Yes, hesitant to be going in and out of good doors/trim multiple times. One of these winters I'll have "door clean up week" and open it up one time, and take care of all of the items I can in one shot.
For best results, I recommend having the belt scraper seals, new gaskets for the door lock cylinders, paint for door handles and lock covers, window stops, plastic safe grease for the window tracks, a pile of nylon washers with 1/4" holes (more to come on this), silicone grease, a good degreaser for the door latches, new moisture barriers, heat shrink tubing, and soft silicone tubing, all of the above before starting the project. Several times I've had to throw on the brakes because I found something else in the door that needed work.
I also have noticed that at least on the Iroc, the bottoms of both doors are full of clumps of NVH or anti-flutter adhesive that used to be between the reinforcement across the top of the door, and the impact bar across the middle of the door, and the door skin. Seems that whatever, whoever used, has dried, cracked, and is no longer keeping the door skin from vibrating independantly of the structure underneath.
Eventually I'm planning to make another thread for the door locks, but here's a related teaser. Part of my reason for going into the doors NOW is to fix the annoying rattles. Doors on the Iroc sounded like an old Folger's can full of nuts and bolts.
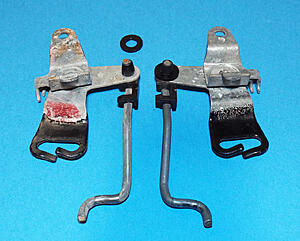
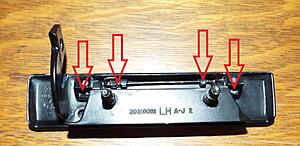
When I started checking into the lock rods, the first thing I noticed is that the plastic keepers at the power lock bellcrank and at the door lock cylinders are really sloppy loose. In the case of the pushrod from the power lock solenoid to the bellcrank, the slop is bad enough the rod can just cam over instead of popping the bellcrank into the lock rod.
The easy fix is a cheap Nylon washer from the hardware store. It's a standard Hillman Fastener part, with about a 1/4" hole in the center. By snapping the washer over the barbed keeper before inserting and clipping the rod in place, over half the slop is instantly removed. This makes the locks snap locked/unlocked stronger, and also reduces a rattle when opening and closing the door.
The photo above shows a lock bellcrank without a washer, and the other with. Also note the plastic coating on the 'fingers', hard to see but the one on the left is starting to peel from age. Thinking Plastidip might be a suitable replacement, but haven't gotten that far yet.
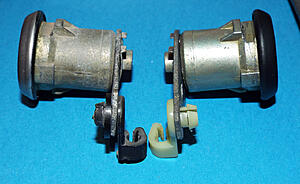
These photos show the keeper at the lock cylinder, with and without the added nylon washer.
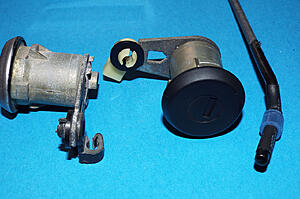
The other tidbit here is the rod from the outside door handle to the door latch. The plastic coated Z bend at the bottom of the rod just slips inside an arm on the latch. The plastic coating is supposed to keep it from rattling. However, the plastic wears through over time, and you get metal on metal. On the rod in the picture, I put a small piece of heat shrink tubing over the old plastic coating to try to absorb some of the vibration.
I've also slipped a piece of silicone tubing (R/C model engine fuel line) over the rod up to the Z. The bottom of the silicone tubing will rest on top of the door latch 'arm' which will keep it from making racket up and down, such as over bumps in the road or closing the doors. I haven't tested this yet, but I'm confident it'll work. (Edit - Turns out this bit reduced a rattle, but also caused the exterior door handle to move when using the inside door handle. Ya win some, ya lose some.)
You're right about the issues being mostly because of the door handle and door lock. I shaved my door handles and lock(s) and now when I close them the doors make none of the rattling noises that they used to. Just a solid Thud. If we could ever get a handle on a source that can sell the door latch mechanism with the plastic coating that would also help quiet them.
If we could ever get a handle on a source that can sell the door latch mechanism with the plastic coating that would also help quiet them.
I sorta have that figured out. Sorta... This will be a long one, so pour yourself a drink, grab a snack, go to the restroom, I'll wait til you get back...
Background info -
GM used a lot of part numbers for door latches from 82-92, and even continued superseding the part number up until 2005'ish when they discontinued the door latches. Some of those 20 some odd part numbers will interchange. Others are slightly different variations that may or may not interchange.
For example, early thirdgen door latches didn't have the plastic cover on the latch that hooks around the striker. Early/mid thirdgens utilize a spring loaded black nylon wedge that contacts the striker when the door is latched, which later thirdgens replace the spring loaded wedge with a molded nylon block that doesn't move. Also, some thirdgen door latches use counter sunk bolts and dimples that locate the latch to the door frame, while others use flat bolts. Some of these will drop right in place of the other and work.
Aside from the deep digging researching the part numbers to verify that GM said they'd interchange, if they didn't we'd probably hear a lot more crying about junkyard doors not interchanging.
More -
Ok, so armed with 20-something part numbers, I started looking at interchange with other GM cars. I was able to find that GM listed the same part number latch for 80-87 G-bodies as 82-87 F-bodies. Next step was finding a source for reproduction latches for an 87 Grand National.
I ended up with a "Goodmark" latch for a 1987 GN, which bolted right into my 87 Iroc. It works, but it's important to note that it's not EXACTLY the same, since it's a slightly modified or "improved" version of the design. Coincidentally, it IS identical to the last examples of GM NOS latches that were offered for the 87 Camaro.
Caveats -
For whatever reason, 88 has it's own number, and 89-92 have the different bolt issue, so the Goodmark GN latch probably won't work on 88-92 thirdgens, and might not work on 82-86 thirdgens.
Also "Goodmark" apparently put their name on a wide variety of offshore reproduction parts for late model GM cars, and then suddenly something happened and they discontinued all of those late model parts. So yeah, the 87 GN latch is no longer available from "Goodmark". However I'm pretty sure you can probably find the same exact part, in the same generic brown box, from the same Asian factory, assembled by the same slave labor, with a Dorman part number on the box, or something similar. Just don't blame me if it doesn't interchange exactly. I spent hours going blind staring at part numbers, and crashed the browser with 20 google tabs open, and countless pages of old catalogs open, to determine if it was worth my hard earned doll hairs to take a chance on a part that might not fit. IF anyone else is going to take this info, and order a G-body latch without doing the same research, it's their own responsibility.
Final Thoughts -
TL,DR. - You might be able to find a reproduction latch for another GM auto that will work.
The old worn door latches work a lot better after they're cleaned. Toss em in a tub of odorless mineral spirits overnight, agitate and/or scrub heavy deposits with an old toothbrush, or stiff paint brush, then lubricate moving parts... It helps.
I'm still working on my Iroc door project. Still need to shoot some NVH crap between the skin and shell of the door, and put the moisture shields and door panels back together, but I did get the doors opening and closing better, the locks working better, windows rolling faster, etc... Just go sick of looking inside doors.
The bumper on the left is from a manual window car, the one in the middle is one of my reproductions, and the one on the right is what's left of the bumper I fished from the door of my 61k mile Iroc with power windows. Years ago I fished similar chunks out of my Formula's door.
If the window is out of the door, it's maybe a little more difficult than if the window is installed in the door.
In these pics you can see the original bumper, still riveted to the window track, and the rivet that will need to be drilled.
Drill the rivet, and the bumper will come out easily. Then just bolt the new one on with a screw, washer, and nylon lock nut.
-More to come-
How in the world did you get the window and regulator out of the door in one piece?
I've been trying like crazy and that roller thing keeps getting cragged on the door frame etc...
How in the world did you get the window and regulator out of the door in one piece?
I've been trying like crazy and that roller thing keeps getting cragged on the door frame etc...
If you tease it around, there's a gap all the way at the front and/or rear where it'll just barely slip through. If it's coming out of a junk door, you can coerce the door and squeeeeeze it through (flex the door gap open). Another thing you can try is tilting the top of the window towards the car as you bring it up and out of the hole. Try to work the nylon washers past the outside edge of the door, then you can just barely get the window out. It's hard to get it out without chipping the nylon washers, but it can be done. Just go slow.
Alright, got a few more updates to add to this thread...
As of 4/15, I finally have the doors of the 87 Iroc all back together!
First a couple expanded thoughts and lessons learned...
- The heatshrink tubing over the worn rubber coating of the various rods at the door latch, seems to be working well.
- The soft silicone tubing over the door handle rod worked to prevent a rattle, however I had some issues with the tubing being too soft, and grabbing in the hole of the door latch. The result was that operating the inside door handle sometimes made the outside door handle move, or vice versa. I slid the tubing up a bit higher on the rod and it worked better, use that tip at your own risk, and test every function of the door before you put the door panel back on, so if it causes problems you can slice it off with a razor blade.
- The "Goodmark" reproduction door latch works well, BUT... You knew that was coming... The built in part of the latch that softens the blow of closing the door over the door striker was setup a bit differently. I ended up drilling a hole, and cutting out the plastic J shaped block in the repro latch, and installing the spring loaded block originally used on the 87. The other issue with the repro latch is that for whatever reason, it seems like the manual lock button lever is a bit different. It's not a big deal, but the sliding manual lock button doesn't slide as far forward in the unlocked position as it used to. It still can be locked/unlocked, but less orange shows in the unlocked position. It's possible this is just something I goofed when I put it back together, or it could just be typical reproduction quality. If it really bothers me, I'll go back in later and look for something I may have missed, or assembled incorrectly. But functionally it works OK.
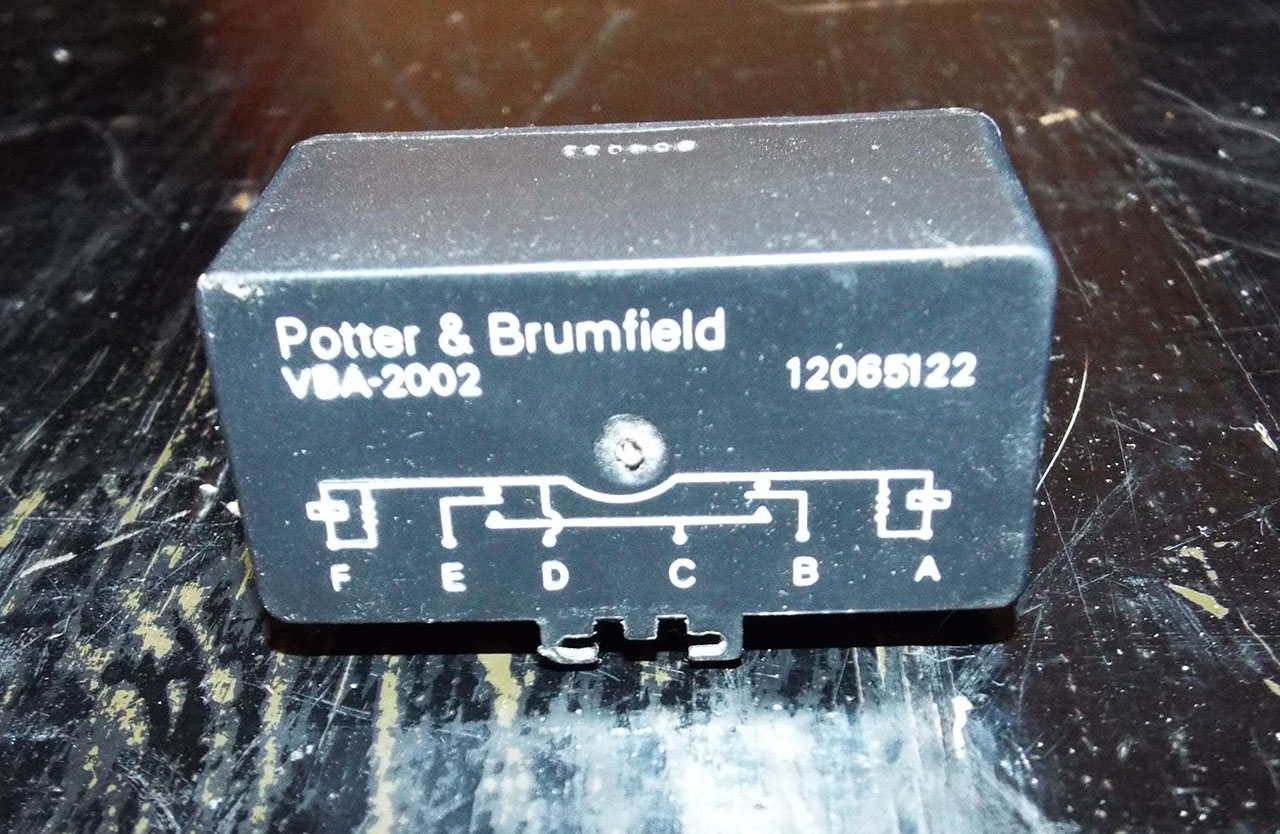
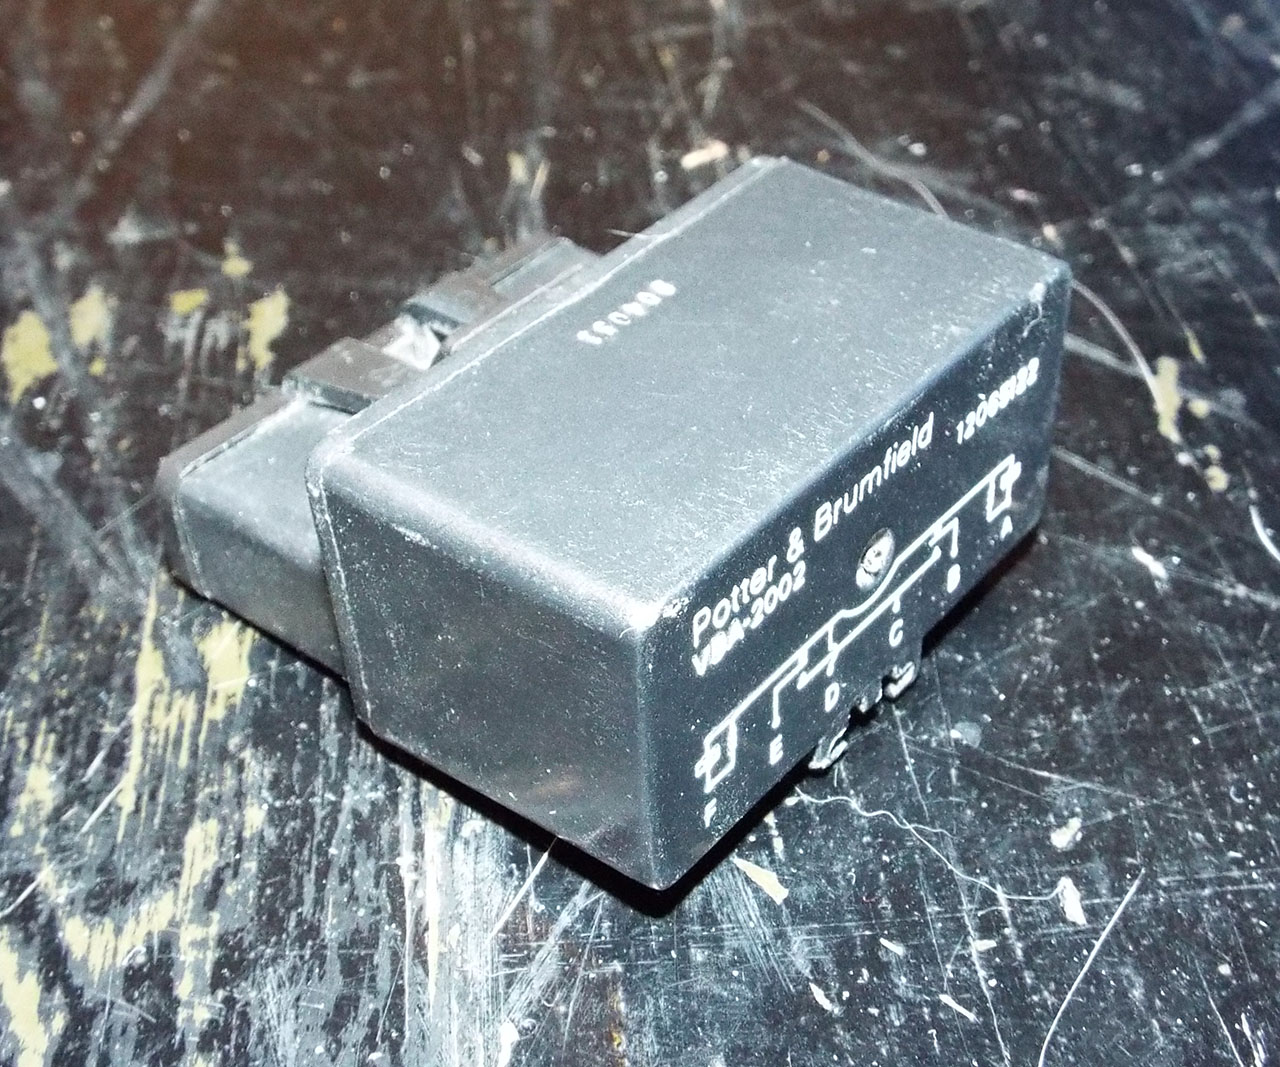
All in all my doors close a lot quieter, and are fare less clunky for my efforts. My windows roll up and down faster, but not out of this world faster. They're fast enough I don't feel like Joe Dirt waiting for the motors to roll them down. The power locks work a lot better, but it still takes one or two clicks to lock or unlock, before sometimes they'd never lock/unlock all the way with the power buttons. Next step there is to change the metal cased power lock relay to a later (89?-up) Potter and Brumfeld lock relay.
Other things I did in the doors, that I don't believe I mentioned or pictured above include -
- Adding the rubber strip across the bottom of the door panel. Did 87's have that strip from the factory? I doubt it, but previous owner could have removed it. Seems like I've seen them mainly on 91s.
- Added felt inside the door handle bezel, behind the manual door lock slider. Later cars have the slot lined with a velvety fuzzy to keep the lock rod from rattling. I used a bit of adhesive backed felt from the crafty section at Walmart. Might regret it on a hot day if the adhesive slips, but it's easy enough to remove it and try again with a better stickum.
- Shimmed/backed the loose front end of the interior door handle. Stock, the front of the handle hooks over the door structure, and a single rivet at the back holds it down. This can rattle around pretty good. A bit of cardboard <Not the corrugated variety> tucked between the metal frame of the door handle, and the door structure was enough to kill most of the rattle. I also used a bit of adhesive backed, closed cell foam under the front edge. A more professional approach would have been to remove the rivet, add a shock absorbing backing, and install a new rivet, but after a year with these doors torn apart...
The last big thing, was I went in with 3M NVH adhesive, and squirt a goober in about 5 or 6 spots across the impact bar to the door skin, and a couple spots across the upper reinforcement between the inner structure and outer door skin. To date, every stock thirdgen door I've been in has had a goober of a rock hard or semi-hard adhesive to keep the door skin from drumming and rattling. Recently, I've encountered several cases where that adhesive was rattling around inside the bottom of a door due to age and the compound drying out, cracking, and falling free. The 3M NVH isn't exactly frugal friendly, it's a 2-part epoxy that requires a Duramix style tool to dispense and mix the 2-parts from the tubes. It's kind of like a double-barrel caulk gun, only unreasonably expensive for something that would cost 99 cents at Home Depot. But 3M is a known quality, and the attributes fit my comfort level and expectations... a slow cure time, and little expansion (ie less mess) were what I was looking for.
The result is doors that close with a solid thump. If the t-tops aren't in, they open and close with 3 fingers without slamming the beegee-sus out of them. I suspect the previous owner moved the t-top strikers down to combat the minor water leaks by overcompressing the rubber weatherstripping. I've got a few new photos to crop, resize, and upload, that'll get added here when I get around to it.
Next step there is to change the metal cased power lock relay to a later (89?-up) Potter and Brumfeld lock relay.
Other things I did in the doors, that I don't believe I mentioned or pictured above include -
- Adding the rubber strip across the bottom of the door panel. Did 87's have that strip from the factory? I doubt it, but previous owner could have removed it. Seems like I've seen them mainly on 91s.
- Added felt inside the door handle bezel, behind the manual door lock slider. Later cars have the slot lined with a velvety fuzzy to keep the lock rod from rattling. I used a bit of adhesive backed felt from the crafty section at Walmart. Might regret it on a hot day if the adhesive slips, but it's easy enough to remove it and try again with a better stickum.
- Shimmed/backed the loose front end of the interior door handle. Stock, the front of the handle hooks over the door structure, and a single rivet at the back holds it down. This can rattle around pretty good. A bit of cardboard <Not the corrugated variety> tucked between the metal frame of the door handle, and the door structure was enough to kill most of the rattle. I also used a bit of adhesive backed, closed cell foam under the front edge. A more professional approach would have been to remove the rivet, add a shock absorbing backing, and install a new rivet, but after a year with these doors torn apart...
The last big thing, was I went in with 3M NVH adhesive, and squirt a goober in about 5 or 6 spots across the impact bar to the door skin, and a couple spots across the upper reinforcement between the inner structure and outer door skin. To date, every stock thirdgen door I've been in has had a goober of a rock hard or semi-hard adhesive to keep the door skin from drumming and rattling. Recently, I've encountered several cases where that adhesive was rattling around inside the bottom of a door due to age and the compound drying out, cracking, and falling free. The 3M NVH isn't exactly frugal friendly, it's a 2-part epoxy that requires a Duramix style tool to dispense and mix the 2-parts from the tubes. It's kind of like a double-barrel caulk gun, only unreasonably expensive for something that would cost 99 cents at Home Depot. But 3M is a known quality, and the attributes fit my comfort level and expectations... a slow cure time, and little expansion (ie less mess) were what I was looking for.
The result is doors that close with a solid thump. If the t-tops aren't in, they open and close with 3 fingers without slamming the beegee-sus out of them. I suspect the previous owner moved the t-top strikers down to combat the minor water leaks by overcompressing the rubber weatherstripping. I've got a few new photos to crop, resize, and upload, that'll get added here when I get around to it.
Are the later lock motors plastic all around? I am not familiar with the early cars.
For the strip at the bottom of the door panel, did you take from another car, or is that something you have found that is close? I know I have it in my 92, but not sure on my other car, and I would like to add if it isn't, just curious if you have another "repro" solution.
For the bolded section, I was going to use the butyl rope for the same thing you did with the NVH adhesive. It is less mess and removable if needed. I got the idea from sounddeadenershowdown.com. When I re-did my 92 I put down the requisite 25-50% of vibration dampener on all the flat surfaces including the roof (haven't gotten to the doors yet, ran out of time and needed to start driving the car again). Before the vibration product you would get the tinny sound when struck, like the doors, and after it was much better. But I wasn't satisfied, even with probably 50% coverage I was getting too much resonance for my taste. I stuffed the butyl rope in all of the areas where the hard top roof structure was close to the skin. The finished product is MUCH different than it was before, I might suggest you add some of that to the impact brace, that is my plan.
I also like your idea of the closed cell foam. I used a lot of that inside my dash in the car, so wires and plastic parts can't produce any noise when the car moves. I have the DSE SFCs, but still get some body flex, but I have almost no rattles and squeaks inside the car, it is a pleasure to drive. I was shooting for new luxury car NVH inside the passenger compartment, and I think I have achieved close, even without doing the doors yet. I also plan on doing the closed cell foam on the back of all the interior panels in the car, especially where two panels touch. It should help tighten everything up, and lower the, already minimal, interior sounds. I think I am going to go to the level your are suggesting with the doors when I get around to them, remove the rivets for the various parts inside and foam in between them too.
Are the later lock motors plastic all around? I am not familiar with the early cars.
To the best of my knowledge, the lock motors are all the same 82-92, steel case, no serviceable parts... Round about 1989 MY, GM switched the Power Lock Relay module from a tin cased monster that grounds through a tab on the case that's bolted to the body, to the Potter and Brumfeld - Attorneys at Law/Building Better Worlds - Power Lock Relay. As far as the difference between them, the P&B lock relay seems to be more modern'y. As in you hit the button and it goes CLICK! while the older metal relay version just kinda goes Thump and the locks barely move. Maybe it's a placebo effect, but to me the later relay works better, it's smaller, it doesn't look like something from the 1940s. It's wired with a different connector and terminals, and it requires it's own ground, so I haven't geared up to convert one just yet.
Originally Posted by scooter
For the strip at the bottom of the door panel, did you take from another car, or is that something you have found that is close? I know I have it in my 92, but not sure on my other car, and I would like to add if it isn't, just curious if you have another "repro" solution.
I got the strips from Ebay, used take offs. Usually they're in great shape and cheap. Just don't all you guys go and buy every last one of them out there all at once now... I still need to find one more to replace one from the green Bird that's torn.
Originally Posted by scooter
For the bolded section, I was going to use the butyl rope for the same thing you did with the NVH adhesive. It is less mess and removable if needed. I got the idea from sounddeadenershowdown.com. When I re-did my 92 I put down the requisite 25-50% of vibration dampener on all the flat surfaces including the roof (haven't gotten to the doors yet, ran out of time and needed to start driving the car again). Before the vibration product you would get the tinny sound when struck, like the doors, and after it was much better. But I wasn't satisfied, even with probably 50% coverage I was getting too much resonance for my taste. I stuffed the butyl rope in all of the areas where the hard top roof structure was close to the skin. The finished product is MUCH different than it was before, I might suggest you add some of that to the impact brace, that is my plan.
I've thought about adding additional sound deadener. The Iroc is a bit of a special case, because it's got some history from before I got it. Long story, but suffice to say it was a basket case. Before the NVH, I could wrap on the door panel and it'd resonate bad. Now, it's a nice dull thump like you'd expect.
Originally Posted by scooter
I also like your idea of the closed cell foam. I used a lot of that inside my dash in the car, so wires and plastic parts can't produce any noise when the car moves. I have the DSE SFCs, but still get some body flex, but I have almost no rattles and squeaks inside the car, it is a pleasure to drive. I was shooting for new luxury car NVH inside the passenger compartment, and I think I have achieved close, even without doing the doors yet. I also plan on doing the closed cell foam on the back of all the interior panels in the car, especially where two panels touch. It should help tighten everything up, and lower the, already minimal, interior sounds. I think I am going to go to the level your are suggesting with the doors when I get around to them, remove the rivets for the various parts inside and foam in between them too.
I'm mostly just trying to get back to the way a 60k mile Iroc should be, and less reminiscent of a car that was hit by a Freight Train and rebuilt. I've got a set of Alstons for this car, because they just fell in my lap and were priced right. Figure a flexy flyer t-top Iroc that's been in a head-on with a train, they'll be better than nothing.
How do you like the DSE SFCs? I'd like to put a set in the Green Bird, but I'm concerned the passenger's side pipe would interfere with a dual cat setup. Not really sure how to make dual cats and modern SFCs work well together. Alstons will fit dual cat cars, but they also interfere with most T56 crossmembers. I'll have to figure something out one of these days.
Foam, felt, rubber, modern adhesives, and replacing missing bolts are my ultimate hope for tightening up this car. So far the change has been pretty extraordinary. It's still not as solid as a 90-92 hard top, but it's closing in on my 91 V6 Firebird with Lexan T's. Can't wait to apply the same attention to detail to the green bird to see how a later hard top responds to the effort.
They are the same brand and look like the same relays in my 93 Cadillac Deville. There are 6 of them behind the glove box.
I grabbed a few extra on my last hunt at the Fla. pic n pull yards.
Duh, I don't know why I was thinking lock motor, oops. I remember you mentioning the relay in another post now.
Originally Posted by Drew
How do you like the DSE SFCs? I'd like to put a set in the Green Bird, but I'm concerned the passenger's side pipe would interfere with a dual cat setup. Not really sure how to make dual cats and modern SFCs work well together. Alstons will fit dual cat cars, but they also interfere with most T56 crossmembers. I'll have to figure something out one of these days.
I liked installing them, even though they are WAAAY more work than every other SFC out there. I can see two spots that may be an issue with the N10. One would be just under the end of the inner wheel area? The other could be that the SFC just takes up space next to the rocker. That one would be easy enough to figure out, they are 1.5" wide (I think that was it) and run parallel to the rock the whole way down, all the way back to the front of the reinforcement area for the rear control arm. I used the Magnaflow TPI, single cat, Y pipe to make the Y pipe for my LS swap, and I should have installed the SFC's first, the Y pipe hit the SFC, somewhere under the last 45/90 to go to the cat. I was able to just bend the exhaust enough to clear it so it doesn't rattle. Might not work for the N10 cars, I can take some pictures if you reminded me at a good time on the weekend.
Duh, I don't know why I was thinking lock motor, oops.
You're good. LOL I almost scrolled back up to check if I thought relay and typed solenoid or motor... Getting old and trying to do too many things at once...
I'll try to remember to bug you about a SFC pic closer to a weekend. I was under my Formula a couple months ago looking at the stock N10 pipes, and I don't know that there'd be room even with the stock setup to run a square tube down the inside of the rocker.
I've got one of the Magnaflow single 3" cat Y-pipes I bought for the Iroc, and I've got a set of Hooker 2460s that I couldn't pass up, been debating if I want to use the Y-pipe with the stock HO manifolds, or make some modifications to fit the headers. Kinda figured on using the Hookers on the Green Bird, but then picked up a set of SLPs, which would be easier to plum into dual cats... Too many good deals, too many projects, too many parts that don't necessarily work well together... Guess I just need to keep building thirdgens until I use all the parts up.
Alright, I finally got around to cropping and resizing pics from the other day...
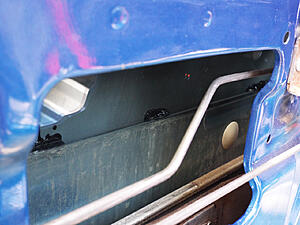
Here's the NVH as applied. Not the best photo, because the window is down, but you get the idea. Somewhere around 88 or 89 GM went to a round door bar instead of the flat stamped bar shown here in the 87. Not shown are the similar globs of NVH on the bottom edge of the door bar. Not pretty but neither was the stuff GM applied originally.
(Note for the 10-speed RacerX : Not my throw rug, no need to criticize some random Ebayer's carpet, Yo.)
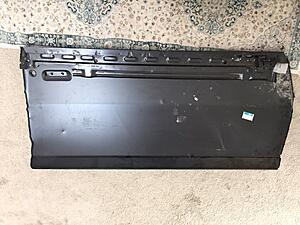
Likewise, you can't really see the reinforcement across the top 1/4 of the door skin in pics, but fortunately I've this handy photo of an NOS doorskin with the inner structure highlighted. I applied similar goobers of NVH between this bar and the door skin *where possible*.
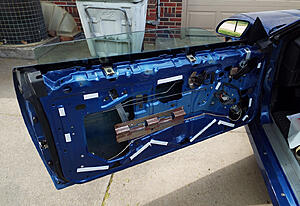
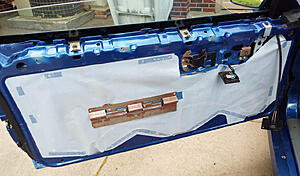
Here are sections of 3M double sided tape applied to retain the replacement moisture barrier. Ideally I would have been a bit more consistent about running a constant strip of stickum across the lower edges to encourage condensation and run off to drip down and inside the door to the drains in the bottom. Note the V pattern to direct water drips to the large cutouts to the inside of the door. Unfortunately the double sided tape I bought for the project a year ago wasn't exactly what I had in mind, so I used what I had on hand. No big deal, the car never sees weather, and I'll almost definitely be in here again sometime.
Here the new moisture barrier is applied. Note again the V pattern to encourage drainage inside the door to the exterior drains instead of onto the door panel and inside the car. Harder to see are the 'points' of the barrier which are tucked inside the door, thru the large openings shown in the previous image. This is by design. Should water or condensation form on the barrier, it should drip down inside the door and out the bottom instead of soaking into the door panel, or inside the car.
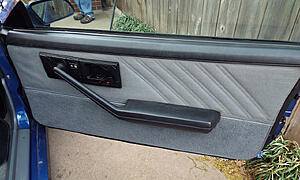
A shameless display of the re-attached door panel cloth... And also the rubber strip from a later thirdgen added to the 87 door panel.
All back together for the time being.
Bonus shot - SEM Trim Black'd door handles and lock bezels.
I might add more photos after I finish putting tools away, and have a chance to vac the debris from the budding tree off of everything...
I got enough material to make about 2,000 sets for $7.99 (or some other insignificant sum) at Walmart. Paint Department, the big ROLL of heavy duty drop cloth. SHHHhhhhh.... Worst part was that they fold the stuff before they roll it up, so you take, say 5ft off the roll, then unfold it like a garbage bag and you have a 5ft by 20ft slab of tarp. So there are some creases in it when it comes off the roll and is laid out. The trick is to go over it very carefully with a heat gun or hair dryer warm up the creases to release the tension. Same stuff I used to bag the front end of the Firebird when I was prepping for primer.
It's a little more opaque than the factory stuff, but it's not like you're looking through the factory barrier anyway after it's been in there a few years and fogged up or dried out and started blowing away as dust. I used a barrier from an 89 I got some parts from as a pattern. Transfered my pattern to a piece of heavy card stock, and then used the card stock to cut two barriers, because that was before I opened up the passenger's door and found it's liner was still intact. I'll probably be using the rest of the roll for projects the rest of my natural life.
Nice. Want to make another template and send it to me in a tube when you start selling those gas tank foam sets?
Perhaps. I'm way behind on my to-do list at the moment. Seems like I've got a million things I need to get done, and progress is slow going. But eventually.... Some day.
Originally Posted by DynoDave43
Drew, do you know what that rubber flap is supposed to be for? Is it to reduce wind noise, or ???
Honestly, I don't know specifically why they added it. What it seems to do most is seal the bottom of the door against the kick panel. If nothing else, I think it makes the doors sound like theyre closing tighter. Idk, but I can see no reason not to use them on any thirdgen. They're cheap enough, and easy to come by. Every little bit helps, and GM wouldn't use them if they did nothing.
I know this post is a year old, but I'm working on this exact project right now. The images you posted cannot be seen any longer. I wondered if you still had pics or a link to the image of where this bumper is in the door. I took the panel off and found a broken thick rubber wheel. It was in pieces. Im guessing this is the bumper. I'd like to see where it is supposed to be. Every bump in the road makes my window clank really bad. I replaced the felts and it made it a lot better, but it's still not solid feeling. Thanks!
The pics are gone because one person had to go and ruin things for everybody. Had an issue with a member making threats, rather than picking through a thousand pics on Imgur removing any that impacted my privacy, it was easier to just delete everything. And that's why we can't have nice things.
Pretty much any rubber bumper that's tall enough will work. The only catch is that since the bumper hits the inside of the door at full down, and the motor or window crank doesn't have a clutch, the bumper has to absorb the stress spike when the stop hits the door. If the bumper doesn't give at all, the window regulator wants to pivot. Eventually the rivets retaining the window regulator will crack their mounting holes in the door frame.
I fixed the photos in the first post, which covers the main topic. Fortunately those photos were in a folder together. The later photos are a bit more difficult because Imgur assigns random file names, so I can't look at the links and find the original files on my hard drive. It'd take a bit of effort to find the photos that match the captions, and re-up them, then update all the links. Harder to do it retroactively than it was to post originally.
Edit - I replaced most of the photos.
One thing I didn't mention in the thread before, was a bit of GM rattle reduction.
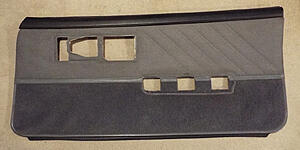
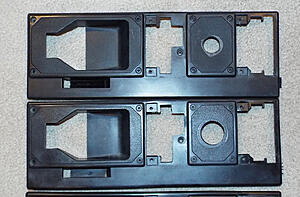
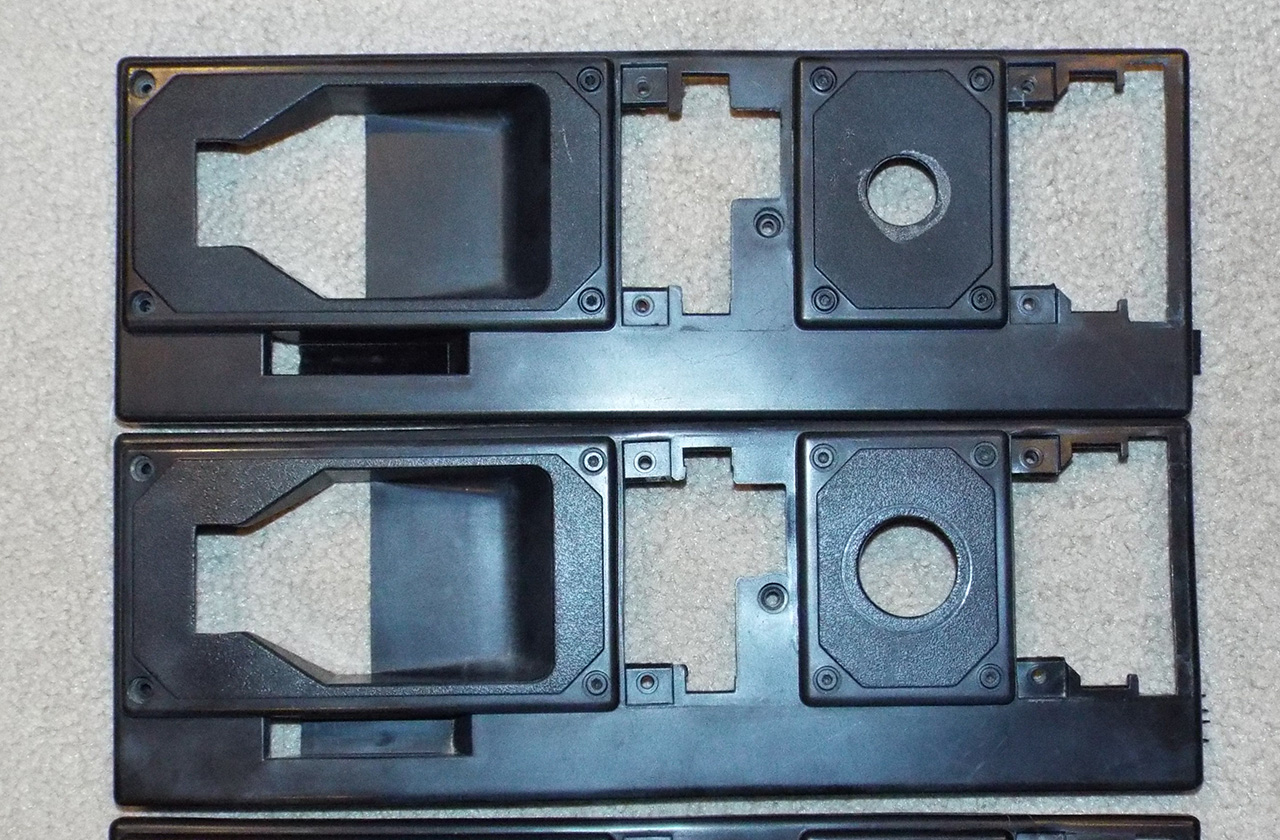
Here's a pair of Camaro door handle trim plates. One is early, one is late. The one with the smaller armrest hole is from a 91. Notice the lock slider **** slot is lined with fuzzy felt on the later plate. The fuzzy keeps the rod and the back of the slider from vibrating in the plate. A pack of self adhesive felt from Walmart's craft section and a minute or two with scissors and sticking the the felt into the plates of the 87 tightened things up a bit.
I've got the chip on a couple of my cars, to the best of my knowledge the only way to fix it is to replace the window. I've got a literal pile of door glass in my personal salvage stash, but I'm not sure it's worth the trouble to change the glass. It's better to prevent the chip in the first place. Not holding down the window switch until the window is all the way down, helps by keeping the top edge above the dew wipe, and it keeps the rubber bumper from getting abused, also keeps from binding the window regulator preventing the door structure flex that leads to cracks around the regulator rivets. A good bumper solves most of the problem.
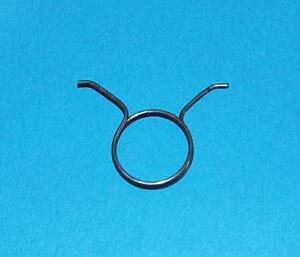
Now if they'd just repop a proper thirdgen door latch, and the coil springs for the power lock bellcranks, a person could fix 99% of thirdgen door rattles.
I came across a few more of the missing photos and reupped them. That should take care of most of the missing links. I've still got a few window stop bumpers available if anyone needs them.
One more tip... While the doors are apart, it's a good time to lubricate the door handles. You know that nails on chalk board squeek you get lifting the door handles sometimes? Or the rattles from door handles? Simply greasing the pivot pins of the handle and the points where the springs are anchored cuts 99% of those noises, also helps prevent wear on the pins which leads to rattly door handles when the pins wear down. The grease also helps fill the void, so less rattles opening/closing the doors.
I pulled the Formula out of storage today and was able to get a few pics of the chipped glass that started my window stop bumper crusade. Edited the OP to add the new pics.
Also I have enough bumpers on hand to fix about 40 cars, see my add in the classifieds.
bumping this thread to ask if anyone has any rough dimensions of the size of the bumper? Mine are long gone and I vacuumed out the bottom of the door before realizing so I have nothing to go off of.
Just need diameter, length, and ideal thread size for the old rivet hole.
 04-21-2018, 11:21 PM


 I'm working through my to-do list, taking pics along the way. Anything that I figure applies to the average thirdgen, and isn't often covered, I consider making a thread. Hopefully someone will find the info helpful.
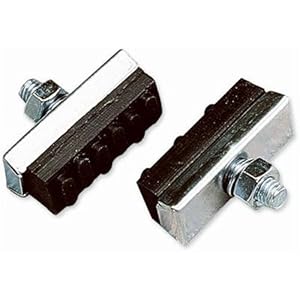
 Probably should have changed these years ago.