
EASY AND SAFE WAY TO INSTALL FRONT COIL SPRINGS

Thread Starter


Joined: Oct 2007
Posts: 1,375
Likes: 6
From: Wyoming
Car: 1995 Formula
Engine: LT1 350
Transmission: Built 4L60e
Axle/Gears: 10 bolt, Eaton posi, 3.73's
EASY AND SAFE WAY TO INSTALL FRONT COIL SPRINGS
Here is a thread on how to safely and easily install the front coil springs, for anyone who isn't sure or who would like an easier and safer way to do this job.
I did this install with NO ENGINE in my car and WITHOUT removing the A-arms from the K-member.
It isn't SUPER easy....well, let me rephrase this...if you follow what my thread says, it WILL BE SUPER EASY for you, since I cover the mistakes NOT TO MAKE (because I already made the mistakes I mention here). You should be able to install both springs on the first try, without headaches. You will need an INTERNAL spring compressor and a bit of time, but it is the easiest method I've ever used, for installing coil springs. Also, it is safer than using a pry bar, chains, ratchet straps, your foot, your hands, etc., in my opinion.
I wanted to install my front coil springs without scratching my newly powdercoated A-arms, K-member, etc., and my car has no engine in it.
Here are the steps, and I learned these steps from trial and error and some cursing (I will add to this thread more pictures and information, over the next several days, so it is as complete as possible):
Before doing any of these steps, make sure you lubricate the compressor tool threads with WD-40 or comparable lubricant, so it�s easy to tighten the compressor (clean excess lubricant off the compressor hooks), and make sure you tape the rubber spring pads onto the top FLAT portion of the springs or the portion that has the coils very close to one another at the coil end. Look at the indentations on the inner surface of the rubber pads that were made by the coil ends of the springs, and place the pads where they were before, then firmly tape the pads onto the springs with duct tape or electrical tape. This is very easy!!
Now follow these steps, and please read "MORE IMPORTANT NOTES WITH PICS" at bottom of thread, as well.
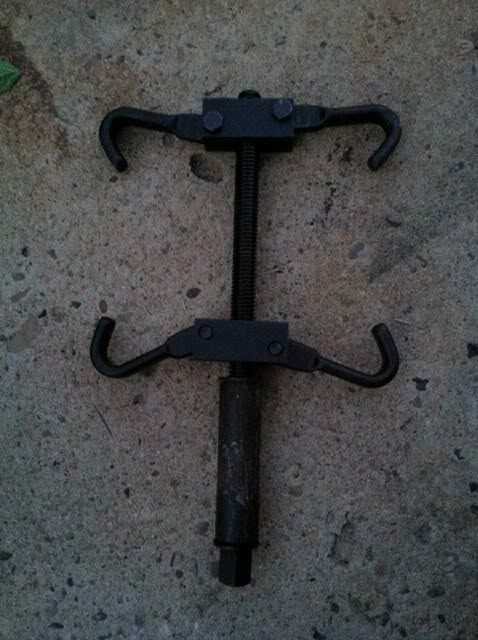
1) BUY an INTERNAL spring compressor from O Reilley's for $35.00. It is WORTH IT!!
2) Cut or find a 3/4" diameter piece of pipe that is 3 1/4" long
3) Remove (unscrew) the top pair of hooks on the spring compressor
4) Take the bottom pair of hooks off and leave 1 washer on threaded bolt
5) Place 3 1/4" length piece of pipe on the threaded bolt--this pipe is what prevents the threaded bolt from going up too high and past the top of the spring, so it won't hit the K-member.
6) Place the other washer onto the threaded bolt
7) Place hooks inside spring at 2nd to last coils on each end
8) Make sure hooks are centered and are on the SAME WAY on each end
9) Screw the threaded bolt with piece of pipe into the hooks down the center of the spring and into the top hooks (it does not thread into the lower hooks...only the top hooks).
10) Once good placement of the hooks is certain, use a 19mm socket with long handled ratchet to turn the threaded bolt and get the hooks just tight enough so they do not slide around on the spring. Check to make sure that the hooks "split the spring in half while looking through the spring end to end," so the compressor doesn't slip under heavy load. Proceed to tighten the compressor.
11) I like standing on the spring with both feet (with work boots on) while holding onto my car's fenders, with the spring lying down horizontally on a piece of carpet on the ground, as I turn the ratchet to compress the spring. This way, the spring won't spin as the compressor's threaded bolt gets harder to turn. If you do not feel safe doing this, then put a piece of plywood or heavy carpet over top of the spring, and step on the carpet or plywood, instead.
12) Once the spring is compressed about 35 half turns of the ratchet, you will be able to easily install the cotton pickin' thing into your car.
13) Have a jack ready near the A-arm
Below are a few pics with explanations. BE SURE TO READ "MORE IMPORTANT NOTES WITH PICS" BELOW BEFORE YOU START YOUR INSTALLATION. IT WILL SAVE YOU SOME AGGRAVATION.
Have a jack ready. Put the compressed spring up into the K-member pocket first, making sure the rubber pad is firmly taped to the top of the spring. Make sure the COIL END of the bottom of the spring is on the INSIDE so that it will be near the two small holes on the inside of the A-arm spring pocket. Hold the spring up firmly while bringing the A-arm toward the bottom of the spring, with your hand (preferably near the INSIDE of the A-arm, just to be safe). Tilt the bottom of the spring inward toward the pocket in the A-arm, just until the spring coil end catches inside the spring pocket. If the bottom of the spring will not go into the pocket easily, then compress the spring some more----just enough so that it will slide in more easily.
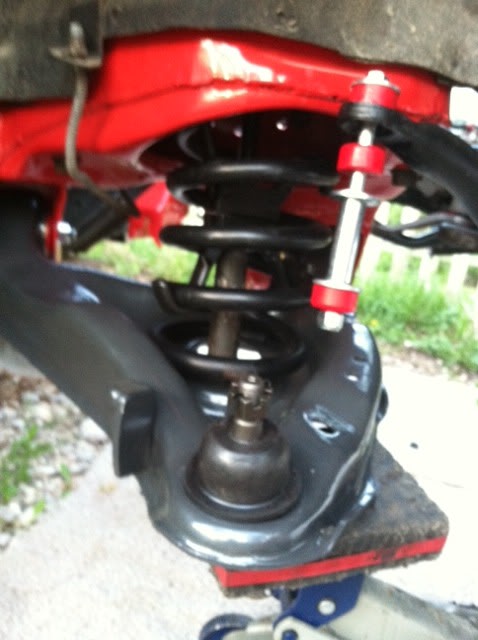
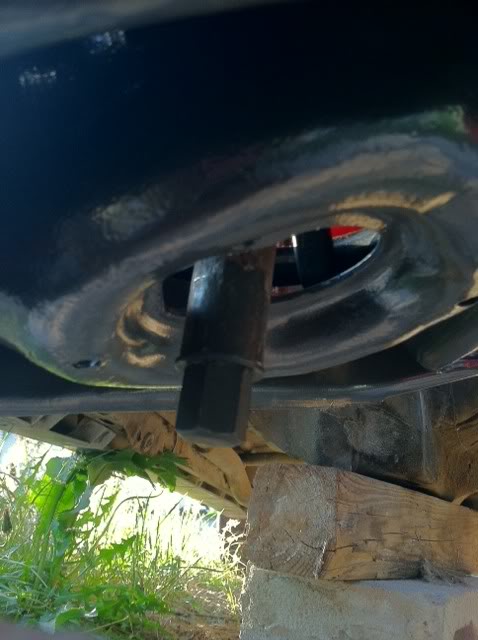
The bottom of the spring compressor threaded bolt will go through the hole in the A-arm. You may have to "fenagle" it just a little bit, but that's OK. It WILL go through the hole, as long as you made the piece of pipe the length I specified and as long as the compressor is CENTERED in the spring!! I barely had to push the spring inward, and my "setup" went right through the hole in the A-arm Now, jack up the A-arm a little bit, so you don't have to hold the spring up with your muscles anymore (it gets tiring holding the spring up, after about a minute). Later on, once the strut is bolted into place and holding the A-arm up, you can easily undo the spring compressor from the bottom. See below pic:
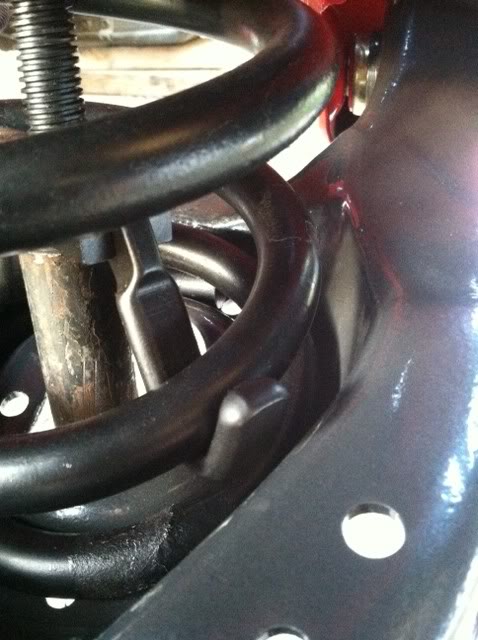
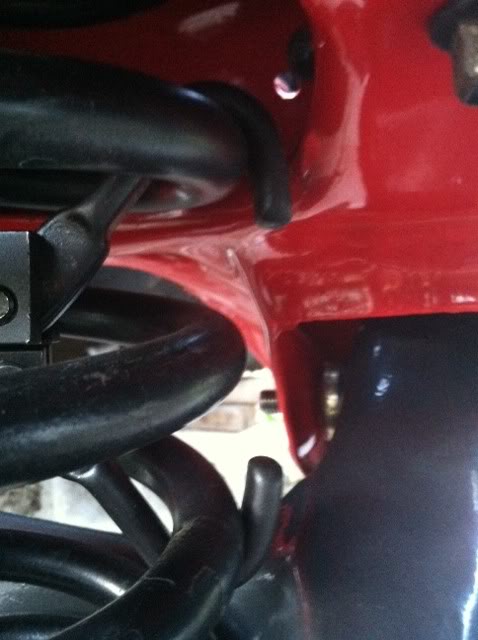
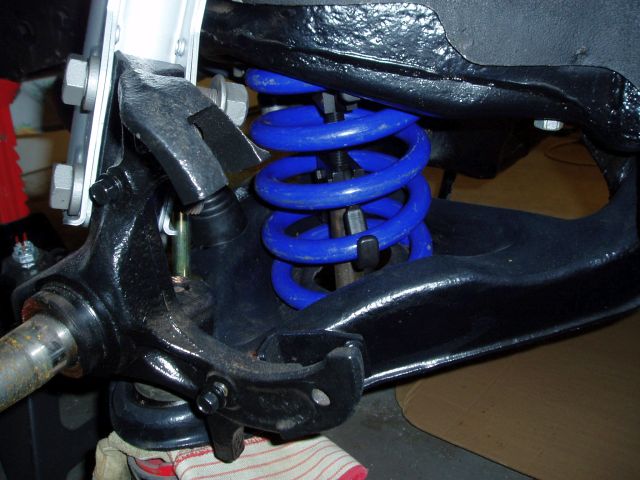
Now, make sure that you "index" the spring correctly before jacking the A-arm up any further (before there is too much pressure on the spring to be unable to turn it with your hand). "Indexing" simply means placing the spring into the pockets correctly. As long as the spring is placed properly in the A-arm and stays in that position as the A-arm is jacked up, then it will automatically be in the proper position in the upper K-member pocket, as well. Below, look at the small hole in the A-arm that is near the coil end. You can see it right smack dab in the middle of the picture below. You want this hole to be uncovered, while the other hole to the left of it is covered by the coil. My coil end is just at the edge of the hole, on the left side of the hole. You should be able to see it clearly in the below picture.
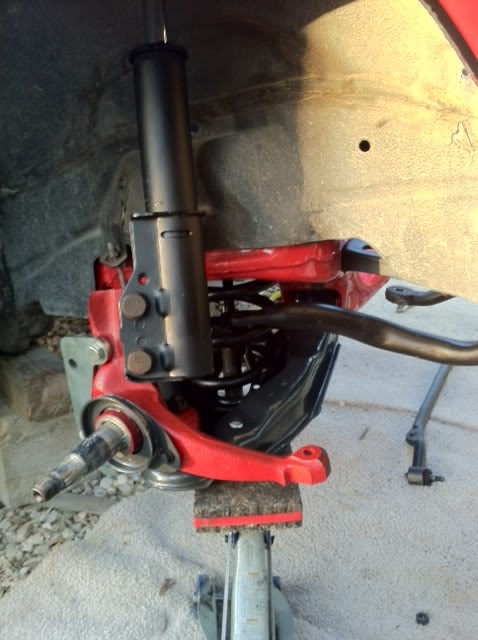
Now, once you get the A-arm jacked up enough to put the strut and strut bolts back in, and you secure the entire assembly with the strut (and end links, if you prefer) you can loosen the spring compressor from underneath the A-arm and "fenagle" the hooks out of the spring, once the threaded bolt is all the way out of both hooks.
VOILA!! DONE!! CONGRATULATIONS!! I removed the end link from the sway bar, as it was in my way, as I fenagled the spring around in the pockets. Not much fenagling was required, though!!
The first piece of pipe I cut was 6" and was far too long, and it made installing the spring pretty much impossible. Once I finally figured out the correct length for that piece of pipe, I was able to install the spring in less than 15 minutes, including compressing the spring and all the above steps. The length of pipe that will work is between
3 1/4" and 3 1/2"
MORE IMPORTANT NOTES WITH PICS:
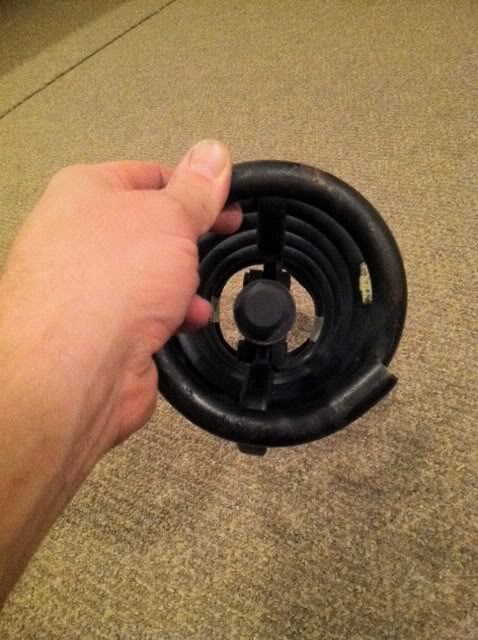
1. The actual length of my piece of pipe was 3 1/2", and it worked very nicely. 3 1/4" will work just as nicely or even better, so it's your choice as to what length pipe you use. Here is my compressor tool with piece of pipe and assembled correctly and ready to use.
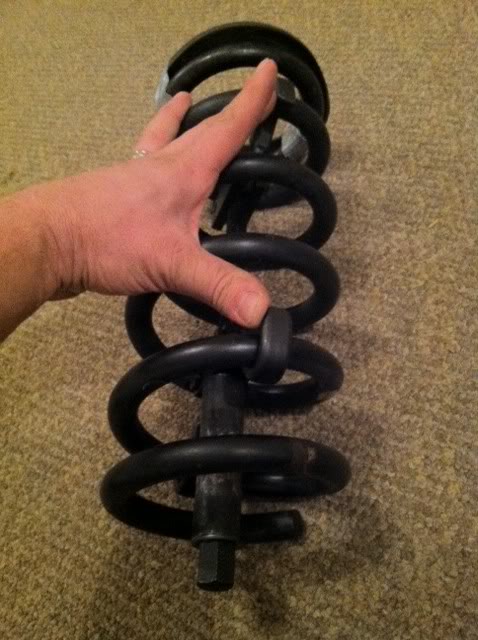
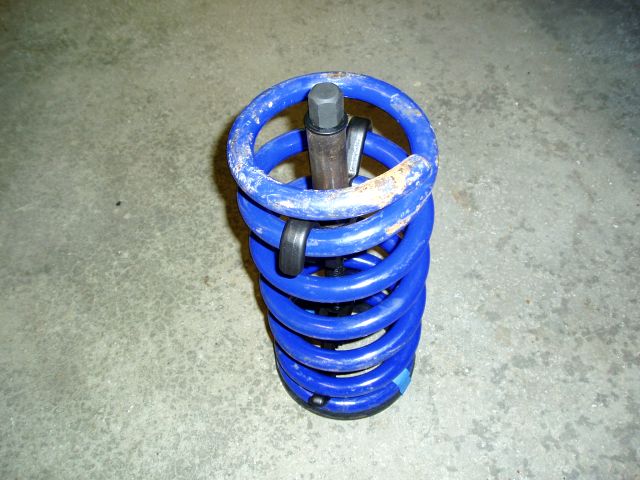
2. Below is how the compressor hooks need to go onto the spring, so that you can index the spring correctly, without any hooks hitting the K-member and thus preventing you from being able to turn the spring to index it correctly, and so you don't have to loosen the compressor and reset the hooks and retighten the compressor, during your installation. Note the position of the hooks in relation to the end of the coil at the bottom of the pic. Do it this way the FIRST time, and save yourself some aggravation later! If your hooks are not EXACTLY in the position below, it will be fine, as long as they're not off by more than an inch to the right of where they are in the pic. Don't try to "get lucky" on the position of the hooks (like I did)...just follow the pic below!
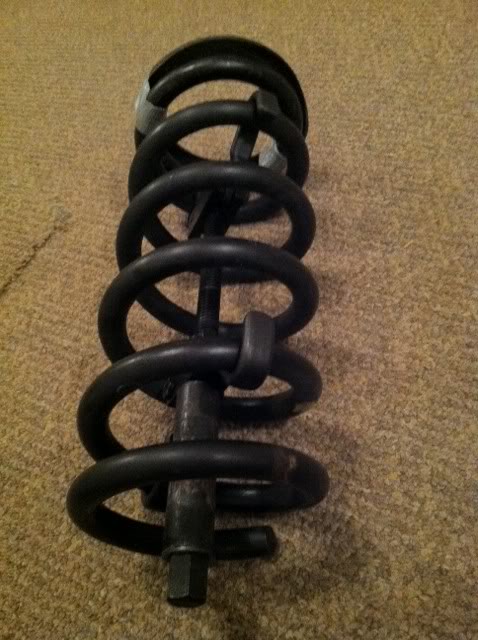
Below is a picture of what happens when you do not put the hooks on the spring as shown in the top two pics directly above. The hook hits the K-member, and you cannot turn the spring to index it properly. Yep, I found this out on my THIRD attempt at installing my springs. GRRRRRR.....but luckily I was able to loosen the compressor tool and swing the hooks out more to have room to turn the spring to the proper "indexed" position.
3. With the hooks placed where they need to be, as shown in NOTE 2, make sure the compressor tool splits the spring in half as you look down into the spring, then hand tighten the compressor tool as tight as you can, before you begin tightening it with a ratchet. See pic below:
I hope you have enjoyed my little thread and found it informative and useful!
God bless!
I did this install with NO ENGINE in my car and WITHOUT removing the A-arms from the K-member.
It isn't SUPER easy....well, let me rephrase this...if you follow what my thread says, it WILL BE SUPER EASY for you, since I cover the mistakes NOT TO MAKE (because I already made the mistakes I mention here). You should be able to install both springs on the first try, without headaches. You will need an INTERNAL spring compressor and a bit of time, but it is the easiest method I've ever used, for installing coil springs. Also, it is safer than using a pry bar, chains, ratchet straps, your foot, your hands, etc., in my opinion.
I wanted to install my front coil springs without scratching my newly powdercoated A-arms, K-member, etc., and my car has no engine in it.
Here are the steps, and I learned these steps from trial and error and some cursing (I will add to this thread more pictures and information, over the next several days, so it is as complete as possible):
Before doing any of these steps, make sure you lubricate the compressor tool threads with WD-40 or comparable lubricant, so it�s easy to tighten the compressor (clean excess lubricant off the compressor hooks), and make sure you tape the rubber spring pads onto the top FLAT portion of the springs or the portion that has the coils very close to one another at the coil end. Look at the indentations on the inner surface of the rubber pads that were made by the coil ends of the springs, and place the pads where they were before, then firmly tape the pads onto the springs with duct tape or electrical tape. This is very easy!!
Now follow these steps, and please read "MORE IMPORTANT NOTES WITH PICS" at bottom of thread, as well.
1) BUY an INTERNAL spring compressor from O Reilley's for $35.00. It is WORTH IT!!
2) Cut or find a 3/4" diameter piece of pipe that is 3 1/4" long
3) Remove (unscrew) the top pair of hooks on the spring compressor
4) Take the bottom pair of hooks off and leave 1 washer on threaded bolt
5) Place 3 1/4" length piece of pipe on the threaded bolt--this pipe is what prevents the threaded bolt from going up too high and past the top of the spring, so it won't hit the K-member.
6) Place the other washer onto the threaded bolt
7) Place hooks inside spring at 2nd to last coils on each end
8) Make sure hooks are centered and are on the SAME WAY on each end
9) Screw the threaded bolt with piece of pipe into the hooks down the center of the spring and into the top hooks (it does not thread into the lower hooks...only the top hooks).
10) Once good placement of the hooks is certain, use a 19mm socket with long handled ratchet to turn the threaded bolt and get the hooks just tight enough so they do not slide around on the spring. Check to make sure that the hooks "split the spring in half while looking through the spring end to end," so the compressor doesn't slip under heavy load. Proceed to tighten the compressor.
11) I like standing on the spring with both feet (with work boots on) while holding onto my car's fenders, with the spring lying down horizontally on a piece of carpet on the ground, as I turn the ratchet to compress the spring. This way, the spring won't spin as the compressor's threaded bolt gets harder to turn. If you do not feel safe doing this, then put a piece of plywood or heavy carpet over top of the spring, and step on the carpet or plywood, instead.
12) Once the spring is compressed about 35 half turns of the ratchet, you will be able to easily install the cotton pickin' thing into your car.
13) Have a jack ready near the A-arm
Below are a few pics with explanations. BE SURE TO READ "MORE IMPORTANT NOTES WITH PICS" BELOW BEFORE YOU START YOUR INSTALLATION. IT WILL SAVE YOU SOME AGGRAVATION.
Have a jack ready. Put the compressed spring up into the K-member pocket first, making sure the rubber pad is firmly taped to the top of the spring. Make sure the COIL END of the bottom of the spring is on the INSIDE so that it will be near the two small holes on the inside of the A-arm spring pocket. Hold the spring up firmly while bringing the A-arm toward the bottom of the spring, with your hand (preferably near the INSIDE of the A-arm, just to be safe). Tilt the bottom of the spring inward toward the pocket in the A-arm, just until the spring coil end catches inside the spring pocket. If the bottom of the spring will not go into the pocket easily, then compress the spring some more----just enough so that it will slide in more easily.
The bottom of the spring compressor threaded bolt will go through the hole in the A-arm. You may have to "fenagle" it just a little bit, but that's OK. It WILL go through the hole, as long as you made the piece of pipe the length I specified and as long as the compressor is CENTERED in the spring!! I barely had to push the spring inward, and my "setup" went right through the hole in the A-arm
Now, jack up the A-arm a little bit, so you don't have to hold the spring up with your muscles anymore (it gets tiring holding the spring up, after about a minute). Later on, once the strut is bolted into place and holding the A-arm up, you can easily undo the spring compressor from the bottom. See below pic:Now, make sure that you "index" the spring correctly before jacking the A-arm up any further (before there is too much pressure on the spring to be unable to turn it with your hand). "Indexing" simply means placing the spring into the pockets correctly. As long as the spring is placed properly in the A-arm and stays in that position as the A-arm is jacked up, then it will automatically be in the proper position in the upper K-member pocket, as well. Below, look at the small hole in the A-arm that is near the coil end. You can see it right smack dab in the middle of the picture below. You want this hole to be uncovered, while the other hole to the left of it is covered by the coil. My coil end is just at the edge of the hole, on the left side of the hole. You should be able to see it clearly in the below picture.
Now, once you get the A-arm jacked up enough to put the strut and strut bolts back in, and you secure the entire assembly with the strut (and end links, if you prefer) you can loosen the spring compressor from underneath the A-arm and "fenagle" the hooks out of the spring, once the threaded bolt is all the way out of both hooks.
VOILA!! DONE!! CONGRATULATIONS!! I removed the end link from the sway bar, as it was in my way, as I fenagled the spring around in the pockets. Not much fenagling was required, though!!
The first piece of pipe I cut was 6" and was far too long, and it made installing the spring pretty much impossible. Once I finally figured out the correct length for that piece of pipe, I was able to install the spring in less than 15 minutes, including compressing the spring and all the above steps. The length of pipe that will work is between
3 1/4" and 3 1/2"
MORE IMPORTANT NOTES WITH PICS:
1. The actual length of my piece of pipe was 3 1/2", and it worked very nicely. 3 1/4" will work just as nicely or even better, so it's your choice as to what length pipe you use. Here is my compressor tool with piece of pipe and assembled correctly and ready to use.
2. Below is how the compressor hooks need to go onto the spring, so that you can index the spring correctly, without any hooks hitting the K-member and thus preventing you from being able to turn the spring to index it correctly, and so you don't have to loosen the compressor and reset the hooks and retighten the compressor, during your installation. Note the position of the hooks in relation to the end of the coil at the bottom of the pic. Do it this way the FIRST time, and save yourself some aggravation later! If your hooks are not EXACTLY in the position below, it will be fine, as long as they're not off by more than an inch to the right of where they are in the pic. Don't try to "get lucky" on the position of the hooks (like I did)...just follow the pic below!
Below is a picture of what happens when you do not put the hooks on the spring as shown in the top two pics directly above. The hook hits the K-member, and you cannot turn the spring to index it properly. Yep, I found this out on my THIRD attempt at installing my springs. GRRRRRR.....but luckily I was able to loosen the compressor tool and swing the hooks out more to have room to turn the spring to the proper "indexed" position.
3. With the hooks placed where they need to be, as shown in NOTE 2, make sure the compressor tool splits the spring in half as you look down into the spring, then hand tighten the compressor tool as tight as you can, before you begin tightening it with a ratchet. See pic below:
I hope you have enjoyed my little thread and found it informative and useful!
God bless!
Last edited by New2Chevy; Mar 10, 2018 at 10:04 PM.
Supreme Member
iTrader: (4)
Joined: Mar 2009
Posts: 3,079
Likes: 4
From: Pepperell, MA
Car: 1987 Trans Am
Engine: LQ9/L92
Transmission: 4L60E
Re: EASY AND SAFE WAY TO INSTALL FRONT COIL SPRINGS
I know I've seen this noted before, but great write up. I've got to redo my fronts in the coming weeks (don't think I indexed one correctly), subscribing as a personal reminder
Member
iTrader: (10)
Joined: Oct 2007
Posts: 173
Likes: 1
From: Bad Roads, MA
Car: 1988 IROC
Engine: L98
Transmission: T-5
Axle/Gears: 3:27 9-bolt
Re: EASY AND SAFE WAY TO INSTALL FRONT COIL SPRINGS
Thanks for the excellent, and timely tutorial. I was in the garage last night scratching my head over how to put the springs in. I have an external spring compressor, but there was no way it was going to work. I just came on the site to do a search on the subject and saw this thread. Great job! I'll be stopping on the way home to get an internal spring compressor.
Supreme Member
Joined: Feb 2007
Posts: 1,275
Likes: 0
From: Andover, NJ
Car: '88 Trans Am GTA; '84 Trans Am
Engine: L98 350TPI; 5.3 LSx built
Transmission: N/A; T56
Axle/Gears: 3.70 9 bolt; 3.73 10 bolt
Re: EASY AND SAFE WAY TO INSTALL FRONT COIL SPRINGS
Hmmm.....will this save me the 200 buck OTC one? Maybe. Do you think it will work with the ones from Advance or Autozone? I'm sure you know if you've done a bit of searching that I've had a hell of a time doing this exact job. I have UMI tubular A arms and Eibachs. Still haven't gotten the fronts in. For 35 bucks to spend online and buy the exact O reileys compressor so I can do this might work. Sometimes there are differences hence my asking.
How far compressed was the spring eventually? I was able to get my originals out with a compressor and everything assembled.
Also maybe the final question; though there may be more. Did you have the A arm hooked up to the pivot on the K the whole time? Or was the A arm completely removed at one point? I also have no engine in the car, so maybe I'll try this method. I will probably have to add an inch or inch and a half to the pipe to compensate for the fact that the Pro Kit springs are an inch-inch and a half drop. This is assuming you're using factory springs.
Last edited by L695speed; May 8, 2012 at 03:06 PM. Reason: added the last two sentences.
Supreme Member
iTrader: (8)
Joined: Aug 2003
Posts: 7,240
Likes: 6
From: LeRoy, NY
Car: 2003 Hyundai Tiburon GT
Engine: 2.7L V6
Transmission: 6-speed
Axle/Gears: 4.41
Re: EASY AND SAFE WAY TO INSTALL FRONT COIL SPRINGS
Hmmm.....will this save me the 200 buck OTC one? Maybe. Do you think it will work with the ones from Advance or Autozone? I'm sure you know if you've done a bit of searching that I've had a hell of a time doing this exact job. I have UMI tubular A arms and Eibachs. Still haven't gotten the fronts in. For 35 bucks to spend online and buy the exact O reileys compressor so I can do this might work. Sometimes there are differences hence my asking.
How far compressed was the spring eventually? I was able to get my originals out with a compressor and everything assembled.
Also maybe the final question; though there may be more. Did you have the A arm hooked up to the pivot on the K the whole time? Or was the A arm completely removed at one point? I also have no engine in the car, so maybe I'll try this method. I will probably have to add an inch or inch and a half to the pipe to compensate for the fact that the Pro Kit springs are an inch-inch and a half drop. This is assuming you're using factory springs.
How far compressed was the spring eventually? I was able to get my originals out with a compressor and everything assembled.
Also maybe the final question; though there may be more. Did you have the A arm hooked up to the pivot on the K the whole time? Or was the A arm completely removed at one point? I also have no engine in the car, so maybe I'll try this method. I will probably have to add an inch or inch and a half to the pipe to compensate for the fact that the Pro Kit springs are an inch-inch and a half drop. This is assuming you're using factory springs.
Thread Starter
Joined: Oct 2007
Posts: 1,375
Likes: 6
From: Wyoming
Car: 1995 Formula
Engine: LT1 350
Transmission: Built 4L60e
Axle/Gears: 10 bolt, Eaton posi, 3.73's
Re: EASY AND SAFE WAY TO INSTALL FRONT COIL SPRINGS
Don't waste your money on the OTC tool. It's not needed. As long as the rental compressor is an INTERNAL compressor, and you use the piece of pipe that I specified in my thread, it should work just great! I bought my compressor because I knew I would need it again for future spring installs (aftermarket springs, springs on a 4th gen I am getting, etc.) Even if you bought it to only use it once, I believe it is well worth the $35.00 purchase price.
I will post pics of my compressor and the pipe assembled, plus I will post more pics when I install my driver's side spring soon. I have been swamped with work and school and have had almost no time to devote to my Camaro.
I'm glad a few guys here got some help from my thread. I did it to save time and cursing for people who want to do it right the first time
Hmmm.....will this save me the 200 buck OTC one? Maybe. Do you think it will work with the ones from Advance or Autozone? I'm sure you know if you've done a bit of searching that I've had a hell of a time doing this exact job. I have UMI tubular A arms and Eibachs. Still haven't gotten the fronts in. For 35 bucks to spend online and buy the exact O reileys compressor so I can do this might work. Sometimes there are differences hence my asking.
How far compressed was the spring eventually? I was able to get my originals out with a compressor and everything assembled.
Also maybe the final question; though there may be more. Did you have the A arm hooked up to the pivot on the K the whole time? Or was the A arm completely removed at one point? I also have no engine in the car, so maybe I'll try this method. I will probably have to add an inch or inch and a half to the pipe to compensate for the fact that the Pro Kit springs are an inch-inch and a half drop. This is assuming you're using factory springs.
How far compressed was the spring eventually? I was able to get my originals out with a compressor and everything assembled.
Also maybe the final question; though there may be more. Did you have the A arm hooked up to the pivot on the K the whole time? Or was the A arm completely removed at one point? I also have no engine in the car, so maybe I'll try this method. I will probably have to add an inch or inch and a half to the pipe to compensate for the fact that the Pro Kit springs are an inch-inch and a half drop. This is assuming you're using factory springs.
Last edited by New2Chevy; May 8, 2012 at 10:36 PM.
Thread Starter
Joined: Oct 2007
Posts: 1,375
Likes: 6
From: Wyoming
Car: 1995 Formula
Engine: LT1 350
Transmission: Built 4L60e
Axle/Gears: 10 bolt, Eaton posi, 3.73's
Re: EASY AND SAFE WAY TO INSTALL FRONT COIL SPRINGS
OK guys. The thread should be complete now. Please re-read my original posted thread, as I added some NOTES and pics to it!
Hope it helps! Ask me questions if need be
Hope it helps! Ask me questions if need be
Trending Topics
Supreme Member
Joined: Feb 2006
Posts: 1,366
Likes: 1
From: St.Louis, IL
Car: 1988 Camaro
Engine: 377
Transmission: TH350; Circle D 4200 converter
Axle/Gears: Ford 9"
Re: EASY AND SAFE WAY TO INSTALL FRONT COIL SPRINGS
Ah, very nice work. I'll try this when I swap my front springs and struts.
Supreme Member
Joined: Feb 2007
Posts: 1,275
Likes: 0
From: Andover, NJ
Car: '88 Trans Am GTA; '84 Trans Am
Engine: L98 350TPI; 5.3 LSx built
Transmission: N/A; T56
Axle/Gears: 3.70 9 bolt; 3.73 10 bolt
Re: EASY AND SAFE WAY TO INSTALL FRONT COIL SPRINGS
I did, not sure if I'll try any time soon, but when I do I'll let you know how I do. Those are stock springs right? I may have to compensate as I said earlier for the shorter pro kit springs on the pipe length. But I guess I'll find out. Its possible I didn't have a decent enough compressor and didn't trust the hooks. The compressor you're using there is no way for the hooks to slip the way they are. I would love to get those damn things in because then I can roll the car out and work on it outside without worrying about the trans hitting the lip on my garage door when I push it back in.
Thread Starter
Joined: Oct 2007
Posts: 1,375
Likes: 6
From: Wyoming
Car: 1995 Formula
Engine: LT1 350
Transmission: Built 4L60e
Axle/Gears: 10 bolt, Eaton posi, 3.73's
Re: EASY AND SAFE WAY TO INSTALL FRONT COIL SPRINGS
Thank you.
This method will work well for you and may be even easier if your engine is in the car.
This method will work well for you and may be even easier if your engine is in the car.
Last edited by New2Chevy; May 9, 2012 at 09:18 PM.
Thread Starter
Joined: Oct 2007
Posts: 1,375
Likes: 6
From: Wyoming
Car: 1995 Formula
Engine: LT1 350
Transmission: Built 4L60e
Axle/Gears: 10 bolt, Eaton posi, 3.73's
Re: EASY AND SAFE WAY TO INSTALL FRONT COIL SPRINGS
Yes, my install was just the stock springs. I painted them with black caliper paint.
I am imagining that with the Pro Kit springs, the bottom of the compressor tool will be even higher up once it is compressing the spring and the spring is up in the K-member pocket (depending upon how much you compress the springs) and should go through the hole in the A-arm even easier than mine did.
You won't have to compensate or change anything.
I did, not sure if I'll try any time soon, but when I do I'll let you know how I do. Those are stock springs right? I may have to compensate as I said earlier for the shorter pro kit springs on the pipe length. But I guess I'll find out. Its possible I didn't have a decent enough compressor and didn't trust the hooks. The compressor you're using there is no way for the hooks to slip the way they are. I would love to get those damn things in because then I can roll the car out and work on it outside without worrying about the trans hitting the lip on my garage door when I push it back in.
Supreme Member
Joined: Feb 2007
Posts: 1,275
Likes: 0
From: Andover, NJ
Car: '88 Trans Am GTA; '84 Trans Am
Engine: L98 350TPI; 5.3 LSx built
Transmission: N/A; T56
Axle/Gears: 3.70 9 bolt; 3.73 10 bolt
Re: EASY AND SAFE WAY TO INSTALL FRONT COIL SPRINGS
The hole in the arm I don't believe would be an issue, its the threaded rod hitting the K member that I'm worried about hence more pipe. I think I can get the exact same compressor you used from Advanced. The rental ones I didn't like how the hooks were. Looked as if you hit the spring the right way it would let loose.
Thread Starter
Joined: Oct 2007
Posts: 1,375
Likes: 6
From: Wyoming
Car: 1995 Formula
Engine: LT1 350
Transmission: Built 4L60e
Axle/Gears: 10 bolt, Eaton posi, 3.73's
Re: EASY AND SAFE WAY TO INSTALL FRONT COIL SPRINGS
Oh yes now I understand. I forgot about that.
If I were you, I'd make a 4 1/2" piece of pipe and see how that works.
I'm betting it would work perfectly for you.
To add, I had about 2" of room at the top of my stock spring, even with the compressor tool all the way compressed.
But yeah I'd try 4 1/2" on the pipe length and then if you need to, you can cut it shorter, but I doubt you will have to cut it shorter.
The hole in the arm I don't believe would be an issue, its the threaded rod hitting the K member that I'm worried about hence more pipe. I think I can get the exact same compressor you used from Advanced. The rental ones I didn't like how the hooks were. Looked as if you hit the spring the right way it would let loose.
Supreme Member
iTrader: (5)
Joined: Mar 2011
Posts: 2,893
Likes: 4
From: Central Texas
Car: GTA
Engine: 350 TPI
Transmission: 700R4
Axle/Gears: Aussie 9-bolt/3.27 posi
Re: EASY AND SAFE WAY TO INSTALL FRONT COIL SPRINGS
A couple years ago I did all 4 springs under 2 hours, including the drives around the apartment complex for the a-arms to settle into place, with no spring compressor.
Rears are simple so I won't address those here
Put front corner on jack stand
Wheel off
brake line loose from chassis, but still connected on both ends
Support a-arm with jack
Unbolt strut from strut mount (1 nut!)
Lower jack swinging a-arm/strut assembly down (wrap chain to spring & a-arm if you are worried about it flying out, but I never have had it pop loose)
Pull spring out
Reverse steps to reassemble
Go to other corner
Last edited by BlackenedBird; May 9, 2012 at 10:31 PM. Reason: typo fix
Thread Starter
Joined: Oct 2007
Posts: 1,375
Likes: 6
From: Wyoming
Car: 1995 Formula
Engine: LT1 350
Transmission: Built 4L60e
Axle/Gears: 10 bolt, Eaton posi, 3.73's
Re: EASY AND SAFE WAY TO INSTALL FRONT COIL SPRINGS
I had no problems getting the springs out. I had to pry them out at the bottom, and they fell right out.
My problem was putting them back in. I had two main problems trying your method:
1) I couldn't get the spring back into the A-arm pocket while holding it up into the K-member pocket. It was just too long and too hard to push in there
2) My A-arms are freshly powdercoated, and I didn't want to scratch the heck out of them by trying to pry the spring back into the A-arm pocket.
I now know how to do the job easily and safely with an internal spring compressor, and I think it's the best all around way to do the job.
This is my opinion.
Thank you for your comment!
A couple years ago I did all 4 springs under 2 hours, including the drives around the apartment complex for the a-arms to settle into place, with no spring compressor.
Rears are simple so I won't address those here)
Put front corner on jack stand
Wheel off
brake line loose from chassis, but still connected on both ends
Support a-arm with jack
Unbolt strut from strut mount
Lower jack swinging a-arm/strut assembly down (wrap chain to spring & a-arm if you are worried about it flying out, but I never have had it pop loose)
Pull spring out
Reverse steps to reassemble
Go to other corner
Supreme Member
Joined: Feb 2007
Posts: 1,275
Likes: 0
From: Andover, NJ
Car: '88 Trans Am GTA; '84 Trans Am
Engine: L98 350TPI; 5.3 LSx built
Transmission: N/A; T56
Axle/Gears: 3.70 9 bolt; 3.73 10 bolt
Re: EASY AND SAFE WAY TO INSTALL FRONT COIL SPRINGS
The other problem with just using a jack is you need weight, in the case of the OP and myself, we have no engine in the car. Which contributes enormously to the problem. I can't wheel the car around (I could wheel it but any imperfection in the pavement will cause the trans to hit) or put an engine in til I have the front springs in. its too low on the stops with no springs. If it wasn't for this key item, I'm sure I would have gotten them in myself by now. But I agree with you Blackenedbird it shouldn't be too big of an issue.

Thread Starter
Joined: Oct 2007
Posts: 1,375
Likes: 6
From: Wyoming
Car: 1995 Formula
Engine: LT1 350
Transmission: Built 4L60e
Axle/Gears: 10 bolt, Eaton posi, 3.73's
Re: EASY AND SAFE WAY TO INSTALL FRONT COIL SPRINGS
My pleasure
QUOTE=Ticeblue;5268528]Thank you for writing this up sir![/QUOTE]
QUOTE=Ticeblue;5268528]Thank you for writing this up sir![/QUOTE]
Thread Starter
Joined: Oct 2007
Posts: 1,375
Likes: 6
From: Wyoming
Car: 1995 Formula
Engine: LT1 350
Transmission: Built 4L60e
Axle/Gears: 10 bolt, Eaton posi, 3.73's
Re: EASY AND SAFE WAY TO INSTALL FRONT COIL SPRINGS
I didn't have any trouble with using just a jack, once the springs were compressed using the internal compressor, even without the weight of an engine in there.
The other problem with just using a jack is you need weight, in the case of the OP and myself, we have no engine in the car. Which contributes enormously to the problem. I can't wheel the car around (I could wheel it but any imperfection in the pavement will cause the trans to hit) or put an engine in til I have the front springs in. its too low on the stops with no springs. If it wasn't for this key item, I'm sure I would have gotten them in myself by now. But I agree with you Blackenedbird it shouldn't be too big of an issue.
Last edited by New2Chevy; May 12, 2012 at 06:18 PM.
Supreme Member
Joined: Feb 2007
Posts: 1,275
Likes: 0
From: Andover, NJ
Car: '88 Trans Am GTA; '84 Trans Am
Engine: L98 350TPI; 5.3 LSx built
Transmission: N/A; T56
Axle/Gears: 3.70 9 bolt; 3.73 10 bolt
Re: EASY AND SAFE WAY TO INSTALL FRONT COIL SPRINGS
The problem I had was I couldn't get them compressed like I needed to. Got the cheapo 35 dollar compressor from Advanced, I'll attempt one at least today if I can get everything set.
Thread Starter
Joined: Oct 2007
Posts: 1,375
Likes: 6
From: Wyoming
Car: 1995 Formula
Engine: LT1 350
Transmission: Built 4L60e
Axle/Gears: 10 bolt, Eaton posi, 3.73's
Re: EASY AND SAFE WAY TO INSTALL FRONT COIL SPRINGS
Mine was $35 at oreilleys And worked great
I wonder if yours was a different kind than mine?
I wonder if yours was a different kind than mine?
Supreme Member
Joined: Feb 2007
Posts: 1,275
Likes: 0
From: Andover, NJ
Car: '88 Trans Am GTA; '84 Trans Am
Engine: L98 350TPI; 5.3 LSx built
Transmission: N/A; T56
Axle/Gears: 3.70 9 bolt; 3.73 10 bolt
Re: EASY AND SAFE WAY TO INSTALL FRONT COIL SPRINGS
THANK YOU FOR THIS!!!!
I got them in, both of them should be indexed exactly too. My whole suspension is in except for adjustments. Just need to finish brakes and the motor and then the joy rides begin. Body and interior after.
For future reference, for those using UMI A arms and Pro Kit springs. Use a 4 1/2 inch pipe. That will work perfectly when using this method. Took me about 2 hours of screwing around and actually working on the car including jacking it up, some slight disassembly and putting it back down.
Member
iTrader: (10)
Joined: Oct 2007
Posts: 173
Likes: 1
From: Bad Roads, MA
Car: 1988 IROC
Engine: L98
Transmission: T-5
Axle/Gears: 3:27 9-bolt
Re: EASY AND SAFE WAY TO INSTALL FRONT COIL SPRINGS
Thanks to this thread I got my springs in a couple of weeks ago...
Member
iTrader: (1)
Joined: Jun 2010
Posts: 361
Likes: 0
From: Buffalo, NY
Car: 92 Camaro RS
Engine: 305 TBI
Transmission: 700R4
Axle/Gears: 10 Bolt 3.42 Posi
Re: EASY AND SAFE WAY TO INSTALL FRONT COIL SPRINGS
How about removal???...Im scared to drop my A-Arm loose from the ball joint and have my springs pop loose from my compression tool and kill me.
Member
iTrader: (10)
Joined: Oct 2007
Posts: 173
Likes: 1
From: Bad Roads, MA
Car: 1988 IROC
Engine: L98
Transmission: T-5
Axle/Gears: 3:27 9-bolt
Re: EASY AND SAFE WAY TO INSTALL FRONT COIL SPRINGS
No need to use a compressor to remove the old springs. I just wrap a length of chain around them and the K-member to keep them from be-heading me.

Joined: Jun 2003
Posts: 5,028
Likes: 78
From: Desert
Car: 1991 Z28 Vert
Engine: 383 single plane efi
Transmission: T-56
Axle/Gears: 8.8 with 3.73s
Re: EASY AND SAFE WAY TO INSTALL FRONT COIL SPRINGS
where are the pics from the original thread?
Thread Starter
Joined: Oct 2007
Posts: 1,375
Likes: 6
From: Wyoming
Car: 1995 Formula
Engine: LT1 350
Transmission: Built 4L60e
Axle/Gears: 10 bolt, Eaton posi, 3.73's
Thread Starter
Joined: Oct 2007
Posts: 1,375
Likes: 6
From: Wyoming
Car: 1995 Formula
Engine: LT1 350
Transmission: Built 4L60e
Axle/Gears: 10 bolt, Eaton posi, 3.73's
Re: EASY AND SAFE WAY TO INSTALL FRONT COIL SPRINGS
No need for a compressor, to get the springs out.
Just drop the A arms all the way down with the car jacked up and pry the bottom, and they fall right out.
Just drop the A arms all the way down with the car jacked up and pry the bottom, and they fall right out.
Last edited by New2Chevy; Mar 10, 2018 at 09:55 PM.
Member
iTrader: (1)
Joined: Jun 2010
Posts: 361
Likes: 0
From: Buffalo, NY
Car: 92 Camaro RS
Engine: 305 TBI
Transmission: 700R4
Axle/Gears: 10 Bolt 3.42 Posi
Re: EASY AND SAFE WAY TO INSTALL FRONT COIL SPRINGS
Thanks guys I finished my entire suspension over the weekend, it really wasnt all that difficult. Mostly a pain in the butt because of all the old rusty Bolts and screws.
Joined: Jun 2003
Posts: 5,028
Likes: 78
From: Desert
Car: 1991 Z28 Vert
Engine: 383 single plane efi
Transmission: T-56
Axle/Gears: 8.8 with 3.73s

Junior Member
Joined: Nov 2009
Posts: 40
Likes: 0
Re: EASY AND SAFE WAY TO INSTALL FRONT COIL SPRINGS
Way easier with engine in the car I did it with no engine scary **** car body gets pushed off the frame by the force in the Springs. Almost fell off the jack stands :s. my pipe was 1/2 3 in long black iron all we sold at work. worked ok and inch longer woulda been better its probably the shortest you wanna go. the rod of my compressor sat up in the hole in the top of the spring pocket.
Last edited by direngrey; May 16, 2013 at 06:35 AM. Reason: Addition

Junior Member
iTrader: (1)
Joined: Jul 2008
Posts: 4
Likes: 0
From: League City, TX
Car: 88 Camaro Iroc Z
Engine: 582 BBC
Transmission: 4L80e
Re: EASY AND SAFE WAY TO INSTALL FRONT COIL SPRINGS
I was not able to get the coil spring compressed enough by just standing on the spring as mentioned in step 11. The spring kept rolling/spinning on me. To solve this I took a 2X12 i had in the garage and used a u-bolt to anchor the spring to the board. The u-bolt slips around about a 1/4" from the end of the last coil. I anchored the side that sits in the a arm. I was then able to stand on the board and compress the spring with no issues.
Just my
Just my
Thread Starter
Joined: Oct 2007
Posts: 1,375
Likes: 6
From: Wyoming
Car: 1995 Formula
Engine: LT1 350
Transmission: Built 4L60e
Axle/Gears: 10 bolt, Eaton posi, 3.73's
Re: EASY AND SAFE WAY TO INSTALL FRONT COIL SPRINGS
I was not able to get the coil spring compressed enough by just standing on the spring as mentioned in step 11. The spring kept rolling/spinning on me. To solve this I took a 2X12 i had in the garage and used a u-bolt to anchor the spring to the board. The u-bolt slips around about a 1/4" from the end of the last coil. I anchored the side that sits in the a arm. I was then able to stand on the board and compress the spring with no issues.
Just my
Just my

Thread Starter
Joined: Oct 2007
Posts: 1,375
Likes: 6
From: Wyoming
Car: 1995 Formula
Engine: LT1 350
Transmission: Built 4L60e
Axle/Gears: 10 bolt, Eaton posi, 3.73's

Member

Joined: May 2012
Posts: 208
Likes: 16
From: Kansas City MO
Car: 1987 IROC-Z convertible
Engine: 5.0
Transmission: 700R
Axle/Gears: 2:77
Re: EASY AND SAFE WAY TO INSTALL FRONT COIL SPRINGS
Bravo Man, worked perfect on the first try!! I've spent a lot of time on this during previous jobs. Glad I found this thread. It also helped me to tape the compressor jaws to the spring to get them to seat in place without sliding all over and having to reset them. Don't use very much tape on the top jaws tho as it makes it tough to get the tool out once you're done.

Junior Member
iTrader: (2)
Joined: Sep 2009
Posts: 98
Likes: 0
Car: 1987 Iroc Vert
Engine: 305
Transmission: 5 spd
Re: EASY AND SAFE WAY TO INSTALL FRONT COIL SPRINGS
I realize this is a old tread, but I had to give credit to New2chevy, These instructions worked like a charm. I give it an A++. It went so well and fast, I was looking for a problem because I couldn't believe I was done. LOL . The pictures are dead on with the placement of the claws.
One thing I added, was to use HOCKEY tape on the compressor CLAWS, so they would not slip or scratch the new power coated coils.
Thanks again
George
One thing I added, was to use HOCKEY tape on the compressor CLAWS, so they would not slip or scratch the new power coated coils.
Thanks again
George

Member
Joined: Oct 2004
Posts: 102
Likes: 0
Car: 1989 Formula 350
Engine: 350
Transmission: 700R4
Re: EASY AND SAFE WAY TO INSTALL FRONT COIL SPRINGS
Since its not locked I am going to add my THANKS to new2chevy also! 
I want to add I tried tightening the compressor with an impact gun A BUNCH of times and it just wouldnt work well at all. I got frustrated and came back in to read the thread again. Since he stated he used a hand tool I figured I may as well do the same (Even though I thought it wouldnt work well) THAT WAS THE KEY!!! just like he said about 35 half turns and the spring went right in. Oh and another point I would like to reiterate is the 3.5 inch pipe! WORKED LIKE A CHARM!!!
YOU DA MAN! Thank you so much for this very informative thread!
Thread Starter
Joined: Oct 2007
Posts: 1,375
Likes: 6
From: Wyoming
Car: 1995 Formula
Engine: LT1 350
Transmission: Built 4L60e
Axle/Gears: 10 bolt, Eaton posi, 3.73's
Re: EASY AND SAFE WAY TO INSTALL FRONT COIL SPRINGS
It's really cool to see my thread helping guys out, years after I posted it!
It was my pleasure to write it up!
God bless,
New2
It was my pleasure to write it up!
God bless,
New2

Junior Member
Joined: Apr 2012
Posts: 40
Likes: 1
From: Mid-Michigan
Car: K-1 Evoluzione (85 Camaro)
Engine: 5.7L
Transmission: TH700R4
Axle/Gears: stock
Re: EASY AND SAFE WAY TO INSTALL FRONT COIL SPRINGS
Just finished converting an 82 Firebird S/E from a V6 to a V8. Of course I had to change the motor mounts, which meant I had to take the springs out to get to the motor mount nuts. And I found this thread after some cursing and trying things, and cursing, and trying other things. I finally gave up and decided I probably wasn't using the right tool(s). After reading the thread, I picked up a PT coil spring compressor from Sears ($37.99) and proceeded to, "do it right." And as described above, it worked! Although, I found that a 4" piece of pipe (actually used a 4" nipple) worked better than 3 1/2". The shorter pipe was allowing the compressor rod to hit the top of the spring mount and wouldn't let me jack the lower control arm high enough to get the nut onto the strut. And that, my friends, was the only thing done differently from what New2Chevy so graciously described above.
For reference, the Autozone repair guide lists the procedure for removing and reinstalling the front springs as such:
1. Raise the front of the vehicle and support it on jackstands.
2. Remove the road wheel(s).
3. Disconnect the stabilizer link from the lower control arm.
If the steering gear hinders removal procedures, detach the unit and move it out of the way.
4. Disconnect the tie rod from the steering knuckle using a ball joint remover.
5. Using an internal fit coil spring compressor, compress the coil spring so that it is loose in its seat.
CAUTION
Be sure to follow manufacturer's instructions when using spring compressor. Coil springs in a compressed state contain enormous energy which, if released accidentally, could cause serious injury.
To remove the coil spring, disconnect the lower control arm from the crossmember at the pivot bolts. If additional clearance is necessary, disconnect the lower control arm from the steering knuckle at the ball joint.
To install:
1. Compress the coil spring until spring height is the same as when removed, then position the spring on the control arm. Make sure the lower end of the coil spring is properly positioned in the lower control arm and that the upper end fits correctly in its pad.
2. Connect the lower control arm from the steering knuckle at the ball joint. Connect the lower control arm from the crossmember at the pivot bolts and install the coil spring.
3. Connect the tie rod to the steering knuckle.
4. Attach the steering gear unit.
5. Connect the stabilizer link to the lower control arm.
6. Install the wheel(s).
7. Lower the vehicle.

Member
Joined: Dec 2013
Posts: 175
Likes: 1
From: Scottsdale, AZ
Engine: 350-TPI
Transmission: 700-R4
Axle/Gears: 3.27 Posi
Re: EASY AND SAFE WAY TO INSTALL FRONT COIL SPRINGS
 I'm going to resuscitate this thread. Your procedure worked flawlessly. Thank you so much for taking the time to write this and do the guess work. I used a 3 1/2" piece of pipe. This should be a sticky!
Junior Member
Joined: Feb 2016
Posts: 1
Likes: 1
Re: EASY AND SAFE WAY TO INSTALL FRONT COIL SPRINGS
This guide helped me out tremendously! I had my car on jacks for a whole week struggling with different spring compressors. Non of them felt safe at all but this one felt so much better, still had my heart pumping though. Thank you for taking the time to share this information New2Chevy!
Thread Starter
Joined: Oct 2007
Posts: 1,375
Likes: 6
From: Wyoming
Car: 1995 Formula
Engine: LT1 350
Transmission: Built 4L60e
Axle/Gears: 10 bolt, Eaton posi, 3.73's
Re: EASY AND SAFE WAY TO INSTALL FRONT COIL SPRINGS
This guide helped me out tremendously! I had my car on jacks for a whole week struggling with different spring compressors. Non of them felt safe at all but this one felt so much better, still had my heart pumping though. Thank you for taking the time to share this information New2Chevy!
Last edited by New2Chevy; Mar 10, 2018 at 05:57 PM.
Joined: Jun 2002
Posts: 722
Likes: 6
From: Ottawa, Ontario
Car: 86 IROC
Engine: LQ4 6.0L
Transmission: T56
Axle/Gears: 3.55 8.8
Re: EASY AND SAFE WAY TO INSTALL FRONT COIL SPRINGS
Here is a link to another method to safely install front coil springs:
https://www.thirdgen.org/forums/susp...ml#post6219439
https://www.thirdgen.org/forums/susp...ml#post6219439

Junior Member
Joined: May 2021
Posts: 2
Likes: 1
Re: EASY AND SAFE WAY TO INSTALL FRONT COIL SPRINGS
Thanks for the detailed instructions, did you paint your cross member and rebuild your control arms yourself ? they look very sweet I'm doing this now myself and want mine to look the same how would I get the same results. I'm guessing they are powder coated...

Junior Member
Joined: Aug 2025
Posts: 1
Likes: 1
Re: EASY AND SAFE WAY TO INSTALL FRONT COIL SPRINGS
OP, I just wanted to give a big thank you for this post. The 3 1/4"L piece of pipe at your exact clocking marks 100% did the trick!! My compressor didnt want to compress it perfectly centered, but luckily the pipe and nut of the compressor still passed through the control arm. It allowed me to jack in small 1/4" incriments and then proceed to tighten the compressor a little more until i was able to reach the strut. Additionally, I installed the Spohn strut mounts which are 1" taller than OEM (meaning I needed to compress an additional 1") and it still worked. I truly don't thing there was any other way I was getting the OEM springs back in the car having the entire front end stripped down with no weight in the front. Thanks again.
Thread Starter
Joined: Oct 2007
Posts: 1,375
Likes: 6
From: Wyoming
Car: 1995 Formula
Engine: LT1 350
Transmission: Built 4L60e
Axle/Gears: 10 bolt, Eaton posi, 3.73's
Re: EASY AND SAFE WAY TO INSTALL FRONT COIL SPRINGS
OP, I just wanted to give a big thank you for this post. The 3 1/4"L piece of pipe at your exact clocking marks 100% did the trick!! My compressor didnt want to compress it perfectly centered, but luckily the pipe and nut of the compressor still passed through the control arm. It allowed me to jack in small 1/4" incriments and then proceed to tighten the compressor a little more until i was able to reach the strut. Additionally, I installed the Spohn strut mounts which are 1" taller than OEM (meaning I needed to compress an additional 1") and it still worked. I truly don't thing there was any other way I was getting the OEM springs back in the car having the entire front end stripped down with no weight in the front. Thanks again.
~New2

Thread
Thread Starter
Forum
Replies
Last Post
FueledSoul
Suspension and Chassis
16
Aug 9, 2014 08:29 PM