When you click on links to various merchants on this site and make a purchase, this can result in this site earning a commission. Affiliate programs and affiliations include, but are not limited to, the eBay Partner Network.
Tech / General EngineIs your car making a strange sound or won't start? Thinking of adding power with a new combination? Need other technical information or engine specific advice? Don't see another board for your problem? Post it here!
swapped my tires from my old wheels to the new ones. still gotta get the right size tires for the front. also most likely goin to paint the centers silver. 3rd set of wheels on this car in a year and still isnt running. (thanks to a friend) lol
Hello Evilokc!
I am brand new to this group,& for the life of me can't figure how to post a new thread! Will you please tell me how to do it? I just recently sold my 1973 RS split-bumper, & purchased a 1992 RS with only 60,000 miles on it! It's a VERY clean car! The car doesn't have cruise control, & am trying to find out how easy it is to add cruise to it. do they come from the factory with the cruise modual already in the car, & is it a simple matter of purchasing a new accessory signal lever with cruise, & plugging it in? OLD NEW
I am brand new to this group,& for the life of me can't figure how to post a new thread! Will you please tell me how to do it?
Welcome aboard waylord.
To post a new thread, select the forum you wish to post in. Example: Detailing and Appearance.
There may be a sub-forum: Members Camaros. There will be a "new thread" button to click. Hit that and an open dialogue box and title bar will come up.
Post away.
i think you went backwards on your swap but welcome regardless,that 73 rs look(ed) fabulous .i would kill for that car(kidding)
im 99% sure you need a new steering column that has cruise control stalk in it,you will need the other connection in your harness.
you need the ball , the cable and possibly other things(not sure if there is computer management) as well.
it isnt a quick,easy thing from my understanding but ive never swapped cruise control into a non cruise car personally.
Last edited by 1986BANDIT; Sep 3, 2020 at 02:51 PM.
skinny,quick question(oh,and thanks for the cam info!!)
i put the 8" balancer on my L98/350 with a different timing chain cover and pointer(billet adjustable)
and threw on the vortec heads( with new springs,retainers etc),installed tthe 7151 cam (dot to dot)and buttoned it all up.
im trying to figure out were to stab in the dizzy and have it point at #1 on the cap.is it at top dead
center on the compression stroke of #1 or is it before tdc?(15 degrees i saw somewhere)
also : if i put a dial /plunge indicator (with a long extension obviously) in the #1 spark plug hole and bring it to the top,is that were the pointer is supposed to line up with the balancer mark?
im loosing my mind.......thanks for any and all help!!
Last edited by 1986BANDIT; Sep 3, 2020 at 03:02 PM.
Hey Bandit.
I'll take it from the top. Some of this you obviously know.
This is my procedure:
1) Determine that the pointer accurately indicates TDC. New or old I always do this.
A piston stop tool is best. In this case I use an old spark plug, smash the guts out of it and place a long bolt in the shell. A 3/8" bolt I believe works. About 2" long. Thread that into number one. Be sure the piston is nearer the bottom of the stroke so you can secure the piston stop. Crank the engine by hand in the normal direction until the piston contacts the stop. Mark the balancer. Rotate the engine the opposite direction until it contacts the stop. Mark the balancer. Midway between those marks is TDC. Adjust your new timing pointer accordingly. I don't think you can get accurate results with a dial indicator because of the angles involved. But maybe.
2) Turn the engine by hand in the normal direction until you reach about 15-20 degrees before TDC. That's your base timing point.
3) I set the distributor up so that the rotor points to the number one spark plug. You have to compensate for the gears on the cam and distributor as they will cause a rotation of the rotor and mess up the alignment when dropping in the distributor.
Now, here's the trick. You have to be sure the oil pump drive shaft notch and the tang in the distributor gear are lined up. I use a loooong slotted screwdriver to do this. You can estimate where the drive tang is orientated with the rotor pointing where you want. Then use the screwdriver to rotate the pump shaft until it matches the distributor. It's a pain the *** to look down the distributor hole with a flashlight but I do it. After a couple of stabs you'll find that the distributor will engage the pump shaft and will drop in with the rotor pointing to where you want it.
I hope that's what you're after.
one more question,i can make a piston stop but here is were my confusion with that lies: were the bolt goes through and stops the piston,does that position of the bolt matter (were or how far in the bolt is)or is it just to reference were the piston stops in both directions to establish the two marks then find the mid point of the two?
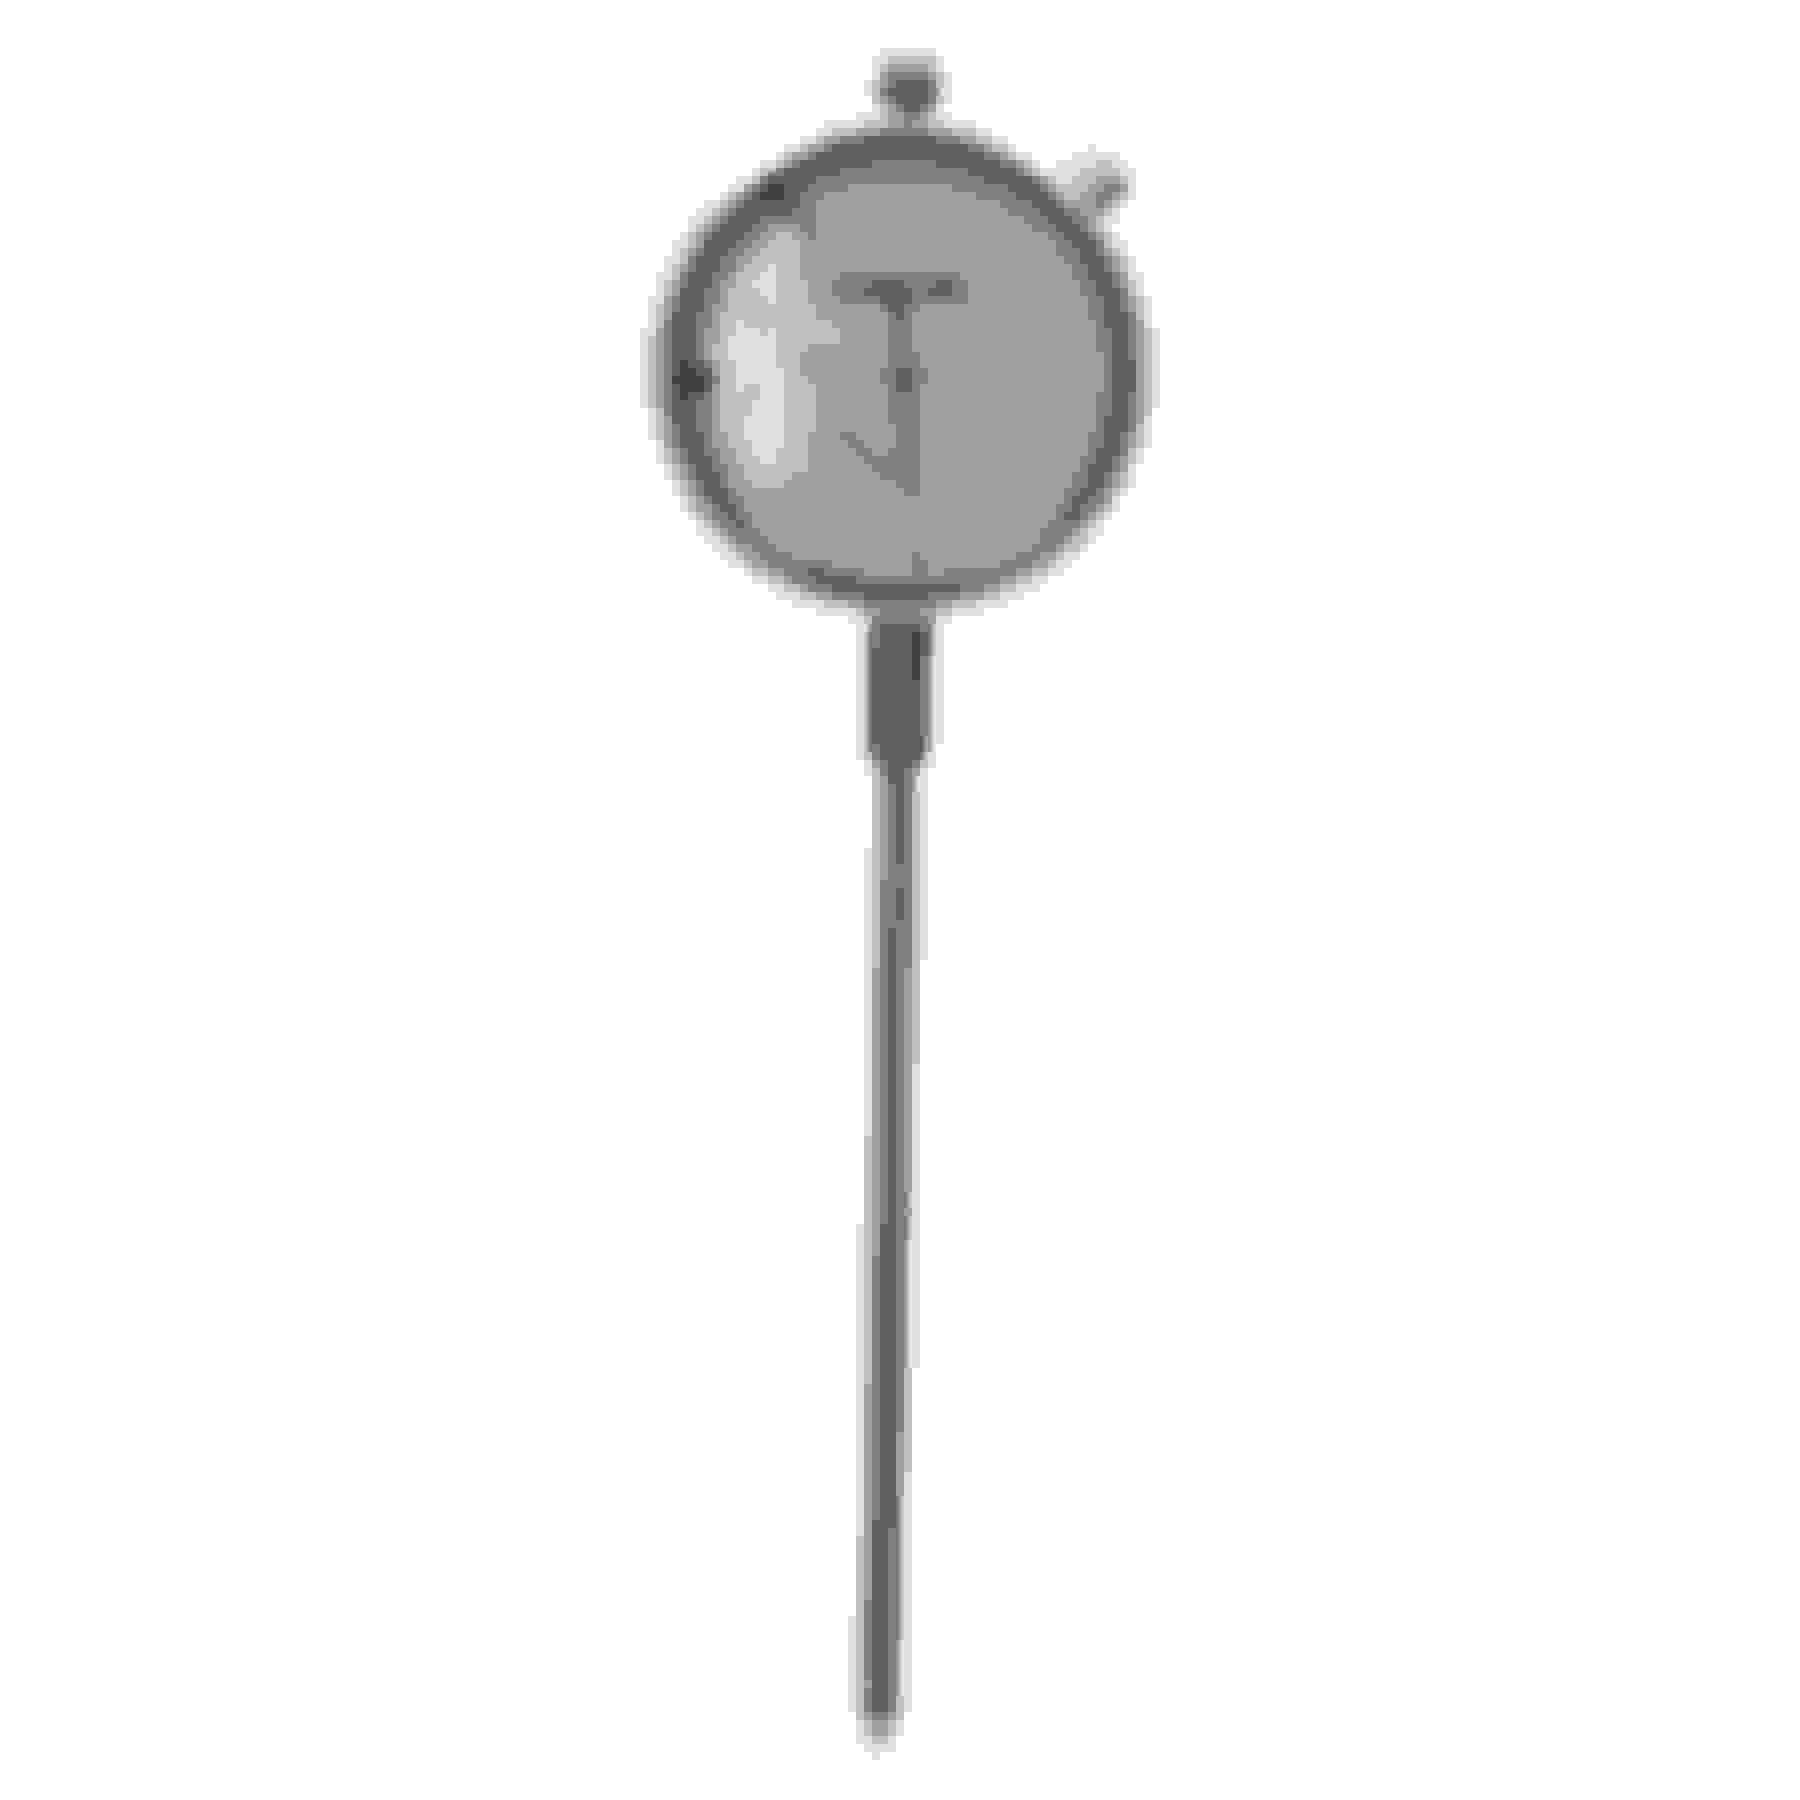
also,i have an indictor and magnetic base.the indicator looks similar to this:
Last edited by 1986BANDIT; Sep 3, 2020 at 04:32 PM.
Doesn't matter as its just a reference in forward and reverse. You just have to be sure the stop is in far enough to make contact. IIRC correctly, the bolt poked out past the spark plug threads by about an inch. More is OK too.
And as for spark plugs in general, the Vortecs use a long reach tapered plug.
i have the right plugs,i just thought using the indicator would be more accurate but i guess the stop gives two points of reference then you find the mid point and the indicator would only give absolute tdc....maybe im overthinking it,idk...
the balancer is also unmarked/no timing tape and the timing pointer is just that(a pointer,lol),
so when i find the correct mark i will need to adjust the balancer rotation to 15 degrees btdc BEFORE installing the dizzy with the rotor pointing at #1 on the cap.
Last edited by 1986BANDIT; Sep 3, 2020 at 04:40 PM.
The piston stop tool is very accurate. It's marking the mid point that can be tricky.
And yes, after you find TDC, bring the engine around to 15 before TDC and line up your rotor relative to that. If the distributor doesn't drop in all the way, check of the oil pump shaft alignment.
I worked on my doors and my paint. found some more spots I wanted to smooth out so some more wet sanding. Finished that up and went to work on sound proofing my doors, I am amazed at the difference. Even with the door panels off the car did quiet down somewhat. Tomorrow finish up the doors interior, touch up a few spots on the paint. Want to polish it out again on Saturday. And then all effort into the interior, headliner and fixing the center console, need to gorilla glue the sides.
Took it for a ride and a couple of guys were blown away, said they haven't seen a Formula 350 in a long while. Looking forward to future local car shows. .
decided to scrap my 9" diff build for now. probably save up and get a pre fabbed one. so for the time being i picked up a 4th gen diff. guess its a little better than my drum non posi v6 diff.
thanks,i really appreciate the effort and help you put in.respect!!
how is the car doing,are you still plugging away at it or taking a break?
as old as i am its my first engine build,done tons of bolt ons but this is a little bit trickier
I failed to mention that you need to be sure that when you're stabbing in the distributor, the engine is approaching TDC with respect to the number one cylinder. You'll need to pull a valve cover to see this. Look for number 6 valves to be in overlap. That is, exhaust closing and intake opening. Otherwise you'll be timed 180 degrees out.
As for my heap, it's on hold for a while yet. Then the engine comes out. Hopefully before hell freezes over here.
Or when the intake closes....that will work too.
There's always more than one way to go about it. I tend to suggest what works for me.
Take a breath man. It's just an engine....
you've done it multiple times and succeeded,i need this thing to run so i can put it to bed (then clean the garage so the car will fit in again,lol) until i can swap it in,lol.
i made a piston stop,i used the piston stop,i popped a hole in the piston with the stop >>>>>>>F U C K<<<<<<<<
i went one way,marked the balancer.i went the other way (using a small screw driver style pry bar with studs in the balancer)
and heard /felt a pop.looked in through the spark plug hole and thought,"this doesn't look right."
i honestly didn't think i put that much force on it
oh well,this block needs to be honed and
possibly over bored anyway (stock 4.0 bore and a few scuffs) so not a big loss.i just wanted to hear it run.
time to use the better long block with hole free pistons,lol.
DaMn it
i was taking too many short cuts anyway,i didn't change the rings, main/rod bearing ,ball hone or pull the pistons,crank etc.
this just forces me to stop being an idiot and do it right.i got mad,cleaned out the garage and parked the car inside....need a break.
Last edited by 1986BANDIT; Sep 4, 2020 at 07:21 PM.
I can't imagine that ever happening. I'm always concerned about nicking the piston but punching a hole through it?
Perhaps you didn't break anything and it only sounded that way. Maybe a peak with a bore scope style of inspection camera will confirm.
the geometry of the bolt is not good in relationship to the crown of the piston sadly,wish i would've went with the other option.
oh well,time to tear down my freshly put together engine and try to salvage as many gaskets as i can as i cant afford any new ones.
the geometry of the bolt is not good in relationship to the crown of the piston.
All piston stop tools are orientated the same way. It's not an angle issue.
While it is a huge helping of tough luck if you did knock a hole in the piston, I can't see it happening without some considerable effort or speed. The top of the piston is almost a 1/4" thick.
Sorry if you think it was poor advice but this is very odd and I can't recall ever seeing it happen. And that procedure is as old as SBC's themselves. Or older.
i don't think it was poor advice at all,i just have really,incredibly s h i t t y luck as it seems.the inherent angle of the bolt in relation to the piston crown is about 10 degrees so its destined to push the bolt and continue without an accurate reference if you are an idiot like me.shame it wasn't a hemi then it would be straight on.
i rotated one way,marked it,rotated the other way POP.i knew right away what it was .i just assumed it would STOP.
this was using a spark plug tapped to 3/8 with a 2"+ long bolt through the top.i was using two bolts in the balancer and a foot long(or less)
screw driver/prybar.guess i need to get proper orientation before the heads go on.
answer me this,when you install the cam exactly(EXACTLY) what do you do to install the dizzy in the right position.
do you rotate it 180 clockwise till the big sprocket dot is at 12? man,im pissed at myself,ready to fire and i do this.
i need to get proper orientation before the heads go on.
answer me this,when you install the cam exactly(EXACTLY) what do you do to install the dizzy in the right position.
do you rotate it 180 clockwise till the big sprocket dot is at 12?
I'm not entirely sure what you're asking. Are you talking about two separate engines? One in the car with the piston stop and another on a stand?
As for the dropping in the distributor, the timing marks don't enter into it. It's the piston relative to TDC that matters. Get it to 15-25 BTDC on number one compression stroke and stop there. Line up the rotor to point to number one spark plug and also line up the oil pump driveshaft slot with the tang in the base of the distributor gear. Lining up the rotor this way ensures the distributor will be installed with the plug wires orientated properly. That part can be a pain with the engine in the car but easy when on a stand. Most times the engine is assembled (so the timing chain set is covered so no dots to see) when the distributor is ready to be dropped in. I leave it out until the engine is installed otherwise you risk damaging it.
Is this what you're asking or am I missing something?
its all good,second times a charm.im going to be a lot more methodical in my rebuild next time,
ill think of this like practice and that i learned something(at a price) i wish prices in Canada were
like the states.a timing chain gasket set is like $40 ffs,thread sealant for head bolts $10-15,it all adds up
when you have to do it a couple times.i guess if it was free i would make the same mistakes over and over.
live and learn ,i honestly should've pulled the pistons and crank,put new rod,main bearings and rings
so really this just makes me driven to do it right and much better instead of mickey mousing it.
Mostly work on the back interior, cleaning it up, starting to put fat mat down in the wheel wells, repainted some of the plastic panels.... Took it out again for a nice ride, really enjoying this car all over again!
fixed my headlight wiring. the led headlights i got were wired a little different at the pluf so just swapped some wires and they worked fine. cleaned up the 4th gen diff i got and realized it has a set of lower control arm relocation brackets on it. (score) lol. also wired up a switch for my holley 7" screen so i can turn it off to load a tune. (for some reason holley wont let it load tunes with both screens on).wired in the tuning usb to the switch too. aligned my hood to where i thought it looked decent.
switch is in the ash tray. left side and bottom wires go to ecu side and will stay powered when switch is turned off. right side goes to the bigger screen and will turn off can signal to screen allowing a tune to be loadable.
got sick of messing with this thing and wanted to finally hear it eventhough the turbo isnt on yet i can still fire it up. borrowed some ls3 manifolds from a buddy and they bolted up pretty good for what i need. anyways heres pretty much first start. i still have to do alot of messing with the settings in the holley but it runs!!
Spent about 2 or 3 hours cleaning my factory GTA wheels with wheel acid. The gold turned out awesome and now I need to find the time to sand and buff out the lip of the rims. Those rims have not been deep cleaned in a long time, wish I did before and after,
not much with this smoke and ash in my area. gives me a mean migraine. i did make a little mount to mount the turbo where i want it. bled and adjusted the master cylinder. think i have to do some more adjustments on it. ordered and installed another damn $40+ adapter harness for this holley stuff so i cna have a fuel level gauge. this holley stuff gets exspensive with all the sensors and adapter harnesses you have to buy. kinda annoying if i do say so. ordered my inner headlights. messed with the tune a little. found out my brand new oil pressure sensor isnt working. mounted a mechanical oil pressure gauge on the firewall for the heck of it. just gotta shorten and hide the tubing. dont think im goin to put the light on the gauge. i put a really good led hood light.
got bored so decided to pull fof my t56. lol nah have the usual clutch bleeding crap these t56 have, thought i had a leak from one of my fittings on the slave cause i saw some drops coming from my bellhousing. pulled the trans and realized it was residue oil from when i installed my oil pressure gauge. ugg. ordered a bigger clutch reservoir cause i was tryin to use a motorcycle one but dont think its big enough. decided to scrap my custom hood idea for the moment and ordered a ctsv3 hood vent. the angle of it looked like its about the same shape as the camaro hood
Finished up my interior for now, mostly. Waiting on a replacement motor for my rear window. Rest of the plastic has been re stained and it all looks so new. Also started on replacing the front wheel bearings, going to grease everything up front too tomorrow.
oh also got an idea since i dont want rear seats and dont want just emptiness there. since ive owned a couple of these fc3s rx7s over the years ive always liked the rear seat compatments and thought about maybe trying to fit them in my camaro. only problem is my bro says theyre getting hard to find and if you do find them theyre pricey.
example of what im talking about. im sure i can build something. but these things are super light. think theyre made of fiberglass.
i think you could easily pull it off with some aluminum sheet upholstered to match your interior.you could even hinge it and use it too store whatever.i kind of like the idea and may try it too.the key is finding a way to mount it to the existing seat mount and seat belt mounting points so it can be removed and reversed.
im contemplating trading my car for a 1975 monza 2+2.it appears to be clean,not rotten and reasonably complete.
its the predecessor of the third gens and has a torque arm rear suspension and is the incestuous love child
of a fox body,vega,70s camaro with some other ferrari based styling cues thrown in.am i really this crazy?
its actually on the road and legal.it looks like the heater core is bypassed,yes i hate the color and the scoop.
it currently has a 383 stroker ,3.73 rear with posi and sadly a t350 automatic with line lock.
anyone willing to chime in on how this is a great idea or am i completely insane? ive always loved vega's
grew up seeing a blown ,pro street vega running around my town that made me loose my mind every time i saw it.
monzas surprisingly are the last North American car to win the imsa racing series and have a great racing lineage.
obviously these weren't stock variants but its still interesting none the less.
so anyone have an opinion,advice,suggestions?do i need help? a shrink,prozac maybe idk...why do i like it.
my plans would be to undo the green,clean off the trim,bumpers,line up the panels as best i can
etc and rip the scoop off.i love my car but i love this thing too and i cant figure out why....
the dark green car is not the car i would get,just a visual example of what i would want to work towards. this would be something i would be shooting for visually.this obviously isn't the same car but a clean example of what they look like when done tastefully.
THIS IS THE CAR.....
Last edited by 1986BANDIT; Sep 20, 2020 at 02:41 PM.
If it were me, i would grap a rear cargo cover lid and mount it flush with the carpet.Then build the front portion to lock/close it, maybe the sides since the lid is probably slightly too narrow.I would leave the carpet and just have one big storage compartment.
Originally Posted by Swapper
oh also got an idea since i dont want rear seats and dont want just emptiness there. since ive owned a couple of these fc3s rx7s over the years ive always liked the rear seat compatments and thought about maybe trying to fit them in my camaro. only problem is my bro says theyre getting hard to find and if you do find them theyre pricey.