
B&M Pro Stick Install


Thread Starter
Supreme Member
iTrader: (1)
Joined: Mar 2001
Posts: 3,245
Likes: 1
From: Medford, Oregon
Car: 1989 Iroc Z L98
B&M Pro Stick Install
I have been wanting an aftermarket shifter for some time in my 1989 Iroc Z. I have a 700r4, so the obvious solution would be the B&M Megashifter for our cars.
I had one in my 1982, I liked the shifter but didn't love it, so I decided to try something different.
I have been watching ebay for a cheap B&M Pro Stick. I chose the Pro Stick because I like the looks of the shifter, I have always liked how they shift, and you can buy a gate plate for it to make it 700r4 compatible for about $20.
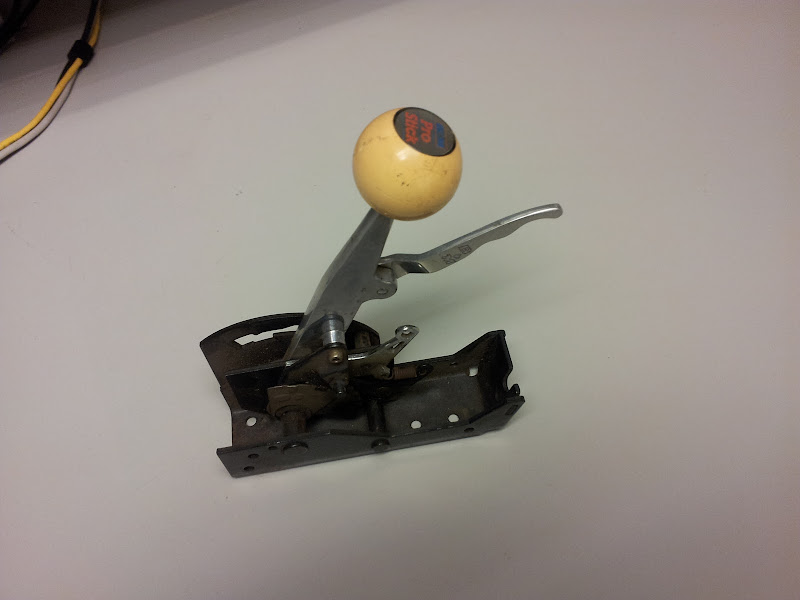
So I scored a B&M Pro Stick on ebay for $35. It needed to be cleaned up, and it needs a new shift ****. The current **** is a faded yellow color, I plan on buying a **** with a button anyway for my nitrous system.
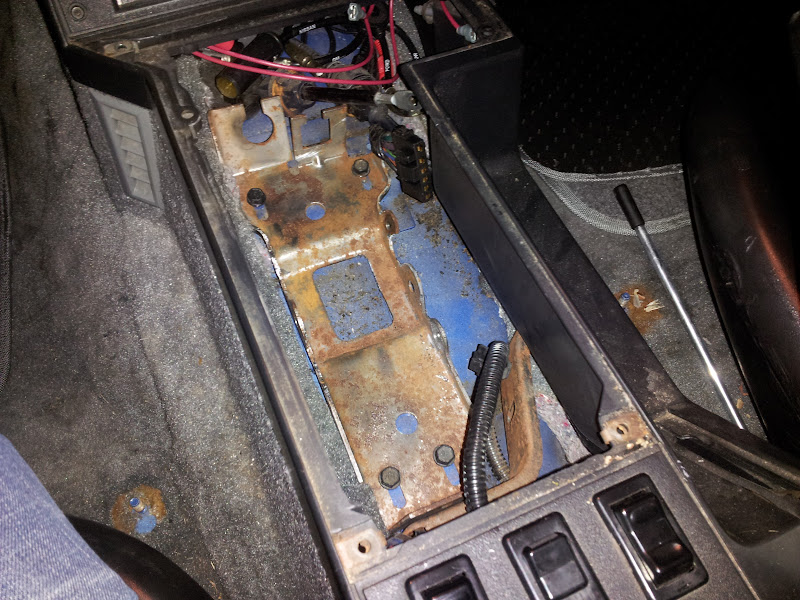
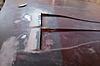
So first, I removed the stock shifter from the console. Using a drill bit and a dremel, I drilled out the rivets so that I was left with just the plate.

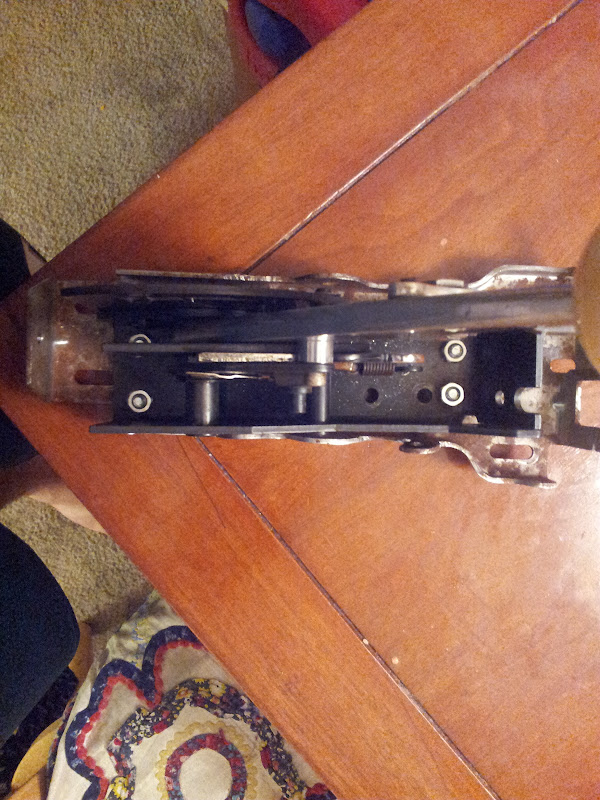
Next, I mounted the B&M Pro Stick to the shift plate. I did this using bolts on the front, and elevator bolts on the back. A lot of people weld the plate to the Pro Stick, I don't have access to a welder so this was the best I could do.

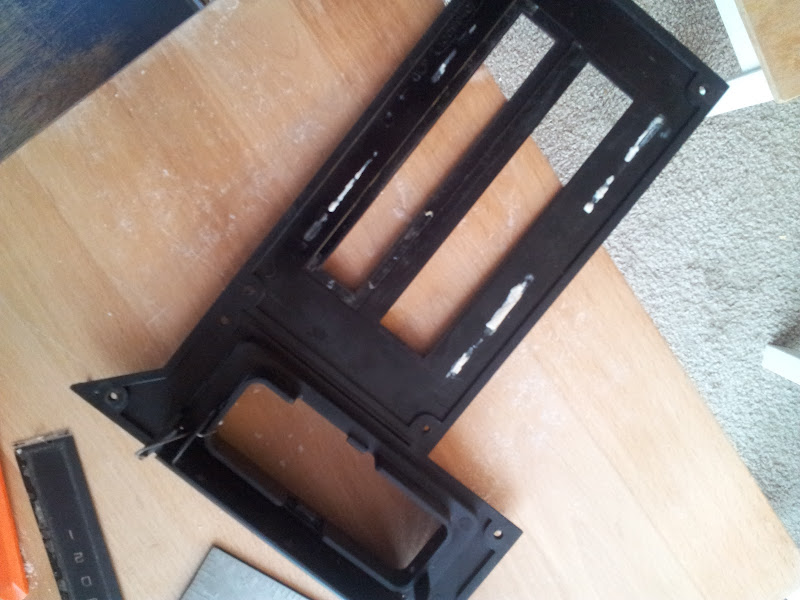
Next I took a stock console, and used a coping saw to cut the middle out and even the holes out on either side. I realize some people will not want to cut up their stock piece, I did not care though.

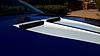
Next, using the factory shift plate bolts I bolted the Pro Stick in place. This was obviously after several test fits:
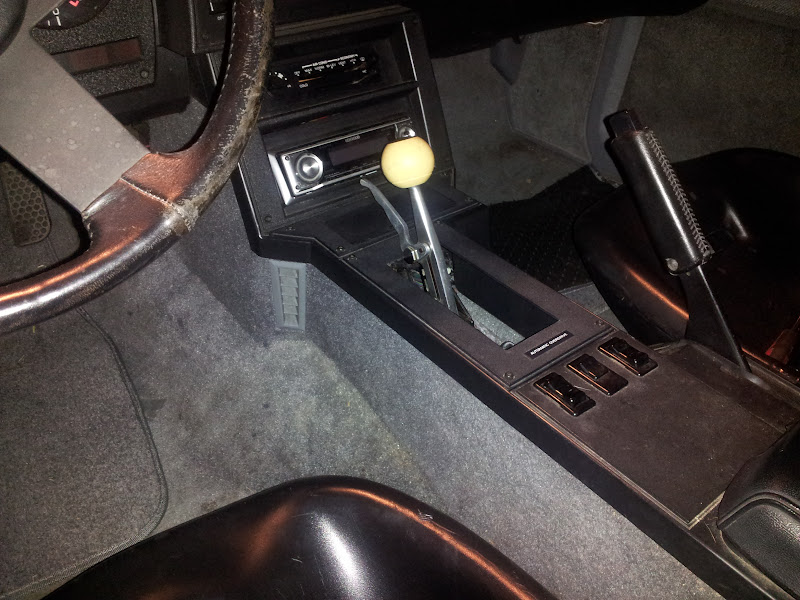

The total cost of this project has been very minimal and I am happy with the results. I may end up putting something under the stock console plate to make this look even more stock, and eventually I will have a sticker made up with the gear positions.
What do you guys think? $35 for the shifter, $20 for a gate plate and $40 for a cable, I should be able to get this done for around $100.
I had one in my 1982, I liked the shifter but didn't love it, so I decided to try something different.
I have been watching ebay for a cheap B&M Pro Stick. I chose the Pro Stick because I like the looks of the shifter, I have always liked how they shift, and you can buy a gate plate for it to make it 700r4 compatible for about $20.
So I scored a B&M Pro Stick on ebay for $35. It needed to be cleaned up, and it needs a new shift ****. The current **** is a faded yellow color, I plan on buying a **** with a button anyway for my nitrous system.
So first, I removed the stock shifter from the console. Using a drill bit and a dremel, I drilled out the rivets so that I was left with just the plate.
Next, I mounted the B&M Pro Stick to the shift plate. I did this using bolts on the front, and elevator bolts on the back. A lot of people weld the plate to the Pro Stick, I don't have access to a welder so this was the best I could do.
Next I took a stock console, and used a coping saw to cut the middle out and even the holes out on either side. I realize some people will not want to cut up their stock piece, I did not care though.
Next, using the factory shift plate bolts I bolted the Pro Stick in place. This was obviously after several test fits:
The total cost of this project has been very minimal and I am happy with the results. I may end up putting something under the stock console plate to make this look even more stock, and eventually I will have a sticker made up with the gear positions.
What do you guys think? $35 for the shifter, $20 for a gate plate and $40 for a cable, I should be able to get this done for around $100.

Junior Member
Joined: Apr 2010
Posts: 54
Likes: 1
From: Clarendon, NC
Car: 1991 RS camaro
Engine: 5.7
Transmission: 700r4
Axle/Gears: peg leg for now
Re: B&M Pro Stick Install
Glad you did this install. I had previously asked if anyone had done something like this. I just purchased one. Question, why did you use the original plate to mount the shifter?
Thread Starter
Supreme Member
iTrader: (1)
Joined: Mar 2001
Posts: 3,245
Likes: 1
From: Medford, Oregon
Car: 1989 Iroc Z L98
Re: B&M Pro Stick Install
Where I wanted to mount the shifter, I needed some sort of base as the area underneath the plate is not flat, and the shifter wasn't big enough to bridge the gap.
Junior Member
Joined: Apr 2010
Posts: 54
Likes: 1
From: Clarendon, NC
Car: 1991 RS camaro
Engine: 5.7
Transmission: 700r4
Axle/Gears: peg leg for now
Re: B&M Pro Stick Install
How was the height? Were you able to go into park and low good? I like this shifter better than the mega shifter
Thread Starter
Supreme Member
iTrader: (1)
Joined: Mar 2001
Posts: 3,245
Likes: 1
From: Medford, Oregon
Car: 1989 Iroc Z L98
Re: B&M Pro Stick Install
Height, park and low are perfect. You can adjust the height too by spacing it up with a bracket I suppose. The way mine sits, I almost have to reach below the console height to hit the reverse / park release, not too worried about it though I like how it looks.


Joined: Jul 2009
Posts: 142
Likes: 3
From: California, MD
Car: 88 Camaro
Engine: 383
Transmission: T5
Axle/Gears: Moser 9 inch/4.11 TruTrac
Re: B&M Pro Stick Install
Nice. Installed mine exactly the same. I did make a bracket that raised the whole shifter about 1.5 inches.
Trending Topics
Thread Starter
Supreme Member
iTrader: (1)
Joined: Mar 2001
Posts: 3,245
Likes: 1
From: Medford, Oregon
Car: 1989 Iroc Z L98
 . I can't believe people will spend $600 on a Hurst Dual gate when this is such an easy install, especially in a street strip car it's perfect.
Junior Member
Joined: Nov 2015
Posts: 5
Likes: 0
From: Tucson AZ
Car: 1884 Z28
Engine: Modified 5.0 H.O
Transmission: TH 350
Re: B&M Pro Stick Install
I did the same install but with a bit more work it looks stock. I made a custom mount plate out of 1/4" aluminum and moved the shifter to the right about 2" and raised the front 1" so that my hand was not in the radio every time I went to park. Also I did not want to modify the cover or at least look like i did. I wanted to use the cut out already in it. It looks very nice and works even better. To modify the selector cover I just used a file and only took a few minutes but only on the underside. I can post pics and the steps to make it work if anyone is interested.
Last edited by Timothy Fiscus; Nov 6, 2015 at 11:11 PM.

Junior Member
Joined: Feb 2016
Posts: 9
Likes: 0
From: SALISBURY NC
Car: 88 Camaro IROC
Engine: 406 sbc
Transmission: 700R4
Axle/Gears: Ford 9 inch 4.56 gear
Re: B&M Pro Stick Install
I liked reusing the stock shift plate since the shifter can be unbolted easily. I also don't have access to a welder, so it made for an easy solution for me.
Where I wanted to mount the shifter, I needed some sort of base as the area underneath the plate is not flat, and the shifter wasn't big enough to bridge the gap.
Where I wanted to mount the shifter, I needed some sort of base as the area underneath the plate is not flat, and the shifter wasn't big enough to bridge the gap.
Junior Member
Joined: Nov 2015
Posts: 5
Likes: 0
From: Tucson AZ
Car: 1884 Z28
Engine: Modified 5.0 H.O
Transmission: TH 350
Re: B&M Pro Stick Install
I wired it using the original wiring. If you would like a detailed account of how i did it and what color wires went where id be happy to supply you with them. Ive had no problems with the shifter since I installed it. Works great.
Junior Member
Joined: Nov 2015
Posts: 5
Likes: 0
From: Tucson AZ
Car: 1884 Z28
Engine: Modified 5.0 H.O
Transmission: TH 350
Re: B&M Pro Stick Install
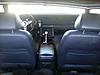
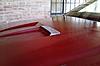
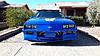
Here is the finished shifter along with most of the car. The hood took me a week to make it a functional, factory looking hood with working air scoops. I fabricated quite a lot of parts for this car including the grill louvers, emblems, and some other parts under the hood. I have $2000 total out of pocket into this car and thats including the car itself.

Last edited by Timothy Fiscus; Jan 21, 2017 at 10:14 PM. Reason: sentences were chopped up by attachments


Joined: May 2013
Posts: 1,494
Likes: 99
From: CT
Car: 86 Trans Am WS6
Engine: 383 stroker
Transmission: 700r4
Axle/Gears: 9 Bolt Torsen 3.70
Re: B&M Pro Stick Install
nice job, I have the megashifter but love the look of the pro stick and I bet it feels a lot more functional.
Junior Member
Joined: Feb 2016
Posts: 9
Likes: 0
From: SALISBURY NC
Car: 88 Camaro IROC
Engine: 406 sbc
Transmission: 700R4
Axle/Gears: Ford 9 inch 4.56 gear
Re: B&M Pro Stick Install


Junior Member
Joined: Feb 2016
Posts: 9
Likes: 0
From: SALISBURY NC
Car: 88 Camaro IROC
Engine: 406 sbc
Transmission: 700R4
Axle/Gears: Ford 9 inch 4.56 gear
Re: B&M Pro Stick Install


Junior Member
Joined: Nov 2015
Posts: 5
Likes: 0
From: Tucson AZ
Car: 1884 Z28
Engine: Modified 5.0 H.O
Transmission: TH 350
Re: B&M Pro Stick Install
I see you still have the reverse lockout on it, is it functional and is it a pain to engage? I just took it off mine and put a aluminum spacer in its place for the spring.

Thread
Thread Starter
Forum
Replies
Last Post
ambainb
Camaros for Sale
11
Apr 25, 2016 09:21 PM
LT1Formula
Engine/Drivetrain/Suspension Parts for Sale
7
Aug 20, 2015 09:36 PM
rsrmoore
Transmissions and Drivetrain
1
Aug 7, 2015 08:44 PM