
S60 Upgrade and Install

Thread Starter


Joined: Nov 2006
Posts: 537
Likes: 4
From: Calgary, Alberta, Canada
Car: 89 WS6 TransAm
Engine: LQ408
Transmission: T56 Magnum
Axle/Gears: Strange S60, 4.10s
S60 Upgrade and Install
Since my LS1 upgrade I have been walking gingerly. Even though the 10 bolt was built up and braced I have just never been confident in a high RPM clutch dump, especially after adding some sticky tires. With having a solid rear suspension and now new found grip, I have been feeling like when, not if things are going to come apart.
Add the facts that any additional increase in N2O jets just makes it more susceptible to breaking and the nearest track is a couple hours away and ... well needing to drive in a cautious manner just doesn't make sense and more importantly is taking all the fun out of this!
No more! Order in and picked up.
Took a cruise today to the US border to pick up the goods from the shipping depot. Here are a few pics and comments of the new setup upon first inspection, with more to follow during the install.
Shipping box from Strange, BIG. Needed to lower the midgate to get this thing in.
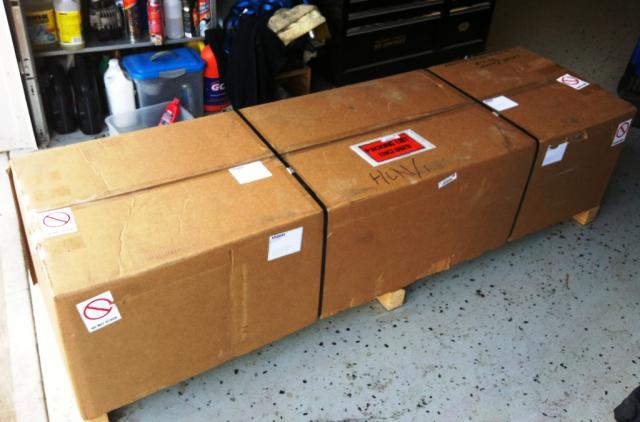
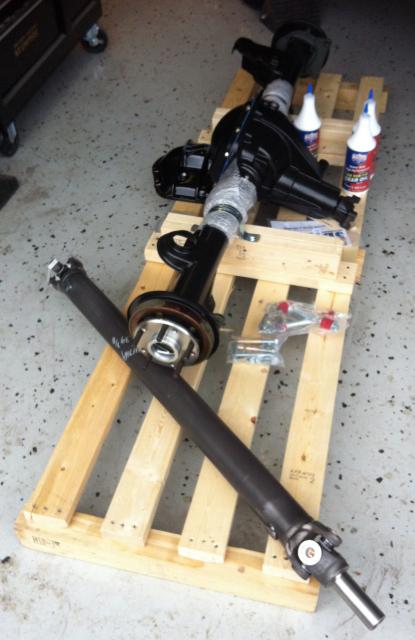
Nicely packed and solidly mounted. Chrome moly driveshaft with 1350 U-joints was also added to the bill. I went with the powder coat option on the rear as I have just been too busy working to do the little things I would normally do myself.
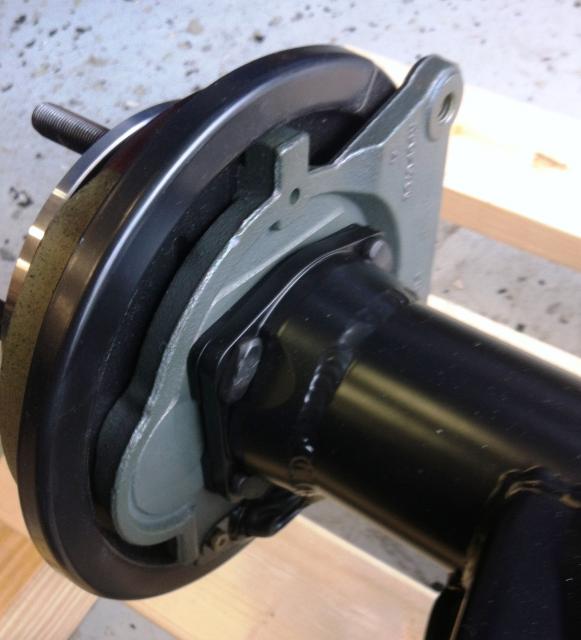
I had provided new LS1 backing plates so I could keep the car going while I was waiting. I had purchased the new backing plates from RockAuto and forwarded then to Strange for the install. I was hoping they would powder coat the backing plates with the rear but they remained uncoated.
One other thing I found interesting was there were no grease zerks on the axle bearings as I had seen in magazine reviews.
Went with the BMR LCA relocation brackets welded on. Stabilizer mounts are welded on as part of the standard package.
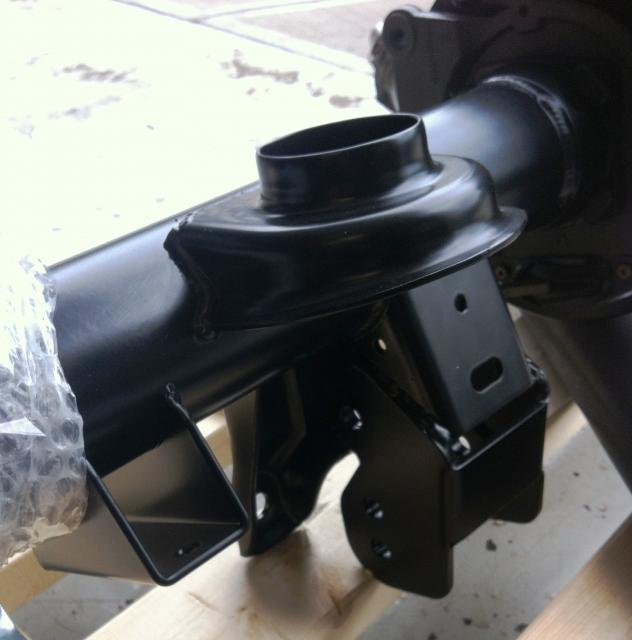
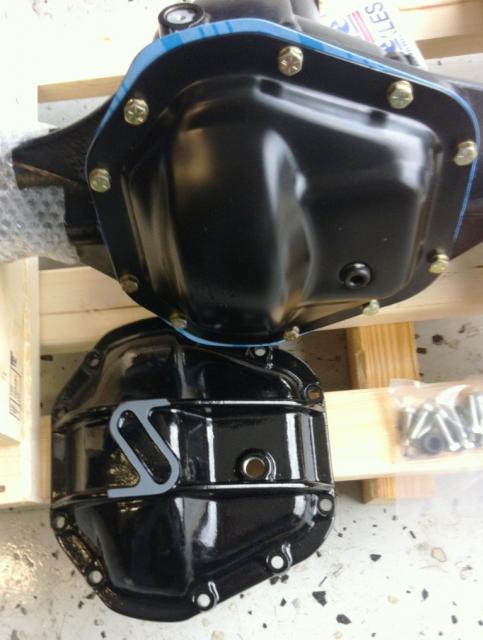
Also added the Strange aluminum cover to the package. Strange would not ship this with the rear as they do not want to be responsible for it not clearing the track bar, so it was shipped separately. After seeing the powder coated cover against the aluminum one, not sure if this was money well spent.
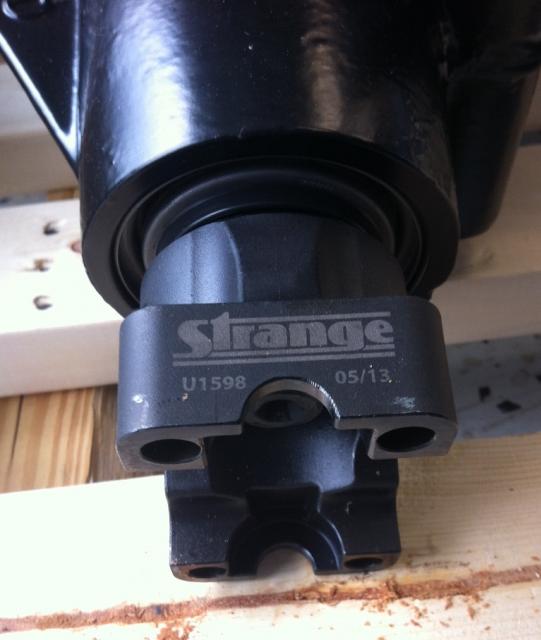
Can't hurt to have a chrome moly yoke...
Add the facts that any additional increase in N2O jets just makes it more susceptible to breaking and the nearest track is a couple hours away and ... well needing to drive in a cautious manner just doesn't make sense and more importantly is taking all the fun out of this!
No more! Order in and picked up.
Took a cruise today to the US border to pick up the goods from the shipping depot. Here are a few pics and comments of the new setup upon first inspection, with more to follow during the install.
Shipping box from Strange, BIG. Needed to lower the midgate to get this thing in.

Nicely packed and solidly mounted. Chrome moly driveshaft with 1350 U-joints was also added to the bill. I went with the powder coat option on the rear as I have just been too busy working to do the little things I would normally do myself.

I had provided new LS1 backing plates so I could keep the car going while I was waiting. I had purchased the new backing plates from RockAuto and forwarded then to Strange for the install. I was hoping they would powder coat the backing plates with the rear but they remained uncoated.
One other thing I found interesting was there were no grease zerks on the axle bearings as I had seen in magazine reviews.

Went with the BMR LCA relocation brackets welded on. Stabilizer mounts are welded on as part of the standard package.

Also added the Strange aluminum cover to the package. Strange would not ship this with the rear as they do not want to be responsible for it not clearing the track bar, so it was shipped separately. After seeing the powder coated cover against the aluminum one, not sure if this was money well spent.

Can't hurt to have a chrome moly yoke...

Thread Starter
Joined: Nov 2006
Posts: 537
Likes: 4
From: Calgary, Alberta, Canada
Car: 89 WS6 TransAm
Engine: LQ408
Transmission: T56 Magnum
Axle/Gears: Strange S60, 4.10s
Re: S60 Upgrade and Install
Got to work on removing the 10 bolt yesterday, with leaving in everything possible that was not absolutely required to be removed, which is actually most everything. Left the rear brakes in tact to minimize the amount of bleeding needed later and only removed the axle mounting bracket from the Spohn torque arm to modify its mounting location to fit the S60.

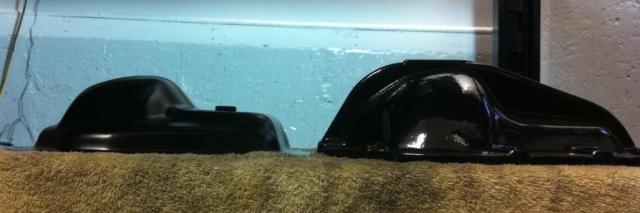
Here are a couple comparison pics of the two rears together. When the 10 bolt was built, it was sandblasted and POR 15 coated, while the new S60 has been powder coated by Strange. I actually like the POR 15 coated axle finish better as it seems to be smoother.

One important note that Strange indicates in their installation instructions is that the torque arm mounts on the S60 are both 1/2" farther forward and 1/2" towards the driver side compared to the stock 10 bolt. Not sure if this will impact the torque arm re-install, but we will see.

Here are a couple comparison pics of the two rears together. When the 10 bolt was built, it was sandblasted and POR 15 coated, while the new S60 has been powder coated by Strange. I actually like the POR 15 coated axle finish better as it seems to be smoother.


One important note that Strange indicates in their installation instructions is that the torque arm mounts on the S60 are both 1/2" farther forward and 1/2" towards the driver side compared to the stock 10 bolt. Not sure if this will impact the torque arm re-install, but we will see.
Supreme Member
iTrader: (7)
Joined: Jul 2000
Posts: 2,047
Likes: 2
From: Prince George, BC, Canada
Car: 89 GTA
Engine: 5.7L Supercharged
Transmission: T-56
Axle/Gears: Moser 9" 3.70
Re: S60 Upgrade and Install
It's looking good so far, how much has this setup cost you being a canada buyer? With 1/2" you should be ok in not having the torque arm mount contact the tranny tunnel of the car, my ford 9 was terrible for this and I had to make a new bracket.
Also you say you like the por15 finish better, do you think it's more durable as well and does gear oil affect it? I never used the stuff and wouldn't mind redoing the spray paint finish that is on my rear.
Also you say you like the por15 finish better, do you think it's more durable as well and does gear oil affect it? I never used the stuff and wouldn't mind redoing the spray paint finish that is on my rear.
Thread Starter
Joined: Nov 2006
Posts: 537
Likes: 4
From: Calgary, Alberta, Canada
Car: 89 WS6 TransAm
Engine: LQ408
Transmission: T56 Magnum
Axle/Gears: Strange S60, 4.10s
Re: S60 Upgrade and Install
- Chrome Moly yoke upgrade
- Powder coating
- 3" chrome moly driveshaft, with Chrome Moly yoke upgrade
- BMR LCAs included and installed
- Aluminum cover
- 4:10s, stock width 3rd Gen.
- Freight to Sweetgrass border crossing
The POR 15 finish has been impervious to all oil and brake fluid, with no issues. It is also very easy to fix up, if you do scrape it. The big thing with the POR 15 is proper preparation. If done correctly, it is impossible to remove without a grinder, do it incorrect and it can be scratched off. It works awesome on freshly blasted metal. Follow the cleaning and acid etching and it turns out great as it is also self leveling. I did the complete undercarriage of the car with it and have been very happy with the results.
Supreme Member
iTrader: (7)
Joined: Jul 2000
Posts: 2,047
Likes: 2
From: Prince George, BC, Canada
Car: 89 GTA
Engine: 5.7L Supercharged
Transmission: T-56
Axle/Gears: Moser 9" 3.70
Re: S60 Upgrade and Install
Wow that is a lot cheaper the I was expecting! What limited slip did you go with?
Thanks for the Por 15 info, think that's what I'll do when I have spare time to work on it.
Thanks for the Por 15 info, think that's what I'll do when I have spare time to work on it.
Thread Starter
Joined: Nov 2006
Posts: 537
Likes: 4
From: Calgary, Alberta, Canada
Car: 89 WS6 TransAm
Engine: LQ408
Transmission: T56 Magnum
Axle/Gears: Strange S60, 4.10s
Re: S60 Upgrade and Install
The limited slip is the Strange standard fare Truetrac. Locker upgrade is only $70 more, but I wanted to stay with limited slip for street use and also because I plan to stay stick. Midwest Chassis has been beating on one of these over on Tech for quite a while and have reported nothing but good things.
Thread Starter
Joined: Nov 2006
Posts: 537
Likes: 4
From: Calgary, Alberta, Canada
Car: 89 WS6 TransAm
Engine: LQ408
Transmission: T56 Magnum
Axle/Gears: Strange S60, 4.10s
Re: S60 Upgrade and Install
More progress over the last couple evenings.
Modified my Spohn Torque Arm mount as per the instructions. Started with a hacksaw and very quickly moved to the grinder and cut off wheel. After fitting was done, I finished it up with a coating of POR 15.
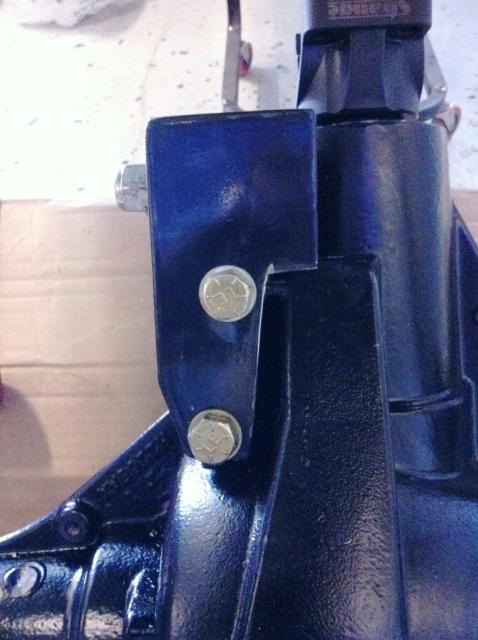
Well the 1/2" farther forward mounting of the S60 torque arm mount has introduced a bit of a challenge for me. With my Spohn torque arm and the custom cross member, there is not much give for this extra 1/2" in reduced distance between the pivot point and rear mounting point. This issue would be the same for someone who is running the BMR trak pak torque arm as there is not much room for forward movement due to the limited movement of the pivot point hardware itself.
Luckily I was able to decrease the torque arm length by removing the rear upper adjuster locking nut and bottoming out the adjuster in the torque arm and am still able to adjust the pinion angle with the adjustable lower adjuster, though it too is close to being bottomed out.
In addition to this I needed to lengthen my LCA arms to push the axle back and get it re-centered fore/aft in the wheel well. This allowed me to also get the new driveshaft in with 1/4" of clearance to spare at full compression.
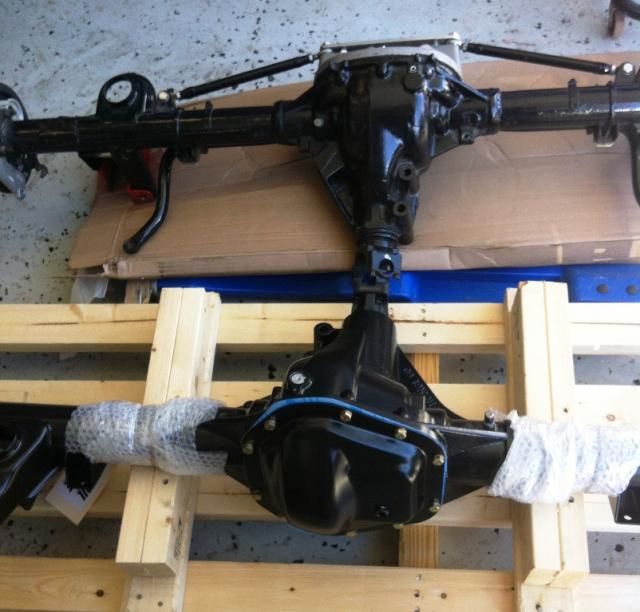
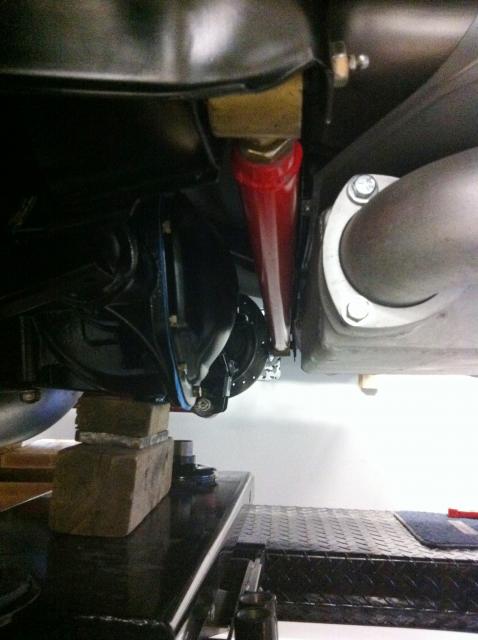
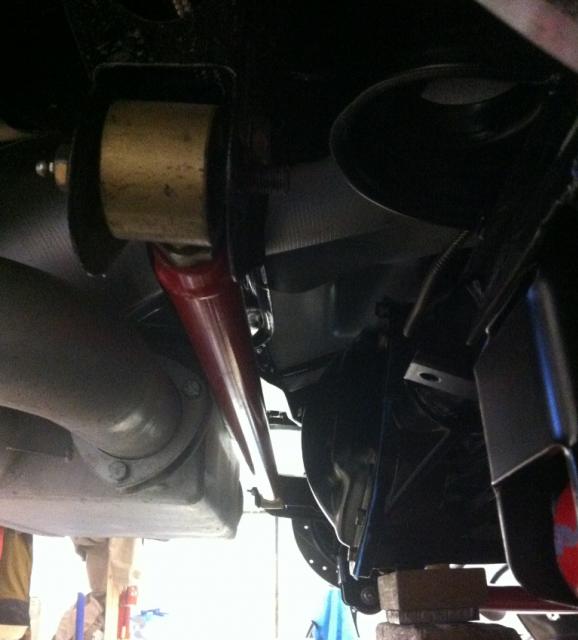
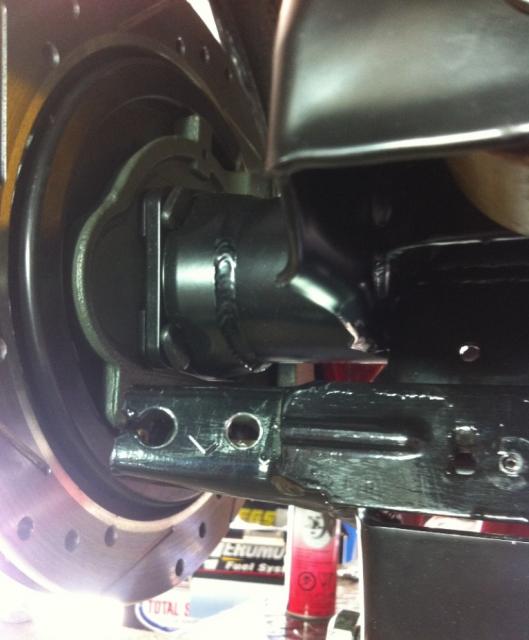
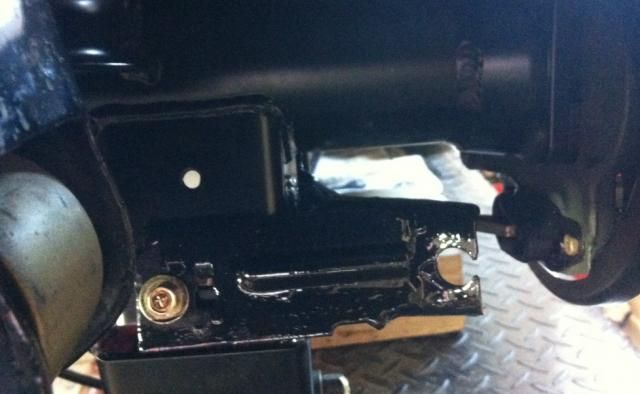
Here is the axle in its fully bottomed out position. No housing clearance issue anywhere, except where my 4" exhaust runs over the axle tubes. When at full compression against the bump stops, the axle is just touching the exhaust, not enough to even consider clearancing, as I have no plans to getting any air time.
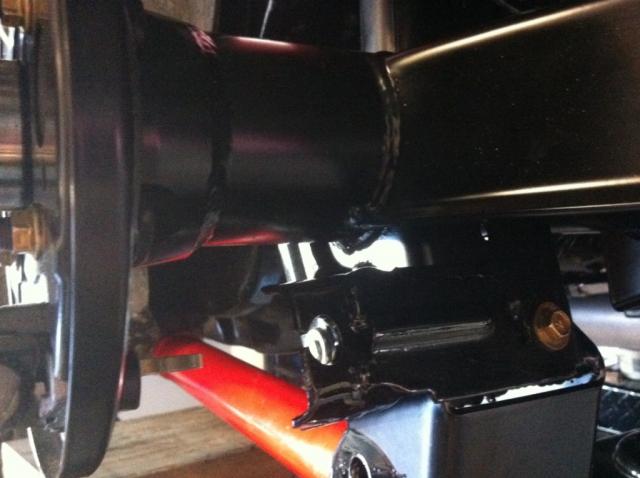
Neither the torque arm or bolts hit the tunnel. No body mods needed.
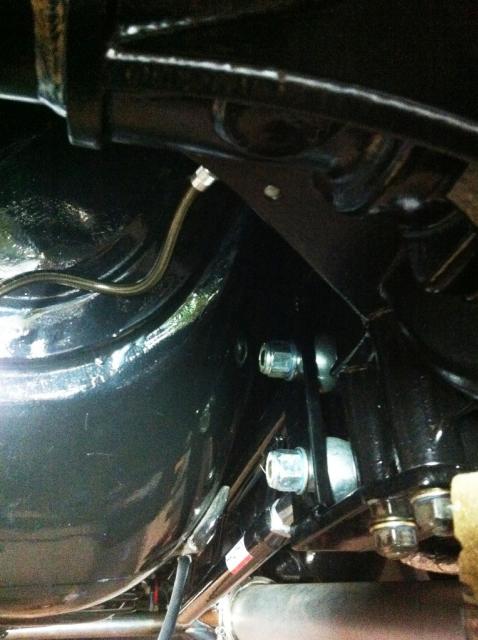

One of the exhaust at full compression.
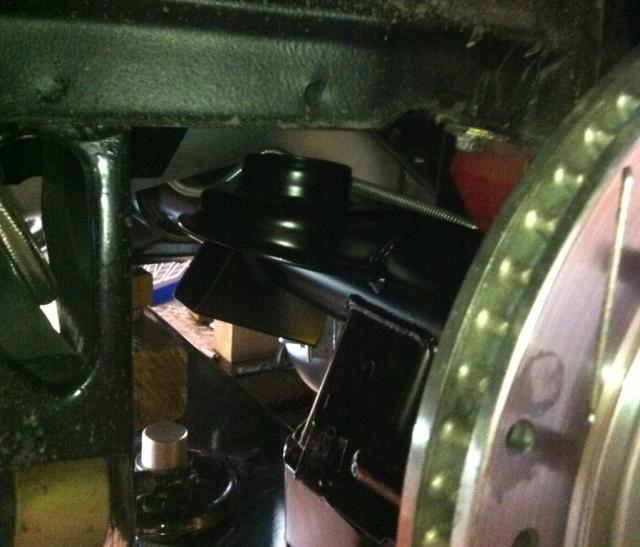
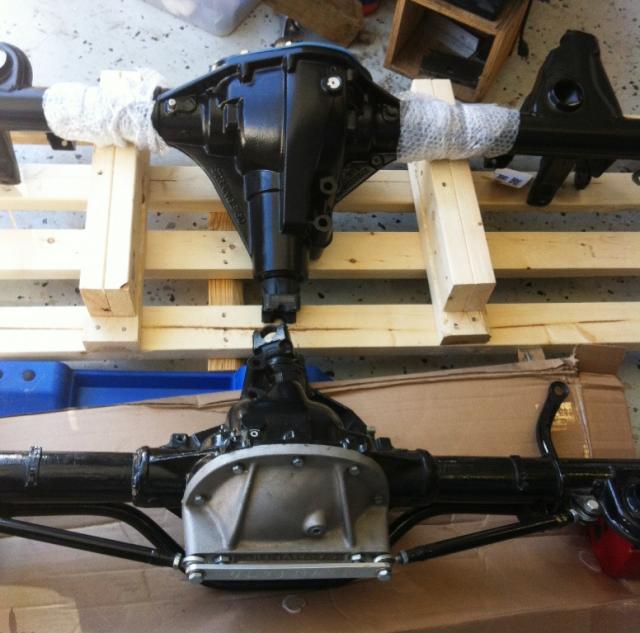
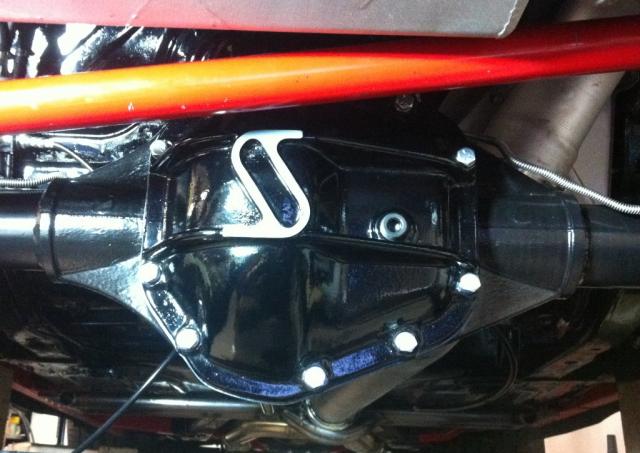
Here is the axle in its final position at about its regular ride height. Plenty of clearance between the rear and the panhard bar, so will be checking out the aluminum diff cover install next.
 URL]
URL]
Next up LS1 e-brake cables on the 3rd gen width diff. Yep, more customization...
Modified my Spohn Torque Arm mount as per the instructions. Started with a hacksaw and very quickly moved to the grinder and cut off wheel. After fitting was done, I finished it up with a coating of POR 15.

Well the 1/2" farther forward mounting of the S60 torque arm mount has introduced a bit of a challenge for me. With my Spohn torque arm and the custom cross member, there is not much give for this extra 1/2" in reduced distance between the pivot point and rear mounting point. This issue would be the same for someone who is running the BMR trak pak torque arm as there is not much room for forward movement due to the limited movement of the pivot point hardware itself.
Luckily I was able to decrease the torque arm length by removing the rear upper adjuster locking nut and bottoming out the adjuster in the torque arm and am still able to adjust the pinion angle with the adjustable lower adjuster, though it too is close to being bottomed out.

In addition to this I needed to lengthen my LCA arms to push the axle back and get it re-centered fore/aft in the wheel well. This allowed me to also get the new driveshaft in with 1/4" of clearance to spare at full compression.
Here is the axle in its fully bottomed out position. No housing clearance issue anywhere, except where my 4" exhaust runs over the axle tubes. When at full compression against the bump stops, the axle is just touching the exhaust, not enough to even consider clearancing, as I have no plans to getting any air time.
Neither the torque arm or bolts hit the tunnel. No body mods needed.


One of the exhaust at full compression.

Here is the axle in its final position at about its regular ride height. Plenty of clearance between the rear and the panhard bar, so will be checking out the aluminum diff cover install next.
 URL]
URL]
Next up LS1 e-brake cables on the 3rd gen width diff. Yep, more customization...
Last edited by HP52TA; Jul 6, 2013 at 10:28 AM. Reason: fixed pictures
Trending Topics

Member
iTrader: (2)
Joined: Feb 2010
Posts: 460
Likes: 3
Car: '89 Camaro
Engine: LS1
Transmission: 4L65/70E
Axle/Gears: 9 Inch, 3.70 gears
Re: S60 Upgrade and Install
Think I'll keep an eye on this, cause I'm pretty sure the 10 bolt on my car is the first point of failure.
Thread Starter
Joined: Nov 2006
Posts: 537
Likes: 4
From: Calgary, Alberta, Canada
Car: 89 WS6 TransAm
Engine: LQ408
Transmission: T56 Magnum
Axle/Gears: Strange S60, 4.10s
Re: S60 Upgrade and Install
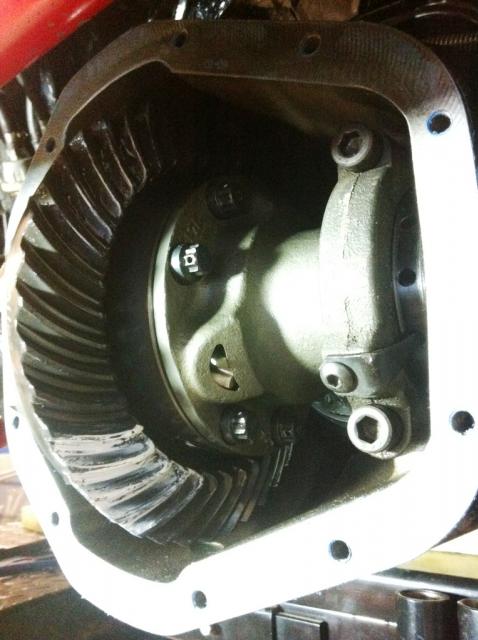
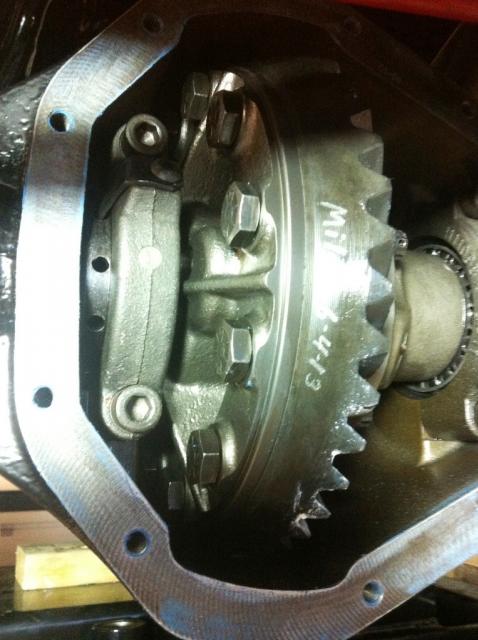
Pulled the steel cover for installation of the aluminum version. Took a couple shots of the Strange Truetrac for curious minds...
Did some comparisons between the stamped steel and the aluminum cover before installing, with the aluminum cover standing out an additional 3/4".
Next up was my LS1 brake install. All hardware had been installed on the 4th gen rear that I had built up previously, so I was expecting this to be a quick install. When I eventually do upgrade my wheels, I want the deep dish look, so had the rear built to 3rd gen width. I was going to go narrower yet, but ended up going with the 3rd gen width as I could then go with a more standard backspaced wheel. I am quite glad I did, as going narrower would have created some bigger issues with the LS1 emergency brake install then what I encountered.
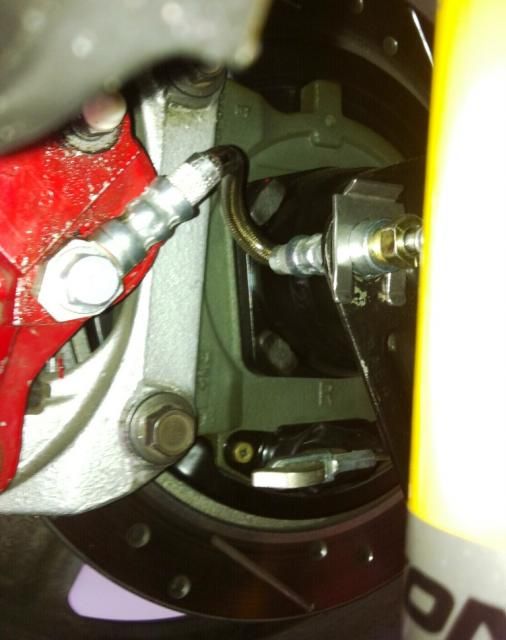
Here is the driver side LS1 emergency brake bracket installed. Outer hole is the stock cable location. Inner hole is the new location I created to correctly align the cable with the pull path. Driver side path is the worse of the two for clearance. If I had gone narrower on the rear width, this would have been a bigger issue and may have required a "Plan B".
Finished brackets installed with a fresh coat. On the previous rear I had been running bolt on LCA extension brackets, so the emergency brake brackets had already been cut to only bolt to the outer side of the LCA pivot bolt, with an additional bolt installed in the rear of the bracket to provide additional support.
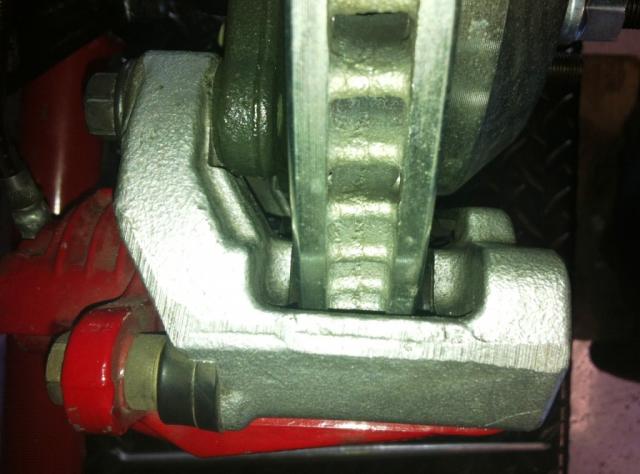
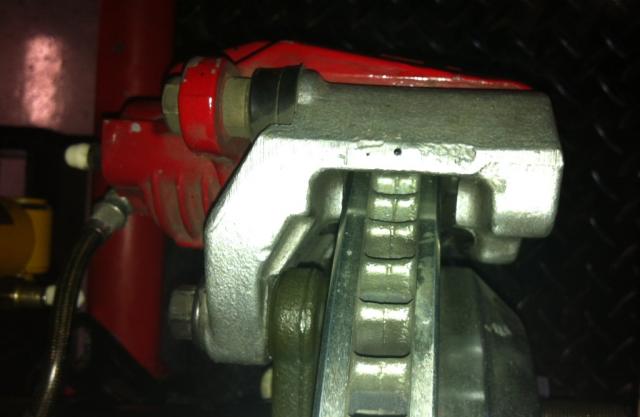
Brake calipers were a direct bolt on with no clearance issues between the rotor and caliper brackets, but they are not perfectly centered. Tried a couple 12mm washers between the backing plate and caliper mount but as they were a thicker washer this only moved the offset to the other side. The offset is not really an issue as clearance is fine, but I'm going to hit the hardware store for a couple thin stainless washers and see if I can get them perfectly centered. You can see the difference in clearance between the inner and outer, with no spacing washers installed.
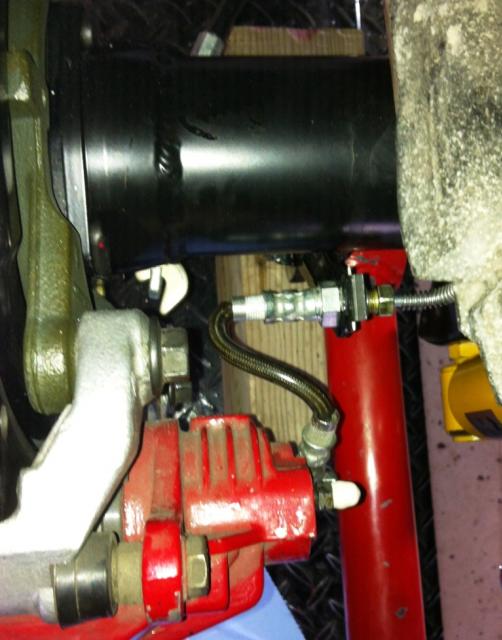
One more reason, going any narrower on the rear width would have caused brake install issues. Here is the LS1 bracket where the hardlines meet the soft. There are some pretty tough bends in these hoses which are for the 4th gen width rear.


Did some comparisons between the stamped steel and the aluminum cover before installing, with the aluminum cover standing out an additional 3/4".


Next up was my LS1 brake install. All hardware had been installed on the 4th gen rear that I had built up previously, so I was expecting this to be a quick install. When I eventually do upgrade my wheels, I want the deep dish look, so had the rear built to 3rd gen width. I was going to go narrower yet, but ended up going with the 3rd gen width as I could then go with a more standard backspaced wheel. I am quite glad I did, as going narrower would have created some bigger issues with the LS1 emergency brake install then what I encountered.
Here is the driver side LS1 emergency brake bracket installed. Outer hole is the stock cable location. Inner hole is the new location I created to correctly align the cable with the pull path. Driver side path is the worse of the two for clearance. If I had gone narrower on the rear width, this would have been a bigger issue and may have required a "Plan B".

Finished brackets installed with a fresh coat. On the previous rear I had been running bolt on LCA extension brackets, so the emergency brake brackets had already been cut to only bolt to the outer side of the LCA pivot bolt, with an additional bolt installed in the rear of the bracket to provide additional support.


Brake calipers were a direct bolt on with no clearance issues between the rotor and caliper brackets, but they are not perfectly centered. Tried a couple 12mm washers between the backing plate and caliper mount but as they were a thicker washer this only moved the offset to the other side. The offset is not really an issue as clearance is fine, but I'm going to hit the hardware store for a couple thin stainless washers and see if I can get them perfectly centered. You can see the difference in clearance between the inner and outer, with no spacing washers installed.


One more reason, going any narrower on the rear width would have caused brake install issues. Here is the LS1 bracket where the hardlines meet the soft. There are some pretty tough bends in these hoses which are for the 4th gen width rear.


Member
iTrader: (2)
Joined: Feb 2010
Posts: 460
Likes: 3
Car: '89 Camaro
Engine: LS1
Transmission: 4L65/70E
Axle/Gears: 9 Inch, 3.70 gears
Re: S60 Upgrade and Install
Nice to see that your LS1 brakes went on fine, I was a little concerned for when I change out my rear end.
Joined: Mar 2007
Posts: 1,698
Likes: 3
From: NE Pennsylvania
Car: 85 Iroc-Z
Engine: 383 TPI Procharger D1SC
Transmission: TKO600
Axle/Gears: Strange S60 3.73
Re: S60 Upgrade and Install
Good write up. Plan on installing one in my car this winter.
Joined: Mar 2007
Posts: 1,698
Likes: 3
From: NE Pennsylvania
Car: 85 Iroc-Z
Engine: 383 TPI Procharger D1SC
Transmission: TKO600
Axle/Gears: Strange S60 3.73
Re: S60 Upgrade and Install
Did you swap over you brake lines that were on your old axle for the LS1 set up? If so, how did the fit on the new rear?
Supreme Member
Joined: Apr 2006
Posts: 4,482
Likes: 10
From: Northern, CA
Car: 1989 Iroc-Z Camaro
Engine: TBI,5.0
Transmission: Automatic 700R4
Axle/Gears: Eaton Posi,3.42,LPW Ultimate Cover
Re: S60 Upgrade and Install
Very, very nice.
I would really like to see the car this is going into.
Last edited by Ron U.S.M.C.; Oct 14, 2013 at 11:10 PM.
Member
Joined: Apr 2006
Posts: 221
Likes: 1
From: Morrison IL
Car: 88 GTA, 74 T/A
Engine: 383 stroker (Procharged)
Transmission: TH400 w/brake (new 2013)
Axle/Gears: 12-Bolt S60 - 3.73 (new 2013)
Re: S60 Upgrade and Install
HP52TA,
Thanks for all pictures...I'm also looking at going this route. Couple of questions.
I have a 10bolt in my car now with the stock panhard bar and torque arm, will these items need to be replaced or will they work with the S60 rearend?
I also have the stock disc brakes on my car, I really dont want to go to the 4-gen brakes if I can help it, is it possible to make the stock brakes work?
Do you still have the 700R-4 trans in your car? I'm looking at putting a turbo 400 in my car and I'm sure that I willl need a different drive shaft.
Thanks!
Anyone there??
Thread Starter
Joined: Nov 2006
Posts: 537
Likes: 4
From: Calgary, Alberta, Canada
Car: 89 WS6 TransAm
Engine: LQ408
Transmission: T56 Magnum
Axle/Gears: Strange S60, 4.10s
Re: S60 Upgrade and Install
There should be no issues with the stock torque arm or panhard bar. Neither of mine are stock though and I did not test fit the stock parts, but am sure there is no major fitment issue. The S60 T/A mount is farther forward than the 10 bolt, but their should be sufficient movement at the front slip mount to accommodate.
For your disc brakes, you will have to talk to Strange, (see their website for brake options) as I am not sure if they have axle end brackets to accommodate the 3rd gen discs.
I am running a T56. Regardless of trans, you will need a new length of driveshaft as the S60 has a much deeper pumpkin and longer pinion output shaft then the 10 bolt.
Post up your stock fitment resolutions when you get there. Good luck.
Thread Starter
Joined: Nov 2006
Posts: 537
Likes: 4
From: Calgary, Alberta, Canada
Car: 89 WS6 TransAm
Engine: LQ408
Transmission: T56 Magnum
Axle/Gears: Strange S60, 4.10s
Re: S60 Upgrade and Install
https://www.thirdgen.org/forums/ltx-...uild-swap.html
Pics in garage also. Nothing special to look at ... yet.
Joined: Mar 2007
Posts: 1,698
Likes: 3
From: NE Pennsylvania
Car: 85 Iroc-Z
Engine: 383 TPI Procharger D1SC
Transmission: TKO600
Axle/Gears: Strange S60 3.73
Re: S60 Upgrade and Install
Is the conversion u joint that they offer necessary for our cars?
Member
Joined: Apr 2006
Posts: 221
Likes: 1
From: Morrison IL
Car: 88 GTA, 74 T/A
Engine: 383 stroker (Procharged)
Transmission: TH400 w/brake (new 2013)
Axle/Gears: 12-Bolt S60 - 3.73 (new 2013)
Joined: Mar 2007
Posts: 1,698
Likes: 3
From: NE Pennsylvania
Car: 85 Iroc-Z
Engine: 383 TPI Procharger D1SC
Transmission: TKO600
Axle/Gears: Strange S60 3.73
Re: S60 Upgrade and Install
Just purchased mine yesterday. Will be installing as soon as I get it. I would like to add the strange aluminum cover to mine. It seems to fit fine on your car. Is yours lowered at all?
Thread Starter
Joined: Nov 2006
Posts: 537
Likes: 4
From: Calgary, Alberta, Canada
Car: 89 WS6 TransAm
Engine: LQ408
Transmission: T56 Magnum
Axle/Gears: Strange S60, 4.10s
Re: S60 Upgrade and Install
The conversion U joint is only used if you decide to shorten you stock driveshaft. It allows the stock driveshaft 1310 yoke to mate with the S60s 1350 yoke. 1310 on one axis, while being 1350 size on the other axis.
Good luck with your install.
Member
Joined: Apr 2006
Posts: 221
Likes: 1
From: Morrison IL
Car: 88 GTA, 74 T/A
Engine: 383 stroker (Procharged)
Transmission: TH400 w/brake (new 2013)
Axle/Gears: 12-Bolt S60 - 3.73 (new 2013)
Re: S60 Upgrade and Install
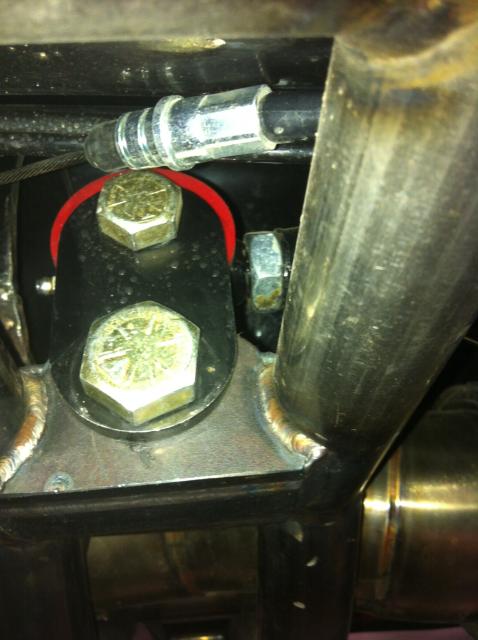
Only issue I had was that I had to put a notch in the pan hard bar so to clear one of the main cap stud bolts. I'll try and take a picture tonight. My car is at the normal ride height.
Member
iTrader: (2)
Joined: Feb 2003
Posts: 219
Likes: 0
From: ME
Car: 1986 IROC-Z
Engine: LS1-ish
Transmission: T56 stage II
Axle/Gears: S60 4:10's
Re: S60 Upgrade and Install
Next up was my LS1 brake install. All hardware had been installed on the 4th gen rear that I had built up previously, so I was expecting this to be a quick install. When I eventually do upgrade my wheels, I want the deep dish look, so had the rear built to 3rd gen width. I was going to go narrower yet, but ended up going with the 3rd gen width as I could then go with a more standard backspaced wheel. I am quite glad I did, as going narrower would have created some bigger issues with the LS1 emergency brake install then what I encountered.
That's an awesome rear. I am ordering mine soon and was contemplating getting it narrowed a little for a deeper dish wheel as well as LS1 brakes. But after reading this I will plan on keeping it stock length so I don't have issues with the brakes.
Quick question... I'm pretty sure I know the answer, but I'm assuming you have to use LS1 backing plates with LS1 brakes? I couldn't find a good answer, and didn't know if the 3rd gens could be modified because those suckers are pricey. Be cheaper just to find a used 4th gen rear.
Anyway's... Nice job on the build.
Thread Starter
Joined: Nov 2006
Posts: 537
Likes: 4
From: Calgary, Alberta, Canada
Car: 89 WS6 TransAm
Engine: LQ408
Transmission: T56 Magnum
Axle/Gears: Strange S60, 4.10s
Re: S60 Upgrade and Install
Quick question... I'm pretty sure I know the answer, but I'm assuming you have to use LS1 backing plates with LS1 brakes? I couldn't find a good answer, and didn't know if the 3rd gens could be modified because those suckers are pricey. Be cheaper just to find a used 4th gen rear.
Send them into Strange when you order the diff and they will install them for free. You need them installed on the axles before the end bearings are pressed on. Good luck.
Member
iTrader: (2)
Joined: Feb 2003
Posts: 219
Likes: 0
From: ME
Car: 1986 IROC-Z
Engine: LS1-ish
Transmission: T56 stage II
Axle/Gears: S60 4:10's
Re: S60 Upgrade and Install
You can get the LS1 backing plates from Rock Auto for a great price, so it is not worth the hassle, nor the concerns with jimmy rigged brake parts. They come with the backing plate and E-brake shoes already installed as well.
Send them into Strange when you order the diff and they will install them for free. You need them installed on the axles before the end bearings are pressed on. Good luck.
Send them into Strange when you order the diff and they will install them for free. You need them installed on the axles before the end bearings are pressed on. Good luck.
I just went back through and was reading this thread to see if you mentioned driveshaft length. So I have a question, I see you are running a T56, like me, and wanted to know if your driveshaft ended up being stock length? I'm using the Hawks motor mounts which should put the drivetrain in stock location but, but unfortunately my car is basically a shell at the moment so i can't measure anything. Strange wants an answer on the length so I was hoping you could shed some light. I might and probably should wait until my motor/rear is in, but was hoping to get some info.
Thanks.
Thread Starter
Joined: Nov 2006
Posts: 537
Likes: 4
From: Calgary, Alberta, Canada
Car: 89 WS6 TransAm
Engine: LQ408
Transmission: T56 Magnum
Axle/Gears: Strange S60, 4.10s
Re: S60 Upgrade and Install
You cannot use the stock length driveshaft with the S60. The pinion assembly is much longer than the 10 bolt, therefore the driveshaft must also be shorter.
Prior to the S60 install I was running a stock LS1 driveshaft, so asked Strange to reduce the length the same difference as pinion driveshaft mount locations. They reluctantly agreed to build it for me and I took responsibility for its fit once it left there building. Being in Canada, I figured it was easier to adjust locally if need be then send it back to Strange. As I have adjustable LCAs and torque arm, I was not too concerned with making it fit.
Final location of my LCAs and torque arm are within 1/8" of where they were prior to the S60 swap. If you have this same adjustability, I would not be concerned with ordering based off current driveshaft length, however if you are using non-adjustable LCAs and torque arm, I would measure twice, cut once.
Supreme Member
Joined: Apr 2006
Posts: 4,482
Likes: 10
From: Northern, CA
Car: 1989 Iroc-Z Camaro
Engine: TBI,5.0
Transmission: Automatic 700R4
Axle/Gears: Eaton Posi,3.42,LPW Ultimate Cover
Re: S60 Upgrade and Install
This is one excellent thread.
If I ever build an engine that could turn that thing I definitely will upgrade.
I don't think my little 5.0 is ready for the monsters Strange offers.
Could it even turn one of those off the line?
If I ever build an engine that could turn that thing I definitely will upgrade.
I don't think my little 5.0 is ready for the monsters Strange offers.
Could it even turn one of those off the line?
Member
iTrader: (2)
Joined: Feb 2010
Posts: 460
Likes: 3
Car: '89 Camaro
Engine: LS1
Transmission: 4L65/70E
Axle/Gears: 9 Inch, 3.70 gears
Re: S60 Upgrade and Install
Ron, it will take more power to turn a Dana 60 versus a 10 bolt, but the power loss compared to a 9" or 12 bolt isn't what people think it is.
http://www.carcraft.com/techarticles...p/viewall.html
http://www.carcraft.com/techarticles...p/viewall.html

Thread
Thread Starter
Forum
Replies
Last Post
ambainb
Camaros for Sale
11
Apr 25, 2016 09:21 PM
NinjaNife
Tech / General Engine
27
Aug 23, 2015 11:49 AM