
Dyno Don header major issues

Thread Starter
Member
Joined: Dec 2006
Posts: 224
Likes: 0
Car: 1986 camaro z28
Engine: 350sbc
Transmission: TKO 600
Axle/Gears: stock axle with 4.11's
Dyno Don header major issues
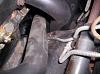
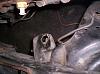
Bought a set of Dyno Don headers while back directly from him...I hav bbrand new poly motor mounts. Vortec heads...driverside header impossible to get fastener in without denting the primary...header on driver side has approx 1/8 in clearance...passenger side went on smooth but hits frame at the collector...dyno don said that be enough which I really really doubt it will be...In fact I feel 100% confident they will hit. I don't like to talk bad about people but I'm not happy with my experience with headers.
Last edited by Outlaw28; Oct 26, 2014 at 06:36 PM.

Member

Joined: Nov 2013
Posts: 127
Likes: 0
From: Sidney,Ohio
Car: 1990 RS Camaro
Engine: 406
Transmission: TKO 600
Axle/Gears: 3.27
Re: Dyno Don header major issues
Really how parts fit in the real world requires more experience than you may have . There must be more to your fitment .
Joined: Mar 2000
Posts: 5,703
Likes: 132
From: Orange, CA
Car: '90 Trans Am-12.45@110.71
Engine: 355 w/AFR 195's Elem. 400/430 HP/TQ
Transmission: Tremec T-56
Axle/Gears: 12 Bolt 3.73
Re: Dyno Don header major issues
As I stated, I never verified fitment with poly mounts.
The tubes are very close to the bolt holes with 1 3/4" tubes
but they will go in if the correct procedure is used.
Sometimes grind a little off the bolt and start the tightest ones first.
The tubes are very close to the bolt holes with 1 3/4" tubes
but they will go in if the correct procedure is used.
Sometimes grind a little off the bolt and start the tightest ones first.
Last edited by Dyno Don; Oct 25, 2014 at 04:50 PM.
Thread Starter
Member
Joined: Dec 2006
Posts: 224
Likes: 0
Car: 1986 camaro z28
Engine: 350sbc
Transmission: TKO 600
Axle/Gears: stock axle with 4.11's
Re: Dyno Don header major issues
Southside2 that was a very ignorant statement.
Dynodon i had to dent the primary it IS THE ONLY WAY ANY FASTENER WILL FIT IN THAT SPOT. I tried playing around with motor mounts and fastening the headers on in different orders still hit the on the passenger side and driver side is way to close. they will both be hitting car when fired up.
Dynodon i had to dent the primary it IS THE ONLY WAY ANY FASTENER WILL FIT IN THAT SPOT. I tried playing around with motor mounts and fastening the headers on in different orders still hit the on the passenger side and driver side is way to close. they will both be hitting car when fired up.
Thread Starter
Member
Joined: Dec 2006
Posts: 224
Likes: 0
Car: 1986 camaro z28
Engine: 350sbc
Transmission: TKO 600
Axle/Gears: stock axle with 4.11's
Re: Dyno Don header major issues
ive done a lot of searching and seems as if other people have had same issues...mainly on driver side header. I know there is not a lot of room and you dont have my exact car to mock up...im not saying your bad at what you do don, but fact is everyone makes mistakes every once in awhile. Ive had my car check on frame after previous experience with old car and mine is in factory specs. never been wrecked straight as can be. I also know that back in the day the build quality by GM was not perfect and there may be differences in all our cars. Now after all that, still comes down to the fact they dont fit. Im open to any other options to try and make them fit. I will not cut into car to make them fit. Ive tried bolting them in different orders as you have said don but with same results.
Supreme Member
Joined: Jun 2011
Posts: 2,036
Likes: 6
From: knoxville tn
Car: 86 IROC
Engine: 5.0 TPI
Transmission: 700-R-4
Axle/Gears: 2.73 open
Re: Dyno Don header major issues
Bought a set of Dyno Don headers while back directly from him...I hav bbrand new poly motor mounts. Vortec heads...driverside header impossible to get fastener in without denting the primary...header on driver side has approx 1/8 in clearance...passenger side went on smooth but hits frame at the collector...dyno don said that be enough which I really really doubt it will be...In fact I feel 100% confident they will hit. I don't like to talk bad about people but I'm not happy with my experience with headers.

Supreme Member
Joined: Feb 2006
Posts: 1,777
Likes: 27
From: Sanctuary state
Car: 67 ******mobile
Engine: 385 Solid roller
Transmission: T-56
Axle/Gears: 4.11
Re: Dyno Don header major issues
Havent owned but 1 header before that didnt need a slight ding here and there
Sometimes in situations like that if you hold the header back and push the bolt forward against the flange with a small 12 pt head or?? you can get it started, go from there.
nothings bolt on.
Sometimes in situations like that if you hold the header back and push the bolt forward against the flange with a small 12 pt head or?? you can get it started, go from there.
nothings bolt on.
Trending Topics
Supreme Member
Joined: Jun 2011
Posts: 2,036
Likes: 6
From: knoxville tn
Car: 86 IROC
Engine: 5.0 TPI
Transmission: 700-R-4
Axle/Gears: 2.73 open
Re: Dyno Don header major issues
Havent owned but 1 header before that didnt need a slight ding here and there
Sometimes in situations like that if you hold the header back and push the bolt forward against the flange with a small 12 pt head or?? you can get it started, go from there.
nothings bolt on.
Sometimes in situations like that if you hold the header back and push the bolt forward against the flange with a small 12 pt head or?? you can get it started, go from there.
nothings bolt on.
Supreme Member


Joined: Jan 2000
Posts: 3,178
Likes: 48
From: Tracy, CA
Car: '87 IROC
Engine: LB9
Transmission: TH700R4
Re: Dyno Don header major issues
I feel your pain. This is a review section, but maybe this might help with your install.
You might be able to get some bolt clearance in those tight locations by using short studs and nuts instead of bolts. You might have to position the headers in the chassis first, then screw the suds into the head and then slip the header flange over the studs. Might be worth a try.
If you have to beat the tubes to get clearance, use some localized heat with an oxy acetylene torch first.
The only times I had to beat a set of headers (Hedman) to fit was for a '69 302 Mach 1. Had to beat some tubes to get frame and bolt clearance and had to beat the passenger side floorboard upwards to get the collector flange to clear. I had to beat the tubes on a set of Blackjacks (Hedman cheapies, IIRC) to clear the steering gear on a '68 350 Firebird as well.
In my experience, the only headers that fit without issue are the old SLP's that are on the IROC now. It was harder getting out the stock manifolds than installing the headers.
Last edited by paulo57509; Oct 27, 2014 at 08:13 PM.
Joined: Jul 1999
Posts: 12,096
Likes: 126
From: SALEM, NH
Car: '88 Formula
Engine: LC9
Transmission: 4L60E
Axle/Gears: 3.89 9"
Re: Dyno Don header major issues
Bought a set of Dyno Don headers while back directly from him...I hav bbrand new poly motor mounts. Vortec heads...driverside header impossible to get fastener in without denting the primary...header on driver side has approx 1/8 in clearance...passenger side went on smooth but hits frame at the collector...dyno don said that be enough which I really really doubt it will be...In fact I feel 100% confident they will hit. I don't like to talk bad about people but I'm not happy with my experience with headers.
https://www.thirdgen.org/forums/afte...ml#post5721474
-- Joe
Senior Member
iTrader: (1)
Joined: Dec 2011
Posts: 552
Likes: 1
From: Vancouver
Car: 1989 Trans am GTA
Engine: 305 TPI
Transmission: t56 6 speed
Axle/Gears: 3.45
Re: Dyno Don header major issues
It was tight getting my dyno dons in but want at all that bad. Driver side was tight but everything did line up okay with a little persuasion. The only thing I need to do is bend a brake line out of the way that is touching the header.
Joined: Mar 2004
Posts: 1,643
Likes: 50
From: Manitoba
Car: '91 GTA
Engine: 421sbc
Transmission: Powerglide
Axle/Gears: Ford 9" with 3.89
Re: Dyno Don header major issues
Did you try taking out one/both motor mount bolts and lifting the engine? then bolt the headers on?
I have to do that with my 1 7/8 Ed Quay long tubes.
I have to do that with my 1 7/8 Ed Quay long tubes.
Senior Member
iTrader: (7)
Joined: Jan 2012
Posts: 531
Likes: 2
From: On TGO
Car: 88 GTA
Engine: Built 355 to install
Transmission: Built turbo 350
Re: Dyno Don header major issues
Member
Joined: Nov 2013
Posts: 127
Likes: 0
From: Sidney,Ohio
Car: 1990 RS Camaro
Engine: 406
Transmission: TKO 600
Axle/Gears: 3.27
Re: Dyno Don header major issues
Outlaw28, As every one has said installing headers is a venture into the unknown. The wanting/need for more power is like opening Pandora's box. So most changes from stock will require some kind of compromise, adjustment,
The only thing I want to add to this thread is.
Clean your bolt holes [in the heads]. Run a 3/8-16 tap [look up tapping threads] in each hole. This should be done with care and oil/tap magic. This is key to bolt fit. The bolts don't like crappy rusty holes full of debris. So use compressed air and blow/remove all debris.
Dirty holes give a false sense of tightness.
Improper length bolts [ too long ] Bottoming out in the hole/head before compressing header to head.
The use of thread lock products dose not work. Too high heat for most thread lock.
Use a anti-seize compound,[ copper. aluminum]. use it on bolts
Apply high temp prematix sealant on both side of gasket. { I have used many types of gaskets, I will still do this on all} .
Do a dry fit [ no sealant ] To insure all will fit [starter, trans, bell house, AC, etc...
The important part is make sure you have every fitment addressed before any sealant.
Retighten bolts all the time.
good luck. with headers, it is up to you to pull it off / or put up there down side.
Supreme Member

Joined: Dec 2005
Posts: 9,919
Likes: 885
From: 53.0907� N, 113.4695� W
Re: Dyno Don header major issues
Here's an interesting story.
I have set of Hedman mid length headers. When first installed them in my 86 IROC there was hard interference on the drivers side k-member and on the passenger side a-arm mount. So much so that I sliced out the bits that were in the way rather than mash up my new headers.
Fast forward to the new chassis, also an 86, but this one a former V6 Sport Coupe. Howewver I came across an engine mount spacer in my parts pile that must have been part of the original IROC package. I must have missed it earlier. Once that 1/4" spacer was placed between the mount and the block, the headers slipped in with zero issues. No contact whatsoever. Passenger side drops in from the top with starter removed and the drivers side goes in from below. What's more, it brought the engine to dead nuts level across the heads whereas before there was a definite slant.
I can't say I've ever seen a spacer like that in any previous build but it's OEM.


Joined: Jul 1999
Posts: 12,096
Likes: 126
From: SALEM, NH
Car: '88 Formula
Engine: LC9
Transmission: 4L60E
Axle/Gears: 3.89 9"
Supreme Member
Joined: Dec 2005
Posts: 9,919
Likes: 885
From: 53.0907� N, 113.4695� W
Re: Dyno Don header major issues
I purchased the 86 IROC in more or less unmodified form. No engine mods. I yarded out the original 305 TPI and it wasn't until I was well into the 2nd (possibly 3rd) engine swap that I came across the spacer in my parts pile. IIRC there was a typical GM part number stamped on it too. That was several years back mind you. I'd be surprised if it wasn't OEM seeing as that I'd have no other source for it. But you never know...
Last edited by skinny z; Oct 31, 2014 at 09:07 PM.
Member
Joined: Jun 2001
Posts: 397
Likes: 11
From: new york , n.y. , USA
Car: klowny1969 <-youtube 4 3rd gen vids
Engine: subscribe to klowny1969 on youtube!
Transmission: subscribe to my channel on youtube
Re: Dyno Don header major issues
Hey Guys..here is a detailed video on my youtube channel (klowny1969) on how to install dyno don headers:
Joined: Sep 2004
Posts: 5,906
Likes: 240
From: Chicagoland Suburbs
Car: 1989 Trans Am GTA
Engine: LT1, AFR 195cc, 231/239 LE cam.
Transmission: M28 T56
Axle/Gears: 3.23 10bolt waiting to explode.
Re: Dyno Don header major issues
When I had my hooker 2055's, I could not install the bolts with the header flush to the head. I had to keep it loose, so the bolt could be put into the header first, then start tightening them down bit by bit to close the cap. Many of the bolts were too close to the primary to tighten with a socket, and I had to resort to an open ended wrench.
The same is true of my 2210 Long tubes. Though they are much easier actually to install, despite having a larger primary tube, bolt fitment is easier, and the spark plugs are a little easier to change as well. Still have to use a cut down spark plug socket though.
Fact: The standard header flange for SBC was never really designed to deal with large primaries. The bolts are too close to the ports, another 1/8th or 3/16th spacing the holes out would alleviate this, but also make every other standard flang header out there useless.

Member
iTrader: (3)
Joined: Jul 2009
Posts: 409
Likes: 0
From: Ontario, Canada
Car: 86 IROC
Engine: 350 Vortec TPI
Transmission: 700R4
Axle/Gears: BW 3.27
Re: Dyno Don header major issues
The funny thing was when I put the 350 in, I tried to include those plates. When I tried to torque down the bolts, they would never torque and would snap. It appeared to stretch them and then snap. Needless to say, I did not include them and left them off.

Supreme Member
Joined: May 2001
Posts: 1,410
Likes: 118
From: Kars, Ontario, Canada
Car: '87 FIREGOOSE!!!!
Re: Dyno Don header major issues
I know people bash them, but my Edelbrock headers have been on and off the car since like '97, never had an issue with them ever, fit perfect. Even the Y pipe is great fit and quality.

Junior Member
Joined: Aug 2014
Posts: 76
Likes: 0
From: Dover, OH
Car: 1991 Trans Am
Engine: 350 Crate
Transmission: 700R4 with shift kit
Axle/Gears: 10 bolt 2.73
Re: Dyno Don header major issues
The same is true of my 2210 Long tubes. Though they are much easier actually to install, despite having a larger primary tube, bolt fitment is easier, and the spark plugs are a little easier to change as well. Still have to use a cut down spark plug socket though.
.
Besides replacing spark plugs on a 1st gen sebring. You have to remove the intake manifold to get to 3 of them. That's ridiculous haha

Joined: Oct 2001
Posts: 12,223
Likes: 1,148
From: Il
Car: 1989-92 FORMULA350 305 92 Hawkclone
Engine: 4++,350 & 305 CIs
Transmission: 700R4 4800 vig 18th700R4 t56 ZF6 T5
Axle/Gears: 3.70 9"ford alum chunk,dana44,9bolt
Re: Dyno Don header major issues
Anyone have a picture of the clearance issue with the bolt and tube? I use a small 3/8s 12pt arp intake bolt on some headers with issues like this. AND I have made my own thin sided wrenches to work in the areas.
SBC exhaust ports and bolt locations don't always play well with large tube headers.
SBC exhaust ports and bolt locations don't always play well with large tube headers.


Joined: Jan 2009
Posts: 887
Likes: 17
From: Golden, CO
Car: 87 IROC
Engine: L31 350
Transmission: T56
Axle/Gears: 4.10 D44
Re: Dyno Don header major issues
Per Dyno Don's recommendation, on page 2 of this thread, post 62 and 63 specifically, I used 5/16" head bolts. Additional links in post #4, here.
The wrench and/or socket was still tight enough on 2-3 locations, that I wanted to add some clearance on the tubes so any future service was not a pain... I used a brass punch, which is about the same diameter as the bolt head, and laid it against the tube in the same orientation as the bolt, and hammered lightly on the side of the punch. I didn't have to move much, and I was able to use a socket (and U joint) on most, if not all, of the bolts.
Also, with the stock (I think) motor mounts, I did have a lot of shift in engine location. I put a floor jack under one side of the engine, the rubber motor mounts shifted in the metal bracket, and I slipped an 0.030"-0.050" spacer (scrap block of wood) under the driver side mount to keep it from rotating back.
Last edited by MoJoe; Nov 1, 2014 at 09:11 AM.
Supreme Member
Joined: Dec 2005
Posts: 9,919
Likes: 885
From: 53.0907� N, 113.4695� W
Re: Dyno Don header major issues
Anyone have a picture of the clearance issue with the bolt and tube? I use a small 3/8s 12pt arp intake bolt on some headers with issues like this. AND I have made my own thin sided wrenches to work in the areas.
SBC exhaust ports and bolt locations don't always play well with large tube headers.
SBC exhaust ports and bolt locations don't always play well with large tube headers.
I use a 3/8" 12 point bolt for ALL of the header bolts and also have a box end wrench with a thinned down wall for those especially tight spots. Makes life (and installing and re-torquing headers) easier.
Joined: Aug 1999
Posts: 5,268
Likes: 466
From: RI
Car: 1984 Camaro Berlinetta
Engine: LT1
Transmission: T56 6-speed
Axle/Gears: 4.11 LS1 Rear End
Re: Dyno Don header major issues
Here's an interesting story.
I have set of Hedman mid length headers. When first installed them in my 86 IROC there was hard interference on the drivers side k-member and on the passenger side a-arm mount. So much so that I sliced out the bits that were in the way rather than mash up my new headers.
Fast forward to the new chassis, also an 86, but this one a former V6 Sport Coupe. Howewver I came across an engine mount spacer in my parts pile that must have been part of the original IROC package. I must have missed it earlier. Once that 1/4" spacer was placed between the mount and the block, the headers slipped in with zero issues. No contact whatsoever. Passenger side drops in from the top with starter removed and the drivers side goes in from below. What's more, it brought the engine to dead nuts level across the heads whereas before there was a definite slant.
I can't say I've ever seen a spacer like that in any previous build but it's OEM.
Attachment 284600
Attachment 284601
Attachment 284602
Your engine was "slanted" because you installed the engine clamshells on the wrong sides of the engine.
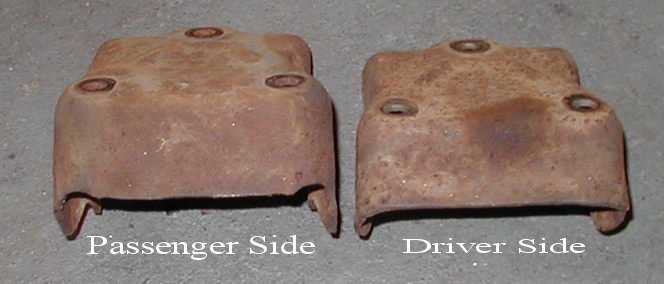
I have NEVER seen a factory installed thirdgen with ANY type of shim placed under the motor mounts. ( and I've pulled WAY MORE than my fair share of SBC's out of thirdgen engine bays. )

Joined: Aug 2013
Posts: 4,826
Likes: 913
From: MICHIGAN
Car: 1988 Trans Am
Engine: L03
Transmission: 700R4
Axle/Gears: 10 Bolt 2.73 Open

Joined: Oct 2001
Posts: 12,223
Likes: 1,148
From: Il
Car: 1989-92 FORMULA350 305 92 Hawkclone
Engine: 4++,350 & 305 CIs
Transmission: 700R4 4800 vig 18th700R4 t56 ZF6 T5
Axle/Gears: 3.70 9"ford alum chunk,dana44,9bolt
Re: Dyno Don header major issues
Some cars actually use the same size mount on both sides. I have 2 originals here that are like that. Its weird.
Joined: Nov 2007
Posts: 845
Likes: 4
From: Salt Lake
Car: 1989 IROC & ROLL-Z
Engine: L98 Vortec FIRST TPI
Transmission: T56, Mech Speedo
Axle/Gears: G92 J65 3.27
Supreme Member
Joined: Dec 2005
Posts: 9,919
Likes: 885
From: 53.0907� N, 113.4695� W
Re: Dyno Don header major issues
Your engine was "slanted" because you installed the engine clamshells on the wrong sides of the engine.
I have NEVER seen a factory installed thirdgen with ANY type of shim placed under the motor mounts. ( and I've pulled WAY MORE than my fair share of SBC's out of thirdgen engine bays. )
I have NEVER seen a factory installed thirdgen with ANY type of shim placed under the motor mounts. ( and I've pulled WAY MORE than my fair share of SBC's out of thirdgen engine bays. )
Joined: Aug 1999
Posts: 5,268
Likes: 466
From: RI
Car: 1984 Camaro Berlinetta
Engine: LT1
Transmission: T56 6-speed
Axle/Gears: 4.11 LS1 Rear End
Re: Dyno Don header major issues
OK; stop and think for just 1 minute,..... You put the SHORT engine mount on the pass side..... then had to RAISE the pass side. But your backing up your argument that you had to install this huge "OEM" plate under 1 montor mount to the pass side because the engine was 'slanted' in the opposite direction ??

You obviously don't know that stock ThirdGen Engine mounts are NOT marked "LH" or RH". To each his own,.... you can believe what-ever you want; but when making absolute statments you should be SURE that you know what you are talking about.
I don't expect anyone to just take my word for it..... a 2 minute
 here at TGO will list countless other posts on this same topic over the last 15 years. Here's what I believe to be true; I'd recomend everyone reading this to verify this elsewhere before installing thier clamshells on the wrong side.
 Stock ThirdGen engine clamshells =
RH ( Pass side ) = P/N 14039436
LH ( Driver side ) = P/N 334971
The part number should be facing FORWARD in the engine bay when the clamshells are installed properly. If the part number is facing the firewall - they are installed backwards.
That is incorrect. I sourced out the correct part numbers through GM and installed them as directed. What's more the clamshells, having the part numbers stamped directly on them also have, stamped in, LH and RH. Seems pretty straightforward to me. Further to that, with the mounts reversed, the "slant " was worse.
Last edited by John in RI; Nov 3, 2014 at 10:11 PM. Reason: edit spelling
Supreme Member
Joined: Dec 2005
Posts: 9,919
Likes: 885
From: 53.0907� N, 113.4695� W
Re: Dyno Don header major issues
Pretty sure my information is correct. And yes, IIRC the mounts were stamped with an LH and a RH. Could be time has clouded my memory but I'm pretty sure. I may even have some pics of that buried somewhere.
You put the SHORT engine mount on the pass side..... then had to RAISE the pass side. But your backing up your argument that you had to install this huge "OEM" plate under 1 montor mount to the pass side because the engine was 'slanted' in the opposite direction ??
No. Not the opposite direction. More so in the same direction. That is what I meant when I stated "the slant was worse". When the drivers side mount was installed on the passenger side, the right side of the engine sat lower than when the mounts were correctly orientated. That would perfect sense even based on the photos posted. When the mounts in the correct location, the passenger side was still low, so the "huge" 3/16" shim was needed to prop things up. Don't ask me to explain, this is how it was.
You obviously don't know that stock ThirdGen Engine mounts are NOT marked "LH" or RH". To each his own,.... you can believe what-ever you want; but when making absolute statments you should be SURE that you know what you are talking about.
I am. This is what I had to work with.
I don't expect anyone to just take my word for it..... a 2 minute here at TGO will list countless other posts on this same topic over the last 15 years. Here's what I believe to be true; I'd recomend everyone reading this to verify this elsewhere before installing thier clamshells on the wrong side.
Stock ThirdGen engine clamshells =
RH ( Pass side ) = P/N 14039436
LH ( Driver side ) = P/N 334971
The part number should be facing FORWARD in the engine bay when the clamshells are installed properly. If the part number is facing the firewall - they are installed backwards. What I will do is have a look to see if the PNs are visible from the front. That would tell the tale.
That said, were did the spacer come from? My only source for parts was the car I had and that was a bone stock 86 IROC-Z. Unmodified as far as I could tell with original exhaust and by the look of the parts as it was disassembled, never worked on (it was 12 years old when I brought it home).
You put the SHORT engine mount on the pass side..... then had to RAISE the pass side. But your backing up your argument that you had to install this huge "OEM" plate under 1 montor mount to the pass side because the engine was 'slanted' in the opposite direction ??
No. Not the opposite direction. More so in the same direction. That is what I meant when I stated "the slant was worse". When the drivers side mount was installed on the passenger side, the right side of the engine sat lower than when the mounts were correctly orientated. That would perfect sense even based on the photos posted. When the mounts in the correct location, the passenger side was still low, so the "huge" 3/16" shim was needed to prop things up. Don't ask me to explain, this is how it was.
You obviously don't know that stock ThirdGen Engine mounts are NOT marked "LH" or RH". To each his own,.... you can believe what-ever you want; but when making absolute statments you should be SURE that you know what you are talking about.
I am. This is what I had to work with.
I don't expect anyone to just take my word for it..... a 2 minute
here at TGO will list countless other posts on this same topic over the last 15 years. Here's what I believe to be true; I'd recomend everyone reading this to verify this elsewhere before installing thier clamshells on the wrong side. Stock ThirdGen engine clamshells =
RH ( Pass side ) = P/N 14039436
LH ( Driver side ) = P/N 334971
The part number should be facing FORWARD in the engine bay when the clamshells are installed properly. If the part number is facing the firewall - they are installed backwards.
That said, were did the spacer come from? My only source for parts was the car I had and that was a bone stock 86 IROC-Z. Unmodified as far as I could tell with original exhaust and by the look of the parts as it was disassembled, never worked on (it was 12 years old when I brought it home).
Last edited by skinny z; Nov 4, 2014 at 10:23 PM.
Supreme Member
Joined: Jan 2004
Posts: 2,322
Likes: 100
From: So. Ohio
Car: 88 Camaro
Engine: L98 350
Transmission: 700r4
Re: Dyno Don header major issues
Pulled a 350 out of a 71 GMC van years ago that had the plates under the mounts, no doubt an added stiffener for the GMC stuff. Only time I've seen anything like it.
Joined: Oct 2001
Posts: 12,223
Likes: 1,148
From: Il
Car: 1989-92 FORMULA350 305 92 Hawkclone
Engine: 4++,350 & 305 CIs
Transmission: 700R4 4800 vig 18th700R4 t56 ZF6 T5
Axle/Gears: 3.70 9"ford alum chunk,dana44,9bolt
Re: Dyno Don header major issues
I've seen them under 4wd trucks
Supreme Member
Joined: Dec 2005
Posts: 9,919
Likes: 885
From: 53.0907� N, 113.4695� W
Re: Dyno Don header major issues
Joined: Aug 1999
Posts: 5,268
Likes: 466
From: RI
Car: 1984 Camaro Berlinetta
Engine: LT1
Transmission: T56 6-speed
Axle/Gears: 4.11 LS1 Rear End
Re: Dyno Don header major issues
What I will do is have a look to see if the PNs are visible from the front. That would tell the tale.
Supreme Member
Joined: Dec 2005
Posts: 9,919
Likes: 885
From: 53.0907� N, 113.4695� W
Re: Dyno Don header major issues
Sorry. No. As it stands at the moment as I've had to put the car away for the winter, there's no real opportunity to work on it. If the weather breaks (and warms up some) I'll pull the car cover off and do the fuel stabilizer and check the anit-freeze. Perhaps I can get a look then. (What I really need is a heated shop).

Joined: Jun 2004
Posts: 156
Likes: 0
From: Lincoln, Missouri
Car: 1980 Regal
Engine: 383 Superram
Transmission: 700R4
Axle/Gears: 12 bolt w/ 3.31 posi
Re: Dyno Don header major issues
Stock ThirdGen engine clamshells =
RH ( Pass side ) = P/N 14039436
LH ( Driver side ) = P/N 334971
The part number should be facing FORWARD in the engine bay when the clamshells are installed properly. If the part number is facing the firewall - they are installed backwards.

Thread
Thread Starter
Forum
Replies
Last Post
evilstuie
Exhaust
24
Feb 28, 2016 03:33 PM
NBrehm
Engine/Drivetrain/Suspension Parts for Sale
1
Aug 25, 2015 11:49 PM