When you click on links to various merchants on this site and make a purchase, this can result in this site earning a commission. Affiliate programs and affiliations include, but are not limited to, the eBay Partner Network.
I started noticing my cracked dash pad more and more as the months went on. This is really not a "how to" but more of a description of what I did because it was pissing me off (I have absolutely no experience with fiberglassing - none). I must say that my end result is much better than what I started out with, but the amount of time/effort that went into the project was high. It is worth paying $450 for a replacement. That being said, someone who can't afford it or someone who takes pride in their work and just wants something better than OEM might enjoy the challenge. I've seen a few threads on here regarding fiberglassed dashes, but none really took you through a step by step. I am definitely an AMATEUR when it comes to fiberglassing, so critiques are welcome and will hopefully help the next person who decides to better their Camaro or Firebird.
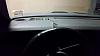
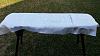
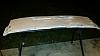
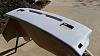
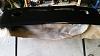
Everyone has seen cracked dash pads
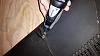
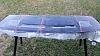
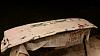
File down the raised edges from the cracks with a rotary tool
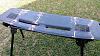
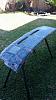
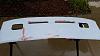
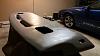
End result
Last edited by HeathAU25; Mar 1, 2015 at 11:53 PM.
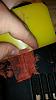
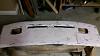
Fill with spot putty and sand the bulky imperfections flat.
Sorry for the delay with posts, the forum is making me shrink files to 1mb.
The spot putty I used is here: http://shop.advanceautoparts.com/p/d...651/89010802-P
I honestly thought this product was crap. It looked like I received a tube that was about 10 years old. The tube cracked in several places and oozed putty as I was using it. I guess it worked alright and it wasn't too big of a deal since I was going to glass over this surface anyway. If I were to do it again, here's what I would use: http://shop.advanceautoparts.com/p/b...erm=spot+putty
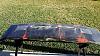
Use fiberglass resin (also purchased from Lowes - cheapest price) http://www.lowes.com/pd_331529-98-20...sin&facetInfo=
to coat the dash pad. Then coat the cloth that you have laid over top. Use a cheap brush to saturate everything. Keep adding layers of fiberglass. I initially only did 1 layer of fiberglass (I didn't know) and it wasn't strong enough, so the cracks showed through. Use at least 3 layers. I believe I ended up with 4 layers total.
Last edited by HeathAU25; Mar 1, 2015 at 11:59 PM.
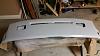
Sand down the high points of your hardened resin (picture above). At this stage, just worry about scuffing everything up. Doesn't have to be completely flat/smooth. I used an 80 grit I think with an orbital sander. At first, I wanted to keep the speaker holes flat and drill along a template to make a grid. This didn't work out the way I wanted it, so I ended up cutting large holes for the speakers as you will see below. Cut these now and fiberglass over the edges.
There are no speaker holes in the above pictures because I actually had to go back and make them, add more fiberglass layers, and re-body filler everything - learn from my mistakes.
Body filler on with speaker holes and lots of sanding with 120 grit (if I remember correctly)
Here are the speaker covers I used:
http://www.ebay.com/itm/TWO-4x6-SPEAKER-GRILLS-SCREENS-COVERS-Black-Classic-Home-Boat-Car-Replacements-/331186926465?pt=Boat_Parts_Accessories_Gear&hash=item4d1c477381&vxp=mtrI sanded them down to make them lower profile - didn't want them popping up too high and getting in the way and annoying the hell outta me. Was easy with a course grit belt sander. Here's a picture of the height difference. Took it down about 1/4 inch. Made a big difference.
EDIT: A few posts down, you will see I threw on some truck bed liner to create a flat, oem textured look. Gloss did turn out to be a problem.
Here's the dash the second time around (after adding more layers of fiberglass)
You can see some imperfections here. I spot puttied, then added another coat of primer.
I hadn't yet filed the little vent holes along the front corners in this picture, just kind of forgot about it. I ended up doing this after primer to make a perfect fit. These little vent grilles have a pretty complex back to them, but will end up fitting nicely into the hole if you just take your time with a couple of files.
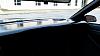
Cleared over it with a krlyon (i think) satin finish - I wanted a matte, but all of the matte finishes had poor reviews. This was the best I could find. I attached the speaker covers with some epoxy, screwed it in, and boom, new dash pad with some character. What do you guys think?
It's definitely not perfect. I was afraid to sand down too much because on the first attempt, I sanded too far and went through some fiberglass mesh down to the cracks. Looking back, I could have sanded more the second time around and made a slightly smoother look.
Also, another note, it is worth loading up the gun and actually spraying this thing down to get a consistent black and clear coat. One of the few things that I'm picky about with this thing is the slight orange peel from the rattle can. Worth the time to load up the gun and spray it.
Last edited by HeathAU25; May 10, 2015 at 08:36 PM.
Going to add a very very thin layer of black caulk between the speaker grill and the pad to seal that seam. I'm picky.
As I write this, I realize that I am proud of this work, but I would probably never do it again. It took several hours of labor and about $140 of material with paint, bondo, resin, cloth, speaker grills and sandpaper. I just wanted something that would likely last forever and I think I got it. So I'm definitely glad I did it, but it was a lot of work. Take this into consideration before starting your own project.
Last edited by HeathAU25; Mar 1, 2015 at 11:45 PM.
Joe, it's not as glossy as it appears in the pictures. It is a true satin finish. I've been driving it a good 2 months now without any aggravation from glare.
That's one of the better fixes I've seen on these dash pads with Joe Tag, that has to be reflecting on your windshield big time.
I would tone it down a little.
That's one of the better fixes I've seen on these dash pads with Joe Tag, that has to be reflecting on your windshield big time.
I would tone it down a little.
Thanks!! The only complaint I have about the satin is you can see all the little imperfections. Dulling it down will cut down on how many of these you see. How would you guys go about deglossing? Is there a compound that will do that for a top clear? Or should I just shoot with black again and do no clear coat. Like I said, all the matte clear coats seem to be either glossier than what I used or yellow badly.
I have seen members use spray on bedliner to give texture similar to the plastics in the car when they do repairs and mods to them. Maybe do that and use SEM dyes used for plastics to coat it. The texture would look more like the original, hide imperfections and help with the gloss problem. https://www.thirdgen.org/forums/car-...ouble-din.html
Decided to go ahead and pull out the dash and sand off the satin finish and go with truck bed liner. LOOKS AWESOME. Actually looks so much like stock that if it weren't for the speaker covers I wouldn't be able to tell. Let me know what you think.
so when you lay down the fiberglass do you recommend doing all three layers at onetime? Withiout letting them dry in between layers?
This is the first time I've ever worked with fiberglass, but from what I read, you are good to go with multiple layers at a time as long as the layer underneath hasn't set yet. I did the final two layers this way. No problems. I wanted to coat the surface of the dash with resin before placing the first layer of matte down to get a better bond. I pretty much went one layer at a time, left to right, working in resin as I went, and then adding another layer once getting to the end, and repeating the process immediately before the resin had time to set. Oh and the front edge is the edge most visible, so I made sure this was wrapped well with the fiberglass.
so when you lay down the fiberglass do you recommend doing all three layers at onetime? Withiout letting them dry in between layers?
Originally Posted by HeathAU25
This is the first time I've ever worked with fiberglass, but from what I read, you are good to go with multiple layers at a time as long as the layer underneath hasn't set yet. I did the final two layers this way. No problems. I wanted to coat the surface of the dash with resin before placing the first layer of matte down to get a better bond. I pretty much went one layer at a time, left to right, working in resin as I went, and then adding another layer once getting to the end, and repeating the process immediately before the resin had time to set. Oh and the front edge is the edge most visible, so I made sure this was wrapped well with the fiberglass.
Some resins include wax that rises to the top. From what I recall it's purpose is to keep the surface from becoming tacky. After the wax has set up all you would need to do is to remove it before laying another coat. Other resins don't include the wax which can be added later on. IMO one of the most crucial things when fiberglassing is planning everything out beforehand which includes knowing how the products work and their limitations. Something as simple as the temperature can greatly affect your outcome.
Good idea, I agree on applying an initial bond.
FWIW, resins do not dry. They are self curing via a reaction creating heat and can catch fire if in a large enough volume and/or in such a way that the heat can concentrate. That won't typically happen with small batches but it's good to know what you're working with. (Also, people have been known to pick up a reaction to resin over time so it's a good idea to use gloves and also pay attention to fiberglass dust precautions. -especially cutting and/or grinding.)
...are non air - inhibited or waxed resin s . They are for the final coat. This resin cures with a hard , non - tacky surface. When the catalyzed resin is applied as a final coat to the laminate coats of resin, the wax rises to the top, sealing off the air and allows the resin to cure to a hard finish, which can then be sanded, painted or gel - coated.
Well done, I did mine a year or two back. I used wire mesh for the speakers and a semi gloss or satin, can't recall. I do get some glare but sunglasses take care of that. I'm removing my heater core and will then cover the defrost vents. I haven't used the heater for years.https://www.thirdgen.org/forums/inte...dashboard.html
Well done, I did mine a year or two back. I used wire mesh for the speakers and a semi gloss or satin, can't recall. I do get some glare but sunglasses take care of that. I'm removing my heater core and will then cover the defrost vents. I haven't used the heater for years.https://www.thirdgen.org/forums/inte...dashboard.html
That looks great! I didn't notice the glare on mine until taking a longer trip a couple of weekends ago. It wasn't horrible, but the clear coat that I used never completely cured - it would get tacky in the heat. It needed to be redone. If you ever feel like you want a true matte finish with the texture, the bed liner worked ridiculously well. Used this:
Whoa!!! That came out AWESOME with the truck bed liner!!!!
Originally Posted by NufNuffZ28
Nice job on the dash pad it looks great!
Originally Posted by RSD
Looks perfect. I think I am going to add this to my list!
Thanks for the compliments, guys! The bed liner worked so well. I put the dash in later that night and it wasn't completely hardened yet, so me sweating and pushing while trying to fit the thing back in left a couple of finger prints in the paint. Shot a little bit of bed liner over it really quick last night and blended it perfectly. Easiest type of aerosol paint I've ever used.
Once you had the hard panel, did you think about gluing a piece of black textured vinyl over it rather than painting it?
I did, but thought that it would be tough to bring the vinyl around the corners. The textured paint looks more OEM and shockingly was very even looking.
Bedlined mine like a year ago. Glare from plastic dash cap was crazy, I was gonna paint it matte black but didn't have any. I did have bedliner and didn't feel like driving to the store.
This was a great thread man! Bed liner does look way better on this dash!
What do you think about this, instead of those speaker covers, what if you used a metal mesh similar to what is on the speaker covers you installed, but just laid the mesh flat, secured it, then fiber glassed over the top of it. It would lay flush with the dash pad and not protrude and bug your sensibilities. I might do this instead of buying a new dash pad in the future.
That's what I did on mine, I linked my thread in my post. Just used aluminum screen in a small frame.
I decided to try this with my dash and am almost ready to prime. Question for the OP: Should I paint it flat black then hit it with the bedliner or can the bedliner cover it with enough black color by itself?
I decided to try this with my dash and am almost ready to prime. Question for the OP: Should I paint it flat black then hit it with the bedliner or can the bedliner cover it with enough black color by itself?
The bedliner I used from HF was plenty black enough. I just primed and sprayed on the liner. Good luck! Mine's still looking great by the way. It's definitely a long lasting option.
I'm going to keep mine the satin black and not use bedliner, but I'm curious. Does that bedliner collect dust? I tried some plastidip on the dash that I redid and while it looked fine it collected dust. Like you couldn't just dust it off, I would of had to use damp rags all the time, and dust easily showed up. Even if my finger was dusty and I touched it it would leave a dust print. Took a while to get all of the plasti dip off...
I'm going to keep mine the satin black and not use bedliner, but I'm curious. Does that bedliner collect dust? I tried some plastidip on the dash that I redid and while it looked fine it collected dust. Like you couldn't just dust it off, I would of had to use damp rags all the time, and dust easily showed up. Even if my finger was dusty and I touched it it would leave a dust print. Took a while to get all of the plasti dip off...
Bedliner shockingly does not attract the dust and is easy to wipe off with a cloth. Although the car is now garage kept, only driven a couple of times a week, has new upholstery, headliner and carpet, so maybe that's why it's not too dusty. Still it's easy to wipe down. Much smoother than you'd think. The plastidip you used has that rubber effect that clings to the dust. I know what you're talking about... annoying. If you end up going satin, just be careful. If you look higher up in this thread, I went satin before the bedliner. Was too glossy (glare), and the top coat never truly cured. When the inside of the car got hot, it became tacky.
I've had mine done for two years now. The satin black does glare but with sunglasses, especially polarized sunglasses, it is not bad. I think you would be in trouble if , like you did, you clear coated it. That would throw of gobs of glare.


 with Joe Tag, that has to be reflecting on your windshield big time.