
Tools for steering repairs


Tools for steering repairs
Hi
I want to renew the complete steering linkage with my '88 Camaro TBI, to be more precise: all tie rod ends (inner, outer), the center link and the idler arm. So the idler arm is no problem, that's just two screws. My concern is about the pitman arm that I have to take the center link off from and the two outer tie rod ends. A pickle fork is very tempting but I guess, it's not really the best tool because there are pullers. As I'm a beginner, could you tell me out of your experience, a concrete tool (factory number, brand) that works fine and without any problems for me or possible damage for the pitman arm?
The other question: I have to align the height of the center link when exchanging the idler arm. Is there an easier way than using the tool? I mean, can't I just use a water bubble to do that?
Thanks a lot,
Thomas


Joined: May 2004
Posts: 5,338
Likes: 73
From: Lexington, SC
Car: 1987 SC/1985 TA
Engine: 350/vortec/fitech
Transmission: T56
Axle/Gears: 3.27 9-bolt
Re: Tools for steering repairs
You can 'rent' the puller at AZ or one of the other chains.
You could use a bubble level but you'd need to ensure that your mounting points are level first (or set the centerlink to the same degree of slant).
You could use a bubble level but you'd need to ensure that your mounting points are level first (or set the centerlink to the same degree of slant).
Re: Tools for steering repairs
Hi Naf
Thanks for your suggestion. As I live in Switzerland, I have to see whether there is a possibility to rent such tools here. Normally I'd rather buy the tools.
Do I only need one puller for both the pitman arm and the tie rod ends? I understand that there are different pullers, same as with the pickle forks. How do I know which one is the right for my car? Are there any dimensions?
Concerning the alignment of the center link. So does the center link have to be level with the car / chassis and not level to the ground?
Thanks,
Thomas
Re: Tools for steering repairs
You don't need a pickle fork or any other tool. Once the nut is removed, 2-3 good sharp blows with a hammer on the boss the rod end goes through will release it. Now before anyone says you will hurt the steering box, if you think you can deliver a blow more damaging than a 1.5 ton car hitting a pothole at 60 MPH you are quite the man. Even with a fork you are still putting the same force to the same parts. It's better to hit the pitman end on than from the side though. Doesn't add the leverage of the length of the arm on the gears.


Joined: Dec 2005
Posts: 6,499
Likes: 31
From: Macon, GA
Car: 1992 Camaro RS
Engine: Vortec headed 355, xe262
Transmission: T56
Axle/Gears: 9-bolt 3.70
Re: Tools for steering repairs
When I did mine I had a hell of a time getting the idler arm and centerlink threads to seat in the tapers to tighten it down. A C-clamp probably will hold it together well enough if you can get the room for it. I broke down and rented a set of tools and one of them BARELY fit on the idler arm+center link enough to seat it.

I used the crazy thing on the bottom right, but it only barely worked. Ended up using a bunch of washers to try to keep it from crushing the soft parts it as pushing against. Made sure the frame of the centerlink was the one that was load bearing. In hindsight, I think a c-clamp could have been made to do that just fine.
But yeah, c-clamps and a pickle fork were all I needed really. The only hard part is seating the tapers.
Joined: May 2004
Posts: 5,338
Likes: 73
From: Lexington, SC
Car: 1987 SC/1985 TA
Engine: 350/vortec/fitech
Transmission: T56
Axle/Gears: 3.27 9-bolt
Re: Tools for steering repairs
You'll need a different puller for the tie rod end and the pitman arm. The pitman puller I have is an OEM 27016 BUT you shouldn't need this. The pitman arm can stay attached to the box. My tie rod puller looks to be a Cal Van 194. You 'should' be able to use this for both the tie rod ends AND the pitman arm connection to the center link. I don't hesitate to use a pickle fork on pieces that I have no intention of saving.
The centerlink needs to be installed so that it is the same height on each end RELATIVE to the chassis. After connecting to the pitman arm, adjust the idler arm so that you get the same measurement from each end to a common part of the chassis. It's not a micrometer type of measurement though, within a 1/4 inch of so is fine.
The centerlink needs to be installed so that it is the same height on each end RELATIVE to the chassis. After connecting to the pitman arm, adjust the idler arm so that you get the same measurement from each end to a common part of the chassis. It's not a micrometer type of measurement though, within a 1/4 inch of so is fine.
Re: Tools for steering repairs
@Naf
Yeah, I don't need the old tie rod ends. But the pitman arm won't be replaced, so I read that using a pickle fork or hammering on some parts could cause damage. I know that a lot of people use a hammer and / or a pickle fork, there are some videos on Youtube. So actually like "Joe Tag" says: In the video, they use a hammer on the tie rod ends and it looks as if this works fine (don't know about damage to the part where the tie rod end is attached to). For the pitman arm to center link connection the guy uses a pickle fork. Not sure whether to do that as well or use a puller instead, what do you think?
@InfernalVortex
Am I right you're problems were about putting the center link back on the idler arm and not about getting it off? I didn't really understand that. I mean, you put the thread through the hole in the idler arm and tighten the nut. Where's the problem here?
Talking about that: In my manual it says you should use a tool to "seat the tapers". And you should tighten it to 20Nm. And only after that you should tighten the nut to 48Nm. What's the difference between "seating the tapers" and "tightening the nut"?
Last edited by Thomas Stahel; Nov 29, 2013 at 11:52 AM.
Trending Topics


Joined: Sep 2005
Posts: 27,998
Likes: 2,485
Car: Yes
Engine: Usually
Transmission: Sometimes
Axle/Gears: Behind me somewhere
Re: Tools for steering repairs
you put the thread through the hole in the idler arm and tighten the nut. Where's the problem here?
The idler arm needs to be mounted not only so that the center link is level, but also, so that its pivot is parallel to the pitman shaft in the gearbox. It's pretty easy to get it level; the inner rod end is basically in line with the control arm bolt, which makes em pretty easy to eyeball. Getting all that geometry correct is fairly critical. The idea being, if you imagine a parallelogram consisting of the K-member, the pitman arm, the center link, and the idler arm, all staying at all times a parallelogram, and all the parts always staying in the same plane; and, the tie rods located such that as the suspension travels, the tie rods and the control arms travel exactly together, so that the wheels don't turn just from suspension articulation.
No need to pull the pitman arm. No need to worry about damaging it either. A pickle fork works just fine.
Re: Tools for steering repairs
Hm, that sounds a bit complicated as I'm not that good at spatial sense ;-)
Well, as I understand, I can adjust the height of the relay rod by changing where the idler arm is mounted in the long slot. To get its pivot parallel to the pitman shaft I need to turn the new idler arm into the same position as the old one when taking it off with the wheels both straight? Or what's the procedure to get it right?
And what can you say about a possible danger when driving the car if the geometry wasn't correct?
Joined: Dec 2005
Posts: 6,499
Likes: 31
From: Macon, GA
Car: 1992 Camaro RS
Engine: Vortec headed 355, xe262
Transmission: T56
Axle/Gears: 9-bolt 3.70
Re: Tools for steering repairs
Worst case scenario is your wheels wont be correctly angled in corners. Just results in slightly less grip and excessive tire wear. It's not really a danger, just something you'd like to avoid if possible. I autocrossed mine last month and saw my idler arm is in completely the wrong spot earlier this week. Nothing will explode so dont fret too much about it. Just get it as close as you can.
Also, to be clear, the bolt on the centerlink that the idler arm attaches to can spin inside the centerlink. You have to rely on the friction between the shank of that stud and the tapers inside the idler arm to keep the stud stationary while you're tightening down the nut. There's no head to it on the otherside of the centerlink to keep it still, so you just have to hope it grabs enough that you can tighten down the nut. The same is true with the pittman arm, but dont worry about damaging it with the picklefork. It's a pretty stout piece and it doesnt have any sensitive joints on it. Just use a pickle fork on it. It's fine.
Also, to be clear, the bolt on the centerlink that the idler arm attaches to can spin inside the centerlink. You have to rely on the friction between the shank of that stud and the tapers inside the idler arm to keep the stud stationary while you're tightening down the nut. There's no head to it on the otherside of the centerlink to keep it still, so you just have to hope it grabs enough that you can tighten down the nut. The same is true with the pittman arm, but dont worry about damaging it with the picklefork. It's a pretty stout piece and it doesnt have any sensitive joints on it. Just use a pickle fork on it. It's fine.
Re: Tools for steering repairs
It's me again...
Could someone please explain to me the best procedure to exchange all tie rods, sleeves, the center link and the idler arm? I have to say that I think my toe wasn't set correctly the last time the center link (only) was exchanged. If I want to drive straight my steering wheel points a little bit to the right side.
So if I remove the complete steering linkage (only the outer tie rod ends, the idler arm from the chassis and the center link from the pitman arm), is it best if I have my wheels straight or the steering wheel in the middle? Actually I think the steering wheel should be centered so that the pitman arm is in the 90� position which allows me to easily align the new idler arm, right? And then should I reassamble all the parts (except idler arm) using the old linkage as a model for how far I have to thread the tie rod ends into the sleeves? Then turn the idler arm to the same position as the old idler arm was when I took it off and install it to the chassis, after that install the rest (linkage) to the idler arm and pitman arm? But how to adjust toe? Again with the steering wheel centered? And how do I know whether the wrong adjustment is on the right or on the left side?
Ah, and to adjust toe (adjusting the sleeves), do I have to jack up the car?
Joined: Sep 2005
Posts: 27,998
Likes: 2,485
Car: Yes
Engine: Usually
Transmission: Sometimes
Axle/Gears: Behind me somewhere
Re: Tools for steering repairs
Correct: everything is easiest to see when the wheels are straight ahead.
Best way to do it is, remove the entire old linkage, by taking the idler arm off the chassis, the center link off the pitman arm, and the tie rods off the spindles. Lay it all on the ground. Assemble all the new parts including the idler arm so that each tie rod is the same length. Install it all to the car as a unit; verify that the height of each inner tie rod end is the same relationship to the control arm bolt (the tie rod end will be right directly in front of the bolt), and the idler arm shaft is parallel to the pitman shaft. (idler am itself should also be parallel to the pitman arm) Then just drive it straight to the alignment shop, don't try to finesse it any further, even though you can get it closer it'll still need alignment.
Get them to NOT set the alignment to the stock specs at the shop. THEY SUCK. I have no idea which body orifice the factory had their heads jammed up when they wrote those, but they are WRONG: I think maybe the tire mfrs bribed them to produce something GUARANTEED TO DESTROY tires and maybe split the profits with them.
The specs you want are: as much positive caster as they can get, should be something in the 4 - 4�� range, with up to �� more on the right if you drive on roads with a high center crown; negative camber, � - 1�, again with up to �� more on the right if your roads have a high crown; and about .050" of toe IN. The factory specs are NOTHING LIKE that, so be prepared for an argument: but DO NOT give in to all the belly-aching you will hear about "we can't warranty that" and all such drivel, you ABSOLUTELY DO NOT WANT the factory specs UNDER ANY CIRCUMSTANCES. If they won't do it, get back in the car and drive it away, to some other shop.
Re: Tools for steering repairs
Hi Sofakingdom
In my '88 GM manual it says:
Toe: 0� +/-0.1�
Camber: 0� +/-0.5�
Caster: +5.0 +/-0.5�
So it's actually not that different to your specs. But thanks anyway for mentioning it, I'll stick to that. What do you mean by "a road with a high crown"? Sorry, I'm Swiss, I can't imagine what that is exactly ;-)
You said it's best when the wheels are straight ahead. But in my case the steering wheel (and thus the pitman arm) points a wee bit to the right when my wheels are straight ahead. So I guess, the steering wheel should be straight and not the wheels?
I thought of first installing the idler arm to the chassis as it's a bit hard to do if the weight of the entire linkage "hangs" on it...
I don't understand this: "...verify that the height of each inner tie rod end is the same relationship to the control arm bolt (the tie rod end will be right directly in front of the bolt)..." What is the control arm bolt? I thought the control arm is the thing at the wheels side where the outer tie end rod is mounted.
And is this to make sure the center link is parallel to the chassis? How can you change the height of the inner tie rod ends in relationship to the control arm bolt? Is this achived by adjusting the idler arm where it's mounted to the chassis?
Thanks,
Thomas
PS: If I want to use a well-fitting tool to take off the center link from the pitman arm and also the tie rod ends, which one would fit best (also concerning size and mouth opening)? http://www.profiwerkzeug24.ch/570-kf...und-ausdrucker? (from pages 1, 2 and 4)
Last edited by Thomas Stahel; Dec 8, 2013 at 08:51 AM.
Joined: Sep 2005
Posts: 27,998
Likes: 2,485
Car: Yes
Engine: Usually
Transmission: Sometimes
Axle/Gears: Behind me somewhere
Re: Tools for steering repairs
I haven't ever seen GM specs like that; musta changed em at some point during the mfg run. Early on, they called out for like 1� of caster, and POSITIVE camber; which made the cars EAT tires.
"Control arm" is also called "A-arm" and various other things. It's the large horizontal piece that the spring sits on at the bottom; has 2 HUGE bolts (largest on the whole car) that holds it to the K-member and act as its pivots, and the ball joint at the other end.
The thing the outer tie rod end bolts to is the "spindle".
Yes this whole process is so that you make sure that the parallelogram consisting of the K-member, pitman arm, idler arm, and center link, is a rectangle when the wheels are straight ahead (pitman arm parallel to idler arm, and center link parallel to K-member); all in the same plane (if the K-member is level, so is the center link); the shaft of the idler arm, that bolts to the chassis, is parallel to the pitman shaft (so that as each one rotates, the arms themselves stay parallel at all times); and the inner tie rod ends are in line with the control arm bolt (so that as the suspension travels up and down, the tie rod holds the wheels still and doesn't try to steer the tire in or out).
You'll want the Trenn- und Montagegabel, 410 mm, mit 16mm Gabel�ffnung.
"...verify that the height of each inner tie rod end is the same relationship to the control arm bolt (the tie rod end will be right directly in front of the bolt)..."
The thing the outer tie rod end bolts to is the "spindle".
Yes this whole process is so that you make sure that the parallelogram consisting of the K-member, pitman arm, idler arm, and center link, is a rectangle when the wheels are straight ahead (pitman arm parallel to idler arm, and center link parallel to K-member); all in the same plane (if the K-member is level, so is the center link); the shaft of the idler arm, that bolts to the chassis, is parallel to the pitman shaft (so that as each one rotates, the arms themselves stay parallel at all times); and the inner tie rod ends are in line with the control arm bolt (so that as the suspension travels up and down, the tie rod holds the wheels still and doesn't try to steer the tire in or out).
You'll want the Trenn- und Montagegabel, 410 mm, mit 16mm Gabel�ffnung.
Re: Tools for steering repairs
Hm, I still didn't get it.
The control arm is next to the wheel. So it's next to the outer tie rod end. But you said that the inner tie rod end will be right directly in front of the bolt. But the control arm's bolt is actually quite far away...
And in another manual I've seen something interesting concerning the installing of the tie rods:
"Rotate both inner and outer tie rod housings rearward to the limit of ball joint travel before tightening clamps. Make sure clamp slots and sleeve slots are aligned before tightening clamps. Make sure tightened bolts will be in horizontal position to 45 degress upward (in the forward direction) when the tie rod is in its normal position. Make sure the tie rod end stays in position relative to the rod during the tightening operation. Tighten the clamps, and then return the assembly to the center of its travel."
I have no idea what that means... How can I rotate the housings? What are the housings? What is the center of its travel...?
The control arm is next to the wheel. So it's next to the outer tie rod end. But you said that the inner tie rod end will be right directly in front of the bolt. But the control arm's bolt is actually quite far away...
And in another manual I've seen something interesting concerning the installing of the tie rods:
"Rotate both inner and outer tie rod housings rearward to the limit of ball joint travel before tightening clamps. Make sure clamp slots and sleeve slots are aligned before tightening clamps. Make sure tightened bolts will be in horizontal position to 45 degress upward (in the forward direction) when the tie rod is in its normal position. Make sure the tie rod end stays in position relative to the rod during the tightening operation. Tighten the clamps, and then return the assembly to the center of its travel."
I have no idea what that means...
How can I rotate the housings? What are the housings? What is the center of its travel...? Joined: Sep 2005
Posts: 27,998
Likes: 2,485
Car: Yes
Engine: Usually
Transmission: Sometimes
Axle/Gears: Behind me somewhere
Re: Tools for steering repairs
Control arm (with bolt)
http://www.ebay.com/itm/151171850712
The "housing" refers to the outside of the joint part of the rod end. The purpose of all that is, so that both ends of the rod have the full amount of movement available. Don't worry too much about it though, the alignment shop will set it up as part of the alignment.
Re: Tools for steering repairs
Well, I know how the control arm looks. It's just that the control arm is on the outer tie rod end side and non on the inner one. That's why I don't understand how to align it, because you said it's directly in front of the bolt...
So to repeat and be sure once again:
All I can adjust or alter is the position of the idler arm (has to be parallel to the pitman arm) and the mounting point of the idler arm (so that the center link is parallel to the chassis)? Nothing else will change the correct position of the center link, right?
Then something else I noticed... with my idler arm came a lock nut. With my center link came two lock nuts and two castle nuts. With my tie rod ends also came each one castle nut. Am I right to use the castle nuts for the tie rod ends (both inner and outer ones) and the lock nuts for the idler arm to center link and pitman arm to center link? Strangely at the moment there is a castle nut for the idler arm to center link and (I guess) a lock nut for tie rod end to center link. I guess the mechanic put it the wrong way? Does it even matter?
Joined: Dec 2005
Posts: 6,499
Likes: 31
From: Macon, GA
Car: 1992 Camaro RS
Engine: Vortec headed 355, xe262
Transmission: T56
Axle/Gears: 9-bolt 3.70
Re: Tools for steering repairs
The bolt that holds the control arm to the car is right under/behind the bolt that connects the tie rod end to the centerlink.

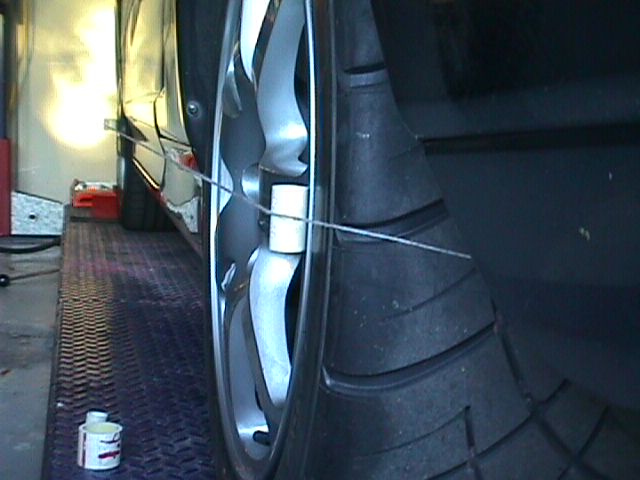
Look at my sleeve adjuster, and then follow the inner tie rod over to the centerlink. Directly above the inner tie rod, about halfway down it's length between the adjuster and the centerlink in the picture you will see a bolt in the background. That's the A-arm bolt that you use a reference point.
Also, I used the torque-to-yield lock nuts on the idler arm-> centerlink and pittman arm-> centerlink attachments.
Last edited by InfernalVortex; Dec 8, 2013 at 12:11 PM.
Re: Tools for steering repairs
Wow, now it's crystal clear ;-) I was pondering over the illustration in my manual but didn't get what this "head of the front pivot bolt" means. Now I understand. In the manual it says that you have to use a socket on this bolt. I guess, it's to extend the length of the bolt to be able to measure the distance to the center link. What kind of socket do they talk about?
Thanks a lot!
Thanks a lot!


Joined: Oct 2001
Posts: 12,228
Likes: 1,156
From: Il
Car: 1989-92 FORMULA350 305 92 Hawkclone
Engine: 4++,350 & 305 CIs
Transmission: 700R4 4800 vig 18th700R4 t56 ZF6 T5
Axle/Gears: 3.70 9"ford alum chunk,dana44,9bolt
Re: Tools for steering repairs
Your control arm bolt and nut are put in wrong. The bolts are "supposed" to go in from the front. I'm sure GM has a good reason why
.
Joined: Dec 2005
Posts: 6,499
Likes: 31
From: Macon, GA
Car: 1992 Camaro RS
Engine: Vortec headed 355, xe262
Transmission: T56
Axle/Gears: 9-bolt 3.70
Re: Tools for steering repairs
I've known that for years, Im not at all worried about it. It's been that way for about 4 years now. It's probably so that if the nut falls off and the bolt comes out, it wont make it past the steering linkage. But that's probably the reason I couldnt get it back in that side anyway.
Last edited by InfernalVortex; Dec 8, 2013 at 12:35 PM.
Joined: Oct 2001
Posts: 12,228
Likes: 1,156
From: Il
Car: 1989-92 FORMULA350 305 92 Hawkclone
Engine: 4++,350 & 305 CIs
Transmission: 700R4 4800 vig 18th700R4 t56 ZF6 T5
Axle/Gears: 3.70 9"ford alum chunk,dana44,9bolt
Re: Tools for steering repairs
I've known that for years, Im not at all worried about it. It's been that way for about 4 years now. It's probably so that if the nut falls off and the bolt comes out, it wont make it past the steering linkage. But that's probably the reason I couldnt get it back in that side anyway.

Supreme Member

Joined: Jul 2009
Posts: 2,328
Likes: 10
From: Kitchener, ON
Car: 1988 GTA
Engine: LB9
Transmission: T5
Axle/Gears: 3.45
Re: Tools for steering repairs
Ganz bestimmt, das einfachtse werkzeken zum kugelgelenk auseinander brechen ist ein Gurkegabal und einer halbwegs anstanginer hammer.
Joined: Dec 2005
Posts: 6,499
Likes: 31
From: Macon, GA
Car: 1992 Camaro RS
Engine: Vortec headed 355, xe262
Transmission: T56
Axle/Gears: 9-bolt 3.70
Re: Tools for steering repairs
Oh by the way, you set toe with the car on the ground, tires loaded.
There are many homegrown methods to do this, with varying degrees of accuracy and difficulty. Generally the more work, the more accurate it will be.
I personally just drove my car up on a pair of wooden boards and ran string across the side of the car. You can really see the adjustments working that way. But I also used easy to adjust aftermarket hex sleeves (see my picture). You may or may not have trouble adjusting yours yourself.
This is a picture I found on the interwebs...
I didnt even go through that much trouble. I just taped it to the back of the rear tire and pulled it forward across the center of the wheel of both wheels. My version of this is a very inaccurate method for various reasons, but it will get you more than close enough to get it to an alignment shop.
I drove the car onto a pair of boards (less drag on the tires but mostly just to get an extra inch or two of room under the car to reach up there and make adjustments with the car on the ground) while keeping the wheel straight. Adjusted each side until the wheels pointed forward, went back and backed up off the boards, drove back up on the boards keeping the wheel straight, readjusted. There's just going to be play in the system, and when you move one wheel with the adjuster it may move the other wheel more than it moves the side you're targetting. It shoudl take you about an hour. And it probably wont be exactly right, but as long as both tires are lined up with each other you wont see any unnecessary tire wear on your way to the alignment shop.
Last edited by InfernalVortex; Dec 8, 2013 at 01:22 PM.
Re: Tools for steering repairs
Hm.. have to get back to my question about the different nuts.
I noticed that at the bolts of the ball joints which connect to the idler arm / pitman arm there are also holes which would ask for a castle nut. But with my center link I got only two castle nuts (which should go with the inner tie rod ends) and two lock nuts... I'm really confused.
I noticed that at the bolts of the ball joints which connect to the idler arm / pitman arm there are also holes which would ask for a castle nut. But with my center link I got only two castle nuts (which should go with the inner tie rod ends) and two lock nuts... I'm really confused.
Joined: Oct 2001
Posts: 12,228
Likes: 1,156
From: Il
Car: 1989-92 FORMULA350 305 92 Hawkclone
Engine: 4++,350 & 305 CIs
Transmission: 700R4 4800 vig 18th700R4 t56 ZF6 T5
Axle/Gears: 3.70 9"ford alum chunk,dana44,9bolt
Re: Tools for steering repairs
Hm.. have to get back to my question about the different nuts.
I noticed that at the bolts of the ball joints which connect to the idler arm / pitman arm there are also holes which would ask for a castle nut. But with my center link I got only two castle nuts (which should go with the inner tie rod ends) and two lock nuts... I'm really confused.
I noticed that at the bolts of the ball joints which connect to the idler arm / pitman arm there are also holes which would ask for a castle nut. But with my center link I got only two castle nuts (which should go with the inner tie rod ends) and two lock nuts... I'm really confused.
That's how the factory did it anyway.
Re: Tools for steering repairs
Hm, is it normal that the lubricaten nibbles are very hard to install? There is no thread in the tie rod ends, just small holes. Do the nibbles (the treaded part) have to be tightened completely to the tie rod end?
Joined: Dec 2005
Posts: 6,499
Likes: 31
From: Macon, GA
Car: 1992 Camaro RS
Engine: Vortec headed 355, xe262
Transmission: T56
Axle/Gears: 9-bolt 3.70
Re: Tools for steering repairs
They are self tapping, so yes, that's normal. This tripped me up for a minute too.
Joined: Dec 2005
Posts: 6,499
Likes: 31
From: Macon, GA
Car: 1992 Camaro RS
Engine: Vortec headed 355, xe262
Transmission: T56
Axle/Gears: 9-bolt 3.70
Re: Tools for steering repairs
I tightened them nearly flush. You may not have to, you maybe shouldn't. I dont know. I just tightened them til they were snug. They're just self tapping so all you're feeling is them cutting their own threads.
Re: Tools for steering repairs
Hello again
My linkage is finally "repaired". But there are still some issues that bother me.
1) I didn't manage to set / measure the height of the center link. When I put a socket (18mm) with an extension on the bolt that you told and showed me, a) the socket moved, I couldn't really get it straight onto the bolt and b) even the thinner extension on the socket, the extension touched the center link arm, it was too close. Did that have to do with my jacking up the car under the swaybar bushings?
2) The Moog idler arm seems to be around 1.5cm longer / higher than the original one. The original one was already mounted quite far at the top of the slots which means, that - to maintain the correct height - the new idler arm should be 1.5cm more to the top, which doesn't work. Did anyone have the same problem, as you surely used this replacement part as well? Was just looking at the Delco and Raybestos ones and they look more like the original idler arm.
3) Another problem is about the tie rod assembly. On the left side in the driving direction it's okay but on the right (even with my pitman arm and idler arm parallel; steering wheel centered) I had to screw the tie rod ends into the sleeve so far to get the wheel straight, that they are already touching inside, so a toe alignment might be impossible.
I also noticed, when I screwed the tie rod ends into the sleeves, that the clamp around them (or actually the nuts and bolts) are not facing the same "side". In the service manual picture it shows that the bolts should be on the bottom side of the sleeves (nuts facing to the front!) which in this case was only true for one sleeve. Does this even matter?
Another issue with the clamps... in the manual it says, that you have to tighten them so hard, that there is no slit left. But it says they need only 19Nm. Even with all my strength I didn't manage to pull them so hard that there wouldn't be any slit. Is that normal? Or did I tighten the clamp at the wrong place on the sleeve? In the manual it says something about two dimples. I only saw that afterwards.
I'm really not that satisfied with my work or I would say, very unsure, if everything is alright and safe to drive. If the center link height is not correct, a toe alignment would be senseless at the moment, would it? I was at the vehicle inspection and they said that the toe was very slightly out of their tolerance.
But I still have a humming sound when I steer to the right. That's what I'm worrying about. The inspector thought it might have something to do with the power-steering pump as it is leaking. But it has been leaking for the last ten years, so little that I never had to fill up any oil.
I'm very thankful about all of your help.
Thomas
Joined: May 2004
Posts: 5,338
Likes: 73
From: Lexington, SC
Car: 1987 SC/1985 TA
Engine: 350/vortec/fitech
Transmission: T56
Axle/Gears: 3.27 9-bolt
Re: Tools for steering repairs
I recommend that you bring it in to an alignment shop and ask them to look at your work. They should be able to fix anything that may be off a little. They'll have to loosen the tie rod sleeves anyway and will re-tighten them to the correct torque.
The hum when turning could be a wheel bearing. If it changes pitch and volume with speed and degree of turn, check your bearings. They need to be checked before an alignment anyway. With the wheel off the ground you should not be able to wiggle it any by grasping it at the six and twelve o'clock positions...grab it at the top and bottom of the wheel and check for play.
A bearing that causes a hum may pass this test though. If you don't know when they were last changed, it may be a good time to swap in new ones.
Re: Tools for steering repairs
Hi
As I'm Swiss I'm a bit afraid whether our alignment shops are used to such old American cars, that's always a bit tricky. As I had a vehicle inspection today I'll also have to check the rear brakes (uneven) and the driver's side door (sags).
But the alignment shop can't change the center link's height, I guess, they are not "real" mechanics. Is this system of adjusting the height of some kind of center link still common in modern vehicles?
As to the bearing... before I renewed my linkage, I had a similar hum, but changing its side during one ride... once when I steered to the left, later when I steered to the right, but that obviously came from a very loose tie rod end on one side. The wheel apparently even touched the wheel house sometimes. I'm still not sure whether the hum changes during a ride now, I didn't drive that far today.
As to the wheel bearings. I had my front brake rotor replaced about 4 years ago. A year later the bearing on one side was damaged, but I didn't hear a hum then but more a light squeaking sound. Because both rotors already showed abnormal wearing the mechanic decided to exchange the rotors again and also the bearing on the right side. So that's 3 years ago... And the inspector today didn't find any clearance on the wheels.
Last edited by Thomas Stahel; Dec 17, 2013 at 12:36 PM.
Joined: Dec 2005
Posts: 6,499
Likes: 31
From: Macon, GA
Car: 1992 Camaro RS
Engine: Vortec headed 355, xe262
Transmission: T56
Axle/Gears: 9-bolt 3.70
Re: Tools for steering repairs
Hello again
My linkage is finally "repaired". But there are still some issues that bother me.
1) I didn't manage to set / measure the height of the center link. When I put a socket (18mm) with an extension on the bolt that you told and showed me, a) the socket moved, I couldn't really get it straight onto the bolt and b) even the thinner extension on the socket, the extension touched the center link arm, it was too close. Did that have to do with my jacking up the car under the swaybar bushings?
2) The Moog idler arm seems to be around 1.5cm longer / higher than the original one. The original one was already mounted quite far at the top of the slots which means, that - to maintain the correct height - the new idler arm should be 1.5cm more to the top, which doesn't work. Did anyone have the same problem, as you surely used this replacement part as well? Was just looking at the Delco and Raybestos ones and they look more like the original idler arm.
3) Another problem is about the tie rod assembly. On the left side in the driving direction it's okay but on the right (even with my pitman arm and idler arm parallel; steering wheel centered) I had to screw the tie rod ends into the sleeve so far to get the wheel straight, that they are already touching inside, so a toe alignment might be impossible.
I also noticed, when I screwed the tie rod ends into the sleeves, that the clamp around them (or actually the nuts and bolts) are not facing the same "side". In the service manual picture it shows that the bolts should be on the bottom side of the sleeves (nuts facing to the front!) which in this case was only true for one sleeve. Does this even matter?
Another issue with the clamps... in the manual it says, that you have to tighten them so hard, that there is no slit left. But it says they need only 19Nm. Even with all my strength I didn't manage to pull them so hard that there wouldn't be any slit. Is that normal? Or did I tighten the clamp at the wrong place on the sleeve? In the manual it says something about two dimples. I only saw that afterwards.
I'm really not that satisfied with my work or I would say, very unsure, if everything is alright and safe to drive. If the center link height is not correct, a toe alignment would be senseless at the moment, would it? I was at the vehicle inspection and they said that the toe was very slightly out of their tolerance.
But I still have a humming sound when I steer to the right. That's what I'm worrying about. The inspector thought it might have something to do with the power-steering pump as it is leaking. But it has been leaking for the last ten years, so little that I never had to fill up any oil.
I'm very thankful about all of your help.
Thomas
My linkage is finally "repaired". But there are still some issues that bother me.
1) I didn't manage to set / measure the height of the center link. When I put a socket (18mm) with an extension on the bolt that you told and showed me, a) the socket moved, I couldn't really get it straight onto the bolt and b) even the thinner extension on the socket, the extension touched the center link arm, it was too close. Did that have to do with my jacking up the car under the swaybar bushings?
2) The Moog idler arm seems to be around 1.5cm longer / higher than the original one. The original one was already mounted quite far at the top of the slots which means, that - to maintain the correct height - the new idler arm should be 1.5cm more to the top, which doesn't work. Did anyone have the same problem, as you surely used this replacement part as well? Was just looking at the Delco and Raybestos ones and they look more like the original idler arm.
3) Another problem is about the tie rod assembly. On the left side in the driving direction it's okay but on the right (even with my pitman arm and idler arm parallel; steering wheel centered) I had to screw the tie rod ends into the sleeve so far to get the wheel straight, that they are already touching inside, so a toe alignment might be impossible.
I also noticed, when I screwed the tie rod ends into the sleeves, that the clamp around them (or actually the nuts and bolts) are not facing the same "side". In the service manual picture it shows that the bolts should be on the bottom side of the sleeves (nuts facing to the front!) which in this case was only true for one sleeve. Does this even matter?
Another issue with the clamps... in the manual it says, that you have to tighten them so hard, that there is no slit left. But it says they need only 19Nm. Even with all my strength I didn't manage to pull them so hard that there wouldn't be any slit. Is that normal? Or did I tighten the clamp at the wrong place on the sleeve? In the manual it says something about two dimples. I only saw that afterwards.
I'm really not that satisfied with my work or I would say, very unsure, if everything is alright and safe to drive. If the center link height is not correct, a toe alignment would be senseless at the moment, would it? I was at the vehicle inspection and they said that the toe was very slightly out of their tolerance.
But I still have a humming sound when I steer to the right. That's what I'm worrying about. The inspector thought it might have something to do with the power-steering pump as it is leaking. But it has been leaking for the last ten years, so little that I never had to fill up any oil.
I'm very thankful about all of your help.
Thomas
2. Doesn't matter how high up in the car the idler arm goes. What matters is whether the idler arm meets the centerlink at the same height on both sides. That mainly affects, at least to my understanding, both tires being synchronized as you turn the wheel. The farther you go off center the more it will diverge from "correct". This is something that needs to be set properly for good steering geometry. This will affect toe.
3. You should not have trouble getting toe set properly. This is fundamental and has a large impact on how the car drives. The toe needs to be set properly before you even mess with caster or camber. In fact I know from friends who do alignments for a living that generally the only thing they even do when they set alignments is toe. They rarely ever touch caster or camber adjustments. The adjuster should not be bottomed out at all. I dont understand how it can be that far off that you cant set it for proper toe. Can you measure the tie rod ends on both sides to be sure they're the same length?
Re: Tools for steering repairs
Thanks for your help.
1) As I understood, the center link has to be parallel to the chassis and not to the ground because the chassis might not be absolutely parallel to the ground? So measung from the ground might not be correct... I would have to measure from the ground to the a-arm bolts. I could find out whether this is parallel to the ground. If not I could calculate the percental difference which then should be the same between the idler arm-to ground and pitman arm-to-ground or am I wrong? Cause if it worked like you wrote, I might as well use a bubble level on the center link...
2) I know that it doesn't matter if the idler arm is attached higher in the car. But in my case I think to get the center link at the correct height, the longitudinal slot in the chassis, where I mount the idler arm, is not "long" / "high" enough. I'm already at the very top of the slot and I think it should come even higher. As I wrote, I measured the length / height of the new and my old idler arm. The new one is 1.5 cm longer but the holes are quite in the same place, which means: to put the idler arm at the same position as before (and this position should have been correct, I guess), I would have to put the new idler arm 1.5 cm higher. But there is only about 1 cm left to the slot's stop. But I'll first have to check the correct height before I can say, the idler arm is really a problem...
3) What do you mean by "bottomed out"? Sorry I'm no English native Anyway, that's what irritated me as well. To set the left wheel straight, the tie rod assembly (inner tie rod - sleeve - outer tie rod) is a lot longer than the one on the right side to set this wheel straight. Even though I watched out to turn the inner and outer tie rods evenly into the sleeve (I counted the threads and they were equal within ~2 threads) I have to shorten the right tie rod assembly in a way that the two tie rods almost touch each other inside the sleeve. And at that point I can't turn them any further. It seems to me that the wheel IS straight now without the tie rod ends touching each other but it's very close compared to the left side, that's what causes me quite a headache. Cause it just shouldn't be that way. If everything is correct, both sides should be about the same length So to answer your question: No, the right side is quite a lot shorter than the left side.
1) As I understood, the center link has to be parallel to the chassis and not to the ground because the chassis might not be absolutely parallel to the ground? So measung from the ground might not be correct... I would have to measure from the ground to the a-arm bolts. I could find out whether this is parallel to the ground. If not I could calculate the percental difference which then should be the same between the idler arm-to ground and pitman arm-to-ground or am I wrong? Cause if it worked like you wrote, I might as well use a bubble level on the center link...
2) I know that it doesn't matter if the idler arm is attached higher in the car. But in my case I think to get the center link at the correct height, the longitudinal slot in the chassis, where I mount the idler arm, is not "long" / "high" enough. I'm already at the very top of the slot and I think it should come even higher. As I wrote, I measured the length / height of the new and my old idler arm. The new one is 1.5 cm longer but the holes are quite in the same place, which means: to put the idler arm at the same position as before (and this position should have been correct, I guess), I would have to put the new idler arm 1.5 cm higher. But there is only about 1 cm left to the slot's stop. But I'll first have to check the correct height before I can say, the idler arm is really a problem...
3) What do you mean by "bottomed out"? Sorry I'm no English native
Anyway, that's what irritated me as well. To set the left wheel straight, the tie rod assembly (inner tie rod - sleeve - outer tie rod) is a lot longer than the one on the right side to set this wheel straight. Even though I watched out to turn the inner and outer tie rods evenly into the sleeve (I counted the threads and they were equal within ~2 threads) I have to shorten the right tie rod assembly in a way that the two tie rods almost touch each other inside the sleeve. And at that point I can't turn them any further. It seems to me that the wheel IS straight now without the tie rod ends touching each other but it's very close compared to the left side, that's what causes me quite a headache. Cause it just shouldn't be that way. If everything is correct, both sides should be about the same length So to answer your question: No, the right side is quite a lot shorter than the left side. Joined: Dec 2005
Posts: 6,499
Likes: 31
From: Macon, GA
Car: 1992 Camaro RS
Engine: Vortec headed 355, xe262
Transmission: T56
Axle/Gears: 9-bolt 3.70
Re: Tools for steering repairs
Thanks for your help.
1) As I understood, the center link has to be parallel to the chassis and not to the ground because the chassis might not be absolutely parallel to the ground? So measung from the ground might not be correct... I would have to measure from the ground to the a-arm bolts. I could find out whether this is parallel to the ground. If not I could calculate the percental difference which then should be the same between the idler arm-to ground and pitman arm-to-ground or am I wrong? Cause if it worked like you wrote, I might as well use a bubble level on the center link...
2) I know that it doesn't matter if the idler arm is attached higher in the car. But in my case I think to get the center link at the correct height, the longitudinal slot in the chassis, where I mount the idler arm, is not "long" / "high" enough. I'm already at the very top of the slot and I think it should come even higher. As I wrote, I measured the length / height of the new and my old idler arm. The new one is 1.5 cm longer but the holes are quite in the same place, which means: to put the idler arm at the same position as before (and this position should have been correct, I guess), I would have to put the new idler arm 1.5 cm higher. But there is only about 1 cm left to the slot's stop. But I'll first have to check the correct height before I can say, the idler arm is really a problem...
3) What do you mean by "bottomed out"? Sorry I'm no English native Anyway, that's what irritated me as well. To set the left wheel straight, the tie rod assembly (inner tie rod - sleeve - outer tie rod) is a lot longer than the one on the right side to set this wheel straight. Even though I watched out to turn the inner and outer tie rods evenly into the sleeve (I counted the threads and they were equal within ~2 threads) I have to shorten the right tie rod assembly in a way that the two tie rods almost touch each other inside the sleeve. And at that point I can't turn them any further. It seems to me that the wheel IS straight now without the tie rod ends touching each other but it's very close compared to the left side, that's what causes me quite a headache. Cause it just shouldn't be that way. If everything is correct, both sides should be about the same length So to answer your question: No, the right side is quite a lot shorter than the left side.
1) As I understood, the center link has to be parallel to the chassis and not to the ground because the chassis might not be absolutely parallel to the ground? So measung from the ground might not be correct... I would have to measure from the ground to the a-arm bolts. I could find out whether this is parallel to the ground. If not I could calculate the percental difference which then should be the same between the idler arm-to ground and pitman arm-to-ground or am I wrong? Cause if it worked like you wrote, I might as well use a bubble level on the center link...
2) I know that it doesn't matter if the idler arm is attached higher in the car. But in my case I think to get the center link at the correct height, the longitudinal slot in the chassis, where I mount the idler arm, is not "long" / "high" enough. I'm already at the very top of the slot and I think it should come even higher. As I wrote, I measured the length / height of the new and my old idler arm. The new one is 1.5 cm longer but the holes are quite in the same place, which means: to put the idler arm at the same position as before (and this position should have been correct, I guess), I would have to put the new idler arm 1.5 cm higher. But there is only about 1 cm left to the slot's stop. But I'll first have to check the correct height before I can say, the idler arm is really a problem...
3) What do you mean by "bottomed out"? Sorry I'm no English native
Anyway, that's what irritated me as well. To set the left wheel straight, the tie rod assembly (inner tie rod - sleeve - outer tie rod) is a lot longer than the one on the right side to set this wheel straight. Even though I watched out to turn the inner and outer tie rods evenly into the sleeve (I counted the threads and they were equal within ~2 threads) I have to shorten the right tie rod assembly in a way that the two tie rods almost touch each other inside the sleeve. And at that point I can't turn them any further. It seems to me that the wheel IS straight now without the tie rod ends touching each other but it's very close compared to the left side, that's what causes me quite a headache. Cause it just shouldn't be that way. If everything is correct, both sides should be about the same length So to answer your question: No, the right side is quite a lot shorter than the left side.2. Moog makes good parts allegedly. All of my parts are moog except my idler arm, which is AC Delco. So I dont have any direct advice there. Just get it as close as you can. I think you need to be within 1/8th to 1/16th of an inch... or probable 1-3mm I imagine is about what it translates to.
3. Bottomed out is another one of those stupid american english idioms. I just mean to say that they are tightened up as far as they will go against each other. Just to be clear, you did make sure the inner and outer tie rod ends are in the right places, yes? So you dont have, for example, two inner tie rods on one side and two outer tie rods on the other? I dont THINK that would make a difference beyond not being able to adjust it, but the way you phrased it Im not sure if you're using the sleeves to adjust them, or if you're screwing the rods into the sleeve? If the second then it's possible you have two outers on one side and two inners on the other and they may be slightly different lengths that would cause that.
Re: Tools for steering repairs
1. Okay, so I'll try that somehow...
2. Yeah, maybe I should have picked the Delco one. As I can see in pictures they look surely more like the old one. So, you have the AC Delco one... is it rellay the same length / height as the stock one? I didn't measure my old center link (it was a Raybestos one, changed 2 years ago).
3. Yes, I had the part's numbers, and the grease fittings are different on the inner and outer tie rods (with the outer ones the fittings are at the bottom and with the inner ones they're on the sides), so that should be okay. Is there a way to screw them wrongly into the sleeves (I was trying out and noticed that actually it's not possible to put them wrong because of the different-handed threads)? I mean, surely I screwed them in counting the threads on each side so that they are equal within 2 threads, but that shouldn't make any difference either. When adjusting them, I turned the sleeve around... I mean, I can't turn the tie rods, they are fixed now...
Joined: May 2004
Posts: 5,338
Likes: 73
From: Lexington, SC
Car: 1987 SC/1985 TA
Engine: 350/vortec/fitech
Transmission: T56
Axle/Gears: 3.27 9-bolt
Re: Tools for steering repairs
Setting the idler arm height within 0.5 cm is fine in most cases. The driver's weight will likely have more effect on steering geometry than this small difference.
The inner and outer tie rods are threaded differently. They're threaded so that turning the adjuster sleeve will lengthen or shorten the whole assembly. You may want to verify that the tie rods on each side are the same length, that you didn't wind up with a wrong part.
When you take it to a shop and they put it on the alignment rack, you may find that everything is good.

Thread
Thread Starter
Forum
Replies
Last Post
bubbaz28
Suspension and Chassis
10
Sep 18, 2015 02:09 PM
83 Crossfire TA
Suspension and Chassis
6
Sep 18, 2015 12:01 PM
punkmaster98
Interior Parts for Sale
0
Sep 8, 2015 09:45 PM