
Double Barrel cool air intake from GM parts

Thread Starter
Junior Member
Joined: Feb 2006
Posts: 32
Likes: 0
From: texas
Car: 1991 convertible RS
Engine: Lo3 305 TBI
Transmission: MD8 700RV
Axle/Gears: 2.73OEM to 3.08 posi disk underway
Double Barrel cool air intake from GM parts
I know there are a ton of these mods but this one looks clean and is easy.
I got the parts from the junk yard and they were cheep. I got a few air ducts and stuff and headed home. This is what came out of all the parts.
I think I can post photos......
Well check it out.
Ron
I got the parts from the junk yard and they were cheep. I got a few air ducts and stuff and headed home. This is what came out of all the parts.
I think I can post photos......
Well check it out.
Ron
Thread Starter
Junior Member
Joined: Feb 2006
Posts: 32
Likes: 0
From: texas
Car: 1991 convertible RS
Engine: Lo3 305 TBI
Transmission: MD8 700RV
Axle/Gears: 2.73OEM to 3.08 posi disk underway
Here are some other photos.
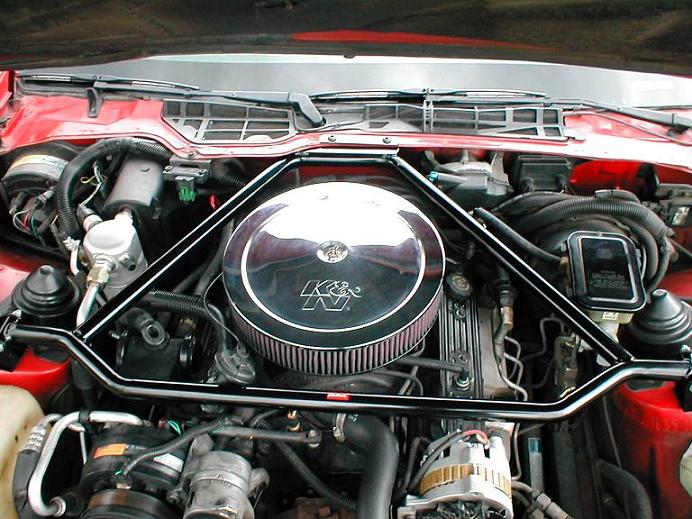
The air intake on the bottom is simply the stock intake(from the junk yard) inverted. I made a little bracket to hold this in place. The added intake is the nose off the stock intake too. I cut it and then spot welded it to the intake. Cut a hole from the inside out and I got twice the air flow. GM made room for the original hose to fit in there so two fit in there easy. I took a tall filter cover(cal cover) from a 85 malibu TBI. I fits and allow the use of a taller filter. More air more filter...right
Well there you have it.
Ron
Last edited by dirtfarmer; Apr 16, 2006 at 09:10 PM.

Joined: Feb 2001
Posts: 13,777
Likes: 567
From: Cincinnati, OH
Car: '90 RS
Engine: 377 LSX
Transmission: Magnum T56
That is actually not too bad of a set-up and I can't recall if I have ever seen one like that. I would try to route that one duct up out of the engine bay. You kinda have it in a poor location. I see that you have a STB which makes running a traditional f-body dual snorkel unit diffucult. This may be a great alternative.
Thread Starter
Junior Member
Joined: Feb 2006
Posts: 32
Likes: 0
From: texas
Car: 1991 convertible RS
Engine: Lo3 305 TBI
Transmission: MD8 700RV
Axle/Gears: 2.73OEM to 3.08 posi disk underway
I'm glad you like it Shifty.
Which hose do you refer? The lower one?
Is it too close to the motor you think?
Which hose do you refer? The lower one?
Is it too close to the motor you think?
Joined: Feb 2001
Posts: 13,777
Likes: 567
From: Cincinnati, OH
Car: '90 RS
Engine: 377 LSX
Transmission: Magnum T56
Originally Posted by dirtfarmer
I'm glad you like it Shifty.
Which hose do you refer? The lower one?
Is it too close to the motor you think?
Which hose do you refer? The lower one?
Is it too close to the motor you think?
Thread Starter
Junior Member
Joined: Feb 2006
Posts: 32
Likes: 0
From: texas
Car: 1991 convertible RS
Engine: Lo3 305 TBI
Transmission: MD8 700RV
Axle/Gears: 2.73OEM to 3.08 posi disk underway
Ok. I see what you are saying. I think I could tie that up to the strut support (Zip ties)and get it away from the motor more.
Good idea
Good idea
Trending Topics

Senior Member
Joined: Aug 2004
Posts: 708
Likes: 0
From: Upstate New York
Car: 1988 SC Camaro
Engine: 305 TBI
Transmission: 700-R4
I like that setup too! I never thought of it...I have a regular dual snorkel setup (that looks like Robot arms)...your idea is something to try perhaps...might get a little cramped in the engine bay with all the ducting however...hmm

Senior Member
Joined: Mar 2006
Posts: 633
Likes: 0
From: Point Pleasant, NJ
Car: 1987 Chevy Stepside
Engine: 350 TBI w/ a Cam
Transmission: 3 Speed Stick w/ granny low
Originally Posted by brodyscamaro
IMO, open element works better and is easier...


Supreme Member

Joined: Mar 2001
Posts: 5,144
Likes: 2
From: CC, TX
Car: 1999 Yamaha Banshee
Engine: 379cc twin cyl 2-stroke stroker
Transmission: 6 spd manual
Axle/Gears: 14/41 tooth
Originally Posted by r0nin89
Open elemtn ftw...oldschool
Supreme Member
Joined: Mar 2001
Posts: 5,144
Likes: 2
From: CC, TX
Car: 1999 Yamaha Banshee
Engine: 379cc twin cyl 2-stroke stroker
Transmission: 6 spd manual
Axle/Gears: 14/41 tooth
Originally Posted by Fast355
And not smog legal either


Joined: Jan 2005
Posts: 10,450
Likes: 510
From: Hurst, Texas
Car: 1983 G20 Chevy
Engine: 305 TPI
Transmission: 4L60
Axle/Gears: 14 bolt with 3.07 gears
Originally Posted by brodyscamaro
30 second job to put the stock one on for inspection and testing once a year
The open element sounds better for sure, but it sucks in way too much hot underhood air for my taste.
Thread Starter
Junior Member
Joined: Feb 2006
Posts: 32
Likes: 0
From: texas
Car: 1991 convertible RS
Engine: Lo3 305 TBI
Transmission: MD8 700RV
Axle/Gears: 2.73OEM to 3.08 posi disk underway
Originally Posted by brodyscamaro
IMO, open element works better and is easier...
When I come in from a drive and lift the hood I can feel the difference in the cal cover temp and the Strut tower temp.
It may be no big deal or big differance in HP. I just think cool air
 is a good thing.
Ron
Thread Starter
Junior Member
Joined: Feb 2006
Posts: 32
Likes: 0
From: texas
Car: 1991 convertible RS
Engine: Lo3 305 TBI
Transmission: MD8 700RV
Axle/Gears: 2.73OEM to 3.08 posi disk underway
[QUOTE=Crusin' 1980's]I like that setup too! I never thought of it...I have a regular dual snorkel setup (that looks like Robot arms)...your idea is something to try perhaps...might get a little cramped in the engine bay with all the ducting however...hmm
Wow Crusin that looks like it will pull in the air.
Here is a shot with the top hose off.
This shows a little more info.
Ron
Wow Crusin that looks like it will pull in the air.
Here is a shot with the top hose off.
This shows a little more info.
Ron
Last edited by dirtfarmer; Apr 16, 2006 at 10:40 PM.
Thread Starter
Junior Member
Joined: Feb 2006
Posts: 32
Likes: 0
From: texas
Car: 1991 convertible RS
Engine: Lo3 305 TBI
Transmission: MD8 700RV
Axle/Gears: 2.73OEM to 3.08 posi disk underway
Well I got out Last night and looked at the problem.
I found the zip ties and looked at getting the #2 hose up and out of the way.
Using the ties I joined the hoses together then lifted them and secured them to the strut brace. It looks like there is enough space there for good air flow.
Check it out Let me know what you think.
This AM I got some shots so yall can see.

I know it is hard to see but the #2 hose is 3 in. from the valve cover at its closest point.
Ron
I found the zip ties and looked at getting the #2 hose up and out of the way.
Using the ties I joined the hoses together then lifted them and secured them to the strut brace. It looks like there is enough space there for good air flow.
Check it out
Let me know what you think.This AM I got some shots so yall can see.
I know it is hard to see but the #2 hose is 3 in. from the valve cover at its closest point.
Ron
Last edited by dirtfarmer; Apr 17, 2006 at 02:58 PM.
Thread Starter
Junior Member
Joined: Feb 2006
Posts: 32
Likes: 0
From: texas
Car: 1991 convertible RS
Engine: Lo3 305 TBI
Transmission: MD8 700RV
Axle/Gears: 2.73OEM to 3.08 posi disk underway
Warning this may be 
I had one of the air scoops left over so.....It hit me to use it to feed more air to the lower cool air intake.
My thought was if I could pull air from under the car and deliver it to the #2 intake IE the space behind the head light it couldn't hurt.
Well It fit so easy and there was a ready made mount bolt from the ground clearance mount there. I just put it on.
If some how it builds a higher air pressure there (behind the lights) at "cruse" speed. I should get better air flow "ram air".
See I told you to look out for stuff flowing down hill.
Here are the shots. The thing is hard to see behind the light mount ...and harder to photograph.
It is easy to see under the car the scoop is going to get some air.
Check it out.....
Ron
Last edited by dirtfarmer; Apr 17, 2006 at 03:45 PM.
Senior Member
Joined: Aug 2004
Posts: 708
Likes: 0
From: Upstate New York
Car: 1988 SC Camaro
Engine: 305 TBI
Transmission: 700-R4
hey Dirtfarmer, I looked at my car today to see if i would be able to do what you did, but my evap canister for the gas is right in the way...what did you do with yours?...maybe I'll re-locate mine eventually and try what you did...but the canister seems to be right in the way of instralling another air duct right below the stock one...
Thread Starter
Junior Member
Joined: Feb 2006
Posts: 32
Likes: 0
From: texas
Car: 1991 convertible RS
Engine: Lo3 305 TBI
Transmission: MD8 700RV
Axle/Gears: 2.73OEM to 3.08 posi disk underway
Oh you are right I did move the canister over.
The thing has a funny mount....when you take the mount bolts out a tension held sort of hook for the bottom of the canister falls out. I just moved the canister over (toward the fender) and remounted it using self tapping screws.
That opens up the space for the inverted scoop.
The thing has a funny mount....when you take the mount bolts out a tension held sort of hook for the bottom of the canister falls out. I just moved the canister over (toward the fender) and remounted it using self tapping screws.
That opens up the space for the inverted scoop.
Last edited by dirtfarmer; Apr 17, 2006 at 03:55 PM.
Senior Member
Joined: Aug 2004
Posts: 708
Likes: 0
From: Upstate New York
Car: 1988 SC Camaro
Engine: 305 TBI
Transmission: 700-R4
I did move the canister over
Supreme Member
Joined: Aug 2004
Posts: 4,168
Likes: 3
From: Marietta, GA
Car: '91 Firebird Convertible
Engine: 305 TBI (LO3)
Transmission: 700r4, Vette Servo
Axle/Gears: 3.27 9 Bolt, PBR disks
I like the OE much better because it dresses up the engine bay a little bit and the sound it makes is righteous.
With the power bulge hood I'm getting soon, it should have no problems getting all the cool air it needs. Plus, I've never seen a randon road side inspection for modified cars. I suppose the cops in the Bay Area have worse things to think about.
Very cool ideas though. How did you cut the hole in the side of the air lid?
Thread Starter
Junior Member
Joined: Feb 2006
Posts: 32
Likes: 0
From: texas
Car: 1991 convertible RS
Engine: Lo3 305 TBI
Transmission: MD8 700RV
Axle/Gears: 2.73OEM to 3.08 posi disk underway
Cadillac,
That is a good looking rig. I think you're OE it is clean easy and looks great.
I used an air cut off wheel to cut the inside of the air lid. Then used an air grinder to "finish" the hole. The metal is thin and easy to cut. The weld there is tricky. I just spot welded several spots. I was afraid of burning a hole in it.
I plan to seal it with black high heat silicone.

Thread
Thread Starter
Forum
Replies
Last Post
1992 Trans Am
History / Originality
27
May 10, 2023 07:19 PM
kyle5647
Tech / General Engine
1
Aug 15, 2015 11:56 PM