


q about replacing head gasket


Thread Starter
Supreme Member
Joined: Feb 2003
Posts: 1,011
Likes: 0
From: Augusta/Valdosta, GA
Car: 1987 Iroc-Z28
Engine: 350 TPI
Transmission: auto
q about replacing head gasket
my car is steadily burning more and more oil on startup. 3 months ago it would rarely burn any on startup, and now it rarely doesn't burn oil on startup. i don't think it's a major concern, it's just embarresing to have a nice looking car, but then people think it's a pile of crap when i crank it up and it smokes.
it NEVER smokes while i'm driving, even when i hit it hard, it's just when i crank it up
i'm pretty sure it's my head gasket, not positive but pretty sure.
i guess my question is, about how long would it take to break down the engine enough to replace the head gasket and then put it back together? once i start doing it, i'll figure out how everything needs to be taken off, but i want to be sure that i plan enough down-time for the car so i'm not stranded w/ no car to get to work. thanks guys...
it NEVER smokes while i'm driving, even when i hit it hard, it's just when i crank it up
i'm pretty sure it's my head gasket, not positive but pretty sure.
i guess my question is, about how long would it take to break down the engine enough to replace the head gasket and then put it back together? once i start doing it, i'll figure out how everything needs to be taken off, but i want to be sure that i plan enough down-time for the car so i'm not stranded w/ no car to get to work. thanks guys...
Thread Starter
Supreme Member
Joined: Feb 2003
Posts: 1,011
Likes: 0
From: Augusta/Valdosta, GA
Car: 1987 Iroc-Z28
Engine: 350 TPI
Transmission: auto
lord, i dont even know what that is 
never had to mess w/ it before, guess i'll start learning now...
so how much down-time do you think is needed to replace valve stem seals?
never had to mess w/ it before, guess i'll start learning now...
so how much down-time do you think is needed to replace valve stem seals?

TGO Supporter
Joined: Jul 2003
Posts: 4,803
Likes: 2
From: Grand Rapids, MI
Car: Z28
Engine: Sb2.2 406
Transmission: Jerico 4 speed
Axle/Gears: Ford 9" 3.60
The valve seal is a little gasket type thing that seats around the valve guide boss of the cylinder head. It acts as a gasket between the cylinder head and the valve stem. It's job is to prevent oil seeping down the valve stem when the car is sitting. Don't worry, it's one of the more common SBC issues.
It's all in a days work. Literally, it can be done in a day. The only specialty tool you will need is a valve spring compressor. Since the heads are on the vehicle, you will probably want a stud mounted version. You will also need a method of keeping the valves up when you compress the valve springs. Compressed air injected into the combustion chamber via a spark plug fitting is the easiest way. If you don't have access to compressed air, a length of nylon cord (I've used i believe 1/4" dia. cord before). Thread the cord into the chamber and rotate the engine to bring that particular cylinder to TDC. That pushes the nylong cord up against the valve head.
Take the compressor tool and press down on the spring, compressing them. This releases the locks and the springs can be removed. you will then see the seal around the base of the valve guide boss/valve stem. Pop it off and put the new ones back on. Fel-Pro offers generic replacements. i got mine at Advance Auto.
Do a search, you will find complete details on whats all involved. Again, i emphasize, it is not that hard. Just give yourself a day to do it and you should be good to go.
It's all in a days work. Literally, it can be done in a day. The only specialty tool you will need is a valve spring compressor. Since the heads are on the vehicle, you will probably want a stud mounted version. You will also need a method of keeping the valves up when you compress the valve springs. Compressed air injected into the combustion chamber via a spark plug fitting is the easiest way. If you don't have access to compressed air, a length of nylon cord (I've used i believe 1/4" dia. cord before). Thread the cord into the chamber and rotate the engine to bring that particular cylinder to TDC. That pushes the nylong cord up against the valve head.
Take the compressor tool and press down on the spring, compressing them. This releases the locks and the springs can be removed. you will then see the seal around the base of the valve guide boss/valve stem. Pop it off and put the new ones back on. Fel-Pro offers generic replacements. i got mine at Advance Auto.
Do a search, you will find complete details on whats all involved. Again, i emphasize, it is not that hard. Just give yourself a day to do it and you should be good to go.

Member
Joined: Dec 2003
Posts: 161
Likes: 0
From: So. Illinois
Car: '93 S10 Short bed standard cab
Engine: 383 Stroker
Transmission: 92' stage 2 700r4 w/3600 stall
Axle/Gears: 3.42
Well, You need something to hold the valves in place for when you remove the valve springs. When you get the valve spring off, you can pull off the valve stem seal, which is your problem, and replace it with the new one. Then you need to do that 15 more time...once you replace the spring, retainer, and valve stem retainer locks (can't really remember the name for them). You need something to hold the valve up so it doesn't drop into the cylinder when you take off the retainer and spring.
Thread Starter
Supreme Member
Joined: Feb 2003
Posts: 1,011
Likes: 0
From: Augusta/Valdosta, GA
Car: 1987 Iroc-Z28
Engine: 350 TPI
Transmission: auto
ehh, all this stuff is foreign to me. now that i know what the problem is though i'll search around for instructions on how to do it.
hopefully when i actually start working on it, it will become clearer what needs to be done.
$20 in parts and a number of hours.....that'll work for me as long as i dont screw anything up too bad...thanks for the info
hopefully when i actually start working on it, it will become clearer what needs to be done.
$20 in parts and a number of hours.....that'll work for me as long as i dont screw anything up too bad...thanks for the info
Trending Topics
Thread Starter
Supreme Member
Joined: Feb 2003
Posts: 1,011
Likes: 0
From: Augusta/Valdosta, GA
Car: 1987 Iroc-Z28
Engine: 350 TPI
Transmission: auto
ok i read up on how to do it. i only have one question for now
i'll prob. use the air compressor route to keep the valves up. at what point in the process do i need to do that though?
i know the rocker arms and springs have to come out to replace the valve springs....do the pushrods need to come out to, or can i leave them be?
so i start w/ the #1 clyander all the way up...do i use the air compresser on the #1 cylinder before i remove the rocker arms and springs for that cylender? if so, then i would hook the air up, remove the rocker arms and springs, remove valve seal, put on new valve seal, replace springs and rocker arms, and then remove air from the #1 cylindar?
thanks for any info...i have a pretty good grasp and what the process is, but i'm just not quite sure on a few little details
edit: lmao, i just reread my message and saw that i spelled "cylender" 4 different ways....i have no idea how to spell that
i'll prob. use the air compressor route to keep the valves up. at what point in the process do i need to do that though?
i know the rocker arms and springs have to come out to replace the valve springs....do the pushrods need to come out to, or can i leave them be?
so i start w/ the #1 clyander all the way up...do i use the air compresser on the #1 cylinder before i remove the rocker arms and springs for that cylender? if so, then i would hook the air up, remove the rocker arms and springs, remove valve seal, put on new valve seal, replace springs and rocker arms, and then remove air from the #1 cylindar?
thanks for any info...i have a pretty good grasp and what the process is, but i'm just not quite sure on a few little details
edit: lmao, i just reread my message and saw that i spelled "cylender" 4 different ways....i have no idea how to spell that
TGO Supporter
Joined: Jul 2003
Posts: 4,803
Likes: 2
From: Grand Rapids, MI
Car: Z28
Engine: Sb2.2 406
Transmission: Jerico 4 speed
Axle/Gears: Ford 9" 3.60
"Cylinder" (your second spelling was correct)
Remove the valve covers
remove the rocker arms (pushrods can remain in place)
Remove the spark plugs
Insert the adapter for compressed air
Put compressed air in the cylinder
Place valve spring compressor on head and compress springs
Remove locks (a magnet helps if they fall off)
Remove the retainer and spring
Replace valve seals
Installation is reverse of assembly
When done, move to the next cylinder. I don't think order really matters.
Just make sure you reset the valve lash.
Might want to take the moment and clean the valve cover mounting surface thouroughly before you button it back up. The last thing you want is oil leaking onto the exhaust. Get new gaskets if they are bad.
That's the basics. If you don't have the spring compressor, i am pretty sure they can be rented at Autozone via the "loan-a-tool" program.
Remove the valve covers
remove the rocker arms (pushrods can remain in place)
Remove the spark plugs
Insert the adapter for compressed air
Put compressed air in the cylinder
Place valve spring compressor on head and compress springs
Remove locks (a magnet helps if they fall off)
Remove the retainer and spring
Replace valve seals
Installation is reverse of assembly
When done, move to the next cylinder. I don't think order really matters.
Just make sure you reset the valve lash.
Might want to take the moment and clean the valve cover mounting surface thouroughly before you button it back up. The last thing you want is oil leaking onto the exhaust. Get new gaskets if they are bad.
That's the basics. If you don't have the spring compressor, i am pretty sure they can be rented at Autozone via the "loan-a-tool" program.
Thread Starter
Supreme Member
Joined: Feb 2003
Posts: 1,011
Likes: 0
From: Augusta/Valdosta, GA
Car: 1987 Iroc-Z28
Engine: 350 TPI
Transmission: auto
great thanks, thats the info i was looking for. i just wasnt sure exactly what order to do each step.
my last question, what do you mean by "make sure you reset the valve lash." not sure what that is
and yeah i plan on renting a spring compressor from autozone, and prob. buying the compressor fitting from there too
my last question, what do you mean by "make sure you reset the valve lash." not sure what that is
and yeah i plan on renting a spring compressor from autozone, and prob. buying the compressor fitting from there too
TGO Supporter
Joined: Jul 2003
Posts: 4,803
Likes: 2
From: Grand Rapids, MI
Car: Z28
Engine: Sb2.2 406
Transmission: Jerico 4 speed
Axle/Gears: Ford 9" 3.60
valve lash is that thing that regards "tighten rocker nut x/x amount of turns past zero lash." When I'm feeling lazy i just back them all off until they tick and then tighten them until they stop. After they stop, i go about 1/3 more of a turn. There are other forms of setting lash. The method i said, would be performed between putting the rockers on and putting the valve covers on. Another method is wiggle/spin the pushrod. When the pushrod has the slightest change in tension, stop. Tighten around a 1/2 turn more or so. The lifter has to be on the heel of the cam (aka - the valve has to be closed 100%). It's a bit harder and requires a method of rotating the engine manually. I've done both (or a variation of the second). If ou do the second, marking the balancer into quadrants helps alot.
Perform another search . Vader has posted a very thourough writeup somewhere regarding setting the valve lash.
Perform another search
. Vader has posted a very thourough writeup somewhere regarding setting the valve lash. Last edited by Stekman; Jun 24, 2004 at 09:55 PM.
Thread Starter
Supreme Member
Joined: Feb 2003
Posts: 1,011
Likes: 0
From: Augusta/Valdosta, GA
Car: 1987 Iroc-Z28
Engine: 350 TPI
Transmission: auto
lol alright i'll read up on valve lash...i'm sure i'll have another slew of questions after i read up on that, but i'm all out for now
Thread Starter
Supreme Member
Joined: Feb 2003
Posts: 1,011
Likes: 0
From: Augusta/Valdosta, GA
Car: 1987 Iroc-Z28
Engine: 350 TPI
Transmission: auto
ok, so for valve lash, you can set it w/ the engine on or off
with the engine on, you tighten until it stops clacking, and then turn 1/4 turn more, but you get oil all over your engine bay
with the engine off, you tighten until you feel resistance, and then turn 1/4 turn more. so does that mean you tighten the bolt on top of the rocker arms (not sure what its called) until the push rod is snug w/ the end of the rocker arm, and then tighten 1/4 turn more?
if i do it w/ the engine on, do i just loosely tighten the bolt before i crank it up?
if i do it w/ the engine off, how will i tell if i've tightened them correctly? when i cut the engine on, will it be clacking if i have tightened them wrong?
with the engine on, you tighten until it stops clacking, and then turn 1/4 turn more, but you get oil all over your engine bay
with the engine off, you tighten until you feel resistance, and then turn 1/4 turn more. so does that mean you tighten the bolt on top of the rocker arms (not sure what its called) until the push rod is snug w/ the end of the rocker arm, and then tighten 1/4 turn more?
if i do it w/ the engine on, do i just loosely tighten the bolt before i crank it up?
if i do it w/ the engine off, how will i tell if i've tightened them correctly? when i cut the engine on, will it be clacking if i have tightened them wrong?
TGO Supporter
Joined: Jul 2003
Posts: 4,803
Likes: 2
From: Grand Rapids, MI
Car: Z28
Engine: Sb2.2 406
Transmission: Jerico 4 speed
Axle/Gears: Ford 9" 3.60
With engine on, you got it.
Engine off, you spin the pushrod. I've jiggled it up and down as well, but spinning is the method by the books. Spin it until you feel resistance, like it gets harder to spin. Turn an added 1/4 or whatever. The actual amount past zero lash is nothing set in stone.
Is what I've done on my Caprice when i had to change the seals is i spun the pushrods until i feel tension, then i fired it up. If it didn't clack at all, i backed them off until they did, then i reset them. I did one side at a time. The side that i wasn't doing at the time, i left that valve cover on. If it's loose, it will clack. If it's tight, it won't clack. Be careful you don't overtighten them.
Are you leaning towards engine on or off?
Engine off, you spin the pushrod. I've jiggled it up and down as well, but spinning is the method by the books. Spin it until you feel resistance, like it gets harder to spin. Turn an added 1/4 or whatever. The actual amount past zero lash is nothing set in stone.
Is what I've done on my Caprice when i had to change the seals is i spun the pushrods until i feel tension, then i fired it up. If it didn't clack at all, i backed them off until they did, then i reset them. I did one side at a time. The side that i wasn't doing at the time, i left that valve cover on. If it's loose, it will clack. If it's tight, it won't clack. Be careful you don't overtighten them.
Are you leaning towards engine on or off?

Junior Member
Joined: Jun 2003
Posts: 92
Likes: 0
From: Jim Thorpe, PA
You also might want to place rags around the all oil drain back ports and push rod holes. Basically so that you don't wind up dropping a valve stem keeper down into one of them. Accidents happen and it's better to be safe than tear down more than you have to.
Thread Starter
Supreme Member
Joined: Feb 2003
Posts: 1,011
Likes: 0
From: Augusta/Valdosta, GA
Car: 1987 Iroc-Z28
Engine: 350 TPI
Transmission: auto
i'm leaning towards trying with the engine off, because i dont feel like having to clean up the mess.
so how are the push rods actually attatched? do they screw in? otherwise, why would you feel resistance when you turned them?
oh wait, do you tighten the bolt on top of the rocker arms until you feel resistance when you try to turn the push rod? like, you tighten the bolt enough so that the end of the rocker arm slightly comes in contact w/ the top of the pushrod, so you feel resistance when you try to turn it, and then you tighten the bolt another 1/4 turn?
so with the engine off, is the best way to do it, one cylinder at a time? like take off the rocker arms/springs/valve seal off cylinder #1, replace seal/springs/rocker arms, tighten bolt to whatever, and then crank it up and see if it sounds good? and then once cylinder #1 is good, move on to the next one? and then once i finish one side, put the valve cover back on, and move to the other side of the engine?
so is adjusting the valve lash the only "calibration" type thing i'll encounter when i do this? do i need a torque wrench for any of the other bolts, or is tightening w/ a regular wrench fine?
so how are the push rods actually attatched? do they screw in? otherwise, why would you feel resistance when you turned them?
oh wait, do you tighten the bolt on top of the rocker arms until you feel resistance when you try to turn the push rod? like, you tighten the bolt enough so that the end of the rocker arm slightly comes in contact w/ the top of the pushrod, so you feel resistance when you try to turn it, and then you tighten the bolt another 1/4 turn?
so with the engine off, is the best way to do it, one cylinder at a time? like take off the rocker arms/springs/valve seal off cylinder #1, replace seal/springs/rocker arms, tighten bolt to whatever, and then crank it up and see if it sounds good? and then once cylinder #1 is good, move on to the next one? and then once i finish one side, put the valve cover back on, and move to the other side of the engine?
so is adjusting the valve lash the only "calibration" type thing i'll encounter when i do this? do i need a torque wrench for any of the other bolts, or is tightening w/ a regular wrench fine?
TGO Supporter
Joined: Jul 2003
Posts: 4,803
Likes: 2
From: Grand Rapids, MI
Car: Z28
Engine: Sb2.2 406
Transmission: Jerico 4 speed
Axle/Gears: Ford 9" 3.60
The pushrods aren't attached at all. They are cradled on the bottom by the little dish in the top of the lifter. At the top they are held in place by the rocker arm. When the rocker arm is off, push down on one of the pushrods, you will notice it will depress slightly and then you will feel an almost spring loaded tension push it back up. That's what applies the tension. It is a little chamber inside the lifter, that contains a plunger mechanism. As you tighten the rocker arm, it pushes down on the pushrod. Eventually, the pushrod will depress the plunger mechanism. Due to that spring loaded action you felt (assuming you pushed down on one when you remove the valve covers) is what then applies tension.
Yep, you tighten that little nut that is in the middle of the rocker arm. The valve spring obviously takes a considerably larger amount of force to depress than the lifter, the tip of the valve (where the rocker arm is resting) acts as the fulcrum point for the assembly. Tightening the rocker nut pushes the center down. This in turn pushes the pushrod seat down even further. Then, like above, the rocker seat pushes down on the pushrod, which, well you get the idea by now.
If you do it with the engine off, you will need a method of turning the engine manually. You need to get the lifter ont he heel end of the cam to ensure the valve is fully shut. How I've done it is i mark the balancer into quadrants, 4 lines. One line is 180° (directly across) from the TDC line. The rest are in 90° incriments. Assuming the balancer hasn't slipped at all, bring the engine to TDC compression stroke for the #1 cylinder. Set the lash for both the intake and exhaust valves. Once set, rotate the engine 90° clockwise (from the front of the engine, or in standard engine rotation) and line up the next mark with the timing tab. Now set the valves for the #8 cylinder. Keep moving the balancer in 90° incriments until you end up rotating the engine in a 720° manner or 2 complete cycles around the balancer. Follow the standard SBC firing order (1-8-4-3-6-5-7-2) with each 90° incriment.
Make sure you use something OTHER than the balancer bolt to rotate the engine. I use something like this for that purpose:
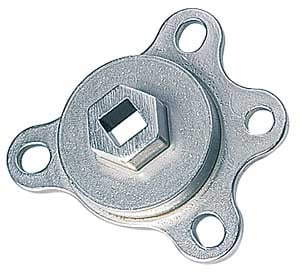
That is offered by proform and can be purchased through Summit or jegs for about $20. It bolts through the crank pulley bolts and can be turned via a 1/2 ratchet. I've heard a strap wrench around the balancer works, too, but i have never personally tried it.
You do not need a tq wrench for any of this process and the valve lash is the only calibration measure you will encounter.
Yep, you tighten that little nut that is in the middle of the rocker arm. The valve spring obviously takes a considerably larger amount of force to depress than the lifter, the tip of the valve (where the rocker arm is resting) acts as the fulcrum point for the assembly. Tightening the rocker nut pushes the center down. This in turn pushes the pushrod seat down even further. Then, like above, the rocker seat pushes down on the pushrod, which, well you get the idea by now.
If you do it with the engine off, you will need a method of turning the engine manually. You need to get the lifter ont he heel end of the cam to ensure the valve is fully shut. How I've done it is i mark the balancer into quadrants, 4 lines. One line is 180° (directly across) from the TDC line. The rest are in 90° incriments. Assuming the balancer hasn't slipped at all, bring the engine to TDC compression stroke for the #1 cylinder. Set the lash for both the intake and exhaust valves. Once set, rotate the engine 90° clockwise (from the front of the engine, or in standard engine rotation) and line up the next mark with the timing tab. Now set the valves for the #8 cylinder. Keep moving the balancer in 90° incriments until you end up rotating the engine in a 720° manner or 2 complete cycles around the balancer. Follow the standard SBC firing order (1-8-4-3-6-5-7-2) with each 90° incriment.
Make sure you use something OTHER than the balancer bolt to rotate the engine. I use something like this for that purpose:
That is offered by proform and can be purchased through Summit or jegs for about $20. It bolts through the crank pulley bolts and can be turned via a 1/2 ratchet. I've heard a strap wrench around the balancer works, too, but i have never personally tried it.
You do not need a tq wrench for any of this process and the valve lash is the only calibration measure you will encounter.
Thread Starter
Supreme Member
Joined: Feb 2003
Posts: 1,011
Likes: 0
From: Augusta/Valdosta, GA
Car: 1987 Iroc-Z28
Engine: 350 TPI
Transmission: auto
so doing it with the engine off...do i go ahead and replace the valve seal on all 8 cylinders, and then tighten the bolts, then fire it up? wouldn't it be hard to hear which cylinders are knocking if i've done them all at once?
i dont quite understand the whole turning the push rod thing yet. i now know how it works, which i had no clue of before, but not positive about the turnint yet...i understand that when you tighten the bolt on top of the rocker arm, and valve spring is so stiff that the opposite side of the rocker arm (the one that comes in contact w/ the push rod) is tilted down the more you tighten the bolt.
but what exactly do you mean by turning the rod until you feel resistance? when the rocker arm is loose, the push rod will turn freely because it is only in contact with the top of the lifter. as you tighten the rocker arm bolt, the tip of the rocker arm tilts lower and lower until it comes into contact with the end of the push rod. so when you say "you tighten the bolt until you feel resistance when you turn the push rod," does that mean that you tighten the bolt until the tip of the rocker arm is slightly in contact with the push rod, so force is being applied on the push rod from both ends, so you feel some resistance?
so you tighten the bolt until there is enough pressure from the rocker arm that you feel resistance when you turn it. when you get to that point, turn the bolt another 1/4 turn and you should be set?
if i replace all 8 at once, and fire the engine up and hear some clacking, how do i go about figuring out which one is off?
sorry for all the newb questions and my scattered train of thought in my posts...it'll click for me sooner or later
edit: why do you say "Make sure you use something OTHER than the balancer bolt to rotate the engine"? what's wrong with using that?
edit #2: if you have the heads off, you can tell TDC by seeing when the piston is completely level w/ the top of the cylinder, right? is there an exact way to determine TDC with the heads still on, or do you just turn the engine until the rocker arm for the cylinder you're working on is all they way up?
if it's a complicated thing to explain, i'll do a search on it in the morning
i dont quite understand the whole turning the push rod thing yet. i now know how it works, which i had no clue of before, but not positive about the turnint yet...i understand that when you tighten the bolt on top of the rocker arm, and valve spring is so stiff that the opposite side of the rocker arm (the one that comes in contact w/ the push rod) is tilted down the more you tighten the bolt.
but what exactly do you mean by turning the rod until you feel resistance? when the rocker arm is loose, the push rod will turn freely because it is only in contact with the top of the lifter. as you tighten the rocker arm bolt, the tip of the rocker arm tilts lower and lower until it comes into contact with the end of the push rod. so when you say "you tighten the bolt until you feel resistance when you turn the push rod," does that mean that you tighten the bolt until the tip of the rocker arm is slightly in contact with the push rod, so force is being applied on the push rod from both ends, so you feel some resistance?
so you tighten the bolt until there is enough pressure from the rocker arm that you feel resistance when you turn it. when you get to that point, turn the bolt another 1/4 turn and you should be set?
if i replace all 8 at once, and fire the engine up and hear some clacking, how do i go about figuring out which one is off?
sorry for all the newb questions and my scattered train of thought in my posts...it'll click for me sooner or later
edit: why do you say "Make sure you use something OTHER than the balancer bolt to rotate the engine"? what's wrong with using that?
edit #2: if you have the heads off, you can tell TDC by seeing when the piston is completely level w/ the top of the cylinder, right? is there an exact way to determine TDC with the heads still on, or do you just turn the engine until the rocker arm for the cylinder you're working on is all they way up?
if it's a complicated thing to explain, i'll do a search on it in the morning
Last edited by CamaroRS385hp; Jun 25, 2004 at 12:23 AM.

Supreme Member
Joined: Apr 2002
Posts: 3,552
Likes: 5
From: New Jersey
Car: 86 Corvette, 89 IROC, 1999 TA
Engine: 350, 350, LS1
Transmission: 700r4, 700r4, T-56
Axle/Gears: 3.07, 373, 4.10
the advice about blocking off the oil drain back holes is excellent advice.. I've replaced valve seals on several different cars I've owned (all SBC's of course) and never bothered to block em off.. well it came back to bite me in the *** when I replaced em on my nova.. it can turn a simple project into dissassembling most of the top end.
TGO Supporter
Joined: Jul 2003
Posts: 4,803
Likes: 2
From: Grand Rapids, MI
Car: Z28
Engine: Sb2.2 406
Transmission: Jerico 4 speed
Axle/Gears: Ford 9" 3.60
Those extenda-reach magnet things are handy tools to have around, just for that purpose (in the event that one does fall).


Supreme Member
Joined: Jul 1999
Posts: 18,457
Likes: 16
From: Loveland, OH, US
Car: 4
Engine: 6
Transmission: 5
You should use the positive type, not the umbrella type, or the O-ring type.
Keep in mind, that the intake valve guides have oil (the crankcase, specifically the volume under the valve cover) at one end, and the intake manifold at the other. So, any leak around them, literally sucks oil into the engine. The startup puff of smoke is caused by oil that simply runs down the stem, in between the valve and the guide, and right into the intake. Lots of it can run in there when the engine is turned off. So, a whole bunch drips in, you start the motor up, and see a huge puff. The engine burns some all the time when this is going on, just not enough to be quite so noticeable the rest of the time, maybe.
The least effective type of seal of all that are available, is the O-rings. They go inside the retainer, under the keepers, up at the top of the valve stem; all they do, is to keep oil that accumulates on top of the retainer, from running down the stem. Weak at best.
Umbrellas are less weak, but still largely ineffective. What they are, is a little thing that's shaped a bit llike its name, that goes on the valve stem below the retainer, between the retainer and the guide; it's sized so that it clamps itself firmly to the stem, and rides up and down with the valve. It partially covers the guide at full valve opening, and does a little better job than the O-ring at keeping oil from running down the valve stem; but still falls far short of the goal.
The best kind of seal is the "positive" ones. These have a little metal band that clamps them onto the guide, and the hole where the valve goes through is smaller than the stem, so they seal tight to the valve stem too. Some even have a metal tension band for the valve stem. No oil whatsoever gets past.
The part #s for stock-diameter valve guides are FelPro SS72527 for the intake; and the one to use for the exhaust is the SS72877.
Here's what really good ones look like. I hate oil-burning motors, even though it must not bother some people, if they think umbrella seals are the best ones to use. These are what I use on my own motors as well as those I build for others. Unfortunately they require machining the guides to a precision size, which of course can't be done while the heads are on the motor, and some people are evidently unwilling to do that or unaware of the possibility. The Fel Pro intake seals look somewhat like these except they're made of Viton or something like that, and they're larger, to fit over unmachined factory cast-iron guides.
Keep in mind, that the intake valve guides have oil (the crankcase, specifically the volume under the valve cover) at one end, and the intake manifold at the other. So, any leak around them, literally sucks oil into the engine. The startup puff of smoke is caused by oil that simply runs down the stem, in between the valve and the guide, and right into the intake. Lots of it can run in there when the engine is turned off. So, a whole bunch drips in, you start the motor up, and see a huge puff. The engine burns some all the time when this is going on, just not enough to be quite so noticeable the rest of the time, maybe.
The least effective type of seal of all that are available, is the O-rings. They go inside the retainer, under the keepers, up at the top of the valve stem; all they do, is to keep oil that accumulates on top of the retainer, from running down the stem. Weak at best.
Umbrellas are less weak, but still largely ineffective. What they are, is a little thing that's shaped a bit llike its name, that goes on the valve stem below the retainer, between the retainer and the guide; it's sized so that it clamps itself firmly to the stem, and rides up and down with the valve. It partially covers the guide at full valve opening, and does a little better job than the O-ring at keeping oil from running down the valve stem; but still falls far short of the goal.
The best kind of seal is the "positive" ones. These have a little metal band that clamps them onto the guide, and the hole where the valve goes through is smaller than the stem, so they seal tight to the valve stem too. Some even have a metal tension band for the valve stem. No oil whatsoever gets past.
The part #s for stock-diameter valve guides are FelPro SS72527 for the intake; and the one to use for the exhaust is the SS72877.
Here's what really good ones look like. I hate oil-burning motors, even though it must not bother some people, if they think umbrella seals are the best ones to use. These are what I use on my own motors as well as those I build for others. Unfortunately they require machining the guides to a precision size, which of course can't be done while the heads are on the motor, and some people are evidently unwilling to do that or unaware of the possibility. The Fel Pro intake seals look somewhat like these except they're made of Viton or something like that, and they're larger, to fit over unmachined factory cast-iron guides.
Last edited by RB83L69; Jun 25, 2004 at 06:38 PM.
Thread Starter
Supreme Member
Joined: Feb 2003
Posts: 1,011
Likes: 0
From: Augusta/Valdosta, GA
Car: 1987 Iroc-Z28
Engine: 350 TPI
Transmission: auto
wait, so machining is required for the seals in the pic above? i'll go with whatever works best and will be a simple, take it out of the package and put it on, kind of thing
Supreme Member
Joined: Jul 1999
Posts: 18,457
Likes: 16
From: Loveland, OH, US
Car: 4
Engine: 6
Transmission: 5
The FelPro (Viton) ones do not. The Comp Cams (Teflon) ones in the pic, as well as similar ones from Crane, Manley and others, do.
I just didn't happen to have a pic of the FelPro ones that I could use.
I just didn't happen to have a pic of the FelPro ones that I could use.
Thread Starter
Supreme Member
Joined: Feb 2003
Posts: 1,011
Likes: 0
From: Augusta/Valdosta, GA
Car: 1987 Iroc-Z28
Engine: 350 TPI
Transmission: auto
oh ok, guess i'll go w/ those felpro part #'s you listed since they don't need machining and are a better design than o-rings or umbrellas...thanks

Supreme Member

Joined: Apr 2002
Posts: 1,587
Likes: 2
before you go through the seal replacement, what color is the smoke?? if its bluish, then it is likely valve stem seals. if it is very white it is antifreeze and you will need head gaskets, maybe even a new head. the way to test this is to get a radiator pressure tester and pressurize the cooling system. remove the spark plugs and disconnect the ignition, also injectors if fi. leave the cooling system under pressure for at least 15 min then crank the engine while somebody watches to see if any antifreeze blows out of the spark plug holes.
Thread Starter
Supreme Member
Joined: Feb 2003
Posts: 1,011
Likes: 0
From: Augusta/Valdosta, GA
Car: 1987 Iroc-Z28
Engine: 350 TPI
Transmission: auto
i don't think it's antifreeze...i haven't had to top off my coolant tank in like months....my oil is a different matter though. about 1/2 qt. low every 6 weeks or so
Thread Starter
Supreme Member
Joined: Feb 2003
Posts: 1,011
Likes: 0
From: Augusta/Valdosta, GA
Car: 1987 Iroc-Z28
Engine: 350 TPI
Transmission: auto
yup i checked today just to be sure...definitely blue, and it has the odor of oil...*** i hate smoking engines...i decided i'm gonna wait to replace the valve seals until i install my headers (bout a month), so i can deal w/ the spark plugs w/o getting pissed off at the stupid exhaust mani. in the way

Thread
Thread Starter
Forum
Replies
Last Post
NinjaNife
Tech / General Engine
27
Aug 23, 2015 11:49 AM