
Homemade subframe connectors.

Thread Starter
Junior Member
Joined: Aug 2014
Posts: 64
Likes: 0
From: Mn
Car: 91' camaro rs
Engine: Sbc 327
Transmission: T-5
Axle/Gears: Stock 10 bolt w/posi 3.90 gears
Homemade subframe connectors.


Just thought I�d start sharing more of my build with everyone. I�ve had my car for 15 years now and I�ve been tinkering with it here and there ever since. I�m having a 454 LS carbed with front belt driven distributor being built right now for it. I also have a tko 600 built by liberty gears, I bought it lightly used. I plan on building a ford 8.8 soon too. Anyway I decided to build my own subframe connectors to save money. I have about 5 hours into building them and around $40.00 in materials. I just need to paint them and weld them to the car. I pretty much copied the umi version but with my own twist to it. Anyway just thought I share, thanks.


Joined: Jan 2005
Posts: 1,402
Likes: 200
From: S. UTAH
Car: 1989 IROC-Z 305 LB9 AT Convertible
Engine: LB9 305
Transmission: AT
Re: Homemade subframe connectors.
Look nice. I presume you will put the car on a "Drive on" lift, to weld them on.
Thread Starter
Junior Member
Joined: Aug 2014
Posts: 64
Likes: 0
From: Mn
Car: 91' camaro rs
Engine: Sbc 327
Transmission: T-5
Axle/Gears: Stock 10 bolt w/posi 3.90 gears
Re: Homemade subframe connectors.
Thanks!! No actually I�ll be welding them on with the car on jack stands lol I do plan on buying a lift maybe this winter, not great timing on my part but oh well. It will be easy enough to do.
Joined: Jan 2005
Posts: 1,402
Likes: 200
From: S. UTAH
Car: 1989 IROC-Z 305 LB9 AT Convertible
Engine: LB9 305
Transmission: AT
Re: Homemade subframe connectors.
Working on my 89 this week, i PUT MY oroc ON MY 2 POST lift and even though I set the pads even, the L door would not close right, till it was back on the ground. I recommend you get a GOOD muffler shop, or other, to do the welding w/ the weight on all 4 tires.
Joined: Jun 2003
Posts: 5,028
Likes: 78
From: Desert
Car: 1991 Z28 Vert
Engine: 383 single plane efi
Transmission: T-56
Axle/Gears: 8.8 with 3.73s
Re: Homemade subframe connectors.
The way to install the subframe connectors isn't with the car sitting on all four tires. You need to place the jack stands directly underneath the suspension points. You want the front drivers and front passengers side points to be as dead nuts equal as you can get them. The rear is the same concept. The ends of the outer frame rails where the rear Lower Control Arms bolt to is an easy spot to use. For the front you can use the inner frame rails immediately before or after the springs. If you can put the jack right underneath one of the K member bolts that's the best spot. Installing the connectors on a drive on lift will almost ensure that any twist your chassis has accumulated over the years or any flex your suspension may impose will become permanent.
Thread Starter
Junior Member
Joined: Aug 2014
Posts: 64
Likes: 0
From: Mn
Car: 91' camaro rs
Engine: Sbc 327
Transmission: T-5
Axle/Gears: Stock 10 bolt w/posi 3.90 gears
Re: Homemade subframe connectors.
Thanks for the advise Tibo! I know I�ve a lot of mixed instructions on how to properly install them. I was kind of going crazy trying to figure out which way I was going to do it.
Trending Topics
Joined: Jan 2005
Posts: 1,402
Likes: 200
From: S. UTAH
Car: 1989 IROC-Z 305 LB9 AT Convertible
Engine: LB9 305
Transmission: AT
Re: Homemade subframe connectors.
The way to install the subframe connectors isn't with the car sitting on all four tires. You need to place the jack stands directly underneath the suspension points. You want the front drivers and front passengers side points to be as dead nuts equal as you can get them. The rear is the same concept. The ends of the outer frame rails where the rear Lower Control Arms bolt to is an easy spot to use. For the front you can use the inner frame rails immediately before or after the springs. If you can put the jack right underneath one of the K member bolts that's the best spot. Installing the connectors on a drive on lift will almost ensure that any twist your chassis has accumulated over the years or any flex your suspension may impose will become permanent.
I did not know that. I figured level, smooth drive on ramp, proper tire size and inflation, would set the unibody "straight' so to speak.
Joined: Jan 2005
Posts: 1,402
Likes: 200
From: S. UTAH
Car: 1989 IROC-Z 305 LB9 AT Convertible
Engine: LB9 305
Transmission: AT
Re: Homemade subframe connectors.
Actually, my point was, I set my lift pads pretty even, on the unibody and that imparted enough "twist' to affect door alignment. I COULD HAVE DONE MUCH BETTER, and would have, if i was setting up for connectors.
I guess I would need to have the lift pads touch the areas Tibo mentioned, with no gap. (I have threaded screw pad adjustment. )
I guess I would need to have the lift pads touch the areas Tibo mentioned, with no gap. (I have threaded screw pad adjustment. )

Supreme Member
Joined: Jul 2000
Posts: 1,787
Likes: 20
From: Tomball, TX
Car: 89 TTA
Engine: Turbo 3.8
Transmission: 200R4
Re: Homemade subframe connectors.
The way to install the subframe connectors isn't with the car sitting on all four tires. You need to place the jack stands directly underneath the suspension points. You want the front drivers and front passengers side points to be as dead nuts equal as you can get them. The rear is the same concept. The ends of the outer frame rails where the rear Lower Control Arms bolt to is an easy spot to use. For the front you can use the inner frame rails immediately before or after the springs. If you can put the jack right underneath one of the K member bolts that's the best spot. Installing the connectors on a drive on lift will almost ensure that any twist your chassis has accumulated over the years or any flex your suspension may impose will become permanent.
Joined: Jun 2003
Posts: 5,028
Likes: 78
From: Desert
Car: 1991 Z28 Vert
Engine: 383 single plane efi
Transmission: T-56
Axle/Gears: 8.8 with 3.73s


Joined: Sep 2005
Posts: 28,015
Likes: 2,492
Car: Yes
Engine: Usually
Transmission: Sometimes
Axle/Gears: Behind me somewhere
Re: Homemade subframe connectors.
You need to get the chassis UNEQUIVOCALLY PERFECTLY ABSOLUTELY STRAIGHT, during the welding process. Remember: DURING the welding process. Not easy to do laying underneath a car.
Problem with using any kind of a drive-on is, if any of the springs sag differently from any others (such as, the LF droops lower than the RF), welding in the SFCs with it like that will PERMANENTLY LOCK IN the uneven sag.
The jack stand method can work fine but requires an ABSOLUTELY LEVEL surface for them to sit on, as well as great care in placement under the vehicle. Otherwise you do the same as above, except you lock in the floor unevenness into the chassis. Most garage floors are not adequate. If the stands are not properly placed you can lock in some weird tweeeek to the chassis.
Mine were installed on a race car chassis jig.
Joined: Jan 2005
Posts: 1,402
Likes: 200
From: S. UTAH
Car: 1989 IROC-Z 305 LB9 AT Convertible
Engine: LB9 305
Transmission: AT
Re: Homemade subframe connectors.
My IROC has good door gaps, sitting on level concrete. Hence why I was thinking drive on lift. Or course, Frame Machine would probably be best. Have it checked for straightness and corrected. THAT might necessitate panel/door adjustment, if things move. (IE the vehicle has had body work over its life, or was not perfectly straight when new.)
Joined: Sep 2005
Posts: 28,015
Likes: 2,492
Car: Yes
Engine: Usually
Transmission: Sometimes
Axle/Gears: Behind me somewhere
Re: Homemade subframe connectors.
Yup, always best to get the CHASSIS straight, independent of the bolt-ons; then hang the trim parts - fenders, doors, etc. - to match.
Used to be a joke about old Vettes; you could always tell if somebody had done body work on them, if the panels lined up. They were TERRIBLE about that from the factory.
Used to be a joke about old Vettes; you could always tell if somebody had done body work on them, if the panels lined up. They were TERRIBLE about that from the factory.


Joined: Jun 2015
Posts: 2,194
Likes: 246
From: Austin, TX
Car: 90 Formula / T-tops
Engine: 305 TPI
Transmission: MD8
Re: Homemade subframe connectors.
home-made subconnectors looking great! Question for you guys? Do you think a place set up for frame straightening would be well suited for putting on sub-frame connectors?
Joined: Sep 2005
Posts: 28,015
Likes: 2,492
Car: Yes
Engine: Usually
Transmission: Sometimes
Axle/Gears: Behind me somewhere
Re: Homemade subframe connectors.
Generally so, yes; except that a typical frame rack is REAL HARD to get up underneath and weld. Some are OK though; if it's over a pit, not just sitting on the floor, it would be likely.
Joined: Jun 2015
Posts: 2,194
Likes: 246
From: Austin, TX
Car: 90 Formula / T-tops
Engine: 305 TPI
Transmission: MD8
Re: Homemade subframe connectors.

Senior Member


Joined: Apr 2016
Posts: 733
Likes: 47
Car: 1991 base firebird
Engine: tbi 305
Transmission: 700r4
Re: Homemade subframe connectors.
the sfc look really good. please post pics once you have them fit and or welded. ive considered making my own inners. im not sure though. have way to many projects going on.
Thread Starter
Junior Member
Joined: Aug 2014
Posts: 64
Likes: 0
From: Mn
Car: 91' camaro rs
Engine: Sbc 327
Transmission: T-5
Axle/Gears: Stock 10 bolt w/posi 3.90 gears
Re: Homemade subframe connectors.
My car was in an accident before I bought it. Probably 20 years ago now. I brought it to a guy in the town I lived in that had a frame machine, he got it as close as he could but not completely straight as from the factory. He started breaking chains on his machine he was pulling so hard. I know he was the only guy in the area who had one of those machines and he sold it a while back. I don�t think I�m going to try and have it done again. I�ll live with the way it is now. You really can�t tell that it�s not perfect. That being said what the best way to level it on jack stands? I was just measuring from the fender lip to the floor to try to get it roughed in.
Thread Starter
Junior Member
Joined: Aug 2014
Posts: 64
Likes: 0
From: Mn
Car: 91' camaro rs
Engine: Sbc 327
Transmission: T-5
Axle/Gears: Stock 10 bolt w/posi 3.90 gears
Re: Homemade subframe connectors.
Thanks Evilokc for the compliment! I do enjoy fabricating projects when I have time.
Thread Starter
Junior Member
Joined: Aug 2014
Posts: 64
Likes: 0
From: Mn
Car: 91' camaro rs
Engine: Sbc 327
Transmission: T-5
Axle/Gears: Stock 10 bolt w/posi 3.90 gears
Re: Homemade subframe connectors.
Thanks for the compliment as well liquidblue! Evilokc, I will post pics once I get them in. I feel the same way as far as projects go, I put an addition on the house that I�m trying to finish up, restoring a 59� airstream the wife keeps nagging me to work on instead of my car lol, and my kids like to ask for my attention a lot haha! I guess for me working on the car can be relaxing and a break from other things.👍
Supreme Member
Joined: Jul 2000
Posts: 1,787
Likes: 20
From: Tomball, TX
Car: 89 TTA
Engine: Turbo 3.8
Transmission: 200R4
Re: Homemade subframe connectors.
I don't believe you can get the chassis "UNEQUIVOCALLY PERFECTLY ABSOLUTELY STRAIGHT" without putting it on a frame machine and you cannot weld SFC on those. A chassis jig is nice but manner time the car has to be stripped down for that to work. I'm just trying to think about this practically. Perfection is the enemy of good enough.
I think you would start to run into diminishing returns at some point. If while on a drive on lift, you measure to your suspension points and chassis points to the ground/lift and they are all level with one another, how much better would it really be to do an install any differently?
Joined: Jun 2003
Posts: 5,028
Likes: 78
From: Desert
Car: 1991 Z28 Vert
Engine: 383 single plane efi
Transmission: T-56
Axle/Gears: 8.8 with 3.73s
Re: Homemade subframe connectors.
What's problematic about it is that if someone attempts to do it this way themselves and then they put the car back down and their doors don't open or close well anymore or the t-top fitment changes slightly; that leads to a whole host of other work, sometimes even body work.
I don't believe you can get the chassis "UNEQUIVOCALLY PERFECTLY ABSOLUTELY STRAIGHT" without putting it on a frame machine and you cannot weld SFC on those. A chassis jig is nice but manner time the car has to be stripped down for that to work. I'm just trying to think about this practically. Perfection is the enemy of good enough.
I think you would start to run into diminishing returns at some point. If while on a drive on lift, you measure to your suspension points and chassis points to the ground/lift and they are all level with one another, how much better would it really be to do an install any differently?
"... if someone attempts to do it this way themselves and then they put the car back down and their doors don't open or close well anymore or the t-top fitment changes slightly; that leads to a whole host of other work, sometimes even body work..."
These cars came with a straight chassis from the factory. I've read that the factory had tolerances within 1/4". So taking a chassis back to straight isn't going to cause any problems. The doors closed and everything sealed from the factory. Over time a car might have had some twist imparted in it and it's possible a person adjusted doors, panels or glass to compensate for the twist but they can all be adjusted back.
One does not need a frame rack or race car jig to install subframe connectors just as one doesn't need a computerized laser alignment system to do an alignment.
Joined: Jan 2005
Posts: 1,402
Likes: 200
From: S. UTAH
Car: 1989 IROC-Z 305 LB9 AT Convertible
Engine: LB9 305
Transmission: AT
Re: Homemade subframe connectors.
If the car is sitting on a drive on rack and the doors operate properly, with good body gaps, wouldn't welding in the SFC's just help "lock in" the "Set" that is acceptable, on the rack? Why would the door fit, t-top go astray when it's driven off the rack?
Supreme Member
Joined: Jul 2000
Posts: 1,787
Likes: 20
From: Tomball, TX
Car: 89 TTA
Engine: Turbo 3.8
Transmission: 200R4
Re: Homemade subframe connectors.
Now, my logic may certainly be flawed, lol, but the one thing that has been preached on this site repeatedly is that you want the suspension loaded to install SFCs, whether that is using a drive on lift, jack stands under the control arms and axle, ramps, etc. Now personally, I would want to check if my chassis is straight beforehand, but I would wager the vast majority out there would be pleased with the results of installing this way, especially if they are happy with the current condition of the car (handling, height, ride, etc.) After all, does it really matter whether or not the chassis is perfectly straight? Yes/No/Maybe? I believe SFCs will strengthen/stiffen your chassis regardless.
Reading a bit more carefully on what you originally stated, I think I see your point. If we look at the scenario where your suspension, let's say the rear, has settled unequally. At this point, maybe the rear axle of your car is level relative to the ground, but the rear of the chassis/body may not be. You could measure your rear LCA mounting points on rear frame rail to the ground and see if they are equal. In the case where they are very different, say 1/2", if you install SFCs using the technique where the rear suspension loaded, you could welding in that 1/2" side to side difference into your chassis. Is that an accurate summary of what you were describing?
If I'm on the right track and you do come across such a difference, supporting the chassis by the suspension mounting points so they are equal with one another with respect to the ground (assuming it is flat) would ensure the chassis has no twist to it when installing SFCs. At the same time, you might have to tackle a bit more work if locking your chassis in a corrected manner causes some other issues to popup up.
Originally Posted by Tibo
The way to install the subframe connectors isn't with the car sitting on all four tires. You need to place the jack stands directly underneath the suspension points. You want the front drivers and front passengers side points to be as dead nuts equal as you can get them. The rear is the same concept. The ends of the outer frame rails where the rear Lower Control Arms bolt to is an easy spot to use. For the front you can use the inner frame rails immediately before or after the springs. If you can put the jack right underneath one of the K member bolts that's the best spot. Installing the connectors on a drive on lift will almost ensure that any twist your chassis has accumulated over the years or any flex your suspension may impose will become permanent
If I'm on the right track and you do come across such a difference, supporting the chassis by the suspension mounting points so they are equal with one another with respect to the ground (assuming it is flat) would ensure the chassis has no twist to it when installing SFCs. At the same time, you might have to tackle a bit more work if locking your chassis in a corrected manner causes some other issues to popup up.
Thread Starter
Junior Member
Joined: Aug 2014
Posts: 64
Likes: 0
From: Mn
Car: 91' camaro rs
Engine: Sbc 327
Transmission: T-5
Axle/Gears: Stock 10 bolt w/posi 3.90 gears
Re: Homemade subframe connectors.
Currently the car is on jack stands. The two rear stands are right across the control arm mounts on the chassis side, the fronts are at the k member. I�m going to check how the doors open today. Maybe I need to move the front stands back further? I�ll level the car out the best I can. I need to go to Lowe�s and get wire to make an extension cord for my welder for the 240 today. I was using the 120 with an extension cord to Tac all the pieces together under the car for mock up, not enough power to weld the connectors in. I have the miller 211 mig with the mvp option.( multi voltage plug) basically you can unscrew the 240 plug off and put a 120 plug on. My 240 receptacle is to far away from the car. I�d like a good answer how to do it soon by the time I get back lol otherwise I�m just doing what I think is best.
Joined: Jun 2003
Posts: 5,028
Likes: 78
From: Desert
Car: 1991 Z28 Vert
Engine: 383 single plane efi
Transmission: T-56
Axle/Gears: 8.8 with 3.73s
Re: Homemade subframe connectors.
Currently the car is on jack stands. The two rear stands are right across the control arm mounts on the chassis side, the fronts are at the k member. I’m going to check how the doors open today. Maybe I need to move the front stands back further? I’ll level the car out the best I can.
Last edited by Tibo; Aug 19, 2019 at 05:56 PM.
Joined: Sep 2005
Posts: 28,015
Likes: 2,492
Car: Yes
Engine: Usually
Transmission: Sometimes
Axle/Gears: Behind me somewhere
Re: Homemade subframe connectors.
Here's how to measure a car.
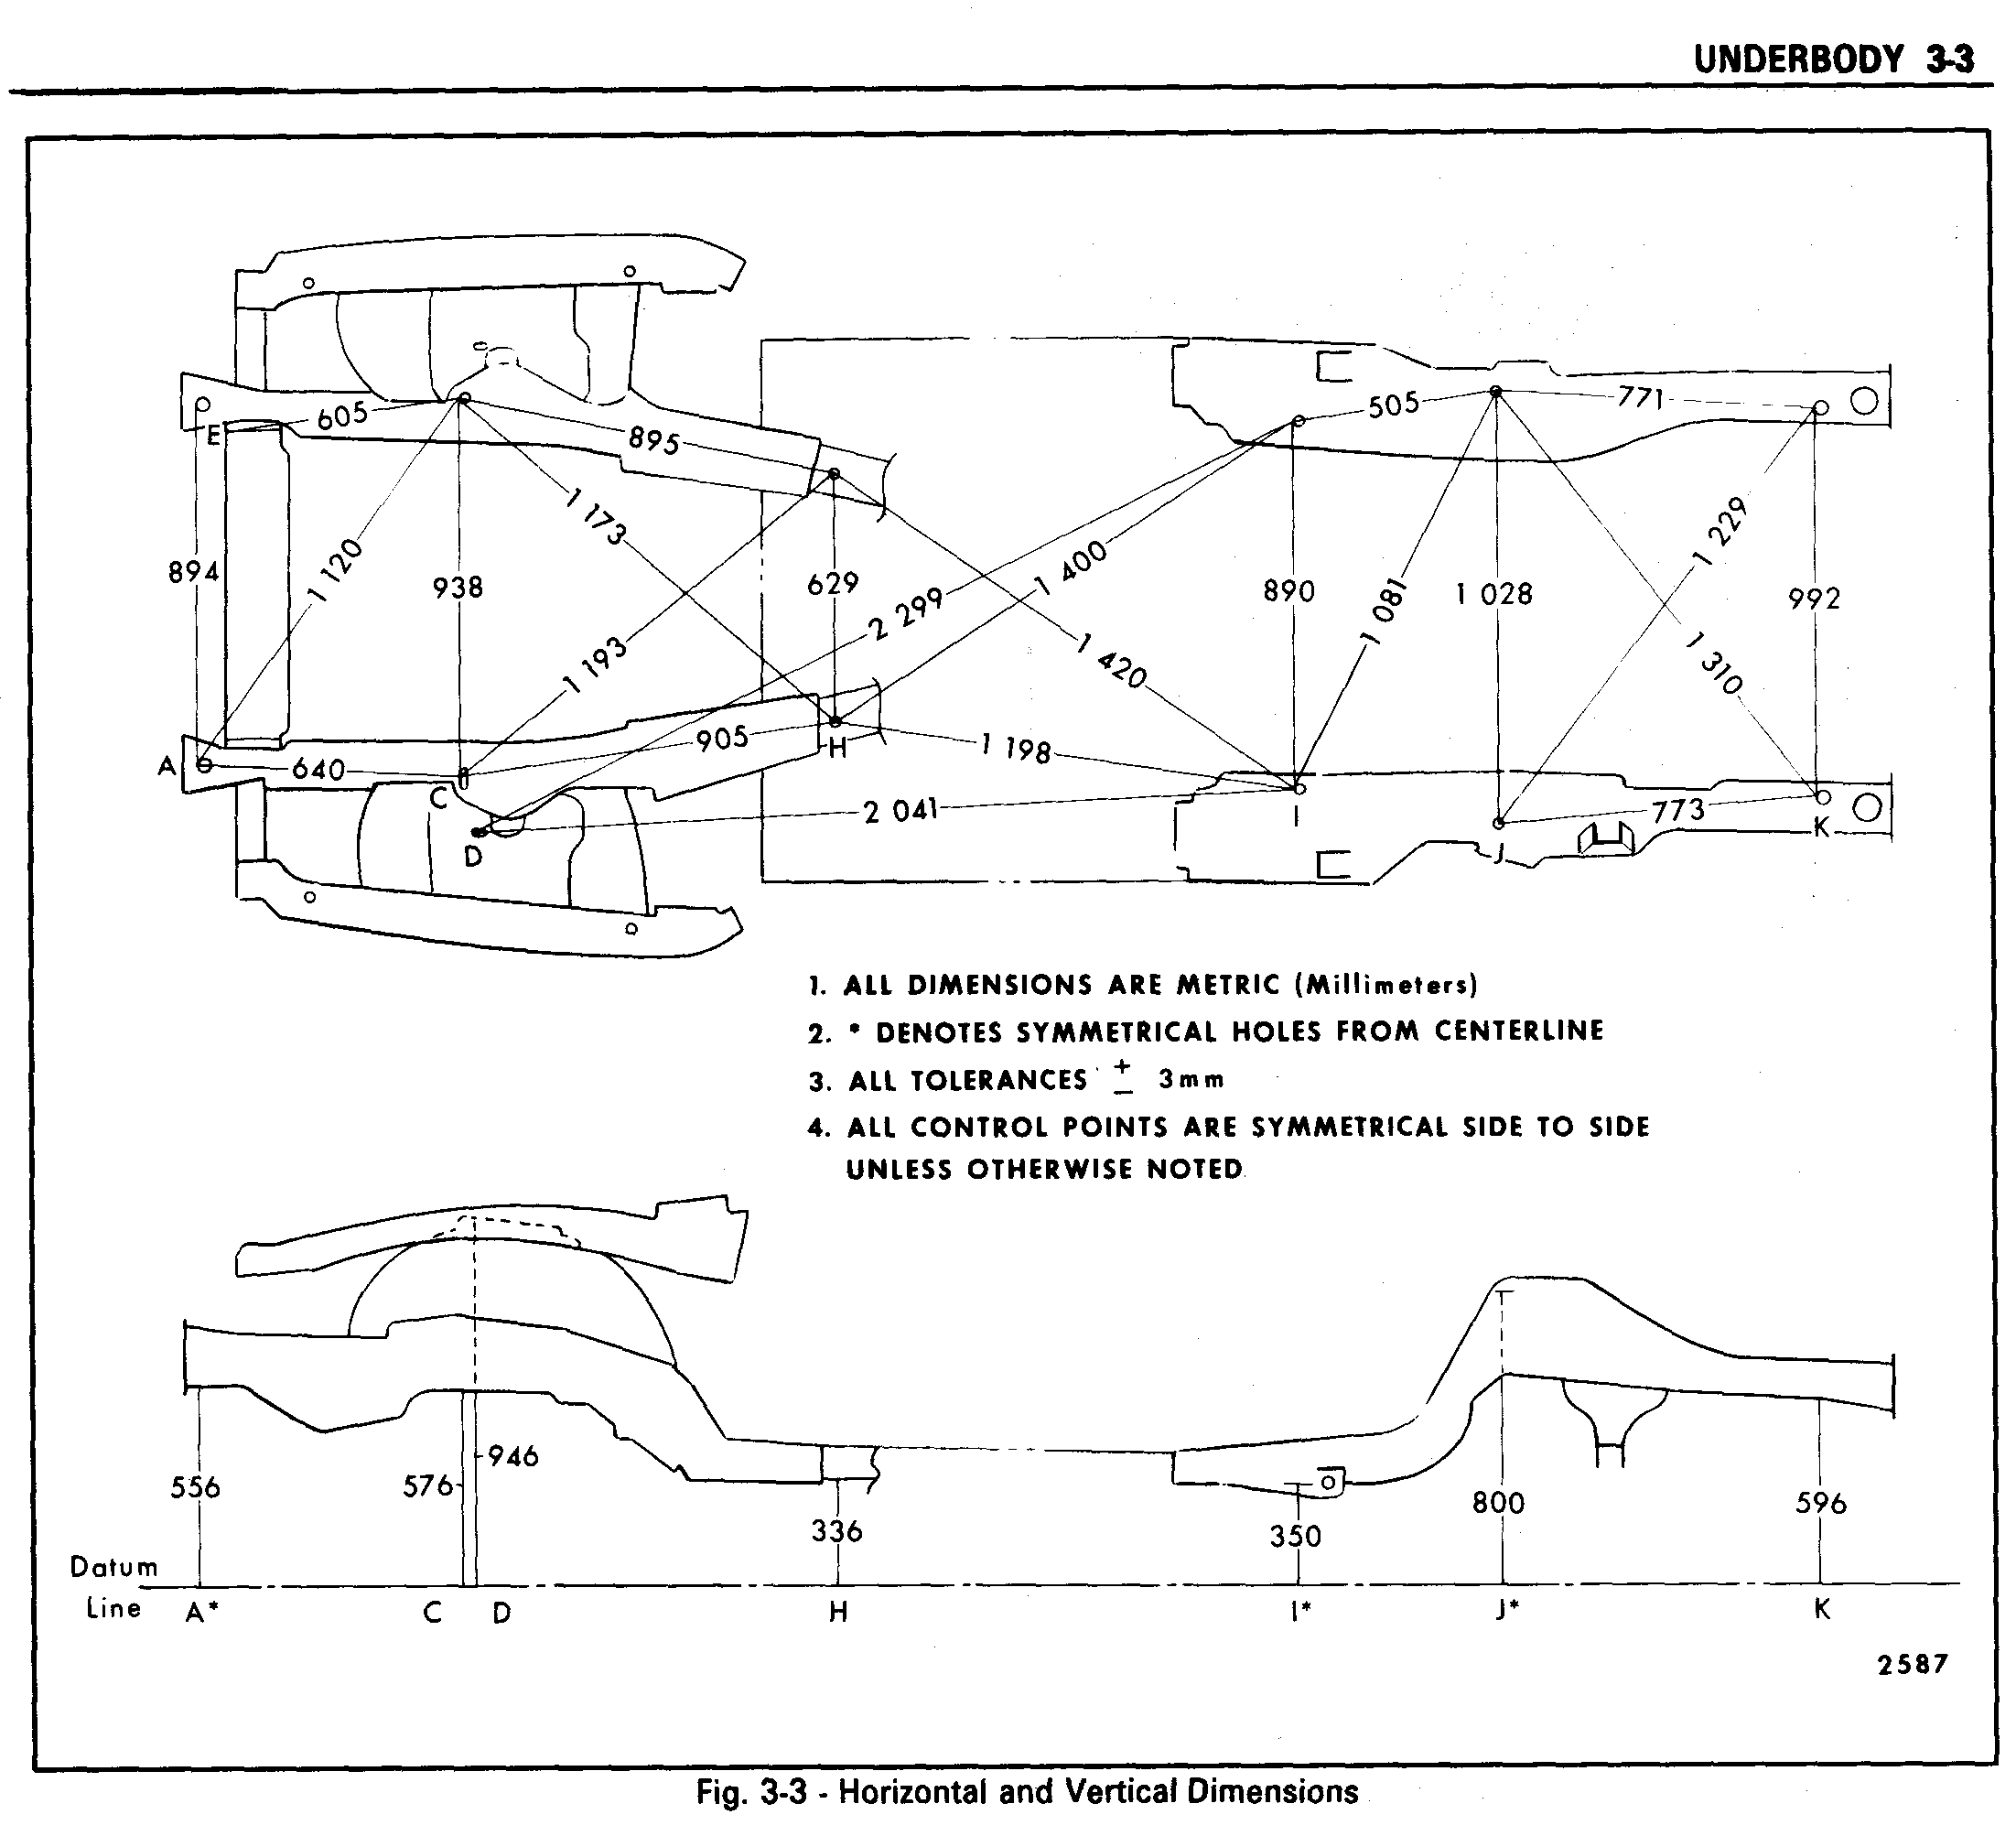


If you lift it off the ground, say 5', add 60" (about 1525mm) to the vertical dimension on these drawings.
Remember, at some point, you're into "measure with micrometer, mark with chalk, cut with axe". How many times has the car been run over bumps that scraped? How thick is the paint? How much rust does it have? And so on.
OTOH, remember that one of the SPECIFIC THINGS that the Japanese and European mfrs KICKED GM'S (and Frod's and Xler's) A$$ on back then, was FIT AND FINISH. GM might have considered these cars "good enough" at �"; the Honda in the parking lot next to it might have been made to 1/16". That's one of the reasons the American car companies got an A$$ WHUPPIN in the 70s and 80s. I remember the Lexus commercial in the late 80s/early 90s, whenever it was that they were introduced, showing the "ball bearing" test on the trunk closure, hood closure, door closure, etc. Any one of these cars would have failed MISERABLY at that. Not because they're inherently "inferior", but rather, because the entire hierarchy at the American car mfrs at that time, GM included, was so arrogant and misguided, that they thought they were invincible, and that people would continue to buy the same old crap no matter how crappy it was. After all, the "storied history of GM (Frod Xler)". NOBODY is invincible. Just because �" was "good enough" in the 80s, doesn't mean that you'd want your Project Car to be THAT SLOPPY in 2019.
�" is 6.3mm. 1/16" is the better part of 2mm. Don't P&M about 1mm; but if you can't beat 3mm, you need to try harder.
Thread Starter
Junior Member
Joined: Aug 2014
Posts: 64
Likes: 0
From: Mn
Car: 91' camaro rs
Engine: Sbc 327
Transmission: T-5
Axle/Gears: Stock 10 bolt w/posi 3.90 gears
Re: Homemade subframe connectors.
I guess I forgot to mention that there is no motor or trans in the car right now. Would that change placement of the jack stands in your opinion?
Good idea. I actually went to Lowe�s and got there extension cord wire and bought the ends too. It wasn�t cheap, the cord wasn�t unreasonable at $1.19 a foot but the plugs were $15 and $10. But at least I have an extension now.
Good idea. I actually went to Lowe�s and got there extension cord wire and bought the ends too. It wasn�t cheap, the cord wasn�t unreasonable at $1.19 a foot but the plugs were $15 and $10. But at least I have an extension now.
Joined: Sep 2005
Posts: 28,015
Likes: 2,492
Car: Yes
Engine: Usually
Transmission: Sometimes
Axle/Gears: Behind me somewhere
Re: Homemade subframe connectors.
And, all this CRAP about "suspension loaded", is just that. CRAP
Repeat after me. CRAP.
What is important is, THE CHASSIS IS STRAIGHT. Doesn't matter what state the "suspension" is in. Doesn't matter about "loaded".
Repeat after me: the important property of the object in question is, STRAIGHT.
Yes it matters about whether you take a BENT chassis that (perhaps) someone has aligned the doors and fenders to, and lock that BENT chassis into that BENT state by PERMANENTLY welding SFCs onto it that PERMANENTLY enforce the tweeeeek. You DO NOT want a BENT chassis. You want the chassis STRAIGHT when you weld on your SFCs. Then, after you're all done with STRAIGHTENING out the actual CAR, you can quite eeeeeeezily align your doors fenders hood etc. to the STRAIGHT CAR.
Remember: when you're installing SFCs, you're working on the CHASSIS. That's the part you want STRAIGHT. Not BENT. Not "loaded", not "suspension", not "fender gaps", not "doors fit", NOT NOT NOT NOT NOT. You want the CHASSIS STRAIGHT. Then and only then, you can properly align the ADJUSTABLE parts to IT. Not, fudge the NON-ADJUSTABLE part (the chassis) to "fit" the current … whatever state … the ADJUSTABLE parts like doors and such, happen to be in.
Joined: Jan 2005
Posts: 1,402
Likes: 200
From: S. UTAH
Car: 1989 IROC-Z 305 LB9 AT Convertible
Engine: LB9 305
Transmission: AT
Re: Homemade subframe connectors.
I made a dedicated 220 Volt extension cord, using a 12 Gauge, 110v cord and 220 volt plug & receptacle. I applied black dashes on it orange sheath, to denote it 220V.
Unfortunately the Harbor Freight MIG I bought about 20 years ago, NEVER welded correctly. I DID NOT KNOW this, since I (at that time) had no Mig experience.
Unfortunately the Harbor Freight MIG I bought about 20 years ago, NEVER welded correctly. I DID NOT KNOW this, since I (at that time) had no Mig experience.
Thread Starter
Junior Member
Joined: Aug 2014
Posts: 64
Likes: 0
From: Mn
Car: 91' camaro rs
Engine: Sbc 327
Transmission: T-5
Axle/Gears: Stock 10 bolt w/posi 3.90 gears
Re: Homemade subframe connectors.
Sofakingdom, thank you for the great info! Where�d you find it? I�ll look into those measurements on my next day off.
Joined: Jun 2003
Posts: 5,028
Likes: 78
From: Desert
Car: 1991 Z28 Vert
Engine: 383 single plane efi
Transmission: T-56
Axle/Gears: 8.8 with 3.73s
Re: Homemade subframe connectors.
In my build thread I covered how I set up the angles and locations for my transmission mount and rear end with plumb bobs and heavy brown paper on the floor.
Joined: Sep 2005
Posts: 28,015
Likes: 2,492
Car: Yes
Engine: Usually
Transmission: Sometimes
Axle/Gears: Behind me somewhere
Re: Homemade subframe connectors.
Where’d you find it?

I'll give you a hint... I scanned it. (in case you haven't already figured that out)
Joined: Sep 2005
Posts: 28,015
Likes: 2,492
Car: Yes
Engine: Usually
Transmission: Sometimes
Axle/Gears: Behind me somewhere
Re: Homemade subframe connectors.
Third-gen F bodies do not have a chassis.

Thread
Thread Starter
Forum
Replies
Last Post