When you click on links to various merchants on this site and make a purchase, this can result in this site earning a commission. Affiliate programs and affiliations include, but are not limited to, the eBay Partner Network.
Some questions during install of my new 406 SBC - street/strip/show/autoX
Tech / General EngineIs your car making a strange sound or won't start? Thinking of adding power with a new combination? Need other technical information or engine specific advice? Don't see another board for your problem? Post it here!
Re: Some questions during install of my new 406 SBC - street/strip/show/autoX
awesome guys, glad to see some chatter about this topic. Much appreciated!!
So, I have heard advice form a good amount of people regarding nitrous hits at "lower" rpms and whatnot. Both sides of the argument seems to make sense, and I tend to be a little more cautious most of the time, but on this day (knowing it was my last track session of the year) I was kinda being a little more adventurous with things. I certainly do NOT want to bend a rod or destroy the internals by spraying to much too low in the rpm band. I've heard from some guys in person who have had stock bottom end engines that they wack with 100-150 nitrous hits right at the footbrake launch, and according to them those engines have survived for more than a few years. I know my piston ring gap is on the tighter side, so I am cautious there. I do not have a trans brake, so I cant hold the rpms higher than about 2,000 at the footbrake launch. I had typed up a whole big thread about my nitrous install back in September, and some more details are there: https://www.thirdgen.org/forums/powe...ous-406-a.html .
I agree with the idea of a multi-component activation circuit. On my old setup on the 305, I used that WOT micro-switch AND a manual pushbutton on the shifter (along with the master arming switch. Now, with the Holley EFi ECU, I don't need the physical WOT window switch, the Holley ecu just goes off of its internal Throttle Position Sensor in order to know if I am at WOT or not. I can actually program the TPS percentage to whatever % I want it to allow nitrous to spray. If I wanted it at 16% tps, it would activate then, if I wanted it at 100%, it would do it then; I currently have it to be at 80%. So at 80% TPS that condition is met. I also have a few more "conditions" which must be met in order for the solenoids to spray... The master arming switch has to be on, the rpms have to be between my minumm/maximum rpms allowed, and I have to have the button on the shifter held down. With one of these things omitted, the nitrous will not enable and spray. Also, if AFR is too rich or lean it will cut the nitrous off.
There are a few other features in the Holley ecu software for basic single stage nitrous that I can use also.. especially the one related to "what it does when I pedal the throttle" If you look at the box on the right where it says "pedaling control" I have 3 options. I can have it simply shut off the stage, or I can pause the stage and when ALL conditions are met again it will come back on, or I can time-delay the stage to come back on. I might have to learn more about what to do here, because this could be a critical tuning choice for the health of the rotating assembly. It worked good when I had it on the progressive nitrous tune, because when i pedaled it, it restarted the progressive ramp so it was "soft" on the hit. However, on Pass #2 (the one above with the photos) it went directly back on to spray the full 150 shot as I got back wot and thats when it was a "hard hit" and probably yanked that front upwards. I am open to all suggestions and advice on this topic.
(this photo was taken of the tune I used for run 3, which was a progressive-ramp to 150 shot)
Sidenote, took the camaro out for an hour drive tonight after work and had some fun N/A while going to Tractor Supply to pickup a 1-ton chain hoist that I will get setup in the garage to help with the engine removal in a few weeks. I am determined to find the oil leak and fix it, and also fix the issue with the high oil pressure. That is priority #1 this winter, and after that I'll get into the exhaust project. I love running errands in this car and driving it as much as I can, so I am bummed that winter means no driving it for a while.
Re: Some questions during install of my new 406 SBC - street/strip/show/autoX
The only thing I would change is the TPS Percentage.
I would set it to 100%...
Minimize the amount of Intake Vacuum present while using the Nitrous-Oxide.
Re: Some questions during install of my new 406 SBC - street/strip/show/autoX
Yesterday was the last day of driving the car for 2021. Put 82 miles on it and enjoyed a few nitrous hits on the interstate when traffic was low. Removed the hood after the drive, because I am determined to find and repair the oil leak at the back of the engine. It has bothered me for some time, but now that the driving season is over, I am going to tackle it before getting into the exhaust project. I have always been mindful of the "borderline" high oil pressure (which I have described in this thread, and another separate thread) and I am sure that the oil leak was caused/magnified by the higher oil pressure. Engine builder and I think that the check-valve in the melling oil pump is probably stuck and just over-pressurizing the system. Anyways, this is all covered by the 24 month warranty on the engine, in which I am currently in month 23! So he's going to get me a replacement pump, gasket, and whatnot.
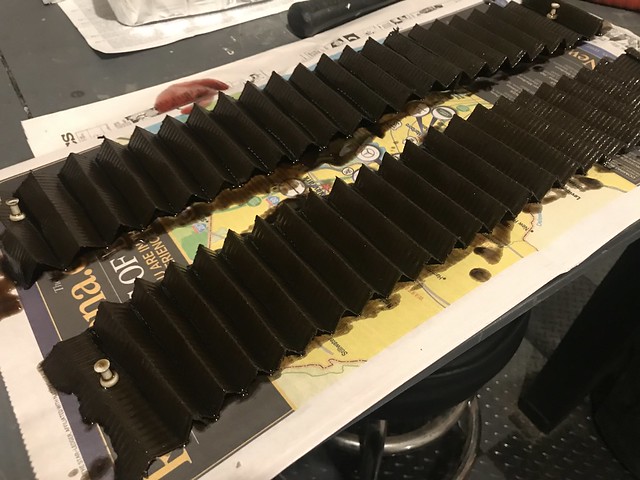
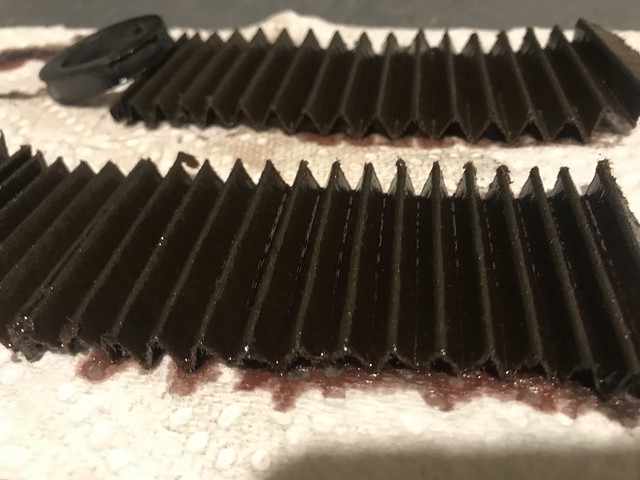
Today, I had a good couple hours of camaro work in between my current upstairs bathroom renovation project, so I removed the full exhaust including the headers, removed the driveshaft, drained the trans fluid (looked/smelled just great after 2 years of heavy use), removed the transmission, removed the torque converter, drained the cooling system, removed the radiator and fans, drained engine oil, drained power steering fluid, and some other stuff. Everything went smoothly today aside from the Lokar TV cable housing not wanting to come out from the transmission. After fighting with it for 25 minutes, I had to sacrifice it, and later on noticed a metal burr on the housing that was lodging it in place. So I'll need a new lokar cable. Also, the biggest pain in the butt was the insane moisture in the air. Everything in my garage was coated in water droplets, the vinyl floor, my tools, the tv, tool boxes, every surface of the car, every nut and bolt and socket. Plus the oil mess under the car, it was one heck of a messy day and everything was slippery. Look at the humidity droplets on the valve covers and header tubes below!...and the wet floor, simply from humidity.
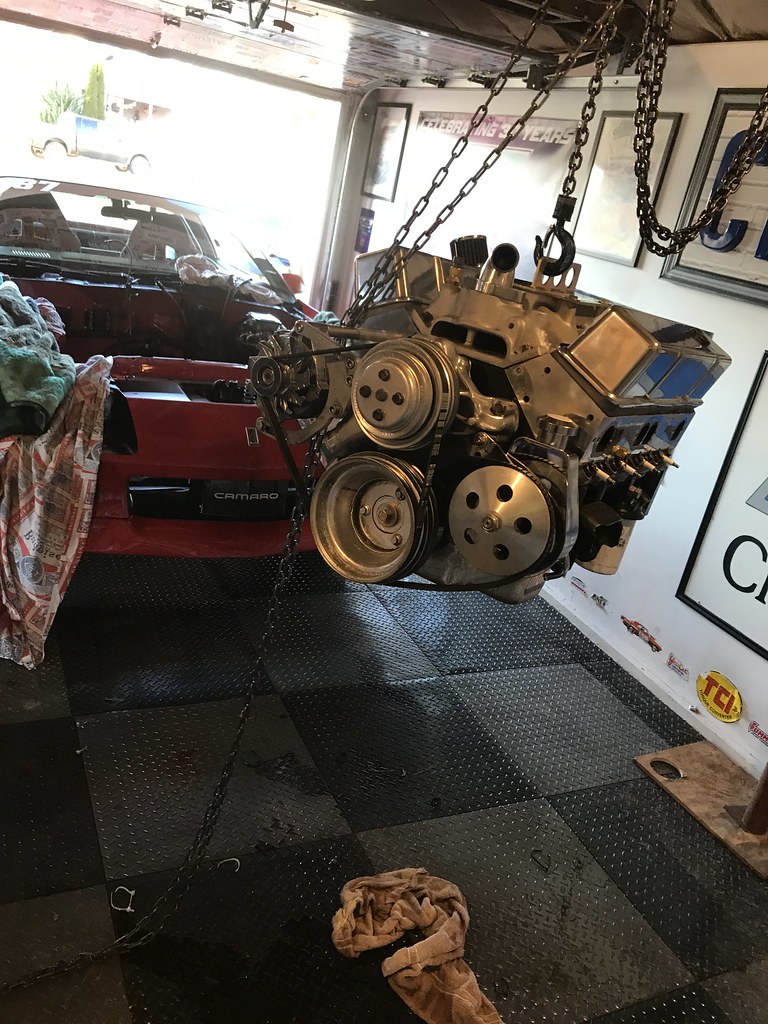
Tomorrow I will be taking off the sniper efi throttle body and the nitrous stuff, along with the fuel lines and electrical wiring. I know I probably could do the oil pump, gasket, and rear main seal with the engine lifted up in the engine bay, but I have better chances of getting everything buttoned up properly if I put the engine on a stand. I will be using this 1-Ton chain fall hoist which will be mounted to a chain (and that 10,000 pound strap) to my 2"x"10 garage rafters. I also will be putting up some screw-jack supports from the floor to the rafters to keep the beam deflection to a minimum. Once the engine is up high enough, I'll roll the car out, lower the engine, put it on an engine stand, and roll the car back into the garage. This makes more sense for me to do as opposed to the cherry picker, because with the cherry picker I would opt to remove the front nose again, and I always worry about screwing up the paint.
Re: Some questions during install of my new 406 SBC - street/strip/show/autoX
vorteciroc: Thanks! I spend a lot of time out in this small garage, so I made it look good as well as be functional for my needs. As for the transmission, I wasn't planning on doing anything to it aside from a simple exterior cleanup, and fresh fluid. I use a mix of AMSOIL ATF and the CATERPILLAR ATF that Dana at ProBuilt recommend I use. He always told me to use a few quarts of CAT ATF as it helps the planetaries live longer in autocross and road racing. I trust his advice, and after 4 years of beating on this transmission, it has done very well. At times, I consider installing a trans-brake, but then I am afraid it will be problematic in the long run. Dana has always mentioned that he doesn't recommend trans-brakes for 700r4's. Also, the $500 price tag isn't in my budget this year.
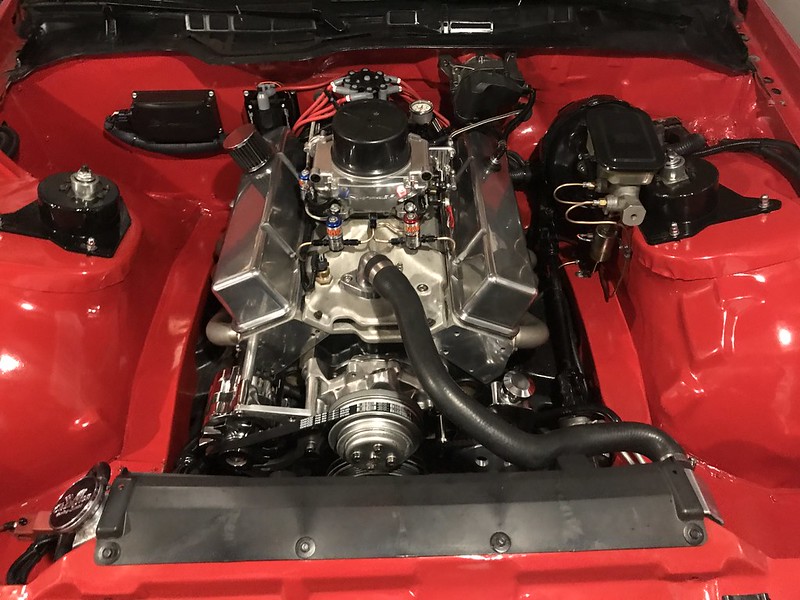
-As for photos of the engine bay sheetmetal work, that can all be found in my previous "pre-engine install" thread: which is located here: https://www.thirdgen.org/forums/tech...rior-next.html scroll down to january 16, 2020 which is post #45 .... looking back, man I wish I had done some stuff a little different. I recently got my own TIG and MIG welder and have much more ability to do better. as for the wiring, I can also do better and I will be re-doing some of it these next few weeks.
Update:
Got back out in the garage around 1 PM today and by 3 pm had the engine out of the car. Started by taking off the sniper efi and nitrous stuff, as well as the distributor, starter, and undoing a bunch of the wiring. Hooked up the chain's hook to the lift plate and the engine came out very easy; almost too easy. The chain hoist system worked just fine. Once it was up in the air, my dad and I just simply rolled the car back a few feet and lowered the engine down. Then I took off the flexplate and bolted the engine to the engine stand. Cleaned up some fluids, rolled the engine off to the side, and rolled the car back into place. Didn't get any further than that, aside from some tool cleanup, and then I went inside and continued the bathroom project.
I was really hoping to see the oil leak coming from one of the little pipe plugs at the back of the engine, but they all look sealed up nice and tight. Tomorrow or Tuesday after work, I will get things cleaned up and maybe flip the engine over to remove the oil pan and see what is going on with the pump. Wherever the leak is, the flexplate and converter sprayed the oil on everything, so I have a bcnh of cleanup to do. While the engine is out I want to redo a bunch of the under-hood wiring (again) and move some of it inside to my new fuse block arrangement under the dashboard.
Re: Some questions during install of my new 406 SBC - street/strip/show/autoX
Thanks for Posting the Hyper-Link, and the Images!
Your Thread (the one in the Hyper-Link that you Posted for me) was Amazing!
I very much enjoyed it!!!
I would clean the exterior of the Engine (very carefully with some type of solvent... don't just spay it everywhere) and give everything a close inspection for any other sources of Oil Leaks...
The Engine not running, makes things more difficult...
It would be so much easier to have the Engine running with some UV-Reactive Dye in the Engine Oil.
Below is the only Image that I saw, with a Seal that looks problematic:
The Black Oil-Pan Gasket (1-Piece, I think?) seems as if something contacted it/ damaged it.
What is the Make/ Model of the Gasket?
I personally have only used the Blue Fel-Pro 1-Piece Oil-Pan Gaskets (they produce a few different variations that can make things easier in certain situations).
Hopefully you are lucky, and a new 1-Piece Oil-Pan Gasket will be the only thing needed.
Any other Upgrades planned?
I can always recommend some!
Last edited by vorteciroc; Dec 13, 2021 at 09:10 PM.
Re: Some questions during install of my new 406 SBC - street/strip/show/autoX
Originally Posted by IROCZman15
vorteciroc: Thanks! I spend a lot of time out in this small garage, so I made it look good as well as be functional for my needs. As for the transmission, I wasn't planning on doing anything to it aside from a simple exterior cleanup, and fresh fluid. I use a mix of AMSOIL ATF and the CATERPILLAR ATF that Dana at ProBuilt recommend I use. He always told me to use a few quarts of CAT ATF as it helps the planetaries live longer in autocross and road racing. I trust his advice, and after 4 years of beating on this transmission, it has done very well. At times, I consider installing a trans-brake, but then I am afraid it will be problematic in the long run. Dana has always mentioned that he doesn't recommend trans-brakes for 700r4's. Also, the $500 price tag isn't in my budget this year.
I am always happy to see (or to hear from other Members) that Dana/ PBA is still always passing on my recommendations!
I really like Dana a lot!!!
He always tries to do everything that he can, to make the best outcome for his Customers.
He always gets the best Parts for a Customers needs ...or the best Parts with in a Customers Budget.
He always does what is necessary for the best Service that he can provide...
it does not matter if he is providing Technical Help, Selling Parts, Selling a complete Kit, or a Transmission!
He does not skimp, or cut corners!
He researches every little detail!
Now a days, he will call me for anything that he needs to know (New Part designs, or other New changes)!
He has always called TransGo, Sonnax, or ACDelco for Tech Assistance, when he did not know something!
He has never been shy or afraid to say, that he does not know something, or understand something.
He will always contact Me for help.
Most people in this Business would lie or fake knowing something (to look good).
Dana would never ever do that! He will go find out what he did not know... then get back to you, and pass on the Information!
He rally is the Best!
In my opinion, this makes him the BEST person to deal with for THM700-R4 and 4L60E Transmissions and Parts!!!
The BEST!
He will do whatever it takes to provide the BEST Service/ Parts/ Transmissions possible!
Did I say that I really like the Guy?
Re: Some questions during install of my new 406 SBC - street/strip/show/autoX
Is that NOT a 1-piece oil pan gasket?
I'd never use anything else. Even when I dropped the oil pan for a cam swap, everything buttoned up leak free. I still like a dab of the Right Stuff in those corners too.
As vortec pointed out, maybe a gasket is all that's needed. That and maybe some oil pan hardware that has a shouldered bolt (like the ARP stuff).
Re: Some questions during install of my new 406 SBC - street/strip/show/autoX
excellent guys, thanks.
Vortec: as for upgrades see below, but I would love to get this car to pull a proper wheelie, so perhaps one day I'll toss in a transbrake, even if I don't use it all that frequently. I really just want that feeling of being rocketed in the air, and also a cool photo for the garage wall! Not sure if you or Dana have any specific 700R transbrakes your recommend?
Skinny: I am pretty sure its a 1 piece oil pan gasket. I peeled it off today and it broke into pieces, but it did appear to be 1 piece. I will be calling the engine builder tomorrow to find out what gaskets he used so he can send me some (or I can just order em). I don't think I want to do cork gaskets anymore, so maybe I'll find a proper synthetic gasket for the oil pan and also for the valve covers too. Suggestions? (Dart SHP block 406 sbc)
- your comment about the shouldered oil pan hardware has me intrigued.. would ya mind enlightening me ?!?
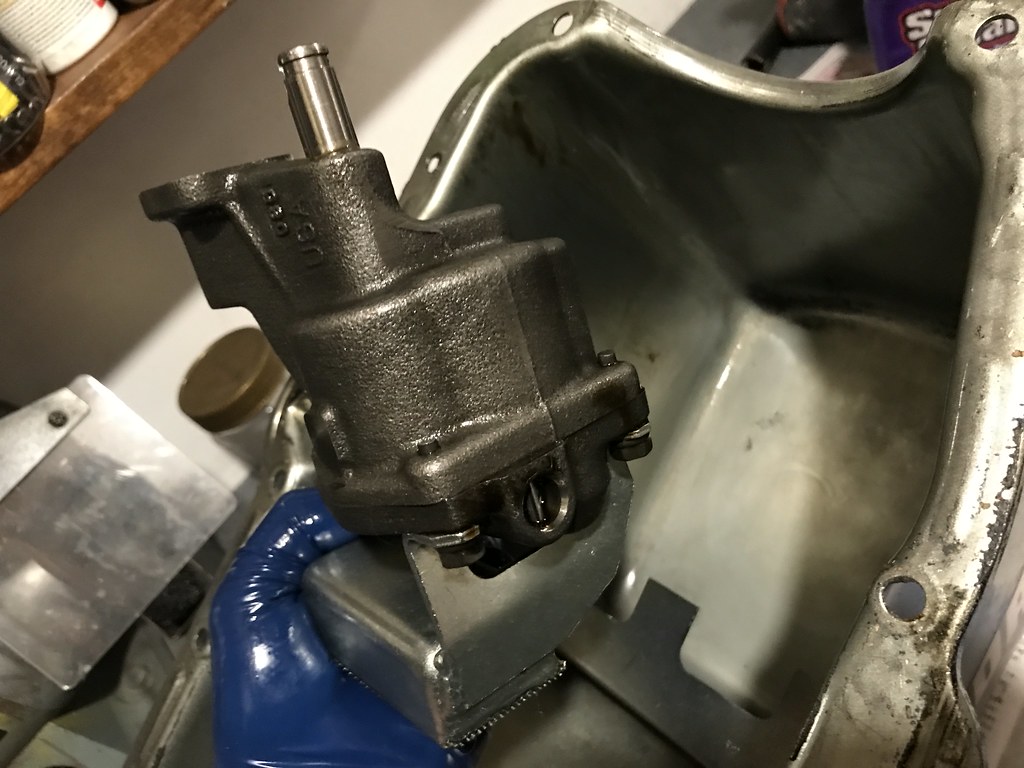
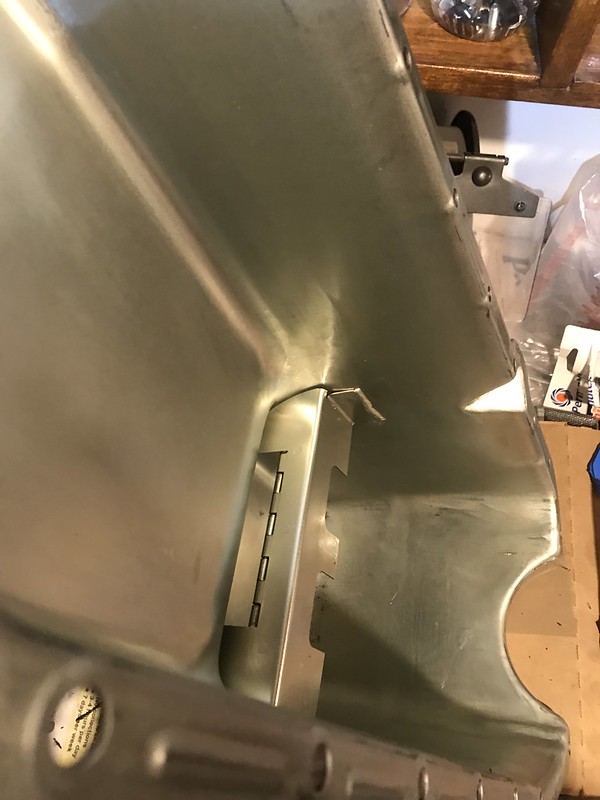
I only had an hour after work today to work in the garage, but I flipped the engine upside down, removed the oil pan, noticed the flappy oil pan gasket at the same spot you guys are seeing it (see better photos below) and then examined the oil pump before taking it off. It is the Melling M55Hv (high volume) oil pump. I've never inspected one before, so I am not really sure what to look for regarding a "stuck" check spring or check ball. No matter what, this pump is getting replaced. Does anything look awry? Should there be some kind of cap/cover on that port where you can see the spring coiled inside the hole (photo below) ?? I took off the rear main-cap also and I looked at the blue rear main seal and it did seem intact, but I poked at it a little bit and probably disrupted it's sealing surface, so I will simply get a new 2-piece rear main seal. This is as far as I plan on taking the engine apart this calendar year It is healthy and the only issues were: high oil pressure and oil leak. I'm in no need of upgrading hardcore parts, so this is more engine maintenance project. I wiped a few things down real quick, but I have got some serious cleaning to do one of these upcoming days.
As for additional winter upgrades my list includes:
-reinstall engine, transmission, converter, driveshaft, radiator, etc. (December)
- redo a bunch of engine bay wiring (December)
- find, buy, install a proper set of long tube headers (January)
- build a y-pipe and install it to a new magnaflow 4" exhaust setup (January-February)
- research and buy a set of 28" tall drag tires on a 15" wheel (April)
- rust repair under windshield channel and new windshield (April-May)
Last edited by IROCZman15; Dec 13, 2021 at 09:44 PM.
Re: Some questions during install of my new 406 SBC - street/strip/show/autoX
Originally Posted by skinny z
Is that NOT a 1-piece oil pan gasket?
I'd never use anything else. Even when I dropped the oil pan for a cam swap, everything buttoned up leak free. I still like a dab of the Right Stuff in those corners too.
As vortec pointed out, maybe a gasket is all that's needed. That and maybe some oil pan hardware that has a shouldered bolt (like the ARP stuff).
I think it is a 1-Piece Gasket... but I can't tell from the Images.
If you compare all the Original SBC Engine Gaskets to all the New Gaskets...
The difference in design/ materials, is AMAZING!!!
From pieces of Rope for a 2-Piece Rear Main-Seal... to a 1-Piece Design that is available in several Rubber-Materials (Viton, Silicone, Dry-Teflon, ETC).
Here, which version do you prefer in the Image below...
The Rope-Seal on the Left, or the Modern Seal on the Right:
From 4-Piece Cork and some horrible composition of Rubber for the Oil-Pan... to a 1-Piece Design that is available in several versions (Like the Steel-Core Silicone-Rubber 1-Piece Gaskets).
-OR-
The most modern Design for the Vortec Intake-Manifold, is awesome!
There is so much more too!
It must sound strange to most of you...
But I find Gasket Technology to be very interesting!
The Difference from the 1950s, to the New Gaskets used on the Gen-III/ Gen-IV SBC Engines... is absolutely incredible!
All of the Gaskets (Oil-Pan for example) are a Steel-Gasket with Rubber in specific places... that make an excellent all-around Gasket!
...and the Other Gaskets are the same Design:
Not to forget the MLS Cylinder-Head Gaskets!!!
Last edited by vorteciroc; Dec 13, 2021 at 11:11 PM.
Re: Some questions during install of my new 406 SBC - street/strip/show/autoX
Originally Posted by vorteciroc
This is my gasket of choice.
As for the shouldered oil pan bolts, ARP's version provides a nice broad base to spread the load. Combine that with the anti-crush sleeves built into the pan gasket and it's practically goof proof.
Also available in stainless steel for you showy guys!
Re: Some questions during install of my new 406 SBC - street/strip/show/autoX
I'm a little suspicious of this injury...
_________________________________________________________________________
The 2 piece RMS is often difficult to seal up. The two parts I see are offset which is common good practice. Some also elect to apply a small dab of silicone to the butt ends of the seal halves.
Last edited by skinny z; Dec 14, 2021 at 10:59 AM.
Re: Some questions during install of my new 406 SBC - street/strip/show/autoX
Awesome info fellas, thank you. Vorteciroc: yea, there is a huge difference in gasket quality in those pictures. Very neat. I do like that idea of the 1 piece oil pan gasket. After chatting with the engine builder, they do use that 4 piece cork/rubber oil pan gasket on their "basic" builds like mine. Skinny: I am also curious about how that portion of the rear oil pan's gasket tore like that, I'm not smart enough to come up with a practical hypothesis, but I am wondering if the high oil pressure added to it? This is the only compromised spot on the pan gasket. The blue 2 piece rear main seal was intact and did not appear to be leaking. I will be replacing it anyways.. see below. Also, I do like the idea of those shouldered pan bolts. I Think I will go with those for sure.
yup, thanks Matt. Makes sense!
I did a little research today and brought the pump to work where I disassembled it..took that roll-pin out and the spring out. I couldn't verify that the spring was stuck or not, but I did learn how it all worked when I called Melling just after I took it apart. The internal pressure relief valve slides open to relieve pressure (controlled by the spring). If the valve or spring is stuck, it would cause high pressure as it is unable to bypass the excess fluid. According to melling, the spring in this current pump is a 58 psi spring. Which makes sense, because i was getting 60 psi (on my stock camaro dashboard's oil pressure gauge) for many months. And then all of a sudden after racing at island one day LAST October, it went to 80ish psi and lived around there ever since. Melling also said, that 80psi isn't dangerous back then when I called them, and they said the same exact thing to me today. During our chat today, they did agree that I should repair or replace the pump. Melling then told me that they would recomend a better version of the pump, one with better gears, a chromoly shaft, a more robust "neck", and a (blue) spring installed that is pre-set to 70 psi. It also comes with another 58 psi spring, but he said the 70 psi would be best for me due to how I use the car and the rpms I rev to.
-The pump they recommended to me is the Melling Select # 10550ST. ( link contains a video) https://www.summitracing.com/parts/m...gaAh9SEALw_wcB
Looks like I would have to buy a pickup tube though? And then weld it on to the pump? Am I correct ?
I then called the Engine builder (Pat at Nyes Racing Engines) and he agreed that this pump would be great, along with the blue 70psi spring. We also chatted about rear main seals and the oil pan gasket failure as well as what gaskets to use for the rebuild.
FelPro Rear main seal: https://www.summitracing.com/parts/f...8aAlUuEALw_wcB
OR,
I could buy the bottom end block full gasket set...but I don't need most of those gaskets, and they seem inferior to the synthetic ones. https://www.summitracing.com/parts/fel-cs77332
but this comes with the 4 piece cork gasket set for the oil pan. I'm really thinking of using the 1 piece synthetic oil pan gasket that you guys mentioned above. Do you have a specific part number, or should I just find the one on jegs/sumit that matches my dart shp gen 1 sbc block?
Re: Some questions during install of my new 406 SBC - street/strip/show/autoX
According to Dart their SHP block uses a 1981-1985 stock style oil pan & passenger side dipstick.
A search at Summit specs out a Fel-Pro OS34510T. There's a note that it's a thick front seal as opposed to the thin version.
Also from Summit is an explanation as to which is which.
Over it's lifetime, the SBC used 2 different Oil Pan Gaskets. The difference between them is the thickness of the gasket in the area that meets the timing cover:
A "thin seal" is about 1/4 in. thick.
A "thick seal" is about 3/8 in. thick.
Which pans use which gaskets?
The OEM oil pans made between 1955 and 1974 used the "thin seal."
The OEM oil pans made in 1975 and later used the "thick seal."
Most aftermarket oil pans use the "thick seal."
So tying that all together with World's specification and Summit's explanation it looks to be a thick gasket for your SHP block.
You can measure the current seal for verification.
Re: Some questions during install of my new 406 SBC - street/strip/show/autoX
NoEmissions: Yes, I do see the nomenclature of how the sleeve/spring/valve function now. It is always more helpful for me to put my hands on something mechanical and see it function as opposed to a photo or by word of mouth. Even if the pump is a little loud, I am ok with that, and odds are that I won't hear it over the upcoming long tube headers and exhaust project (January). Glad to see you approve of the pump style though, as I do trust your opinion.
Skinny Z: thanks man. I took out my digital caliper to verify that I had the "thick" groove despite cross-referencing the gasket kit the engine builder had used initially with the new composite style. I appreciate you giving me the advice on this though!
.
The parts arrived Friday and I got them installed. The new melling "shark tooth" style oil pump has many benefits I listed above, and it also is said to do away with any "pulsing" that the straight-cut gears cause and oil pressure results in a fluttering gauge. So since I will be adding a secondary oil pressure gauge (on the A-pillar), I should have a rock solid and accurate oil pressure reading from both gauges. I kept the 70 psi spring in the pump, but the pump kit came with the 58 psi spring if I ever want to change it out. The oil screen/pickup did not come with the pump, so I measured and did my research to get the right depth one. I welded the pickup tube to the pump also. I went with the FelPro 1piece gasket with the thick groove at the timing cover. It came with new bolts also. I also installed a new Felpro 2900 rear main seal, making sure to offset it 3/8" from the block and dabbed a touch of permatex "right stuff" 90 minute gasket maker on the ends of the RMS that meet eachother. I also used this same permatex at the front and back corners of the block before installing the felpro oil pan gasket. Did some degreasing of the engine while it was on the engine stand, and installed a new oil filter as well. Took a few hours and opened up all the engine bay wire loom to reconfigure the wiring a bit better. Cut out some unnecessary stuff, combined grounds, used label maker on important wires, and relocated some wiring to go inside the cabin to a separate fuse block I mounted under the passenger dashboard area. Tucked everything away in split loom and temporarily routed it in place.
With everything on the engine buttoned up, I rolled it over to the chain hoist and got the hook on the lift plate. My dad and a hot rodding neighbor came by and we dropped the engine in, landing it in place like a perfect dream on the first shot. Two motor mount bolts slid in without any persuasion. Super simple and effortless. Got the chain hoist and pipe-jacks out of the way just in time to go meet-up with a fella who bought my old Nitto 555 tires from me (see ad in classifieds). He has some turbocharged volvo drift car and was excited to have a set of tires to fry, so its cool that my old tires will be laid to rest in a long smokey drift burnout instead of just discarded to the trash. Anyways, with only a little time left in the afternoon today, I popped in the hyperspark distributor, bolted on the nitrous plate and its wiring/plumbing, and also installed the sniper throttle body and half of it's wiring. I have a few hours tomorrow afternoon to try to get the transmission, converter, driveshaft, headers, radiator, wiring, plumbing, fluids, etc taken care of.
Sidenote, next month I am removing the main crank pulley and the water pump pulley and getting them professionally finished. Had zero luck finding a local NJ chrome shop (called 11 potential places and struck out) and I am fearful of shipping them because in recent months USPS and UPS has completely lost 4 of my outgoing packages. But there are a few local places that do similar shiny-silvery coatings, so I am going to try that. Also opting for the less flashy non-chrome finish on these pulleys because I don't want TOO much attention to be drawn to a stamped steel pulley, but they do look very bad with my poorly done "chrome" aerosol paint job that is 2 years old and flaking off. Was quoted about $25-$30 per pulley so thats not a bad deal.
Re: Some questions during install of my new 406 SBC - street/strip/show/autoX
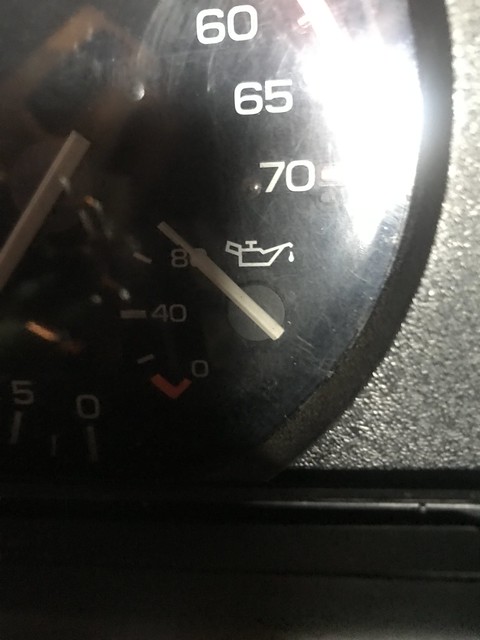
It was a busy week for everything except the car, but I finally had a few hours on Friday and Today to get stuff accomplished. Got the converter, transmission, driveshaft, (old) headers, radiator, fans, electronics, nitrous, distributor, sniper efi, fuel lines, starter, new Lokar tv cable, trans fluid lines, etc etc installed. Poured in some fluids too. Cranked the engine over without fuel just to make sure everything sounded normal. Since it did, I put fuel to it and the damn thing fired right up. Oil pressure was there right away and not "off the charts" like I was used to seeing. My dash gauge is probably not super accurate, and the 20w-50 oil was cold/thick so the dashboard gauge displayed higher than the 70 psi that the 70 psi spring in the pump should produce.
(Two gallons of the evans was the stuff I removed/saved from the cooling system a few weeks ago, so I only needed to buy one new gallon...and turns out, I only needed about 1pint from it anyways!)
Later on, hours AFTER I put in the 20w-50 VR1 and ran the car for a bit my buddy suggested I put in some lighter weight oil for the cold winter ahead. So I drained the fresh VR1 and put in some Valvoline 10w30 because I do plan on running the car occasionally and doing some short test drives during the cold winter anyways. I saved the brand new VR1 and it will go back in the engine around March. Maybe I am overthinking it, but the brand new oil pump and gaskets/seals might get worked-in better without having to pump 70 psi of thick 20w-50 oil during cold weather cold-starts.
I cut open the old oil filter (May 2021) and the transmission filter (February 2021) like I usually do, and everything looked very good. Just a little bit of metallic sludge on the magnet of the transmission filter, but the filter element was clean. Same for the engine oil filter, very clean.
Oil:
Trans:
I have a few more button-up and clean-up things to do tomorrow since I am off from work, but afterwards I plan to take the car on a road test. If everything is in order, I can start moving on to the research/purchase of some of the other winter projects.
- Long tube headers with a full exhaust
- Set of gauges in the A-pillar (oil pressure, fuel pressure and secondary Oxygen sensor)
- fuel tank access door in the trunk
- getting water pump pulley and crank balancer pulley refinished
- replacing oem steel transmission fluid lines with CopperNickle 5/16" lines
Re: Some questions during install of my new 406 SBC - street/strip/show/autoX
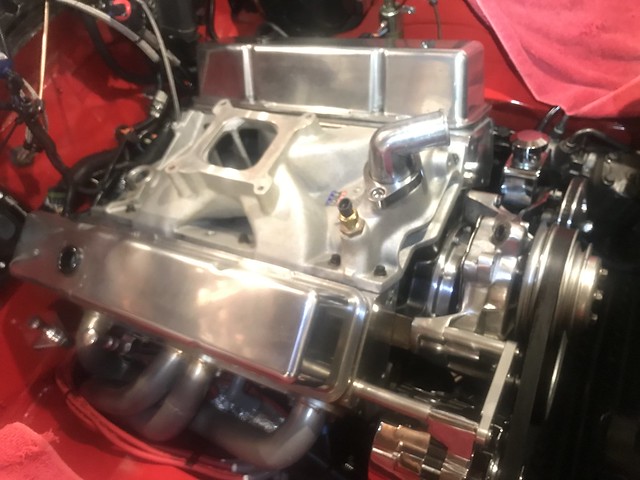
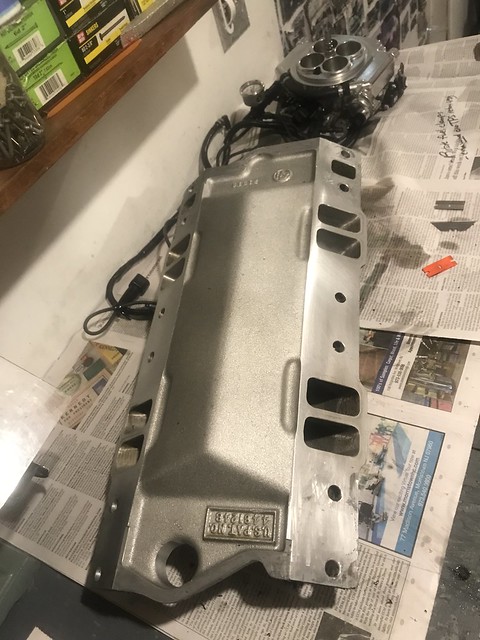
Got stuff on the top of the engine taken care of and fired up the engine again. Took it around the neighborhood to get some heat in the engine so that I could check/adjust the timing. When I pulled back in the driveway, I was stunned to see oil dripping at the back of the engine. However, it was not from the rear main seal or oil pan gasket. It was also not from the head gasket area or valve covers. At first I thought it was the little pipe-plug at the back of the block by the distributor, but sadly it looks like the rear china wall has a leak at the intake manifold gasket. This is a new leak and for sure 100% was not there when I was using the car during the spring or summer. My buddy told me that sometimes (not always) the intake manifold gasket may develop a break in the sealing surfaces when using the carburetor style engine lift plate that I used, because the weight is hanging on the manifold bolts with the gasket in between. . This makes total sense, and I wish I had thought of this weeks ago. BUMMER! Looks like I will be ordering a replacement intake manifold gasket, and pulling apart the top end again.
I just do not want any leaks, and even though it is a minor oil leak, it is not going to get better on its own, so I am going to take care of it next. After setting the timing and topping off fluids, I took the car for a longer drive, and it was ripping, just blowing off the cold tires on the cold road! Good fun. Oh, and oil pressure is now right about 70psi according to the dashboard gauge, so I am super happy. Also, no idea what is with my trans temp gauge, its pegged at max, so possibly has a short or stuck needle, I'll need to get that fixed next time I am under the dashboard.
Re: Some questions during install of my new 406 SBC - street/strip/show/autoX
So, slight bummer about the intake leak, but nothing too terrible int he grand scheme of things. Pulled everything apart one day last week and ordered a set of Edelbrock gaskets (same that were on it). Once they were delivered a few days later, I used some Permatex 90 minute rtv and got everything installed. Let it cure and fired up the car. No leaks, all set. Good stuff
I have been doing a whole lot of research on the exhaust components, mostly here on thirdgen.org where I have a longgg thread discussing this topic. link: https://www.thirdgen.org/forums/exha...ons-700-a.html There were a few options, but my budget is limited for this exhaust project so some of the high dollar custom built headers were not a realistic option. I knew I needed a 1.75" diameter primary tube and I wanted a long tube setup that maintained good ground clearance. The hooker super comps and dougs hang a little low,and my car is already low. A buddy of mine was going to give me his hooker super comps, but many of the primaries were bashed in and would need a ton of work, plus some type of ceramic heat coating. They were my optionB. Option A, was a set of those chineese ebay headers that 3rd gen and even 4th gen guys have had pretty good success with. At $212 with free shipping I am willing to give them a try.
link: https://www.ebay.com/itm/30361071372...151000b2p00004
These tuck up well and I have seen plenty of photos that show great clearance. Unfortunately they have a collector that goes from 3" and necks-down to 2.5". So my plan is to simply cut off the necked-down part and weld on my own flange or v-band at that point.
very long thread that has been going on for many years regarding these ebay longtubes: https://www.thirdgen.org/forums/exha...gtubes-10.html
I am also pretty much settled on buying a 4" mufflex "cat back" setup. I have no desire to fight a set of dual 2.5" exhaust pipes to the back of the car. Not interested. The mufflex 4" will be tight in some key areas, but I think i ca make it work with much less headache than a dual pipe setup. I will have to decide on which muffler I want to go with, but I think i am going to skip a spintech, and probably go with the magnaflow or flowmaster. I do not care about having dual tailpipes, so it will be a single 4" in and 4" out muffler with a turndown under the bumper.
link: https://mufflex-performance.com/1982...lowmaster.html
I called Denny at mufflex and he said there is no wiggle room on the price, even if I drove down to pick it up. He did say that prices are going up quite a bit for 2022, but he could lock me in at the previous listed price.
What all this means, is that I will be building my own collectors and y-pipe which will either incorporate a single 4" electric exhaust cut out or two 3" cut outs. I already have one 3" cutout, so if space allows I would do two 3" cutouts right after the collectors and before the merge. if not, I'll sell the 3" cutout that I have and buy a 4" instead. I've seen some fbody guys get creative and cut out pockets of the factory inner subframe rails. I might also do this too, and the car is solid-enough to do this because of subframe connectors and 6 point roll bar. I might have to build my own trans crossmember, and also modify the S&W relocated torque arm mount (which doubles as a driveshaft loop). So I have some work cut out for me this month, but I am ok with that.
I will end up selling the dynodons headers and y-pipe after my exhaust project is complete, so if anyone is interested, shoot me a PM. They are 1.75" primaries but a short/mid length header. The collectors are 2.5" and a ball-cup style mating surface. The y-pipe is in great shape and was cut/welded to gain extra ground clearance. I have had these on the car since about 2007, and they have served me very well. Probably will be for sale mid February, local pickup would be preferred.
Re: Some questions during install of my new 406 SBC - street/strip/show/autoX
I left this thread quiet for a bit and started a whole new thread for the exhaust system project. It is pretty much complete and included me cutting out some oem frame rails, building my own transmission crossmember from scratch, redoing torque arm mount and driveshaft safety loop, some 1.75" long tube stainless steel ebay long tube headers, building my own 3" diameter collectors and y-pipe, a 4" mufflex exhaust system with the magnaflow muffler, and some other stuff. Was a lot of work under the car, but I think it was well worth it. Sounds good and will flow sufficiently for when this car is running on the nitrous.
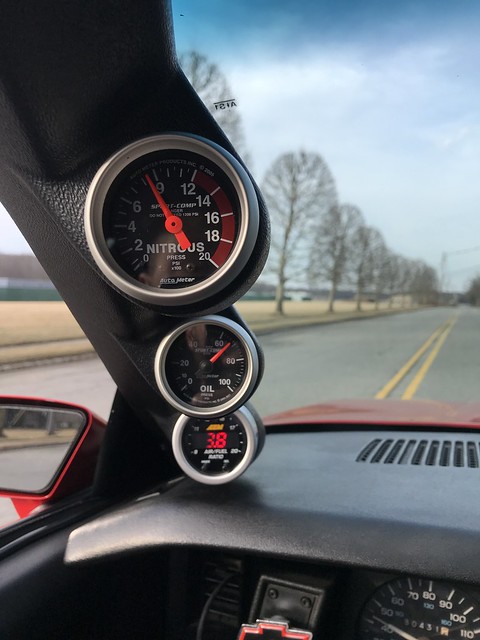
During the exhaust project I installed a second oxygen sensor bung so I could visually monitor the passenger side exhaust gasses of the engine. Prior to this, I only had one o2 sensor and it was in the drivers side header, which is all the holley sniper ever needed. So, I bought a 3-pod a-pillar gauge cluster and installed an AEM afr gauge (with its wideband sensor), an oil pressure gauge, and a nitrous pressure gauge. Turned out good, I like it.
Next, is the rear drag wheels and tires. I think I am 95% settled on what I want to order, but I figured I would run it past the group first.
Wheels:
-Since my front drag wheels are the 15" Jegs SSR star wheels, I will be going with a matching jegs SSR star rear wheel. I don't need a 10" wide rim and the headaches it may cause on my lowered car with inner wheel clearance. So, I think the 15"x8" wheel is what I will buy. As for backspacing, there are only two choices, either 4.5" or 5.5" backspacing. I like a wheel with a deeper dish as opposed to the face of the wheel outboard. Running the numbers and measuring puts me doing good with a 4.5" backspace but 5.5" might be a little tight around the parking brake mechanism. I have those C4 corvette style brakes, so they are larger than stock. just for the heck of it, I bolted up one of the 15" jegs front-skinnies and played around with the spacing/measurements. It might be tight, but I think it will work.
Tires:
My current MT ET Street SS dot tires are on the 16"x8" iroc wheels and are a 255/50/16, which are about 26" tall. I am looking for a 28" drag tire that will help stretch out my gears at the top end of the track, and since the MT ET street SS rubber has never let me down, it would make sense for me to stick with that tire, just in a 28" tall version. I have probably close to 80-90 dragstrip passes and 500plus miles of street driving on these tires and they are not really too worn down, so a new (taller) taller set will get me a couple years of use. I think anything like those et street radial pro or the hoosier radials is overkill for my car and despite being stickier, would wear down within a year of use. Most of those tires are on backorder too, yet this ET street SS tire is available to purchase/ship right now. So, The 28" tall MT ET street SS tire I could get would be the 275/60/15.
link:
I plan to sell the current IROC-Z wheels with current mickey thompson drag radials in a few weeks once the new wheel package is good to go, so if someone wants a pair of oem iroc wheels with sufficient rubber left on a set of well proven drag radials, let me know and I will sell them to you at a fair price, but I am not interested in shipping them, so local-ish pickup or meet up.
Last edited by IROCZman15; Feb 25, 2022 at 09:26 PM.
Re: Some questions during install of my new 406 SBC - street/strip/show/autoX
Coming from someone that used to ride around with bias ply slicks on the street in the 90s, going with a wider rim lets you run more air in the tire while keeping a good contact patch. The stiffer sidewall tires like the MT S/S probably are not as sensitive to "walking" with lower air pressure than the thin walled slicks. However, in my case, the wider 10" rims with more air sure were a lot more stable and "drivable" than the 8" rims, having to run less air for a good contact patch.
Re: Some questions during install of my new 406 SBC - street/strip/show/autoX
Very good point, very true. I did not consider that. My biggest thing is backspacing and inner brake component clearance. I've never had the chance to be in a car riding on bias-ply tires, but I could totally imagine it as you describe it. I did have a chance to bolt up a pair of hoosier QTP slicks, and that I describe below along with some photos. having had the MT et street SS tires in the 26" tall height i did get quite used to them and was fortunate to never have them appear to 'walk around", so I guess that means that the sidewall is significantly more structural just as you describe. Good to know, I am glad to have experienced people help me out here!
As for the calipers, it seems common that I might need to grind a little bit of the cooling fins, possibly. Some shaving of the e-brake stuff might need to happen, but I'll cross that bridge if I need to. I spent some time on the corvette forums (since they run these C4 corvette style brakes) and did read that some people indeed had to grind down some cooling fins. Some of their posts were pretty old and even though they used a jegs ssr star wheel, those star wheels were designed different back then ... if you guys remember my old front jegs star skinnies, the whole backside of the wheels was bigger and bulkier. But just this past year when I bought the replacement jegs star skinnies, the new design/mold of both the front and the back is different and less bulky. So the old posts I read were kind of useless...and basically I will just have to order the wheels and mount them up to find out.
Placing the order for the new wheels/tires before the end of tonight.
..... last bit about the wheels. but back in the Fall I had a chance to try out my buddy John's rear drag wheels which were a 15" diameter wheel and running a Hoosier Quick Time Pro tire which measured 27x10.5 15-LT . I was curious about overall height and also about inner wheel fitment of a 15" wheel with my brakes. The calipers cleared by just a very slight bit, but his backspacing was about 5.25" and I had contact between the parking brake brackets and the inner barrel of his wheel...even left a small scratch. I know its a different wheel and design, but that's all I really have to go off of.
Photos of his wheels
His wheel next to the wheels I ran for the past two years 27" vs 26"
Took the car out to fill up the gas tank with 93 since its been low on fuel all winter. Got into the throttle a bit and left some tire smoke trails in the process, with no hood on. Car ran good and exhaust sounds good. Header wrap is still smoking a tiny bit, hopefully that goes away soon, it gives off a unique smell. When i got home, despite the roaring wind, a few neighbors lent a hand and we got the hood back on the car too.
Boxed up one of the two Stroud 5-point safety harnesses and I am sending it back to Stroud for a re-certification since my SFI on those harnesses expires June 2022. $65 plus shipping.
Re: Some questions during install of my new 406 SBC - street/strip/show/autoX
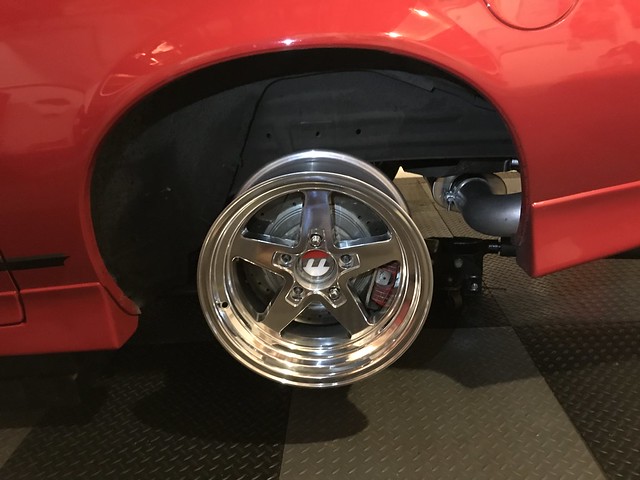
Got the wheels and tires a few days ago and just got a chance to get em mounted and balanced. Bolted them up and aside from some very slight shaving of the caliper fins and drivers side e-brake cable tang, they fit perfect. Perfect offset, perfect height, and perfect width. The drag-bag Air bags will help keep the tire from hitting the upper outer fender lip and I'm a big fan of how much better the bigger diameter tire fills out the space of the wheel-well. They weigh in right around 44 pounds. Not sure if I am going to use the center cap on the rear wheel, but I will keep the center cap on the front skinny. Got plenty of threads of the lug stud exposed if tech inspection asks to check lug engagement. overall, great, just gotta see how well they perform, and will soon post up my old Iroc wheels with the et streets for sale in the classifieds in hopes of offsetting the cost of these wheels.
pre-grinding photo:
post grinding photos: (will paint caliper tomorrow)
with my rear 18" Boze street/autocross wheels which have a 295/40/18 tire on em:
compared to my old rear iroc wheels with those 26" tall et street tires on them:
Re: Some questions during install of my new 406 SBC - street/strip/show/autoX
I like the look.
What are the dimensions of the rear wheels?
I've thought about a 27" or 28" tire for the track myself but have always understood that a little "massaging" was in order.
Re: Some questions during install of my new 406 SBC - street/strip/show/autoX
Originally Posted by IROCZman15
I plan to sell the current IROC-Z wheels with current mickey thompson drag radials in a few weeks...
but I am not interested in shipping them, so local-ish pickup or meet up.
That's unfortunate.
Let me know if you change your mind.
Re: Some questions during install of my new 406 SBC - street/strip/show/autoX
skinny: Its the JEGS SSR Star wheel 15"x8" with the 4.5" of backspacing.
Here is a link: https://www.jegs.com/i/JEGS/555/680272/10002/-1
I had zero work to do to the rear fenders, inner fenders, or anything. The only metal work i had to do was due to my bigger brakes, and that was just some slight shaving of the calipers and parking brake bracket. Nothing to the car at all.
- I can't imagine what the shipping cost would be to ship these two wheels, thats the only reason I didn't want to consider shipping them. If they don't sell locally, I'll venture into shipping estimates. Probably posting the wheels and a bunch of car parts in the classifieds in a few weeks time.
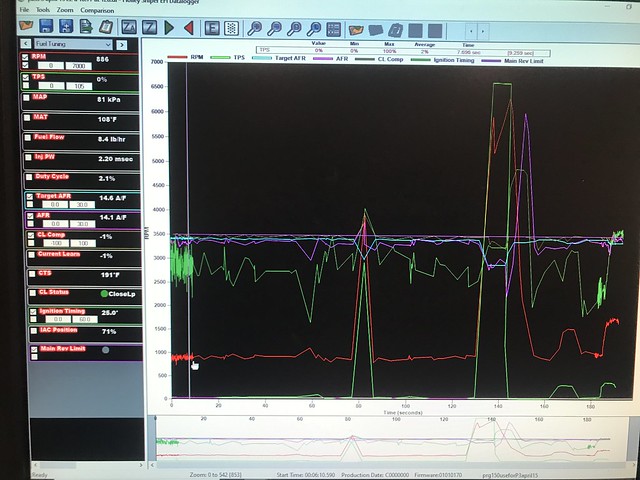
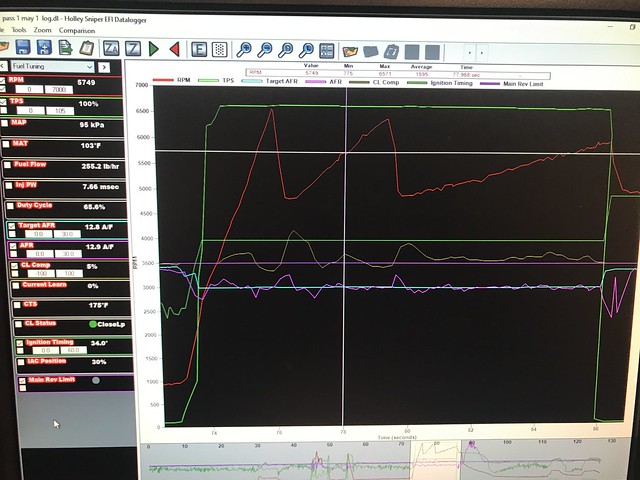
Took the car out this afternoon, but whew there was a lot of people on the road so didn't get crazy. About half a tank of fuel used and 90 minutes of wheel time. Made some adjustments to the idle in the driveway, and with the new placement of the oxygen sensors they are able to get a better more uniform reading of each bank.. but especially I am able to have a more accurate idle and I did NOT come home smelling like exhaust fumes which was a common occurrence these past two years. Still will need some tuning at WOT because I was seeing AFR numbers in 11s, 10,s and occasional 9s when I would get heavy on the pedal. Obviously it lacked power there too and I felt it. I'll see what I need to do to get that dialed in, but the exhaust/muffler is opening up and getting a nice louder sound to it. I know I have fouled plugs from all the quick on/off cold starts over the winter but I actually didn't expect really rich AFR numbers when doing the exhaust project; in fact I expected leaner afr numbers instead. Next drive I will take more datalogs, but the ones I took show some pretty heavy CL comp negative numbers (pulling fuel out) while still being rich. Light blue line is target AFR, pink line is actual AFR, and yellow line is CL comp%. I'll dig into it soon. Learn table data said it was Adding fuel at these rpms too!
.
All coolant temps and numbers were good on the dashboard. Had between 30-40 psi of oil pressure at hot idle, and right between 65-70 when on the throttle. Still running that winter 10-30 thin oil for another week and then I will switch back to the 20-50 VR1 for the rest of the year. The drivers side (holley) afr readings are about half a point leaner than the passenger side (AEM wideband) numbers. I think I am probably a little low on trans fluid too and might need a slight adjustment of the TV-cable, but will check that out. The new rear wheels handled just fine along with the skinnies. No rubbing from anything in the front or the back. Put some air in the rear drag bags too and the rear suspension was quite firm, so I'll tone it down if needed, but I don't plan on doing frequent road driving with these wheels on either. Took a few photos too.
oil pressure at idle:
..and oil pressure at moderate throttle:
Last edited by IROCZman15; Mar 7, 2022 at 05:58 PM.
Re: Some questions during install of my new 406 SBC - street/strip/show/autoX
It has been a while but I do have an update.
Despite the several times I wanted to go to the track in March and April, the repeated bad weather and rain-outs didn't allow my spring shakedown of the car to happen until just this past weekend. Even the swap meet I wanted to go to, got rained out. Anyways, prior to going, I had done some street driving and street rips with the car and was moderately "ok" with the AFR numbers I saw on both the Holley and the new AEM gauge. The car felt pretty slow on the street and I had done datalogs and tune revisions several times. Basically I would do a pull in 2nd or 3rd gear, and the car was real rich at tip-in and stayed that way while sloooowly climbing the rpms. Adjustments to the base table and AE were never really fully successful, so I went into the Test and Tune Friday night at Island Dragway with pretty low expectations . However, I knew that if I got a few actual WOT dragstrip passes, I could probably dial in the tune better. Jerry and my buddy John went to the track too, and Jerry brought the firebird. I had hoped to get about 5 runs on the night but that plan came to a halt when a huge oil down happen just after the first few sets of the cars went down the track. That cleanup took 1 hour and 50 minutes, so basically 2 hours of a 4 hour race night were gone and I didn't have a pass in yet, and temps were going down as well as track surface temperature.
Pass 1:
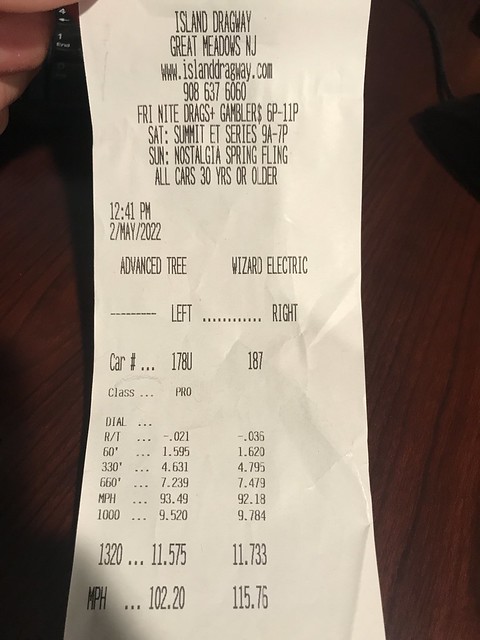
Finally got to make my first pass at 9:21pm, and it went pretty well surprisingly. I had set the brand new rear MT tires at 19.5 psi. Air bags were at 7psi drivers side and 11 psi passenger side. Rear shocks were both set at 4/5 so on the tighter side. After a 3.5 second burnout I footbraked the launch from 1109 rpms. Rear tires had a very slight slip, but then hooked and I shifted 1-2 at 6,490 rpms. rpms dropped to 4,816 in second gear and I shifted a bit early at 6195 rpms. Rpms dropped to 4,772 in 3rd gear and then I crossed the finish line at 6,069 rpms. I was targeting a 12.8 AFR in closed loop and total timing was 34.0 deg advances. The car felt good, and it didnt do anything funny, but I expected a low 12 second slip. Was certainly surprised to see an 11.78 e.t. at 115.7 mph, which is actually my fastest N/A pass to date (previously was 11.800 back in november 2021)
-Checked the datalog and was happy with what I saw, but knew I might only get 1 or two more runs in for the night. the fueling still went rich at the hit, like very rich (in open loop), but as soon as closed loop came on, it cleared it up and I looked over the CL comp numbers. I would love to get that rich dip out, but pulling fuel from the base table (open loop) and the AE functions still doesn't seem to help?
I was satisfied enough with that NA pass but I know I could improve on it NA later on in the coming weeks. Did not pull spark plugs, maybe I should have checked a few. I wanted to see how a nitrous pass would do and I had to decide if I should do a fixed 150 shot and see if it would hold the launch, OR do a progressive ramp. i decided to try the fixed 150 shot knowing if I got a 3rd pass I could load the progressive tune in and make adjustments if needed.
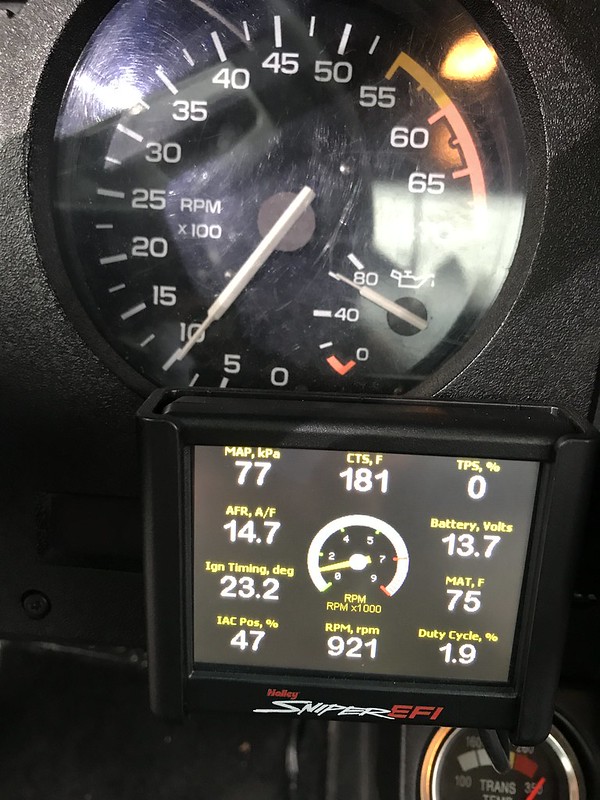
With the 150 shot tune loaded, I kept the shocks and air bags the same. I lowered the rear tire pressure from 19.5 to 18.0 psi. Did a 5 second burnout. I launched from a dead idle at 921 rpms. The nitrous came in withte full 150 shot mid way through 1st gear (as I set it to do) and it spun the tires. I pedaled it very quickly, got off the button, and then got back into it, shifting 1-2 shift at 6,611 rpms. The rpms dropped to 5,272 in second gear. Took second gear to 6,607 rpms and it dropped to 5,023 rpms in 3rd gear. Nitrous turns off at the shifts if I hit the hi-side 6,500 rpm limit I pre-set. I crossed through the finish line at 6,510 rpms which was just a fraction of a second after the nitrous clicked off.
pass 3:
I now knew that I would have to wait until another day to test the full nitrous launch, but I looked over the datalog and aside from the spin in 1st gear, I was happy enough with the AFR numbers that I saw. I target 12.4 afr on nitrous and the holley adjusts CL comp to this. My AEM gauge is usually a bit richer with the readings, in the 12.0-12.2 range if the holley is reading 12.5. (still not sure why..) So at this point in time, I am happy keeping the afr rich (safe) and then working from there as opposed to running it lean and dialing it back. I loaded the progressive 150 nitrous tune in, which ramps from 50%-->100% in 1.2 seconds (essentially spraying a 75 shot ramped to a 150 shot in 1.2 seconds; see below). I also increased the rpm rev-limiter for the nitrous cut-off to be at 6,700 rpms instead of the 6,500 rpms from last run. John advised I try the other lane and that I take more psi out of the rear tires so I brought them down to 17.0 psi.
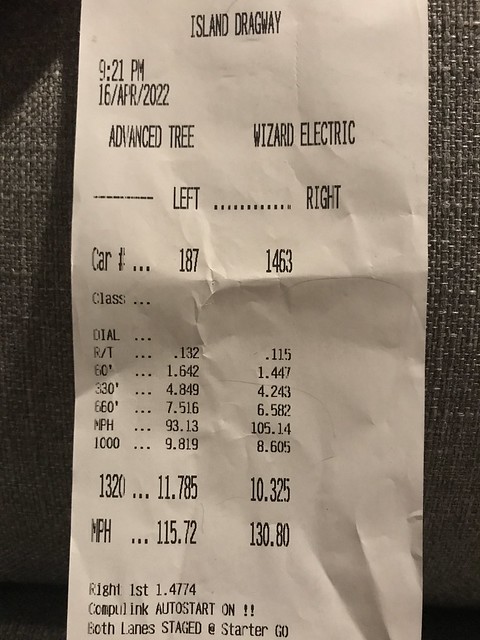
- I did a decent burnout, but as I rolled to the line I did not see that the guy next to me had pulled way past the line and started staging with his back tires. At this point I was already staged, while they rolled him back. I probably could have rolled back out, but I decided to just stay where I was at. He finally got it sorted out and when the tree dropped I left from an approx 920 rpm idle again. I felt the tire slip (maybe like 1/3 of 1 rotation, not too much), but then it was allll good. unfortunately the datalog recorded very stupidly and it only has very strange intermittent data points. the log started recording normal, and even ended normal, but the whole middle, it only seemed to record about 1 data point every half second. So I have no data on shift points, rpms, fueling, closed loop compensation, or anything. That especially is sad, because this is data I wish i had for the future, because this turned out to be my best pass to date, with a 10.77 at 126.7 mph ! (previous best was 10.87 at 123.81mph november 2021)
-***- watch this video until the very end for a weird surprise as to what I saw happen!
Timeslip:
Datalog (if you can even call this nonsense a datalog?!?!)
(entire datalog) see how it starts and ends with LOTS of data points, but gets "dumb" ? what the heck is that about?!?1
progressive nitrous tune settings/limits/timing:
and
I did NOT expect any personal best timeslips during this shakedown-session , but I am ok with how it turned out. The personal goal I set over a decade for this car was mid-high 10s on nitrous and mid-high 11s on motor. If this car can pull a 10.55 timeslip at 130 mph, I will consider that as "goal accomplished", so I am hoping I can get there. Maybe on a day with a sticky track for a great launch (and wheelie) and i can up the jets to the 175 shot or the 200 shot. After hanging out with the fellas in the pits, I packed up and drove the car home, thumping into the garage at 12:30 am with a sense of relief that the car didn't do anything dumb after a big winter of garage work.
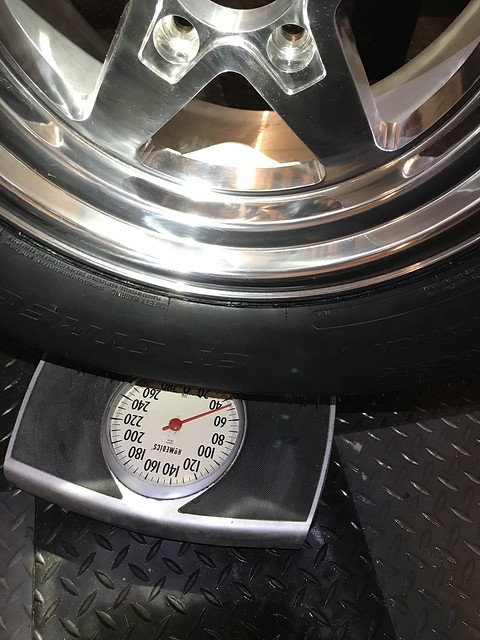
The next morning, with the tools removed from the car, I took it over to get an approximate "race weight" on the car at the local stone quarry's scale. With me in the car it weighed 3,620 pounds, which is heavier than last year. Later on in the day I switched the race wheels out, put the subwoofers and amplifier back in the car and weighed it in "street weight setup" to learn that it weighs 3,780 pounds with me in it.
While looking over the car remembered that I had heard a clunking noise from the back of the car when going over some bumps on turns. Soon noticed that it looks like the "roto-joint" end on the axle side of my UMI Panhard bar is experiencing some wear and clunking. It was hard for me to film it and shake the car at the same time, but you get the idea
video:
Re: Some questions during install of my new 406 SBC - street/strip/show/autoX
Nice write up and build man. If I may ask, what schematic did you use for the msd box and distributor plus the coil? I'll be using the stock dizzy, msd 8226 coil, same as yours and my msd 6a box
Re: Some questions during install of my new 406 SBC - street/strip/show/autoX
Nice write up and build man. If I may ask, what schematic did you use for the msd box and distributor plus the coil? I'll be using the stock dizzy, msd 8226 coil, same as yours and my msd 6a box
Re: Some questions during install of my new 406 SBC - street/strip/show/autoX
@IROCZman15 It is great to see someone enjoying time at the Drag Strip!
I can't pass an FAA Pilot's Physical anymore (do to health issues) so I can't race my Funny-Car anymore.
Seeing you guys at the Track with "Street Cars", makes me want to put together a new Third-Gen..
And get back to racing at the Track!
Re: Some questions during install of my new 406 SBC - street/strip/show/autoX
OG B4c: Thanks man. As for the MSD setup, I no longer run the MSD ignition system. I did for probably the first 8 months of the new engine setup, and it worked just fine, up until one day in September 2020. I made a detailed post about it and filmed a bunch of youtube videos. The post is on page 4 of this thread, and it is post # 164. The youtube videos are on my youtube page, right around September 2020; my username is the same on youtube as it is on here. Essentially, something wacky happened INSIDE the MSD digital 6 box and it pulled 20 degrees of timing permanently. So when I was idling and targeting 21 degrees of advance, it was only sending 1 degree of advance. At WOT when i wanted 35 deg advance, I was getting 15 deg advance. I sent the box back to MSD who diagnosed some failed internals, but while I waited for the box to be repaired, I took the advice of EVERYONE on the holley sniper tech forums and I bought the Holley Hyperspark ignition system which was $501 and consisted of a distributor, a coil, and a CD box. It was a very simple install and has been flawless ever since; I highly recommend it. The holley hyperspark is all plug and play, aside from the fans and if you want to install nitrous, or a 2-step, etc. For both systems, I followed the actual holley and msd wiring diagrams. I have always ran the sniper and ignition postive&negative leads directly to the battery itself. I cant remember the actual wire colors and where stuff went on the MSD, but I know I used the diagram and also the official holley YouTube channel has some good install videos.
edit: I re-read your question and I am actually noticing that you want to use the stock distributor. That is way different than the MSD pro billet or hypserspark distributors that I mentioned that I used. Stock distributor has that ignition module and talks with the oem ecu. My two recent configurations only have the sniper ecu in play, My factory ecu is now somewhere in california as I sold it to a TGO member.
Vorteciroc: Thanks for the compliments! I remember you chatting on here about your pilots license and the funny car. That's a bummer for sure. I do enjoy the fact that this car is (and always will be) a street car. I do hope to one day build a secondary project car and have it be strictly a dragstrip monster. It will not replace this car, but simply I can dig way deeper into performance and maybe going some rounds at an event. This car has to always remain capable of street, strip, autocross, short-course road-course, and car show duties, which is a challenge, but I think so far I have done a decent job at it. Like ya said, perhaps you can build a car that is less intense than the funny car and just get back out to the track with it.
so,
I am hoping to get to the track again this upcoming sunday, which is the Nostalgia event at island dragway. Maybe I will focus less on the 10.50 timeslip goal of mine, and maybe try to go some rounds in the bracket racing game. If I did do that, I would run the car naturally aspirated, because I have not have enough nitrous passes to get me dialed in just yet. NA is easier to nail the shift points but it will run a slower et.. To be determined at the end of the week.
Last edited by IROCZman15; Apr 25, 2022 at 08:10 PM.
Re: Some questions during install of my new 406 SBC - street/strip/show/autoX
IROCZman15: I will definitely check it out. Also, I'm only going to the stock distributor and coil due to the fact that they say its recommended that you don't use holley timing control for the first start ups as I was planning to get all hyperspark ignition parts for later. But anywho hopefully I can get this car of mine back up and going soon.
Any suggestions on starting off with the Sniper setup coupled with an engine break in?
Edit: I'm going from PROM tuning to something that is a little easier like the sniper with a SBC 355
Re: Some questions during install of my new 406 SBC - street/strip/show/autoX
I can't stress this enough, but it is a great idea to spend a few hours reading on the Holley EFI tech forums, specifically the one for the sniper. https://forums.holley.com/forumdispl...?82-Sniper-EFI
Tons of topics and troubleshooting of the common issues.
- also, keep in mind that the holley wizard that sets up the tune on the handheld, like to run the AFR on the rich side.
- check out the EFI Systems Pro page https://www.efisystempro.com/efi-pro-hangout and look for his write-up tutorials.
- some really good holley efi videos on youtube by guys like Deven Vanderhoof and Joe Simpson
Re: Some questions during install of my new 406 SBC - street/strip/show/autoX
IROCZman15
I really appreciate it and have very much enjoyed the thread and knowledge reading over your journey with this car. But we all know its more than just a car 👍
Re: Some questions during install of my new 406 SBC - street/strip/show/autoX
I went over to the Nostalgia Spring Event at Island Dragway on Sunday May 1. Lots of cars were there and the weather was good almost all of the day until 6pm. I had already decided to run all motor for the bracket-race event because the car is much more consistent that way at this point in the game. We got two time-shots (test runs) so I did one in each lane.
I have in-car video footage, and it had audio with it, but I think when I clipped the videos to length I didn't click the button for retaining the audio.. so that stinks, no sound. Sorry.
Pass 1: (test pass)
Footbraked the launch from a dead idle and launched at 966 rpms. Shifted 1-2 at 6,571 rpms and 2-3 at 6,386 rpms and going across the finish line at 5,949 rpms. Felt good, and turned out to be my best NA pass to date by a little bit. Track photographer snapped a photo of the leave, and the rear squat is looking much better with the air-bags and these taller tires... but it was nothing dramatic for a launch photo. .
Pass 2: (test pass)
After looking at the learn data and datalog, I was happy and left everything with the tune alone... in fact I just re-used the same tune as pass 1.
Car felt slower, and timeslip confirmed it, but not by too much. I think engine temp, air temp, and heat soak to the sniper tbi were a factor. Footbrake launch from 1741 rpms. Shifted 1-2 at 6,564, shifted 2-3 at 6,596 and finished at 5,931 rpms.
Pass 3: (Round 1 Eliminations)
Chatted with Jerry and some other racing guys about what to do. I think I over-estimated how much I would want/need to slow the car down, so it was probably my mistake by dialing in an 11.85. My thought process was that I could tap the brakes if I was too far out ahead. Instead, I left way late on the tree, and around the 1100 foot mark the car int he other lane blew past me. I had actually just started to get off the throttle (see green colored dip on datalog, that is the the Throttle position sensor), but then when he passed me I got right back on the throttle thinking I was going to now be wayyy slow. Instead, I was still well below my dial-in and got knocked out.
- Footbrake launched at from 1828 rpms. 1-2 shift was at 6,623 rpms and I tagged the rev limiter just a bit. 2-3 shift was 6,583 rpms and I crossed the line at 5,933 rpms which was weird because I had gotten out of the throttle just one second prior.
Pass 4: (test pass on nitrous)
I spoke to the track staff and as the event was winding down to a close (and the weather radar was showing a big rain storm coming right at us) I waited for more competition rounds to go on. When there was a break in the action, I did a solo test pass. I have been curious to move beyond the 150 nitrous shot, so I put in my home-math calculations for the 175 horsepower nitrous jets. I also knew that the track prep was great and the starting line should be great. but I didn't want to put a fixed 175 shot on the launch. So , I did a progressive ramp from 50% (of 175 hp) to 100% (of 175 hp) over the course of 1.4 seconds.
- I footbraked the launch and left at 2,032 rpms. I had the nitrous programmed to come on at 2,800 rpms and when it did, I felt the front drivers side wheel come up and then touch back down to the ground. The launch was great and was the best 60 foot I have had to date. In fact, everythign about the pass was the best to date, especially 106 mph in the 8th mile and the 10.601 e.t. Anyways, first gear ran up quick and it was on the rev limiter faster than I could react to, so I lost a little bit there, but I shifted 1-2 at 6,641. The 2-3 shift was at 6,536 rpms and I went through the finish line at 6,571 rpms. It felt fast, especially the first half of hte track. Was bittersweet to see my timeslip, because I was hioping that it was the 10.5x second pass I have been working towards, but instead it was just supppperrrr close to it. However, that means that I now know a 10.5x pass is possible. Mayyybe not a 130 mph speed though.
- I was pretty stoked about the 1-wheel in the air launch, but sadly, by this late hour in the day, the track photographers were long gone so I only have the dashcam footage (with no audio sadly) ad you can see the hood shake a little bit as the tire came down. But there was this video from the bleachers with audio, and I actually think the car sounds damn good with the true sound of just one small block chevy with a full muffled exhaust system and on nitrous going down the track.
I am pretty sure that I can now go back one day when the track prep is really good and the track photographer is there in order to get a photo of the car lifting a wheel (or 2) up at the launch. I also think the 175 shot will get me into the 10.5x territory, but if not I can put in the jets for a 200 shot and that should be it.
-as I was packing the car up, the sky grew dark and rain drops started. Yet, it didn't rain too hard and I had a pretty easy drive home. Good times indeed. the car seems happy too.
Re: Some questions during install of my new 406 SBC - street/strip/show/autoX
Its been a little while and this was a good time to update this thread.
Did a few car shows and cruise nights in recent months, and a bunch of street driving, but was unable to get the car to any local SCCA or MSNE autocross events; as my wife and I had our first baby who was born mid June.
Like last year, I was hopeful that I could get some autocross laps in before the big UMI Autocross challenge event, but sadly that was not the case.
The UMI event was this past weekend, and I barely had time to pack and prep the car. The day before leaving I took the car over to weigh it with almost all of the gear and tools in the car, and it weighted 4040 pounds. The next day I packed the rest of the stuff which was another 30-40 pounds, so the car was heavy for the 230 mile trip out to the track. Left med day on Thursday and the drive was pretty damn good. Spent about 80% of the drive cruising at 80-85 mph with the torque converter locked-up. Since I had decided to save some money and not stay at the hotel this year, I drove directly to the track. Stayed in a tent this year, as many more people each year are camping in motorhomes, trailers, tents and whatnot. Got setup, unpacked car, registered and hungout with a bunch of familiar faces, as well as walking the track. the weather was due to be hot all weekend, with temps mostly in the 90's.
Friday went well, I might add some details later, but having not made any autocross laps in almost a year, I needed to get re-acclimated. I left a little bit on the table, but ran clean runs without any cone penalties which is more important to me early on in these events. I have to keep reminding myself,t hat I have done absolutely zero upgrades to the car to make it better prepared for any autocross since last year. Every year, these guys are getting faster and building better cars, and that is not the case for me this year. Almost everyone there shows up with their car on a trailer and ready to rip; only a very few street drive, and generally we are not that fast. Some people are running 3 and 4 degrees of negative camber, and I am only at -1 degree. For the most part, I am outgunned "off-the-bat" by about 50% of the cars there. Anyways, we got 3 runs in the morning and then 3 runs int he afternoon. Just prior to my final run of the day, a heavy rain and windstorm came in, so that delayed everything quite a bit. I took soem guest-riders on several runs and that is always fun to do. UMI provided a big lunch, and an even bigger bbq/grill dinner, along with nighttime entertainment of a country band, fire pits, and big cornhole tournament.
Saturday, they switched up the course and it was a modified reverse version of Friday. I got a little more aggressive during the runs, and got faster, but, of course, so did almost everyone else. Got 3 runs in the morning and after the UMI lunch got 3 more runs. Took some riders and on my very last run, I clipped 1 cone.
Hungout for a bit as the event finished up, then packed up my tent, gear, tools, etc. A big rain storm was heading to the area, so I bounced out of there about halfway through the awards ceremony. Got on the highway and made the long drive in a relativity short amount of time. Overall, out of 125 registered competitors, only 114 showed up and made any laps...and of that number, I finished in the 72nd spot of everyone, which puts me in teh 63rd percentile. Scott and Billy were there as usual, and they outgunned me by a bit this year.
The car never skipped a beat all weekend. Tires were outstanding, powertrain was stout. Power steering pump did not overheat and fail. Car behaved fantastic on the highway even loaded down with all the extra gear. The only catastrophe of the whole entire 4 day event was that during the rain/wind storm one of the fiberglass poles on my tent snapped.
I is unlikely I will have the time to get to any other autocross events this summer, but I might be able to get a few car shows in. I do plan on getting to some drag racing events in the fall, and would be very happy to get that elusive 10.5x timeslip. I am also super motivated to get a proper wheels-up launch, so I am going to start digging into that topic soon here on the forums. Possibly a different torque converter, since there are no reputable trans-brakes for a 700r. Anyways, the UMI Autocross event was spectacular, as always, and I look forward to doing it again next year.
Re: Some questions during install of my new 406 SBC - street/strip/show/autoX
Videos:
Watching playback of the videos is interesting. I know the course and keep watching saying, man it felt much faster, but looks so slow on the screen. The car is pretty much at its capability for g-forces and not spinning out or sliding around too much, so as fast as it was (and as slow as it looks on screen) is how its pretty much going to be.
Re: Some questions during install of my new 406 SBC - street/strip/show/autoX
For starters, congrats on the new born baby!
Looks like a good time. And your times kept getting better. I'd love to do that some day. But I'm not sure I'd be much good at it at my age. Dabbled in it in my youth, and did decently. But more than my reaction times, visually seeing the course has become difficult for me. Spotting the pointer cones, and "seeing" the path through a maze of cones seems to have become more difficult, if videos are to be believed. actually, watching a couple of your videos, this one didn't seem as bad for that to me.
Edit: Having now watched all the videos, I think this being run at an actual race track helps quite a bit. The interior (road course?) roads and grass help define where you are going, visually speaking. Vs a 10 acre blacktop lot, it's a lot easier to see where you are going. The closest I ever came to something like this is when we autocrossed at an airport, and the runways sort of defined / boxed in your direction. I liked the direction and course they ran during the second half better.
Last edited by DynoDave43; Jul 29, 2022 at 08:35 PM.
Re: Some questions during install of my new 406 SBC - street/strip/show/autoX
Thanks everyone! Yea, the baby is doing well as is my wife, but whewwww having a newborn sure does put a whole different style of "energy" into my days!
DynoDave: I totally understand where you are coming from with the "course navigation" aspect of things. I fully agree with your observation though, regarding how this course is easier to navigate due to the pre-existing track having defined walls and grass areas. I've done a half dozen autocross events in the big parking lots (MetLife/Giants stadium in NJ) and those are much harder, because it really does look like an overwhelming "sea of cones", which is definitely harder to navigate. however, at every autocross event I have ever done, the drivers always have ample time to get out there and physically take a walk-through of the course. Some people even bring little "razor" scooters so they can get a bunch of course"walks" in, because walking one of these courses can sometimes take about 15 minutes or so per lap. However, even after walking the courses, people (me included) do miss a turn or get lost on the course (D.N.F.), but the beauty of autocross is that that you don't get knocked out and have to finish your day; you simply get back in the pre-staging grid and get another run at it. It sure is fun, and while drag racing lasts only a dozen or so seconds, autocross you really get to work the car for almost a minute which is a different type of fun. I do suggest looking into some local groups by you and maybe going to spectate (should be free to watch), and you might get to to go for some ride-alongs (so bring a helmet), which could maybe give you an itch to give your car a rip at it one day in the future... and that may re-ignite those memories from when you autocrossed back a few years ago.
UMI put out their first batch of event photos, and I might attach a few of them here in the coming weeks, but I will hold off for now.
Going to be calling Dana at ProBuilt Automatics in the coming days to discuss his thoughts on transbrake or new torque converter options, specifically so I can get that real nice wheelie when I get back to drag racing in September. Stay tuned !
Last edited by IROCZman15; Jul 30, 2022 at 09:27 PM.
Re: Some questions during install of my new 406 SBC - street/strip/show/autoX
I haven't updated this thread in quite a while, sorry about that. However, for those who were not aware, I have had another thread going regarding a new torque converter/better launch/wheelie and it is where most of my recent TGO activity has been.
In general, its been going well, and some early success with testing, but if the weather would cooperate better, I could really get some good testing passes in before winter.
Re: Some questions during install of my new 406 SBC - street/strip/show/autoX
Haven't had much time to do anything with the car in quite a while. Hadn't even washed it since October. Drove it around occasionally. I have a small task list of things to do this winter on it.
- Holley RetroBright Headlights
- Check Balancer and pulleys
- Cut 1/4 coil off of rear coil springs
- Buy spare 10 pound nitrous tank
- Vaccum pump (electric)
- new side window weatherstripping
- Buy spare U-joints and spare rubber trans mount
- Poly grease everything
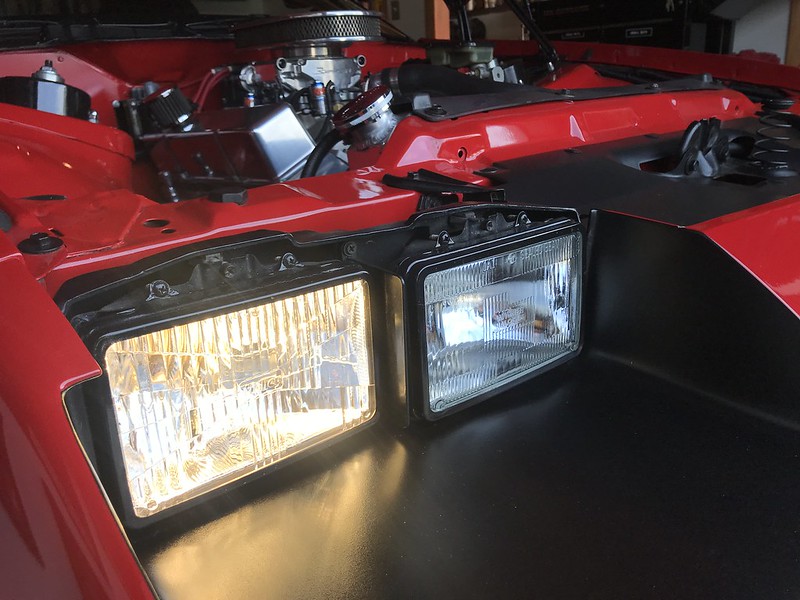
I saw that Holley had a big savings sale a few weeks ago, and it was my time to save $80 on the pair of the RetroBrights. For owning this car for almost 23 years, I have only ever had the glass sealed-beam oem style headlights on this car. Never did anything different, just didn't fit the look for me. With Holley now making the look-alike version of a 3,000 k LED and in plug and play I decided to go for it. I put these in earlier today and only did a test comparison during the daytime and on the bask-side of the garage door. Not sure if I will get out to drive this car at night since the winter weather is basically here.
side by side. new light vs oem style sealed beam that I removed.
Drivers side is the new holley light passenger side is oem style
Garage lights all off, and lights on the back-side of the garage door. drivers side is new light and passenger is oem style
Re: Some questions during install of my new 406 SBC - street/strip/show/autoX
Looks awesome!!!
I am currently working on a Plug and Play Harness that converts the OEM Wiring into the Trigger Circuits for a pair of Relays to power some LED Headlight Sets.
Hopefully it will be done soon.
Below are some Images of the same type of Harness (that I have finished) but for HID Low-Beams instead of LEDs.
The Harness uses Connectors that mate to the OEM Low-Beam Connectors:
Re: Some questions during install of my new 406 SBC - street/strip/show/autoX
I almost completely forgot!
For those of you who have never seen the original Delphi Mating-Connector to our Low-Beam and High-Beam Connectors...
The Image below shows the Low-Beam Connector on the Left-Side...
And the Mating-Connector and Sealing-Boot on the Right-Side:
The Wiring Harness is available to be constructed in all 3 forms...
-In-line (Standard).
-Linear Twisted.
-Concentric Twisted.
The Images below are of a Section of this harness (Cut off as it was too long) in the Concentric Twisted Form:
The Images below are of a Section of this harness (Cut off as it was too long) in the Linear Twisted Form:
Last edited by vorteciroc; Jan 1, 2023 at 08:22 PM.