When you click on links to various merchants on this site and make a purchase, this can result in this site earning a commission. Affiliate programs and affiliations include, but are not limited to, the eBay Partner Network.
99-02 Plastic LS1 Fuel tank in a TPI, project capture thread
Note: this first post in this thread is a work in progress. If you revisit this page and this first post continuously changes, you aren't going crazy - it's an edit in progress. Just trying to have the best information up front for reference purposes.
There are a few threads about swapping this tank into our Third Gens, however, generally those threads go all over the place, or have information spread out over multiple threads etc. I've had this project on my wish list for many years now and since circumstances have arisen needing replacement of my current fuel tank, the time has come to tackle this long awaited project.
This project will capture the process of swapping a 4th Gen plastic tank into a 1991 TPI L98 equipped Z28. I live in an emissions mandated area as well, so this project will also capture keeping the stock evap system operational with this tank. I will mainly be capturing this project on video, so this thread will mostly be text with sparse pictures until it's completed, at which point I'll upload a detailed video log of it on Youtube and link it here.
image credit (with my chickenscratch overlaid ontop) - Forum member Strick1
Here is my initial understanding of how the fuel lines should be configured off the tank to make my project work - please anyone chime in if any of this is incorrect. The right-most line is the feed line. This line I will hookup to the stock feed line. Same for the left-most hose - the return line - just route that to the stock line.
The vent line, I haven't really seen this covered in other threads, but I'm assuming that white disc object in the left of this picture is a purge valve that vents to atmosphere? Or is it just a connector with a hose, and I'd need to swap my current purge valve at the end of that?
Edit - all the lines on the tank will remain in-place, routed as they are stock - will update picture as I finalize this post later
And lastly, my plan is to have a doubly redundant charcoal system - I'd like to take advantage of the 4th gen canister... and for emissions purposes, it seems I need to keep the third gen canister functional as well (the emissions testers hook up a pressure line to it when pressure testing the car). Is the way I have it drawn above acceptable? Or does anyone think this will draw issues with the pressure test failing somehow by routing this way / having 2 canisters involved? The plan is to take the outgoing hose off the charcoal canister (which I assume is hooked to a solenoid which will be bypassed) and hookup my own line there instead (drawn in red) to the stock Evap line.
Edit- this conversation is ongoing, but there is good info in the posts below... will update this section again as project is finalized...
Additional things needing adaptation:
- replacing the fuel level sensor with a 90 ohm unit (part listed below);
- removal of the fuel pressure regulator in the sending unit, and use the stock TPI fuel pressure regulator.
- Shortening fuel filler neck hose as needed
4th Gen Fuel Neck Shroud (to canibalized the rubber surround - if anyone knows a part number for this for future people to reference, feel free to post) - Ebay
$13 https://www.ebay.com/itm/93-02-CAMAR...72.m2749.l2649
New sender unit gasket and lock ring, Part #s 25167743 and 25691383 respectively. Rockauto, $9 total
Spare quick connectors for plastic 4th gen fuel vapor line (5/16" connector with 5/16" line barb) - Dorman 800-080, $10 for pair (will most likely be needing to use at least 1 of these to replace the 90 degree connector where the new and stock lines will mate up) https://www.summitracing.com/parts/rnb-800-080
16x1.5mm male to 6an male adapter to thread into the stock 3rd gen rubber hose fitting
Earl's p/n 991955
90 degree 6an female to 6an female adapter as the in-between for the above and below adapters
Earl's p/n 934106
6an male to 3/8" QD male adapter to fit to 4th gen nylon QD lines
Earl's p/n 961965
Adapter to mate plastic 4th gen quick connect line to stock 3rd gen 5/16" fuel return line (at rubber hose) - S.U.R.&R. 3/8" flanged hose barb to 3/8" QD adapter K155 $15 https://www.summitracing.com/parts/urr-k155
Adapter to mate plastic 4th gen quick connect line to stock 3rd gen 1/4" fuel vapor line (at rubber hose) - S.U.R.&R. 5/16" flanged hose barb to 5/16" QD adapter K150 $15 https://www.summitracing.com/parts/urr-k150
Napa GP 1" hose for filler neck (replace comprimised stock 4th gen part) $7
All parts should be in by Thursday so I can start the conversion install on Friday, in the meantime still doing research, with the still unanswered pieces to this puzzle I have below. Please feel free to contribute if you have any valuable knowledge.
Unsolved questions:
1) Charcoal lines to TPI evap system - anything special I need to do, or can I just take the line out from the tank charcoal canister as mentioned above?
This is mostly solved, however I still have to figure out how I'm going to manage the 2 vent lines (stock canister vent line and new 4th gen canister vent line). Under normal conditions when the purge valve is closed (engine not drawing in fumes to burn), there shouldn't be an issue with both lines being open, however when the purge valve is open, there could be flow issues possibly creating lean conditions... need to do some Bernouli equations... most likely will end up either plugging the front vent line, or installing a check valve
2) Tank strap bolts - there is mention of possibly needing longer tank strap bolts to secure the tank due to the additional volume - can anyone confirm this? And if so, what bolt dimensions worked for you?
Edit- it's mentioned below the stock bolts will work, however I did find 2 mentions in other threads stating longer bolts were needed or helpful... will most likely be purchasing longer bolts just in case and hope I don't need to use them
3) Tank wiring - adapting the tank wiring for ground - I think this is covered sufficiently someplace in other threads, I just need to reread (still, will tackle tomorrow).
Solved Questions:
1) Fuel lines - I'll be utilizing the stock lines from the 4th gen tank as well as the stock 3rd gen lines on the car. Will be mating them up with connectors listed in the parts ordered list above
2) Is the 3rd gen purge vavle needed anywhere in this setup? - no, 4th gen tank has its own purge valve
3) Securing filler neck - need to bolt to the car - hopefully there is something already threaded on the body as mentioned below, otherwise, that is not a fun place to try and drill and tap stuff.
4) Cleaning plastic tank - my tank wasn't actually that bad. It did ship with about a gallon or so of old fuel in it, which was most certainly bad, but it was easy enough to remove with a siphon for most of the fuel and turkey baster for the last of it. Ran a bunch of damp and dry paper towels inside the tank to clean the walls, just dampened with water, nothing special and dried. Left to air dry for 24 hrs.
Re: 99-02 Plastic LS1 Fuel tank in a TPI, project capture thread
Originally Posted by 91Z-28-350
Additional things needing adaptation:
- replacing the fuel level sensor with a 90 ohm unit (part listed below);
- removal of the fuel pressure regulator in the sending unit, and use the stock TPI fuel pressure regulator. To my knowledge, all that is needed for that is just removing the in tank unit, is this correct? Or does additional adjustment of the stock unit need to happen as well due to the additional pressure of the LS1 pump? No, you just have to remove the pressure regulator
- Shortening fuel filler neck hose as needed
4th Gen Fuel Neck Shroud (to canibalized the rubber surround - if anyone knows a part number for this for future people to reference, feel free to post) - Ebay
$13 https://www.ebay.com/itm/93-02-CAMAR...72.m2749.l2649You don't need this at all
New sender unit gasket and lock ring, Part #s 25167743 and 25691383 respectively. Rockauto, $9 total
Still need to order fuel lines and fittings...
It will probably take a few weeks for the parts to trickle in, in the meantime I have quite a bit more research to do, with the unanswered pieces to this puzzle I have below. Please feel free to contribute if you have any valuable knowledge.
Unsolved questions:
1) Fuel lines / conections (3 methods?) - I have no experience so far in dealing with fuel lines. It sounds fairly easy by the other posts, however there is very little information posted about it. From my understanding there are 3 routes I can take:
a) Use the 4th gen plastic lines and splice those to the stock 3rd gen lines
b) fabricate lines from stainless tubing
c) fabricate lines from fuel injector hosing
For those that have done this tank swap - which did you do or recommend? I used the 4th gen stuff as much as possible. The 4th gen hard line and a 4th gen fuel filter will screw right into the stock 4th gen "T" block. You would just need to block one opening of the T. I would have to look at the return to give advise, I was putting in a 4.8 so I used the stock 4th gen "returnless" system
2) Is the 3rd gen purge vavle needed anywhere in this setup?
3) Charcoal lines to TPI evap system - anything special I need to do, or can I just take the line out from the tank charcoal canister as mentioned above? If you're looking to use the 4th gen charcoal and purge, you'll have to run wires back there to use that solenoid instead of the 3rd gen one since it is in the engine bay
4) Securing filler neck - I ordered the 4th Gen filler shroud with the rubber boot in it - is this boot enough to keep the neck from overly flopping around or do I need to secure the neck to the car's body as well? If you screw the 4th gen filler neck to the body, you can use the stock 3rd gen boot. When I installed mine, there was even a hole in the proper spot on the body for the strap on the neck. If you do this the neck won't move around, that's how it is on the 4th gen
5) Tank strap bolts - there is mention of possibly needing longer tank strap bolts to secure the tank due to the additional volume - can anyone confirm this? And if so, what bolt dimensions worked for you? Both the 3rd gen straps and bolts can be used, the profile of the tank is the same for both generations
6) Tank wiring - adapting the tank wiring for ground - I think this is covered sufficiently someplace in other threads, I just need to reread. For the sender there is just fuel + and ground and sender + and ground since there is no ground on the tank for the sender since it is plastic. If you're looking for the pressure sensor and the evap to work you'll need to do a more wiring.
7) Cleaning plastic tank - this should be easy enough for me to answer on my own, just have to get around to researching it. Feel free to answer though if you found a particular method that worked well for you. I had a tank with bad gas. I drained as much as I could, then used a turkey baster to suck the last bit out. The tank was fairly clean though, I don't think most tanks are going to have too much crap in them, and no rust since the tank is plastic.
Re: 99-02 Plastic LS1 Fuel tank in a TPI, project capture thread
I think you have it right so far. Found a diagram showing same thing basically
Few ways to run fuel lines. Cheap and not as cheap lol
Cheap is simply slipping efi rated rubber hose line to the tank outlets and taking them to the body hardlines with worm gear clamps holding it all down. I did this on my 91. For the body hardline thats threaded Dorman makes an adapter with an end that has a barb like lip for quick disconnects but works for slipping hose on and clamping
For my race/street car i used plastic slip on quick disconnects that convert outlet to -6 and -8 an
Then run braided line with -6/-8 an hose ends to fuel rails.
For multiple fuel pumps, you can run 2 walbros out the stock feed outlet. It can support 1000 whp on gas give or take depending on setup
For triples run thethird pump out the tank pressure sensor hole by jb weld or rtv’ing a bulk head fitting thru it then y into the dual pumps externally. Works great
Russel i believe makes the screw together style fittings for ls1 tank outlets to convert to AN fittings
The sending unit I believe came from a 97 grand prix or grand am, something similar. Need the tank pigtails for the wires out the top of tank. There are 3 wires but two are ground. I think you can connect just one of them to stock body side connector on the thirdgen for the gauge. Or maybe i combined the two into 1 wire off the ls1 tank and back to stock 3rd gen connector. I’ll have to double check
Last edited by Orr89RocZ; Mar 26, 2018 at 02:17 PM.
Re: 99-02 Plastic LS1 Fuel tank in a TPI, project capture thread
Thank you for the responses, they are helping quite a bit. I've recevied all the parts I listed above on Friday and have been inspecting things to refine the plan ahead. Hawk's was kind enough to leave all the lines and fittings from the tank intact, the plastic fuel lines and connectors seem in good order.
My current plan is to utilize the stock plastic lines off the tank and tie them into the stock 3rd gen lines at the rubber hose points that the 3rd gen currently connects to, right here in this picture:
I'm researching which fittings I'll need to do this and so far have come up with the following - will need one of these connectors to tie in main fuel supply line:
And two of these connectors to tie in the return line and fuel vapor line (hopefully... can someone confirm the stock 3rd gen fuel lines off the tank are 3/8"?):
The stock lines will most certainly have to be measured and shortened as well, I plan on reusing the stock connectors with the method mentioned in post #19 of this thread for reinserting the connectors back into the stock plastic lines:
Also plan on ordering a few backup connectors in case any break... also one of the stock connectors is a 90 degree connector (fuel vapor line) so probably won't be able to reuse that one without things getting awkward:
The vent solenoid on the charcoal can is basically open the vast majority of the time, venting the filtered air to atmosphere, unless the OBDII system is running diagnostics / leak tests on the system, then it is closed. Our OBDI system obviously doesn't have the capability to do this, so we really don't have to worry about this, so the simple solution would be to just take that solenoid off the end of the hose and let the system vent to atmosphere 100% of the time. However, if I did this, the car would fail the Az fuel system pressure test they do during inspections, since the pressure would just leak out (same concept as the stock OBDII pressure tests - the solenoid closes during pressure test to stop leaking)... so the fix I am going to attempt is to just connect a manual shutoff valve in place where the solenoid is. This way I can have the vent open as the system normally runs, and just manually close the valve for the pressure test that emissions does (what the solenoid also does when the car tests the system). It will likely just be a shutoff valve that people use for NOS gas systems. It looks like i should just need to find a suitable one with a 5/8" male inlet.
I also need to inspect the canister itself tonight to see if I need to order another. There was fuel in the tank when they shipped it and I need to make sure that none leaked into the canister since I'm sure the box was handled as shippers usually handle them (and there was no "this side up" markings on the box).
Re: 99-02 Plastic LS1 Fuel tank in a TPI, project capture thread
Originally Posted by 91Z-28-350
The vent solenoid on the charcoal can is basically open the vast majority of the time, venting the filtered air to atmosphere,
This is incorrect. It system would be closed most of the time, and it NEVER vents to free air. That is the whole purpose of the EVAP system, so it DOESN'T vent to free air. That would be a failure of the system, and the whole emissions compliance to the EPA. The Canister is supposed to absorb the hydrocarbons and when the operating conditions are correct, it opens the system and the vapors get pulled into the vacuum side of the engine, to burn the fumes.
Originally Posted by 91Z-28-350
so the fix I am going to attempt is to just connect a manual shutoff valve in place where the solenoid is. This way I can have the vent open as the system normally runs, and just manually close the valve for the pressure test that emissions does (what the solenoid also does when the car tests the system). It will likely just be a shutoff valve that people use for NOS gas systems. It looks like i should just need to find a suitable one with a 5/8" male inlet.
I also need to inspect the canister itself tonight to see if I need to order another. There was fuel in the tank when they shipped it and I need to make sure that none leaked into the canister since I'm sure the box was handled as shippers usually handle them (and there was no "this side up" markings on the box).
You are way overthinking this. You don't need to do anything like replacing the solenoid. Just install the tank if you don't want to actually use it and be done with it.
Re: 99-02 Plastic LS1 Fuel tank in a TPI, project capture thread
Scooter, watch the video I posted above. The solenoid is venting filtered clean air to atmosphere via the solenoid, not fuel vapor / hydrocarbons. The side that pulls to the engine when the purge valve in the engine compartment opens is actually from the unfiltered side of the canister (same section as the inlet from the tank where the fuel vapor enters the canister). The canister is a horseshoe shape inside, and the pipe where the vent solenoid is, is on the other side, venting filtered air. Also when the engine is drawing a vacuum to the canister, the solenoid vent is usually also still open at this point, allowing free air to enter the canister and draw the fumes out of the activated charcoal (in addition to the fumes directly from the tank). The video above is long, but I assure you, that solenoid is open 95+% of the time.
If the tank is installed as is, it will fail the emissions pressure test, as that solenoid is open, venting to atmosphere when no voltage is applied to it. The same thing happens with the stock charcoal canister in the engine compartment, the vent to atmosphere hose off the stock 3rd gen canister is where they plug in a hose to check pressure on the engine side. This would be impossible if the system never vented to atmosphere.
Last edited by 91Z-28-350; Apr 2, 2018 at 12:22 PM.
Re: 99-02 Plastic LS1 Fuel tank in a TPI, project capture thread
No, it isn't OEM are NOT allowed to vent fuel vapor to atmosphere EVER. I don't care what your video says
**EDIT, just reread what you wrote. That doesn't even make sense. Why and where would clean "filtered" air be coming from? and why would it need to be vented? If anything it is just pulling in new air
Re: 99-02 Plastic LS1 Fuel tank in a TPI, project capture thread
Originally Posted by 91Z-28-350
I also need to inspect the canister itself tonight to see if I need to order another. There was fuel in the tank when they shipped it and I need to make sure that none leaked into the canister since I'm sure the box was handled as shippers usually handle them (and there was no "this side up" markings on the box).
I looked into how the EVAP system works on this tank. On the vent line solenoid, it allows air INTO the canister, not out. So that top red arrow going to the right, it should be shown as going to the left, into the canister.
The reason for that solenoid is the OBD-II diagnostics. Closing that solenoid while opening the engine mounted vent solenoid allows a vacuum to be created in the fuel tank. The engine mounted vent solenoid is then closed retaining that vacuum. The tank pressure sensor reports the tanks vacuum/pressure to the PCM. If the vacuum doesn't hold then the system is compromised.
Our 3rd gen setups don't have this requirement, so that solenoid (tank mounted) doesn't exist. Just leave it open to the air, which is how our cars are set up.
Re: 99-02 Plastic LS1 Fuel tank in a TPI, project capture thread
It's vented to mainly keep the tank near atmospheric pressure. There is also a valve in the tank itself to make sure that too much pressure or vacuum doesn't build up, but that valve is a backup and when activated (when releasing pressure) would be venting actual fuel vapor into the air, thus why the filtered air after the charcoal fileter is used as the primary. The video is long, but check it out, they go into the full detail of the system, and smoke test it to show you what's going on at each step of the process.
Last edited by 91Z-28-350; Apr 2, 2018 at 02:58 PM.
Re: 99-02 Plastic LS1 Fuel tank in a TPI, project capture thread
It's also vented to make sure the system free flows when the engine applies a vacuum and is drawing vapor into the combustion chamber to burn. Think open straw vs blocked straw.
Re: 99-02 Plastic LS1 Fuel tank in a TPI, project capture thread
Rob, I probably should have drawn that arrow bidirectional, as you're right, it is also letting in air when the purge valve is open, but it is also most certainly is letting air out (most of the time it's outgoing to atmosphere).
I understand that video is a huge commitment at an hour an a half long (if you need to know anything about OBDII EVAP systems, this video is excellent though), you could watch an actual full length movie in that same time, it's dang long... Here's a timestamped section of the video that gets to the point we're discussing, maybe just check out a minute or two of that part - if it doesn't auto jump for you, just jump to 15 minutes 58 seconds
Re: 99-02 Plastic LS1 Fuel tank in a TPI, project capture thread
OK, watched that part. I buy the fact that some air may exit the canister as vapor enters it. But as stated in the video the charcoal absorbs fuel vapors. So how much air is really going to exit?
Not nearly as much as expected. Much more will enter during active purge. But it is important to understand that it is a two way vent.
As the tank vent solenoid is normally open (NO), can just leave it all in place and not connect to the electrical side of the solenoid. Should still pass the AZ tank pressure test.
Re: 99-02 Plastic LS1 Fuel tank in a TPI, project capture thread
The can is pretty free flowing. Here's a video showing what I mean - have the can off the gas tank as i prepare to clean the tank up. Not the best videographer, but the video at least conveys the point hopefully.
Re: 99-02 Plastic LS1 Fuel tank in a TPI, project capture thread
Originally Posted by scooter
No, it isn't OEM are NOT allowed to vent fuel vapor to atmosphere EVER. I don't care what your video says
**EDIT, just reread what you wrote. That doesn't even make sense. Why and where would clean "filtered" air be coming from? and why would it need to be vented? If anything it is just pulling in new air
Sorry Scooter, I missed this post. The clean filtered air venting out of the car is from the pressure inside the system being greater than atmosphere. Anytime that happens (filling up the tank with gas, car sitting in the sun / heat, etc) the greater pressure in the tank is going to force the air out, through the activated charcoal in the canister which filters the fuel vapor. Same concept as a LifeStraw, or Berkey filter, etc - dirty water in, clean water out... or in this case, fuel vapor laced air in, clean filtered air out.
Re: 99-02 Plastic LS1 Fuel tank in a TPI, project capture thread
Old tank is now out, just want to confirm for wiring with the new tank, about to solder on the old plug onto the new tank - did you guys just wire the sender and pump grounds together to the single ground on the 3rd gen plug or did you wire sender ground to the body?
Re: 99-02 Plastic LS1 Fuel tank in a TPI, project capture thread
As an update:
The tank is in the car and worked great for about 2 and a half days. The pump has since gone bad (only holding 30 PSI while running and holding no pressure when just priming or shut off). I've ordered a racetronix replacement pump and hope this was just an artifact of using the used pump that came with the tank and there isn't something I'm missing with inherent incompatability with putting these pumps / tanks in the stock TPI setup.
Before the pump started acting up, the car passed emissions smoothly, which was the major goal of this project, so at least that's checked off.
Some major items of note I didn't capture so far: The junction lines where I tied the plastic LS1 lines into the stock TPI lines, with the parts mentioned in the first post, went well with the exception of the main fuel supply line. The threading on the rubber hose is 16x1.5mm not 6an. So as a temporary measure, I ran to the local hose specialty / performace shop and got a male 16x1.5 to male 6an adapter, then a 6an female to 6an female adapter in order for the 6an male to 3/8" male QD adapter to work. It added several inches to the length of the line and there is an S shape to the rubber hose in the meantime until better parts come in to shorten that back up. I've ordered an adapter from Racetronix that is 6an female to 3/8" male QD w/ a 90 degree bend... This is as short an adapter setup as I can find (male 16x1.5mm to male 6an -> female 6an to 3/8" male QD)... If anyone ends up coming across anyone who makes a 16x1.5mm male to 3/8 male QD piece, please let me know lol.
Another item of challenge was fitting the female QD pieces onto the shortened LS1 plastic fuel lines. The method I linked to in the first post of using a brake line vice with a caulking gun is still far from ideal. The main fuel supply line I managed to fully seat the connector with no issues, but the return line and vapor lines did not go as smoothly. I got the return line in about 2/3rds the way in before it slightly kinked, at which point i left it at that instead of pushing my luck and majorly kinking it.The vapor line was even worse, with maybe the connector in about 1/3rd of the way before kinking. All the lines are holding up well so far, but I will be hitting up the junk yards to find a spare lines to retry with better technique and replacing at least the return and vapor lines.
A third item of challenge was the rubber fuel filler neck. The stock neck the tank came with was trashed and unservicable, and finding replacement 1" fuel hose of the stock wall thickness has proven to be impossible thus far. I ended up getting 1 1/4" hose and 1" double walled hose from the local fuel hose specialty shop and modifying them both. I had to bevel the inside of the double walled 1" hose just to get it on the metal filler neck piece (the outer diameter of this hose is probably the same size as the tank inlet... cannot use for the full length). From there I had to whittle the outside of that hose way down until it would tightly fit inside the 1 1/4" hose (had to use silicon grease to get it on... the 1" tubing piece was about 2-3" long, just enough to get the metal filler neck to fit securely in the 1 1/4" hose). The 1 1/4" hose fit perfectly onto the plastic tank side though, nice and snugly but not difficult. If you can get a tank with a servicable rubber hose, you are much better off.
I still have not secured the metal filler neck to the body yet, that part is going to be more challenging. I will have to bend the metal filler neck tab at a much steeper angle to meet the body and will have to somehow drill and tap a hole in the body to secure the neck to (in a space no drill will fit...) may have to use the t-handle from the tap and die set to somehow hand-drill a hole. Can only get to that sheet metal from above, there is additional sheet metal below that spot. If anyone has any ideas here, please let me know. For now it is just resting inside the plastic 3rd gen fuel door filler. It is fairly secure as far as lateral movement, but the oval in that filler leaves a few inches of vertical movement I'd like to get rid of. Fitting the 4th gen filler with the 3rd gen fuel door would eliminate that movement, but the 4th gen piece is quite a bit shallower than the 3rd gen piece and the 3rd gen fuel door won't fit with it. So may either just try to make that rubber "O" piece work with the 3rd gen filler piece or possible see if the 4th gen fuel door will look ok on the 3rd gen body.
The stock 3rd Gen tank strap bolts were more than adequate for the job as Scooter mentioned. The 4th gen tank without the filler neck on it is so much easier to handle than the 3rd gen tank. Am so glad I'll never have to deal with the 3rd gen PITA tank ever again.
The video will probably be at least a few more weeks to put together... need to get everything fixed and then work on editing.
Last edited by 91Z-28-350; Apr 16, 2018 at 04:58 AM.
Re: 99-02 Plastic LS1 Fuel tank in a TPI, project capture thread
For the filler bracket, there was already a hole in my 92 in the EXACT spot needed for the 4th gen filler neck to be screwed to. Have you looked in there yet? It's in the trapezoid area above the plastic wheel liner piece.
Also, with the filler neck hose, I just used the 1.25" hose and put two clamps on the filler end to secure it/crush it down to the proper size. No leaks and is a lot less involved than you did with the two different size hoses into each other. Another way to go would be to use a hose adapter, I needed one on my old Suburban when I swapped tanks. I think it was an 1.5 to 1" piece of steel, formed, so you could just put the correct size hoses on and not crush it, that would also eliminate the work you did with two hoses, and be a little more secure.
Re: 99-02 Plastic LS1 Fuel tank in a TPI, project capture thread
When I was installing the tank, I had my hopes up that there would be a bracket there as you had mentioned, but was let down lol. It's pretty much smooth sheet metal with a slight ridge running longitudinally with the car (kinda similar to the body sheetmetal ridges underneath the car near the ground effects) about a 1/4 way up the body hole area for the filler neck. No threaded holes or brackets that would accept any type of hardware.
I'll have to take some pictures next time I'm under the car to show you how mine is set up and see if anyone has any ideas / creativity in getting it bolted.
Re: 99-02 Plastic LS1 Fuel tank in a TPI, project capture thread
No, there is no bracket on the car, the filler neck has a bracket, that had a hole in it. That bracket lined up perfect with an existing hole in the trapezoid area, not on the side of the frame rail. You probably won't see the hole unless you pull the existing neck out of that trapezoid area.
Re: 99-02 Plastic LS1 Fuel tank in a TPI, project capture thread
Originally Posted by scooter
No, there is no bracket on the car, the filler neck has a bracket, that had a hole in it. That bracket lined up perfect with an existing hole in the trapezoid area, not on the side of the frame rail. You probably won't see the hole unless you pull the existing neck out of that trapezoid area.
The way i wrote that probably isn't very clear - so far as I can tell, my car doesn't have any of that. It'll probably be easier if I post some pictures tomorrow with what that area of the body looks like for your guys input.
Re: 99-02 Plastic LS1 Fuel tank in a TPI, project capture thread
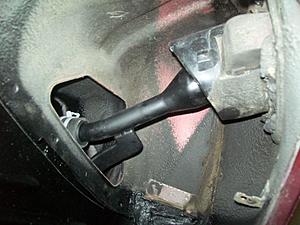
So with the tank in, I really wasn't able to get a good view of the area near the filler neck bolt hole from below the car due to the small clearance between the body and tank. I did find some video from when I was doing the neck fitting that shows it decently enough from the gas door side (from the outside). My ramblings on the video were filmed prior to us commenting, but I think it describes the situation well enough. If someone has a better idea on how to get this bolted, I'm all for any suggestions. Drilling a hole to tap in that location is going to be very tricky as that sheet metal isn't accessible from below (there is more sheet metal directly below that area for the body / frame) and from the top, there is maybe like 4 inches of clearance - not enough for an electric drill or even manual old school crank hand drill.
My only idea so far is to use the small T handle from my tap and die set, and put a drill bit in it and a whooooooole lot of patience in trying to carve out a hole with it lol. Not looking forward to that exercise in frustration so any suggestions welcome.
Re: 99-02 Plastic LS1 Fuel tank in a TPI, project capture thread
Also as an update to the main fuel line fittings, the Racetronix piece I discussed before won't work as it's meant for tubing on one end. So unless I get a custom piece of rubber hosing made up (which I may do down the line), the shortest adapter setup is still going to be a 3 piece setup.
16x1.5mm male to 6an male adapter to thread into the stock 3rd gen rubber hose fitting
Earl's p/n 991955
90 degree 6an female to 6an female adapter as the in-between for the above and below adapters
Earl's p/n 934106
6an male to 3/8" QD male adapter to fit to 4th gen nylon QD lines
Earl's p/n 961965
Re: 99-02 Plastic LS1 Fuel tank in a TPI, project capture thread
Originally Posted by scooter
No, there is no bracket on the car, the filler neck has a bracket, that had a hole in it. That bracket lined up perfect with an existing hole in the trapezoid area, not on the side of the frame rail. You probably won't see the hole unless you pull the existing neck out of that trapezoid area.
Posted the video 2 posts above, was your hole around that same area where my filler neck bracket was resting in the video above (behind the sheet metal lip)? Or was it nearer the lip? Or did you have a raised area with a hole in it? I am definitely willing to pull the neck apart again to take another look and recut another section of hose to fit, but I really didn't see a hole around there. Also if yours is similar to mine above, did you use any spacers to raise the filler neck up so it aligns with the center of the fuel door hole?
Re: 99-02 Plastic LS1 Fuel tank in a TPI, project capture thread
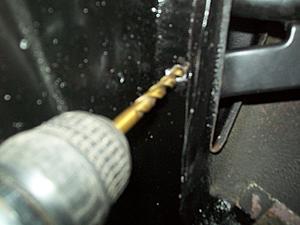
I think the hole was very close to the lip where the side stamping comes around the opening. I didn't use a spacer, nothing was needed. It would have been, essentially, exactly where the hole is on the bracket when it was sitting there. Your bracket has also been flattened out. I have a few necks and they all have more angle than yours. It's steel, you can bend it to where you need it to be
My other suggestion would be to just bent the bracket on the neck so you would screw through the side stamping instead of the inside of that opening, since you would need a 90 degree drill and a very short drill bit. If you went in the side, you should be able to get a drill in there
Re: 99-02 Plastic LS1 Fuel tank in a TPI, project capture thread
Oh wow, thanks Scooter. It looks like he unbolted the wheel well sheet metal (had no clue that unbolted) and drilled through a couple layers of the sheet metal below it? Interesting, I'll shoot him a few question lol, thanks again!
Last edited by 91Z-28-350; May 4, 2018 at 10:42 AM.
Re: 99-02 Plastic LS1 Fuel tank in a TPI, project capture thread
I thought I mentioned the plastic liner that comes out? It's just a small plastic piece in the wheel well you can see the ONE, and oly, fastener bracket that holds it in his picture there, lol, in the lower RH corner of the 1st picture there
You can also see that the metal arm on his filler neck is at much more of an angle than yours. You just need to adjust yours
Re: 99-02 Plastic LS1 Fuel tank in a TPI, project capture thread
Hahaha, man I just never caught on lol. The pattern of the grime on the top of mine I always assumed was rust / oxidation lol. Thought the there was the plastic liner then a layer of sheet metal. Man... I feel dumb now hahahaha. That makes things much easier.
Re: 99-02 Plastic LS1 Fuel tank in a TPI, project capture thread
Originally Posted by 91Z-28-350
The vent solenoid on the charcoal can is basically open the vast majority of the time, venting the filtered air to atmosphere, unless the OBDII system is running diagnostics / leak tests on the system, then it is closed. Our OBDI system obviously doesn't have the capability to do this, so we really don't have to worry about this, so the simple solution would be to just take that solenoid off the end of the hose and let the system vent to atmosphere 100% of the time. However, if I did this, the car would fail the Az fuel system pressure test they do during inspections, since the pressure would just leak out (same concept as the stock OBDII pressure tests - the solenoid closes during pressure test to stop leaking)... so the fix I am going to attempt is to just connect a manual shutoff valve in place where the solenoid is. This way I can have the vent open as the system normally runs, and just manually close the valve for the pressure test that emissions does (what the solenoid also does when the car tests the system). It will likely just be a shutoff valve that people use for NOS gas systems. It looks like i should just need to find a suitable one with a 5/8" male inlet.
I also need to inspect the canister itself tonight to see if I need to order another. There was fuel in the tank when they shipped it and I need to make sure that none leaked into the canister since I'm sure the box was handled as shippers usually handle them (and there was no "this side up" markings on the box).
Question:
What type of manual shutoff valve solenoid on the evap canister that you use?
I've used this, specifically the 8 inch version, on several customer projects. Completely removed any smell of gasoline. Works quite well, and as a bonus you can freely replace the charcoal medium whenever you'd like.
Re: 99-02 Plastic LS1 Fuel tank in a TPI, project capture thread
So I know this is old but I'm about to do this myself. I will leave the 4th evap canister in place and leave it to vent into the can on the tank. How do I handle the stock 3rd gen evap though without a code or issues? I stayed TPI and not sure how to hook up the stock 3rd gen charcoal canister to avoid issues with the TPI ECM./